the book of javascript 2nd edition phần 3 pot
Bạn đang xem bản rút gọn của tài liệu. Xem và tải ngay bản đầy đủ của tài liệu tại đây (575.94 KB, 50 trang )
72 Chapter 5
Table 5-1 lists all the different window.open() features you can play with.
Try experimenting with different ones to see what they do. Except for the
features that deal with pixels (for example,
height), all you have to do is type
the feature name inside the third parameter’s quotes. Some of the features
apply to a specific browser—the
directories feature, for example, works only
on Netscape.
Some Browsers and Computers Open Windows Differently
The process of opening windows differs slightly depending on the browser and
computer being used. For example, JavaScript windows in Mozilla, Safari, and
Opera browsers are always resizable, so even if you leave that feature out of
the string, the window remains resizable. Another difference is that you
can’t hide the menu bar on a Macintosh.
Closing Windows
If you’ve opened a window called my_window and want to close it later in the
script, use the
close() method:
my_window.close();
You’ll recall from Chapter 4 that the word window refers to the window
containing the JavaScript. This means you can also use JavaScript to close
the window that’s actually running the JavaScript, like this:
window.close();
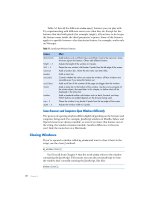
Table 5-1:
JavaScript Window Features
Feature Effect
directories
Adds buttons such as What’s New and What’s Cool to the menu bar. Some
browsers ignore this feature. Others add different buttons.
height = X
Adjusts the height of the window to X pixels.
left = X
Places the new window’s left border X pixels from the left edge of the screen.
location
Adds a location bar, where the site visitor can enter URLs.
menubar
Adds a menu bar.
resizable
Controls whether the visitor can resize the window; all Mac windows are
resizable even if you leave this feature out.
scrollbars
Adds scroll bars if the contents of the page are bigger than the window.
status
Adds a status bar to the bottom of the window. Use the status property of
the
window object, discussed later in this chapter, to define what will be
displayed in the status bar.
toolbar
Adds a standard toolbar with buttons such as back, forward, and stop.
Which buttons are added depends on the browser being used.
top = X
Places the window’s top border X pixels from the top edge of the screen.
width = X
Adjusts the window width to X pixels.
Opening and Manipulating Windows 73
This is exactly how the About the Author window on the Book of JavaScript
page works. If you view the source code on the page that loads into one of
the help windows, you’ll see it has a button toward the bottom, labeled Close
Window. If that button were a link, the script would look like this:
<a href = "#" onClick = "window.close(); return false;">Close Window</a>
Figure 5-6 shows how to do the same thing with a button instead of
alink.
<form><input type = "button" value = "Close Window" onClick =
"window.close();"></form>
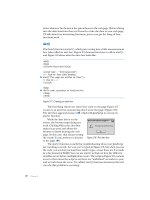
Figure 5-6: Using a button to close a help window
The primary difference between the code in Figure 5-6 and the simple
link I described is that Figure 5-6 uses a button instead of a link. The button
is a form element that takes an
onClick, just as a link does.
Using the Right Name: How Windows See Themselves and
Each Other
Every window is a bit egocentric and thinks of itself as window. Let’s say you
open a web page titled The Original Window. Now let’s say that window opens
a second window,
new_window.html (titled The New Window), using JavaScript,
like this:
var new_window =
window.open("new_window.html","new_window","height=100,width=100");
These two windows see each other in different ways. The original win-
dow thinks the new window is called
new_window. The new window, however,
thinks of itself as
window. This means if you want to close the new window using
JavaScript inside the original window, you’d write this code:
new_window.close();
But to close the new window using JavaScript inside the new window, you’d
write the following in
new_window.html:
window.close();
This window-centrism is one of the aspects of object-oriented pro-
gramming that makes it interesting. It’s like dealing with distinct individuals
who have different perspectives on the world.
74 Chapter 5
Moving Windows to the Front or Back of the Screen
Of course, once you’ve opened a window, you can do much more than just
close it. You can move it to the front of the screen (on top of the other windows)
or to the back of the screen (behind all the other windows). The
focus() method
brings a window forward, and
blur() puts the window in back. The focus()
method is especially useful when you have a window that should always appear
at the front of a screen. For example, if I wanted a small navigation window
to appear over the intro page, I could make all the links using this technique:
<a href = "#" onClick =
"navigation = window.open('
'width=605,height=350' );navigation.focus(); return false;">Navigation Window</a>
This line opens the navigation window and brings it up to the front.
NOTE Notice that I didn’t put the word var before the navigation variable when I called
window.open(). If you use var inside a link, JavaScript will forget the name of the
window once it executes the rest of the JavaScript commands in the
onClick. The
reason for this will be clearer after you read Chapter 6.
Window Properties
So far we’ve seen four methods for the window object: open(), close(), focus(),
and
blur(). Later in the chapter, we’ll explore two somewhat more complicated
methods,
resizeto() and move(), both of which involve a little math. First, how-
ever, let’s look at some window properties that come in handy from time
to time.
The status Property
One of the most useful (and most abused) properties is the window’s status.
The value of this property defines what appears in the window’s status bar (see
Figure 5-3). One common
status is the URL of a link you are mousing over.
You can use the
status property to change what appears in the status bar.
You may have noticed that some people put a kind of marquee in this area,
scrolling across the bottom with messages like Buy our stuff! Buy our stuff!
I don’t want to encourage status bar abuse, so I’m not going to teach you
exactly how to do that, but you can use these JavaScript techniques to create
a similar effect. To change what appears in the status bar of a window, use a
<body> tag like this:
<body onLoad = "window.status = 'hi there!';">
This tag tells JavaScript to change the contents of the window’s status bar
after the page has been fully loaded into the browser.
Opening and Manipulating Windows 75
You might want to use the status property to inform visitors about the
site they’ll see if they click a link. For example, if you have a link to a very
graphics-intensive site, the words Warning: This site has a lot of graphics could
appear in the status bar when the visitor mouses over the link. You can set
this up with an
onMouseOver:
<a href = " onMouseOver =
"window.status='Warning: This site has a lot of graphics'; return true;">
My Heavy Graphic Site</a>
Notice the return true after the window.status command. This is similar to
the
return false I put at the end of my onClick in rollover links (see Chapter 4),
and it does almost the same thing. When the user performs an
onMouseOver,
return true prevents the URL from appearing in the status bar. If you don’t
put it there, the words Warning: This site has a lot of graphics flash briefly in the
status bar; then the link’s URL quickly replaces them before the warning can
be seen.
NOTE You might be asking, “Why is it return false in the case of onClick and return true
in the case of
onMouseOver?” That’s a good question, and unfortunately there’s no good
answer—that’s just how it is. The best you can do is memorize which goes with which.
The opener Property
When one window opens a new window, the new window remembers its
parent (the original window) using the
opener property. An opened window
can access its parent through this property and then manipulate the parent.
For example, if you want a link in the new window to change the contents of
the status bar in the original window, you’d include the following code inside
a link in the new window:
<a href = "#" onClick =
"var my_parent = window.opener; my_parent.status='howdy'; return false;">
put howdy into the status bar of the original window</a>
The first statement inside the onClick says, “Find the window that opened
me, and set the variable
my_parent to point to that window.” The second
statement changes the
status property of that window to howdy.
Alternatively, you could combine the lines:
<a href = "#" onClick =
"window.opener.status = 'howdy'; return false;"> put howdy into the status
bar of the original window</a>
The opener property is very useful if you want to have a remote control that
affects the contents of the original window. The remote control file (available
at offers an
example of this. Figure 5-7 shows the code that triggers the remote control.
76 Chapter 5
<html>
<head>
<title>The Controlled Window</title>
<script type = "text/javascript">
<! hide me from older browsers
// open the control panel window
var control_window =
window.open("the_remote.html","control_window","width=100,height=100");
// show me >
</script>
</head>
<body>
Use the remote control to send various web pages to this window.
</body>
</html>
Figure 5-7: The code for the window that calls the remote control
NOTE Some people install pop-up blocking software on their computers or set their browsers to
block pop-up windows. Because the JavaScript in Figure 5-7 opens a window automat-
ically (without the user having to click a link), it qualifies as a pop-up window, and
computers that block pop-ups will prevent the window from opening. If the above Java-
Script doesn’t work on your computer, it may be because you have blocked pop-ups.
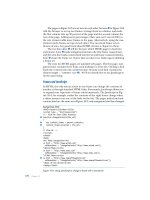
The code in Figure 5-7 opens a window and loads the web page called
the_remote.html, which is shown in Figure 5-8. Figure 5-9 shows you the code
for the_remote.html.
o
Figure 5-8: The page that calls the remote control, and the
remote control itself
<html>
<head>
<title>Remote Control</title>
</head>
<body>
X <a href = "#"
onClick = "window.opener.location.href='
window.focus();">NY Times</a><br>
Opening and Manipulating Windows 77
<a href = "#"
onClick = "window.opener.location.href=' />window.focus();">Webmonkey</a><br>
<a href = "#"
onClick = "window.opener.location.href='
window.focus();">Salon</a><br>
</body>
</html>
Figure 5-9: The remote control code
Figure 5-9 includes code for a typical link using an onClick (X). When
a visitor clicks the New York Times link, JavaScript looks up
window.opener
(the window that opened the remote control) and then changes its
location
to . Then, because of the
window.focus(), JavaScript
brings the remote control window to the front of the screen. Notice that
because this JavaScript is running inside the remote control window, we use
window.focus() rather than control_window.focus().
More Window Methods
You’ve seen four window methods so far: open(), close(), focus(), and blur().
Let’s look at two more that come in handy from time to time: resizing and
moving windows.
Resizing Windows
Modern browsers provide two different ways your JavaScript can resize a
window. The
window.resizeTo() method resizes a window to a given width
and height. To change a small window into one that’s 500 pixels wide and
200 pixels high, you’d use the following script:
window.resizeTo(500,200);
Alternatively, you can change the size of a window by a specific amount
using
window.resizeBy(). The window.resizeBy() method takes two numbers:
how much the width of the window should change and how much the height
should change. The code
window.resizeBy(10, -5);
makes a browser 10 pixels wider and 5 pixels shorter.
Moving Windows
The window.moveTo() method moves a window to an absolute position on the
screen. If you want the window in the upper-left corner of the user’s screen,
you’d type:
window.moveTo(0,0);
78 Chapter 5
The first number is the number of pixels from the left border of the screen
you want the window’s upper-left corner to appear, and the second number
is the number of pixels from the top of the screen.
An alternative to
window.moveTo() is window.moveBy(). If you want to move
a window 5 pixels to the right and 10 pixels down from its current position,
you’d type:
window.moveBy(5,10);
The first number is the number of pixels to the right you want to move the
window, and the second is the number of pixels down. If you want to move
the window 10 pixels up and 5 to the left, just use negative numbers:
window.moveBy(-5,-10);
Be careful not to move a window entirely off a user’s screen. To ensure
against this possibility, you have to know the size of the user’s screen. The two
properties that indicate this are:
window.screen.availHeight
window.screen.availWidth
Figure 5-10 shows how you can use window.screen.availHeight and
window.screen.availWidth to move a window to the center of the screen.
This script centers the window on any screen, regardless of its size.
<html>
<head>
<title>Center Window</title>
<script type = "text/javascript">
<! hide me from older browsers
// set some variables
X var window_height = 200;
Y var window_width = 200;
// make the window smallish
Z window.resizeTo(window_height, window_width);
// find out how big the screen is
var height = window.screen.availHeight;
[ var width = window.screen.availWidth;
// get the left position
// it'll be half of the screen
// minus half of the window width
var left_point = parseInt(width / 2) - parseInt(window_width / 2);
// get the top position
Opening and Manipulating Windows 79
// similar calculation as for the left position
\ var top_point = parseInt(height/2) - parseInt(window_height / 2);
// move the window
//
] window.moveTo(left_point, top_point);
// show me >
</script>
</head>
<body>
<h1>Hi!</h1>
</body>
</html>
Figure 5-10: Code for moving a window to the center of the screen
Lines X through Z resize the window to 200 by 200 pixels. Once that’s
done, the script uses
window.screen.availHeight and window.screen.availWidth to
figure out how high and wide the screen is. After determining those values, the
script does some calculations to figure out where the upper-left corner of the
window should go. Let’s look at the formula to calculate the left-hand position
of the window:
var left_point = parseInt(width / 2) - parseInt(window_width / 2);
The first part of this formula determines the screen’s midpoint by dividing
the width of the screen by two (we’ve defined the variable
width in [). The
parseInt() command ensures that the resulting number is an integer. Knowing
the screen’s midpoint isn’t enough to center the window, however, because
window.moveTo() sets the left border of the window you’re moving. If you move
the left border of the window into the center of the screen, the window will
be too far to the right. To get the window to the center of the screen, we
have to move it over to the left. The second part of the formula, subtracting
parseInt(window_width / 2), figures out how far to move the window to the left:
half the window’s width (see Figure 5-11).
Figure 5-11: Calculating how to center a window
If you place the left side of the window in the
middle of the screen, the window won’t be
centered. You have to move it a bit to the left.
½ screen width
window
window
½ window
width
½ screen width
To center the window, move it ½ of its width
to the left. In other words, the left border is:
½ screen width – ½ window width.
screen screen
80 Chapter 5
Line \ performs a similar calculation to determine where to set the top
of the window. Once we’ve determined the window’s correct top and left
position, we use the
window.moveTo() command to move it (]).
NOTE In Internet Explorer, the moveTo() method works only when it is moving the window
containing the JavaScript. In other words, if you have opened a window named
my_window, you can’t move that window using my_window.moveTo(100,100). You can
still use
window.moveTo(100,100) to move the window that contains the JavaScript
calling the
moveTo() method.
Summary
In this chapter you’ve learned:
z How to open new windows with window.open()
z How to incorporate various standard browser elements in the new
window using the
feature parameter
z How to close the windows you’ve opened with window_name.close()
z How to move windows to the front of the screen with window.focus()
z How to send windows to the back of the screen with window.blur()
z How to change the message in the window’s status bar by setting
window.status
z How a window you’ve opened can affect the previous window with
window.opener
z How to resize windows with window.resizeTo() and window.resizeBy()
z How to move windows with window.moveTo() and window.moveBy()
Congratulations! Now that you know how to swap images and mess with
windows, you can handle about 75 percent of what most web professionals do
with JavaScript. The next few chapters will cover some details of JavaScript as
a programming language, and then we’ll be ready for the really fancy stuff.
Assignment
We’ve learned how to change the contents of the status bar of a window
we’ve opened using JavaScript:
var my_window = window.open("","my_window");
my_window.status = "I'm in the new window's status bar!";
We can use a similar technique to swap an image in a window we’ve
opened using JavaScript. Remember, the code to swap an image looks like
this, where
the_image is the name of an image on the page:
window.document.the_image.src = "new_image.gif"
Opening and Manipulating Windows 81
To swap an image in another window, just replace window in the script
with the name of the window containing the image.
Your homework assignment is to write a page (let’s call it the main page)
that contains two links. Write some JavaScript so that when the main page
opens, it also opens a little window containing an image. When clicked, the
two links on the main page swap different images into the little window.
Figures 5-12 and 5-13 demonstrate what I mean.
This assignment is a bit tricky, but give it your best shot before looking at
the solution in Appendix A.
Figure 5-12: After opening the main
window
Figure 5-13: After clicking the Really
Happy link
WRITING YOUR OWN
JAVASCRIPT FUNCTIONS
In this chapter we’re going to focus on
a programming concept—writing your
own functions. Knowing how to write
your own functions will improve almost any
JavaScript you create. In fact, you’ll see how custom-
made functions can enhance several of the JavaScript
tricks you’ve already learned.
In this chapter, you’ll learn how to:
z Write your own functions
z Use homemade functions to improve your code
z Write functions you can cut and paste into whatever pages you want
We’ll be using homemade functions in every chapter from now on, so
pay extra-close attention to what’s going on in this chapter. You’ll be glad
you did
84 Chapter 6
Functions as Shortcuts
Functions aren’t anything new. You’ve already seen a number of functions
that come built in to JavaScript. The
alert() function, for example, takes
whatever text you put inside the parentheses and displays an alert box with
that text.
In its simplest form, function is just a shorthand name for a series of
JavaScript instructions. When you call the
alert() function, JavaScript under-
stands it as a command to carry out some task, such as opening a window
that has an OK button and a close button and putting some text in the
window.
The functions you create act as shorthand as well. Let’s say you want to
write a link that opens a small window and then centers that window on the
screen if the visitor is using Netscape 4.0 or above.
You could write a link resembling Figure 6-1 (most of the code in it is
similar to Figure 5-10).
<a href = "#"
onClick = "if ((parseInt(navigator.appVersion) > 3) &&
(navigator.appName == 'Netscape')) {
var the_window =
window.open(' />'the_window','height=200,width=200');
var screen_height = window.screen.availHeight;
var screen_width = window.screen.availWidth;
var left_point = parseInt(screen_width / 2) - 100;
var top_point = parseInt(screen_height / 2) - 100;
the_window.moveTo(left_point, top_point);
} return false;">Click me to open a small centered window</a>
Figure 6-1: A link that opens a small window and centers it in Netscape 4 and above—
this won’t work in Internet Explorer (see note at the end of Chapter 5)
However, it is not a good idea to write a link in this way: There’s too
much JavaScript embedded in the HTML. This makes HTML hard to follow,
even for people who know JavaScript. Furthermore, if you want two or three
links on your page, your HTML becomes even uglier and your page’s down-
load time increases. Even more problematic, if you want to change the code
to affect window size or centering, you have to make the change everywhere
you put the link.
The solution to these problems is to give all the JavaScript in Figure 6-1
a name and then simply call that name when you want to open and center a
window. That’s exactly what homemade functions are for: They allow you
to call a set of JavaScript instructions (the function) just by using its name.
Basic Structure of JavaScript Functions
Figure 6-2 shows you the skeleton of a homemade function.
Writing Your Own JavaScript Functions 85
function functionName()
{
a line of JavaScript;
another line of JavaScript;
more lines of JavaScript;
}
Figure 6-2: The basic structure of a homemade function
A function definition starts with the word function. When JavaScript sees
that word, it knows you’re about to define the subsequent bunch of JavaScript
as a function.
Naming Your Functions
Next comes the function’s name. The rules for naming a function are similar
to those for naming a variable. The first character must be a letter; the rest of
the characters can include letters, numbers, dashes, and underscores. No
other characters, including spaces, are allowed. Like variables, function names
are case sensitive, so JavaScript will consider a function called
feedTheCat() to
be different from a function called
FeedTheCat().
Make sure you don’t give a function and a variable the same name. If
you have a variable called
my_cat and a function called my_cat, JavaScript will
forget either what the function’s supposed to do or what value you’ve stored
in the
my_cat variable. Because of this weird behavior, and because function
names are case sensitive, it makes sense to have a different convention for
naming functions than for naming variables. For variables I use lowercase
letters with underscores, and for functions I use what’s called in-caps or
camel-caps notation. Names in this notation style consist of strings of words
without spaces, in which every word except the first is initial-capitalized, as
in
openAndCenterTheWindow(), myCat(), and printDate(). In-caps notation is a
pretty common convention and should serve you well.
Parentheses and Curly Brackets
A pair of parentheses follows the function’s name. For now, you won’t be
entering anything between them, but they’re still necessary.
After the parentheses you need a pair of curly brackets. Between these
brackets you’ll write the JavaScript that will run when the function is called.
An Example of a Simple Function
Figure 6-3 shows you how the window-centering code in Figure 5-10 looks
rewritten as a web page containing a function. Notice that the link calling
the function (X) has the same form as a link that calls a built-in JavaScript
function—the function name appears inside an
onClick.
86 Chapter 6
<html>
<head>
<title>Getting Centered</title>
<script type = "text/javascript">
<! hide me from older browsers
function openAndCenterWindow()
{
if ((parseInt(navigator.appVersion) > 3) &&
(navigator.appName == "Netscape")) {
var the_window =
window.open(' />'the_window','height=200,width=200');
var screen_height = window.screen.availHeight;
var screen_width = window.screen.availWidth;
var left_point = parseInt(screen_width / 2) - 100;
var top_point = parseInt(screen_height / 2) - 100;
the_window.moveTo(left_point, top_point);
}
}
// show me >
</script>
</head>
<body>
X <a href = "#" onClick =
"openAndCenterWindow(); return false;">Click me to open a small
centered window</a>
</body>
</html>
Figure 6-3: Opening and centering a window using a function
Next, notice that I’ve put the JavaScript declaring the function in the head
of the page. You can declare functions in either the head or the body of an
HTML page, but I like to declare my functions in the head because that way
I don’t have to search for them all over the page.
Finally, it’s important to remember that the browser reads the page from
the top down. When it sees the word
function, it remembers the function
name and the lines of JavaScript you’ve associated with that name. However,
the JavaScript between the curly brackets doesn’t actually execute until the
onClick in the link calls the function. When we start putting more than one
function on a web page, you’ll see why it’s important to keep this in mind.
Writing Flexible Functions
The code in Figure 6-3 does a good job of opening and centering a window
containing No Starch Press’s home page. But what if you wanted another
link to open and center a different window with a different URL in it—
Webmonkey’s, for example?
Writing Your Own JavaScript Functions 87
One approach would be to write a second function that looks just like
the first one, the only difference being that you’d replace the line
var the_window =
window.open(' />with the line
var the_window =
window.open(' />This would work fine, but it’s not a good idea to have two functions that do
almost exactly the same thing. First of all, it’s wasteful. If you could write one
function that worked regardless of the URL, you’d save both typing and down-
load time. Even more important, if you want to change how you’re doing the
centering, you’ll have to change two functions instead of just one.
Using Parameters
Luckily, there’s a way to make your function more flexible. The trick is to add a
parameter. Remember, the
alert() function takes one parameter—the words
you want to appear in the alert box. You can write the
openAndCenterWindow()
function to take a parameter, too. In this case, the parameter would be
the URL of the web page you want to appear in the window. In general, a
function’s parameter is whatever item of information the function needs in
order to do its job—text to be displayed, a URL to link to, or whatever. Many
functions use multiple parameters.
The code in Figure 6-4 shows how to add a parameter to your function
and how to call the function with this parameter.
<html>
<head>
<title>Getting Centered Functionally</title>
<script type = "text/javascript">
<! hide me from older browsers
function openAndCenterWindow(the_url)
{
if ((parseInt(navigator.appVersion) > 3) &&
(navigator.appName == "Netscape"))
{
X var the_window =
window.open(the_url,'the_window','height=200,width=200');
var screen_height = window.screen.availHeight;
var screen_width = window.screen.availWidth;
var left_point = parseInt(screen_width / 2) - 100;
var top_point = parseInt(screen_height / 2) - 100;
the_window.moveTo(left_point, top_point);
}
}
88 Chapter 6
// show me >
</script>
</head>
<body>
Y <a href = "#"
onClick = "openAndCenterWindow(' return false;">
Click me to put the Webmonkey home page in a small centered window</a>
<p><a href = "#"
onClick = "openAndCenterWindow(' return false;">
Click me to put the No Starch Press home page in a small centered window</a>
</body>
</html>
Figure 6-4: Opening and centering a window with a parameter
Line-by-Line Analysis of Figure 6-4
The tag for Webmonkey,
<a href = "#" onClick =
"openAndCenterWindow(' return false;">Click me
to put the Webmonkey home page in a small centered window</a>
calls the function with the URL for Webmonkey in parentheses (see the
result in Figure 6-5). Here Webmonkey’s URL goes into the function just
as the words go into the
alert() function, but instead of any random string,
it’s a URL.
Figure 6-5: The Webmonkey site, opened and centered
Writing Your Own JavaScript Functions 89
Similarly, the tag
<a href = "#"
onClick = "openAndCenterWindow(' return false;">
Click me to put the No Starch Press home page in a small centered window</a>
calls the function with the URL for No Starch Press.
Now let’s look at the function itself. Only two lines differ from those in
Figure 6-3. The first line of the function now looks like this:
function openAndCenterWindow(the_url)
Notice that a word appears inside the parentheses now. This term is a variable,
storing whatever value you’ll use when you call the function. So if the line
openAndCenterWindow("happy happy!");
calls the function, the variable the_url holds the value "happy happy!".
When we call the function in Figure 6-4 as follows, the variable
the_url
holds the value
" /><a href = "#"
onClick = "openAndCenterWindow(' return false;">
Click me to put the No Starch Press home page in a small centered window</a>
The second line in the function that differs from Figure 6-3 is Y, which
opens the window. In Figure 6-3 we opened the window with a web page:
var the_window =
window.open(' 'the_window',
'height=200,width=200');
In Figure 6-4 we open the window with the variable that was set when the
function was called:
var the_window =
window.open(the_url, 'the_window', 'height=200,width=200');
JavaScript sees the variable the_url and knows it’s a variable because no
quotes surround it. If the function has
' inside the
parentheses, like this
openAndCenterWindow(' />the variable the_url has the value so the window
opens with the No Starch Press home page. Figure 6-6 shows you graphically
what’s going on here.
90 Chapter 6
Figure 6-6: Passing parameters
Using More Than One Parameter
Sometimes you want to change more than one thing each time you call a
function. The built-in JavaScript function
prompt(), for example, can change
two sets of words: the words that appear above the text box and those that
appear within it. When we call
prompt() as follows, we pass in two parameters,
separated by a comma:
var the_answer = prompt("What's your favorite color?","yellow?");
The method window.open(), discussed in the last chapter, provides an
example of three parameters: the URL you want to open inside the window,
the name of the window, and the window’s features.
The functions you write can also take more than one parameter. Let’s say
you want to write a function to display a web page in a square window. You
might write a function that finds the name of the page and the length of one
of the sides of a window. Figure 6-7 shows you what this would look like.
<html>
<head>
<title>Square Windows</title>
<script type = "text/javascript">
<! hide me from older browsers
X function openSquareWindow(the_url, the_length)
{
var the_features = "width=" + the_length + ",height=" + the_length;
var the_window = window.open(the_url, "", the_features);
}
// show me >
</script>
</head>
<body>
Y <a href = "#"
onClick = "openSquareWindow(' 400); return false;">
Open the Webmonkey home page in a big square window</a><br>
Function Definition
Function Call
function openAndCenterWindow(the_url)
{
var the_window=
window.open(the_url, ", 'height=200,width=200');
}
openAndCenterWindow('
Writing Your Own JavaScript Functions 91
<a href = "#"
onClick = "openSquareWindow(' 100); return false;">
Open the No Starch Press home page in a small square window</a><br>
</body>
</html>
Figure 6-7: Writing functions that take more than one parameter
Notice that in X two variables now appear between the parentheses
following the function name:
the_url and the_length. In Y we’re calling the
function as we would call
prompt(), with two parameters separated by a comma.
Calling the function sets the first variable in the function definition to the
first parameter, so in the case of Y,
the_url is set to />Similarly, the second variable in the function definition is set to the second
parameter in the function call. If we call the function as in Y,
the_length is set
to
400. Figure 6-8 depicts the results of calling functions with two parameters.
Figure 6-8: Calling functions with two parameters
Getting Information from Functions
You can also write functions that give information back to you. Consider the
prompt() function:
var the_answer = prompt("What's your name?","Ishmael");
When a user types his or her name into the prompt box and clicks OK, the
name goes into the variable
the_answer. In programming parlance, you’d say
that the function
prompt() returns the words typed into the prompt box. The
functions you write can return values as well. Figure 6-9 shows a very simple
example of how to make a function return values.
<html>
<head>
<title>Date Printer</title>
<script type = "text/javascript">
<! hide me from older browsers
function getNiceDate()
Function Definition
Function Call
function openSquareWindow(the_url, the_length)
{
var the_features = "width=" + the_length + ",height=" + the_length,
var the_window = window.open(the_url, "", the_features);
}
openSquareWindow(' 400);
92 Chapter 6
{
var now = new Date();
var the_month = now.getMonth() + 1; // remember, January is month 0
var the_day = now.getDate();
var the_year = now.getYear();
X var the_nice_date = the_month + "/" + the_day + "/" + the_year;
Y return the_nice_date;
}
// show me >
</script>
</head>
<body>
Hello! Today is
<script type = "text/javascript">
<! hide me from older browsers
Z var today = getNiceDate();
document.write(today);
// show me >
</script>
</head>
</body>
</html>
Figure 6-9: A script with a simple function that returns a value
Line-by-Line Analysis of Figure 6-9
Most of the function should be familiar by now. The first four lines create a
new
Date object and carry out a few method calls to get information from that
object. Line X takes the information gathered and creates a nicely formatted
date. Notice that the line is
var the_nice_date = the_month + "/" + the_day + "/" + the_year;
and not
var the_nice_date = "the_month/the_day/the_year";
The latter won’t work, because JavaScript won’t recognize the_month,
the_day, or the_year as variables if they appear inside quotes. The correct
version of this line takes the variables out of the quotes and puts them
together with slashes using the plus (
+) sign. In the incorrect version,
the quotation marks stop JavaScript from interpreting the names as
variables, so the web page would display Hello! Today is the_month/the_day/
the_year. Line Y tells JavaScript to exit the function and return the value
of
the_nice_date to whatever variable is waiting for it. In this case, the
variable is
today in Z. Whenever JavaScript sees the word return in a
function, it exits the function and outputs whatever value comes after
return.
Writing Your Own JavaScript Functions 93
Dealing with Y2K
Figure 6-9 works fine, but it has a little problem. Remember our discussion
of the Y2K problem in the
getYear() method of the Date object (“Writing the
Date to Your Web Page” on page 26)? Different browsers deal with years
differently. In some versions of Netscape,
getYear() returns the year minus
1900. So if it’s the year 2010,
getYear() returns 110. Other versions return the
full four-digit year if the year is before 1900 or after 1999. Different versions
of Internet Explorer give different results for the same date as well.
The way to deal with this problem is to see whether the year returned by
getYear()is less than 1000. If so, your visitor is using a browser that subtracts
1900 from the date if it’s after 1899. In this case, you can get the correct four-
digit year by adding 1900 to the date. You’ll find a concise form for all this
convoluted logic in the JavaScript function
Y2K(), shown in Figure 6-11.
function Y2K(the_date)
{
if (the_date < 1000)
{
the_date = the_date + 1900;
}
return the_date;
}
Figure 6-11: Dealing with the Y2K problem
This function adds 1900 to the year if it is less than 1000. You can drop
the
Y2K() function into the script shown in Figure 6-8 to deal with its Y2K
problem. Figure 6-12 demonstrates how the two look together.
<html>
<head>
<title>Date Printer</title>
<script type = "text/javascript">
<! hide me from older browsers
function getNiceDate()
{
var now = new Date();
var the_month = now.getMonth()+1; // remember, January is month 0
var the_day = now.getDate();
X var the_year = now.getYear();
Y var the_fixed_year = Y2K(the_year);
var the_nice_date = the_month + "/" + the_day + "/" + the_fixed_year;
Line Z calls the function getNiceDate(),
which returns a nicely formatted date.
The code
document.write(today) then
puts the date on the web page, as shown
in Figure 6-10.
Figure 6-10: Returning the date
94 Chapter 6
return the_nice_date;
}
Z function Y2K(the_date)
{
if (the_date < 1000)
{
the_date = the_date + 1900;
}
return the_date;
}
// show me >
</script>
</head>
<body>
Hello! Today is
<script type = "text/javascript">
<! hide me from older browsers
var today = getNiceDate();
document.write(today);
// show me >
</script>
</head>
</body>
</html>
Figure 6-12: The script in Figure 6-9 with the Y2K fix
Line-by-Line Analysis of Figure 6-12
Line X in Figure 6-12 uses the getYear() method to get the year, and Y calls
the function
Y2K() on the year to fix it up. The variable the_fixed_year is set to
whatever
Y2K() returns. The JavaScript in Figure 6-12 actually defines the
function
Y2K() after the getNiceDate() function. It might seem strange that
getNiceDate() can call Y2K() even though Y2K() is defined after getNiceDate().
Remember, though, that when you define functions, you’re just telling
JavaScript their names and what they do, so the order in which you define
your functions doesn’t matter as long as you define them all before you call
any of them from HTML.
Defining Variables Properly
The getNiceDate() function in Figure 6-12 calls the year variable the_year.
However, when you look at how the
Y2K() function appears in Z, you’ll see
that it calls whatever passes into it
the_date. Since we’re calling Y2K(the_year),
JavaScript looks up the value of
the_year and then sends that value to the
Y2K() function. The Y2K() function stores that value in the variable the_date.
In other words, the functions
getNiceDate() and Y2K() have two different
names for the same value. It’s as if the functions are different countries
where people speak different languages. If you try to talk about
the_year
inside the
Y2K() function, it won’t know what you’re saying, and you’ll get
an error. Figure 6-13 shows you a graphical representation of how this works.
Writing Your Own JavaScript Functions 95
Figure 6-13: How variables work in different functions
Why can’t the Y2K() function access the variable the_year in getNiceDate()?
Because when you first defined
the_year, you put the word var in front of it:
var the_year = now.getYear();
The word var tells JavaScript to create the variable only for the function
where it’s defined. If you’d omitted
var when defining the_year, you could
access that variable inside the
Y2K() function. You might think that freedom
would be a good thing. Why shouldn’t you access
the_year anywhere in the
program—why hide it inside
getNiceDate()? The reason is that if you don’t
hide variables inside functions, you will soon drive yourself crazy. Having
one function change a variable that was declared in another function is a
major cause of difficult-to-debug problems. The idea of protecting variables
declared inside functions is such an important programming concept that
it gets its own name: encapsulation.
Consider the example in Figure 6-14 to see the headaches you’ll avoid
if you define your variables with
var:
<html>
<head>
<title>Bad Encapsulation</title>
<script type = "text/javascript">
<! hide me from older browsers
function getNames()
{
the_name = prompt("What's your name?","");
dog_name = getDogName();
alert(the_name + " has a dog named " + dog_name);
}
function getNiceDate()
{
var now = new Date();
var the_month = now.getMonth()+1; // remember, Jan is month 0
var the_day = now.getDate();
var the_year = now.getYear();
var the_fixed_year = Y2K(the_year);
var the_nice_date = the_month + "/" + the_day + "/" + the_fixed_year;
return the_nice_date;
}
function Y2K(the_date)
{
if(the_date < 1000)
{
the_date = the_date + 1900;
}
return the_date;
}
Let’s say
now.getYear()
returns
110, meaning that it’s 2010
and your visitor is using IE.
This means that
the_year = 110
inside the
getNiceDate()
function.
Here we’re passing
the_year
into the
Y2K()
function. First,
JavaScript figures out that
the_year
is a variable equal
to 110. Then it passes the value
110 to the
Y2K()
function.
Inside the
Y2K()
function, the
variable
the_date
takes the
value 110, because that’s what
we passed into the function.
Now
the_date
gets changed to 2010.
The value of
the_date
is returned
to the awaiting variable.
The awaiting variable is
the_fixed_year
.
So now
the_fixed_year
has the value 2010.
96 Chapter 6
function getDogName()
{
the_name = prompt("What's your dog's name?","");
return the_name;
}
// show me >
</script>
</head>
<body>
<a href = "#" onClick = "getNames(); return false;">Click here for a survey</a>
</body>
</html>
Figure 6-14: The dangers of variables without
var
If I run this example and input thau when the prompt asks for a name
and
fido when the prompt asks for a dog’s name, we end up with an alert that
says fido has a dog named fido. Somewhere along the line, the program forgot
that my name was
thau and replaced it with fido.
This happened because both
getNames() and getDogName() use a variable
called
the_name. Function getNames() saves the user’s name in the variable
the_name. Then function getDogName() saves the dog’s name in the_name.
If I had used
var when declaring the variable the_name in the getDogName()
function, JavaScript would have understood that the variable is specific to
that function and would have left alone all
the_name variables in other
functions. Because I didn’t use
var when I set the variable the_name inside
the
getDogName() function, I unintentionally replaced the contents of the_name
with the dog’s name. When
getDogName() exits and the alert comes up, we see
the dog’s name:
alert (the_name + " has a dog named " + dog_name);
If I had used var inside the getDogName() function, thau has a dog named fido
would have come up. As your JavaScripts get longer, you’re likely to use the
same variable in different functions. Without
var, it’s very difficult to track
down what’s going wrong in these functions, so save yourself the headache
with a little preparation.
Using
var to hide variables inside functions also allows you to write
functions that you can cut and paste into other scripts. If you define all your
variables with
var, you don’t have to worry about whether a function you’ve
written will mess up another function when you paste it into a different page.
Otherwise you can’t tell whether some variable in a program shares a variable
name with your function.
Summary
There’s an art to figuring out when to use a function and knowing the best
way to write one. In general, the best time to use a function is for a simple
task you need to execute more than once. For example, patching the Y2K