the book of javascript 2nd edition phần 5 docx
Bạn đang xem bản rút gọn của tài liệu. Xem và tải ngay bản đầy đủ của tài liệu tại đây (739.38 KB, 50 trang )
172 Chapter 10
The pages in Figure 10-3 are set next to each other because X in Figure 10-2
tells the browser to set up two frames, arrange them in columns, and make
the first column take up 30 percent of the page and the second column the
rest of the page. Adding more percentages (their sum can’t exceed 100) to
the
cols element adds more frames to the page. Alternatively, using the rows
element stacks frames on top of each other. You can tweak frame sets in
dozens of ways. Any good book about HTML devotes a chapter to them.
The two lines after X tell the browser which HTML pages to load into
each frame. Line Y loads navigation.html into the first frame (named
nav),
and the next line loads content.html into the second frame (named
contents).
Line Z closes the frame set. Notice that you don’t use
<body> tags in defining
a frame set.
The next two HTML pages are standard web pages. The first page, navi-
gation.html, contains three links, each leading to a news site. Clicking a link
loads the contents into the
contents frame, because each link contains the
element
target = "contents" (see [). We’ll see shortly how to use JavaScript to
do the same thing.
Frames and JavaScript
In HTML, the only way an action in one frame can change the contents of
another is through standard HTML links. Fortunately, JavaScript allows you
to expand your repertoire of frame tricks immensely. The JavaScript in Fig-
ure 10-4, for example, makes the contents of the right frame change when
a visitor mouses over one of the links on the left. The pages index.html and
content.html are the same as in Figure 10-2; only navigation.html has changed.
navigation.html
<html><head><title>Nav</title>
<script type = "text/javascript">
<! hide me from older browsers
X function changeContents(the_url)
{
Y var content_frame = parent.contents;
Z content_frame.location = the_url;
}
// show me >
</script>
</head>
<body>
<h1> News navigation</h1>
<a href = ""
onMouseOver = "changeContents('');
">Wired News</a><br>
<a href = ""
onMouseOver = "changeContents('');
">C|Net News</a><br>
[ <a href = ""
onMouseOver = "changeContents('');
">News of the Weird</a><br>
</body></html>
Figure 10-4: Using JavaScript to change a frame with a mouseover
Using Frames and Image Maps 173
Line-by-Line Analysis of Figure 10-4
The key to this script is the function changeContents(). When a visitor mouses
over the News of the Weird link, [ calls
changeContents() and sends it the string
"".
The
changeContents() function starts in X, where the_url is set to whatever
string passes into the function. Line Y tells JavaScript to look for the thing
named
contents inside its parent (the frame set containing a frame is the
frame’s parent—see Figure 10-5), and sets the variable
content_frame to point
to the
contents frame.
You refer to frames in JavaScript the same way you refer to windows.
Just as you can change the page shown in a window by referring to its URL
like this:
window_name.location = "";
you can change the page shown in a frame like this:
the_frame.location = "";
This is precisely what Z in Figure 10-4 does. After Y assigns content_frame
to point to the frame we want to change, Z changes that frame’s location by
setting
content_frame.location to the_url.
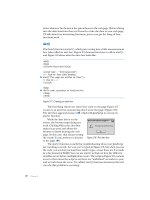
Figure 10-5: A graphical representation of frames and
their parents
174 Chapter 10
Frames and Image Swaps
In the Chapter 5 assignment, I described how clicking a JavaScript-
enhanced link in one window can change an image in another window.
Because JavaScript treats frames and windows similarly, the same trick
enables a link in one frame to change an image in another.
As a refresher, Figure 10-6 contains the code necessary to swap an image
in one window by clicking a link in a second window. Figure 10-7 shows how
the same trick works with frames.
first_page.html
<html>
<head>
<title>Control Panel</title>
<script type = "text/javascript">
<! hide me from older browsers
X var image_window =
window.open("image_page.html","image_window","width=100,height=100");
// show me >
</script>
</head>
<body>
Y <a href = "#" onClick =
"image_window.document.the_image.src = 'sad.gif'; return false;">sad</a>
<br>
Z <a href = "#" onClick =
"image_window.document.the_image.src = 'happy.gif'; return false;">happy</a>
</body>
</html>
image_page.html
<html><head><title>The Image Page</title></head>
<body>
[ <img src = "happy.gif" name = "the_image">
</body>
</html>
Figure 10-6: Swapping an image in one window with a link in another
Figure 10-6 consists of two HTML pages. The first page, first_page.html,
starts by launching a new window in X and calling it
image_window. This window
will open to image_page.html, which has only one item in it—an image of
a happy face, named
the_image ([). When someone clicks the link in Y,
JavaScript looks for the window called
image_window and looks in its document
for
the_image. Once it finds the_image, it changes its src to sad.gif. The link in
Z changes the image back to happy.gif.
frameset.html
<html>
<head>
<title>Image Swapping in Frames</title>
</head>
<frameset rows = "30%, *">
Using Frames and Image Maps 175
<frame src = "navigation.html" name = "navigate">
<frame src = "image_page.html" name = "image_frame">
</frameset>
</html>
navigation.html
<html>
<head>
<title>Control Panel</title>
</head>
<body>
X <a href = "#" onClick =
"parent.image_frame.document.the_image.src = 'sad.gif'; return false;">sad</a>
<br>
<a href = "#" onClick = "parent.image_frame.document.the_image.src =
'happy.gif'; return false;">happy</a>
</body>
</html>
image_page.html
<html><head><title>The Image Page</title></head>
<body>
Y <img src = "happy.gif" name = "the_image">
</body>
</html>
Figure 10-7: Swapping an image in one frame with a link in another
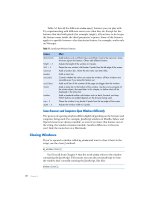
Figure 10-7 does the same thing with frames instead of windows. The
page frameset.html in Figure 10-7 sets up the page illustrated in Figure 10-8;
it has navigation.html in the top frame (which takes up 30 percent of the
window) and image_page.html in the bottom frame with happy.gif (called
the_image in Y). Line X is the link in the top frame that changes happy.gif
in the bottom frame to sad.gif. The critical part of X is
parent.image_frame.document.the_image.src = 'sad.gif';
which is similar to Y in Figure 10-6:
image_window.document.the_image.src = 'sad.gif';
The only difference is that in
Figure 10-6 we refer directly to
the window
image_window, while in
Figure 10-7 we tell the JavaScript
in the navigation.html to go up to
its parent and then down to the
frame
image_frame. Figure 10-8
shows the code in Figure 10-7
at work.
Figure 10-8: Interframe image
swapping in action
176 Chapter 10
Changing the Contents of Two Frames at Once
In some situations, you may want to change the contents of two or more
frames at once. In Salon’s bug-eating piece, for example, mousing over part
of the world in the map frame changes the contents of all three frames.
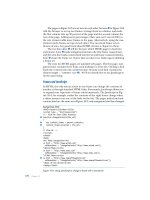
Figure 10-9 contains the JavaScript for a simple example of changing more
than one frame: a Spanish-language tutorial. As you can see in Figure 10-10,
clicking a Spanish word in one frame shows you an image of what that word
means in a second frame and puts the translation of the word into English
inside a form element in a third frame.
frameset.html
<html>
<head>
<title>Changing Two Frames at Once</title>
</head>
X <frameset cols = "30%, 30%, *">
<frame src = "navigation.html" name = "navigate">
<frame src = "form_page.html" name = "form_frame">
<frame src = "image_page.html" name = "image_frame">
</frameset>
</html>
navigation.html
<html>
<head>
<title>Navigation Frame</title>
<script type = "text/javascript">
<! hide me from older browsers
function changeFrames(new_image, new_words)
{
Y parent.image_frame.document.the_image.src = new_image;
Z parent.form_frame.document.the_form.the_name.value = new_words;
}
// show me >
</script>
</head>
<body>
[ <a href = "#"
onClick = "changeFrames('apple.gif','apple'); return false;">manzana</a>
<br>
<a href = "#"
onClick = "changeFrames('orange.gif','orange'); return false;">naranja</a>
</body>
</html>
form_page.html
<html><head><title>The Form Page</title></head>
<body>
<form name = "the_form">
<input type = "text" name = "the_name">
Using Frames and Image Maps 177
</form>
</body>
</html>
image_page.html
<html><head><title>The Image Page</title></head>
<body>
\ <img src = "blank.gif" name = "the_image">
</body>
</html>
Figure 10-9: Changing two frames at once
Figure 10-10: A simple Spanish tutorial—after clicking the word
manzana
Line-by-Line Analysis of Figure 10-9
The tutorial consists of four HTML pages. The first, frameset.html, describes
the layout of the frames (X).
In the first frame, navigation.html contains the JavaScript function and
the links that change the contents of the other two frames. The function
changeFrames() takes the parameters new_image, the name of the image to swap
in the third frame, and
new_words, the words to put into the form element in the
second frame. Line Y performs the image swap by telling JavaScript to find
the parent of the navigation frame (frameset.html), then the frame
image_frame
inside the frame set, and, inside that frame, the image named
the_image (\).
Once JavaScript has found
the_image, changeFrames() changes the_image.src
to whatever
new_image was set to when the script called the function. Line Z
changes the contents of the text box in
form_frame in a similar fashion.
Clicking the manzana link in the navigation frame ([) calls the
changeFrames() function, with apple.gif as the image to swap in and apple
as the word to go into the form. Although
changeFrames() only changes two
frames, you could easily expand it to change as many frames as the frame
set holds.
Frames Inside Frames
Sometimes you need to mix side-by-side frames with stacked frames. For
example, the page shown in Figure 10-11 has one wide frame on top and two
narrower frames next to each other, below the wider top frame. You would
achieve this effect by creating one frame set with two frames, one on top of
the other, and loading the bottom frame with a second frame set that has two
frames next to each other. Figure 10-12 shows the code for Figure 10-11.
178 Chapter 10
Figure 10-11: Frames inside frames
index.html
<html>
<head><title>Frames in Frames</title></head>
X <frameset rows = "20%,*">
Y <frame src = "navigation.html" name = "navigate">
Z <frame src = "bottom_frame.html" name = "bottom">
</frameset>
</html>
bottom_frame.html
<html>
<head><title>Bottom Frames</title></head>
[ <frameset cols = "50%,*">
<frame src = "image_page.html" name = "image_frame">
<frame src = "form_page.html" name = "form_frame">
</frameset>
</html>
Figure 10-12: The frame set for Figure 10-11
The pages navigation.html, image_page.html, and form_page.html
invoked by the code in Figure 10-12 function in the same way as the corre-
sponding pages in Figure 10-9.
The first frame set (call it the outer frame set) sets up two frames, one
on top of the other (X). The top frame (Y) holds navigation.html, which
contains the navigation links and the JavaScript that controls how the links
affect the other frames. The bottom frame (Z) loads bottom_frame.html,
which holds the second frame set (call it the inner frame set). This frame
set ([) creates two frames: The left frame contains image_page.html, and
the right frame contains form_page.html. Each of these pages could also have
a frame set, since you can nest frame sets infinitely. Be careful, though—
having more than one level of frame sets quickly boggles the minds of even
the best web page producers.
Using Frames and Image Maps 179
JavaScript and Frames Inside Frames
As long as you have only one frame set, JavaScript in one frame can influence
any other frame by referring to it as
parent.frame_name. Matters get a bit more
complicated if you have nested frame sets. Consider frame 3 in Figure 10-11.
The parent of this frame is the inner frame set (bottom_frame.html), contain-
ing frames 2 and 3. The appropriate JavaScript in frame 3 could influence
frame 2 using
parent.image_frame. For example, to change the URL shown
in frame 2, frame 3 could run the following script:
parent.image_frame.location = "";
But how can JavaScript in frame 3 change the contents of frame 1? The
inner frame set (which contains frames 2 and 3) doesn’t “know” anything
about frame 1 because it’s located in another frame set. The outer frame set
(index.html), however, does “know” about frame 1 and the inner frame set
because it set them up. So in order for a frame in the inner frame set to affect
a frame in the outer frame set, the inner frame must ask the outer frame set
to find the frame to change. In this case, you could control frame 1 by calling
the parent of frame 3’s parent:
parent.parent.top_frame.location = "";
Running this script in frame 3 changes the URL displayed in frame 1.
The line in frame 3 tells JavaScript to go up to frame 3’s parent, the inner
frame set; find that frame set’s parent, the frame set in frameset.html; and
then find the frame
top_frame inside that frame set.
Alternatively, you can have frame 3 refer directly to the outermost frame
set by using the word
top in your script:
top.navigate.location = "";
This tells JavaScript to find the topmost frame set and look for the frame
named
navigate inside that frame set. The top object contains everything in the
web browser window, so if there are frame sets on the page,
top refers to the
outermost frame set. If there are no frames in the browser,
top means the same
thing as
window.
Whether you use
top or a chain of parents to deal with nested frame sets
depends on the circumstances. If you have a link in a frame buried four frame
sets deep that you want to affect a frame on the top level, using
top probably
makes sense. If you want the link in the buried frame set to affect a frame in
its own frame set,
parent is the way to go.
Frame Busting
Some sites use frames to keep you in their site even when you think you’re
leaving it. For example, when you do an image search on Google, the result
appears on a page that has Google’s upper frame (see Figure 10-13). Google
180 Chapter 10
allows its users to get rid of the top frame by clicking a link, but you might
not want your web page showing up in a Google frame at all. To prevent this
from happening, insert the script shown in Figure 10-14 in the header of
your page.
Figure 10-13: Google uses frames to keep you in its site
Line X checks to see whether the HTML page containing this JavaScript
is the top frame of the frame hierarchy (remember,
self means this page).
Line X translates to “If this page is not on top, perform the statements
between the curly brackets.” If the HTML page is not on top, it’s inside
an alien frame set. To escape the frame set, the page puts itself on top by
setting the
top.location of the window to self.location (Y) which stores the
URL of a web page.
<script type = "text/javascript">>
<! hide me from older browsers
X if (self != top)
{
Y top.location = self.location;
}
// show me >
</script>
Figure 10-14: Frame-busting code
Using Frames and Image Maps 181
Using Frames to Store Information
Web pages have lousy memories. Unless you’ve done something fancy, the
moment a visitor leaves your web page, the page forgets any information it
has collected. If, for example, you have a long quiz and you want to tell a
visitor his or her score at the end, you’ll find it tough to break the quiz into
several pages—the second page can’t keep track of which answers the visitor
gave on the first page.
There are a few ways around this problem. If you want to store the infor-
mation for a long time on your visitor’s computer, cookies are the way to go
(see Chapter 12). But if you only want to save the information briefly, there’s
a neat trick using frames to store information between pages.
The trick involves setting up an invisible frame containing a JavaScript
function with an array that saves the information from each page as your
visitors move from page to page inside your site. When you need to retrieve
the information, simply access an array in the invisible frame. Figure 10-15
lists four web pages to show how you would do this for a quiz. Figure 10-16
shows you what the code in Figure 10-15 generates.
frameset.html
<html>
<head>
<title>A Quiz</title>
</head>
X <frameset rows = "100%,*" frameborder = "0">
Y <frame src = "quiz_page_1.html" noresize>
Z <frame src = "secret_code.html" name = "tracker" noresize>
</frameset>
</html>
secret_code.html
<html>
<head>
<title>A Quiz</title>
<script type = "text/javascript">>
<! hide me from older browsers
[ var answers = new Array();
\ function score(answers)
{
var correct = 0;
var correct_answers = new Array("true","true","false","true");
for (var loop = 0; loop < correct_answers.length; loop++)
{
if (answers[loop] == correct_answers[loop])
{
correct++;
}
}
percent_correct = (correct/4) * 100;
alert("You got " + percent_correct + " percent right!");
}
// show me >
182 Chapter 10
</script>
</head>
<body>
Nothing to see here!
</body>
</html>
quiz_page_1.html
<html>
<head>
<title>Quiz Page 1</title>
</head>
<body>
Answer the following true/false questions:
<p>
<form>
A chicken is a bird.<br>
<input type = "radio" name = "bird"
onClick = "parent.tracker.answers[0]='true';">True<br>
<input type = "radio" name = "bird"
onClick = "parent.tracker.answers[0]='false';">False<br>
<p>
A skink is a lizard.<br>
<input type = "radio" name = "skink"
onClick = "parent.tracker.answers[1]='true';">True<br>
<input type = "radio" name = "skink"
onClick = "parent.tracker.answers[1]='false';">False<br>
<p>
</form>
<p>
] <a href = "quiz_page_2.html">Next Page</a>
</body>
</html>
quiz_page_2.html
<html>
<head>
<title>Quiz Page 2</title>
</head>
<body>
Answer the following true/false questions:
<p>
<form>
A whale is a fish.<br>
<input type = "radio" name = "whale"
onClick = "parent.tracker.answers[2]='true';">True<br>
<input type = "radio" name = "whale"
onClick = "parent.tracker.answers[2]='false';">False<br>
<p>
A human is a primate.<br>
<input type = "radio" name = "human"
onClick = "parent.tracker.answers[3]='true';">True<br>
<input type = "radio" name = "human"
onClick = "parent.tracker.answers[3]='false';">False<br>
Using Frames and Image Maps 183
<p>
^ <input type = "button" value = "Score the Quiz"
onClick = "parent.tracker.score(parent.tracker.answers);">
</form>
</body>
</html>
Figure 10-15: Preserving information between pages with frames
As you can see in Figure 10-16, the quiz doesn’t look as if it’s in frames.
In fact, it has two frames, but one is invisible. The visible frame holds two
true/false questions and a link to go to the next page (Figure 10-17). Although
clicking the link apparently brings the visitor to a completely new web page,
it’s actually the same page with new contents in the visible frame.
Line-by-Line Analysis of Figure 10-15
The invisible frame stores the visitor’s answers as he or she moves from page
to page. If you didn’t put the quiz in frames, the browser would forget the
visitor’s answers each time it loaded a new web page. Here’s how the invisible
frame stores information.
The first page in Figure 10-15, frameset.html, sets up the frames as we’ve
seen before, but with a few changes. Line X describes two frames. The first
one takes up 100 percent of the window, making it seem as if the page has no
second frame. We’ve set
frameborder, which controls the thickness of the line
between the two frames, to
0 to eliminate any trace of the invisible frame.
Lines Y and Z contain another new element:
noresize. This attribute
to the
<frame> tag tells the browser to prevent visitors from resizing the frames.
Without this element, a visitor might accidentally click the bottom of the
window and pull the hidden frame up. Putting
noresize inside the <frame>
tags prevents this from happening. Also note that the invisible frame, called
tracker, holds the HTML page secret_code.html—this is where we’ll be
storing the information. Because the frame is hidden, visitors can’t see the
contents of secret_code.html.
The next page, secret_code.html, holds the visitor’s answers in the answers
array ([) and scores the quiz at the end.
Figure 10-16: Page 1 of the quiz
generated by Figure 10-15
Figure 10-17: Page 2 of the quiz
generated by Figure 10-15
184 Chapter 10
The scoring function starts in \. This function creates an array called
correct_answers, which holds the correct answers and loops through the array,
comparing each correct answer with the answer the visitor gave. If the answers
match, the script increments the variable
correct. Once the script has checked
all the answers, the function calculates what percentage the visitor got right
and announces the score in an alert.
The two quiz pages show how the script stores the visitors’ answers in the
invisible frame and how it calls the
score() function.
The page quiz_page_1.html contains a form with two quiz questions and
a link. Each quiz question is true or false; the visitor answers by clicking the
appropriate radio button. Clicking the True radio button on the first question
runs the following code:
parent.tracker.answers[0]='true';
This line goes to the frame tracker in the page’s parent (that is, the frame
set) and stores the string
'true' in the first slot (answers[0]) of the array. Click-
ing the False radio button on the second question runs the following code
and then stores the string
'false' in the second slot of the answers array:
parent.tracker.answers[1]='false';
Clicking the link in ] loads the new page, quiz_page_2.html, into
the visible frame. The invisible frame, however, sticks around, storing the
values from the last page. It keeps the visitor’s answers to the two questions
on quiz_page_2.html in the third and fourth slots in the
answers array.
Clicking the Score the Quiz button in ^ calls the following code:
parent.tracker.score(parent.tracker.answers);
This line invokes the score() function found inside the tracker frame.
The function takes an array containing the visitor’s answers as a parameter.
Because the tracker frame stores the answers array, the script can pass the
array to the score function by referring to
parent.tracker.answers.
This example uses practically every major element of programming this
book has covered to date, so take a long look at it and make sure you under-
stand everything that’s going on. I’ve introduced two major new concepts:
z One frame refers to a variable stored in another frame with
parent.other_frame.variable, as in parent.tracker.answers
z One frame calls a function declared in another frame with
parent.other_frame.function(), as in parent.tracker.score()
Image Maps
JavaScript allows you to expand the capabilities of image maps by letting
you call JavaScript statements when users click, mouse over, or mouse off
different parts of an image map.
Using Frames and Image Maps 185
Image Map Basics
To construct an image map, you need an image and a map that describes
which parts of the image should link to which URLs. Figure 10-18 shows you
part of the code for the image map that Salon uses in its bug-eating piece.
Figure 10-19 shows you what this HTML looks like in a browser. Clicking any
of the dark areas in the image brings you to a web page about that area.
<html>
<head>
<title>Image Map Example</title>
</head>
<body>
X <img src = "left.gif" isMap useMap = "#left">
Y <MAP name = "left">
Z <AREA coords = "9,23,41,42"
[ href = " />\ shape = "RECT">
<AREA coords = "26,42,75,64"
href = " />shape = "RECT">
<AREA coords = "28,65,55,78"
href = " />shape = "RECT">
<AREA coords = "58,70,78,86"
href = "
shape = "RECT">
<AREA coords = "51,88,63,103"
href = "
shape = "RECT">
] </MAP>
</body>
</html>
Figure 10-18: Part of Salon’s bug-eating image map
Line X in Figure 10-18 tells the browser to display left.gif and associate it
with the map called
left. The element isMap tells the browser this is an image
map, and the element
useMap tells the browser which map to use.
The rest of the page defines the map. Line Y starts the definition and
gives the map a name, Z through \ define the different regions of the map
(each called an
AREA), and ] ends the map definition. Three elements define
each area: shape, coordinates, and URL link. In Salon’s image, each area is
rectangular (\). Line [ associates the first area with a URL that discusses
bug eating in the United States, and Z defines which part of the image this
area covers. The four numbers are the x (horizontal) and y (vertical) coordi-
nates of the upper-left corner and the x and y coordinates of the lower-right
corner, in pixels. So the first area in Figure 10-19 goes from the (9, 23) point
of the image to the (41, 42) point of the image, where the numbers represent
the number of pixels from the upper-left corner (see Figure 10-20).
186 Chapter 10
Image Maps and JavaScript
Adding JavaScript to an image map is just like adding JavaScript to an HTML
link. The area tag can handle
onClick, onMouseOver, and (in the 4.0 and later
browsers)
onMouseOut events. For example, if you want an alert box to pop up
when a visitor moves the mouse over Alaska, you could rewrite the first area
in Figure 10-18 as follows:
<AREA coords = "9,23,41,42"
href = " />onMouseOver = "alert('It's cooooold in Alaska!');"
shape = "RECT">
Adding onClick and onMouseOut is equally simple.
How Salon’s Bug-Eating Script Works
Because Salon’s bug-eating piece involves so many pages (see Figure 10-1 for
what the page looks like in a browser), the code in Figures 10-21 through
10-23 describes only the frame set and navigation pages. One large difference
between the code in these figures and Salon’s actual code is that Salon has
divided its image map into three separate images to minimize download times.
Figures 10-21 through 10-23 assume the site has just one image. To see how
the code for handling three separate images differs, look at the scripts avail-
able at />index.html
<html>
<HEAD>
<TITLE>Salon | Wanderlust: Man Eating Bugs</TITLE>
Figure 10-19: Window
displayed by the HTML
in Figure 10-18
Figure 10-20: Graphical
representation of the area
described by Z through \
in Figure 10-18
Using Frames and Image Maps 187
</HEAD>
X <FRAMESET frameborder = no border = 0 COLS = "280,*">
Y <FRAMESET frameborder = no border = 0 ROWS = "165,*">
<FRAME SRC = "nav.html" NORESIZE SCROLLING = "no" border = "0" NAME = "map">
<FRAME SRC = "teaser.html" NORESIZE SCROLLING = "no" border = "0" NAME =
"teaser">
</FRAMESET>
<FRAME SRC = "eatbug.html" NORESIZE SCROLLING = "no" border = "0" NAME =
"thePicture">
</FRAMESET>
</html>
Figure 10-21: Salon’s bug-eating script—frame set
nav.html
<html>
<head>
<title>Image Map Example</title>
<script type = "text/javascript">>
<! hide me from older browsers
X var hold = "notta";
Y function changeMe(theMap,theOne,theBug) {
Z window.document.left.src = theMap;
[ if (hold == theOne)
{
\ return;
} else {
] parent.thePicture.location = theOne;
^ parent.teaser.location = theBug;
_ hold = theOne;
}
}
// show me ></script></head>
Figure 10-22: Salon’s bug-eating script—navigation page head containing
changeMe()
function
The top page of the site, index.html, uses two frame sets to describe three
frames. The frame on the left, called
map, contains the image map; the one
below the map, called
teaser, contains a little picture and some text; and the
third frame on the right, called
thePicture, contains a bigger image of the
appropriate bug. The content of all three frames changes when a visitor
mouses over part of the map.
<body>
X <img src = "left.gif" name = "left" isMap useMap = "#left">
<MAP name = "left">
Y <AREA coords = "9,23,41,42" shape = "RECT" href = "us.html"
Z target = "thePicture"
[ onmouseOver = "changeMe('us.gif','us.html','usteaser.html');"
\ onMouseOut = "window.document.left.src='left.gif';">
188 Chapter 10
<AREA coords = "26,42,75,64" shape = "RECT" href = "us.html"
target = "thePicture"
onmouseOver = "changeMe('us.gif','us.html','usteaser.html');"
onMouseOut = "window.document.left.src='left.gif';">
<AREA coords = "28,65,55,78" shape = "RECT" href = "mexico.html"
target = "thePicture"
onmouseOver = "changeMe('mexico.gif','mexico.html','mteaser.html');"
onMouseOut = "window.document.left.src='left.gif';">
</MAP>
</body>
</html>
Figure 10-23: Salon’s bug-eating script—navigation page body containing images
Salon’s Nested Frames
Salon nested its frames using a different method than the one I described
in the section “JavaScript and Frames Inside Frames” on page 179. Instead
of having a frame call in a second file containing a frame set, as in Z in
Figure 10-12, Salon puts a second frame set right inside the first one (Y
in Figure 10-21). This works fine in HTML, but it confuses JavaScript a
little, as we’ll see.
Salon’s Image Map
Most of the action happens in the frame containing the map, defined in
nav.html in Figure 10-23, starting with X. This line puts the image of the world
map on the page and tells the browser to use the image map
left. Line Y sets
the coordinates for the first region of the left image map and the URL link.
Line Z targets the frame
thePicture (on the right side of the screen), and Y
tells the browser to load us.html into
thePicture when a visitor clicks on the
region. Lines [ and \ tell the browser what to do when a visitor moves the
mouse over or out of this region. Mousing over a region calls the
changeMe()
function, which changes the contents of the frames appropriately.
The changeMe() Function
Function changeMe(), shown in Figure 10-22 starting in Y, changes the contents
of the frames. It takes three parameters:
theMap, the name of a new map to
swap with the standard one;
theOne, the name of the page that holds the big
image to swap into
thePicture frame; and theBug, the name of the page with
the teaser information to swap into the
teaser frame. Each region of the map
calls
changeMe() with a different map, thePicture page, and teaser page. For
example, the
mouseOver() in [ of Figure 10-23 calls changeMe() like this:
changeMe('us.gif','us.html','usteaser.html');
Using Frames and Image Maps 189
This tells changeMe() to swap the us.gif map into one frame, us.html into
another frame, and
usteaser.html into a third frame.
Line Z in Figure 10-22 swaps the map of the world with another map
with the appropriate region colored green—
us.gif, for example. Line [
then checks to see whether the visitor has actually chosen a new area. If the
visitor mouses over Alaska and then moves over to the continental United
States, the picture in
thePicture frame shouldn’t change. The variable hold,
declared in X, keeps track of the currently selected region. The
if-else state-
ment in [ checks to see whether the page to load into
thePicture frame is
already loaded there. If it is, the function just returns (\) and no more swaps
happen. Whenever JavaScript sees the word
return inside a function, it leaves
that function. Putting a
return inside an if-then statement, as in \, is a handy
way to quit in the middle of a function.
If the visitor has moused over a new area, the
else part of the clause runs.
Line ] puts the page
theOne into the frame named thePicture, and ^ puts the
page
theBug into the frame named teaser.
Summary
Enhanced with JavaScript’s ability to change the contents of web pages,
frames and image maps add functionality that would otherwise be impossible.
The examples shown here just scratch the surface of what you can do with
JavaScript, frames, and image maps. Keep practicing and playing with them,
and you’re bound to come up with amazing designs.
If you’ve read this whole chapter, you should know how to:
z Create frames
z Trigger image swaps in one frame with an event in another one
z Change the contents of a form in one frame following an event in
another one
z Change the URL shown in a frame using both JavaScript and HTML
z Change more than one frame at the same time
z Deal with nested frames
z Use frames to save information after a visitor leaves a web page
z Create an image map
z Add JavaScript to image maps
z Say apple in Spanish
If you have all of that down, you should feel very powerful. Here’s an
assignment to test your knowledge.
190 Chapter 10
Assignment
Create your own browser page using forms and frames. The page should
have at least two frames: a frame with a text box that allows a visitor to
type in a URL, and a frame that shows the URL after submission of the
form. Figure 10-24 shows an example of what I mean, but you can build a
browser page to suit your taste. In addition to providing a location box,
the browser page in Figure 10-24 uses Salon’s image map to display various
URLs in the display frame.
Figure 10-24: A homemade browser
VALIDATING FORMS, MASSAGING
STRINGS, AND WORKING WITH
SERVER-SIDE PROGRAMS
Web developers can add interactivity to
their sites with code that runs on either the
web browser or the webserver. JavaScript works
inside web browsers, and everything we’ve seen so far
adds interactivity to web pages by making the browser
perform fancy JavaScript tricks. Web developers can
also make their pages more interactive by using CGI scripts, Java servlets,
.NET applications, and other scripting tools. Although the use of these tools
is outside the scope of this book, it’s important to know how JavaScript can
be used to enhance these server-side programs.
One of the most common ways to use JavaScript along with server-side
programs is as a form validator. Making sure that visitors have filled out a form
correctly before sending it to a server-side program speeds up the process
immensely by cutting down on the number of times they have to submit
forms to your webserver.
192 Chapter 11
In this chapter you’ll learn how to:
z Make sure visitors fill out HTML forms correctly
z Make sure they have formatted strings (email addresses, for example)
correctly
z Make JavaScript work with server-side programs
A Real-World Example of Form Validation
Before saving the information you’ve entered in a form, many sites use
JavaScript to make sure you’ve filled out the form correctly. When you sign
up for Dictionary.com’s Word of the Day, for example, you must provide
your name, a correctly formatted email address, and several other pieces of
information. Before Dictionary.com saves your information, it checks your
email address for correct formatting and tells you if it sees any mistakes (see
Figure 11-1). Later in the chapter, after you’ve learned the basics of JavaScript
form validation, we’ll look at the code that implements this feature in the
Dictionary.com site.
Figure 11-1: Dictionary.com’s form validator in action
Making Sure a Visitor Has Filled Out a Form Element
Making sure a visitor has supplied all the mandatory information in an
HTML form is the most basic type of form validation. If you want to require
your visitors to provide a name and age, you need a JavaScript function to
make sure they’ve entered this information before the form goes to the
server-side program.
Chapter 7 covers almost everything you need to know to do this. If you’re
feeling unsure about how JavaScript and forms work together, review
Chapter 7 before reading on. If you feel confident, look at Figure 11-2,
which checks whether a user has filled out the mandatory form elements,
and see whether you can figure out the code before reading the line-by-line
analysis.
Validating Forms, Massaging Strings, and Working with Server-Side Programs 193
<html>
<head>
<title>Checking Mandatory Fields</title>
<script type = "text/javascript">
<! hide me from older browsers
function checkMandatory()
{
X var error_string = "";
// check the text field
Y if (window.document.the_form.the_text.value == "")
{
error_string += "You must give your name.\n";
}
// check the scrollable list
Z if (window.document.the_form.state.selectedIndex < 0)
{
error_string += "You must select a state.\n";
}
// check the radio buttons
[ var rad_select = "no";
\ for (var loop = 0; loop < window.document.the_form.gender.length; loop++)
{
] if (window.document.the_form.gender[loop].checked == true)
{
rad_select = "yes";
}
}
^ if (rad_select == "no")
{
error_string += "You must select a gender.\n";
}
_ if (error_string == "")
{
return true;
} else {
error_string = "We found the following omissions in your form: \n" +
error_string;
` alert(error_string);
return false;
}
}
// show me >
</script>
</head>
<form name = "the_form" action = "" method = "post"
a onSubmit = "var the_result = checkMandatory(); return the_result;">
Name:<input type = "text" name = "the_text">
<br>
State you live in:<br>
<select name = "state" size = "3">
<option value = "alabama">Alabama</option>
<option value = "arizona">Arizona</option>
<option value = "california">California</option>
<option value = "colorado">Colorado</option>
<option value = "connecticut">Connecticut</option>
194 Chapter 11
<option value = "delaware">Delaware</option>
<option value = "illinois">Illinois</option>
</select>
<p>
Gender:<br>
<input type = "radio" name = "gender">Female<br>
<input type = "radio" name = "gender">Male<br>
<p>
<input type = "submit" value = "Submit me!">
</form>
</body>
</html>
Figure 11-2: Making sure your visitor has filled in mandatory fields
Line-by-Line Analysis of Figure 11-2
The validation begins in a, which calls checkMandatory() after your visitor
clicks the Submit me! button. If there are any empty form elements, an alert
box pops up explaining what needs filling out. (Figure 11-3 shows you what
happens if the visitor hasn’t filled out any of the form elements before
clicking the button.)
In brief, the
checkMandatory() function works by returning the value true if
the visitor has filled out all the fields,
false if something’s missing. If the func-
tion returns
false, the script sets the variable the_result to false in a. As you
learned in Chapter 7, browsers won’t submit a form if a JavaScript returns
false inside the onSubmit handler.
The
checkMandatory() function checks each of the form elements and, if
the user fails to fill out an element, adds a phrase describing the error to the
error_string variable, declared in X. Once the function has made all the
checks, the
error_string will contain a blurb for each form element not
filled in, or it will be blank if the user has entered all the elements.
Figure 11-3: The message displayed when your visitor hasn’t filled in any of
the elements
Validating Forms, Massaging Strings, and Working with Server-Side Programs 195
Checking Text Fields and Scrollable Lists
The first check is in Y, where the function determines whether there’s
anything in the name field. If not, it adds some text to the
error_string
variable. Notice the use of the plus and equal signs (
+=) in the body of the
if-then statement in Y. A statement such as a += b is short for a = a + b.
When dealing with strings,
+= tells the function to add the following item to
the end of the variable. The body of Y adds the string
"You must give your
name.\n"
to the variable error_string (the \n at the end creates a line break
inthe alert box). Line Z checks the scrollable list to see whether the user has
selected anything. If the visitor has selected a state,
selectedIndex equals the
position of the selected element: 0 with the first option selected, 1 with the
second option selected, and so on. If the visitor has not selected a state,
selectedIndex equals 1. If the selectedIndex of this form element is less
than 0, the script adds the appropriate message to
error_string.
Checking Radio Buttons
The trickiest type of form element to check is the radio button. To check
whether a user has selected a particular radio button, you have to loop
through all the buttons in a series and check them one at a time. In Fig-
ure 11-2, [ declares the variable
rad_select to keep track of whether the
guest has chosen a radio button. Initially, the function sets
rad_select to "no".
If the function encounters a selected radio button as it loops through them,
it sets
rad_select to "yes" to show that it’s found a selected radio button.
The loop begins in \ and is the standard loop for checking a list of radio
buttons. The loop might look strange at first, but if you study it long enough
to understand what’s going on, it soon becomes second nature.
The variable
loop starts at 0 and goes until it has checked the last radio
button named
gender. Each time through the loop, ] checks to see whether
the radio button has been selected and, if it has, changes
rad_select from "no"
to
"yes". After the loop has looked at all the radio buttons, ^ checks whether
rad_select is still "no". If it is, the visitor hasn’t selected any of the radio
buttons, so the script adds the appropriate error message to
error_string.
Checking error_string
Now that all the checks are done, _ determines whether any error messages
have been added to
error_string. If not, error_string still equals the null
string (
""), which is what X set it to. If error_string is null, no error messages
have been added, which means the form is complete and can be sent to the
server-side program that will process the input values in some way.
In a real-world web application, the server-side program would be speci-
fied in the
action of the <form> tag. To send the form to that program, the
onSubmit in a must return true. If nothing has been added to error_string, the
if-then statement starting in _ returns true, which sets the variable the_result
in a to
true. Thus the onSubmit returns true, and the form is submitted.
196 Chapter 11
NOTE In the example script in Figure 11-2, the action does not specify any server-side pro-
gram. If there were a program there, it would probably store the information in a data-
base somewhere and thank the user for filling out the survey. In this case, since there is
no server-side program, the page just reloads, clearing the values entered into the form.
If the
error_string contains something, meaning that the form is incom-
plete, the script adds
We found the following omissions in your form: and a line
break to the front of
error_string and puts the string in an alert box (`).
After the visitor clicks OK in that box,
checkMandatory() returns false, setting
the_result to false in a. As a result, the onSubmit then returns false, the form
does not go to the server-side program, and the page doesn’t reload.
Much of the code in Figure 11-2 applies to all form validation scripts.
The main differences between form validation scripts arise from the types of
input values they need to check. If, for example, you wanted a script to test a
form element for a valid email address, you’d add some code to do that check
in the
checkMandatory() function. In order to write that code, however, you
have to know a bit about analyzing strings.
String Handling
You’ll often want to verify that a string has a certain format—that an email
address looks valid, or a date is formatted the way you want, or perhaps that a
credit card number passes a basic validity test. There are two ways to verify
string formats: using string methods, which break strings apart and analyze
them, and using a technique called regular expressions to define patterns of
strings as valid or invalid.
Breaking Strings Apart
To verify string formats by breaking them apart, you need these five useful
string methods:
indexOf(), lastIndexOf(), charAt(), substring(), and split().
I’ll cover each method and show how to use them to verify an email address
or date. The credit card script is long, so I don’t discuss it here, but you’ll
find a good example at />Form_validators/Netscape’s_suite/index.html.
indexOf() and lastIndexOf()
The indexOf() method finds the location of a specified set of characters
(called a substring) inside a string and tells you at what position the substring
starts (the first character of a string is in position 0, the second in position 1,
and so on). If the string doesn’t contain the specified substring,
indexOf()
returns 1.
Complementing
indexOf(), the lastIndexOf() method gives you the
position of the last occurrence of a character or substring. Table 11-1 shows
the value of various calls to
indexOf() and lastIndexOf() when the variable
the_word holds the string superduper (var the_word = "superduper").