the book of javascript 2nd edition phần 9 ppt
Bạn đang xem bản rút gọn của tài liệu. Xem và tải ngay bản đầy đủ của tài liệu tại đây (762.69 KB, 54 trang )
372 Chapter 18
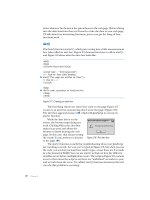
Consider the code in Figure 18-6.
function getName()
{
var first_name = prompt("What's your first name?","");
var last_name = prompt("What's your last name?","");
var the_name = first_name + " " + last_name;
}
function theGreeting() {
X debugger;
var the_name = getName();
if (the_name == "Dave Thau")
{
alert("Howdy, partner!");
} else {
alert("Ahoy, polloi!");
}
}
Figure 18-6: Starting the debugger
As before, we suspect that something funny is going on with getName().
In this case, rather than putting in an alert or using logging, we invoke the
JavaScript debugger in X. This stops the JavaScript program and makes
the JavaScript debugger window look like Figure 18-7. The
debugger; line
appeared within
theGreeting(), so the Local Variables section of the debugger
shows you what it knows about the function. Initially, it knows that there is
one variable,
the_name, and that it has no value (the value is void).
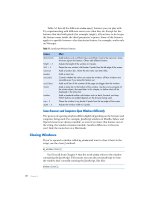
Figure 18-7: After X has been executed
Debugging JavaScript and Ajax 373
After I click the Step Into button a couple of times to get into getName(),
then fill in some prompts, the debugger in Figure 18-8 shows that
first_name
and
last_name are set correctly.
Figure 18-8: Examining variables; first_name and last_name look correct
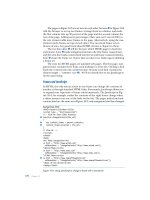
I click the Step Into button a few more times until I’ve exited getName(),
and I see in Figure 18-9 that for some reason
the_name is still void. From this I
can deduce that the value is not getting passed out of the
getName() function.
Figure 18-9: Examining variables; the_name looks incorrect
374 Chapter 18
In this simple example, the complexity of a full-blown debugger such as
Venkman is unnecessary. However, with complicated functions, being able to
step through the JavaScript one line at a time, and see the values of the varia-
bles at every step, can cut down debugging time immensely. If you’d like to
learn more about how to use Venkman, you can find an excellent tutorial at
/>The Venkman debugger is by far the easiest JavaScript debugger to use
and is itself a reason to download Firefox. If you are trying to debug a problem
that occurs only in Internet Explorer, you will need a debugger that works
for Internet Explorer. The best option here is the Microsoft Script Editor,
1
which comes packaged with Microsoft Office.
Debugging Ajax in Firefox 1.5 and 2.0
Debugging Ajax is much like debugging JavaScript. However, the client-server
communication that goes on in debugging Ajax adds a bit of complexity. An
extension for Firefox 1.5 and 2.0 called Greasemonkey,
2
combined with a
script called the XMLHttpRequest Debugging Script,
3
can give you a window
into how your web browser and a webserver are communicating.
Once you have downloaded and installed Greasemonkey and the
XMLHttpRequest Debugging script, you can monitor requests sent and
received by Firefox request objects. The XmlHttpRequestDebugging script
maintains a list of JavaScripts that might have request objects that need to be
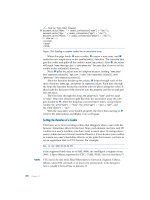
monitored. To add JavaScripts that run on your desktop computer to that
list, choose ToolsManage User Scripts from the Firefox menu, and add
http://localhost/* to the Included Pages list, as seen in Figure 18-10.
Once you have done so, a
div is added to any web page on this list that
makes an Ajax-style request. For example, Figure 18-11 shows the debugging
window after Odysseus has logged into the To Do list application from
Chapter 17. The figure shows two Ajax calls. The first line of a call tells
you the type of call it was, in this case a
GET. The next line tells you where
the request was sent. The third line lets you see what message was sent
with the request when the
request.send() method was invoked. In the case
of a
GET, the message is null. With POST, the message will be the string sent.
On the third line is also an [edit&replay] button, which gives you a window
like Figure 18-12. In this window you can change the message sent in the
request and then resend the request to see what happens.
The fourth line of the window in Figure 18-11 gives you the status
of the webserver’s response. Clicking [export] opens a window with the
complete response from the webserver (Figure 18-13). As you can gather,
this tool is extremely useful for debugging client-server communications
in Ajax.
1
A good tutorial is available at />howto_debug_jav.html.
2
See .
3
See />Debugging JavaScript and Ajax 375
Figure 18-10: Adding JavaScripts that run on your desktop
machine to the list of scripts to monitor
NOTE Only you (and other users who have added Greasemonkey and the XMLHttpRequest
Debugging script and have added your web page to their watch list) will see the
XmlHttpRequest debugging window. Don’t worry about anyone else being affected by it.
Figure 18-11: XmlHttpRequest debugger showing
client-server traffic
376 Chapter 18
Figure 18-12: Using the XmlHttpRequest debugger
to examine and edit an Ajax message
Other Debugging Resources
Before closing this section on debugging, I should mention two other
debugging tools. Firebug
4
is a relatively new and popular debugger for
Firefox 1.5 that combines logging, a JavaScript debugger, and the ability to
watch Ajax requests. Microsoft’s Visual Web Developer Express Edition
5
is a
free website development environment that includes a JavaScript debugger
and can also watch Ajax requests.
Fixing Bugs
Once you’ve found where your bugs are, you need to fix them—and you
have multiple options for this, both good and bad. This section covers a few
things you should do when getting rid of bugs.
4
See />5
See />Debugging JavaScript and Ajax 377
Figure 18-13: A detailed look at the client-server communication
Back Up Your Program
Some bugs are really hard to get rid of. In fact, sometimes in the process of
eradicating a little bug that’s driving you nuts, you end up destroying your
entire program. This happens a lot, so saving a backup of your program
before you start to debug is the best way to ensure that a bug doesn’t get the
best of you.
Fix One Bug at a Time
If you have multiple bugs, fix one and test your fix before moving to the next
bug. Fixing a lot of bugs at once increases the risk of adding even more bugs.
Avoid Voodoo Coding
Sometimes you know a bug exists, but you don’t really know why. Let’s say
you have a variable called
index and for some reason index is always 1 less
than you think it should be. At this point you can do two things. You can sit
there for a while and figure out why
index is 1 less than it should be, or you
378 Chapter 18
can just shrug, add 1 to index before using it, and move on. The latter method
is called voodoo programming. When you start thinking, “What the hell? Why is
index 2 instead of 3 here? Well . . . I’ll just add 1 for now and fix it later,”
you’re engaging in voodoo programming.
Voodoo programming may work in the short term, but eventually it will
doom you. It’s like sweeping dust under a rug. The problem resurfaces—
either you get yet another weird error you can’t figure out, or the next poor
soul cursed to look at your code will find it extremely hard to understand.
Don’t practice voodoo coding.
Look for Similar Bugs
In some ways, the ability to cut and paste code is the worst thing that ever
happened to programmers. Often you’ll write some JavaScript in one function,
then cut and paste it into another function. If the first function had a problem,
you have now created problems in two functions. I’m not saying you shouldn’t
cut and paste code—but keep in mind that bugs have a way of multiplying, so
if you find one bug, look for similar bugs elsewhere in your code. One bug
that typically crops up several times in every JavaScript is misspelled variable
names. If you misspell
the_name as teh_name in one place, chances are you’ve
done it someplace else too.
Clear Your Head
You’re sitting there staring at a bug, and you just can’t figure out what’s
going on or how to fix it. Or maybe you can’t even find the bug in the first
place. The best thing to do is walk away from your computer. Go read a book
and take a stroll around the corner. Get a tasty beverage. Do something—
anything—but don’t think about the program or the problem. This tech-
nique is called incubation, and it works amazingly well. After you’ve had a
little break and relaxed a bit, try finding the bug again. Often you’ll approach
the problem in a new, more fruitful way. Incubation works because it breaks
you out of a dysfunctional mindset.
Ask for Help
Sometimes you get stuck in your own contorted thought patterns, and you
need someone who hasn’t thought about the problem to find the hole in
your logic. In structured coding environments, programmers periodically
review each other’s code. Code review not only helps iron out bugs but
also results in better code. Don’t be afraid to show other people your
JavaScripts. You’ll become a better JavaScripter.
Debugging JavaScript and Ajax 379
Summary
Programming is a skill that improves dramatically over time, and learning
how to debug efficiently is one of the biggest components of that process.
Whenever you program, you will need to debug. A completely bug-free pro-
gram is almost never written in one draft. The best you can do is to try to
minimize the bugs and to write your programs in a way that makes it easy
to detect and fix the bugs that slip in. The tools and techniques covered in
this chapter should help make your debugging experience as pleasant as
possible.
Congratulations! You now know everything you need to start a career as
an official JavaScripter. All that remains is lots and lots of practice. View source
on every page that catches your fancy, and check out the free JavaScript
resources listed in Appendix B.
If you’ve made it this far, you’ve learned a lot of JavaScript, but this book
hasn’t by any means covered every detail of this huge subject—so leaf through
Appendix C to get a feel for the other JavaScript functions and objects at your
disposal. If you’re going to do a lot of JavaScripting, get a good JavaScript
reference book, like David Flanagan’s JavaScript: The Definitive Guide (O’Reilly,
2006). But most importantly, experiment freely and push the boundaries of
what you’ve learned here. Now go forth and code!
ANSWERS TO ASSIGNMENTS
Here are solutions to the assignments I’ve
given at the end of each chapter. The scripts
and images used in the solutions may be found
on this book’s companion website (http://www
.bookofjavascript.com). The JavaScript in this appendix
contains comments where I think explanation is neces-
sary. If your solution works and is not much longer than
mine, you’ve done a good job. There is no assignment
for Chapter 1, so we’ll start with Chapter 2.
Chapter 2
The Chapter 2 assignment asks you to change Figure 2-12 so that seconds are
displayed along with minutes and hours. Use the
Date object’s getSeconds()
method to get the number of seconds and the
fixTime() function to fix the
formatting of the seconds.
382 Appendix A
<html>
<head>
<title>Chapter 2 Assignment</title>
<script type = "text/javascript">
<! hide me from older browsers
// get the date information
//
var today = new Date();
var the_day = today.getDate();
var the_month = today.getMonth();
var the_hour = today.getHours();
var the_minutes = today.getMinutes();
var the_seconds = today.getSeconds();
// correct for the month starting from zero
//
the_month = the_month + 1;
// add leading zeros if necessary
the_day = fixTime(the_day);
the_minutes = fixTime(the_minutes);
the_seconds = fixTime(the_seconds);
// create the string you want to print
//
var the_whole_date = the_month + "/" + the_day + " ";
var the_whole_time = the_hour + ":" + the_minutes + ":" + the_seconds;
// This is the time fixer function don't worry about how this works either.
function fixTime(number) {
if (number < 10) {
number = "0" + number;
}
return number;
}
// show me >
</script>
</head>
<body>
Right now it's:
<script type = "text/javascript">
<! hide me from older browsers
// write the date
//
document.write(the_whole_date);
document.write(the_whole_time);
// show me >
</script>
</body>
</html>
Answers to Assignments 383
Chapter 3
In this assignment, you are asked to send people you like to one page, people
you don’t like to another page, and everyone else to a third page. This should
exercise your new understanding of
if-then-else-if statements.
<html><head><title>Chapter 3 Assignment</title></head>
<body>
<script type = "text/javascript">
<! hide me from older browsers
// get the visitor's name
//
var the_name = prompt("What's your name?", "");
// If the name is thau, dave, pugsly, or gomez,
// send the visitor to Sesame Street.
// If it's darth vader, the evil emperor, or jar jar binks,
// send the visitor to the American Psychological Association
// for some therapy.
// If it's none of the above, send him or her to the New York Times.
if ((the_name == "thau") || (the_name == "dave") ||
(the_name == "pugsly") || (the_name=="gomez"))
{
window.location = " />} else if ((the_name == "darth vader") || (the_name == "the evil emperor") ||
(the_name == "jar jar binks"))
{
window.location = " />}
else
{
window.location = " />}
// show me >
</script>
</body>
</html>
Chapter 4
This assignment asks you to create an image swap that changes two images at
once. Do this by putting two image swap statements inside the event handlers.
<html>
<head>
<title>Chapter 4 Assignment</title>
</head>
<body>
<h1>Welcome to the Book of JavaScript Website!</h1>
<p>
<img src = "front_cover.gif" name = "cover">
</p>
<p>
<a href = "#"
384 Appendix A
onMouseOver = "window.document.cover.src='back_cover.gif';
window.document.turn.src='turn_back.gif';"
onMouseOut = "window.document.cover.src='front_cover.gif';
window.document.turn.src='turn_over.gif';">
<img src = "turn_over.gif" border = "0" name = "turn">
</a>
</p>
</body>
</html>
Chapter 5
This assignment asks you to write a web page that contains two links. When the
web page opens, it should also open a little window containing an image. When
clicked, the two links on the main page should swap different images into the
little window. Make sure that index.html and image_page.html are in the same
directory.
index.html
The index.html file opens the little window.
<html>
<head>
<title>Chapter 5 Assignment</title>
<script type = "text/javascript">
<! hide me from older browsers
// open the little window with the page image_page.html and call the
// little window the_window
//
var the_window =
window.open("image_page.html","the_window","width=100,height=100");
// show me >
</script>
</head>
<body>
<h1>Play with a little window</h1>
<a href = "#"
onClick = "the_window.document.the_image.src='sad_face.gif';">Make him
sad</a><br>
<a href = "#"
onClick = "the_window.document.the_image.src='happy_face.gif';">Make him
happy</a><br>
</body>
</html>
image_page.html
The image_page.html file specifies the content of the little window.
<html><head><title>Little Window</title></head>
<body>
Answers to Assignments 385
<img name = "the_image" src = "happy.gif">
</body>
</html>
Chapter 6
This assignment asks you to create a function that swaps one image with
another and opens a new window to a given URL. The function takes three
parameters: the name of an image to swap, the URL of a new image to put in
its place, and a URL to open in the new window.
<html><head><title>Chapter 6 Assignment</title>
<script type = "text/javascript">
<! hide me from older browsers
// function fancySwap() takes three parameters:
// 1. the web page image that's getting swapped out
// 2. the filename of an image to swap into the web page image
// 3. a URL to open into a new window
//
function fancySwap(the_image, new_image, the_url)
{
the_image.src = new_image;
var my_window = window.open(the_url, my_window, "height=300,width=150");
}
// show me >
</script>
</head>
<body>
<a href = "#"
onMouseOver = "fancySwap(window.document.apple,'hilight_apple.gif',
' "
onMouseOut = "window.document.apple.src='normal_apple.gif';">
<img src = "normal_apple.gif" name = "apple" border = "0">
</a>
<a href = "#" onMouseOver =
"fancySwap(window.document.sun,'hilight_sun.gif','
onMouseOut = "window.document.sun.src='normal_sun.gif';">
<img src = "normal_sun.gif" name = "sun" border = "0">
</a>
<a href = "#" onMouseOver =
"fancySwap(window.document.monkey,'hilight_monkey.gif',
' /> onMouseOut = "window.document.monkey.src='normal_monkey.gif';">
<img src = "normal_monkey.gif" name = "monkey" border = "0">
</a>
</body>
</html>
Chapter 7
This assignment asks you to write a script for a clock that tells the time in
San Francisco, New York, London, and Tokyo. The clock should have a text
field for the time, a button to update the clock, and four radio buttons, one
for each of those time zones. When you click on one of the radio buttons,
386 Appendix A
the correct time should appear in the text field. When you click on the update
button, the clock should update with the time from the zone you’ve selected
with the radio buttons.
This solution has two main functions:
updateClock() is called when the
update button is clicked, and
updateReadout() is called when one of the time
zone radio buttons is clicked.
<html><head><title>Chapter 7 Assignment</title>
<script type = "text/javascript">
<! hide me from older browsers
// Function updateReadout() takes one parameter, the time zone to
// convert the time to. The parameter can be either newyork, sanfran or
// tokyo.
// The function determines the time for that time zone and then sets the
// value of a text field to that time.
function updateReadout(the_zone)
{
// get the current UTC time
//
var now = new Date();
var the_hours = now.getUTCHours();
var the_minutes = now.getUTCMinutes();
var the_seconds = now.getUTCSeconds();
// adjust for selected time zone
//
if (the_zone == "newyork")
{
the_hours = the_hours - 4;
} else if (the_zone == "sanfran") {
the_hours = the_hours - 7;
} else if (the_zone == "tokyo") {
the_hours = the_hours + 9;
}
// now fix the hours if over 24 or under 0
//
if (the_hours < 0)
{
the_hours = the_hours + 24;
} else if (the_hours > 24) {
the_hours = the_hours - 24;
}
// put zeros in front of minutes and seconds if necessary
the_minutes = formatTime(the_minutes);
the_seconds = formatTime(the_seconds);
// now put the time in the text box
var the_time = the_hours + ":" + the_minutes + ":" + the_seconds;
window.document.clock_form.readout.value = the_time;
}
Answers to Assignments 387
// function formatTime() takes a number as a parameter.
// If that number is less than 10, it puts a 0 in front
// of it for formatting purposes.
//
function formatTime(the_time)
{
if (the_time < 10) {
the_time = "0" + the_time;
}
return the_time;
}
// By looping through a set of radio buttons, function updateClock()
// checks to see which time zone has been selected by the viewer. Once
// it determines the selected time zone, it calls updateReadout().
//
function updateClock()
{
var selected_zone = "";
for (var loop = 0; loop < window.document.clock_form.zones.length; loop++)
{
if (window.document.clock_form.zones[loop].checked == true)
{
selected_zone = window.document.clock_form.zones[loop].value;
}
}
updateReadout(selected_zone);
}
// show me >
</script>
</head>
<body>
<form name = "clock_form">
<input type = "text" name = "readout">
<input type = "button" value = "update" onClick = "updateClock();"><br>
San Francisco <input type = "radio" name = "zones" value = "sanfran"
onClick = "updateReadout('sanfran');" checked><br>
New York <input type = "radio" name = "zones" value = "newyork"
onClick = "updateReadout('newyork');"><br>
London <input type = "radio" name = "zones" value = "london"
onClick = "updateReadout('london');"><br>
Tokyo <input type = "radio" name = "zones" value = "tokyo"
onClick = "updateReadout('tokyo');"><br>
</form>
</body>
</html>
Chapter 8
This assignment uses arrays and loops to draw a chart based on user input.
One function,
getNumbers(), creates an array that stores the values to the
chart. After collecting these values from the user,
getNumbers() then loops
through the array, calling
drawSquares() to draw each line of the chart.
388 Appendix A
<html><head><title>Chapter 8 Assignment</title>
<script type = "text/javascript">
<! hide me from older browsers
// function getNumbers() gets a number of bars to draw
// and the length of those bars. It calls the drawSquares()
// function to actually draw the bars to the web page.
//
function getNumbers()
{
// create a new array
//
var the_values = new Array();
// find out how many bars the person wants
//
var how_many = prompt("How many bars?","");
// now loop that many times, asking for a value
// each time and loading that value into the array
//
for (var loop = 0; loop < how_many; loop++)
{
var value = prompt("How long is this bar? (1-10)","");
the_values[loop] = value;
}
// now loop through the array and print out the bars
//
for (var loop = 0; loop < how_many; loop++)
{
drawSquares(the_values[loop]);
}
}
// function drawSquares()
// takes a number of squares to draw, and then draws them to
// the web page
//
function drawSquares(the_number)
{
for (var loop = 0; loop < the_number; loop++)
{
window.document.write("<img src='square.gif'>");
}
window.document.write("<br>");
}
// show me >
</script>
</head>
<body>
<a href = "#" onClick = "getNumbers(); return false;">Draw the histogram</a>
</body>
</html>
Answers to Assignments 389
Chapter 9
This assignment asks you to alter Figure 9-11 so that mousing over the image
stops the slide show, and mousing off the image starts it again. The solution
is very much like Figure 9-11. The only addition is the link around the image
that clears the time-out when it is moused over and restarts the slideshow
when the mouse moves off of it.
<html>
<head>
<title>Chapter 9 Assignment</title>
<script type = "text/javascript">
<! hide me from older browsers
// preload the images
var the_images = new Array();
the_images[0] = new Image();
the_images[0].src = "one.jpg";
the_images[1] = new Image();
the_images[1].src = "two.jpg";
the_images[2] = new Image();
the_images[2].src = "three.jpg";
var the_timeout;
var index = 0;
// function rotateImage() swaps in the next image in the_images
// array and increases the index by 1. If the index exceeds the
// number of images in the array, index is set back to zero.
// setTimeout is used to call the function again in one second.
function rotateImage()
{
window.document.my_image.src = the_images[index].src;
index++;
if (index >= the_images.length)
{
index = 0;
}
the_timeout = setTimeout("rotateImage();", 1000);
}
// show me >
</script>
</head>
<body>
<a href = "#"
onMouseOver = "clearTimeout(the_timeout);"
onMouseOut = "rotateImage();">
<img name = "my_image" src = "one.jpg"></a>
<form>
<input type = "button" value = "Start the show"
onClick = "clearTimeout(the_timeout); rotateImage();">
<input type = "button" value = "Stop the show"
onClick = "clearTimeout(the_timeout);">
</form>
</body>
</html>
390 Appendix A
Chapter 10
This assignment asks you to create a page with at least two frames. The first
frame should contain a submit button and a text box into which a visitor should
type a URL. After the submit button is clicked, the second frame shows the
web page called by the URL in the text box. In addition to providing a
location box, the browser page in the solution uses Salon’s image map to
show various URLs in the display frame.
Because it uses frames, this assignment requires three HTML files:
index.html, assignment-nav.html, and blank.html.
index.html
The first page, index.html, lays out the frameset.
<html><head><title>Chapter 10 Assignment</title></head>
<frameset rows = "50%,*">
<frame src = "assignment-nav.html" name = "nav">
<frame src = "blank.html" name = "contents">
</frameset>
</html>
assignment-nav.html
The second page, assignment-nav.html, contains the image map and the form.
Clicking on an area in the image map or submitting the form loads a URL
into the lower frame. Notice the use of this in the form’s
onSubmit.
<html><head><title>nav</title></head>
<body>
<table border = 0>
<tr><td>
Type a URL below, or
<br>
click on an area of the map.
<form onSubmit = "parent.contents.location=this.the_url.value; return false;">
<input type = "text" name = "the_url">
</form>
</td>
<td>
<img src = "src/left.gif" name = "left" isMap useMap = "#left">
</td>
</tr>
</table>
<MAP name = "left">
<AREA coords = "9,23,41,42" shape = "RECT" href = "#"
target = "thePicture"
onClick = "parent.contents.location = ' return
false;"
onmouseOver = "window.document.left.src='src/us.gif';"
onMouseOut = "window.document.left.src='src/left.gif';">
Answers to Assignments 391
<AREA coords = "26,42,75,64" shape = "RECT" href = "#"
target = "thePicture"
onClick = "parent.contents.location = ' return
false;"
onmouseOver = "window.document.left.src='src/us.gif';"
onMouseOut = "window.document.left.src='src/left.gif';">
<AREA coords = "28,65,55,78" shape = "RECT" href = "#"
target = "thePicture"
onClick = "parent.contents.location = ' return
false;"
onmouseOver = "window.document.left.src='src/mexico.gif';"
onMouseOut = "window.document.left.src='src/left.gif';">
</MAP>
</body>
</html>
blank.html
The third page, blank.html, is just a blank page which appears in the lower
frame.
<html><head><title>blank</title></head>
<body>
</body>
</html>
Chapter 11
This assignment extends Chapter 10’s assignment by adding string validation
to make sure the URLs entered in the browser’s location bar are valid web
addresses. This means the URL should start with http:// or https://, have no
spaces, and have at least two words with a period between them.
The solution begins with the code from Chapter 10’s assignment and
adds a function named
domainCheckAndGo() that performs the string validation.
Like the Chapter 10 assignment, this assignment requires three HTML files
because it uses frames.
index.html
The first page, index.html, lays out the frameset.
<html><head><title>Chapter 11 Assignment</title></head>
<frameset rows = "50%,*">
<frame src = "assignment-nav.html" name = "nav">
<frame src = "blank.html" name = "contents">
</frameset>
</html>
392 Appendix A
assignment-nav.html
The second page, assignment-nav.html, contains the contents of the top frame,
including the JavaScript.
<html><head><title>nav</title>
<script type = "text/javascript">
<! hide me from older browsers
// function domainCheckAndGo()
// This function makes sure a URL is legal. If it is, it
// sends the visitor to that URL.
function domainCheckAndGo(the_url)
{
// split the URL into two parts, along the //
// there should be two parts to it, the protocol (for example, http:)
// and the address
var first_split = the_url.split('//');
if (first_split.length != 2)
{
alert("Sorry, there must be one // in a domain name");
return false;
}
// Now check to see if the URL is legal see the alerts in the
// if-then statement to see what the if-then statement is checking.
// If any of the conditions are violated, the script calls up an
// alert box explaining the error and then uses return to exit
// the function without changing the URL in the bottom frame.
if ((first_split[0] != 'http:') && (first_split[0] != 'https:'))
{
alert("Sorry, the domain must start with http:// or https://");
return false;
}
if (the_url.indexOf(' ') != -1)
{
alert("Sorry, domains can't have spaces");
return false;
}
// get everything after the http://
//
var two_slashes = the_url.indexOf('//');
var all_but_lead = the_url.substring(two_slashes + 2, the_url.length);
var domain_parts = all_but_lead.split('.');
if (domain_parts.length < 2)
{
alert("Sorry, there must be at least two parts to a domain name");
return false;
}
// Loop through all the parts of the domain, making
// sure there's actually something there for example,
// py com is not legal because there
// are three dots in a row.
Answers to Assignments 393
for (var loop = 0; loop < domain_parts.length; loop++)
{
if (domain_parts[loop] == '')
{
alert("Sorry, there must be some text after each .");
return false;
}
}
// If we've made it this far, the URL must be legal,
// so load the URL into the frame.
parent.contents.location = the_url;
}
// show me >
</script>
</head>
<body>
<table border = 0>
<tr><td>
Type a URL below, or
<br>
click on an area of the map.
<form onSubmit = "domainCheckAndGo(this.the_url.value); return false;">
<input type = "text" name = "the_url">
</form>
</td>
<td>
<img src = "src/left.gif" name = "left" isMap useMap = "#left">
</td>
</tr>
</table>
<MAP name = "left">
<AREA coords = "9,23,41,42" shape = "RECT" href = "#"
target = "thePicture"
onClick = "parent.contents.location = ' return
false;"
onmouseOver = "window.document.left.src='src/us.gif';"
onMouseOut = "window.document.left.src='src/left.gif';">
<AREA coords = "26,42,75,64" shape = "RECT" href = "#"
target = "thePicture"
onClick = "parent.contents.location = ' return
false;"
onmouseOver = "window.document.left.src='src/us.gif';"
onMouseOut = "window.document.left.src='src/left.gif';">
<AREA coords = "28,65,55,78" shape = "RECT" href = "#"
target = "thePicture"
onClick = "parent.contents.location = ' return false;"
onmouseOver = "window.document.left.src='src/mexico.gif';"
onMouseOut = "window.document.left.src='src/left.gif';">
</MAP>
</body>
</html>
394 Appendix A
blank.html
The third page, blank.html, is just a blank page which appears in the lower
frame.
<html><head><title>blank</title></head>
<body>
</body>
</html>
Chapter 12
This assignment asks you to use cookies to keep track of whether or not a user
has visited a web page. The solution below uses Webmonkey’s cookie library
to set and read a cookie named
was_here.
<html><head><title>Chapter 12 Assignment</title>
<script type = "text/javascript">
<! hide me from older browsers
// this is from the webmonkey cookie library at />//
function WM_readCookie(name) {
if(document.cookie == '') {
// there's no cookie, so go no further
return false;
} else {
// there is a cookie
var firstChar, lastChar;
var theBigCookie = document.cookie;
firstChar = theBigCookie.indexOf(name);
// find the start of 'name'
var NN2Hack = firstChar + name.length;
if((firstChar != -1) && (theBigCookie.charAt(NN2Hack) == '=')) {
firstChar += name.length + 1; // skip 'name' and '='
lastChar = theBigCookie.indexOf(';', firstChar); //
if(lastChar == -1) lastChar = theBigCookie.length;
return unescape(theBigCookie.substring(firstChar, lastChar));
} else {
// If there was no cookie of that name, return false.
return false;
}
}
}
// WM_readCookie
// Function setCookie() sets a cookie named was_here to expire far
// in the future.
//
function setCookie()
{
var the_future = new Date("December 31, 2023");
var the_cookie_date = the_future.toGMTString();
var the_cookie = "was_here=yes;expires=" + the_cookie_date;
document.cookie = the_cookie;
Answers to Assignments 395
}
// Function checkFirst() checks if the was_here cookie
// has been set. If it hasn't, the alert pops up and the
// cookie is set using setCookie();.
//
function checkFirstTime()
{
var the_date = WM_readCookie("was_here");
if(the_date == false)
{
alert("Welcome, newtimer!");
setCookie();
}
}
// show me >
</script></head>
<body>
<h1>My Page</h1>
<script type = "text/javascript">
<! hide me from older browsers
checkFirstTime();
// show me >
</script>
Don't you just love this page?
</body>
</html>
Chapter 13
This assignment asks you to create a bouncing smiley face screen saver using
Dynamic HTML. The script below uses two variables,
x_motion and y_motion, to
keep track of the horizontal and vertical directions in which the smiley face is
moving. These variables will either hold the value
"plus" or "minus". A "plus"
value calls for a number to be added to the current position. If the variable is
x_motion, adding a value will move the smiley face to the right. If the variable
is
y_motion, adding a value will move the smiley face down.
<html>
<head>
<title>Chapter 13 Assignment</title>
<script type = "text/javascript">
<! hide me from older browsers
// set the direction
//
var x_motion = "plus";
var y_motion = "plus";
// set the borders
//
var top_border = 100;
var bottom_border = 200;
var left_border = 100;
var right_border = 300;
396 Appendix A
// This function moves the face 5 pixels in the vertical dimension
// and 5 pixels in the horizontal dimension. It uses two variables,
// x_motion and y_motion, to determine the direction left versus
// right and up versus down. When the face reaches a horizontal or
// vertical border, the x_motion or y_motion variable changes, so that
// the next time the face moves, it moves in the opposite direction.
function moveSmile()
{
var the_smile = document.getElementById("smile").style;
if (x_motion == "plus")
{
the_smile.left = parseInt(the_smile.left) + 5;
} else {
the_smile.left = parseInt(the_smile.left) - 5;
}
if (y_motion == "plus")
{
the_smile.top = parseInt(the_smile.top) + 5;
} else {
the_smile.top = parseInt(the_smile.top) - 5;
}
if (parseInt(the_smile.left) > right_border)
{
x_motion = "minus";
} else if (parseInt(the_smile.left) < left_border) {
x_motion = "plus";
}
if (parseInt(the_smile.top) > bottom_border)
{
y_motion = "minus";
} else if (parseInt(the_smile.top) < top_border) {
y_motion = "plus";
}
theTimeOut = setTimeout('moveSmile()', 100);
}
// show me >
</script>
</head>
<body>
<form>
<input type = "button" value = "Make happiness bounce"
onClick = "moveSmile();">
<input type = "button" value = "Stop that smiley!"
onClick = "clearTimeout(theTimeOut);">
</form>
<div id = "smile" style = "position:absolute; left:100; top:100;">
<img src = "happy_face.gif" width = "130" height = "75">
</div>
</body>
</html>