THE BOOK OF JAVASCRIPT, 2ND EDITION phần 6 doc
Bạn đang xem bản rút gọn của tài liệu. Xem và tải ngay bản đầy đủ của tài liệu tại đây (831.44 KB, 42 trang )
250 Chapter 13
The word true inside the cloneNode() method means that you want to
clone the node and all its children. In this case it would be the table and all
the contents of the table. If for some reason you didn’t want to make a copy
of the children, you’d put
false there.
Once you’ve made your changes, you can replace the original table
with the new one using the
replaceNode() method. Like insertBefore() and
removeChild(), this method is called by the parent of the nodes to be replaced.
Given the
myTable and cloneTable variables defined above, you could do this:
var tableParent = myTable.parentNode;
tableParent.replaceChild(cloneTable, myTable);
Manipulating a Page Using the DOM
As mentioned earlier, you could do most of the things described in this
section with creative use of
innerHTML. However, sometimes dealing with the
complex strings needed to get
innerHTML to be what you want can be difficult.
In these cases, the DOM techniques are very helpful. When we get to the
chapters on Ajax, you’ll see even more applications of the DOM manipu-
lation techniques.
Fancy Event Handling
Dynamic web pages call for dynamic reactions to user actions. We’ve discussed
how to write JavaScript that reacts when users click links, buttons, and form
elements. Now it’s time to learn about more complicated event handling:
how to accurately read the keyboard and the mouse.
The event Object
Whenever an event occurs, an event object is generated. The nature of this
object depends on the event which generated it. To access the
event object,
simply pass the keyword
event to whichever function is handling the event:
<a href = "#" onClick = "handleClick(event); return false; ">Click me!</a>.
The event object is most frequently accessed when you want to know
which key a user has pressed, or precisely where the mouse is.
Keyboard Events
There are two main keyboard event handlers, the functions of which are
pretty obvious:
onKeyDown and onKeyUp. Triggering either of these event
handlers creates an
event object that stores which key has been pressed
(or unpressed) and whether or not any special keys (
ALT, CTRL, or SHIFT)
were pressed at the same time. The relevant properties of the
event object
appear in Table 13-2.
Dynamic HTML 251
Figure 13-18 is short script that demonstrates how to use the event object
to determine which key a user has pressed while in a text input field.
<html><head><title>Demonstrating Keyboard Events</title>
<script type = "text/javascript">
<! hide me from older browsers
function displayEvent(evt) {
var type = evt.type;
X var code = evt.keyCode;
Y var theChar = String.fromCharCode(code);
var alt = evt.altKey;
var ctrl = evt.ctrlKey;
var shift = evt.shiftKey;
Z var displayString = "event type: " + type + "; key code: " + code +
", which is the character " + theChar +
"; ALT, CTRL, and SHIFT were: " +
alt + ", " + ctrl + ", and " + shift + "\n\n";
[ if ((code >= 65) && (code <= 90)) {
document.getElementById("showEvents").value += displayString;
}
}
// show me >
</script>
</head>
<body>
<form>
Type here: <input type = "text"
\ onKeyDown = "displayEvent(event);" onKeyUp = "displayEvent(event);"><br>
See the events here: <textarea id = "showEvents" cols = "80" rows = "20">
</textarea>
</form>
</body>
</html>
Figure 13-18: Demonstrating keyboard events
Although the script in Figure 13-18 is simple, there are some subtleties.
First, whenever a user types anything while in the text field, the act of pressing
the key down creates one event, and the act of releasing the key creates
another event. These events are captured by the event handlers in \. In either
case, the
displayEvent() function is called. This function creates variables for
each of the event’s properties, combines them into a string, and then puts the
Table 13-2:
Properties for Keyboard Events
Property Type Description
altKey
boolean True if the ALT key was down when this key was pressed
ctrlKey
boolean True if the CTRL key was down when this key was pressed
shiftKey
boolean True if the SHIFT key was down when this key was pressed
keyCode
integer The Unicode decimal value for the key that was pressed; use
String.fromCharChode(keyCode) to convert this to a string
Type
string The type of event—keyup or keydown, for example
252 Chapter 13
resulting string into the textarea with the id of showEvents. The most interesting
lines in this function are X, which gets a number representing the character
being pressed, and Y, which converts that number into an actual character.
After those lines are executed, Z creates a string representing what happened
in the event and [ puts that string in the text area if the key being pressed is
a letter (letters have character code numbers between 65 and 90).
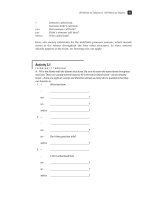
Figure 13-19 shows what happens when a and then A are typed into the
text field. Notice that in both cases, the
characterCode is 65, and the resulting
character is A. In order to determine whether the user has entered a capital
or lowercase letter, the
shiftKey property of the event must be examined.
Figure 13-19: Typing a and A into the Figure 13-18 script
Mouse Events
Mouse events have their own properties. Unfortunately, some cross-browser
differences complicate accessing the position of the mouse and determining
which mouse button was clicked. Table 13-3 shows the properties of mouse
events, and it gives some details about how to deal with cross-browser
differences.
Table 13-3:
Properties of Mouse Events
Property Description
button
Equals 2 if it’s a right-click—otherwise, it depends on the browser
clientX
Internet Explorer’s X position for the mouse
clientY
Internet Explorer’s Y position for the mouse
pageX
Most other browsers’ X position for the mouse
pageY
Most other browsers’ Y position for the mouse
Dynamic HTML 253
As you can see from Table 13-3, all the properties of mouse events are
browser dependent. The
button property, for example, describes which button
was clicked when an
onMouseDown or onMouseUp event happened. However, the
meaning of the numbers provided by the
button property depend on the
browser being used. In Internet Explorer, 1 means the left button was clicked,
2 means the right button, and 4 means the middle button. In most other
browsers, 0 means the left button, 1 means the middle button, and 2 means
the right button. Because 2 means the right button was clicked in both cases
and many people don’t have a middle button on their mouse, it is often safe to
see if the button property of the event was 2 and call it a left-click if it was not.
The position of the mouse is a bit trickier. Browsers other than Internet
Explorer generally use an event’s
pageX and pageY properties to give a number
representing the X and Y positions (in pixels) of the event relative to the
top-left corner of the browser window. These two properties take into con-
sideration scrolling a window. If a window is 10,000 pixels long and the user
has scrolled down to the very bottom, the
pageY property will be around
10,000 at the bottom of the window. Internet Explorer, on the other hand,
uses properties named
clientX and clientY. These properties do not take
scrolling into consideration, so to use them, you should add numbers repre-
senting how far down and to the left the browser has been scrolled. Those
numbers are available as
document.body.scrollTop and document.body.scrollLeft.
Figure 13-20 presents a script that determines the X and Y positions of a
mouse and puts the results in a textarea.
<html><head><title>Checking Mouse Position</title>
<script type = "text/javascript">
<! hide me from older browsers
function displayEvent(evt)
{
var x = 0;
var y = 0;
X if (evt.pageX) {
Y x = evt.pageX;
y = evt.pageY;
Z } else if (evt.clientX) {
[ x = evt.clientX + document.body.scrollLeft;
y = evt.clientY + document.body.scrollTop;
}
\ document.getElementById("results").value += x + " " + y + "\n";
}
// show me >
</script>
</head>
<body>
<div id = "box" style = "height:100px;width:100px;border:1px black solid;"
] onMouseMove = "displayEvent(event);"
^ onMouseOver = "document.getElementById('results').value='';"></div>
<form><textarea id = "results" cols = "80" rows = "20"></textarea></form>
</body>
</html>
Figure 13-20: Detecting the position of the mouse
254 Chapter 13
In Figure 13-20, moving inside the div calls the displayEvent() function
(]), and moving the mouse onto the
div clears the textarea that stores all
the mouse information collected (^). The
displayEvent() function first checks
to see if the browser knows about the
pageX property of the event (X). If so it
uses
pageX to get the x coordinate of the mouse, relative to the top-left corner
of the browser window (Y) and
pageY to get the y coordinate. If the browser
does not know about the
pageX property but does know about the clientX
property (Z), it uses
clientX and clientY. Notice in [ that the amount that
the browser has been scrolled to the right or down must be added to the
clientX and clientY property to account for scrolled windows. The last line
in the function (\) adds the appropriate information to the textarea with
the
id of results.
Adding Event Handlers Using JavaScript
Throughout this book, whenever we have wanted to trigger an event based
on a user’s behavior, we have put an event handler inside the triggering
element. For example, in Chapter 4, when we wanted an alert box to pop up
when a user clicked a link, we put an
onClick event inside the link:
<a href = "#" onClick = "alert('Thanks!');">Click me</a>
Putting event handlers inside the elements that trigger the events can
cause some problems:
z Doing so puts JavaScript inside your HTML elements rather than inside
<script> tags. This means that someone trying to understand your JavaScript
(and that person may be you) will have to hunt around in the HTML to
find all the various bits of JavaScript on the page.
z Sometimes you want a JavaScript function to be triggered by many ele-
ments. For example, if you have 20 checkboxes, each of which has an
onClick, you will need to stick the same code (onClick = "doFunction();")
in 20 different places. If the function’s name changes, or if you decide
to add a parameter to the function, you will need to change the page in
20 different places.
z You may want an event handler to be invoked in some cases, but not in
others. In the case of writing drag-and-drop code, a given object, such as
a
div, should only be moved if the mouse has been clicked while on that
object. In this case, the object’s
onMouseMove event should only trigger a
function when the appropriate object has been clicked.
For these reasons, modern browsers provide ways for JavaScript to attach
functions to the event handlers of objects. The template for this is:
element.handler = function;
Dynamic HTML 255
For example, to call a function named doAlert() whenever a div with
the
id of myDiv is clicked, use the following line:
document.getElementById("myDiv").onclick = doAlert;
This line is unusual for two reasons. First, the event handler (onClick)
is all lowercase. This is a requirement when assigning a function to a handler
in this way. Second, notice that the function does not have parentheses after
it. This means that no parameters may be passed to this function. However,
a function called in this way does have access to the event that called the
function, and it turns out that the event is almost always the only parameter
you need.
As with all things related to events, there are some browser incompati-
bilities involved with getting access to the
event object. In Internet Explorer,
the event is automatically stored in a variable named
event. To access the
event, just use the
event variable:
function doAlert() {
myEvent = event;
// do something with the myEvent variable
alert("Got the event!");
}
In most other browsers, the event is automatically passed as a parameter
to the function being called. This means that the function being called,
doAlert() in the example given, needs to have a parameter in its definition:
function doAlert(myEvent) {
// do something with the myEvent variable
alert("Got the event!");
}
Once the event object has been accessed inside a function, it is sometimes
helpful to retrieve information about the object that created the event. To do
this, Internet Explorer uses an
event object property called srcElement. Most
other browsers use a property named
target.
Figure 13-21 puts all this information together in a cross-browser script
for assigning functions to events using JavaScript.
<html><head><title>Cross-Browser Event Handling</title>
<script type = "text/javascript">
<! hide me from older browsers
function attachHandlers() {
X var theElements = document.getElementById("myForm").childNodes;
for (var loop = 0; loop < theElements.length; loop++) {
Y if ((theElements[loop].nodeName == "input") ||
(theElements[loop].nodeName == "INPUT")) {
Z theElements[loop].onclick = doAlert;
}
}
256 Chapter 13
}
[ function doAlert(evt) {
var thisBox;
\ if (!evt) {
evt = event;
thisBox = evt.srcElement;
] } else {
thisBox = evt.target;
}
alert('You clicked on ' + thisBox.name);
}
// show me >
</script>
</head>
^ <body onLoad = "attachHandlers();">
<form id = "myForm">
_ <input type = "checkbox" name = "1"><input type = "checkbox" name = "2">
<input type = "checkbox" name = "3"><br>
<input type = "checkbox" name = "4"><input type = "checkbox" name = "5">
<input type = "checkbox" name = "6"><br>
</form>
</body>
</html>
Figure 13-21: Cross-browser script for attaching functions to event handlers
The script in Figure 13-21 creates a set of six checkboxes, each with a
different name. Clicking any of these checkboxes results in an alert box pro-
viding the name of the checkbox that was just clicked. Notice that the HTML
describing the checkboxes contains no
onClick handlers (_). This is because
the handlers are assigned using JavaScript. The
onLoad handler inside the
<body> tag (^) triggers the function which assigns the handlers. The function
is called by the
onLoad handler because an HTML element cannot have a func-
tion attached to its handler until the web browser knows about the element.
If a piece of JavaScript tries to attach a handler to a form element that has
not yet been processed by the browser, an error will result. For this reason,
it’s best to wait until all the elements have been loaded before assigning
functions to their handlers.
The
attachHandlers() function has several interesting aspects. First, it uses
the DOM methods covered earlier in the chapter to access the checkboxes.
These checkboxes are child elements of the form element, and so they are
accessible as the
childNodes of the form (X). The childNodes property returns
an array, which is then looped through. Each time through the loop, the
JavaScript checks the next element in the array to see if it is an
input element.
Notice that both the strings
INPUT and input are checked. This is because some
Dynamic HTML 257
browsers capitalize element names and other browsers don’t. For each input
element found, Z attaches the
doAlert() function to the element’s onclick
handler.
Once the handlers have been attached, the page waits until a checkbox is
clicked. When that happens, the
onclick event is triggered, and the doAlert()
function is called. Notice that the definition of
doAlert() contains a parameter
([). In Firefox and most other browsers, this parameter will be filled with
an
event object that contains information about the event that caused the
doAlert() function to be called. If that parameter is not filled in, it means the
user is most likely using Internet Explorer. In this case, \ is true. The
evt
variable is set to the Internet Explorer variable
event, and thisBox is set to the
checkbox that was clicked using Internet Explorer’s
srcElement property. If
Firefox, or some other browser was used instead, the function’s
evt parameter
would already contain the
event object, and we’d only need to set thisBox to
the checkbox that was clicked by accessing the
target property (]).
One final note about assigning functions to event handlers using
JavaScript: If for some reason you want to remove an event handler from
an object, simply set the handler’s value to
null. Here’s an example:
document.getElementById("myDiv").onclick = null;
Drop-Down Menus
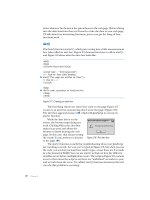
I’ll close this chapter by showing how to build a basic drop-down menu
with DHTML. The menu shown in Figure 13-22 has three links: Dogs,
Cats, and Birds. Mousing over Cats
<html><head><title>Drop-Down Menus</title>
<script type = "text/javascript">
<! hide me from older browsers
X var div_array = new Array("divOne", "divTwo", "divThree");
function changeDiv(the_div, the_change)
{
Y document.getElementById(the_div).style.visibility = the_change;
causes a submenu to drop down with
the names of several cat breeds. Click-
ing one of those links sends the browser
to a web page about that kind of cat.
Figure 13-23 shows the code
that drives this drop-down menu. I’ve
already covered everything you must
know to understand this code, so take
a look at it, and see if you can figure
out how it works before reading my
explanation.
Figure 13-22: A drop-down menu
258 Chapter 13
}
function closeAll()
{
Z for (var loop = 0; loop < div_array.length; loop++)
{
changeDiv(div_array[loop], "hidden");
}
}
// show me >
</script>
</head>
<body>
<div id = "top1" style = "position:absolute; top:20; left:0; z-index:1">
[ <a href = "#"
onMouseOver = "closeAll(); changeDiv('divOne','visible');">Dogs</a>
</div>
<div id = "top2" style = "position:absolute; top:20; left:40; z-index:1">
<a href = "#"
onMouseOver = "closeAll(); changeDiv('divTwo','visible');">Cats</a>
</div>
<div id = "top3" style = "position:absolute; top:20; left:80; z-index:1">
<a href = "#"
onMouseOver = "closeAll(); changeDiv('divThree','visible');">Birds</a>
</div>
<div id = "rightBorder" style = "position:absolute; top:20; left:50;">
<a href = "#"
onMouseOver = "closeAll();"><img src = "long_spacer.gif" border = 0></a>
</div>
<div id = "bottomBorder" style = "position:absolute; top:80; left:0;">
\ <a href = "#"
onMouseOver = "closeAll();"><img src = "long_spacer.gif" border = 0></a>
</div>
] <div id = "divOne" style =
"position:absolute; top:40; left:0; visibility:hidden;">
<a href = "#">Collie</a><br>
<a href = "#">Puli</a><br>
<a href = "#">Corgie</a><br>
</div>
<div id = "divTwo" style =
"position:absolute; top:40; left:80; visibility:hidden">
<a href = "#">Siamese</a><br>
<a href = "#">Manx</a><br>
<a href = "#">Calico</a><br>
</div>
<div id = "divThree" style =
"position:absolute; top:60; left:80; visibility:hidden">
<a href = "#">Parakeet</a><br>
<a href = "#">Finch</a><br>
<a href = "#">Canary</a><br>
</div>
</body>
</html>
Figure 13-23: A basic hierarchical menu
Dynamic HTML 259
Line-by-Line Analysis of Figure 13-23
A drop-down menu has a div for each menu option. The nine divs in
Figure 13-23 include one
div for each top-level menu element ([), one for
each submenu (]), one for the bottom border, and one for the right border.
Each time a visitor mouses over one of the main menu options, only the sub-
menu matching the link most recently moused over is shown. If the visitor
mouses over Cats, making the list of cat breeds visible, and then mouses
over Dogs, the
closeAll() function hides the Cats submenu and changeDiv()
displays the Dogs submenu. Mousing over the bottom or right border closes
all the submenus.
The closeAll() Function
The closeAll() function loops through the array of divs defined in X. Each
time through the loop in Z,
closeAll() calls the changeDiv() function to hide
one of the
divs.
The changeDiv() Function
The changeDiv() function takes two parameters: the name of a div to change,
and whether to make the
div hidden or visible. Line Y changes the visibility
of the specified
div to visible or hidden, depending on the value of the sec-
ond parameter of
changeDiv().
The Borders
The menu’s bottom border is a long transparent (and therefore invisible)
GIF (\). The code in \ dictates that mousing over this invisible GIF hides
all submenus. This GIF and the blank GIFs on the right of the menus make
sure the submenu vanishes if the visitor’s mouse leaves the menu area
completely.
Figure 13-23 offers a basic example of how you might implement a hier-
archical menu. For more complete versions, check out the menu and naviga-
tion section of Dynamic Drive’s website. Fortune magazine’s website used this
one: />Summary
DHTML is the topic of several excellent books—what we’ve discussed here
should just whet your appetite. But you have learned a few DHTML basics,
including the following:
z How to use divs to create blocks of HTML
z How to add styles to divs
z How to make divs, along with the HTML they contain, visible or invisible
z How to move divs
260 Chapter 13
z How to animate divs with timed loops
z How to use DOM methods to alter HTML documents
z How to read keyboard and mouse events
z How to create a basic hierarchical menu
If you understood all that, you shouldn’t have any problem with the
assignment.
Assignment
Create a DHTML screensaver like the one shown in Figure 13-24. The smiley
face in the figure continually bounces around the screen. When it hits one of
the walls, it bounces off at a random angle. To make the smiley face move
diagonally, change its
top and left positions in a timing loop. To get it to
bounce off a wall, make it change directions when it hits one side of the
screen. Remember, to make the smiley move right, you would add to its
left
property, and to make it move left, you would subtract from its
left property.
Figure 13-24: A screensaver created with
JavaScript
AJAX BASICS
Ajax (Asynchronous JavaScript and XML)
helps create web pages that act like desktop
applications. By combining DHTML with the
ability to download and display information from
a webserver while a user is still interacting with a web
page, Ajax puts an end to the old submit-and-wait cycle
common to most interactive websites.
If you’ve used Google Maps (), you’ve seen Ajax
in action. There are also Ajax versions of word processors, spreadsheets, and
other common applications. Like DHTML, Ajax is a complex topic and is the
focus of a number of books. However, with the JavaScript you’ve learned so
far, and a few other details, you will be well on your way to becoming a master
of Ajax.
This chapter introduces Ajax, including:
z An overview of Ajax and the technologies it encompasses
z The A in Ajax—Asynchronicity—and why you need it
z The basic JavaScript you’ll need for Ajax
262 Chapter 14
z Browser compatibility issues
z Potential pitfalls when using Ajax
z When to use Ajax and when to avoid it
z How to set up a webserver and write server-side programs that
communicate with Ajax
This chapter tells only part of the Ajax story. In Chapter 15 you’ll learn
about the X in Ajax (which stands for the data transfer standard XML), and
how to read and navigate XML documents in JavaScript and use them in
Ajax applications.
A Real-World Example of Ajax
The best-known example of Ajax may be Google Maps (maps.google.com).
Figure 14-1 shows you the map which results from searching for the office of
No Starch Press. The map is very interactive; you can zoom in, zoom out, and
pan around without having to reload the page. A smaller map in the bottom-
right corner of the main map shows you the larger context of the map you’re
viewing. A blue box in the smaller map moves around as you pan across the
large map.
Figure 14-1: Google Maps
The map’s interface can mark places you ask about, such as No Starch
Press in Figure 14-1, and show directions between two points. For example,
Figure 14-2 shows the route between the office and El Metate, one of my
favorite Mexican restaurants in San Francisco. All of this interactivity involves
frequent trips to Google’s webservers without the user seeing the page
reload.
Ajax Basics 263
Figure 14-2: Getting directions with Google Maps
Introduction to Ajax
The term Ajax was coined by Jesse James Garrett
1
to describe a general
approach to creating web applications. This approach involves the
following steps:
1. An event, such as a user moving the mouse or typing into an input field,
triggers one or more simultaneous requests to a webserver for more
information.
2. While the webserver is processing the requests, the web browser goes
about its business as usual, allowing the user to continue interacting with
the web page.
3. The result from each request appears once the webserver has processed
that request, and it is used to update the web page using the DHTML
techniques you learned in Chapter 13.
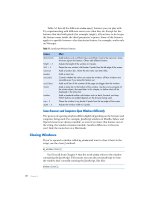
Figure 14-3 shows how Ajax works and how it differs from the traditional
style of communication between web browsers and webservers.
In the traditional style of browser-server communication, a user clicks
a link or submits a form in a web browser. This causes the browser to send a
request for information to a webserver: either the web page named in the
href attribute of the link, or the results of a program or script named in the
action attribute of the <form> tag. Once the request is sent, the browser sits
idly, usually animating an icon in the upper-right corner of the window, and
the user waits for the webserver to respond to the request. Eventually the
server responds, and the web page reloads, presenting new information.
1
For Garrett’s original essay on Ajax, see />archives/000385.php.
264 Chapter 14
Figure 14-3: Ajax versus traditional communications between a web browser
and a webserver
In the Ajax style, on the other hand, the browser makes a request from
the webserver without the user knowing about the request. The icon in the
browser’s corner doesn’t spin, and the browser can still be used. When
the response comes back from the webserver, the information displayed
in the web browser is updated without reloading the page. The entire process
occurs without causing a pause in the user’s interactions with the web page.
Asynchronicity—The A in Ajax
The A in Ajax stands for asynchronous, which in this context means something
like non-waiting. In asynchronous communication (the After Ajax part of Fig-
ure 14-3), the browser sends a request to a webserver and does not wait for
the reply. Many asynchronous requests can be made simultaneously, and the
browser deals with the responses as they come from the webserver. In contrast,
the traditional style of browser-server communication described in the Before
Ajax part of Figure 14-3 is synchronous; that is, the browser submits a request
to a webserver and then waits for a reply, unable to send any other requests
until the server responds.
Before Ajax After Ajax
User submits form to webserver.
Moving off a text field sends
the server a secret message.
User waits while webserver thinks.
( . . . ) ( . . . )
The server thinks. Meanwhile, the
user keeps playing with the page.
Browser page reloads; user can continue.
Page is updated, but doesn’t reload.
User has not stopped enjoying the page.
Server done; sends answer back.
!
Server done; sends answer back.
User is still uninterrupted.
!
Ajax Basics 265
An example of asynchronicity can be seen when you download a web
page and watch images appearing on the page at different times. The images
are requested simultaneously, and the browser displays them as it receives
them. While this sort of asynchronicity is built in to all but the oldest web
browsers, until recently JavaScript programmers couldn’t control asynch-
ronous communications with webservers. This all changed with the addition
of a new JavaScript object called the request object.
XML—The X in Ajax
The X in Ajax stands for XML. Since the publication of the XML standard in
1998, XML has become the format for sharing structured text-based infor-
mation between computers. As we will see, browsers have built-in ways for
dealing with information that has been formatted as XML documents. This,
and the ubiquity of XML documents, makes XML a great format for sharing
information between web browsers and webservers.
JavaScript—The J in Ajax
Ajax uses JavaScript to create requests, send them to webservers, parse the
XML results, and update web pages accordingly. The rest of the chapter
describes how to use JavaScript to create and send requests, and deal with
the asynchronous nature of the requests.
Creating and Sending Requests
The key to implementing the Ajax-style communication described above is the
JavaScript request object, which is built into Internet Explorer 6.0 and later,
Firefox 0.8 and later, Opera 7.54 and later, and Safari 1.2.2 and later. Your
JavaScript can use this request object to query a webserver for information,
store the returned information, and update the page when the server has
provided the information.
There are four steps involved in using JavaScript to make an Ajax request:
1. Creating a request object
2. Telling the request object where to send the request
3. Telling the object what to do when the request is answered
4. Telling the object to make the request
Creating a Request Object
The first step in making an Ajax request is to create a request object. Sadly,
there is a little bit of browser incompatibility involved in creating this object.
In Internet Explorer,
2
a request object is created like this:
var request = new ActiveXObject("Microsoft.XMLHTTP");
2
It’s possible to get slightly different versions of the request object from different versions of IE.
You only need to do this for fancy Ajax tricks that are beyond the scope of this discussion.
266 Chapter 14
In browsers other than Internet Explorer, do this:
var request = new XMLHttpRequest();
Putting these together gives this:
var request = null;
if (window.XMLHttpRequest) {
request = new XMLHttpRequest();
} else if (window.ActiveXObject) {
request = new ActiveXObject("Microsoft.XMLHTTP");
}
Once this block of JavaScript has executed, the request variable will contain
a request object.
Telling the Object Where to Send the Request
The request object will request information from some resource. Usually,
that resource will be the webserver that served up the web page containing
the JavaScript making the request. In this case, the request object needs to
know the URL of a program or script that lives on the webserver (known as
a server-side program). This server-side program will process the request and
respond with the requested information. (Chapter 16 will focus more on
server-side Ajax.)
If you don’t have access to a webserver, you can instead ask the request
object to request a file that lives in the same directory as the file containing
the JavaScript making the call. To request a file, the request object simply
needs to know the file’s name, such as my_file.txt. Here’s how to tell a request
object to request the file named my_file.txt:
request.open("GET", "my_file.txt");
The open method of the request object takes two parameters. The first
parameter is the type of request you want to make (
GET, POST, HEAD, and so on).
I’ll discuss the difference between these in Chapter 16; for now, we’ll only
use
GET.
The second parameter is a string that tells the object where to send the
request. If the resource is password protected, the username and password
can be provided as two additional (optional) parameters, like so:
request.open("GET", "my_file.txt", username, password);
What to Do When the Request Is Answered
As described in the introduction, a key feature of Ajax is asynchronicity. After
a request object makes a request, the web browser is free to do whatever it
wants, which may involve creating more request objects to make additional
requests. Each request object is responsible for tracking the process of making
Ajax Basics 267
its request, waiting for a reply, and realizing when all the information provided
in response to the request has been completely downloaded. Your task as a
JavaScript coder is to tell each request object what it should do when the
requested resource has been completely downloaded, using a special prop-
erty of the request object called its
readyState.
As the request object moves through its stages, from creation, to being
told about where to send the request, to sending the request, and so on, the
value of the
readyState property changes. The property is called readyState
because each stage of a request object is called its state. Table 14-1 lists the
values the
readyState property can take and what they mean.
The main trick in Ajax is to write a special function that is called whenever
the
readyState property changes value. To define this function and make
sure it is called when the request object’s
readyState property changes, do
something like this:
request.onreadystatechange = function() {
alert("the state has changed!");
}
There’s actually a lot happening in the code fragment above, so let’s go
slowly. The part of this JavaScript before the period refers to the request
object we’ve created. The part following the period,
onreadystatechange, is an
event handler of the object.
We’ve seen plenty of event handlers before:
onClick, onMouseOver, and
so on. These handlers are part of the objects. For example, a form button
(
<input type = "button">) will have an onClick handler, which is triggered
whenever a user clicks the button. We’ve used these handlers by referring
to them inside the HTML tag. For example, the tag
<input type = "button"
onClick = "myFunction();">
will attach the function myFunction() to the
button’s
onClick event handler.
Just as a button has an
onClick handler, the request object has a handler
called
onreadystatechange, which is called automatically whenever the value of
the request object’s
readyState property changes. And, just as we can attach a
function to the button’s
onClick handler, we can attach a function to the
onreadystatechange handler.
Table 14-1:
Values of a Request Object’s readyState Property
Property Value State Name Description
0 Uninitialized The object has been created but not told about the request:
open() has not been called.
1 Loading The object knows about the request but has not sent it yet:
send() has not been called.
2 Loaded The request has been sent, and basic information about
the response is available.
3 Interactive The response is being loaded into the request object.
4 Completed The entire response has been loaded into the request
object and is now available.
268 Chapter 14
However, in contrast to the button’s handler, we don’t stick the function
into an HTML tag. Instead, we set the
onreadystatechange handler equal to
something called an anonymous function. This function has no name; it is
simply called
function. By setting this handler equal to this anonymous
function we ensure that whenever the request object’s
readyState property
changes, the function—that is, the code in the braces—is called. It looks
weird, but you’ll get used to it.
Writing JavaScript That Is Called After the Request Has Been Answered
A request object begins life with a readyState of 0. Calling request.open()
tells the request object where to send the request, and switches the object’s
readyState to 1. Because the readyState has changed, the anonymous function
attached to the
onreadystatechange handler is called.
Usually, you don’t want your JavaScript to do anything special at this
point, so the function should not do anything when the
readyState has been
changed to 1. In fact, the function usually does not do anything until the
readyState has changed to 4, which, as you can see in Table 14-1, means that
the request has been answered and that all the information sent by the server
has been downloaded into the object. Once
readyState 4 is reached, the
function is ready to do something with the data.
Because JavaScripts usually don’t do anything until the request object
reaches a
readyState of 4, the anonymous function often looks something
like this:
request.onreadystatechange = function() {
if (request.readyState == 4) {
alert("Download complete! ");
}
}
In the code above, the alert is called only after the request’s readyState
property changes to 4. The anonymous function is actually called when
the property changes from 0 to 1, 1 to 2, and 2 to 3, but because of the
if-then
statement, the
alert is called only when the readyState changes to 4. Although
this code sample calls an
alert, more typically the JavaScript inside the if-then
statement will do something with the information that has been downloaded
into the request object. We’ll see examples of this soon.
Sending the Request
Once you’ve told the request object where to send the request and what to
do when the request has been answered, it’s time to tell the request object to
send the request, like so:
request.send(null);
Ajax Basics 269
This command sends the request using the request object’s send method.
The single parameter of the
send method contains information (for example,
form information) to send to a webserver when making a
POST request.
Because the request we’re making is of type
GET (remember the first param-
eter of the
request.open() method), the parameter of the send method is set
to
null, which is a predefined term meaning “no information.”
Putting Everything Together
Figure 14-4 combines everything covered so far in one function, which
includes creating the request object, telling it where to send the request,
providing the anonymous function that is to be triggered when the request
object changes state, and sending the request.
<html><head><title>A Simple Ajax Script</title>
<script type = "text/javascript">
<! hide me from older browsers
X function doAjaxCall(the_request) {
var request = null;
Y if (window.XMLHttpRequest) {
request = new XMLHttpRequest();
} else if (window.ActiveXObject) {
request = new ActiveXObject("Microsoft.XMLHTTP");
}
Z if (request) {
[ request.open("GET", the_request);
\ request.onreadystatechange = function() {
] if (request.readyState == 4) {
document.getElementById("resultDiv").innerHTML =
"All done!";
}
}
^ request.send(null);
} else {
_ alert("Sorry, you must update your browser before seeing Ajax in action.");
}
}
// show me >
</script>
</head>
<body>
<form>
` <input type = "button" value = "Make Ajax Request"
onClick = "doAjaxCall('sample.txt'); return true;">
</form>
a <div id = "resultDiv"></div>
</body>
</html>
Figure 14-4: A simple Ajax script
270 Chapter 14
The action begins when the user clicks the button in `, which calls the
doAjaxCall() function (X) and sends it the name of a file to read.
NOTE In general, a URL would go in here, but because I’m not assuming you have access to
a webserver, we’re just going to read a file that lives in the same directory as the file
containing this JavaScript.
The
doAjaxCall() function creates a new request object (Y), which is
either an
XMLHttpRequest object or an ActiveXObject object. If the browser
reading the JavaScript knows what the
XMLHttpRequest object is, it will create
a new object of this type; if instead it knows what the
ActiveXObject is, it will
create a new object of this type. If the browser doesn’t know either of these
objects, request will stay equal to
null.
In Z, we make sure that a request object was created. If not, _ lets the
user know that he or she needs a browser upgrade.
If a request object was created, [ tells it where to send the request. The
function to call when the
readyState property of the request object changes is
declared in \. This function says, “If the request is in state 4, the request object
has sent the request and received an answer; put the All done! message into the
div with the id of resultDiv (]).”
Finally, the request object makes the request in ^, which begins the
process of downloading the requested text file. The request object then goes
through its five states, and each state change triggers the anonymous function.
Once the request object is in state 4, the anonymous function writes All done!
into the
div.
The magic in all of this is that while the request object is performing the
query and getting the results, the browser does not freeze up and the page
does not reload. And that is the beauty of Ajax.
Getting the Results
The code in Figure 14-4 performs the request, retrieves the results, and puts
All done! into the
div; it doesn’t actually display the retrieved results. It’s as if
I asked you what you wanted for dinner and ignored what you said.
Usually, once the request object has entered state 4, you will want to look
at the information the object has retrieved. This information is stored in one
or two properties of the request object: The
responseText property of the object
always contains a text string with the results, and if the response is an XML
document, the
responseXML property of the request contains an XML object
representing the results (more on this in Chapters 15 and 16). If the response
is not an XML document,
responseXML will contain the value null.
To put the results of the query into the
div in a in Figure 14-4, change
the body of the
if-then statement in ] to
document.getElementById("resultDiv").innerHTML = request.responseText;
Ajax Basics 271
Demonstrating Asynchronicity
Now it’s time to have a deeper look at asynchronicity. Figure 14-5 demonstrates
how two request objects can download files asynchronously. Here, clicking
the Start Downloading button downloads two files, shortWait and longWait,
which take different amounts of time for a webserver to process. The JavaScript
behind this figure (shown in Figure 14-6) requests the file that takes the
longest to process (longWait) first, and then requests the one that takes less
time to process (shortWait).
Figure 14-5: Demonstrating asynchronicity
Were these files to be downloaded synchronously, the script would down-
load the slowest file—longWait—first, and then the quickest file, shortWait
(because that’s the order in which they were requested). However, because
these files are loaded asynchronously, all requests happen simultaneously.
This means that shortWait will be downloaded before longWait.
Each line in the figure shows the name of the file being downloaded and
the number of seconds it took to download. What you can’t see in the figure
is that each of the lines appeared on the web page as the file is downloaded:
the first line 1.2 seconds after the button was clicked, and the next line about
4 seconds later.
Now let’s have a look at the code behind Figure 14-5 to see how the magic
works. Figure 14-6 reveals the trick.
NOTE Before you can try out this example or most of the examples in Chapters 15, 16, and 17,
you’ll need to set up a webserver and PHP on your local computer. If you don’t already
have a webserver and PHP on your local machine, refer to “Setting Up a Webserver
and PHP” on page 273. If you already have a webserver running on your machine,
it has PHP installed, and you know where the webserver’s top-level document directory
is, you can try running the script in Figure 14-6. To do so, put the files longWait.php,
shortWait.php, and Fig14-06.html in a directory named boj, and put that directory in the
top-level directory of your webserver. Then browse to http://localhost/boj/Fig14-06.html.
If that doesn’t work, try http://127.0.0.1/boj/Fig14-06.html. If that doesn’t work either,
you should refer to your webserver’s manual to determine how to connect with your
webserver. The files longWait.php, shortWait.php, and Fig14-06.html are available
at />272 Chapter 14
<html><head><title>Demonstrating Ansynchronicity</title>
<script type = "text/javascript">
<! hide me from older browsers
X function demoAsync() {
var now = new Date();
downloadFile("longWait", now );
downloadFile("shortWait", now);
}
Y function downloadFile(the_request, start_time) {
var request = null;
if (window.XMLHttpRequest) {
request = new XMLHttpRequest();
} else if (window.ActiveXObject) {
request = new ActiveXObject("Microsoft.XMLHTTP");
}
if (request) {
request.open("GET", "http://localhost/boj/" + the_request +
".php");
Z request.onreadystatechange =
function() {
if (request.readyState == 4) {
[ document.getElementById("resultDiv").innerHTML +=
"File " + the_request + " was downloaded in " +
\ getExpiredTime(start_time) + " seconds <br>";
}
}
request.send(null);
} else {
alert("Sorry, you must update your browser before seeing" +
" Ajax in action.");
}
}
] function getExpiredTime(start_time) {
var then = start_time.getTime();
var now = new Date();
var now_time = now.getTime();
var diff = (now_time – then) / 1000;
return diff
}
// show me >
</script>
</head>
<body>
^ <form><input type = "button"
onClick = "demoAsync(); return true;" value = "Start Downloading"></form>
<div id = "resultDiv"></div>
</body>
</html>
Figure 14-6: Asynchronicity in Ajax
Ajax Basics 273
Line-by-Line Analysis of Figure 14-6
The action starts when a user clicks the button in ^, which calls the demoAsync()
function in X. This function creates a new
Date object that tracks the time
when the function was called, and then it calls the
downloadFile() function
twice (once for each file we want to download). Notice that the function
asks for the largest file, longWait, first and the smallest file, shortWait, next.
The
downloadFile() function that starts in Y looks like a typical Ajax func-
tion. It begins by trying to create a new request object, and if that succeeds, it
tells the request which resource to access.
The anonymous function that is called when the request changes its state
is defined in Z. This function says that we should add some information to
the contents of the
div named resultDiv ([) once the request has completed
(that is, when the request object’s
readyState property equals 4). The informa-
tion added is the name of the requested file and the time it took to download.
Line \ calls
getExpiredTime() to determine how long (in seconds) it took to
download the file.
SETTING UP A WEBSERVER AND PHP
Below you’ll find some resources for setting up the Apache webserver and PHP on
your desktop machine. Apache has been the most popular webserver on the Internet
for more than 10 years. It is very robust, has loads of features, and works on all
modern Windows, Macintosh, and Unix (including the major flavors of Linux) operat-
ing systems. In the spirit of full disclosure, I should mention that my cousin, Robert S.
Thau, was one of the original authors of Apache. Hooray, Robert!
For Windows and Linux
If you are using Windows 98, NT, 2000, or XP, or a major version of Linux
(Debian, Mandrake, Red Hat, or SuSE), you can install Apache and PHP
using one easy package called XAMPP from Apache Friends. The package
is available at and at http://
www.bookofjavascript.com/Freeware/xampp. The useful MySQL database
and a few other things are also included. If you want to get up and running
quickly, I suggest you use XAMPP.
For Macintosh OS X Server
If you’re running the Macintosh OS X Server operating system (http://www
.apple.com/server/macosx)—which is different from its desktop operating system—
you already have Apache and PHP installed. See your OS X Server documentation
for details on how to get it operational.
For Macintosh OS X Standard
If you’re not running OS X Server, there is a simple package for setting up Apache,
PHP, and MySQL on the Macintosh. It’s called MAMP, and it’s available at http://
mamp.info and at />274 Chapter 14
Next up, getExpiredTime() (]) is passed a Date object that represents the
time when the
demoAsync() function was called. The getTime() method of this
Date object returns the number of milliseconds between January 1, 1970,
and the time represented by the object (
getTime() was described in Table 2-1).
Next, a
Date object that represents the current date and time is created, and
getTime() calculates the number of milliseconds between the current time
and January 1, 1970; the difference between these two numbers is the time
(in milliseconds) that has passed since the
demoAsync() function was called
and the request object completed its download of the requested file. That
number is divided by 1,000 (1,000 milliseconds in a second) to get a time in
seconds.
Ajax and Usability
There are many good examples of Ajax (Google Maps, Flickr, and Google
Suggest, to name a few), but it is very easy to create a confusing and difficult-
to-use Ajax application. Below is a list of some roadblocks that you may
encounter along your road to implementing excellent Ajax.
The Back Button
Web users are accustomed to using their browser’s back button to return to
pages they’ve just seen. Unfortunately, unless special care is taken, the back
button does not work as expected in Ajax applications. For example, if you
click the left side of a Google map and drag it to the right side of the screen,
the map will change, but clicking the browser’s back button won’t return the
map to its previous state. Instead, because all of an Ajax application happens
on a single web page, clicking back will take you off that web page. In the case
of Google Maps, this may take you out of Google Maps entirely. You can use
many of the Ajax frameworks described in Appendix B to help make the
browser’s back button work in ways that will make more sense to your visitors.
Dojo (), Backbase (), and
RSH (
are three examples of such libraries.
URLs and Bookmarking
Web page URLs can be written down, sent to friends, and bookmarked.
However, because the URL of a web page for an Ajax application does not
change as the contents of the page change (all updates happen on the same
page), special care must be taken to create URLs that can be bookmarked
and emailed. Again, you’ll find solutions to this problem in the Ajax frame-
works in Appendix B.
Poor Design
People who have been browsing web pages for any length of time are
probably all too familiar with the usual submit-wait-reload method of web
interaction. In this style of communication, the entire web page updates