Thinking in C# phần 8 ppt
Bạn đang xem bản rút gọn của tài liệu. Xem và tải ngay bản đầy đủ của tài liệu tại đây (565.83 KB, 85 trang )
574 Thinking in C# www.ThinkingIn.NET
int id = instanceCounter++;
internal TwoState(){
this.Text = State;
System.EventHandler hndlr =
new System.EventHandler(buttonClick);
this.Click += hndlr;
}
bool state = true;
public string State{
get {
return(state == true) ? "On" : "Off";
}
set{
state = (value == "On") ? true : false;
OnStateChanged();
}
}
private void buttonClick(
object sender, System.EventArgs e){
changeState();
}
public void changeState(){
state = !state;
OnStateChanged();
}
public void OnStateChanged(){
Console.WriteLine(
"TwoState id " + id + " state changed");
this.Text = State;
}
}
class ChristmasTree : Panel {
bool allOn;
internal bool AllOn{
get { return allOn;}
Chapter 14: Programming Windows Forms 575
}
public ChristmasTree(){
TwoState ts = new TwoState();
ts.Location = new Point(10, 10);
TwoState ts2 = new TwoState();
ts2.Location = new Point(120, 10);
Add(ts);
Add(ts2);
BackColor = Color.Green;
}
public void Add(TwoState c){
Controls.Add(c);
c.Click += new EventHandler(
this.TwoClickChanged);
}
public void AddRange(TwoState[] ca){
foreach(TwoState ts in ca){
ts.Click += new EventHandler(
this.TwoClickChanged);
}
Controls.AddRange(ca);
}
public void TwoClickChanged(
Object src, EventArgs a){
allOn = true;
foreach(Control c in Controls){
TwoState ts = c as TwoState;
if (ts.State != "On") {
allOn = false;
}
}
if (allOn) {
BackColor = Color.Green;
} else {
BackColor = Color.Red;
}
}
576 Thinking in C# www.MindView.net
}
class PACForm : Form {
ChristmasTree p1 = new ChristmasTree();
ChristmasTree p2 = new ChristmasTree();
public PACForm(){
ClientSize = new Size(450, 200);
Text = "Events & Models";
p1.Location = new Point(10,10);
p2.Location = new Point(200, 10);
Controls.Add(p1);
Controls.Add(p2);
}
static void Main(){
Application.Run(new PACForm());
}
}///:~
When run, if you set both the buttons within an individual ChristmasTree
panel to “On,” the ChristmasTree’s background color will become green,
otherwise, the background color will be red. The PACForm knows nothing
about the TwoStates within the ChristmasTree. We could (and indeed it
would probably be logical) change TwoState from descending from Button to
descending from Checkbox and TwoState.State from a string to a bool and
it would make no difference to the PACForm that contains the two instances of
ChristmasTree.
Presentation-Abstraction-Control is often the best architecture for working with
.NET. Its killer advantage is that it provides an encapsulated component. A
component is a software module that can be deployed and composed into other
components without source-code modification. Visual Basic programmers have
enjoyed the benefits of software components for more than a decade, with
thousands of third-party components available. Visual Studio .NET ships with a
few components that are at a higher level than just encapsulating standard
controls, for instance, components which encapsulate ADO and another which
encapsulates the Crystal Reports tools.
PAC components need not really be written as a single class; rather, a single
Control class may provide a single public view of a more complex namespace
Chapter 14: Programming Windows Forms 577
whose members are not visible to the outside world. This is called the Façade
design pattern.
The problem with PAC is that it’s hard work to create a decent component. Our
ChristmasTree component is horrible – it doesn’t automatically place the
internal TwoStates reasonably, it doesn’t resize to fit new TwoStates, it doesn’t
expose both logical and GUI events and properties… The list goes on and on.
Reuse is the great unfulfilled promise of object orientation: “Drop a control on
the form, set a couple of properties, and boom! You’ve got a payroll system.” But
the reality of development is that at least 90% of your time is absolutely
controlled by the pressing issues of the current development cycle and there is
little or no time to spend on details not related to the task at hand. Plus, it’s
difficult enough to create an effective GUI when you have direct access to your
end-users; creating an effective GUI component that will be appropriate in
situations that haven’t yet arisen is almost impossible.
Nevertheless, Visual Studio .NET makes it so easy to create a reusable component
(just compile your component to a .DLL and you can add it to the Toolbar!) that
you should always at least consider PAC for your GUI architecture.
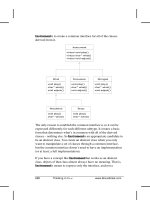
Model-View-Controller
Model-View-Controller, commonly referred to simply as “MVC,” was the first
widely known architectural pattern for decoupling the graphical user interface
from underlying application logic. Unfortunately, many people confuse MVC with
any architecture that separates presentation logic from domain logic. So when
someone starts talking about MVC, it’s wise to allow for quite a bit of imprecision.
In MVC, the Model encapsulates the system’s logical behavior and state, the View
requests and reflects that state on the display, and the Controller interprets low-
level inputs such as mouse and keyboard strokes, resulting in commands to either
the Model or the View.
MVC trades off a lot of static structure — the definition of objects for each of the
various responsibilities – for the advantage of being able to independently vary
the view and the controller. This is not much of an advantage in Windows
programs, where the view is always a bitmapped two-dimensional display and the
controller is always a combination of a keyboard and a mouse-like pointing
device. However, USB’s widespread support has already led to interesting new
controllers and the not-so-distant future will bring both voice and gesture control
and “hybrid reality” displays to seamlessly integrate computer-generated data
into real vision (e.g., glasses that superimpose arrows and labels on reality). If
you happen to be lucky enough to be working with such advanced technologies,
578 Thinking in C# www.ThinkingIn.NET
MVC may be just the thing. Even if not, it’s worth discussing briefly as an
example of decoupling GUI concerns taken to the logical extreme. In our
example, our domain state is simply an array of Boolean values; we want the
display to show these values as buttons and display, in the title bar, whether all
the values are true or whether some are false:
//:c14:MVC.cs
using System;
using System.Windows.Forms;
using System.Drawing;
class Model {
internal bool[] allBools;
internal Model(){
Random r = new Random();
int iBools = 2 + r.Next(3);
allBools = new bool[iBools];
for (int i = 0; i < iBools; i++) {
allBools[i] = r.NextDouble() > 0.5;
}
}
}
class View : Form {
Model model;
Button[] buttons;
internal View(Model m, Controller c){
this.model = m;
int buttonCount = m.allBools.Length;
buttons = new Button[buttonCount];
ClientSize =
new Size(300, 50 + buttonCount * 50);
for (int i = 0; i < buttonCount; i++) {
buttons[i] = new Button();
buttons[i].Location =
new Point(10, 5 + i * 50);
c.MatchControlToModel(buttons[i], i);
buttons[i].Click +=
Chapter 14: Programming Windows Forms 579
new EventHandler(c.ClickHandler);
}
ReflectModel();
Controls.AddRange(buttons);
}
internal void ReflectModel(){
bool allAreTrue = true;
for (int i = 0; i < model.allBools.Length; i++) {
buttons[i].Text = model.allBools[i].ToString();
if (model.allBools[i] == false) {
allAreTrue = false;
}
}
if (allAreTrue) {
Text = "All are true";
} else {
Text = "Some are not true";
}
}
}
class Controller {
Model model;
View view;
Control[] viewComponents;
Controller(Model m){
model = m;
viewComponents = new Control[m.allBools.Length];
}
internal void MatchControlToModel
(Button b, int index){
viewComponents[index] = b;
}
internal void AttachView(View v){
this.view = v;
}
580 Thinking in C# www.MindView.net
internal void ClickHandler
(Object src, EventArgs ea){
//Modify model in response to input
int modelIndex =
Array.IndexOf(viewComponents, src);
model.allBools[modelIndex] =
!model.allBools[modelIndex];
//Have view reflect model
view.ReflectModel();
}
public static void Main(){
Model m = new Model();
Controller c = new Controller(m);
View v = new View(m, c);
c.AttachView(v);
Application.Run(v);
}
}///:~
The Model class has an array of bools that are randomly set in the Model
constructor. For demonstration purposes, we’re exposing the array directly, but
in real life the state of the Model would be reflected in its entire gamut of
properties.
The View object is a Form that contains a reference to a Model and its role is
simply to reflect the state of that Model. The View( ) constructor lays out how
this particular view is going to do that – it determines how many bools are in the
Model’s allBools array and initializes a Button[] array of the same size. For
each bool in allBools, it creates a corresponding Button, and associates this
particular aspect of the Model’s state (the index of this particular bool) with this
particular aspect of the View (this particular Button). It does this by calling the
Controller’s MatchControlToModel( ) method and by adding to the
Button’s Click event property a reference to the Controller’s
ClickHandler( ). Once the View has initialized its Controls, it calls its own
ReflectModel( ) method.
View’s ReflectModel( ) method iterates over all the bools in Model, setting
the text of the corresponding button to the value of the Boolean. If all are true,
the title of the Form is changed to “All are true,” otherwise, it declares that
“Some are false.”
Chapter 14: Programming Windows Forms 581
The Controller object ultimately needs references to both the Model and to the
View, and the View needs a reference to both the Model and the Controller.
This leads to a little bit of complexity in the initialization shown in the Main( )
method; the Model( ) is created with no references to anything (the Model is
acted upon by the Controller and reflected by the View, the Model itself never
needs to call methods or properties in those objects). The Controller is then
created with a reference to the Model. The Controller( ) constructor simply
stores a reference to the Model and initializes an array of Controls to sufficient
size to reflect the size of the Model.allBools array. At this point, the
Controller.View reference is still null, since the View has not yet been
initialized.
Back in the Main( ) method, the just-created Controller is passed to the
View( ) constructor, which initializes the View as described previously. Once
the View is initialized, the Controller’s AttachView( ) method sets the
reference to the View, completing the Controller’s initialization. (You could as
easily do the opposite, creating a View with just a reference to the Model,
creating a Controller with a reference to the View and the Model, and then
finish the View’s initialization with an AttachController( ) method.)
During the View’s constructor, it called the Controller’s
MatchControlToModel( ) method, which we can now see simply stores a
reference to a Button in the viewComponents[ ] array.
The Controller is responsible for interpreting events and causing updates to the
Model and View as appropriate. ClickHandler( ) is called by the various
Buttons in the View when they are clicked. The originating Control is
referenced in the src method argument, and because the index in the
viewComponents[ ] array was defined to correspond to the index of the
Model’s allBools[ ] array, we can learn what aspect of the Model’s state we
wish to update by using the static method Array.IndexOf( ). We change the
Boolean to its opposite using the ! operator and then, having changed the
Model’s state, we call View’s ReflectModel( ) method to keep everything in
synchrony.
The clear delineation of duties in MVC is appealing – the View passively reflects
the Model, the Controller mediates updates, and the Model is responsible
only for itself. You can have many View classes that reflect the same Model (say,
one showing a graph of values, the other showing a list) and dynamically switch
between them. However, the structural complexity of MVC is a considerable
burden and is difficult to “integrate” with the Visual Designer tool.
582 Thinking in C# www.ThinkingIn.NET
Layout
Now that we’ve discussed the various architectural options that should be of
major import in any real GUI design discussion, we’re going to move back
towards the expedient “Do as we say, not as we do” mode of combining logic,
event control, and visual display in the sample programs. It would simply
consume too much space to separate domain logic into separate classes when,
usually, our example programs are doing nothing but writing out simple lines of
text to the console or demonstrating the basics of some simple widget.
Another area where the sample programs differ markedly from professional code
is in the layout of Controls. So far, we have used the Location property of a
Control, which determines the upper-left corner of this Control in the client
area of its containing Control (or, in the case of a Form, the Windows display
coordinates of its upper-left corner).
More frequently, you will use the Dock and Anchor properties of a Control to
locate a Control relative to one or more edges of the container in which it
resides. These properties allow you to create Controls which properly resize
themselves in response to changes in windows size.
In our examples so far, resizing the containing Form doesn’t change the Control
positions. That is because by default, Controls have an Anchor property set to
the AnchorStyles values Top and Left (AnchorStyles are bitwise
combinable). In this example, a button moves relative to the opposite corner:
//:c14:AnchorValues.cs
using System.Windows.Forms;
using System.Drawing;
class AnchorValues: Form {
AnchorValues(){
Button b = new Button();
b.Location = new Point(10, 10);
b.Anchor =
AnchorStyles.Right | AnchorStyles.Bottom;
Controls.Add(b);
}
public static void Main(){
Application.Run(new AnchorValues());
}
Chapter 14: Programming Windows Forms 583
}///:~
If you combine opposite AnchorStyles (Left and Right, Top and Bottom) the
Control will resize. If you specify AnchorStyles.None, the control will move
half the distance of the containing area’s change in size. This example shows
these two types of behavior:
//:c14:AnchorResizing.cs
using System.Windows.Forms;
using System.Drawing;
class AnchorResizing: Form {
AnchorResizing(){
Button b = new Button();
b.Location = new Point(10, 10);
b.Anchor =
AnchorStyles.Left
| AnchorStyles.Right
| AnchorStyles.Top;
b.Text = "Left | Right | Top";
Controls.Add(b);
Button b2 = new Button();
b2.Location = new Point(100, 10);
b2.Anchor = AnchorStyles.None;
b2.Text = "Not anchored";
Controls.Add(b2);
}
public static void Main(){
Application.Run(new AnchorResizing());
}
}///:~
If you run this example and manipulate the screen, you’ll see two undesirable
behaviors: b can obscure b2, and b2 can float off the page. Windows Forms’
layout behavior trades off troublesome behavior like this for its straightforward
model. An alternative mechanism based on cells, such as that used in HTML or
some of Java’s LayoutManagers, may be more robust in avoiding these types of
trouble, but anyone who’s tried to get a complex cell-based UI to resize the way
they wish is likely to agree with Windows Forms’ philosophy!
584 Thinking in C# www.MindView.net
A property complementary to Anchor is Dock. The Dock property moves the
control flush against the specified edge of its container, and resizes the control to
be the same size as that edge. If more than one control in a client area is set to
Dock to the same edge, the controls will layout side-by-side in the reverse of the
order in which they were added to the containing Controls array (their reverse
z-order). The Dock property overrides the Location value. In this example, two
buttons are created and docked to the left side of their containing Form.
//:c14:Dock.cs1
using System.Windows.Forms;
using System.Drawing;
class Dock: Form {
Dock(){
Button b1 = new Button();
b1.Dock = DockStyle.Left;
b1.Text = "Button 1";
Controls.Add(b1);
Button b2 = new Button();
b2.Dock = DockStyle.Left;
b2.Text = "Button2";
Controls.Add(b2);
}
public static void Main(){
Application.Run(new Dock());
}
}///:~
When you run this, you’ll see that b appears to the right of b2 because it was
added to Dock’s Controls before b2.
DockStyle.Fill specifies that the Control will expand to fill the client area from
the center to the limits allowed by other Docked Controls. DockStyle.Fill will
cover non-Docked Controls that have a lower z-order, as this example shows:
//:c14:DockFill.cs
using System.Windows.Forms;
using System.Drawing;
class DockFill: Form {
DockFill(){
Chapter 14: Programming Windows Forms 585
//Lower z-order
Button visible = new Button();
visible.Text = "Visible";
visible.Location = new Point(10, 10);
Controls.Add(visible);
//Will cover "Invisible"
Button docked = new Button();
docked.Text = "Docked";
docked.Dock = DockStyle.Fill;
Controls.Add(docked);
//Higher z-order, gonna' be invisible
Button invisible = new Button();
invisible.Text = "Invisible";
invisible.Location = new Point(100, 100);
Controls.Add(invisible);
}
public static void Main(){
Application.Run(new DockFill());
}
}///:~
Developing complex layouts that lay themselves out properly when resized is a
challenge for any system. Windows Forms’ straightforward model of
containment, Location, Anchor, and Dock is especially suited for the PAC GUI
architecture described previously. Rather than trying to create a monolithic
chunk of logic that attempts to resize and relocate the hundreds or dozens of
widgets that might comprise a complex UI, the PAC architecture would
encapsulate the logic within individual custom controls.
Non-code resources
Windows Forms wouldn’t be much of a graphical user interface library if it did
not support graphics and other media. But while it’s easy to specify a Button’s
look and feel with only a few lines of code, images are inherently dependent on
binary data storage.
It’s not surprising that you can load an image into a Windows Form by using a
Stream or a filename, as this example demonstrates:
//:c14:SimplePicture.cs
586 Thinking in C# www.ThinkingIn.NET
//Loading images from file system
using System;
using System.IO;
using System.Windows.Forms;
using System.Drawing;
class SimplePicture : Form {
public static void Main(string[] args){
SimplePicture sp = new SimplePicture(args[0]);
Application.Run(sp);
}
SimplePicture(string fName){
PictureBox pb = new PictureBox();
pb.Image = Image.FromFile(fName);
pb.Dock = DockStyle.Fill;
pb.SizeMode = PictureBoxSizeMode.StretchImage;
Controls.Add(pb);
int imgWidth = pb.Image.Width;
int imgHeight = pb.Image.Height;
this.ClientSize =
new Size(imgWidth, imgHeight);
}
}///:~
The Main( ) method takes the first command-line argument as a path to an
image (for instance: “SimplePicture c:\windows\clouds.bmp”) and passes that
path to the SimplePicture( ) constructor. The most common Control used to
display a bitmap is the PictureBox control, which has an Image property. The
static method Image.FromFile( ) generates an Image from the given path
(there is also an Image.FromStream( ) static method which provides general
access to all the possible sources of image data).
The PictureBox’s Dock property is set to Dockstyle.Fill and the ClientSize
of the form is set to the size of the Image. When you run this program, the
SimplePicture form will start at the same size of the image. Because
pb.SizeMode was set to StretchImage, however, you can resize the form and
the image will stretch or shrink appropriately. Alternate PictureBoxSizeMode
values are Normal (which clips the Image to the PictureBox’s size),
Chapter 14: Programming Windows Forms 587
AutoSize (which resizes the PictureBox to accommodate the Image’s size),
and CenterImage.
Loading resources from external files is certainly appropriate in many
circumstances, especially with isolated storage (#ref#), which gives you a per-
user, consistent virtual file system. However, real applications which are
intended for international consumption require many resources localized to the
current culture – labels, menu names, and icons may all have to change. The
.NET Framework provides a standard model for efficiently storing such resources
and loading them. Momentarily putting aside the question of how such resources
are created, retrieving them is the work of the ResourceManager class. This
example switches localized labels indicating “man” and “woman.”
//:c14:International.cs
using System;
using System.Drawing;
using System.Resources;
using System.Globalization;
using System.Windows.Forms;
class International : Form {
ResourceManager rm;
Label man;
Label woman;
public International(){
rm = new ResourceManager(typeof(International));
RadioButton eng = new RadioButton();
eng.Checked = true;
eng.Location = new Point(10, 10);
eng.Text = "American";
eng.CheckedChanged +=
new EventHandler(LoadUSResources);
RadioButton swa = new RadioButton();
swa.Location = new Point(10, 30);
swa.Text = "Swahili";
swa.CheckedChanged +=
new EventHandler(LoadSwahiliResources);
man = new Label();
588 Thinking in C# www.MindView.net
man.Location = new Point(10, 60);
man.Text = "Man";
woman = new Label();
woman.Location = new Point(10, 90);
woman.Text = "Woman";
Controls.AddRange(new Control[]{
eng, swa, man, woman});
Text = "International";
}
public void LoadUSResources
(Object src, EventArgs a){
if ( ((RadioButton)src).Checked == true) {
ResourceSet rs =
rm.GetResourceSet(
new CultureInfo("en-US"), true, true);
SetLabels(rs);
}
}
public void LoadSwahiliResources
(Object src, EventArgs a){
if (((RadioButton)src).Checked == true) {
ResourceSet rs =
rm.GetResourceSet(
new CultureInfo("sw"), true, true);
SetLabels(rs);
}
}
private void SetLabels(ResourceSet rs){
man.Text = rs.GetString("Man");
woman.Text = rs.GetString("Woman");
}
public static void Main(){
Application.Run(new International());
}
Chapter 14: Programming Windows Forms 589
}///:~
Here, we wish to create an application which uses labels in a local culture (a
culture is more specific than a language; for instance, there is a distinction
between the culture of the United States and the culture of the United Kingdom).
The basic references we’ll need are to ResourceManager rm, which we’ll load
to be culture-specific, and two labels for the words “Man” and “Woman.”
The first line of the International constructor initializes rm to be a resource
manager for the specified type. A ResourceManager is associated with a
specific type because .NET uses a “hub and spoke” model for managing resources.
The “hub” is the assembly that contains the code of a specific type. The “spokes”
are zero or more satellite assemblies that contain the resources for specific
cultures, and the ResourceManager is the link that associates a type (a “hub”)
with its “spokes.”
International( ) then shows the use of radio buttons in Windows Forms. The
model is simple: All radio buttons within a container are mutually exclusive. To
make multiple sets of radio buttons within a single form, you can use a
GroupBox or Panel. International has two RadioButtons, eng has its
Checked property set to true, and, when that property changes, the
LoadEnglishResources method will be called. RadioButton swa is similarly
configured to call LoadSwahiliResources( ) and is not initially checked. By
default, the man and woman labels are set to a hard-coded value.
The LoadxxxResources( ) methods are similar; they check if their source
RadioButton is checked (since they are handling the CheckedChange event,
the methods will be called when their source becomes unchecked as well). If their
source is set, the ResourceManager loads one of the “spoke” ResourceSet
objects. The ResourceSet is associated with a particular CultureInfo instance,
which is initialized with a language tag string compliant with IETF RFC 1766
(you can find a list of standard codes in the .NET Framework documentation and
read the RFC at The GetResourceSet( )
method also takes two bools, the first specifying if the ResourceSet should be
loaded if it does not yet exist in memory, and the second specifying if the
ResourceManager should try to load “parents” of the culture if the specified
CultureInfo does not work; both of these bools will almost always be true.
Once the ResourceSet is retrieved, it is used as a parameter to the
SetLabels( ) method. SetLabels( ) uses ResourceSet.GetString( ) to
retrieve the appropriate culture-specific string for the specified key and sets the
associated Label.Text. ResourceSet’s other major method is GetObject( )
which can be used to retrieve any type of resource.
590 Thinking in C# www.ThinkingIn.NET
We’ve not yet created the satellite assemblies which will serve as the “spokes” to
our International “hub,” but it is interesting to run the program in this state. If
you run the above code and click the “Swahili” radio button, you will see this
dialog:
Figure 14-6: A detailed exception handling dialog from Microsoft
This is not a dialog you’d ever want an end-user to see and a real application’s
exception handling would hide it, but it’s an interesting example of the kind of
behavior that you could potentially include in your own components to aid 3rd
party developers during debugging.
Creating satellite assemblies
For your satellite assembly to work, you must follow naming (including
capitalization) and directory conventions. First, you will create a new
subdirectory for each culture you wish to support and named with the culture’s
language tag. If you compiled International.exe in the directory c:\tic\chap14,
you will create c:\tic\chap14\sw and c:\tic\chap14\en-US.
In the \sw subdirectory, create a file with these contents:
Man=mwanamume
Woman=mwanamke
And save the file with a .txt extension (say, as “Swahili.txt”). Use the command-
line resource generator tool to turn this file into a binary resource file that follows
the naming convention MainAssembly.languagetag.resources. For this
example, the command is:
Chapter 14: Programming Windows Forms 591
resgen swahili.txt International.sw.resources
The .resources file now has to be converted into a satellite assembly named
MainAssembly.resources.dll. This is done with the assembly linker tool al.
Both of these lines should be typed as a single command:
al /t:lib /embed:International.sw.resources
/culture:sw /out:International.resources.dll
The resulting .DLL should still be in the \sw subdirectory. Do the same process in
the \en-US directory after creating an appropriate text file:
resgen american.txt International.en-US.resources
al /t:lib /embed:International.en-US.resources /culture:en-
US /out:International.resources.dll
Switch back to the parent directory and run International. Now, when you run
the program, the man and woman labels should switch between Swahili and
American in response to the radio buttons.
Constant resources
While culturally appropriate resources use satellite assemblies, it may be the case
that you wish to have certain resources such as graphics and icons embedded
directly in the main assembly. Using graphics as resources is a little more
difficult than using text because you must use a utility class to generate the
resource file. Here’s an example command-line class that takes two command-
line arguments: the name of a graphics file and the name of the desired resources
file:
//:c14:GrafResGen.cs
//Generates .resource file from a graphics file
//Usage: GrafResGen [inputFile] [outputFile]
using System.IO;
using System.Resources;
using System.Drawing;
class GrafResGen {
GrafResGen(
string name, Stream inStr, Stream outStr){
ResourceWriter rw = new ResourceWriter(outStr);
Image img = new Bitmap(inStr);
592 Thinking in C# www.MindView.net
rw.AddResource(name, img);
rw.Generate();
}
public static void Main(string[] args){
FileStream inF = null;
FileStream outF = null;
try {
string name = args[0];
inF = new FileStream(name, FileMode.Open);
string outName = args[1];
outF =
new FileStream(outName, FileMode.Create);
GrafResGen g =
new GrafResGen(name, inF, outF);
} finally {
inF.Close();
outF.Close();
}
}
}///:~
A ResourceWriter generates binary .resource files to a given Stream. A
ResXResourceWriter (not demonstrated) can be used to create an XML
representation of the resources that can then be compiled into a binary file using
the resgen process described above (an XML representation is not very helpful
for binary data, so we chose to use a ResourceWriter directly).
To use this program, copy an image to the local directory and run:
GrafResGen someimage.jpg ConstantResources.resources
This will generate a binary resources file that we’ll embed in this example
program:
//:c14:ConstantResources.cs
/*
Compile with: csc /res:ConstantResources.resources
ConstantResources.cs
*/
//Loads resources from the current assembly
using System.Resources;
using System.Drawing;
Chapter 14: Programming Windows Forms 593
using System.Windows.Forms;
class ConstantResources:Form {
ConstantResources(){
PictureBox pb = new PictureBox();
pb.Dock = DockStyle.Fill;
Controls.Add(pb);
ResourceManager rm =
new ResourceManager(this.GetType());
pb.Image =
(Image) rm.GetObject("someimage.jpg");
}
public static void Main(){
Application.Run(new ConstantResources());
}
}///:~
The code in ConstantResources is very similar to the code used to load
cultural resources from satellites, but without the GetResourceSet( ) call to
load a particular satellite. Instead, the ResourceManager looks for resources
associated with the ConstantResources type. Naturally, those are stored in the
ConstantResources.resources file generated by the GrafResGen utility just
described. For the ResourceManager to find this file, though, the resource file
must be linked into the main assembly in this manner:
csc /res:ConstantResources.res ConstantResources.cs
Assuming that the resources have been properly embedded into the
ConstantResources.exe assembly, the ResourceManager can load the
“someimage.jpg” resource and display it in the PictureBox pb.
What about the XP look?
If you have been running the sample programs under Windows XP, you may have
been disappointed to see that Controls do not automatically support XP’s
graphical themes. In order to activate XP-themed controls, you must set your
Control’s FlatStyle property to FlatStyle.System and specify that your
program requires Microsoft’s comctl6 assembly to run. You do that by creating
another type of non-code resource for your file: a manifest. A manifest is an XML
document that specifies all sorts of meta-information about your program: it’s
name, version, and so forth. One thing you can specify in a manifest is a
594 Thinking in C# www.ThinkingIn.NET
dependency on another assembly, such as comctl6. To link to comctl6, you’ll
need a manifest of this form:
<?xml
version="1.0" encoding="UTF-8" standalone="yes"
?>
<! XPThemed.exe.manifest >
<assembly
xmlns="urn:schemas-microsoft-com:asm.v1"
manifestVersion="1.0">
<assemblyIdentity
type="win32"
name="Thinkingin.Csharp.C13.XPThemes"
version="1.0.0.0"
processorArchitecture = "X86"
/>
<description>Demonstrate XP Themes</description>
<! Link to comctl6 >
<dependency>
<dependentAssembly>
<assemblyIdentity
type="win32"
name="Microsoft.Windows.Common-Controls"
version="6.0.0.0"
processorArchitecture="X86"
publicKeyToken="6595b64144ccf1df"
language="*"
/>
</dependentAssembly>
</dependency>
</assembly>
The manifest file is an XML-formatted source of meta-information about your
program. In this case, after specifying our own assemblyIdentity, we specify
the dependency on Common-Controls version 6.
Name this file programName.exe.manifest and place it in the same directory
as your program. If you do, the .NET Runtime will automatically give the
appropriate Controls in your program XP themes. Here’s an example program:
//:c14:XPThemed.cs
using System.Windows.Forms;
using System.Drawing;
Chapter 14: Programming Windows Forms 595
class XPThemed: Form {
XPThemed(){
ClientSize = new Size(250, 100);
Button b = new Button();
b.Text = "XP Style";
b.Location = new Point(10, 10);
b.FlatStyle = FlatStyle.System;
Controls.Add(b);
Button b2 = new Button();
b2.Text = "Standard";
b2.Location = new Point(100, 10);
Controls.Add(b2);
}
public static void Main(){
Application.Run(new XPThemed());
}
}///:~
When run without an appropriate manifest file, both buttons will have a default
gray style:
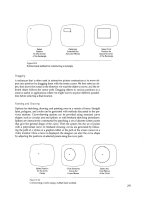
Figure 14-7: By default, Windows Forms do not use XP styles
When XPThemed.exe.manifest is available, b will use the current XP theme,
while b2, whose FlatStyle is the default FlatStyle.Standard, will not.
596 Thinking in C# www.MindView.net
Figure 14-8: A manifest file provides access to the XP look-and-feel
Fancy buttons
In addition to creating theme-aware buttons, it is an easy matter to create
buttons that have a variety of graphical features and that change their appearance
in response to events. In order to run this example program, you’ll have to have
four images in the active directory (in the example code, they’re assumed to be
named “tic.gif”, “away.gif”,”in.gif”, and “hover.gif”).
//:c14:ButtonForm.cs
///Demonstrates various types of buttons
using System.Windows.Forms;
using System;
using System.Collections;
using System.Drawing;
class ButtonForm : Form {
ButtonForm() {
ClientSize = new System.Drawing.Size(400, 200);
Text = "Buttons, in all their glory";
Button simple = new Button();
simple.Text = "Simple";
simple.Location = new Point(10, 10);
Button image = new Button();
image.Image = Image.FromFile(".\\TiC.gif");
image.Text = "Text";
image.Location = new Point(120, 10);
Button popup = new Button();
Chapter 14: Programming Windows Forms 597
popup.Location = new Point(230, 10);
popup.Text = "Popup";
popup.FlatStyle = FlatStyle.Popup;
FlyOverButton flyOver =
new FlyOverButton("Away", "In", "Hovering");
flyOver.Location = new Point(10, 40);
FlyOverImages flyOverImages =
new FlyOverImages(
".\\away.gif",".\\in.gif",".\\hover.gif");
flyOverImages.Location = new Point(230, 40);
Controls.AddRange(new Control[]{
simple, image, popup, flyOver, flyOverImages});
}
public static void Main() {
Application.Run(new ButtonForm());
}
}
class FlyOverButton : Button {
string away;
string inStr;
string hover;
internal FlyOverButton(
string away, string inStr, string hover) {
this.away = away;
this.inStr = inStr;
this.hover = hover;
FlatStyle = FlatStyle.Popup;
Text = away;
MouseEnter += new EventHandler(OnMouseEnter);
MouseHover += new EventHandler(OnMouseHover);
MouseLeave += new EventHandler(OnMouseLeave);
}
private void OnMouseEnter(
object sender, System.EventArgs args) {
((Control)sender).Text = inStr;
}
598 Thinking in C# www.ThinkingIn.NET
private void OnMouseHover(
object sender, System.EventArgs args) {
((Control)sender).Text = hover;
}
private void OnMouseLeave(
object sender, System.EventArgs args) {
((Control)sender).Text = away;
}
}
class FlyOverImages : Button {
internal FlyOverImages(
string away, string inStr, string hover) {
ImageList = new ImageList();
ImageList.Images.Add(Image.FromFile(away));
ImageList.Images.Add(Image.FromFile(inStr));
ImageList.Images.Add(Image.FromFile(hover));
FlatStyle = FlatStyle.Popup;
ImageIndex = 0;
MouseEnter += new EventHandler(OnMouseEnter);
MouseHover += new EventHandler(OnMouseHover);
MouseLeave += new EventHandler(OnMouseLeave);
}
private void OnMouseEnter(
object sender, System.EventArgs args) {
((Button)sender).ImageIndex = 1;
}
private void OnMouseHover(
object sender, System.EventArgs args) {
((Button)sender).ImageIndex = 2;
}
private void OnMouseLeave(
object sender, System.EventArgs args) {
((Button)sender).ImageIndex = 0;
}
}///:~