Agile Web Development with Rails phần 7 pdf
Bạn đang xem bản rút gọn của tài liệu. Xem và tải ngay bản đầy đủ của tài liệu tại đây (860.29 KB, 55 trang )
CACHING,PART ONE 321
Expiring Pages
Creating cached pages is only one half of the equation. If the content ini-
tially used to create these pages changes, the cached versions will become
out-of-date, and we’ll need a way of expiring them.
The trick is to code the application to notice when the data used to create
a dynamic page has changed and then to remove the cached version. The
next time a request comes through for that URL, the cached page will be
regenerated based on the new content.
Expiring Pages Explicitly
The low-level way to remove cached pages is with the
expire_page() and
expire_action( ) methods. These take the same parameters as url_for() and
expire the cached page that matches the generated URL.
For example, our content controller might have an action that allows us to
create an article and another action that updates an existing article. When
we create an article, the list of articles on the public page will become
obsolete, so we call
expire_page( ), passing in the action name that displays
the public page. When we update an existing article, the public index
page remains unchanged (at least, it does in our application), but any
cached version of this particular article should be deleted. Because this
cache was created using
caches_action, we need to expire the page using
expire_action( ), passing in the action name and the article id.
File 17 def create_article
article = Article.new(params[:article])
if article.save
expire_page :action => "public_content"
else
#
end
end
def update_article
article = Article.new(params[:article])
if article.save
expire_action :action => "premium_content", :id => article
else
#
end
end
The method that deletes an article does a bit more work—it has to both
invalidate the public index page and remove the specific article page.
File 17 def delete_article
Article.destroy(params[:id])
expire_page :action => "public_content"
expire_action :action => "premium_content", :id => params[:id]
end
Report erratum
CACHING,PART ONE 322
Expiring Pages Implicitly
The
expire_xxx methods work well, but they also couple the caching func-
tion to the code in your controllers. Every time you change something in
the database, you also have to work out which cached pages this might
affect. While this is easy for smaller applications, this gets more difficult
as the application grows. A change made in one controller might affect
pages cached in another. Business logic in helper methods, which really
shouldn’t have to know about HTML pages, now needs to worry about
expiring cached pages.
Fortunately, Rails can simplify some of this coupling using sweepers.A
sweepers
sweeper is a special kind of observer on your model objects. When some-
thing significant happens in the model, the sweeper expires the cached
pages that depend on that model’s data.
Your application can have as many sweepers as it needs. You’ll typically
create a separate sweeper to manage the caching for each controller. Put
your sweeper code in
app/models.
File 20 class ArticleSweeper < ActionController::Caching::Sweeper
observe Article
# If we create a new article, the public list
# of articles must be regenerated
def after_create(article)
expire_public_page
end
# If we update an existing article, the cached version
# of that particular article becomes stale
def after_update(article)
expire_article_page(article.id)
end
# Deleting a page means we update the public list
# and blow away the cached article
def after_destroy(article)
expire_public_page
expire_article_page(article.id)
end
private
def expire_public_page
expire_page(:controller => "content", :action =>
'public_content')
end
def expire_article_page(article_id)
expire_action(:controller => "content",
:action => "premium_content",
:id => article_id)
end
end
The flow through the sweeper is somewhat convoluted.
Report erratum
CACHING,PART ONE 323
• The sweeper is defined as an observer on one or more Active Record
classes. In this case it observes the
Article model. (We first talked
about observers back on page 270.) The sweeper uses hook methods
(such as
after_update( )) to expire cached pages if appropriate.
• The sweeper is also declared to be active in a controller using the
cache_sweeper directive.
class ContentController < ApplicationController
before_filter :verify_premium_user, :except => :public_content
caches_page :public_content
caches_action :premium_content
cache_sweeper :article_sweeper,
:only => [ :create_article,
:update_article,
:delete_article ]
#
• If a request comes in that invokes one of the actions that the sweeper
is filtering, the sweeper is activated. If any of the Active Record
observer methods fires, the page and action expiry methods will be
called. If the Active Record observer gets invoked but the current
action is not selected as a cache sweeper, the expire calls in the
sweeper are ignored. Otherwise, the expiry takes place.
Time-Based Expiry of Cached Pages
Consider a site that shows fairly volatile information such as stock quotes
or news headlines. If we did the style of caching where we expired a page
whenever the underlying information changed, we’d be expiring pages con-
stantly. The cache would rarely get used, and we’d lose the benefit of
having it.
In these circumstances, you might want to consider switching to time-
based caching, where you build the cached pages exactly as we did previ-
ously but don’t expire them when their content becomes obsolete.
You run a separate background process that periodically goes into the
cache directory and deletes the cache files. You choose how this deletion
occurs—you could simply remove all files, the files created more than so
many minutes ago, or the files whose names match some pattern. That
part is application-specific.
The next time a request comes in for one of these pages, it won’t be satis-
fied from the cache and the application will handle it. In the process, it’ll
automatically repopulate that particular page in the cache, lightening the
load for subsequent fetches of this page.
Report erratum
THE PROBLEM WITH GET REQUESTS 324
Where do you find the cache files to delete? Not surprisingly, this is con-
figurable. Page cache files are by default stored in the
public directory of
your application. They’ll be named after the URL they are caching, with
an .
html extension. For example, the page cache file for content/show/1 will
be in
app/public/content/show/1.html
This naming scheme is no coincidence; it allows the web server to find the
cache files automatically. You can, however, override the defaults using
ActionController::Base.page_cache_directory = "dir/name"
ActionController::Base.page_cache_extension = ".html"
Action cache files are not by default stored in the regular file system direc-
tory structure and cannot be expired using this technique.
16.9 The Problem with GET Requests
At the time this book was written, there’s a debate raging about the way
web applications use links to trigger actions.
Here’s the issue. Almost since HTTP was invented, it was recognized that
there is a fundamental difference between HTTP GET and HTTP POST
requests. Tim Berners-Lee wrote about it back in 1996.
13
Use GET
requests to retrieve information from the server, and use POST requests to
request a change of state on the server.
The problem is that this rule has been widely ignored by web developers.
Every time you see an application with an Add To Cart link, you’re seeing
a violation, because clicking on the link generates a GET request that
changes the state of the application (it adds something to the cart in this
example). Up until now, we’ve gotten away with it.
This changed in the spring of 2005 when Google released their Google
Web Accelerator (GWA), a piece of client-side code that sped up end users’
browsing. It did this in part by precaching pages. While the user reads the
current page, the accelerator software scans it for links and arranges for
the corresponding pages to be read and cached in the background.
Now imagine that you’re looking at an online store containing Add To Cart
links. While you’re deciding between the maroon hot pants and the purple
tank top, the accelerator is busy following links. Each link followed adds
a new item to your cart.
13
/>Report erratum
THE PROBLEM WITH GET REQUESTS 325
The problem has always been there. Search engines and other spiders
constantly follow links on public web pages. Normally, though, these links
that invoke state-changing actions in applications (such as our Add To
Cart link) are not exposed until the user has started some kind of trans-
action, so the spider won’t see or follow them. The fact that the GWA runs
on the client side of the equation suddenly exposed all these links.
In an ideal world, every request that has a side effect would be a POST,
14
not a GET. Rather than using links, web pages would use forms and but-
tons whenever they want the server to do something active. The world,
though, isn’t ideal, and there are thousands (millions?) of pages out there
that break the rules when it comes to GET requests.
The default
link_to( ) method in Rails generates a regular link, which when
clicked creates a GET request. But this certainly isn’t a Rails-specific
problem. Many large and successful sites do the same.
Is this really a problem? As always, the answer is “It depends.” If you code
applications with dangerous links (such as Delete Or der, Fire Employee,or
Fire Missile), there’s the risk that these links will be followed unintention-
ally and your application will dutifully perform the requested action.
Fixing the GET Problem
Following a simple rule can effectively eliminate the risk associated with
dangerous links. The underlying axiom is straightforward: never allow
astraight
<a href=" " link that does something dangerous to be followed
without some kind of human intervention. Here are some techniques for
making this work in practice.
• Use forms and buttons, rather than hyperlinks, to do things that
change state on the server. Forms can be submitted using POST
requests, which means that they will not be submitted by spiders
following links, and browsers will warn you if you reload a page.
Within Rails, this means using the
button_to( ) helper to point to dan-
gerous actions. However, you’ll need to design your web pages with
care. HTML does not allow forms to be nested, so you can’t use
but-
ton_to
( ) within another form.
• Use confirmation pages. For cases where you can’t use a form, create
a link that references a page that asks for confirmation. This confir-
14
Or a rarer PUT or DELETE request.
Report erratum
THE PROBLEM WITH GET REQUESTS 326
mation should be triggered by the submit button of a form; hence,
the destructive action won’t be triggered automatically.
Some folks also use the following techniques, hoping they’ll prevent the
problem. They don’t work.
• Don’t think your actions are protected just because you’ve installed a
JavaScript confirmation box on the link. For example, Rails lets you
write
link_to(:action => :delete, :confirm => "Are you sure?")
This will stop users from accidentally doing damage by clicking the
link, but only if they have JavaScript enabled in their browsers. It
also does nothing to prevent spiders and automated tools from blindly
following the link anyway.
• Don’t think your actions are protected if they appear only in a portion
of your web site that requires users to log in. While this does prevent
global spiders (such as those employed by the search engines) from
getting to them, it does not stop client-side technologies (such as
Google Web Accelerator).
• Don’t think your actions are protected if you use a
robots.txt file to
control which pages are spidered. This will not protect you from
client-side technologies.
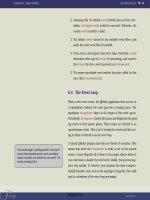
All this might sound fairly bleak. The real situation isn’t that bad. Just
follow one simple rule when you design your site, and you’ll avoid all these
issues.
Put All Destructive Actions
Behind a POST Request
Web
Health
Warning
Report erratum
Chapter 17
Action View
We’ve seen how the routing component determines which controller to use
and how the controller chooses an action. We’ve also seen how the con-
troller and action between them decide what to render back to the user.
Normally that rendering takes place at the end of the action, and typically
it involves a template. That’s what this chapter is all about. The
Action-
View
module encapsulates all the functionality needed to render templates,
most commonly generating HTML or XML back to the user. As its name
suggests,
ActionView is the view part of our MVC trilogy.
17.1 Templates
When you write a view, you’re writing a template: something that will get
expanded to generate the final result. To understand how these templates
work, we need to look at three things
• Where the templates go
• The environment they run in, and
• What goes inside them.
Where Templates Go
The render( ) method expects to find templates under the directory defined
by the global
template_root configuration option. By default, this is set
to the directory
app/views of the current application. Within this direc-
tory, the convention is to have a separate subdirectory for the views of
each controller. Our Depot application, for instance, includes admin and
store controllers. As a result, we have templates in
app/views/admin and
app/views/store. Each directory typically contains templates named after
the actions in the corresponding controller.
TEMPLATES 328
You can also have templates that aren’t named after actions. These can be
rendered from the controller using calls such as
render(:action => 'fake_action_name')
render(:template =>
'controller/name)
render(:file =>
'dir/template')
The last of these allows you to store templates anywhere on your file sys-
tem. This is useful if you want to share templates across applications.
The Template Environment
Templates contain a mixture of fixed text and code. The code is used to
add dynamic content to the template. That code runs in an environment
that gives it access to the information set up by the controller.
• All instance variables of the controller are also available in the tem-
plate. This is how actions communicate data to the templates.
• The controller objects
headers, params, request, response,andsession
are available as accessor methods in the view. In general, the view
code probably shouldn’t be using these directly, as responsibility for
handling them should rest with the controller. However, we do find
this useful when debugging. For example, the following
rhtml template
uses the
debug( ) method to display the contents of the request, the
details of the parameters, and the current response.
<h4>Request</h4> <%= debug(request) %>
<h4>Params</h4> <%= debug(params) %>
<h4>Response</h4> <%= debug(response) %>
• The current controller object is accessible using the attribute named
controller. This allows the template to call any public method in the
controller (including the methods in
ActionController).
• The path to the base directory of the templates is available in the
attribute
base_path.
What Goes in a Template
Out of the box, Rails support two types of template.
•
rxml templates use the Builder library to construct XML responses.
•
rhtml templates are a mixture of HTML and embedded Ruby, and are
typically used to generate HTML pages.
We’ll talk briefly about Builder next, then look at rhtml. The rest of the
chapter applies equally to both.
Report erratum
BUILDER TEMPLATES 329
17.2 Builder templates
Builder is a freestanding library that lets you express structured text (such
as XML) in code.
1
A Builder template (in a file with an .rxml extension)
contains Ruby code that uses the Builder library to generate XML.
Here’s a simple Builder template that outputs a list of product names and
prices in XML.
xml.div(:class => "productlist")do
xml.timestamp(Time.now)
@products.each do |product|
xml.product do
xml.productname(product.title)
xml.price(product.price, :currency => "USD")
end
end
end
With an appropriate collection of products (passed in from the controller),
the template might produce something such as
<div class="productlist">
<timestamp>Tue Apr 19 15:54:26 CDT 2005</timestamp>
<product>
<productname>Pragmatic Programmer</productname>
<price currency="USD">39.96</price>
</product>
<product>
<productname>Programming Ruby</productname>
<price currency="USD">44.95</price>
</product>
</div>
Notice how Builder has taken the names of methods and converted them
to XML tags; when we said
xml.price, it created a tag called <
price
> whose
contents were the first parameter and whose attributes were set from the
subsequent hash. If the name of the tag you want to use conflicts with an
existing method name, you’ll need to use the
tag!( ) method to generate the
tag.
xml.tag!("id", product.id)
Builder can generate just about any XML you need: it supports name-
spaces, entities, processing instructions, and even XML comments. Have
a look at the Builder documentation for details.
1
Builder is available on RubyForge ( and via RubyGems. Rails
comes packaged with its own copy of Builder, so you won’t have to download anything to get
started.
Report erratum
RHTML TEMPLATES 330
17.3 RHTML Templates
At its simplest, an rhtml template is just a regular HTML file. If a template
contains no dynamic content, it is simply sent as-is to the user’s browser.
The following is a perfectly valid
rhtml template.
<h1>Hello, Dave!</h1>
<p>
How are you, today?
</p>
However, applications that just render static templates tend to be a bit
boring to use. We can spice them up using dynamic content.
<h1>Hello, Dave!</h1>
<p>
It
's <%= Time.now %>
</p>
If you’re a JSP programmer, you’ll recognize this as an inline expression:
any code between
<%= and %> is evaluated, the result is converted to a
string using
to_s( ), and that string is substituted into the resulting page.
The expression inside the tags can be arbitrary code.
<h1>Hello, Dave!</h1>
<p>
It
's <%= require 'date'
DAY_NAMES = %w{ Sunday Monday Tuesday Wednesday
Thursday Friday Saturday }
today = Date.today
DAY_NAMES[today.wday]
%>
</p>
Putting lots of business logic into a template is generally considered to be
a Very Bad Thing, and you’ll risk incurring the wrath of the coding police
should you get caught. We’ll look at a better way of handling this when we
discuss helpers on page 332.
Sometimes you need code in a template that doesn’t directly generate any
output. If you leave the equals sign off the opening tag, the contents are
executed, but nothing is inserted into the template. We could have written
the previous example as
<% require 'date'
DAY_NAMES = %w{ Sunday Monday Tuesday Wednesday
Thursday Friday Saturday }
today = Date.today
%>
<h1>Hello, Dave!</h1>
<p>
It
's <%= DAY_NAMES[today.wday] %>.
Tomorrow is <%= DAY_NAMES[(today + 1).wday] %>.
</p>
Report erratum
RHTML TEMPLATES 331
In the JSP world, this is called a scriptlet. Again, many folks will chastise
you if they discover you adding code to templates. Ignore them—they’re
falling prey to dogma. There’s nothing wrong with putting code in a tem-
plate. Just don’t put too much code in there (and especially don’t put
business logic in a template). We’ll see later how we could have done the
previous example better using a helper method.
You can think of the HTML text between code fragments as if each line was
being written by a Ruby program. The
<% %> fragments are added to that
same program. The HTML is interwoven with the explicit code that you
write. As a result, code between
<% and %> can affect the output of HTML
in the rest of the template.
For example, consider the template
<% 3.times do %>
Ho!<br/>
<% end %>
Internally, the templating code translates this into something like the fol-
lowing.
3.times do
puts "Ho!<br/>"
end
The result? You’ll see the phrase Ho! written three times to your browser.
Finally, you might have noticed example code in this book where the ERb
chunks ended with
-%>. The minus sign tells ERb not to include the new-
line that follows in the resulting HTML file. In the following example, there
will not be a gap between line one and line two in the output.
line one
<% @time = Time.now -%>
line two
Escaping Substituted Values
There’s one critical thing you have to know about using rhtml templates.
When you insert a value using
<%= %>, it goes directly into the output
stream. Take the following case.
The value of name is <%= params[:name] %>
In the normal course of things, this will substitute in the value of the
request parameter
name. But what if our user entered the following URL?
/>Report erratum
HELPERS 332
The strange sequence %3cb%3ethere%3c/b%3e is a URL-encoded version of
the HTML
<b>there</b>. Our template will substitute this in, and the page
will be displayed with the word
there in bold.
This might not seem like a big deal, but at best it leaves your pages open
to defacement. At worst, as we’ll see in Chapter 21, Se curing Your Rails
Application,onpage427, it’s a gaping security hole that makes your site
vulnerable to attack and data loss.
Fortunately, the solution is simple. Always escape any text that you sub-
stitute into templates that isn’t meant to be HTML.
rhtml templates come
withamethodtodojustthat. Itslongnameis
html_escape(), but most
people just call it
h().
The value of name is <%= h(params[:name]) %>
Get into the habit of typing h( immediately after you type <%=.
You can’t use the
h( ) method if you need to substitute HTML-formatted
text into a tempate, as the HTML tags will be escaped: the user will see
<em>hello</em> rather than hello. However, you shouldn’t just take HTML
created by someone else and display it on your page. As we’ll see in Chap-
ter 21, Securing Your Rails Application,onpage427, this makes your appli-
cation vulnerable to a number of attacks.
The
sanitize( ) method offers some protection. It takes a string containing
HTML and cleans up dangerous elements: <
form
> and <
script
> tags are
escaped, and
on= attributes and links starting javascript: are removed.
The product descriptions in our Depot application were rendered as HTML
(that is, they were not escaped using the
h( ) method). This allowed us to
embed formatting information in them. If we allowed people outside our
organization to enter these descriptions, it would be prudent to use the
sanitize( ) method to reduce the risk of our site being attacked successfully.
17.4 Helpers
Earlier we said that it’s OK to put code in templates. Now we’re going
to modify that statement. It’s perfectly acceptable to put some code in
templates—that’s what makes them dynamic. However, it’s poor style to
put too much code in templates.
There are two main reasons for this. First, the more code you put in
the view side of your application, the easier it is to let discipline slip and
start adding application-level functionality to the template code. This is
definitely poor form; you want to put application stuff in the controller
Report erratum
HELPERS 333
David Says. . .
Where’s the Template Language?
Many environments have stigmatized the idea of code in the view—for
good reasons. Not all programming languages lend themselves well to
dealing with presentational logic in a succinct and effective way. To
cope, these environments come up with an alternative language to be
used instead of the primary when dealing with the view. PHP has Smarty,
Java has Velocity, Python has Cheetah.
Rails doesn’t have anything because Ruby is already an incredibly well-
suited language for dealing with presentational logic. Do you need to
show the capitalized body of a post, but truncating it to 30 characters?
Here’s the view code in Ruby.
<%= truncate(@post.body.capitalize, 30) %>
On top of being a good fit for presentation logic, using Ruby in the view
cuts down on the mental overhead of switching between the different
layers in the application. It’s all Ruby—for configuration, for the models,
for the controllers, and for the view.
and model layers so that it is available everywhere. This will pay off when
you add new ways of viewing the application.
The other reason is that
rhtml is basically HTML. When you edit it, you’re
editing an HTML file. If you have the luxury of having professional design-
ers create your layouts, they’ll want to work with HTML. Putting a bunch
of Ruby code in there just makes it hard to work with.
Rails provides a nice compromise in the form of helpers. A helper is sim-
ply a module containing methods that assist a view. Helper methods are
output-centric. They exist to generate HTML (or XML)—a helper extends
the behavior of a template.
By default, each controller gets its own helper module. It won’t be surpris-
ing to learn that Rails makes certain assumptions to help link the helpers
into the controller and its views. If a controller is named
BlogController,
it will automatically look for a helper module called
BlogHelper in the file
blog_helper.rb in the app/helpers directory. You don’t have to remember all
these details—the
generate controller script creates a stub helper module
automatically.
Report erratum
HELPERS 334
For example, the views for our store controller might set the title of gener-
ated pages from the instance variable
@page_title (which presumably gets
set by the controller). If
@page_title isn’t set, the template uses the text
“Pragmatic Store.” The top of each view template might look like
<h3><%= @page_title || "Pragmatic Store" %></h3>
<! >
We’d like to remove the duplication between templates: if the default name
of the store changes, we don’t want to edit each view. So let’s move the
code that works out the page title into a helper method. As we’re in the
store controller, we edit the file
store_helper.rb in app/helpers.
module StoreHelper
def page_title
@page_title || "Pragmatic Store"
end
end
Now the view code simply calls the helper method.
<h3><%= page_title %></h3>
<! >
(We might want to eliminate even more duplication by moving the render-
ing of the entire title into a separate partial template, shared by all the
controller’s views, but we don’t talk about them until Section 17.9, Partial
Page Templates,onpage359.)
Sharing Helpers
Sometimes a helper is just so good that you have to share it among all
your controllers. Perhaps you have a spiffy date-formatting helper that
you want to use in all of your controllers. You have two options.
First, you could add the helper method to the file
application_helper.rb in
app/helpers. As its name suggests, this helper is global to the entire appli-
cation, and hence its methods are available to all views.
Alternatively, you can tell controllers to include additional helper modules
using the
helper declaration. For example, if our date formatting helper
was in the file
date_format_helper.rb in app/helpers, we could load it and mix
it into a particular controller’s set of views using
class ParticularController < ApplicationController
helper :date_format
#
You can include an already-loaded class as a helper by giving its name to
the
helper declaration.
Report erratum
FORMATTING HELPERS 335
class ParticularController < ApplicationController
helper DateFormat
#
You can add controller methods into the template using helper_method.
Think hard before doing this—you risk mixing business and presentation
logic. See the documentation for
helper_method for details.
17.5 Formatting Helpers
Rails comes with a bunch of built-in helper methods, available to all views.
In this section we’ll touch on the highlights, but you’ll probably want to
look at the Action View RDoc for the specifics—there’s a lot of functionality
in there.
One set of helper methods deals with the formatting of dates, numbers,
and text.
<%= distance_of_time_in_words(Time.now, Time.local(2005, 12, 25)) %>
248 days
<%= distance_of_time_in_words(Time.now, Time.now + 33, false) %>
1minute
<%= distance_of_time_in_words(Time.now, Time.now + 33, true) %>
half a minute
<%= time_ago_in_words(Time.local(2004, 12, 25)) %>
116 days
<%= human_size(123_456) %>
120.6 KB
<%= number_to_currency(123.45) %>
$123.45
<%= number_to_currency(234.56, :unit => "CAN$", :precision => 0) %>
CAN$235.
<%= number_to_percentage(66.66666) %>
66.667%
<%= number_to_percentage(66.66666, :precision => 1) %>
66.7%
<%= number_to_phone(2125551212) %>
212-555-1212
Report erratum
FORMATTING HELPERS 336
<%= number_to_phone(2125551212, :area_code => true, :delimiter => " ") %>
(212) 555 1212
<%= number_with_delimiter(12345678) %>
12,345,678
<%= number_with_delimiter(12345678, delimiter = "_") %>
12_345_678
<%= number_with_precision(50.0/3) %>
16.667
<%= number_with_precision(50.0/3, 1) %>
16.7
The
debug( ) method dumps out its parameter using YAML and escapes the
result so it can be displayed in an HTML page. This can help when trying
to look at the values in model objects or request parameters.
<%= debug(params) %>
!ruby/hash:HashWithIndifferentAccess
name: Dave
language: Ruby
action: objects
controller: test
Yet another set of helpers deal with text. There are methods to truncate
strings and highlight words in a string (useful to show search results,
perhaps).
<%= simple_format(@trees) %>
Formats a string, honoring line and paragraph breaks. You could
give it the plain text of the Joyce Kilmer poem Trees and it would add
the HTML to format it as follows:
<p> I think that I shall never see
<br />A poem lovely as a tree.</p>
<p>A tree whose hungry mouth is prest
<br />Against the sweet earth’s flowing breast;
</p>
<%= excerpt(@trees, "lovely", 8) %>
A poem lovely as a tre
<%= highlight(@trees, "tree") %>
I think that I shall never see
A poem lovely as a <strong class="highlight">tree</strong>.
Report erratum
LINKING TO OTHER PAGES AND RESOURCES 337
A <strong class="highlight">tree</strong> whose hungry mouth is
prest
Against the sweet earth’s flowing breast;
<%= truncate(@trees, 20) %>
I think that I sh
There’s a method to pluralize nouns.
<%= pluralize(1, "person") %> but <%= pluralize(2, "person") %>
1 person but 2 people
If you’d like to do what the fancy web sites do and automatically hyperlink
URLs and e-mail addresses, there’s a helper to do that. There’s another
that strips hyperlinks from text.
Finally, if you’re writing something like a blog site, or you’re allowing users
to add comments to your store, you could offer them the ability to create
their text in Markdown (BlueCloth)
2
or Textile (RedCloth)
3
format. These
are simple formatters that take text with very simple, human-friendly
markup and convert it into HTML. If you have the appropriate libraries
installed on your system,
4
this text can be rendered into views using the
markdown() and textile( ) helper methods.
17.6 Linking to Other Pages and Resources
The ActionView::Helpers::AssetTagHelper and ActionView::Helpers::UrlHelper mod-
ules contains a number of methods that let you reference resources exter-
nal to the current template. Of these, the most commonly used is
link_to(),
which creates a hyperlink to another action in your application.
<%= link_to "Add Comment", :action => "add_comment" %>
The first parameter to link_to( ) is the text displayed for the link. The next
is a hash specifying the link’s target. This uses the same format as the
controller
url_for( ) method, which we discussed back on page 284.
A third parameter may be used to set HTML attributes on the generated
link. This attribute hash supports an additional key,
:confirm, whose value
is a short message. If present, JavaScript will be generated to display the
message and get the user’s confirmation before the link is followed.
2
/>3
/>4
If you use RubyGems to install the libraries, you’ll need to add an appropriate require_gem
to your environment.rb.
Report erratum
LINKING TO OTHER PAGES AND RESOURCES 338
<%= link_to "Delete", { :controller => "admin",
:action => "delete",
:id => @product
},
{ :class => "redlink",
:confirm => "Are you sure?"
}
%>
The button_to( ) method works the same as link_to( ) but generates a button
in a self-contained form, rather than a straight hyperlink. As we discussed
Section 16.9, The Problem with GET Requests,onpage324, this is the pre-
ferred method of linking to actions that have side effects. However, these
buttons live in their own forms, which imposes a couple of restrictions:
they cannot appear inline, and they cannot appear inside other forms.
There are also a couple of conditional linking methods that generate hyper-
links if some condition is met, and just return the link text otherwise. The
link_to_unless_current( ) helper is useful for creating menus in sidebars where
the current page name is shown as plain text and the other entries are
hyperlinks.
<ul>
<% %w{ create list edit save logout }.each do |action| -%>
<li>
<%= link_to_unless_current(action.capitalize, :action => action) %>
</li>
<% end -%>
</ul>
As with url_for(),link_to( ) and friends also support absolute URLs.
<%= link_to("Help", "e/help/index.html")%>
The image_tag( ) helper can be used to create <
img
> tags.
<%= image_tag("/images/dave.png", :class => "bevel", :size => "80x120")%>
If the image path doesn’t contain a / character, Rails assumes that it
lives under the
/images directory. If it doesn’t have a file extension, Rails
assumes .
png. The following is equivalent to the previous example.
<%= image_tag("dave", :class => "bevel", :size => "80x120")%>
You can make images into links by combining link_to() and image_tag().
<%= link_to(image_tag("delete.png", :size="50x22"),
{ :controller => "admin",
:action => "delete",
:id => @product
},
{ :confirm => "Are you sure?" })
%>
Report erratum
LINKING TO OTHER PAGES AND RESOURCES 339
The mail_to( ) helper creates a mailto: hyperlink that, when clicked, normally
loads the client’s e-mail application. It takes an e-mail address, the name
of the link, and a set of HTML options. Within these options, you can
also use
:bcc, :cc, :body,and:subject to initialize the corresponding e-
mail fields. Finally, the magic option
:encode=>"javascript" uses client-side
JavaScript to obscure the generated link, making it harder for spiders to
harvest e-mail addresses from your site.
5
<%= mail_to("", "Contact Support",
:subject => "Support question from #{@user.name}",
:encode => "javascript")%>
The AssetTagHelper module also includes helpers that make it easy to link
to stylesheets and JavaScript code from your pages, and to create auto-
discovery RSS or Atom feed links. We created a stylesheet link in the
layouts for the Depot application, where we used
stylesheet_link_tag() in the
head.
File 35 <%= stylesheet_link_tag "scaffold", "depot", :media => "all" %>
An RSS or Atom link is a header field that points to a URL in our appli-
cation. When that URL is accessed, the application should return the
appropriate RSS or Atom XML.
<html>
<head>
<%= auto_discovery_link_tag(:rss, :action =>
'rss_feed')%>
</head>
Finally, the JavaScriptHelper module defines a number of helpers for work-
ing with JavaScript. These create JavaScript snippets that run in the
browser to generate special effects and to have the page dynamically inter-
act with our application. That’s the subject of a separate chapter, Chap-
ter 18, The Web, V2.0,onpage373.
By default, image and stylesheet assets are assumed to live in the
/images
and /stylesheets directories of the host runnning the application. If the
path given to an asset tag method includes a forward slash, then the path
is assumed to be absolute, and no prefix is applied. Sometimes it makes
sense to move this static content onto a separate box or to different loca-
tions on the current box. Do this by setting the configuration variable
asset_host.
ActionController::Base.asset_host = " />5
But it also means your users won’t see the e-mail link if they have JavaScript disabled
in their browsers.
Report erratum
PAGINATION 340
17.7 Pagination
A community site might have thousands of registered users. We might
want to create an administration action to list these, but dumping thou-
sands of names to a single page is somewhat rude. Instead, we’d like to
divide the output into pages and allow the user to scroll back and forth in
these.
Rails uses pagination to do this. Pagination works at the controller level
and at the view level. In the controller, it controls which rows are fetched
from the database. In the view, it displays the links necessary to navigate
between different pages.
Let’s start in the controller. We’ve decided to use pagination when display-
ing the list of users. In the controller, we declare a paginator for the
users
table.
File 162 def user_list
@user_pages, @users = paginate(:users, :order_by =>
'name')
end
The declaration returns two objects. @user_pages is a paginator object. It
divides the users model objects into pages, each containing by default 10
rows. It also fetches a pageful of users into the
@users variable. This can be
used by our view to display the users, 10 at a time. The paginator knows
which set of users to show by looking for a request parameter, by default
called
page. If a request comes in with no page parameter, or with page=1,
the paginator sets
@users to the first 10 users in the table. If page=2,the
11
th
through 20
th
users are returned. (If you want to use some parameter
other than
page to determine the page number, you can override it. See
the RDoc.)
Over in the view file
user_list.rhtml, we display the users using a conventional
loop, iterating over the
@users collection created by the paginator. We use
the
pagination_links( ) helper method to construct a nice set of links to other
pages. By default, these links show the two page numbers on either side
of the current page, along with the first and last page numbers.
File 173 <table>
<tr><th>Name</th></tr>
<% for user in @users %>
<tr><td><%= user.name %></td>
<% end %>
</table>
<hr>
<%= pagination_links(@user_pages) %>
<hr>
Report erratum
FORM HELPERS 341
Figure 17.1: Paging Through Some Names
Navigate to the user_list action and you’ll see the first page of names. Click
the number 2 in the pagination links at the bottom, and the second page
will appear (as shown in Figure 17.1 ).
This example represents the middle-of-the-road pagination: we define the
pagination explicitly in our
user_list action. We could also have defined pag-
ination implicitly for every action in our controller using the
paginate dec-
laration at the class level. Or, we could go to the other extreme, manually
creating
Paginator objects and populating the current page array ourselves.
These different uses are all covered in the RDoc.
17.8 Form Helpers
Rails features a fully integrated web stack. This is most apparent in the
way that the model, controller, and view components interoperate to sup-
port creating and editing information in database tables.
Figure 17.2, on the next page, shows how the various attributes in the
model pass through the controller to the view, on to the HTML page, and
back again into the model. The model object has attributes such as
name,
country,andpassword. The template uses helper methods (which we’ll dis-
cuss shortly) to construct an HTML form to let the user edit the data in
Report erratum
FORM HELPERS 342
@params = {
:id => 1234,
:user => {
:name => " ",
:country => " ",
:password => " " }
}
<form action="/myapp/save/1234">
<input name="user[name]" >
<input name="user[country]" >
<input name="user[password]" >
. . .
</form>
<%= form_tag :action => 'save', :id => @user %>
<%= text_field 'user', 'name' %></p>
<%= text_field 'user', 'country' %></p>
<%= password_field 'user', 'password' %></p>
. . .
<%= end_form_tag %>
def save
user = User.find(params[:id])
user.update_attributes(params[:user])
if user.save
end
end
The application receives a request
to edit a user. It reads the data into
a new User model object.
The edit.rhtml template is called. It
uses the information in the user
object to generate
the HTML is sent to the browser.
When the response is received
the parameters are extracted into a
nested hash.
The save action uses the
parameters to find the user record
and update it.
myapp_controller.rb
edit.rhtml
def edit
@user = User.find(params[:id])
end
Figure 17.2: Models, Controllers, and Views Work Together
Report erratum
FORM HELPERS 343
the model. Note how the form fields are named. The country attribute, for
example, is mapped to an HTML input field with the name
user[country].
When the user submits the form, the raw POST data is sent back to our
application. Rails extracts the fields from the form and constructs the
params hash. Simple values (such as the id field, extracted by routing
from the form action) are stored as scalars in the hash. But, if a param-
eter name has brackets in it, Rails assumes that it is part of more struc-
tured data and constructs a hash to hold the values. Inside this hash, the
string inside the brackets is used as the key. This process can repeat if a
parameter name has multiple sets of brackets in it.
Form parameters params
id=123 { :id => "123" }
user[name]=Dave
{:user=>{:name=>"Dave"}}
user[address][city]=Wien
{ :user => { :address => { :city => "Wien" }}}
In the final part of the integrated whole, model objects can accept new
attribute values from hashes, which allows us to say
user.update_attributes(params[:user])
Rails integration goes deeper than this. Looking at the .rthml file in Fig-
ure 17.2 you can see that the template uses a set of helper methods to
create the form’s HTML, methods such as
form_tag() and text_field(). Let’s
look at these helper methods next.
Form Helpers
HTML forms in templates should start with a form_tag() and end with
end_form_tag( ). The first parameter to form_tag( ) is a hash identifying the
action to be invoked when the form is submitted. This hash takes the same
options as
url_for( ) (see page 289). An optional second parameter is another
hash, letting you set attributes on the HTML form tag itself. As a special
case, if this hash contains
:multipart => true, the form will return multi-
part form data, allowing it to be used for file uploads (see Section 17.8,
Uploading Files to Rails Applications,onpage350).
<%= form_tag { :action => :save }, { :class => "compact" }%>
end_form_tag( ) takes no parameters.
Field Helpers
Rails provides integrated helper support for text fields (regular, hidden,
password, and text areas), radio buttons, and checkboxes. (It also sup-
Report erratum
FORM HELPERS 344
Forms Containing Collections
If you need to edit multiple objects from the same model on one form,
add open and closed brackets to the name of the instance variable you
pass to the form helpers. This tells Rails to include the object’s id as part of
the field name. For example, the following template lets a user alter one
of more image URLs associated with a list of products.
File 168 <%= start_form_tag %>
<% for @product in @products %>
<%= text_field("product[]",
'image_url')%><br />
<% end %>
<%= submit_tag %>
<%= end_form_tag %>
When the form is submitted to the controller, params[:product] will be a hash
of hashes, where each key is the id of a model object and the corre-
sponding value are the values from the form for that object. In the con-
troller, this could be used to update all product rows with something like
File 158 Product.update(params[:product].keys, params[:product].values)
ports <
input
> tags with type="file", but we’ll discuss these in Section 17.8,
Uploading Files to Rails Applications,onpage350.)
All helper methods take at least two parameters. The first is the name
of an instance variable (typically a model object). The second parameter
names the attribute of that instance variable to be queried when setting
the field value. Together these two parameters also generate the name for
the HTML tag. The parameters may be either strings or symbols; idiomatic
Rails uses symbols.
All helpers also take an options hash, typically used to set the class of
the HTML tag. This is normally the optional third parameter; for radio
buttons, it’s the fourth. However, keep reading before you go off designing
a complicated scheme for using classes and CSS to flag invalid fields. As
we’ll see later, Rails makes that easy.
Report erratum
FORM HELPERS 345
Text Fields
text_field(:variable, :attribute, options)
hidden_field(:variable, :attribute, options)
password_field(:variable, :attribute, options)
Construct an <
input
> tag of type text, hidden,orpassword respectively. The
default contents will be taken from
@variable.attribute. Common options
include
:size => "nn" and :maxsize=> "nn".
Text Areas
text_area(:variable, :attribute, options)
Construct a two-dimensional text area (using the HTML <
textarea
> tag).
Common options include
:cols => "nn" and :rows => "nn".
Radio Buttons
radio_button(:variable, :attribute, tag_value, options)
Create a radio button. Normally there will be multiple radio buttons for a
given attribute, each with a different tag value. The one whose tag value
matches the current value of the attribute will be selected when the but-
tons are displayed. If the user selects a different radio button, the value of
its tag will be stored in the field.
Checkboxes
check_box(:variable, :attribute, options, on_value, off_value)
Create a checkbox tied to the given attribute. It will be checked if the
attribute value is true or if the attribute value when converted to an integer
is nonzero.
The value subsequently returned to the application is set by the fourth and
fifth parameters. The default values set the attribute to
"1" if the checkbox
is checked,
"0" otherwise.
Selection Lists
Selection lists are those drop-down list boxes with the built-in artificial
intelligence that guarantees the choice you want can be reached only by
scrolling past everyone else’s choice.
Selection lists contain a set of options. Each option has a display string
and an optional value attribute. The display string is what the user sees,
Report erratum