Apress Pro PHP-GTK phần 8 potx
Bạn đang xem bản rút gọn của tài liệu. Xem và tải ngay bản đầy đủ của tài liệu tại đây (792.02 KB, 37 trang )
CHAPTER 12 ■ ADDING IMAGES258
Figure 12-1. A broken image icon
Using a Stock ID
In previous examples, you have seen how to create images for buttons and menu items by using
stock IDs. A stock ID is a shortcut that identifies a commonly used image. You can also create
a regular image from a stock ID by using new_from_stock. This static constructor takes the stock
ID plus a size. The size is defined by a GtkIconSize constant. Stock images come in different sizes
so that they can be used for different purposes. Each use has its own size constant, as follows:
• Gtk::ICON_SIZE_MENU: A small image normally used in menus.
• Gtk::ICON_SIZE_SMALL_TOOLBAR: A small version of the icon used for toolbars.
• Gtk::ICON_SIZE_LARGE_TOOLBAR: A larger version of the toolbar icon.
• Gtk::ICON_SIZE_BUTTON: The version normally used for buttons.
• Gtk::ICON_SIZE_DND: The icon size used when an item is dragged.
• Gtk::ICON_SIZE_DIALOG: The version normally used in dialog windows.
Using a Pixel Buffer
Another way to create an image is from data in memory. An image stored in memory can usu-
ally be found in a GdkPixbuf. A pixel buffer (or pixbuf ) is simply a representation of the image
in memory. It cannot be displayed on its own; it is just data. You can put an image into a pixbuf
when an application is started to allow commonly used images to be loaded more quickly.
A pixbuf can be created from a file, just as an image can be created. To create a pixbuf
from a file, call the static constructor new_from_file and pass a file path. Listing 12-1 creates
a pixbuf from a file and then creates an image from the pixbuf using the static constructor
new_from_pixbuf.
Listing 12-1. Loading an Image into a GdkPixbuf and Then a GtkImage
<?php
// Create a window to display the image.
$window = new GtkWindow();
// Close the application cleanly.
$window->connect_simple('destroy', array('Gtk', 'main_quit'));
// Load a pixbuf from a file.
$pb = GdkPixbuf::new_from_file('Crisscott/images/logo.png');
6137ch12.qxd 3/14/06 2:29 PM Page 258
CHAPTER 12 ■ ADDING IMAGES 259
// Create the image from the pixbuf.
$image = GtkImage::new_from_pixbuf($pb);
// Add the image to the window.
$window->add($image);
// Show the image and the window.
$window->show_all();
// Start the main loop.
Gtk::main();
?>
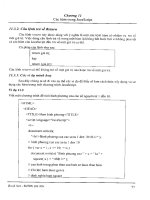
Using GdkPixbuf and GtkImage, we can now add product images to the Crisscott PIMS
application. Product images should appear in two places: in the product summary area and in
the product editing tool.
Listing 12-2 shows the code added to the Crisscott_Tools_ProductEdit class to allow the
user to add or change a product image. The added lines include a GtkEntry for entering the path
to the image file and the code to display the images. In this example, the creation of the pixbuf
is wrapped in a try/catch block. That is because if the file for the pixbuf is not found, an excep-
tion will be thrown. This allows the application to detect a failure to load an image.
Listing 12-2. Adding Product Images to the Application
<?php
// The added lines from the product summary area.
class Crisscott_Tools_ProductSummary extends GtkTable {
//
public function displaySummary(Crisscott_Product $product)
{
// Set the product.
$this->product = $product;
// Set the attribute labels to the values of the product.
$this->productName->set_text($product->name);
$this->productType->set_text($product->type);
// Get the category information.
require_once 'Crisscott/Inventory.php';
$inv = Crisscott_Inventory::singleton();
$cat = $inv->getCategoryById($product->categoryId);
// Set the category name.
$this->productCategory->set_text($cat->name);
// Set the product price.
$this->productPrice->set_text($product->price);
// Remove the current product image.
$this->productImage->remove($this->productImage->get_child());
6137ch12.qxd 3/14/06 2:29 PM Page 259
CHAPTER 12 ■ ADDING IMAGES260
// Try to add the product image.
try {
// Create a pixbuf.
$pixbuf = GdkPixbuf::new_from_file($product->imagePath);
// Create an image from the pixbuf.
$this->productImage->add(GtkImage::new_from_pixbuf($pixbuf));
// Show the image.
$this->productImage->show_all();
} catch (Exception $e) {
// Just fail silently.
}
}
//
}
class Crisscott_Tools_ProductEdit extends GtkTable {
//
private function _layout()
{
// Set up the data entry widgets.
//
$this->imageContainer = new GtkFrame();
$this->imagePathEntry = new GtkEntry();
//
// Set up the labels.
//
$this->imageLabel = new GtkLabel('Image');
// Set the labels' size.
//
$this->imageLabel->set_size_request(100, -1);
//
// Next align each label within the parent container.
//
$this->imageLabel->set_alignment(0, .5);
// Make all of the labels use markup.
//
$this->imageLabel->set_use_markup(true);
//
6137ch12.qxd 3/14/06 2:29 PM Page 260
CHAPTER 12 ■ ADDING IMAGES 261
// Attach the image widgets.
$this->attachWithAlign($this->imageContainer, 2, 4, 0, 4, Gtk::FILL, 0);
$this->attachWithAlign($this->imageLabel, 2, 4, 4, 5, Gtk::FILL, 0);
$this->attachWithAlign($this->imagePathEntry, 3, 4, 4, 5, Gtk::FILL, 0);
//
}
public function resetProduct()
{
// Make sure that there is a product.
if (!isset($this->product)) {
require_once 'Crisscott/Product.php';
$this->product = new Crisscott_Product();
}
// Update the tools in the widget.
//
$this->imagePathEntry->set_text($this->product->imagePath);
// Remove the current image.
$this->imageContainer->remove($this->imageContainer->get_child());
// Try to load the product image.
try {
// Load the image into a pixbuf.
$pixbuf = GdkPixbuf::new_from_file($this->product->imagePath);
// Load the pixbuf into an image.
$this->imageContainer->add(GtkImage::new_from_pixbuf($pixbuf));
// Show the image.
$this->imageContainer->show_all();
} catch (Exception $e) {
// Fail silently.
// The product object will verify if the image exists.
}
//
}
}
?>
Figure 12-2 shows the new version of the application. In Chapter 14, we will expand on
this even further to make it easier to find a valid file path.
6137ch12.qxd 3/14/06 2:29 PM Page 261
CHAPTER 12 ■ ADDING IMAGES262
Figure 12-2. Product images in the application
Note that in Figure 12-2, the image in the product summary area is not quite right. The
image is cropped because it doesn’t fit in the area provided. Instead of resizing the application
to fit the image, it is more reasonable to resize the image to fit the application.
Scaling Images
Resizing an image is also known as scaling. The quick and easy way to scale a GdkPixbuf is by
using scale_simple. scale_simple takes a pixbuf, a new height, and a new width, and returns
a new pixbuf with the given dimensions.
■Caution scale_simple scales the buffer exactly as it is told. It does not respect the aspect ratio of the
original buffer. Make sure that the new dimensions you choose do not distort the buffer beyond your accept-
able limits.
scale_simple also requires one more argument, which tells GDK how to create the new
image. Each of the following methods tells the pixbuf to scale the new image in a different
manner, using a different algorithm. The faster the algorithm, the lower the quality of the
scaled image.
6137ch12.qxd 3/14/06 2:29 PM Page 262
CHAPTER 12 ■ ADDING IMAGES 263
• Gdk::INTERP_NEAREST: This is the fastest way to scale an image, but the quality of the
new image will likely be unacceptable, especially when making the image smaller.
• Gdk::INTERP_HYPER: This produces the best-quality image, but may be too slow for some
applications or for large images.
• Gdk::INTERP_TILES: This method is probably best when you are not certain if the buffer
is being scaled up or being scaled down. It resembles Gdk::INTERP_NEAREST when scaling
up and Gdk::INTERP_BILINEAR when scaling down.
• Gdk::INTERP_BILINEAR: This offers the best balance of quality and speed.
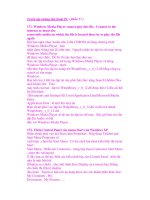
In Listing 12-3, the product image for the product summary area is scaled to fit in the 100
× 100 pixel area set aside for the image.
Listing 12-3. Scaling a GdkPixbuf
<?php
class Crisscott_Tools_ProductSummary extends GtkTable {
//
public function displaySummary(Crisscott_Product $product)
{
//
// Remove the current product image.
$this->productImage->remove($this->productImage->get_child());
// Try to add the product image.
try {
// Create a pixbuf.
$pixbuf = GdkPixbuf::new_from_file($product->imagePath);
// Scale the image.
$pixbuf = $pixbuf->scale_simple(80, 100, Gdk::INTERP_BILINEAR);
// Create an image from the pixbuf.
$this->productImage->add(GtkImage::new_from_pixbuf($pixbuf));
// Show the image.
$this->productImage->show_all();
} catch (Exception $e) {
// Just fail silently.
}
}
//
}
?>
Figure 12-3 shows the product summary area with the scaled image.
6137ch12.qxd 3/14/06 2:29 PM Page 263
CHAPTER 12 ■ ADDING IMAGES264
■Tip Another method for scaling an image is named scale. scale is a very powerful method for manipu-
lating images. Like
scale_simple, it scales an image, but it also can take a portion of the new image and
paste it onto an existing image. This method allows for some rather creative image manipulations, but is a little
too complicated for use in most applications. For more details about using
scale, consult the GdkPixbuf
documentation at .
Setting Transparency
Images can not only define visible pixels, but they also can define pixels that cannot be seen.
These pixels are transparent. Transparent pixels allow the user to see through parts of an image.
Transparent pixels are useful in cases where an image is a unique shape and you do not want
to have a solid-colored background.
For example, let’s say that the products can be rated from zero to five stars based on how
well they sell. In order to make the application look clean and professional, the star icons
depicting the rating should appear in the application without a background. The actual data
that defines an image always defines a rectangular region. To show only the star shape, you
can make some of the pixels in the rectangular region transparent and leave the pixels that
represent the star as opaque.
Most graphic editors, like The GIMP and Photoshop, allow you to create an image with
transparent pixels built in. GdkPixbuf will respect transparent pixels that are built into an image
file. However, it is sometime necessary to work with images that have been created without
transparency. This doesn’t present too much of a problem, because you can add transparency
to any GdkPixbuf that doesn’t have transparency already. You do this by creating an alpha channel
for the GdkPixbuf. An alpha channel defines a particular color in an image to make transparent.
The following line makes all white pixels in an image transparent:
$newPixbuf = $pixbuf->add_alpha_channel(true, 255, 255, 255);
The first argument to add_alpha_channel is a Boolean that tells the pixbuf to make the
color transparent. The next three arguments define the color to make transparent. The color
values here are 8-bit values for red, green, and blue (as opposed to the 16-bit values used by
GdkColor). Now when the image shown, all white pixels will be transparent, and the color of
the widget behind the image (usually a GtkButton or GtkWindow) will show through.
Figure 12-3. A scaled product image
6137ch12.qxd 3/14/06 2:29 PM Page 264
CHAPTER 12 ■ ADDING IMAGES 265
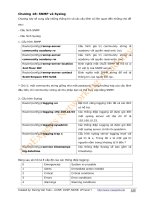
Figure 12-4. A GtkTextView with pieces missing
Animations
Static images are not the only type of images that you can use with PHP-GTK. You can also
load animations. An animation is a series of static images where the images are displayed one
after another.
An animation is useful to draw attention to an image. Something moving on the screen
will be much more eye-catching than a static image. An animation can also be used as a sort
of progress indicator. While work is being performed, you can display an animation. When the
work is done, the animation can be replaced with a static image again.
Working with animations is just like working with static images. In fact, an animation (most
likely in .gif format) can even be loaded with GtkImage::new_from_file. When an animation is
loaded into a GtkImage, it creates a GdkPixbufAnimation instead of a regular GdkPixbuf. A GtkImage
that contains an animation can be added to a container just like any other widget.
Widget Shaping
You can use images for more than just adding pictures to an application. Using images, you
can define shapes that you can then apply to windows and other widgets. An image can be
used to turn a normal rectangular button into a symbol such as a plus sign, a star, or any other
shape.
Setting a widget’s shape is like trimming the widget using a stencil. The stencil defines
which parts should be left and which parts should be removed. After the stencil is applied, all
that is left of the widget are the parts the stencil did not say to trim.
For example, Figure 12-4 shows a GtkTextView that has been modified to remove some
parts from the middle. Notice how only the display of the widget is affected, not the actual
shape of the widget. The text still flows as if the GtkTextView were square.
■Caution Users often associate particular shapes with specific actions. For instance, they often expect
buttons and entries to be rectangular. Make sure that your modifications will have a positive impact on the
usability of the application before straying from the customary shapes and sizes.
6137ch12.qxd 3/14/06 2:29 PM Page 265
CHAPTER 12 ■ ADDING IMAGES266
To shape a widget, you use a pixel map (pixmap) in combination with a bitmap. GdkPixmap
is another format for storing image data in memory. The difference between a pixmap and
a pixbuf is that a pixmap can be drawn onto by other GDK objects.
A GdkPixmap is basically a way to map colors to a given pixel. The number of bits used to
represent each color in the pixmap is called the depth. The greater the depth, the more colors
a pixmap contains. One of the values that can be represented in a pixmap is transparency.
Transparent pixels are basically pixels that do not exist. GdkBitmap, also known as a bitmask, is
pixmap that has a depth of 1. In a bitmap, each bit does not represent a color, but rather indicates
an on or off state. Pixels that are off are transparent. When a bitmap is laid over a GtkWindow, the
bits that are off will not allow the window to show through. This is how a widget is shaped.
The window in Figure 12-4 was created from the code in Listing 12-4.
Listing 12-4. Changing the Shape of a GtkWindow
<?php
// Create a window.
$window = new GtkWindow();
// Set up the window to exit cleanly.
$window->connect_simple('destroy', array('Gtk', 'main_quit'));
// Create a pixbuf from an image file.
$pb = GdkPixbuf::new_from_file('Crisscott/images/inverse.png');
// Get the objects that will shape the widget.
list($pixmap, $mask) = $pb->render_pixmap_and_mask();
// Create a GtkTextView and add some text.
$text = new GtkTextView();
$text->get_buffer()->set_text('This is a test. There is a whole ' .
'in the middle of this text view widget.');
// Wrap the text.
$text->set_wrap_mode(Gtk::WRAP_WORD);
// Change the shape of the text view.
$text->shape_combine_mask($mask, 0, 0);
// Add the text view to the window.
$window->add($text);
// Show the window and image.
$window->show_all();
// Start the main loop.
Gtk::main();
?>
The first step in creating the “see-through” text view is to create a regular GtkWindow. Next,
a pixbuf is created from an image file. After the pixbuf is created, it is used to generate two
objects, one of which will be used as the stencil for shaping the window. The GdkPixbuf
6137ch12.qxd 3/14/06 2:29 PM Page 266
CHAPTER 12 ■ ADDING IMAGES 267
method render_pixmap_and_mask takes no arguments and returns an array containing
a GdkPixmap and a GdkBitmap.
The GdkBitmap is then passed to the window’s shape_combine_mask method. This method
applies the mask to the GtkTextView, starting from the offset given by the last two arguments.
In this case, the mask is not offset because both the x offset (second argument) and y offset
(last argument) are 0. The rest of the example is pretty standard. The text view is added to the
window, the window is shown, and the main loop is started.
Summary
Images are an essential for almost all applications. Simply displaying an image is rather easy.
Once created, a GtkImage can be added to any container. All of the methods for GtkImage are
either constructors for creating the image from different sources or methods for setting the
contents of a previously created image.
To work with the contents of an image, you must edit a pixel buffer, or pixbuf. GdkPixbuf
stores an image and allows the image to be manipulated. A pixbuf can be scaled to a different
size or turned into a pixel map (pixmap) and bitmask. You can use a GdkBitmap to give widgets
a custom shape. This way, the use of images in an application not only makes the application
more visually appealing, but can also shape the application itself.
Chapter 13 looks at what it takes to allow users to drag objects in an application and move
them to another part of the application. This is known as drag-and-drop. You will learn not only
how to make an item draggable, but also how to make a widget accept or reject items for dropping.
6137ch12.qxd 3/14/06 2:29 PM Page 267
6137ch12.qxd 3/14/06 2:29 PM Page 268
269
CHAPTER 13
■ ■ ■
Drag-and-Drop
Drag-and-drop, or DnD for short, refers to using the mouse to move an element on the screen
to another location. Most people are familiar with DnD—moving an icon from one place on
their desktop to another, dragging a file from one folder to another, and so on.
But DnD is not just about moving files around the file system. It is actually a metaphor for
interprocess communication. This means that DnD is a way for the user to supply a particular
piece of an application with information that is stored in a different part of the application or
comes from an entirely different process. For example, most web browsers will display an HTML
file when you drag it from your desktop and drop it over an open browser window.
Adding DnD to an application can help make its use more intuitive. DnD makes the answer
to “How do I get this data from here to there?” as simple as “Drag it and drop it.”
There are two parts to every DnD operation. First there is the source, or the item being
dragged, and then there is the destination, which is the place the item will be dropped. Of the
two, creating a destination is easier and so, we will consider that task first.
Drag-and-Drop Destinations
A destination is a widget that is configured to accept the information provided by dropped data
and do something with it. Any widget can be a destination for a drop. For example, a GtkEntry
widget used to collect the path of an image file may be configured to accept image files that are
dropped onto it. This allows users to drag an image file from their file system onto the widget.
Depending on the setup of the GtkEntry, the path to the file may be set as the GtkEntry’s text,
or maybe the image will be loaded into another widget.
Setting the Drag Destination
A few usability enhancements can be added to the Crisscott PIMS application by way of DnD.
To start, let’s look at what it takes to allow users to add product images simply by dragging an
icon from their desktop and dropping it in the product editing tool’s image path GtkEntry widget.
Listing 13-1 shows the code that sets the GtkEntry as a drop location.
6137ch13.qxd 3/14/06 2:30 PM Page 269
CHAPTER 13 ■ DRAG-AND-DROP270
Listing 13-1. Making a GtkEntry Accept Drops
<?php
class Crisscott_Tools_ProductEdit extends GtkTable {
//
private function _layout()
{
// Set up the data entry widgets.
$this->nameEntry = new GtkEntry();
//
$this->imagePathEntry = new GtkEntry();
// Make the image path entry accept file drops.
$this->acceptDrops($this->imagePathEntry);
}
public function acceptDrops($widget)
{
// Set the widget as a drop location.
$widget->drag_dest_set(Gtk::DEST_DEFAULT_ALL,
array(array('text/uri-list', 0, 0)),
Gdk::ACTION_COPY | Gdk::ACTION_MOVE
);
// Connect the drag-data-received signal.
$widget->connect('drag-data-received', array($this, 'dragDataReceived'));
}
//
}
?>
Making a widget accept drops is a pretty quick process. Calling the drag_dest_set method
of GtkWidget is all it takes to make a widget accept drops. The method takes three arguments:
• flags: Flags that indicate what should happen when data is dragged over the widget.
• targets: An array that determines the drop types the widget will accept.
• actions: The possible actions the destination can take when data is dropped.
Drag Destination Flags
The first argument to drag_dest_set (flags) is bitmask of values that determines how the
widget should react when potential drop data is dragged over the widget. The following are
the possible flag values:
6137ch13.qxd 3/14/06 2:30 PM Page 270
CHAPTER 13 ■ DRAG-AND-DROP 271
• Gtk::DEST_DEFAULT_MOTION: Causes the widget to check to see if data being dragged over
the widget is acceptable to be dropped onto the widget.
• Gtk::DEST_DEFAULT_HIGHLIGHT: Causes the widget to be highlighted while acceptable
drop data is held over the widget.
• Gtk::DEST_DEFAULT_DROP: Causes the widget to call drag_get_data when acceptable data
is dropped on the widget.
• Gtk::DEST_DEFAULT_ALL: Combines all three flags. Gtk::DEST_DEFAULT_ALL is used a vast
majority of time.
In Listing 13-1, the flag value passed to drag_dest_set is Gtk::DEST_DEFAULT_ALL.
Drag Destination Targets
The second argument to drag_dest_set (targets) is an array of targets that the widget should
accept. The targets are not specific items, but rather types of items. Each element of the array
is called a target entry. Each target entry is itself an array consisting of a string and two integers.
The string indicates the MIME type of the data that is acceptable to drop in the destination
widget. Listing 13-1 sets this to text/uri-list. This means that only lists of URIs (strings that
give the location of files either on the local host or on a remote machine) are allowed to be
dropped on the widget. When a file from the user’s desktop is dragged over the widget, the
data type will be text/uri-list. This means that the user can drag an icon onto the widget
and it will respond when the data is dropped. If other types of data, such as highlighted text
from a website (text/plain), are dropped onto the widget, the data will be ignored.
The second element of a target entry array is a flag that can be used to further restrict the
data that may be dropped onto the widget. In Listing 13-1, this value is set to 0 because no
other restrictions are needed. However, it could be set to either of the following:
• Gtk::TARGET_SAME_APP: Only data dragged from within the same application as the des-
tination widget will be accepted. For example, using this value will mean that the user
may not drag items from the desktop and drop them onto the destination widget.
• Gtk::TARGET_SAME_WIDGET: Only data from the same widget will be accepted as drop
data. This value is useful for widgets such as GtkTextView. It can be used to allow text to
be moved within the widget but restrict text from being pulled in from outside resources.
The final element of the target entry array is an integer used to identify the entry type.
This value will be passed to any callbacks used to handle the DnD events. The value should be
unique for each target entry. Using the integer ID is faster than comparing the data types, and
its main purpose it to save time.
Drag Destination Actions
The last argument of dest_drag_set (actions) is a bitmask value that defines what the destina-
tion widget should do with the dragged data. As in Listing 13-1, the values may be combined
to allow more than one type of action to happen when data is dropped. Possible values for this
argument are any combination of the following:
6137ch13.qxd 3/14/06 2:30 PM Page 271
CHAPTER 13 ■ DRAG-AND-DROP272
• Gdk::ACTION_COPY: Copy the dragged data. The location of a file should be copied when
a file is dragged onto the destination widget.
• Gdk::ACTION_MOVE: Move the data from the drag source to the destination. For example,
when dragging text from one part of a GtkTextView to another, it should be moved not
copied.
• Gdk::ACTION_LINK: Add a link to the data. Note that this is useful only if the source and
destination agree on what it means.
• Gdk::ACTION_PRIVATE: Indicate to the source that the destination will do something with
the data that the source will not understand.
• Gdk::ACTION_ASK: Ask the user what to do with the data. This is useful only if the source
allows multiple actions that the destination accepts.
Calling drag_dest_set is all that is needed to make a widget accept drops. Of course, that
is not all there is to DnD. Once a widget accepts drops, it must be set up to do something with
the data. That is what we will look at next.
■Note A widget can be unset as a drag destination using drag_dest_unset. Calling this method will clear
any drag destination information set using
drag_dest_set. This is useful to limit the number of times a widget
is allowed to accept dragged data.
Handling the drag-data-received Signal
When data is dropped onto a drag destination, the drag-data-received signal is emitted. This
signal indicates not only that data was dropped on the widget, but also that it matches one of
the target entry arrays used when setting up the destination. When this signal is fired, the
application should do something with the drag data. Listing 13-2 shows the creation of the signal
handler and the signal handler itself.
Listing 13-2. Creating a drag-data-received Signal Handler
<?php
class Crisscott_Tools_ProductEdit extends GtkTable {
//
public function acceptDrops($widget)
{
// Set the widget as a drop location.
$widget->drag_dest_set(Gtk::DEST_DEFAULT_ALL,
array(array('text/uri-list', 0, 0)),
Gdk::ACTION_COPY | Gdk::ACTION_MOVE
);
6137ch13.qxd 3/14/06 2:30 PM Page 272
CHAPTER 13 ■ DRAG-AND-DROP 273
// Connect the drag-data-received signal.
$widget->connect('drag-data-received', array($this, 'dragDataReceived'));
}
public function dragDataReceived($widget, $context, $x, $y, $data,
$info, $time, $userData)
{
// Get the dropped file's path.
$path = trim($data->data);
// Strip off the "file://localhost/" from the path.
// See the CAUTION note below!
$path = substr($path, 17);
// Check the mime type to make sure the file is an image.
if (strpos(mime_content_type($path), 'image') === false) {
return false;
}
// Set the current product's image path.
$this->product->imagePath = $path;
// Reset the product.
$this->resetProduct();
}
//
}
?>
■Caution File URIs are seldom implemented correctly.The correct format is file://hostname/path/
to/file
. Because of the many different implementations of this URI, it is a good idea to do a few checks to
make sure that the data points to an actual file. Take a look at
PEAR::Gtk_FileDrop (.
net/package/Gtk_FileDrop
) for a more complete example of working with file URIs. For a quick and easy
way to set a destination to accept file drops, check out
PEAR::Gtk2_FileDrop ( />package/Gtk2_FileDrop).
The signal handler created in Listing 13-2 is set up to receive eight arguments:
• destWidget: The destination widget where data was dropped. This is passed because the
signal handler was created with connect, rather than connect_simple.
• context: The drag context—information related to the data being dropped. The drag
context is an object that contains information such as the action that will happen
(Gdk::ACTION_COPY, Gdk::ACTION_MOVE, and so on), the data types offered by the drag source,
and the GdkWindow of the source and destination widgets.
6137ch13.qxd 3/14/06 2:30 PM Page 273
CHAPTER 13 ■ DRAG-AND-DROP274
• x: The horizontal coordinate of the cursor position when the data is dropped.
• y: The vertical coordinate of the cursor position when the data is dropped.
• data: An object containing information about the dragged data.
• info: The target entry ID number.
• time: The timestamp of the event.
• userData: An optional array of user data passed to the callback.
The data argument is a GtkSelectionData object, which contains information about the
dropped data. In Listing 13-2, the only property that is used is the data property, which contains
the data that is dropped. In the case of Listing 13-2, this is the path to the file that is dropped on
the GtkEntry. The path is a URI that pinpoints the file that was dropped on the widget. Notice
that a little work is needed to obtain a usable value. First, the string "file://localhost" needs
to be stripped off the beginning of the path. (Don’t forget that the file URI needs to point to an
actual file!) Next, any white space must also be removed from the end of the path.
■Tip If multiple data types are accepted by the destination, you can check the type of the dropped data by
inspecting the
type property of the GtkSelectionData object. However, if an appropriate ID was set in the
target entry, it is easier to simply check the info argument.
Drag-and-Drop Sources
Just as widgets can accept data that has been dropped onto them, they can also be used to
provide data by being dragged. Users may try to drag a list item to make it part of another list,
or they may drag a product to a part of the application, expecting that the application will allow
them to edit that product’s data. A widget that can be dragged from one part of the application
to another, or even to another application, is called a DnD source.
Setting the Drag Source
Listing 13-3 shows the Crisscott PIMS application’s product summary tool being turned into
a drag source.
Listing 13-3. Turning a Widget into a Drag Source
<?php
class Crisscott_MainWindow extends GtkWindow {
//
private function _populate()
{
// Create the layout table.
$table = new GtkTable(5, 3);
6137ch13.qxd 3/14/06 2:30 PM Page 274
CHAPTER 13 ■ DRAG-AND-DROP 275
// A shortcut for setting both the expand and fill properties.
$expandFill = Gtk::EXPAND|Gtk::FILL;
//
// Create a frame to hold the product summary tool.
$productSummary = new GtkFrame('PRODUCT SUMMARY');
$productSummary->set_size_request(-1, 150);
// Add the product summary tool.
require_once 'Crisscott/Tools/ProductSummary.php';
$this->productSummary = Crisscott_Tools_ProductSummary::singleton();
$productSummary->add($this->productSummary);
// Make the widget a drag source.
// It must be wrapped in a GtkEventBox.
$eb = new GtkEventBox();
// The data will be plain text and the user must use
// the first mouse button to drag.
$eb->drag_source_set(Gdk::BUTTON1_MASK, array(array('text/plain', 0, 0)),
Gdk::ACTION_COPY);
// Create a signal handler to get the appropriate data.
$eb->connect('drag-data-get',
array($this, 'getSummaryDragData'),
$this->productSummary);
// Add the product summary to the event box.
$eb->add($this->productSummary);
//
}
//
}
?>
One of the key things to notice about Listing 13-3 is that the ProductSummary tool itself is
not made a drag source. This is because no-window widgets—those without a GdkWindow—
cannot be made into drag sources. Because the ProductSummary tool extends GtkTable, it must
be wrapped inside a GtkEventBox if it is to be used as a drag source. This is not usually a big
deal for most applications.
Making a widget DnD source is very similar to making a widget a DnD destination. You
use the drag_source_set method, which takes three arguments:
6137ch13.qxd 3/14/06 2:30 PM Page 275
CHAPTER 13 ■ DRAG-AND-DROP276
• buttonMask: A bitmask of buttons that will initiate the drag operation.
• targets: An array that determines the drop types the widget will accept.
• actions: The possible actions the destination can take when data is dropped.
Drag Source Button Masks
The first argument to drag_source_set (buttonMask) is a mask of buttons that can be used to
start the drag operation. This bitmask determines which mouse buttons the user must hold
down in order to drag the widget. The bitmask should be a combination of one or more of the
masks for each button, as follows:
• Gdk::BUTTON1_MASK: The first mouse button.
• Gdk::BUTTON2_MASK: The second mouse button.
• Gdk::BUTTON3_MASK: The third mouse button.
• Gdk::BUTTON4_MASK: The fourth mouse button.
• Gdk::BUTTON5_MASK: The fifth mouse button.
For example, to allow either the first or second mouse button to be used to start a drag
operation, use Gdk::BUTTON1_MASK | Gdk::BUTTON2_MASK.
■Note PHP-GTK has support for mice with up to five buttons, but most users’ mice have only three buttons.
You should carefully consider your target audience before deciding to restrict drag operations to the fourth or
fifth mouse button.
Drag Source Targets and Actions
The next two arguments to drag_source_set are an array of targets and a bitmask of possible
actions. These two arguments take the same form as the corresponding arguments for
drag_dest_set. The targets argument is an array of target entries and defines the ways that
the data for the source may be represented. The actions bitmask determines what will happen
to the data when it is dropped.
Handling the drag-data-get Signal
Notice also that a signal handler is created for the drag-data-get signal. This signal is emitted
when the data is dropped. The callback should be used to set the data that will be passed on to
the drag destination. The data is set by modifying the GtkSelectionData object that is passed in as
one of the callback arguments. Listing 13-4 shows a callback that is connected to the drag-data-get
signal. It expects the same arguments as the signal handler used for the drag-data-received
signal (Listing 13-2).
6137ch13.qxd 3/14/06 2:30 PM Page 276
CHAPTER 13 ■ DRAG-AND-DROP 277
Listing 13-4. Setting Drag Data
<?php
class Crisscott_MainWindow extends GtkWindow {
//
private function _populate()
{
//
// Create a signal handler to get the appropriate data.
$eb->connect('drag-data-get',
array($this, 'getSummaryDragData'),
$this->productSummary)
//
}
public function getSummaryDragData($widget, $context, $selection,
$info, $time, $summary)
{
// Set the product id as the selection's data value.
$selection->set_text($summary->product->productId);
}
//
}
?>
In Listing 13-4, the set_text method is used to set the data property of the GtkSelectionData
object to the product ID of the ProductSummary tool’s current product. When the GtkSelectionData
object is passed on to the drag destination, the product ID can be retrieved from the data property
of the selection object.
Setting Drag Source Icons
When data is dragged from one place to another, the cursor turns into an icon representing
the type of data being moved. Normally, this is determined by the target entry value of the
drag source, but you can control which icon appears. This adds another level of customization
to an application. For example, if the drag source is a Crisscott product, the drag icon could be
set to a small version of the Crisscott logo. This lets the users know that they are moving prod-
uct data and not just an image or chunk of text.
Setting a custom icon is a simple matter of passing a GdkPixbuf object to a widget’s
drag_source_set_icon_pixbuf. Listing 13-5 shows a simple example.
6137ch13.qxd 3/14/06 2:30 PM Page 277
CHAPTER 13 ■ DRAG-AND-DROP278
Listing 13-5. Setting a Custom Drag Source Icon
<?php
class Crisscott_MainWindow extends GtkWindow {
//
private function _populate()
{
//
// Make the widget a drag source.
// It must be wrapped in a GtkEventBox.
$eb = new GtkEventBox();
// Set a drag source icon.
$pixbuf = GdkPixbuf::new_from_file('Crisscott/images/menuItem.png');
$eb->drag_source_set_icon_pixbuf($pixbuf);
//
}
//
}
?>
In this example, a new pixbuf is created using GdkPixbuf::new_from_file and is passed
directly to drag_source_set_icon_pixbuf. When the source is dragged, the cursor changes to
a small Crisscott logo. The end result can be seen in Figure 13-1.
6137ch13.qxd 3/14/06 2:30 PM Page 278
CHAPTER 13 ■ DRAG-AND-DROP 279
Figure 13-1. A custom drag source icon
Summary
To receive drop data, a widget must be set as a destination. This is a simple matter of calling
drag_dest_set. Of course, the widget must also be set up to handle the incoming data, and that
can be done by creating a signal handler for the drag-data-received signal. A source of drop
data is created using drag_source_set. The data that a source gives to the destination needs to
be set in the signal handler for the drag-data-get signal.
DnD is a powerful means to make an application more intuitive. It allows users to achieve
complex operations by simply dragging data from one place to another. DnD can be used to
communicate data from one part of an application to another or to send and receive data from
other applications. DnD empowers users to move or copy data by picking it up and dropping
it in another location, just as they would move a piece of paper from their desk to their filing
cabinet.
In Chapter 14, we will look at other ways to collect data from the user in the form of selectors
and dialogs. These are windows that pop up and present the users with a message or ask them
to make a choice. Selectors and dialogs allow the application to break specialized tasks out from
the rest of the application to maximize space and hide functionality that isn’t always needed.
6137ch13.qxd 3/14/06 2:30 PM Page 279
6137ch13.qxd 3/14/06 2:30 PM Page 280
281
CHAPTER 14
■ ■ ■
Using Selectors & Dialogs
User decisions are ultimately responsible for determining the course of an application’s
actions. For instance, a user is often prompted to confirm a pending action, such as closing
a file without saving, or choosing a particular value such as a filename or color. Normally, such
prompts do not need to appear within the interface but will appear in their own window, pre-
venting the user from interacting with other parts of the application until the request has been
satisfied. Prompts that pose a specific question are known as dialogs, while those that ask the
user to make a selection are known as selectors. For example, the prompt to confirm the closure
of a file without first saving it is known as a dialog, while the prompt to choose a specific filename
is a selector.
PHP-GTK 2 offers several widgets that make the process of creating and displaying dialogs
and selectors rather simple. Dialogs and selectors are really just GtkWindows, which are already
filled with a collection of widgets and emit certain signals. Instead of building a window and
filling it with buttons, labels, and lists, a developer can instantiate one of the dialog or selector
widgets, provide a few hints as to what the contents should be, and wait for the pop-up to return
information regarding the user’s choice. This chapter examines what is required to set up and
communicate with the many types of dialogs and selectors available in PHP-GTK 2.
Dialogs
GtkDialog is a widget designed to prompt the user to answer a question using a top-level window
that displays a message, providing a means for the user to respond. An example of such a win-
dow is presented in Figure 14-1. The dialog asks the user to confirm that they want to close the
application even though their work has not been saved. Note that these windows are made up
of two pieces: the top with the message or question, and the bottom containing buttons that
allow the user to provide some sort of feedback.
Figure 14-1. A simple GtkDialog window
6137ch14.qxd 3/14/06 2:33 PM Page 281
Listing 14-1 contains the code used to create the dialog in Figure 14-1. This listing only
shows the code that actually instantiates the class. Later examples will show how to use the
dialog in an application.
Listing 14-1. Creating a GtkDialog
<?php
// Set up the options for the dialog
$dialogOptions = 0;
// Make the dialog modal.
$dialogOptions = $dialogOptions | Gtk::DIALOG_MODAL;
// Destroy the dialog if the parent window is destroyed.
$dialogOptions = $dialogOptions | Gtk::DIALOG_DESTROY_WITH_PARENT;
// Don't show a horizontal separator between the two parts.
$dialogOptions = $dialogOptions | Gtk::DIALOG_NO_SEPARATOR;
// Set up the buttons.
$dialogButtons = array();
// Add a stock "No" button and make its response "No".
$dialogButtons[] = Gtk::STOCK_NO;
$dialogButtons[] = Gtk::RESPONSE_NO;
// Add a stock "Yes" button and make its response "Yes".
$dialogButtons[] = Gtk::STOCK_YES;
$dialogButtons[] = Gtk::RESPONSE_YES;
// Create the dialog.
$dialog = new GtkDialog('Confirm Exit', null, $dialogOptions, $dialogButtons);
// Add the warning message.
$dialog->vbox->pack_start(new GtkLabel('Are you sure you want to exit?'));
?>
A GtkDialog requires four pieces of information when it is created. The first is a string that
will be used as the title for the dialog window. In Listing 14-1, the title is “Confirm Exit.” The
dialog window in Figure 14-1 shows the title in the title bar of the window. The next argument
for the GtkDialog constructor is the parent window. This is a GtkWindow from which the dialog
was generated. If a GtkWindow is passed, the dialog will be associated with that window. When
it appears on the screen it will appear over the parent window. Depending on the value passed
as the third argument, the dialog can also be modal for the parent, meaning that the user must
answer the dialog’s question before continuing with the main application. If the value for the
second argument is null, the dialog will not be associated with any particular window. It will
CHAPTER 14 ■ USING SELECTORS & DIALOGS282
6137ch14.qxd 3/14/06 2:33 PM Page 282