practical liferay Java -based Portal Applications development apress phần 5 pptx
Bạn đang xem bản rút gọn của tài liệu. Xem và tải ngay bản đầy đủ của tài liệu tại đây (1.14 MB, 32 trang )
CHAPTER 4 ■ CREATING DISCUSSION FORUMS
123
• User Ranks
• RSS
• Anonymous Postings
• Ratings
Let us now look at these options in depth.
Email From
TheEmail From option allows you to configure the e-mail settings of your notification mes-
sages.ThecorrespondingtabbedscreenisshowninFigure4‑22.
Figure 4-22. Configuring the e‑mail format for the Email From notification
Here,youneedtoenterthenameande‑mailaddressofthemessagesender.Markthe
HTML FormatcheckboxifyouwanttoformatthemessageinHTML.Thescreenalsodisplays
the list of definitions used in your message.
Message Added Email
TheMessage Added Email option allows you to set the default format for the notification mes-
sage that goes to subscribers when a new message is posted to the forum.
You can define the Subject, Body, and Signature for the message. Liferay offers some pre-
defined terms you can use for these three fields, but you can choose to exclude them from
CHAPTER 4 ■ CREATING DISCUSSION FORUMS
124
your custom-formatted message. You can also type arbitrary text around the defined terms to
further customize the message.
Message Updated Email
TheMessage Updated Email option functions like the Message Added Email option. It allows
you to set the default format for the notification message that goes to subscribers when an
existing forum message has been updated.
Thread Priorities
TheMessage Boards application defines three priorities in the Thread Priorities screen: Urgent,
Sticky, and Announcement (see Figure 4-23).
Figure 4-23. Setting priority levels for threads
Dependingonimportance,prioritylevelsaresetfrom1to3.Urgent is assigned the high-
est priority level (3.0) while Announcement has the lowest priority level (1.0). For each priority
name,aURLforanimageisassigned.Thisimagegivesusersavisualclueregardingthemes-
sage priority.
CHAPTER 4 ■ CREATING DISCUSSION FORUMS
125
You are free to redefine these priority levels. For example, you might decide to create
moreprioritylevelsrangingfrom1to5,oreven1to10.Editthedisplayedboxestomodifythe
predefined priority levels and to add new ones. You can also select the localized language of
your choice from the drop-down list and perform the additional step of translating the text for
the thread-priority levels into that language.
Once you are done with your editing, click the Save button to save your changes. You and
your users will then be able to apply these priorities to newly created messages.
User Ranks
It is always a good practice to rank the users who post to your forum. Such ranking is typically
assigned based on the number of postings made by the user.
TheMessage Boards application provides a set of predefined ranks, which include these:
• Youngling=0
• Padawan=25
• JediKnight=100
• JediMaster=250
Eachranknameislistedwiththenumberofpostingsrequiredtoachievethatrank.For
example, a newbie is assigned the Youngling rank. When a user makes 25 postings to the
forum, he achieves the Padawan rank. After 100 postings, the Jedi Knight rank is assigned, and
so on. You can modify the rank names as well as the number of required postings to create
your own ranking system. You can also add more ranking levels of your own.
In addition to the ranks for community users, Message Boards also supplies several pre-
defined ranks for forum moderators. As you can do with thread priorities, you can select a
localized language and translate the ranking text into this newly selected language.
RSS
Inthe“CategoryActions”sectiontowardthe beginning of this chapter, you saw that it was
possibletoviewforumpostingsinRSSformat.TheRSS tabbed menu allows you to set defaults
for your RSS feed, such as the maximum number of items to display, the display style, and the
format.
You can display between 1 and 100 items in your RSS feed by making the appropriate
selectionfromthedrop‑downlist.Thenumbersinitiallyincrementbyafactorof1,thenby5,
and finally by 10.
For your RSS-feed display style, you have three choices: full content, abstract, and title. If
you decide to use a small number as your maximum, you’ll have space to display full content
in the feed. If you use a large number, you might want to display the title only. For in-between
cases, display the abstract.
Finally, you have three choices for the feed format: RSS 1.0, RSS 2.0, and Atom 1.0.
■Tip If you are interested, you can read more about RSS formats in Wikipedia.
CHAPTER 4 ■ CREATING DISCUSSION FORUMS
126
Anonymous Postings
TheAnonymous Postings option lets you specify whether to allow anonymous postings to your
forum.Enablinganonymouspostingswillallowuserstopostmessageswithoutsigningonto
the forum. If you wish to associate each post with the identity of the post’s author, uncheck the
check box on this screen.
Ratings
TheRatings option lets you enable or disable message ratings for the forum via a single check
box.
Summary
In this chapter you studied Liferay’s Message Boards, an important application that lets you
create a feature on your portal to facilitate discussion among your user communities. You
learned to create discussion threads as well as categories to better organize those threads. You
learned to manage these categories and set permissions for them depending on the user type.
Such permissions include attaching files to messages, adding or deleting messages, adding
subcategories, and moving threads.
In addition to managing discussion categories, you also learned to manage other forum
elementssuchaspostsandsubscriptions.Displayingrecentpostsandvitalstatisticsonposts
is easy. Regarding subscriptions, you can allow a user to subscribe to particular types of mes-
sages, to set the frequency of message delivery, and to view that information in a browser as an
RSS feed.
You also learned how to ban users who violate the rules of your forum. You can easily dis-
play and manage the list of banned users, and you can unban users when you want to re instate
their ability to participate.
You learned to manage forum growth by allowing users to tag their messages with key-
words,makingtargetedsearcheseasier.PosterscanusekeywordsprovidedbytheMessage
Boards application or keywords they create themselves.
Finally, you learned how to configure the Message Boards application itself. You now can
set up e-mail notifications, define thread priorities, implement a user-ranking system, con-
figure RSS-feed formats, enable or disable anonymous message postings, and allow message
ratings.
CHAPTER 5
Facilitating Collaboration
In the previous chapter, you set up discussion forums to let your portal users collaborate with
one another by participating in different discussion threads. You can think of this collabora-
tion method as “offline” in that users might not get responses to their postings immediately.
You can facilitate several other kinds of collaboration in your portal. Some of these allow real-
time communication, meaning the users would be able to participate in live discussions. I’ll
discuss several different forms of collaboration in this chapter. In particular, you will learn the
following:
• Settingupthemail-clientapplicationonyourportal
• Poppingupe-mailfromyourGmailaccountsandyourInternetMessageAccessProto-
col(IMAP)accounts
• Sendingmail
• SettingupanSMSapplicationandsendingSMSmessages
• Settingupalive-chatapplicationandusingitformultipleconcurrentusers
• Searchingandlocatingusers,organizations,andusergroups
• Invitinguserstoparticipateindiscussions
The first application that we’ll consider is Liferay’s Mail application.
Integrating Mail
Almostallcomputerusersrelyone-mailastheirprimarymeansofcommunication,soyou’ll
integrate a mail client into your portal. Through Liferay’s Mail application, you will be able
to retrieve your mail without leaving the portal and e-mail other people from the application
itself. This lets you go on working in the same environment and helps you avoid the overhead
of switching to another mail client.
Adding the Mail Client
Liferay version 5.1.1 comes with the Mail application, but version 5.1.2 (the current version at
thetimeofthiswriting)doesnot.Soyou’llneedtodownloadthismail-clientapplicationfrom
the Liferay web site.
127
CHAPTER 5 ■ FACILITATING COLLABORATION
128
■Note Refer to Chapter 2 for the steps to download a portlet from Liferay’s site and install it on your
server.
To add the Mail application, follow these steps:
1. Log in as Administrator to your ISI portal.
2. Create a new page called Collaboration. You’ll use this page to add and test all the
applications I’ll discuss in this chapter.
■Tip When you create an actual portal that other members will use, you will create the appropriate com-
munity (as discussed in Chapter 3), create community public pages, and add the required collaboration
applications to them.
3. Select the Add Application menu from the Welcome drop-down list.
4. Locate the Mail application under Collaboration.
5. Addtheapplication.
You will see the screen shown in Figure 5-1 after adding the application to the Collabora‑
tion page.
The MailapplicationservesasaclienttobothyourregularIMAPaccountsandyour
Gmailaccounts.Youneedtoconfiguretheclientforeachtypeofe-mailaccountthatyouwish
to use on your portal. Click the Configure email accounts link to configure the accounts. You
will see the two choices displayed in Figure 5-2.
CHAPTER 5 ■ FACILITATING COLLABORATION
129
Figure 5-1. Adding the Mail application
Figure 5-2. Configuring e‑mail accounts in the Mail application
CHAPTER 5 ■ FACILITATING COLLABORATION
130
Adding a Gmail Account
First, you’ll set up a Gmailaccount(seeFigure5-3):
1. Click the Add a Gmail Account button.
2. Enter your e-mail ID in the User Name edit box.
3. Enter the password in the Password field.
4. Click the Save button.
Figure 5-3. Adding a Gmail account in the Mail client
Afteryousaveyourchanges,theMailapplicationattemptstoconnecttotheGmailserver
to validate the entered account information. If all goes well, you’ll see a message indicating
that the connection is successful and that your account will be ready for use in a few minutes.
You now need to set up the information for incoming- and outgoing-mail servers in the con-
figuration screen that automatically pops up on your screen.
Adjusting Gmail Settings
You’ll need to enter yourGmailaccountIDandpasswordintheUser Name and Password
fieldsonthisscreen(seeFigure5-4),buttherestofthefieldshavealreadybeenpopulatedby
the application:
• Incoming IMAP Server: imap.gmail.com
• Incoming Port: 993
• use‑secure‑incoming‑connection: Checked
• Outgoing SMTP Server: smtp.gmail.com
• Outgoing Port: 465
• use‑secure‑outgoing‑connection: Checked
CHAPTER 5 ■ FACILITATING COLLABORATION
131
Figure 5-4. Gmail account settings for incoming‑ and outgoing‑mail servers
Click the Save button to save your settings. If you make any errors while entering the
configuration, click the Configure email accounts link on the Mail application’s main page to
re-enter or modify the required fields.
■Tip If you have multiple Gmail accounts, you can set up the client to operate all of them. Use the same
procedure as discussed in this section to add more accounts. The first added account becomes the default.
To use another account at any time, select it from the list displayed in the drop-down combo box.
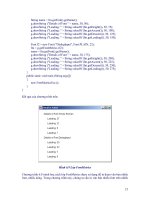
Retrieving Mail
AfteryouconfigureandsavethesettingsforyourGmailaccounts,youwillseethescreen
shown in Figure 5-5.
Figure 5-5. Mail application screen after setting up e‑mail accounts successfully
Atthistime,youareallreadytouseyourGmailaccounts.First,wewilllookathowto
retrieve your mail in the Mail client application.
Click the Check your email link. The mail from the default account will be retrieved
anddisplayedintheclientarea.Thisscreen(seeFigure5-6)resemblesyourregularGmail
account’s inbox screen.
CHAPTER 5 ■ FACILITATING COLLABORATION
132
Figure 5-6. Gmail inbox display in Liferay’s Mail app
■Caution At the time of writing, the Mail portlet was version 5.1.1. Although this version deploys on
Liferay 5.1.2, in some installations the Gmail mail did not pop up as explained in this section. In such situ-
ations, you might need to use the portlet on Liferay 5.1.1 where it works as expected, or await a newer
version of the portlet.
On the left side of the client, you will see the usual menu options for navigating to differ-
ent folders such as Drafts, Sent Mail, and so on. In the center of the screen you will see a list
of all retrieved mail in your inbox. When you click the desired folder on the left, the mail from
the selected folder will appear in the center. You can perform other operations as you can with
yourGmailaccountinyourbrowser:youcanclickanyofthemessageheaderstoviewthe
message body, you can mark and delete messages, and so on.
Sending E‑mail
Just as you can retrieve your mail without leaving the portal, you can send mail without
leaving the portal. To compose and send mail to others through the Mail application, click
the Compose Email link. You will see the familiar screen for composing a new message (see
Figure5-7).
CHAPTER 5 ■ FACILITATING COLLABORATION
133
Figure 5-7. Composing a new e‑mail message in the Mail application
Enter the appropriate information in the From, To, CC, BCC, Subject, and body-text fields,
and include an attachment if desired. Once you are satisfied with the composed message, click
the Sendbuttontosendit.TheGmailoutgoing-mailserverwilldispatchthe message.
Setting Up IMAP Accounts
AsImentionedinthesection“AddingtheMailClient,”theMail application allows you to set
upmailaccountsotherthanGmail.Tosetupyourothermailaccounts,followthesesteps:
1. On the main screen of the Mail application, click the Configure email accounts link.
2. Click the Add a Mail Account button.
3. Entertherequesteddetailsofyourmailaccount(seeFigure5-8),asyoudidwithyour
Gmailaccount.
4. Save your changes.
CHAPTER 5 ■ FACILITATING COLLABORATION
134
Figure 5-8. Configuring your IMAP mail account
Once you set up your mail account, you can retrieve your mail in the client area or even
composeandsendmail,justasyoudidforyourGmailaccount.
■Caution Your incoming-mail server must support the IMAP protocol for the Mail application to work.
Extending Mail Functionality to Other Members
Note that what you’ve done so far applies only to a portal administrator—remember that you
logged in as an administrator while adding the Mail application to your portal page. Now I’ll
show you how to extend this functionality to other members of your portal. You’ll learn how
to assign rights to other community members so that each member can set up her own e-mail
client using her private mail configuration.
Follow these steps to extend the Mail application to other portal members:
1. Addanewpublicpageunderthedesiredcommunity.(Addingpagesisdiscussedin
Chapter2andcreatingcommunitiesisdiscussedinChapter3.)
2. AddtheMail application to the public page you created in the previous step.
3. Click the Configuration button to set permissions. You will see the screen shown in
Figure 5-9.
4. Select the Power User role from the Available tab and click the Update Permissions but-
ton. You will see the screen shown in Figure 5-10.
5. AssignallthreedisplayedpermissionstothePower User role: Configuration, Prefer‑
ences, and View.
6. Click the Finished button to save your changes. Note that the Power User role now has
the newly added permissions displayed in the roles listing.
CHAPTER 5 ■ FACILITATING COLLABORATION
135
Figure 5-9. Setting permissions in the Mail application
Figure 5-10. Setting permissions for the power‑user role
You have now successfully set the public page for the community users. When a commu-
nity user logs on to her account and opens this public page, she will be able to configure the
mail-client application with her own private e-mail configuration.
CHAPTER 5 ■ FACILITATING COLLABORATION
136
Using SMS
E-mail messages are asynchronous, which means the recipient might not see them imme-
diately.Withtheadventofmobilephones,manypeoplepreferSMS(ShortMessageService)
messaging because they can often get quicker responses to their messages. Liferay provides an
application called SMS Text MessengerthatallowsyoutosendSMSmessages.
You’ll find SMS Text MessengerunderLiferayPortal’sCollaborationcategory.Addthis
application to your Collaborationpage.Aftersuccessfullyinstallingtheapplication,youcan
sendSMSmessagestoyourfriends.Intheapplication’sclientarea,entertheTo, Subject, and
Messageinformation(seeFigure5-11).Notethatyourmessagecannotcontainmorethan500
characters.
Figure 5-11. Sending SMS messages through the SMS Text Messenger application
Afteryoupopulatethefields,clicktheSend Text Message button. The screen displays an
appropriate message if the transmission was successful.
So far, you’ve seen methods of collaboration in which the communication between the
users might not be live. Now you’ll look at a Liferay application that allows live communica-
tion between users.
Adding Chat Functionality
Liferay provides a Chat portlet that facilitates instant communication among users who are
live on the portal. In the case of discussion forums and e-mail applications, the sender never
knows whether the recipient is currently online until he sees her reply to his message.
With the Chat application, every logged-in user knows which other portal members are
currentlyonline.AllliveuserscanintercommunicatethroughtheChat application.
Installing the Chat Application
The Chat application, although supplied by Liferay, does not come in the installation package.
You must download the application from the official-plugins area of the Liferay web site and
installitonyourmachine.Accomplishthisbyfollowingthesesteps:
CHAPTER 5 ■ FACILITATING COLLABORATION
137
1. First add the Plugin Installer application to your Admin page (or any other page you’d
like).
2. Select the Portlet Plugins tab.
3. Type chat in the Keywords text box and click the Search Plugins button. The output
screen of the search result is shown in Figure 5-12.
Figure 5-12. Searching for the Chat portlet in the Plugin Installer application
4. Select Chat 5.1.1.3 from the displayed list of applications.
■Note Chat 5.1.1.3 was the current version at the time of writing.
5. The Plugin Installer app now displays the application information for the selected Chat
application (see Figure5-13).
6. Click the Installbuttontoinstalltheapplicationonyourmachine.Afterawhile,you
should see a success message.
CHAPTER 5 ■ FACILITATING COLLABORATION
138
Figure 5-13. Chat application information
If you check out the bottom-right corner of the portal screen, you will notice a small label
that reads Chat (0). This indicates that the Chatapplicationiscurrentlyactiveandhaszero
online users (see Figure5-14).
Figure 5-14. Label indicating the status of the Chat application
Testing the Chat App
AsChat obviously requires more than one participant, you will not be able to test the applica-
tion until another user logs on to the portal. For testing, you will need to use another machine
connected in the same network as your portal-server machine.
To test your Chat application, take the following steps:
■Caution At the time of writing, Liferay version 5.1.2 had a few bugs in the Chat application, which were
brought up in Liferay’s community forum. This entire section was tested on Liferay version 5.1.1.
1. Log in to your portal account on your machine.
2. Log in to another portal account on another machine.
CHAPTER 5 ■ FACILITATING COLLABORATION
139
■Tip If you do not have multiple machines for testing the Chat application, open another browser (not
another window of the same browser type) on your local machine. For example, if you’re using Netscape,
use Internet Explorer or Google Chrome for the second login. Now log on to the Liferay portal with some other
account using this second browser. After you get connected to the portal, you will see that the number of
Chat users has changed from zero to one.
3. Note that the label on the bottom-right corner of your screen now reads Chat (1),
indicating that one Chat user is online. This number will change as the number of live
users grows and shrinks.
4. Click the Chatlabeltoseewhoiscurrentlyonline(seeFigure5-15).Again,thelistwill
grow and shrink depending on who is logged in to the Chat application.
Figure 5-15. The Chat application window showing the list of online users
5. Toinitiateachatwithanonlineuser,clickthedesiredusername.Asmallwindow
popsuponthetopofthedisplayedusername(seeFigure5-16).
CHAPTER 5 ■ FACILITATING COLLABORATION
140
Figure 5-16. Chatting with an online user
6. Type a greeting into the edit box and press Enter. This delivers the message to the
selected user.
7. Type a reply from the other machine where the selected user has logged in.
8. Gobacktoyourownscreentoseethereplyfromtheotheruserinthetextarea(see
Figure5-17).
Figure 5-17. A message and its reply in the chat window
Chatting with Multiple Users
With the Chat application, you are allowed to chat with multiple online users concurrently. To
chat with multiple users, click the desired user names. For each selected user, a new chat win-
dowpopsuponyourscreen(seeFigure5-18).
CHAPTER 5 ■ FACILITATING COLLABORATION
141
Figure 5-18. Concurrent chatting with multiple users
You can now send messages to multiple users in their respective chat windows, and
receive messages from them as well.
Searching and Inviting
You have seen different ways to allow communication and collaboration among your portal
users. In most of the cases shown so far, one user initiates a discussion and other users par-
ticipate in it. But you might find occasion to invite certain users to join a discussion. Liferay
provides applications that allow you to search the users in the entire portal directory and
invite selected users to join discussions. In this section, you will study the two applications
that offer search-and-invite functionality: Directory and Invitation.
Searching Users
The Liferay application that allows you to search the user database is called Directory. Follow
these steps to set up the application:
1. Select the Collaboration page (or any other page where you’d like to add the new
application).
2. Click the Add Application menu.
3. Select the Directory application under the Community category.
4. AddtheDirectory application to the page. The application screen should now look like
the one shown in Figure 5-19.
CHAPTER 5 ■ FACILITATING COLLABORATION
142
Figure 5-19. Directory application screen
5. The application provides three tabs: Users, Organizations, and User Groups.Asthe
namessuggest,youcanusethesetabstosearchforadesireduser,organization,or
user group.
6. In the Search edit box, enter the search criterion funda.
7. Click the Search Users button.
■Caution You are currently logged in as an administrator and thus possess permissions to perform the
various search operations described here. If you’re not an administrator and you’re using a preinstalled
Directory application, you will be able to perform the various search operations only if the administrator has
assigned you permissions to do so.
8. Notetheresultinglistofusersmatchingyoursearchcriterion(seeFigure5-20).The
firstname,lastname,screenname,jobtitle,andorganizationarelistedforeachuser.
Figure 5-20. Displaying the search results
CHAPTER 5 ■ FACILITATING COLLABORATION
143
9. If the list is too large, you can narrow down your search by clicking the Advanced link to
the right of the Search edit box. Clicking the Advanced link displays the screen shown in
Figure 5-21.
Figure 5-21. Specifying advanced search criteria
10. Here, you can enter one or more of the following search criteria: first name, middle
name, last name, screen name, or e-mail address.
11. Select All or Any from the Match drop-down list.
12. Click the Search Users button to perform the directory search with the new search
criteria.
Searching Organizations
In certain situations, you might wanttoinvitemembersofcertainorganizationstoparticipate
inyourdiscussions.Insuchcases,itiseasiertosearchtheportaldirectoryforanorganization
ratherthanforindividualusers.Tolocateanorganizationthatmatchesaparticularcriterion,
perform the following steps:
1. Click the Organizations tab in the Directory application.
2. Enter your search criterion (ISI)intheSearch edit box.
3. Click the Search Organizations button. You’ll see the resulting list at the bottom (see
Figure5-22).
CHAPTER 5 ■ FACILITATING COLLABORATION
144
Figure 5-22. List of organizations matching the search criterion
4. Click the View Userslinkontherightsideofeachorganizationtoseethelistofusers
belongingtothatorganization.
5. If desired, perform an advanced search by clicking the Advanced link near the Search
editbox(asyoudidwhensearchingforindividualusers).Youcanfillincriteriasuchas
theorganization’sname,address,type,country,andregion.
6. You can choose to match all the entered search criteria or any of the entered fields by
selecting the corresponding option in the Match drop-down list.
7. Clicking the Search Organizationsbuttonwilldisplaythelistoforganizationsmatching
your search criteria.
Searching User Groups
In addition to searching individualusersandorganizations,youcanalsosearchusergroups
using the Directory application. To locate a desired user group, carry out the following steps:
1. Click the User Groups tab in the Directoryapplicationscreen(seeFigure5-23).
2. Enter the search criterion in the Search edit box.
3. Click the Search User Groupsbuttontoperformthesearch.Alistofmatchinguser
groups appears at the bottom.
CHAPTER 5 ■ FACILITATING COLLABORATION
145
Figure 5-23. List of selected user groups
■Note There is no advanced-search facility for user groups.
Inviting Friends
Afteryouhavesearchedand located the desired users, you can send them invitations to join
your discussion forums or person-to-person discussions. Liferay provides an application
called Invitation for this purpose.
Adding the Application
To add the Invitation application to your portal page, follow the steps listed here:
1. Select the Collaboration page (or any other page where you’d like to add the Invitation
application).
2. Select the Add Application menu.
3. Select the Invitation application from the Communitycategory.Addingtheapplication
brings up the screen shown in Figure 5-24.
Figure 5-24. The Invitation application
CHAPTER 5 ■ FACILITATING COLLABORATION
146
Configuring the Invitation Message
Before you send an invitation message to your friends, you must configure it first. To configure
the message, follow these steps:
1. Click the Configuration icon in the Invitation application. You will see the screen
shown in Figure 5-25.
Figure 5-25. Configuring the invitation‑message format
2. Compose your message by typing the desired Subject and Body text. (The various terms
used in the Subject and Bodytextareexplainedrightbelowthemessagebody.)
3. Click the Save button to save your changes.
4. Click the Archived tab to archive the current message format for future use. You will see
the screen shown in Figure 5-26.
5. Type the desired name for the current message format and click the Save button.
You will now be able to use the archived message format in the future by clicking the
Actions button and selecting Restore.
CHAPTER 5 ■ FACILITATING COLLABORATION
147
Figure 5-26. Archiving the current message format
Sending Invitations
Aftercomposingthedeliverymessage,youcanstartsendingtheinvitationstoyourfriends.
Here’s how:
1. Click the Invite Friends link in the Invitation application. You will see the screen shown
in Figure 5-27.
Figure 5-27. Entering e‑mail addresses to invite friends
2. Enter the e-mail addresses of the desired friends in the displayed edit boxes.
3. Click the Invite Friends button.
You will see an onscreen message saying that the invitations have been dispatched to the
friends you listed.