practical liferay Java -based Portal Applications development apress phần 10 ppsx
Bạn đang xem bản rút gọn của tài liệu. Xem và tải ngay bản đầy đủ của tài liệu tại đây (13.13 MB, 48 trang )
Chapter 11 ■ eNhaNCING YOUr pOrtaL
309
Adding the Application
ToaddtheStock Charts application on your portal page, follow these steps:
1. Add another instance of the Google Gadget portlet to your portal page.
2. Click the portlet’s application-configuration icon or the Configuration menu option
from the menu drop-down list.
3. Click the Finance link in the category list.
4. Look for the Stock Charts gadget (highlighted in Figure 11-12). You can use the Search
Gadgets facility to locate the application.
Figure 11-12. Selecting the Stock Charts application from the list of finance-related
gadgets
5. Click the Choose button under the Stock Charts application.
6. Return to full-page view by clicking the Return to Full Page link. Your screen should
now look like the one shown in Figure 11-13.
Chapter 11 ■ eNhaNCING YOUr pOrtaL
310
Figure 11-13. The main screen of the Stock Charts application
Using the Application
TheStock Charts application allows you to view stock charts from several companies. You
simplyneedtoprovidethestocksymbolsforthecompanieswhosedatayouwant.Tousethis
application, follow the steps listed here:
1. SupposeyouwishtoviewthestockchartsfromIBM.TypeIBM in the edit box on the
application’s main screen.
2. Click the Go button. Doing this displays IBM’s chart onscreen. By default, a one-year
chart is shown.
3. You can zoom into the chart by selecting smaller time periods. Click the provided but-
tons to view a one-month (1m) chart, a three-month (3m) chart, or a six-month (6m)
chart. You can go back to the one-year chart by clicking the 1y button.
4. If you click the View Large Chart icon in the center (it looks like a computer monitor),
you’ll pop up a new window that displays a full-fledged chart of the selected stock (see
Figure 11-14).
Our technical analysts would find this charting application very useful in performing their
analyses.
Chapter 11 ■ eNhaNCING YOUr pOrtaL
311
Figure 11-14. A full-chart view in the Stock Charts application
The Google News Gadget
A securities portal must havethelatestnewsdisplayedonitswebpages.Togiveourportalthis
feature, we will add yet another Google gadget called Google News.
Adding the Application
Follow these steps to add the Google News gadget to your portal:
1. Add another instance of the Google Gadget portlet to your portal page.
2. Click the portlet’s application-configuration icon or the Configuration menu option
from the menu drop-down list.
3. Click the News category.
4. Look for the Google News gadget (see Figure 11-15). You can use the search facility to
locate the application.
5. Click the Choose button under the Google News application.
6. Return to full-page view by clicking the Return to Full Page link. Your screen should
now look like the one shown in Figure 11-16.
Chapter 11 ■ eNhaNCING YOUr pOrtaL
312
Figure 11-15. Selecting the Google News application from the gadget list
Figure 11-16. The Google News application main screen
Using the Application
TheGoogle News application displays news in various categories taken from authentic news
sources. In the main application screen, you will see five different categories:
• Top Stories
• World
Chapter 11 ■ eNhaNCING YOUr pOrtaL
313
• U.S.
• Business
• Sci/Tech
Theapplicationiseasytouse.Simplyselectthecategoryofyourchoicetodisplay
the news from that category onscreen. Note that the application displays only the title
andthenewssource.Toviewthedetails,clickthedesiredtitle.Doingthispopsupanew
window that shows the contents from the source channel. Our ISI portal members will
probably be most interested in the Business category, but they can access the other catego-
ries if desired.
So far, you’ve added several gadgets to the ISI portal: Stock Ticker, Stock Charts, and
Google News. You’ll probably find several Google gadgets that can enhance your portal’s
usefulness. Simply identify the applications from the list on the Google site, test them to deter-
mine their relevance, and add them to the portal pages using the Google Gadget portlet.
The Sun Notepad Portlet
As you’ve seen, the Google Gadget portlet provides a single gateway to thousands of useful
applications. But you have access to even more third-party applications that aren’t Google
gadgets.TheseapplicationsaresimplyportletswritteninJava,PHP,Ruby,andsoon.Youcan
find a list of these applications on the Liferay web site.
You’ll now learn how to install and use a typical third-party application: a notepad appli-
cation from Sun Microsystems. Available through Liferay’s list of community plugins, the
application allows you to create personal notepad messages under categories that you can
define yourself.
Downloading the Application
TousetheSun Notepad application, you first need to download it from Liferay’s Community
Plugins web page (or simply download it through the Plugin Installer portlet that you used in
thesection“TheGoogleGadgetPortlet”).Todownloadtheapplication,followthesesteps:
1. Go to Liferay’s web site at .
2. Click the Downloads tab.
3. Click the Community Plugins tab.
4. In the displayed list of products, locate the Sun Notepad portlet.
5. Click the Notepad link to pull up the product information (see Figure 11-17).
6. Under the Version History tab, click the Actions button associated with the product ver-
sion you want. Select the Download option. Doing this downloads a .war file to your
machine: sun-notepad-portlet-5.1.1.1.war.
Chapter 11 ■ eNhaNCING YOUr pOrtaL
314
Figure 11-17. Sun Notepad application information
Installing the Application
After you have successfully downloaded the product’s .war file, you are ready to install it on
your machine. Follow these steps to install the product:
1. Log on to the portal using your Administrator account.
2. Navigate to the page containing the Plugin Installer application that you installed ear-
lier. If you’ve removed the application since then, add it back to your page now.
3. Click the Upload File tab.
4. Browse and select the Sun Notepad application’s downloaded .war file.
5. Click the Install button to install the application on your portal. Note that it might take
a while to install the .war file on your app server.
Chapter 11 ■ eNhaNCING YOUr pOrtaL
315
Adding the Application
After you have successfully uploaded and installed the application on your portal, you need to
add it to a page and use it. Perform these steps to add the application:
1. Log on to the portal using your Administrator account.
2. Navigate to the Productspagethatyoucreatedinthesection“TheGoogleGadget
Portlet.”
3. Select the Add Application menu.
4. Locate the new application category called Sun.
5. Select the Notepad Portlet application under the Sun category.
6. Add the application to the page. At this stage, your screen should look like the one
shown in Figure 11-18.
Figure 11-18. Adding the Sun Notepad portlet to a portal page
Chapter 11 ■ eNhaNCING YOUr pOrtaL
316
Using the Application
Initially, no notes are available for display in the application’s main screen, so you need to cre-
ate some. For this, you must first define a category. Follow these steps to create a category:
1. Click the Preferences ( ) icon at the top-right corner of the application’s main screen
(see Figure 11-18). Note that depending on the currently used theme, Preferences might
instead appear as a menu item in a drop-down list. Clicking Preferences brings up the
screen in Figure 11-19.
Figure 11-19. Defining a new category in the Sun Notepad application
2. Enter Technical in the Category Name edit box. We will categorize all our notes on
technical analysis under this category.
3. Click the Add Category button to create the category with the specified name. You’ll
now see the newly added category onscreen.
4. Add one more category called Fundamental to store the notes pertaining to funda-
mentals analysis.
5. You can easily delete any of the created categories by marking the check box to the left
of the unwanted category and clicking the Delete Selected Category button. Note that
deleting a category will also delete the notes belonging to it, without asking for your
confirmation.
6. Set the maximum number of notes to display on each screen by entering the desired
number in the corresponding edit box.
7. Once you have completed all your edits, click the Finished button. You will now return
to the application’s main screen (see Figure 11-20).
Figure 11-20. List of categories in the Sun Notepad application
Chapter 11 ■ eNhaNCING YOUr pOrtaL
317
Now you’ll add a note under the Fundamental category. Follow these steps to do so:
1. Select the Fundamental category from the drop-down list on the main page of the Sun
Notepad portlet.
2. Click the Add A New Note button. You will see the screen shown in Figure 11-21.
Figure 11-21. Adding a new note
3. Enter text for the Title and Body of the note.
4. Click the Add button to create the note.
5. Add one more note under the Fundamental category by repeating steps 1 through 4.
Your application screen now displays the title and body of each note (see Figure 11-22).
Figure 11-22. Displaying a list of notes under the Fundamental category
6. Toeditthenote,simplyclickthecorrespondinglink.Youcanchangethenote’stitle
and/or body as desired.
7. Todeletethenoteormultiplenotes,markthecheckbox(es)totheleftofthedesired
note(s) and click the Delete Selected Note button.
■Note In addition to portlets, the Liferay web site also lists themes and layout templates developed by
Liferay and its user communities. Enhancing the portal’s look and feel with these community-developed
themes and layouts was discussed in Chapter 2.
Chapter 11 ■ eNhaNCING YOUr pOrtaL
318
The Google AdSense Portlet
So far we have built a nice-looking, user-friendly portal for the benefit of those who aim to
make money by investing in securities. But how do you yourself make money by hosting the
portal?Onewayistoputadvertisementsonyoursite.Thismightnotbeeasy,however;you
face the hurdles of getting ads from customers and then doing the accounting.
TheGoogle AdSenseprogramcomestoyourrescueinthiscase.Theprogramallowsyouto
collect advertising revenue from your web portal with a minimal time investment on your part,
and it does not demand any additional resources.
In this section, you will learn to use the Google AdSense portlet on your portal.
Downloading the Portlet
TheGoogle AdSense portlet is listed on the Liferay web site in its Downloadssection.Todown-
load this portlet application, follow the steps listed here:
1. Go to the Liferay web site at .
2. Click the Downloads tab.
3. Click the Official Plugins tab.
4. On the resulting page, enter Google in the Search edit box and click the Search Products
button. You will get a list of products containing the “Google” keyword in their names.
5. Click the Google AdSense product link to display the product information onscreen (see
Figure 11-23). Note that the version number you see might differ from the one shown here.
Figure 11-23. Google AdSense application information
6. Click on the Actions button associated with the product version you want, and select
Download to download the .war file to your machine.
Chapter 11 ■ eNhaNCING YOUr pOrtaL
319
Installing the Portlet
After you have successfully downloaded the product’s .war file, you are ready to install it on
yourmachine.Toinstalltheproduct,followthestepslistedhere:
1. Log on to the portal using your Administrator account.
2. Navigate to the Products page you created earlier. You’ll use the Plugin Installer appli-
cation that you previously added to this page.
3. Click the Upload File tab in the Plugin Installer application.
4. Browse and select the .war file that you just downloaded.
5. Click the Installbutton.TheGoogle AdSense application will be installed on your portal.
Adding the Portlet
After you have successfully installed the application on your portal, you can add it to a page
anduseit.Toaddtheapplication,followthestepslistedhere:
1. Log on to the portal using your Administrator account.
2. Navigate to the Productspagethatyoucreatedinthesection“TheGoogleGadget
Portlet.”
3. Select the Add Application menu.
4. Select the Google AdSense application under the new Google category.
5. Add the application to the page. At this stage, your screen should look like the one
shown in Figure 11-24.
Chapter 11 ■ eNhaNCING YOUr pOrtaL
320
Figure 11-24. Adding the Google AdSense application
Configuring the Portlet
You must configure the Google AdSense application before it can display ads on your portal
pages. Perform these steps to configure the application:
1. Click the application-configuration icon in the application’s main screen, or select the
Configuration menu option from the menu drop-down list (depending on the current
page’s theme). You will see the configuration settings as shown in Figure 11-25.
2. Enter the following information on this screen:
a. Ad Client: Your Google AdSense client code
b. Ad Channel: Name of a channel you created on the Google AdSense site
■Tip You need to create a client code and an ad channel by signing on to the Google AdSense site
(
You can create any number of channels. Note that it is not necessary
to sign up on Google AdSense to use this gadget. You can simply enter some dummy client code and channel
information, and the gadget would display the ads—but you wouldn’t make any revenue.
Chapter 11 ■ eNhaNCING YOUr pOrtaL
321
Figure 11-25. The Google AdSense application-configuration screen
c. Ad Type:Thiscanbeof any of the following three types:
i. Text:Thisresultsinthedisplayoftext-onlyads.
ii. Image:Thisresultsinthedisplayofimageads.Notethatplacinganimagead
on your web pages will result in slower page loads.
iii. Text and Image:Thiswilldisplayamixofbothtextandimageads.
d. Ad Format: You get several choices here. Select the format depending on where you
wanttodisplaythead.Herearesomeselectionguidelines:
i. (728 ✕ 90) - Leaderboard:Thisadformatnearlyoccupiestheentirewidthofthe
web page, so it’s ideal for placement at the top or bottom of the page.
ii. (468
✕ 60) - Banner:Thisisasmallerbannercomparedtotheleaderboard.It’s
ideally suited for a two-column display.
iii. (336
✕ 280) - Large Rectangle:Thisformatisusefulforembeddingtheadin
yourtext;youletthetextflowaroundthead.
iv. (300
✕ 250) - Medium Rectangle:Thisformatisalsousefulforembeddingthe
ad within the text.
v. (250
✕ 250) - Square:Thisisasquareadideallysuitedfortheleftorrightcol-
umn in a three-column display.
vi. (234
✕ 60) - Half Banner: If you have a two-column web page, you can put this
banner in one of the columns.
Chapter 11 ■ eNhaNCING YOUr pOrtaL
322
vii. (200 ✕ 200) - Small Square: An ad with this format ideally goes in one of the cor-
ners of your web page, or in the left column along with the portal-navigation
portlet.
viii. (180
✕ 150) - Small Rectangle: Use this format if you have limited real estate on
your web page for ad display.
ix. (160
✕ 600) - Wide Skyscraper:Thisisaverticaladformatthatishighlyvisible
when placed on the left or right side of your web page.
x. (125
✕ 125) - Button:Thisformatishandyifyouwanttoplacetinyads.
xi. (120
✕ 600) - Skyscraper:Thisisanotherfull-heightadwithhighvisibility,but
with a lesser width than the wide skyscraper.
xii. (120
✕ 240) - Vertical Banner:Thisisaverticalbannerthatusesabouthalfofa
page’s height.
■Tip You can preview the different ad formats by visiting the Google AdSense site.
■Caution Google has the right to change its ad formats without alerting registered clients. Be sure to
check the Google AdSense site for updates.
e. Color Border: Generally, this is set to the background of your web page, so no bor-
derisvisible.Thisway,theadmergesproperlywiththeothercontentonyourweb
page.
f. Color Background: Again, this is generally set to the background color of your web
page, so the ads blend well with other material on the page.
g. Color Link:Thissetsthecolorforthehyperlinksintheads.Youcansetthisto
match the color of the other hyperlinks on your web page.
h. Color Text: Set this to the text color of your web page.
i. Color URL:ThissetsthecolorfortheURLsdisplayedinads.
3. After you have completed the edits, click the Save button.
4. Return to the main application screen by clicking the Return to Full Page link. Your
screen will now display ads as shown in Figure 11-26.
Chapter 11 ■ eNhaNCING YOUr pOrtaL
323
Figure 11-26. The Google AdSense application screen
Anybody who visits your portal page will see the ads displayed in the Google AdSense port-
let.Theadsarecontext-sensitiveandthusrelevanttothematterdisplayedonyourwebpage.
When the user clicks a displayed ad, you would earn some revenue from the click. Your reve-
nue builds up as you get more users and more clicks. At the end of each month, if your account
balance reaches a certain threshold that you specify (subject to a certain minimum), Google
will send you a check for your earned revenue.
Summary
In this chapter, you learned to enhance your portal with the addition of third-party appli-
cations, starting with the Google Gadget portlet.Thisportletservesasagatewaytogadget
applications developed by Google community members, letting you incorporate those gadgets
on your portal pages. It does this by providing an interface between Liferay’s portlet specifica-
tions and Google’s Gadgets API, on which the third-party applications are based. You studied
how to download and install the Google Gadget portlet on your web pages.
Once you install the Google Gadget portlet, you can configure it with any of the available
gadgets. You learned to configure this portlet with three different applications: Stock Ticker,
Stock Charts, and Google News.
In addition to gadgets, you can enhance your site by adding community-developed port-
lets that adhere directly to Liferay’s portlet specifications. You learned to use the Sun Notepad
portlet as an example. Lastly, you learned to use the Google AdSense portlet to earn some rev-
enue from your portal.
CHAPTER 12
Doing Portal Administration
Any portal requires proper administration. And as the number of users grows, adminis-
trative tasks become more demanding. Fortunately, Liferay has provided us with tools for
managing a portal and controlling its activities to ensure user satisfaction. In this chapter,
you will see how to perform several administrative tasks using Liferay’s admin tools. In par-
ticular, you will learn to
• InstallandusetheAdmin portlet
• Studyresourceutilization
• Setloglevels
• Examinesystempropertiesandportalproperties
• Shutdowntheserver
• IntegratewithOpenOffice
• Monitorserverinstances
• Listpluginsandmanagepluginupgrades
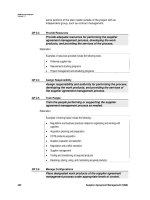
• UsethePassword Generator tool and the Language tool
• MonitorsitetrafficwithGoogleAnalytics
Using the Admin Portlet
Liferay provides a useful application called Admin that helps you perform several admin-
istrativetasks.Suchtasksinvolvemonitoringresourceutilizationtoensureoptimalportal
performance, logging messages from various classes in the system to get insight into what’s
happening under the hood, checking the various system and portal properties, monitoring
server instances, shutting down the server, and so on.
You will now learn to use the Admin portlet. First, you need to install this portlet on your
ISIportal.Forthis,youwillcreateaprivatepageinyourowncommunity.Userswithout
administrator privileges will not be able to use the portlet, but it’s still a good idea to put it on
a private page rather than a public page. Perform these steps to create a private page:
325
CHAPTER 12 ■ DOING PORTAL ADMINISTRATION
326
1. Log on to the portal using your Administrator account.
2. Openthedrop-downWelcome menu.
3. Navigate to the Private Pages menu item of the Fundamental Analysts community that
you created in Chapter 3 (see Figure 12-1).
Figure 12-1. Navigating to the Private Pages menu item
4. Click the new-page icon on the right side of the menu item (highlighted in Fig-
ure 12-1). This opens the Manage Pages screen, which lets you create a new page
(see Figure 12-2).
Figure 12-2. The Manage Pages screen for creating a private page
CHAPTER 12 ■ DOING PORTAL ADMINISTRATION
327
5. EnterAdministration as the page name.
6. Click the Add Page button. This creates a new page and displays it in the navigation
tree on the left side of the screen.
7. Click the Return to Full Page link to see the newly created private page onscreen. You
can now add applications to the page.
Installing the Application
To install the Admin portlet on your portal, follow the steps listed here:
1. Log on to the portal using your Administrator account if you’re not already logged in.
2. OpentheAdministration private page that you just created.
3. SelecttheAdd Application menu.
4. Locate the Admin application under the Admin category.
5. Add the application to the Administration page by clicking the Add link. The screen at
this stage should look like the one shown in Figure 12-3.
Figure 12-3. Installing the Admin application
You are now ready to use the Admin application.
CHAPTER 12 ■ DOING PORTAL ADMINISTRATION
328
Using the Application
Note that the Admin application screen shows the Server tab by default (see Figure 12-3). It
displays the server’s build version, date, and uptime (the time elapsed since the server was
restarted).
These are the functions of the Admin application’s three tabs:
• Server: Facilitates sever monitoring and management
• Instances: Displays a list of server instances
• Plugins: Displays a list of all installed plugins, including portlets, themes, and layouts
I will discuss each of these options in detail.
Examining Server Options
When you click the More link under the Server tab, you will see the following tabbed options:
• Resources: Displays memory usage and facilitates memory management
• Log Levels: Allows you to set the message-priority level for the server’s various packages
and classes
• System Properties: Displays a list of all predefined system properties and their values
• Portal Properties: Displays a list of all predefined portal properties and their values
• Shutdown: Facilitates shutting down the server
• OpenOffice: Facilitates integration withOpenOffice
Checking Resources
When you select the Resources tabbed option under the Server tab, your screen would look like
the one shown in Figure 12-4.
CHAPTER 12 ■ DOING PORTAL ADMINISTRATION
329
Figure 12-4. Monitoring resource allocation
This screen shows information related to memory usage, including a graphical repre-
sentationofthepercentageoffreememorywithrespecttothetotalandmaximummemory
available for Liferay’s use. The screen’s secondary Actions tab offers you options to manage
memory. You perform one of these actions by clicking the Execute button associated with it.
Here are the various actions you can take:
• Run the garbage collector:Executingthis action results in freeing the unreferenced
(orphaned)resourcesfrommemory.ItbasicallysendsarequesttotheJVM(JavaVir-
tualMachine)tobeginthegarbage-collection task.
• Clear content cached by this VM:TheVM(VirtualMachine)periodicallycachesfre-
quently used content to generate a faster response for the users. This action asks the
JVMtoclearthesingleVMcache.Doingthiswillfreeupsomeresources,buttheVM
cache will soon fill up again depending on the current load.
CHAPTER 12 ■ DOING PORTAL ADMINISTRATION
330
• Clear content cached across the cluster: The Liferay portal can run in a cluster environ-
ment. When it does, you can cache the frequently used content on several machines
across the cluster. Performing this action clears this cache. This is useful when you
wanttosynchronizethe servers.
• Clear the database cache: Liferay can cache all your database resultsets. This action
clears the database cache, which proves useful when you make direct modifications to
the database.
• Reindex all search indexes: This actionsendsarequesttoregenerateallsearchindexes.
Regeneratingindexeswillimproveperformancelater,butitmightaffecttheportal’s
immediate performance because the action takes a long time to process. You should
schedulereindexingtasksatnonpeakhourswhentheserverloadisminimal.Also,
becauseyourindexescouldbecomefragmentedduetocontinuousadditions,dele-
tions, and updates, you should perform this task periodically to maintain optimal
server performance.
• Generate thread dump: This action generatesasystemthreaddumpforlaterexamina-
tion, which proves useful during testing and debugging.
Changing Log Levels
Logging application messages helps you debug your applications and also generally helps you
get an inside view of what is happening in the system. During its lifetime, an object might gen-
erateseveralmessagesduringtheexecutionofitsmethods.Youcanprioritizesuchmessages
withdifferentlevels.Liferayprovidesseveralpredefinedprioritylevels:FATAL,ERROR,WARN,
INFO,andDEBUG.Liferayclassesusethelog4jAPI( to log these
messagestoanoutputdevice.Generally,thisoutputdeviceisredirectedtoafile,soyoucan
view the messages later by opening a physical file.
You’ll be happy to know that you can also log the messages generated by the plugins
(classes)thatyouusetoextendLiferay’sfunctionality.I’llshowyouhowtodothatlaterin
this section, but first let’s look at how to select the message-priority levels for the various
Liferay classes.
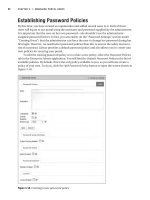
When you select the secondary Log Levels tab under the Server tab, you will see the screen
shown in Figure 12-5.
CHAPTER 12 ■ DOING PORTAL ADMINISTRATION
331
Figure 12-5. Setting log levels for various Liferay classes
In the Category column under the Update Categories tab, you will see a list of various
Liferayclassesandpackages.ThenextcolumncalledLevel displays the currently selected
prioritylevelforeachitem.Bydefault,thislevelissettoERRORformostoftheclassesand
packages. You can select a different priority level or turn off the logging by making a choice
fromthedrop-downcombobox.Afteryouhaveselectedthedesiredprioritylevelsforthe
various classes, click the Save button at the bottom of the screen. The changes take effect
immediately, so all the new messages logged by the system will have updated priority levels.
The messages are generally saved to a physical file, the name and location of which
depends on the application server where Liferay is running. If your portal is running on Tom-
cat, the file is stored in the catalina.yyyy-mm-dd.log file in the <installation folder>\logs
folder, where the fields yyyy, mm, and dddesignatethesystemdate.Soeveryday,anewlogfile
is created.
Now let’s go back to the topic of logging messages generated by user-created plugins. To
do this, you first need to create a logging category.
■Caution All user-created plugins must use the log4j API to log their messages. If they don’t, the mes-
sages will not be logged.
CHAPTER 12 ■ DOING PORTAL ADMINISTRATION
332
Create a logging category by selecting the Add Category tab under the Log Levels tab.
When you do so, you will see the screen shown in Figure 12-6.
Figure 12-6. Adding a new category for logging
Here, you will enter the fully qualified name of the plugin’s class or package, select the
message-prioritylevelfromthecombobox,andclicktheSave button. When you return to the
category list, you will find the newly added category at the end of the list on the last page. The
logging is enabled immediately, so the system will log all the messages generated by the new
category class matching the selected priority level.
As you can see from the category list (see Figure 12-5), Liferay allows you to select classes
in its entire hierarchy starting from the com.liferay root. If you select a class higher up in the
hierarchy, you will end up logging the messages for every class lower down in the hierarchy.
Thiswillmakeyourlogfiletoobulkytoexaminephysically,soyoumightwanttoselectonly
the classes you need.
■Caution Changes made to the log levels are stored in memory and thus are not permanent in nature.
When you restart Liferay, all the changes are lost and the system reverts back to the default settings.
Checking System Properties
SelectingtheSystem Properties tab under the Server tab displays all the predefined system
properties and their values. A typical list of properties is shown in Figure 12-7.
CHAPTER 12 ■ DOING PORTAL ADMINISTRATION
333
Figure 12-7. Displaying system properties
Thelist,whichrunsacrossseveralpages,helpsyouexaminethevalueofanysystem
variable.Forexample,supposeyouwanttoknowwhichcopyoftheTomcatserveronyour
machine is being used by Liferay. If you look up the catalina.home property, you will learn the
location of the Tomcat server that Liferay is using. If you want to know which version of Java
RuntimeEnvironment(JRE)Liferayisusing,youcancheckthevalueoftheenv.JAVA_HOME
variable. And so on.
Checking Portal Properties
SelectingthePortal Properties tab under the Server tab displays the list of portal properties
(see Figure 12-8).