MacBook for dummies - part 3 potx
Bạn đang xem bản rút gọn của tài liệu. Xem và tải ngay bản đầy đủ của tài liệu tại đây (1.2 MB, 31 trang )
50
Part I: Tie Myself Down with a Desktop? Preposterous!
07_04859X ch03.qxp 7/20/06 10:39 PM Page 50
Part II
Shaking Hands
with Mac OS X
08_04859x pt02.qxp 7/20/06 10:41 PM Page 51
In this part . . .
I
t’s time to delve deeper into the workings of Mac OS X
Tiger. I’ll show you how to perform all sorts of common
tasks, as well as how to customize your system, how to
change settings in System Preferences, where your per-
sonal files are stored, and how to use the latest Spotlight
search technology to find anything you’ve stored on your
MacBook or MacBook Pro!
08_04859x pt02.qxp 7/20/06 10:41 PM Page 52
Chapter 4
Working Magic with the
Keyboard and Trackpad
In This Chapter
ᮣ Introducing the highlights of the Finder
ᮣ Discussing that missing mouse button
ᮣ Launching and quitting applications
ᮣ Identifying and selecting icons
ᮣ Using keyboard shortcuts to speed things up
ᮣ Managing windows in Tiger
A
h, the Finder — many admire its scenic beauty, but you shouldn’t ignore
its unsurpassed power nor its many moods. And send a postcard while
you’re there.
Okay, so Tiger’s Finder might not be quite as majestic as the mighty Mississippi
River, but it’s the basic toolbox that you use every single day while piloting
your laptop. The Finder includes the most common elements of Mac OS X:
window controls, common menu commands, icon fun (everything from launch-
ing applications to copying files), network connections, keyboard shortcuts,
and even emptying the trash. In fact, one could say that if you master the
Finder and use it efficiently, you’re on your way to becoming a power user! (My
editor calls this the Finder “window of opportunity.” She’s a hoot.)
This chapter is your Finder tour guide. Grab your laptop and we’re ready to roll.
Using the All-Powerful Finder
This is a hands-on tour, with none of that “On your right, you’ll see the his-
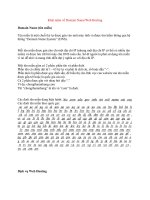
toric Go menu” for you! Time to get off the bus and start the tour with Figure
4-1, in which I show you around the most important elements of the Finder.
(In the final section, “Performing Tricks with Finder Windows,” I give you a
close-up view of window controls.)
09_04859X ch04.qxp 7/20/06 10:41 PM Page 53
The popular attractions include
ߜ The Finder menu bar: Whenever the Finder itself is ready to use (or, in
Mac-speak, whenever the Finder is the active application), the Finder
menu bar appears at the top of your screen. You know the Finder is active
and ready when the word Finder appears to the left of the menu bar.
A menu is simply a list of commands. When you click a menu (such as
the File menu), it extends down so that you can see the commands it
includes. While the menu is extended, you can choose any enabled
menu item (just click it) to perform that action. You can tell that an item
is enabled if its name appears in black; conversely, a menu command is
disabled if it’s grayed-out — clicking it does nothing.
A menu path like File➪Save is just a visual shortcut that tells you to click
the File menu and then click Save from the drop-down menu that appears.
ߜ The Apple menu (Ú): This is a special menu because it appears both in
the Finder and in every application menu that you run. It doesn’t matter
whether you’re in iTunes or Photoshop or Word — if you can see a menu
bar, the Apple menu is there. No matter where you are in Tiger, the
Apple menu
Icons
Finder menu bar
Finder windowDesktop Dock
Figure 4-1:
Tiger’s
friendliest
face — the
Finder,
complete
with a
window and
menu bar.
54
Part II: Shaking Hands with Mac OS X
09_04859X ch04.qxp 7/20/06 10:41 PM Page 54
Apple menu contains common commands to use, such as Restart, Shut
Down, and System Preferences.
I should point out that some applications, such as Front Row and
Apple’s DVD Player, may hide the Finder menu bar when they’re in full-
screen mode. However, you can still access the menu bar, even when it’s
not visible: Just move your cursor to the top edge of the screen, and the
menu bar will usually burst forth.
ߜ The Finder desktop: Your Finder desktop serves the same purpose as
your physical desktop: You can store stuff here (files, alias icons, and so
on), and it’s a solid, stable surface where you can work comfortably.
Application windows as well as other applications such as your Stickies
notes and your DVD player appear on the desktop. Just click an applica-
tion there to launch it.
Your desktop is easy to customize. For instance, you can use your own
images to decorate the desktop, organize it to store new folders and doc-
uments, arrange icons how you like, or put the dock in another location.
Don’t worry — I cover all this in other areas of the book — I just want
you to know that you don’t have to settle for what Apple gives you as a
default desktop.
ߜ All sorts of icons: This is a Macintosh computer, after all, replete with
tons of make-your-life-easier tools. Check out the plethora of icons on
your desktop as well as icons in the Finder window itself. Each icon is a
shortcut of sorts to a file, folder, network connection, or device in your
system, including applications that you run and documents that you
create. Refer to Figure 4-1 to see the icon for my Mac’s hard drive,
labeled Macintosh HD. Sometimes you click an icon to watch it do its
thing (like icons on the dock, which I cover next), but usually you
double-click an icon to make something happen.
ߜ The dock: The dock is a launching pad for your favorite applications,
network connections, and Web sites. You can also refer to it to see what
applications are running. Click an icon there to open the item (for exam-
ple, the postage stamp icon represents Apple’s Mail application, while
the spiffy compass will launch your Safari Web browser).
ߜ The Finder window: Finally! The simple Finder window in Figure 4-1 dis-
plays the contents of my Applications folder. You’ll use Finder windows
to launch applications, perform disk chores such as copying and moving
files, and navigate your hard drive.
Wait a Second. Where the Heck
Is the Right Button?
Tiger takes a visual approach to everything, and what you see in Figure 4-1 is
designed for point-and-click convenience because the trackpad is your primary
55
Chapter 4: Working Magic with the Keyboard and Trackpad
09_04859X ch04.qxp 7/20/06 10:41 PM Page 55
navigational tool while you’re using your MacBook or MacBook Pro. You move
your finger over the surface of the trackpad, and the cursor follows like an
obedient pup. The faster you move your finger, the farther the cursor goes.
You click an item, it opens, you do your thing, and life is good.
Never use any object other than your finger on the trackpad! No pencils
(including the eraser end), pens, or chopsticks; they can damage your track-
pad in no time at all.
If you’ve grazed on the other side of the fence — one of Those Who Were
Once Windows Users — you’re probably accustomed to using a trackpad or
mouse with at least two buttons. This brings up the nagging question: “Hey,
Mark! Where the heck is the right button?”
In a nutshell, the right mouse button simply ain’t there. At least, if you’re
using your Mac laptop’s trackpad, it simply ain’t there. The entire bottom of
the trackpad is one huge button, and you click something by pressing down
anywhere on the top surface of the aforementioned bump.
Lean in closer, and I’ll tell you a secret. (Dramatic pause.) This is one of the
few disagreements that I have with my friends at Apple Computer, Inc. Apple
once felt that a mouse needed but one button, and until the arrival of the
Mighty Mouse on Apple’s desktop models, it was the only button you got.
And you liked it. And you still do, if you’re using a Mac laptop’s trackpad.
In fact, you don’t even need to press the trackpad button to perform magic: If
you tap the trackpad quickly, your Mac laptop counts that as a click. Two fast
taps act as a double-click. Also, if you move two fingers over the surface of
the trackpad at once, the Finder window or application scrolls the contents of
the window up or down. (For example, you can use the scroll function to
move up and down through the pages of a document or to move up and
down through a long Web page.) You can control the sensitivity and opera-
tion of your trackpad from the Keyboard & Mouse pane in System
Preferences.
If you’re like me, you feel that a right button is pretty doggone essential. In
fact, when my laptop is on my desk at home, I plug in a Logitech optical track-
ball (a really fancy mouse, in effect). This neat device has both a right mouse
button and a scroll wheel. So here’s a Mark’s Maxim that I think you’ll appre-
ciate more and more as you use your laptop:
If you can afford a new USB mouse or trackball with more than one button,
buy it. You can thank me later with an e-mail message, which you can send to
In fact, a new industry is springing up for tiny USB mousing devices espe-
cially made for laptops. Some devices are smaller than a business card, but
they still carry a full complement of two buttons and a scroll wheel. You can
56
Part II: Shaking Hands with Mac OS X
09_04859X ch04.qxp 7/20/06 10:41 PM Page 56
carry one of these mini-mice in your laptop bag and eschew your trackpad
completely. In fact, in this book I’m going to refer to the pointer as the
“mouse pointer,” whether you’re using your trackpad or a mouse.
Clicking the right mouse button performs the same default function in Tiger
that it does in Windows. Namely, when you click the right mouse button on
most items — icons, documents, even your desktop — you get a contextual
menu of things. That is, you get more commands specific to that item. (Boy
howdy, I hate that word contextual, but that’s what engineers call it. I call it
the right-click menu, and I promise to refer to it as such for the rest of the
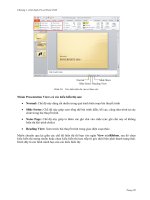
book.) Figure 4-2 illustrates a typical convenient right-click menu with all
sorts of cool items at my disposal.
If you’re using your laptop’s trackpad or one-button mouse, don’t despair.
You can still display a right-click menu: Just hold down the Control key while
you click. (The cursor gains a tiny, funky looking menu sidecar when you
hold down Control to indicate that you’re going to right-click something.)
Pressing an extra key, as you might imagine, can be a real downer, especially
if your non-trackpad-using hand is busy doing something else. Hence my pre-
ceding Mark’s Maxim. Someday, Apple will finally throw in the towel and add
a second trackpad button to their laptops.
Figure 4-2:
Well-
adjusted
folks call
this a right-
click menu.
57
Chapter 4: Working Magic with the Keyboard and Trackpad
09_04859X ch04.qxp 7/20/06 10:41 PM Page 57
Launching and Quitting Applications
with Aplomb
Now it’s time for you to pair your newly found trackpad acumen with Tiger’s
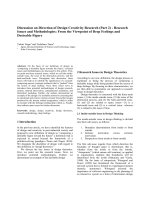
Finder window. Follow along with this simple exercise. Move your cursor
over the iTunes icon on the dock. (This icon looks like an audio CD with a
green musical note on it.) Click the trackpad button (or tap your finger on the
trackpad) once. Whoosh! Tiger launches, or starts, the iTunes application,
and you see a window much like the one in Figure 4-3.
If an application icon is already selected (which I discuss in the next section),
you can simply press Ô+O to launch it. The same keyboard shortcut works
with documents, too.
Close window
Figure 4-3:
Clicking a
dock icon to
launch that
application.
58
Part II: Shaking Hands with Mac OS X
09_04859X ch04.qxp 7/20/06 10:41 PM Page 58
In addition to the dock, you have several other ways to launch an application
or open a document in Tiger:
ߜ From the Apple menu (Ú): A number of applications can always be
launched anywhere in Tiger from the Apple menu:
• System Preferences: This is where you change all sorts of settings,
such as your display background and how icons appear.
• Software Update: This uses the Internet to see whether update
patches are available for your Apple software.
• Mac OS X Software: This launches the Safari browser and displays
software you can download for your Mac.
ߜ From the desktop: If you have a document that you’ve created or an
application icon on your desktop, you can launch or open it here by
double-clicking that icon (clicking the trackpad button twice or tapping the
trackpad twice in rapid succession when the cursor is on top of the icon).
Double-clicking a device or a network connection on your desktop opens
the contents in a Finder window. This works for CDs and DVDs that
you’ve loaded as well as external hard drives and USB Flash drives. Just
double-click ’em to open them and display their contents in a Finder
window. Applications and documents launch from a CD, a DVD, or an
external drive just like they launch from your internal drive (the one
that’s named Macintosh HD), so you don’t have to copy stuff from the
external drive just to use it. (You can’t change the contents of most CDs
and DVDs; they’re read-only, so you can’t write to them.)
ߜ From the Recent Items selection: When you click the Apple menu and
hover your mouse over the Recent Items menu item, the Finder displays
all the applications and documents you’ve used over the last few com-
puting sessions. Click an item in this list to launch or open it.
ߜ From the Login Items list: Login Items are applications that Tiger
launches automatically each time you log in to your user account. I
cover Login Items in detail in Chapter 16.
ߜ From the Finder window: You can also double-click an icon in the con-
fines of a Finder window to open it (for documents), launch it (for appli-
cations), or display its contents (for a folder).
After you finish using an application, you can quit that application to close its
window and return to the desktop. Here are a number of ways to quit an
application:
59
Chapter 4: Working Magic with the Keyboard and Trackpad
09_04859X ch04.qxp 7/20/06 10:41 PM Page 59
ߜ Press Ô+Q. This keyboard shortcut quits virtually every Macintosh
application on the planet.
ߜ Choose the Quit command in the menu. To display the Quit command,
click the application’s name — its menu — from the menu bar. This
menu is always to the immediate right of the Apple menu. (For example,
Safari displays a Safari menu, and that same spot in the menu bar is
taken up by iCal when iCal is the active application. In Figure 4-3, look
for the iTunes menu, right next to Ú.)
ߜ Choose Quit from the dock. You can Control-click (or right-click) an
application’s icon on the dock and choose Quit from the right-click menu
that appears.
A running application displays a small black triangle under its icons on
the dock.
ߜ Click the Close button on the application window (refer to Figure 4-3).
Some applications quit entirely when you close their window, such as
the System Preferences window or Apple’s DVD Player. Other applica-
tions might continue running without a window, such as Safari or iTunes;
to close these applications, you have to use another method in this list.
ߜ Choose Force Quit from the Apple menu, or press Ô+Option+Esc. This
is a last-resort measure! Use this only if an application has frozen and
you can’t use another method in this list to quit. Force-quitting an applica-
tion doesn’t save any changes to any open documents in that application!
Juggling Folders and Icons
Finder windows aren’t just for launching applications and opening the files
and documents you’ve created. You can use the icons in a Finder window to
select one or more specific items or to copy and move items from place to
place within your system.
A field observer’s guide to icons
All icons are not created equal. Earlier in this chapter, I introduced you to
your MacBook’s hard drive icon on the desktop. Here is a little background on
the other types of icons that you may encounter during your laptop travels:
ߜ Hardware: These are your storage devices, such as your hard drive and
DVD drive, as well as external peripherals such as your iPod and printer.
ߜ Applications: These icons represent the applications (or programs) that
you can launch. Most applications have a custom icon that incorporates
60
Part II: Shaking Hands with Mac OS X
09_04859X ch04.qxp 7/20/06 10:41 PM Page 60
the company’s logo or the specific application logo, so they’re very easy
to recognize, as you can see in Figure 4-4. Double-clicking an application
usually doesn’t load a document automatically; you typically get a new
blank document, or an Open dialog box from which you can choose the
existing file you want to open.
ߜ Documents: Many of the files on your hard drive are documents that can
be opened in the corresponding application, and the icon usually looks
similar to the application’s icon. Double-clicking a document automati-
cally launches the required application (as long as Mac OS X recognizes
the file type).
ߜ Files: Most of the file icons on your system are mundane things (such as
preference and settings files, text files, log files, and miscellaneous data
files), yet most are identified with at least some type of recognizable
icon that lets you guess what purpose the file serves. You also come
across generic file icons that look like a blank sheet of paper (used when
Tiger has no earthly idea what the file type is).
ߜ Aliases: An alias acts as a link to another item elsewhere on your
system. For example, to launch Adobe Acrobat, you can double-click an
Adobe Acrobat alias icon that you created on your desktop instead of
the actual Acrobat application icon. The alias essentially acts the same
way as the original icon, but it doesn’t take up the same space — only a
few bytes for the icon itself, compared with the size of the application.
Plus, you don’t have to go digging through folders galore to find the orig-
inal application icon. (For you Windows switchers, an alias is the same
Figure 4-4:
A collection
of some of
my favorite
application
icons.
61
Chapter 4: Working Magic with the Keyboard and Trackpad
09_04859X ch04.qxp 7/20/06 10:41 PM Page 61
as a shortcut. But Macs had it first. Harrumph.) You can always identify
an alias by the small curved arrow at the base of the icon — and the
icon might also sport alias at the end of its name.
You can create an alias in two ways. Here’s one:
1. Select the item.
The following section has details about selecting icons.
2. Choose File➪Make Alias, or press Ô+L.
Figure 4-5 illustrates a number of aliases, arranged below their linked files.
Here’s the other way to create an alias:
1. Hold down Ô+Option.
2. Drag the original icon to the location where you want the alias.
Note that this funky method doesn’t add the alias tag to the end of the
alias icon name!
So why bother to use an alias? Two good reasons:
ߜ Launch an application or open a document from anywhere on your
drive. For example, you can start Apple’s Pages application directly from
the folder where you store the documents for your current Pages project.
ߜ Send an alias to the Trash without affecting the original item. When
that Pages project is finished, you can safely delete the entire folder
without worrying about whether Pages will run the next time you
double-click the application icon!
Figure 4-5:
No, not
the famous
girl-spy
TV show.
These are
alias icons
in Tiger.
62
Part II: Shaking Hands with Mac OS X
09_04859X ch04.qxp 7/20/06 10:41 PM Page 62
If you move or rename the original file, Tiger is smart enough to update the
alias, too! However, if the original file is deleted (or if the original is moved to
a different volume, such as an external hard drive), the alias no longer works.
Selecting items
Often, the menu commands or keyboard commands that you perform in the
Finder need to be performed on something: Perhaps you’re moving an item to
the trash or getting more information on the item or creating an alias for that
item. To identify the target of your action to the Finder, you need to select
one or more items on your desktop or in a Finder window. In this section, I
show you just how to do that.
Selecting one thing
Tiger gives you a number of options when selecting just one item for an
upcoming action:
ߜ Move your mouse pointer over the item and click. A dark border, or
highlight, appears around the icon, indicating that it’s selected.
ߜ Type the first few letters of the icon’s name. As soon as you type
enough letters to match an item name uniquely, Tiger highlights (and
selects) that item.
ߜ If an icon is already highlighted on your desktop or in a window,
move the selection highlight to another icon in the same location by
using the arrow keys. To move through the icons alphabetically, press
Tab to go forward or Shift+Tab to go backward. To shift the selection
highlight alphabetically, press Tab (to move in order) or Shift+Tab (to
move in reverse order).
Selecting items in the Finder doesn’t actually do anything to them. You have
to perform an action on the selected items to make something happen.
Selecting a whole bunch of things
You can also select multiple items with aplomb by using one of these methods:
ߜ Drag a box around adjacent items. If that sounds like ancient Sumerian,
here’s the explanation: Click a spot above and to the left of the first item;
then hold down the trackpad button and drag down and to the right.
(This is dragging in Mac-speak.) A box outline like the one in Figure 4-6
appears to indicate what you’re selecting. Any icons that appear within
the box outline are selected when you release the mouse button.
63
Chapter 4: Working Magic with the Keyboard and Trackpad
09_04859X ch04.qxp 7/20/06 10:41 PM Page 63
ߜ Click the first item to select it and then hold down the Shift key while
you click the last adjacent item. Tiger selects both items and everything
between them.
ߜ Press Ô+A to select all the items in a window.
ߜ Hold down the Ô key while you click each item. This method works
with nonadjacent items.
Check out the status line at the bottom of a Finder window. It tells you how
much space is available on the drive you’re working in as well as how many
items are displayed in the current Finder window. If you’ve selected items, it
also shows you how many you’ve highlighted.
Copying items
Want to copy items from one Finder window to another, or from one location
(such as a CD-ROM) to another (such as your desktop)? Très easy. Just use
one of these methods:
Figure 4-6:
Drag a box
around
icons to
select them.
64
Part II: Shaking Hands with Mac OS X
09_04859X ch04.qxp 7/20/06 10:41 PM Page 64
ߜ To copy one item to another location on the same drive: Hold down
the Option key (you don’t have to select the icon first) and then click
and drag the item from its current home to the new location.
To put a copy of an item in a folder, just drop the item on top of the
receiving folder. If you hold the item that you’re dragging over the desti-
nation folder for a second or two, Tiger opens up a new window so you
can see the contents of the target.
ߜ To copy multiple items to another location on the same drive: Select
them all first (see the preceding section, “Selecting a whole bunch of
things”), hold down the Option key, and then drag-and-drop one of the
selected items where you want it. All the items that you selected follow
the item you drag. (Rather like lemmings. Nice touch, don’t you think?)
To help indicate your target when you’re copying or moving files, Tiger
highlights the location to show you where the items will end up. (This
works whether the target location is a folder or a drive icon.) If the
target location is a window, Tiger adds a highlight to the window border.
ߜ To copy one or multiple items on a different drive: Click and drag the
icon (or the selected items if you have more than one) from the original
window to a window you’ve opened on the target drive. You can also
drag one item (or a selected group of items) and simply drop the items
on top of the drive icon on your desktop.
The items are copied to the top level, or root, of the target drive.
If you try to move or copy something to a location that already has an item
with the same name, Figure 4-7 illustrates the answer: You get a dialog box that
prompts you to decide whether to replace the file or to stop the copy/move
procedure and leave the existing file alone. Good insurance, indeed.
65
Chapter 4: Working Magic with the Keyboard and Trackpad
My, what an attractive sidebar . . . and so useful!
I like as few icons on my desktop as possible. I
created a separate folder, named Incoming, and
put all the items that might otherwise end up on
my desktop into that folder. In fact, I recently
added my Incoming folder to my Finder window
sidebar so that it’s available immediately from
any Finder window. To do this, just drag the
folder into the column at the left side of the
Finder window and drop it in the sidebar’s list of
folder icons.
09_04859X ch04.qxp 7/20/06 10:41 PM Page 65
Moving things from place to place
Moving things from one location to another location on the same drive is the
easiest action you can take. Just drag the item (or selected items) to the new
location. The item disappears from the original spot and reappears in the
new spot.
Duplicating in a jiffy
If you need more than one copy of the same item in a folder, use Tiger’s
Duplicate command. I use Duplicate often when I want to edit a document but
ensure that the original document stays pristine, no matter what. I just create
a duplicate and edit that file instead.
To use Duplicate, you can either
ߜ Click an item to select it and then choose File➪Duplicate.
ߜ Control-click the item and choose Duplicate from the right-click menu.
The duplicate item has the word copy appended to its name.
Figure 4-7:
It’s your
choice, but
replace the
existing file
only if
you’re sure
of what
you’re
doing.
66
Part II: Shaking Hands with Mac OS X
09_04859X ch04.qxp 7/20/06 10:41 PM Page 66
Duplicating a folder also duplicates all the contents of that folder, so creating
a duplicate folder can take some time to create if the original folder was
stuffed full.
Keys and Keyboard Shortcuts
to Fame and Fortune
Your Mac’s keyboard might not be as glamorous as your trackpad, but any
Macintosh power user will tell you that using keyboard shortcuts is usually
the fastest method of performing certain tasks in the Finder, such as saving
or closing a file. I recommend committing these shortcuts to memory and
putting them to work as soon as you begin using your laptop so that they
become second nature to you as quickly as possible.
Special keys on the keyboard
Apple’s laptop keyboards have a number of special keys that you may not
recognize — especially if you’ve made the smart move and decided to migrate
from the chaos that is Windows to Mac OS X! Table 4-1 lists the keys that bear
strange hieroglyphics on the Apple keyboard as well as what they do.
Table 4-1 Too-Cool Key Symbols
Action Symbol Purpose
Media Eject Ejects a CD or DVD from your opti-
cal drive
Audio Mute Mutes (and restores) all sound
produced by your Mac
Brightness Increases or decreases the
brightness of your LCD screen
Keyboard illumination Increases, decreases, or turns off
the brightness of your keyboard
backlighting (PowerBooks and
MacBook Pro only)
Volume Up Increases the sound volume
Volume Down Decreases the sound volume
(continued)
67
Chapter 4: Working Magic with the Keyboard and Trackpad
09_04859X ch04.qxp 7/20/06 10:41 PM Page 67
Table 4-1
(continued)
Action Symbol Purpose
Control # Displays the right-click/
Control-click menu
Command Ô Primary modifier for menus and
keyboard shortcuts
Del & Deletes the selected text
Option % Modifier for keyboard shortcuts
Using Finder and application
keyboard shortcuts
The Finder is chock-full of keyboard shortcuts that you can use to take care
of common tasks. Some of the handiest shortcuts are in Table 4-2.
But wait, there’s more! Most of your applications also provide their own set
of keyboard shortcuts. While you’re learning a new application, display the
application’s Help file and print a copy of the keyboard shortcuts as a handy
cheat sheet.
Table 4-2 Tiger Keyboard Shortcuts of Distinction
Key Combination Location Action
Ô+A Edit menu Selects all (works in the Finder too)
Ô+C Edit menu Copies the highlighted item(s) to
the clipboard
Ô+H Application menu Hides the application
Ô+M Window menu Minimizes the active window to
the dock (also works in the Finder)
Ô+O File menu Opens an existing document, file,
or folder (also works in the Finder)
Ô+P File menu Prints the current document
Ô+Q Application menu Exits the application
Ô+V Edit menu Pastes the contents of the clip-
board at the current cursor
position
68
Part II: Shaking Hands with Mac OS X
09_04859X ch04.qxp 7/20/06 10:41 PM Page 68
Key Combination Location Action
Ô+X Edit menu Cuts the highlighted item to the
clipboard
Ô+Z Edit menu Reverses the effect of the last
action you took
Ô+? Help menu Displays the Help system (works in
the Finder, too)
Ô+Tab Finder Switches between open
applications
Ô+Option+M Finder Minimizes all Finder windows to
the dock
Ô+Option+W Finder Closes all Finder windows
If you’ve used a PC before, you’re certainly familiar with three-key shortcuts —
the most infamous being Ctrl+Alt+Delete, the beloved shutdown shortcut
nicknamed the Windows Three Finger Salute. Three-key shortcuts work the
same way in Tiger (but you’ll be thrilled to know you won’t need to reboot
using that notorious Windows shortcut). If you’re new to computing, just
hold down the first two keys simultaneously and press the third key.
Performing Tricks with Finder Windows
In this section of your introduction to Mac OS X, I describe basic windows
management in Tiger: how to move things around, how to close windows,
and how to make ’em disappear and reappear like magic.
Scrolling and resizing windows
Can you imagine what life would be like if you couldn’t see more than a single
window’s worth of stuff? Shopping would be curtailed quite a bit — and so
would the contents of the folders on your hard drives!
That’s why Tiger adds scroll bars that you can click and drag to move through
the contents of the window. You can either
ߜ Click the scroll bar and drag it
ߜ Click anywhere in the empty area above or below the bar to scroll pages
one at a time
69
Chapter 4: Working Magic with the Keyboard and Trackpad
09_04859X ch04.qxp 7/20/06 10:41 PM Page 69
Figure 4-8 illustrates both vertical and horizontal scroll bars in a typical
Finder window.
Often, pressing the Page Up and Page Down keys moves you through a docu-
ment one page at a time. Also, pressing the arrow keys moves your insertion
cursor one line or one character in the four compass directions.
You can also resize most Finder and application windows by enlarging or
reducing the window frame itself. Move your mouse pointer over the resize
handle in the lower-right corner of the window (which smartly bears a
number of slashed lines to help it stand out) and then drag the handle in any
direction until the window is the precise size you need.
Close
Toolbar
Minimize
Zoom Toolbar button
Resize
Vertical scroll bar
Horizontal scroll bar
Figure 4-8:
A plethora
of helpful
window
controls.
70
Part II: Shaking Hands with Mac OS X
09_04859X ch04.qxp 7/20/06 10:41 PM Page 70
Minimizing and restoring windows
Resizing a window is indeed helpful, but maybe you simply want to banish
the doggone thing until you need it again. That’s a situation for the Minimize
button, which also appears in Figure 4-8. A minimized window disappears
from the desktop but isn’t closed: It simply reappears on the dock as a minia-
ture icon. Minimizing a window is easy: Move your mouse pointer over the
yellow Minimize button at the top-left corner of the window — a minus sign
appears in the button to tell you that you’re on target — and then click.
Hold down the Shift key whilst you minimize, and prepare to be amazed when
the window shrinks in slow motion like Alice in Wonderland!
To restore the window to its full size again (and its original position on the
desktop), just click its window icon on the dock.
Moving and zooming windows
Perhaps you want to move a window to another location on the desktop so
you can see the contents of multiple windows at the same time. Click the
window’s title bar (that’s the top frame of the window, which usually includes
a document or application name) and drag the window anywhere you like.
Then release the trackpad button.
Many applications can automatically arrange multiple windows for you.
Choose Window➪Arrange All (if that menu item appears).
71
Chapter 4: Working Magic with the Keyboard and Trackpad
Only one can be active at once
Yes, here’s a special Mark’s Maxim in the Mac
OS X universe. Only one application window
can be active in Tiger at any time. You can
always tell which window is active:
ߜ The active window is on top of other
windows.
ߜ The Close, Minimize, and Zoom buttons
of the active window are in color. Note,
though, that you can still use an inac-
tive window’s Close, Minimize, and Zoom
buttons.
ߜ Any input you make by typing or by moving
your mouse pointer appears in the active
window.
ߜ Mac OS X
dims
inactive windows that you
haven’t minimized.
09_04859X ch04.qxp 7/20/06 10:41 PM Page 71
To see all that a window can show you, use the Zoom feature to expand any
Finder or application window to its maximum practical size. Note that a
zoomed window can fill the entire screen, or (if that extra space isn’t applica-
ble for the application) the window might expand only to a larger part of the
desktop. To zoom a window, move your mouse pointer over the green Zoom
button (refer to Figure 4-8 yet again) at the top-left corner of the window.
When the plus sign appears in the Zoom button, click to claim the additional
territory on your desktop. (You can click the Zoom button again to automati-
cally return the same window to its original dimensions.)
Closing windows
When you’re finished with an application or no longer need a window open,
move your mouse pointer over the red Close button at the top-left corner of
the window. When the X appears in the button, click it. (And yes, I can get
one more reference out of Figure 4-8, which I’m thinking of nominating as
Figure of the Year.)
If you have more than one window open in the same application and you
want to close ’em all in one swoop, hold down the Option key while you click
the Close button on any of the windows.
If you haven’t saved a document and you try to close that application’s window,
Tiger gets downright surly and prompts you for confirmation. “Hey, human, you
don’t really want to do this, do you?” If you answer in the affirmative — “Why,
yes, machine. Yes, indeed, I want to throw this away and not save it.” — the
application discards the document that you were working on. If you decide to
keep your document (thereby saving your posterior from harm), you can save
the document under the same filename or under a new name.
72
Part II: Shaking Hands with Mac OS X
Toggling toolbars the Tiger way
Time to define a window control that’s actually
inside
the window for a change. A
toolbar
is a
strip of icons that appears under the window’s
title bar. These icons typically perform the most
common actions in an application; the effect is
the same as if you used a menu or pressed a
keyboard shortcut. Toolbars are popular these
days. You see ’em in everything from the Finder
window to most application windows.
You can banish a window’s toolbar to make
extra room for icons, documents, or whatever it
happens to be holding. Just click the little
lozenge-shaped button at the right corner of the
window. (You guessed it — the Toolbar button
is also shown in Figure 4-8.) One note: By tog-
gling the Finder toolbar off, you also lose the
Finder window sidebar.
09_04859X ch04.qxp 7/20/06 10:41 PM Page 72
Chapter 5
Getting to the Heart of the Tiger
In This Chapter
ᮣ Making the most of your Home folder
ᮣ Arranging your desktop for greater efficiency
ᮣ Adding timesavers to the dock
ᮣ Using the trash (and rescuing precious stuff from it)
ᮣ Using Exposé and the Dashboard to perform desktop magic
ᮣ Printing documents
W
hen you’re no longer a novice to Tiger and the basics of Finder, turn
your attention to a number of more advanced topics ’n tricks that will
turn you into a Mac laptop power user — which, after all, is the goal of every
civilized consciousness on Planet Earth.
Consider this chapter a grab bag of Tiger knowledge. Sure, I jump around a
little, but these topics are indeed connected by a common thread: They’re all
sure-fire problem-solvers and speeder-uppers. (I can’t believe the latter is
really a word, but evidently it is. My editors told me so.)
Your Home Folder Is Your Homestead
Each user account that you create in Tiger is a self-contained universe. For
example, each user has a number of unique characteristics and folders
devoted just to that person, and Tiger keeps track of everything that user
changes or creates. (I describe the innate loveliness of multiple users living in
peace and harmony on your laptop in Chapter 16.)
This unique universe includes a different system of folders for each user
account on your system. The top-level folder uses the short name that Tiger
10_04859X ch05.qxp 7/20/06 10:39 PM Page 73
assigns when that user account is created. Naturally, the actual folder name
is different for each person, so Mac techno-types typically refer to this folder
as your Home folder.
Each account’s Home folder contains a set of subfolders, including
ߜ Movies
ߜ Music
ߜ Pictures
ߜ Library
ߜ Public
ߜ Sites (Web pages created by the user)
ߜ Documents (created by the user)
Although you can store your stuff at the root (top level) of your hard drive,
that horde of files, folders, and aliases can get crowded and confusing very
quickly. Here’s a Mark’s Maxim to live by:
Your Home folder is where you hang out and where you store your stuff. Use
it to make your computing life much easier!
Create subfolders within your Documents folder to organize your files and
folders even further. For example, I create a subfolder in my Documents
folder for every book that I write. That way, I can quickly and easily locate all
the documents and files associated with that book project.
In Chapter 16, I discuss security in your Home folder and what gets stored
where. For now, Figure 5-1 shows how convenient your Home folder is to
reach because it appears in the Finder window sidebar. One click of your
Home folder, and all your stuff is right in front of you.
In addition to using the Finder window sidebar, you can reach your Home
folder in other convenient ways:
ߜ From the Go menu: Choose Go➪Home to display your Home folder
immediately from the Finder window. You can press Ô+Shift+H to
accomplish the same thing.
ߜ From the Open and Save dialog boxes: Tiger’s standard File Open and
File Save dialog boxes also include the same Home folder (and sub-
folder) icons as the Finder window sidebar.
74
Part II: Shaking Hands with Mac OS X
10_04859X ch05.qxp 7/20/06 10:39 PM Page 74