High Availability MySQL Cookbook phần 7 docx
Bạn đang xem bản rút gọn của tài liệu. Xem và tải ngay bản đầy đủ của tài liệu tại đây (376.81 KB, 26 trang )
Chapter 4
129
773/tcp open submit
3306/tcp open mysql
Nmap finished: 1 IP address (1 host up) scanned in 0.089 seconds
Host resolution
If you are not using IP addresses in the config.ini le (strongly recommended), ensure that
you have all of the hosts involved in the cluster in a /etc/hosts le to ensure that a simple
DNS outages does not take down the entire cluster. For example, your /etc/hosts may look
as follows:
[root@node1 mysql-cluster]# cat /etc/hosts
# Do not remove the following line, or various programs
# that require network functionality will fail.
127.0.0.1 node1.xxx.com node1 localhost.localdomain localhost
::1 localhost6.localdomain6 localhost6
10.0.0.1 node1.xxx.com node1
10.0.0.2 node2.xxx.com node2
10.0.0.3 node3.xxx.com node3
10.0.0.4 node4.xxx.com node4
10.0.0.5 node5.xxx.com node5
Memory
It is extremely common for IndexMemory and DataMemory to use more memory than the
system's free memory.
This is commonly caused by running another process on the same server as
a storage node, such as a standard MySQL server (which may use a large
amount of RAM while executing a specic query). It is recommended that
storage nodes only run the storage node processes.
In the case that this becomes a regular problem, it is possible to tune the Linux kernel out of
memory (OOM) killer (this is the piece of code which decides which process to kill in the case
of running out of physical memory) to kill another process and not the ndbd process. There
is a value, /proc/<pid>/oom-adj, which ranges from -16 to +15 (-17 means never kill this
process). The following bash snippet can be used to run after a storage node has started to
signicantly reduce the change of the OOM killer, killing ndbd:
[root@node1 mysql-cluster]# for pid in $(pidof ndbd); do echo "-10" > /
proc/$pid/oom_adj; done;
[root@node1 mysql-cluster]#
However, it is still recommended not to come near to running out of physical memory on
a storage node!
MySQL Cluster Troubleshooting
130
Seeking help
In this recipe, we will cover what to do when help is required and where the tips in the
Debugging a MySQL Cluster recipe have not helped.
Getting ready
Before considering Seeking help, it is important to ensure that you have attempted
everything yourself.
If you are experiencing a critical problem with a production system, then it is
likely a good idea to engage professional support immediately (available from
MySQL and other rms).
Community support is excellent for MySQL Cluster and comes in several forms. To use any
support, however, it is important to know exactly what you are asking. In this recipe, we will
rst cover conrming exactly what the problem is (and how to describe it), then discuss how to
look for help, and nally briey cover the process of submitting a bug to MySQL (if this is what
you have found).
How to do it
Firstly, ensure that you have carried out all the steps in the previous debugging recipe.
It is also a good idea to see if you can reproduce your issue, either on the same cluster or on
a different development cluster. If you can, then write down a clear test case that someone
else could use to recreate your problem for themselves. If you can do this, then the chances
of your problem or bug being resolved increase enormously.
Having established exactly what is wrong and attempted to reproduce it, search the MySQL
online manual at Also search the bugs database at
to see whether the bug has been reported and xed. Finally,
search the MySQL mailing list archives at You can also use
to search all the web pages (this search includes the
manual, mailing list, and forums).
During the searching process, keep a record of URLs that seem to be related
to your problem. Even if they do not help you immediately, including them
when you directly ask the community for help saves someone else a search
and may help others help you.
Chapter 4
131
It is an extremely good idea to ensure that you are running the latest version of MySQL in
your cluster if you are experiencing problems. People are naturally reluctant to help users
x problems when running versions of MySQL more than a couple of minor releases behind
current, as this is, in effect, known buggy software and many bugs are xed in each release. If
upgrading is impossible, then be sure to check the changelists of later versions to ensure that
whatever issue you have experienced has not been reported and xed.
If nothing has helped you, then it is now time to ask the community directly for help. The
MySQL Cluster mailing list, which you can subscribe to at />cluster
, contains a large number of developers and active members of the community.
When posting a bug, ensure that you include the following details:
Your setup, number of nodes, architecture, kernel version, operating system, and
network connections. Everything—you really cannot give too much detail
Your config.ini le
What you did to cause the problem (if anything)
What was supposed to happen
What actually happened
If possible, a test case (for example, the SQL query that caused the problem)
What you have already attempted to x the problem (include links to URLs that you
have looked at that appear relevant)
It is likely that someone will quickly give feedback and help you narrow down your issue.
There's more
In the event that you are sure that you have found a problem with MySQL or MySQL Cluster,
you may well be asked to submit a bug report. Good bug reports follow the template given
for a mailing list posted previously.
Bugs are reported at />NIC teaming with MySQL Cluster
In this recipe, we will briey discuss the specic requirements that a MySQL Cluster will bring
to your network and show an example conguration with additional redundancy provided
by a network. While this is not directly a troubleshooting step, it is an extremely common
technique, and we cover the troubleshooting points during the recipe.
MySQL Cluster Troubleshooting
132
Getting ready
The strongly recommended best practice is to ensure that all nodes involved in your cluster
have dedicated NICs connected to different switches.
It is also strongly recommended to ensure that a switch does not become a single point of
failure and that the MySQL Cluster nodes are connected at least to two dedicated switches
for redundancy.
The public network may also require one or two switches, depending on how the application
connects to the cluster. However, it is critical for truly high availability that no single network
device can take out the link to the fully-redundant cluster.
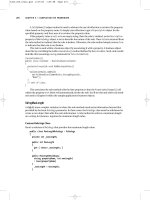
The following diagram shows a design consisting of two storage nodes, two SQL nodes,
and two management nodes all connected to two dedicated cluster switches (using the
rst two NICs bonded) and also connected to two public (that is not dedicated to internal
cluster trafc) switches. The diagram shows two application servers connected to each of
the public switches.
Note that this recipe requires a special conguration on the Linux servers to allow the use
of multiple network connections; this is called bonding and is covered shortly. Additionally,
this diagram demonstrates switches connected using multiple cables - without proprietary
technology and special conguration on the switches. It is likely that only one of these links
would ever be active and delays of up to 50 seconds may occur on failure before the backup
link activates. This time may be enough to cause your cluster to shut down, so ensure that
your network is set up properly for fast failover as this book does not cover such conguration.
There is really no need for the cluster storage and management nodes
to be connected to the public network except for management. It would
be, for example, perfectly possible to connect to the SQL nodes on their
public network. From there, connect to storage and management nodes
via the private network. There is certainly no need for bonded interfaces
on the public network for the storage and management nodes, but these
are shown here as a best practice, which allows any single switch to fail
without any effect on cluster availability.
Chapter 4
133
eth 0
STORAGE
NODE 1
192.168.0.0 / 24 10.0.0.0 / 24
eth 1
eth 0
eth 1
eth 0
eth 1
eth 0
eth 1
eth 0
eth 1
eth 0
eth 1
BOND1
BOND1
BOND1
BOND1
BOND1
BOND1
STORAGE
NODE 2
SQL
NODE 1
SQL
NODE 2
NODE 1
NODE 2
MGM
MGM
BOND0
BOND0
BOND0
BOND0
BOND0
BOND0
eth 2
eth 3
eth 2
eth 3
eth 2
eth 3
Eth2
eth 3
eth 2
eth 3
eth 2
eth 3
PRIVATE
PRIVATE
SWITCH 1
SWITCH 2
SWITCH 1
SWITCH 2
PUBLIC
PUBLIC
Application
Server 1
BOND0
Application
Server 2
BOND0
eth 0
eth 1
eth 0
eth 1
The two private switches must be connected together, ideally using a
high-bandwidth and redundant connection (such as a EtherChannel on
Cisco devices).
Fortunately, the Linux kernel includes an excellent support for bonding network links together,
and in this recipe, we will show how to congure, test, and troubleshoot bonded interfaces.
MySQL Cluster Troubleshooting
134
How to do it…
The rst step is to congure each pair of bonded interfaces. We will show the conguration
for the rst bond, bond0, which is made up of eth0 and eth1. In these les, remove settings
such as whether to use DHCP or an IP address and netmask, and congure the interfaces
as slaves with the following conguration les:
/etc/sysconfig/network-scripts/ifcfg-eth0:
DEVICE=eth0
# Ensure that the MAC address is connected to the same switch
# For each of the eth0's (e.g. private switch 2)
HWADDR=00:16:3E:xx:xx:xx
BOOTPROTO=none
ONBOOT=yes
MASTER=bond0
SLAVE=yes
USERCTL=no
/etc/sysconfig/network-scripts/ifcfg-eth1:
DEVICE=eth1
# Ensure that the MAC address is connected to the same switch
# For each of the eth1's (e.g. private switch 1)
HWADDR=00:16:3E:xx:xx:xx
BOOTPROTO=none
ONBOOT=yes
MASTER=bond0
SLAVE=yes
USERCTL=no
For the second pair, bond1, modify the ifcfg-eth2 and ifcfg-eth3 les in the same
directory, repeat changing MASTER=bond0 to MASTER=bond1.
The bonding conguration le
/etc/sysconfig/network-scripts/ifcfg-bond0
(and ifcfg-bond1) denes the logical interface that sits above the raw interfaces, and
this le should contain the following for the public interface bond0:
DEVICE=bond0
# Change fourth octet to correct IP for server
IPADDR=10.0.0.1
NETMASK=255.255.255.0
USERCTL=no
BOOTPROTO=none
ONBOOT=yes
BONDING_OPTS="mode=1 miimon=100"
Chapter 4
135
mode=1 means active / passive. Other modes are available but may require
you to congure the link port aggregation on the switches. Review the
networking/bonding.txt le in the kernel documentation for more
information (yum install kernel-doc and look at the /usr/share/
doc/kernel-doc* directory).
Now add the following for the private interface bond1:
DEVICE=bond1
# Change fourth octet to correct IP for server
IPADDR=10.2.0.2
NETMASK=255.255.255.0
USERCTL=no
BOOTPROTO=none
ONBOOT=yes
BONDING_OPTS="mode=1 miimon=100"
In CentOS and RHEL 5, it is necessary to manually congure a second bonding interface
(there is only one allowed by default) by adding the following to /etc/modprobe.conf:
alias bond0 bonding
alias bond1 bonding
If everything goes well, you will now be able to bring up your new network interfaces with a
standard network restart. Do this from the console of the server, if possible, as follows:
[root@node1 ~]# service network restart
Shutting down interface bond0: [ OK ]
Shutting down interface eth0: [ OK ]
…
Bringing up interface bond0: [ OK ]
Bringing up interface eth0: [ OK ]
Check that you can ping across your new bonded interface as follows:
[root@node1 network-scripts]# ping 10.0.0.2
PING 10.0.0.2 (10.0.0.2) 56(84) bytes of data.
64 bytes from 10.0.0.2: icmp_seq=1 ttl=64 time=0.178 ms
64 bytes from 10.0.0.2: icmp_seq=2 ttl=64 time=0.122 ms
If this works, reboot, and conrm that the bond remains. If it does not, then check the
upcoming There's more… section discussion.
MySQL Cluster Troubleshooting
136
The next step is to double-check that failover works. Set up a terminal window to continually
ping across one of the bonded interfaces, and prepare to unplug a cable. In a console window,
run tail –f on /var/log/messages.
You should notice that at the moment you unplug a cable, a very small number of pings drop
(with miimon set to 100, probably about two) and a message like the following appears in
the syslog:
Feb 2 00:53:35 node1 kernel: eth1: link down
Feb 2 00:53:37 node1 kernel: bonding: bond0: link status definitely
down for interface eth1, disabling it
Feb 2 00:53:37 node1 kernel: bonding: bond0: making interface eth2
the new active one.
When the cable is reconnected, the following message should appear:
Feb 2 00:55:28 node1 kernel: eth1: link up
Feb 2 00:55:28 node1 kernel: bonding: bond0: link status definitely
up for interface eth1.
At this point, you will notice that the kernel has not failed back to using the previously active
link—it will generally not do this to reduce the number of times that it fails over:
[root@node1 ~]# cat /proc/net/bonding/bond0 | grep Currently
Currently Active Slave: eth2
If this works, congratulations! You have eliminated your network switches and cards as a
single point of failure.
There's more…
If you notice that lots of duplicate packets appear when pinging across your bonded interface,
like in the following example, you may have congured the mode wrongly:
[root@node1 ~]# ping 10.0.0.2
PING 10.0.0.2 (10.0.0.2) 56(84) bytes of data.
64 bytes from 10.0.0.2: icmp_seq=1 ttl=64 time=0.146 ms
64 bytes from 10.0.0.2: icmp_seq=1 ttl=64 time=0.168 ms (DUP!)
64 bytes from 10.0.0.2: icmp_seq=2 ttl=64 time=0.110 ms
64 bytes from 10.0.0.2: icmp_seq=2 ttl=64 time=0.139 ms (DUP!)
To verify the mode, as well as some other useful settings, read the live settings from the
virtual lesystem /proc provided by the kernel:
[root@node1 ~]# cat /proc/net/bonding/bond0
Ethernet Channel Bonding Driver: v3.4.0 (October 7, 2008)
Chapter 4
137
Bonding Mode: load balancing (round-robin)
MII Status: up
MII Polling Interval (ms): 0
Up Delay (ms): 0
Down Delay (ms): 0
This clearly shows that the mode is not mode 1 (which is active / backup), but is in fact round
robin. Round Robin is no use unless the switches that the servers are connected to are able
to and congured for such operation, the detail of which is outside the scope for this book. If
they are not, ensure that you are using active / backup. Check the BONDING_OPTS setting in
ifcfg-bondx, and restart the bonded interface.
In the correct mode, this le should show the following:
[root@node1 ~]# cat /proc/net/bonding/bond0
Ethernet Channel Bonding Driver: v3.4.0 (October 7, 2008)
Bonding Mode: fault-tolerance (active-backup)
Primary Slave: None
Currently Active Slave: eth1
MII Status: up
MII Polling Interval (ms): 100
Up Delay (ms): 0
Down Delay (ms): 0
Slave Interface: eth1
MII Status: up
Link Failure Count: 0
Permanent HW addr: 00:0c:29:e7:a7:2e
Slave Interface: eth2
MII Status: up
Link Failure Count: 0
Permanent HW addr: 00:50:56:ae:70:04
The status of the individual network interfaces can be seen at the bottom
of the previous output page. This can be useful to conrm the status of
individual interfaces within the bond.
5
High Availability with
MySQL Replication
In this chapter, we will cover:
Designing a replication setup
Conguring a replication master
Conguring a replication slave without synchronizing data
Conguring a replication slave and migrating data with a simple SQL dump
Using LVM to reduce downtime on master when bringing a slave online
Replication safety tricks
Multi Master Replication Manager (MMM)
Initial installation
Installing the MySQL nodes
Installing the monitoring node
Managing and using Multi Master Replication Manager (MMM)
Introduction
MySQL Replication is a feature of the MySQL server that allows you to replicate data from one
MySQL database server (called the master) to one or more MySQL database servers (slaves).
Replication is asynchronous, that is, the process of replication is not immediate and there is
no guarantee that slaves have the same contents as the master (this is in contrast to MySQL
Cluster, which was covered earlier in this book).
MySQL Replication has been supported in MySQL for a very long time and is an extremely
exible and powerful technology. Depending on the conguration, you can replicate all
databases, selected databases, or even selected tables within a database.
High Availability with MySQL Replication
140
Designing a replication setup
There are many ways to architect a MySQL Replication setup, with the number of options
increasing enormously with the number of machines. In this recipe, we will look at the most
common topologies and discuss the advantages and disadvantages of each, in order to show
you how to select the appropriate design for each individual setup.
Getting ready
MySQL replication is simple. A server involved in a replication setup has one of following
two roles:
• Master: Master MySQL servers write all transactions that change data to a binary log
• Slave: Slave MySQL servers connect to a master (on start) and download the
transactions from the master's binary log, thereby applying them to the local server
Slaves can themselves act as masters; the transactions that they apply from
their master can be added in turn to their log as if they were made directly
against the slave.
Binary logs are binary les that contain details of every transaction that the MySQL server
has executed. Running the server with the binary log enabled makes performance about 1
percent slower.
The MySQL master creates binary logs in the forms
name.000001, name.000002, and so on.
Once a binary log reaches a dened size, it starts a new one. After a certain period of time,
MySQL removes old logs.
The exact steps for setting up both slaves and masters are covered in later recipes, but for the
rest of this recipe it is important to understand that slaves contact masters to retrieve newer
bits of the binary log, and to apply these changes to their local database.
How to do it
There are several common architectures that MySQL replication can be used with. We
will briey mention and discuss benets and problems with the most common designs,
although we will explore in detail only designs that achieve high availability (as is the
focus of this book).
Master and slave
A single master with one or more slaves is the simplest possible setup. A master with one
slave connected from the local network, and one slave connected via a VPN over the Internet,
is shown in the following diagram:
Chapter 5
141
MASTER SLAVE
VPN
SLAVE
A setup such as this—with vastly different network connections from the different slaves
to the master—will result in the two slaves having slightly different data. It is likely that
the locally attached slave may be more up to date, because the latency involved in data
transfers over the Internet (and any possible restriction on bandwidth) may slow down the
replication process.
This Master-Slave setup has the following common uses and advantages:
A local slave for backups, ensuring that there is no massive increase in load during
a backup period.
A remote location—due to the asynchronous nature of MySQL replication, there is
no great problem if the link between the master and the slave goes down (the slave
will catch up when reconnected), and there is no signicant performance hit at the
master because of the slave.
It is possible to run slightly different structures (such as different indexes) and focus
a small number of extremely expensive queries at a dedicated slave in order to avoid
slowing down the master.
This is an extremely simple setup to congure and manage.
A Master-Slave setup unfortunately has the following disadvantages:
No automatic redundancy. It is common in setups such as this to use lower
specication hardware for the slaves, which means that it may be impossible
to "promote" a slave to a master in the case of an master failure.
Write queries cannot be committed on the slave node. This means write transactions
will have to be sent over the VPN to the master (with associated latency, bandwidth,
and availability problems).
Replication is equivalent to a RAID 1 setup, which is not an enormously efcient
use of disk space (In the previous example diagram, each piece of data is written
three times.).
Each slave does put a slight load on the master as it downloads its binary log. The
number of slaves thus can't increase innitely.
High Availability with MySQL Replication
142
Multi-master (active / active)
Multi-master replication involves two MySQL servers, both congured as replication masters
and slaves. This means that a transaction executed on one is picked up by the other, and
vice versa, as shown in the following diagram:
MASTER MASTER
A SQL client connecting to the master on the left will execute a query, which will end up in that
master's binary log. The master on the right will pick this query up and execute it. The same
process, in reverse, occurs when a query is executed on the master on the right. While this
looks like a fantastic solution, there are problems with this design:
It is very easy for the data on the servers to become inconsistent due to the
non-deterministic nature of some queries and "race conditions" where conicting
queries are executed at the same time on each node
Recent versions of MySQL include various tricks to
minimize the likelihood of these problems, but they are
still almost inevitable in most real-world setups.
It is extremely difcult to discover if this inconsistency exists, until it gets so bad
that the replication breaks (because a replicated query can't be executed on the
other node)
This design is only mentioned here for completeness; it is often strongly recommended not to
use it. Either use the next design, or if more than one "active" node is required, use one of the
other high-availability techniques covered in this book.
Active / passive master
Active / passive master replication involves two MySQL servers congured as per active /
active master replication, but with some form of "write barrier" around a "passive" node in
order to ensure that only one node is able to execute queries that change the data at any
one point of time. This design is demonstrated in the following diagram:
MASTER
WRITE BARRIER
MASTER
Chapter 5
143
In the preceding diagram, the master on the left is the active master and the master on the
right is passive. By running the example we discussed in active / active replication, if a SQL
query is executed on the master on the left, it is injected into the binary log. This query is then
picked up and executed by the master on the right. If a SQL query is executed on the node on
the right, the "write barrier" prevents the query from being executed.
This barrier could consist of one of the following with various degrees of enforcement:
A virtual IP address shared between the nodes (with one node having its ownership
at any point of time)
Permissions set on the "passive" node to prevent all connections except those for the
replication user
An application congured only to connect to the active node and no
untrustworthy user
In many ways, the simplest and easiest, by conguring all slave nodes as "read-only"
on startup with the following
my.cnf entry on the slave:
[mysqld]
read_only
When set as read-only, the node will reject all UPDATE and DELETE queries, and thus can't
allow a standard database user (such as an application or mistaken user) to change data
although changes that are received by the master are executed as normal.
To promote a slave node to a master node, either remove the read_only parameter from
my.cnf or to set the parameter for the currently running MySQL Server only, execute the
following query:
mysql> FLUSH TABLES WITH READ LOCK;
mysql> SET GLOBAL read_only = ON;
The server will now respond to all queries normally. This trick is covered in more detail later in
this chapter in the Replication safety tricks recipe.
The effect is that there is one node that is asynchronously up to date with the other node
(this node may or may not be used for read-only queries). In the event of the failure of
the master, the passive node can be quickly "promoted" to the active master using the
following procedure:
1. Install a write barrier around the previously active node to prevent all new
MODIFY queries.
2. Wait for the passive node to catch up with any queries left in the master's binary log.
3. Remove the write barrier around the passive (which now becomes the active) node.
High Availability with MySQL Replication
144
Clearly, if the active node has failed, step 2 may not be possible (and,
depending on the type of write barrier, step 1 may be difcult). In
this case, the passive node is promoted to master node and some
transactions are lost. If this is not acceptable, you need a synchronous
high-availability technique—several of these techniques are covered in
this book (such as shared storage and MySQL Cluster).
How it works
In this section, we will cover how MySQL replication works in slightly more detail. MySQL
supports two forms of replication: statement-based and row-based replication. There is
also a hybrid mode ("mixed") that is used by default.
Mixed-mode replication
Mixed-mode replication (the default) will use statement-based replication for almost
everything, but it will switch to row-based replication for certain events. Full documentation
on every event that will cause this can be found at />refman/5.1/en/binary-log-mixed.html
, but the most common events that
cause row-based replication to be used are as follows:
When a query updates a MySQL Cluster table
When a query includes the UUID() function
When two or more tables with AUTO_INCREMENT columns are modied
When any INSERT DELAYED query is executed
There is no need to congure anything to get mixed-mode replication to work, because it is
enabled as soon as you turn on binary logging (by adding the log-bin parameter to the
[mysqld] section in my.cnf, which we shall cover in the later recipes in this chapter).
Statement-based replication
Statement-based replication quite literally keeps a record of every statement executed on
the master that the slaves then executed. With this form of replication, which has been
around from MySQL 3.1 version, binary logs can be converted to text for inspection with
the mysqlbinlog command.
Chapter 5
145
The following command runs the output of mysqlbinlog (which is verbose,
and includes many comments and details on the environment) using grep
command to look for a SQL query executed on the node:
[root@node1 mysql]# mysqlbinlog /var/lib/mysql/node1.000001
| grep -in "create database"
23:create database world
Unfortunately, statement-based replication has problems with queries that can cause
different results when executed at the same time on the same dataset, such as DELETE or
UPDATE with a LIMIT and no ORDER BY clause. Go to />refman/5.4/en/replication-sbr-rbr.html
for a complete list of limitations.
To force MySQL to use statement-based replication, modify the binlog-format my.cnf
parameter and restart MySQL:
[mysqld]
binlog-format=mixed
Row-based replication
As a consequence of the limitations inherent to a statement-based replication system,
row-based replication was added in MySQL 5.1.5.
If you enable MySQL Cluster on a SQL node (you'll see how later in
this book), row-based replication will be used by default. MySQL
Cluster is not compatible with statement-based replication.
Row-based replication literally replicates the actual changes ("events") to data in a database.
Rather than a slave executing an entire single transaction, it simply executes the required
queries to achieve the same results (this can, in some cases, increase performance). For
example, if a DELETE query includes a delete subquery, the log would only contain details
of the events—that is, the rows actually deleted.
Even with row-based replication, some queries (such as OPTIMIZE TABLE, ALTER TABLE,
and ANALYZE TABLE) must be stored as queries and executed on the slaves as queries.
While it is not possible to inspect the actual queries within the binary log, it is possible to run
mysqlbinlog with the base64-output=DECODE-ROWS and verbose parameters in
order to see which rows are being updated.
There are some unresolved issues with row-based replication and concurrent large bulk
INSERT and SELECT queries. However, with other uses of a database, it is likely that
row-based replication is more deterministic and less likely to cause problems.
High Availability with MySQL Replication
146
Row-based replication is required for replication involving MySQL Clusters, as covered
in the Master and slave section. To congure row-based replication explicitly, modify the
binlog-format parameter in my.cnf and restart MySQL:
[mysqld]
binlog-format=row
To check which replication mode a MySQL server is running in, SELECT the value of the
binlog_format system variable:
mysql> SHOW VARIABLES LIKE 'binlog_format';
+ + +
| Variable_name | Value |
+ + +
| binlog_format | MIXED |
+ + +
1 row in set (0.00 sec)
Conguring a replication master
In this recipe, we will congure a master. Once congured, a replication master can have as
many slaves as required connecting to it and retrieving its binary log.
Getting ready
The process of setting up a master is as follows:
Congure a replication user account, with restricted permissions, for slaves to use
when they log in
Congure the master to start recording information into a binary log (using row-based,
statement-based or hybrid-based replication modes)
How to do it
We will rstly cover the parameters that must be set in the [mysqld] section in
/etc/my.cnf on the master node.
1. Conguring a node ID
Every server involved in a replication agreement with any other server must have
a unique ID, set in my.cnf with the server-id parameter:
server-id = 1
Chapter 5
147
2. Conguring a binary log
The master must be told to store a binary log. The parameter log-bin will do this,
but it is a good idea to pass a name for this logle.
If you fail to do so, it can cause confusion—particularly if
machine hostnames change.
For a machine with a hostname, the following will place logles in the form
<MySQL datadir> node1-bin.xxxxxx. For example, /var/lib/mysql/node1-
bin.000001
:
log-bin=node1
It is possible to pass a full path to this logle. This is extremely desirable if you have
a dedicated block device to store the binary logs, as on IO intensive systems this may
reduce the overhead of binary logging:
log-bin=/mnt/disk2/node1
In addition to the log les, a le prefix.index (for
example node1.index) is created in the same directory
that tells you which is the most recent binary log le.
You must restart the mysql server after changing this setting:
[root@node1 tmp]# service mysql restart
Shutting down MySQL. [ OK ]
Starting MySQL. [ OK ]
3. Conguring a replication user account
Each slave that connects to a master in a replication setup (for the purposes of
reading the binary log on the master) must have an account to log in. This account
must be granted the dedicated permission REPLICATION SLAVE. It is common
practice to also grant this account
REPLICATION CLIENT, which allows monitoring
of the replication setup.
If possible, grant this permission only to a specic host—in this example,
node 1 (10.0.0.1):
mysql> GRANT REPLICATION SLAVE, REPLICATION CLIENT ON *.* TO
'replication'@'10.0.0.1' IDENTIFIED BY 'password';
Query OK, 0 rows affected (0.00 sec)
To update the permissions table, ush the privileges:
mysql> FLUSH PRIVILEGES;
Query OK, 0 rows affected (0.01 sec)
High Availability with MySQL Replication
148
How it works
The process of replication is a little more complicated than we earlier alluded to. In this
section, we will explain the details behind MySQL replication in slightly more detail.
When a transaction is sent to a MySQL server running with binary logging enabled, the
transaction is executed normally, and just prior to completing the transaction the server
records the change serially in the binary log. Once this is done, it tells the storage engine
that the transaction is ready to be committed.
Even if statements are concurrent during execution, they
are recorded serially in the binary log.
The slave runs two threads to handle its role as a slave.
Firstly, the slave runs a I/O thread that opens a standard client connection to the master
(using the replication user account) and starts a non-SQL BINARYLOG DUMP command, which
causes the master to start a "Binlog dump thread" and allows the slave to read log entries
from the master's binary log. The slave compares each entry with the latest entry that it
already has on the disk. If it fails to nd new entries, it sleeps and waits for the master to send
a new entry signal. If there are new entries, it records these in the "relay log" on the slave.
A second thread, the "SQL slave thread", reads from the relay log and replays the queries,
which completes the process that started with a query being sent to the master and ends
with the query being committed to the slave server database.
When the slave thread executes a query, it does not, by default, record the query in its own
binary log—this can be changed with the my.cnf parameter log-slave-updates.
There's more
The following is a checklist of things to consider when setting up a master:
Disk space
Binary logs take up disk space, and if you have them stored in the same partition as the
MySQL data because you are running out of space, it will prevent changes to your database.
There are a couple of ways to approach this problem, outlined here.
Only logging some databases
You may well have some databases that you do not wish to replicate. Unless you are using
binary logs for some other purpose (such as, for backups), you can stop the MySQL server
from logging these queries with the my.cnf parameter binlog-ignore-db.
Chapter 5
149
When using row-based replication, this works as expected (all queries made against this
database are ignored and not logged). When using statement-based replication, things are
a little more complicated—the effect of this parameter is to not log any statement where the
default database (that is, the one selected by USE) is db_name:
binlog-ignore-db = mysql
To specify more than one database you wish to ignore,
use this option multiple times. Do not use commas.
If you only want to replicate a specic database, you can use the inverse parameter
binlog-do-db.
Limiting individual binary log size
Binary logs can become unmanageable, and the default maximum size for a binary log is 1G.
This is tunable with the
my.cnf parameter max_binlog_size:
max_binlog_size=200M
Rotating binary logs
It is good practice to automatically delete old binary logs. You can rotate binary logs older than
two days with the my.cnf parameter expire_log_days.
The default value for this parameter is 0, which means "no automatic removal".
expire_logs_days = 2
Removals occur when the MySQL server is started and when the logs
are ushed (note that the logs are ushed when the current logle
reaches max_binlog_size, providing a further reason to set this
parameter to a relatively small value).
Performance
In addition to the recommendation of storing your binary log on a block device separate
from your MySQL data directory, there are some additional tricks you can use to increase
performance while logging:
Binary log caching
The
my.cnf parameter named binlog_cache_size sets the size of the cache that is used
to hold SQL statements before they are inserted into the binary log during a transaction. Big,
multi-statement transactions can benet from an increased value (the default is 32M):
binlog_cache_size = 64M
This buffer is allocated per connection on the rst UPDATE or INSERT query.
High Availability with MySQL Replication
150
Conguring a replication slave
without syncing data
In this recipe, we will see how to congure a replication slave and initiate the replication
process. This recipe assumes that a master server is already congured, with a replication
user account congured for the slave.
How to do it
In this recipe, we show how to congure a slave server without showing how to sync data,
which is shown in the next recipe. This recipe would be perfect if you have two freshly installed
MySQL servers for example, or if you have a slave, which is a clone of a master that is not
being updated, using virtualization.
The rst step is to verify that the two servers have different server ID parameters in my.cnf
by executing the following command in the mysql client on both servers:
mysql> SHOW VARIABLES LIKE "server_id";
+ + +
| Variable_name | Value |
+ + +
| server_id | 5 |
+ + +
1 row in set (0.00 sec)
If two servers in a replication agreement have the same server
ID, replication will fail.
If the two servers do have the same server ID, modify the server-id parameter in
my.cnf in order to ensure that both nodes have a server ID explicitly set, and that the
two IDs are different.
The second step is to verify the master status on the master. In the MySQL Client, execute
the following SQL query:
mysql> SHOW MASTER STATUS;
+ + + + +
| File | Position | Binlog_Do_DB | Binlog_Ignore_DB |
+ + + + +
| node1.000003 | 107 | | |
+ + + + +
1 row in set (0.00 sec)
Chapter 5
151
Take note of the lename (node1.000003) and position (107). On the master, we have already
congured a replication user account (replication) and the corresponding password.
The next step is to tell the slave where the master is, what user account to use in order to
log in, what logle to start reading from, and what position to jump to. This is all encased in
a
CHANGE MASTER TO query. Jump onto the slave, enter the MySQL Client, and execute the
following query:
mysql> CHANGE MASTER TO master_host = '10.0.0.1', master_
user='replication', master_password='password', master_log_
file='node1.000003', master_log_pos=107;
Query OK, 0 rows affected (0.01 sec)
Now start the slave threads on the new slave:
mysql> START SLAVE;
Query OK, 0 rows affected (0.00 sec)
And check that the slave has come up using:
mysql> SHOW SLAVE STATUS\G;
*************************** 1. row ***************************
Slave_IO_State: Waiting for master to send event
Master_Host: 10.0.0.1
Master_User: replication
Slave_IO_Running: Yes
Slave_SQL_Running: Yes
Seconds_Behind_Master: 0
1 row in set (0.00 sec)
Congratulations! Your replication agreement is now working.
At this point, do something on the master (such as creating a table, inserting a row, and so
on) and ensure that it appears in the slave. If it does not, review the output of SHOW SLAVE
STATUS and ensure that the slave thread is running, and that there is no error displayed.
High Availability with MySQL Replication
152
Conguring a replication slave,
migrating data with a simple SQL dump
In this recipe, we will show how to congure a replication slave while coping with a master that
both has data on it and potentially has that data changing, while minimizing the time for which
the master must be "locked" from updates.
In the common case of adding a slave to a master that already has data in it, the simplest
technique is to use the mysqldump binary provided by MySQL to inject the data from master
to slave, and to reset the slave at the same time.
For this one-line command on the master to work, the following requirements must be met:
Any existing slave process must be stopped on the slave (STOP SLAVE)
A user account must exist that is able to create databases and tables, and insert
rows when connecting to the slave from the master
It must be acceptable to lock the tables on the master for the duration of the operation
This technique copies all data from the master to the slave, including all of
the mysql database—with the exclusion of the users table. It is likely that
all of the other tables are identical if the software versions are the same.
Ensure you have replicate-ignore-db = mysql in /etc/my.cnf on
the slave, if you don't wish to replicate the mysql database, or remove
the ignore-table parameter using the next command (recommended).
How to do it
The command to execute on the master, in full, is as follows:
[root@node1 mysql]# mysqldump delete-master-logs ignore-table=mysql.
user master-data lock-all-tables all-databases -u root
password='' hex-blob | mysql -h 10.0.0.2 -u root password=''
We can explain this command in chunks as follows:
mysqldump: Binary for producing SQL statements from a MySQL database. This
means, "take my database and produce a le that contains SQL statements, which
would build an identical database if executed".
delete-master-logs: Deletes all logs on the master from the moment you start
the backup (these are not needed; the slave only requires logs after this point).
master-data: Includes a CHANGE MASTER TO command within the dump.
Chapter 5
153
lock-all-tables: Locks all tables on the master during the period of the
backup, in order to ensure that every transaction before the time of the backup
is logged, and every transaction after the backup is in the binary log. If you have
a lot of data, this may involve a very long lock on all tables. Look at the next recipe
for a solution.
all-databases: Backs up all databases on the master.
hex-blob: If you have BLOBs (binary objects) in your database, this option
ensures they are stored in a way that allows them to be imported correctly
(that is, stored as hexadecimal characters).
The pipe command (|): Takes output from the command on the left and passes
it to the command on the right.
mysql –h 10.0.0.2: Connects to the slave.
-u root –-password='x': Uses these details.
Once this command has nished execution, run
START SLAVE as shown in the preceding
section to start your slave up.
How it works
The CHANGE MASTER TO command is only one of several ways to point a slave at a master
(it is the most recommended way). Internally, this command creates a le master.info in
the MySQL data directory (/var/lib/mysql by default), which keeps the details. This le
is updated every time this CHANGE MASTER TO query is executed, and it is this le that the
server uses when it begins to see the latest logle that the slave was reading from, and at
what position, when the server shuts down.
Using LVM to reduce downtime
on a master when bringing a slave online
It is possible to use the Logical Volume Manager (LVM) which comes with most Linux
distributions, including Redhat / CentOS, to take a read-only snapshot of the block device that
the MySQL Data directory is residing on, and use this to synchronize a slave with only a very
short period of table locks on the master.
In many cases of 24x7 use of a database, this is essential and it can be useful when you do
not want to wait for a scheduled outage interval every time a slave needs re-synchronizing.