HackNotes Windows Security Portable Reference phần 7 pot
Bạn đang xem bản rút gọn của tài liệu. Xem và tải ngay bản đầy đủ của tài liệu tại đây (608.9 KB, 31 trang )
128
Part III: Windows Hardening
HackNote / HackNotes Windows Security Portable Reference / O’Dea / 222785-0 / Chapter 8
that allowed local users to escalate privileges to that of the SYSTEM user,
a flaw discovered by @stake, Inc. Technically, the flaw lies in the DSDM
(DDE Share Database Manager)—undocumented functions within this
module allow an attacker to specify arbitrary command lines to be exe
-
cuted in the SYSTEM user context. Microsoft has provided a patch for this
issue for Windows 2000 systems; details are available from http://
www.microsoft.com/technet/security/bulletin/MS01-007.asp. (For the
truly adventurous, @stake released proof-of-concept code for this vulner
-
ability; the C source for this tool can be found at http://www .atstake.com/
research/advisories/2001/netddemsg.cpp.)
Network DDE is used by some Microsoft Office applications to
share data on the network, particularly when NetMeeting is not avail
-
able. The NetDDE privilege escalation is fixed in Windows 2000 SP3,
and a patch is available for Windows 2000 SP1 and SP2. Nevertheless,
this networked service is not commonly used and should be disabled
whenever possible.
Network Location Awareness (Startup: Manual)
The NLA service provides
applications an interface to determine what network they are on, or in
the case of multiple networks, which to use. Previously, applications that
were multiple adapter aware did so by corresponding directly with the
available network interfaces for information; the NLA simplifies that
task by providing a common interface.
NT LM Security Support Provider (Startup: Manual)
This service of the
LSASS provides NTLM authentication for protocols that do not make
use of named pipes for communication, such as telnet services when NT
authentication is used. If non-standard authenticated services are not
offered, this service can probably be disabled without negative impact.
Performance Logs and Alerts (Startup: Manual)
This is the service that pro
-
vides data storage and limits monitoring for the system monitor via
Perfmon. If no monitoring is in place, this service can be disabled, but
the logs and alerts section of the Perfmon application will generate errors
if this service is unavailable.
Plug and Play (Startup: Manual)
When a new device is attached to the
system, this service is responsible for identifying the device and loading
the appropriate drivers to make the device available. This is considered
a core Windows service, and disabling it is not recommended.
Print Spooler (Startup: Automatic)
Present in all Windows operating sys
-
tems, this service works with applications to proxy print jobs so that the
application can offload printer communication to the operating system.
Disabling this service will have negative impact on applications at
-
tempting to print.
P:\010Comp\HackNote\785-0\ch08.vp
Friday, June 13, 2003 8:26:48 AM
Color profile: Generic CMYK printer profile
Composite Default screen
Protected Storage (Startup: Automatic)
This service provides secured
storage for user details like passwords, encryption keys, and other sen
-
sitive data such as the Internet Explorer AutoComplete history. This
service can be disabled but will break features that use Protected Storage
data. Protected Storage can be easily enumerated by authorized users.
For example, Cain and Abel v2.5 offers a Protected Storage explorer.
Remote Access Auto Connection Manager (Startup: Manual)
This program
helps manage remote access service connections by deciding whether or
not an RAS connection is necessary and then initiating the connection if
it is. For users of dial-up networking, this service keeps the modem from
dialing out every time the system triggers a network operation. Dis
-
abling this service is not recommended for systems with VPN clients or
dial-up networking services.
Remote Access Connection Manager (Startup: Manual)
This service receives
messages directly from the user or indirectly via the Auto Connection
manager and establishes the requested network connection. This ser-
vice is required for establishing VPN and dial-up connections.
Remote Desktop Help Session Manager (Startup: Manual)
When this ser-
vice is started, it registers the Remote Desktop service with the Remote
Procedure Call locator. In most environments, this service provides lit-
tle more than an additional exposure. Unless specific requirements exist
for Remote Desktop services, this should be disabled.
Remote Procedure Call (Startup: Automatic)
The RPC service provides the
endpoint mapper (TCP/135) for RPC applications. Many critical Win-
dows services are exposed via RPC rather than as direct TCP/IP ser
-
vices, and the RPC service manages these applications. Windows 2000
pre-SP2 suffered a denial-of-service vulnerability in the RPC services,
where attackers could crash the RPC service and break most common
Windows functions. This service should not be disabled.
Remote Procedure Call Locator (Startup: Manual)
This service provides an
RPC name resolution service for third-party applications using a special
API. Core Windows RPC services do not depend on this service and in
most environments, Locator can be disabled without impact.
Remote Registry Service (Startup: Automatic)
The name of this service is
self-explanatory and fairly chilling. The remote registry service exposes
the Windows registry to properly authenticated remote users, allowing
enumeration or even changing the system’s registry settings from a re
-
mote device. While Remote Registry can be helpful from an administra
-
tive perspective, this service is probably best disabled unless specifically
required for administration purposes.
Chapter 8: Understanding Windows Default Services
129
Windows Services Revealed
HackNote / HackNotes Windows Security Portable Reference / O’Dea / 222785-0 / Chapter 8
Windows Services Revealed
P:\010Comp\HackNote\785-0\ch08.vp
Friday, June 13, 2003 8:26:48 AM
Color profile: Generic CMYK printer profile
Composite Default screen
Removable Storage (Startup: Automatic)
The Windows Backup utility
uses the Removable Storage service to maintain information on stor
-
age media and backup sets. You can browse the data maintained by Re
-
movable Storage in the %windir%\ System32\NtmsData directory.
Depending on the backup system used, this service may be disabled.
Resultant Set of Policy Provider (Startup: Manual on DCs)
When using the
Group Policy editor, this service can be invoked to verify the end result
of a given policy by connecting to a domain member and reading the
current policy settings. This service need not be disabled.
Routing and Remote Access (Startup: Disabled)
This service should be en
-
abled only if the system in question is to function as a router between
two or more networks. This service is not required for Internet Connec
-
tion Sharing—under that service, Routing is handled by the Application
Layer Gateway Service. Leave this service disabled.
RunAs / Secondary Logon (Startup: Windows 2003: Automatic, Windows 2000:
Manual)
This service provides the much anticipated, highly underused
RunAs utility. RunAs allows the user to launch selected applications
under the context of another user by providing the credentials when the
application is launched. This allows administrators to perform the ma-
jority of their tasks as a restricted user, elevating their privilege only
when necessary. Unfortunately, many administrators prefer not to be
hounded by password prompts and continue to simply log on as a user
with full administrative privileges. While this service could be used by
an authenticated attacker, the attacker would need to already have the
credentials of a more privileged user available. We recommend en
-
abling this service and learning to use it to help limit exposure.
Security Accounts Manager (Startup: Automatic)
This is the service that
maintains and administers the local authentication database (SAM data
-
base) that was discussed in Chapter 5. This service is a required part of
the LSASS.
Server (Startup: Automatic)
Network file and print services and other
named-pipe services are all accessed via this service. Depending on the
NetBIOS configuration, Server will bind to NetBIOS Sessions on
TCP/139 and direct SMB onTCP/445. Unless the system is highly spe
-
cialized, such as a Microsoft SQL Server that is restricted to TCP/1433
(no named pipes support), this service is usually required. This service
can be disabled on workstations without impacting SMB client services,
which are managed by the Workstation service. This will prevent desk
-
top users from creating their own local shares.
130
Part III: Windows Hardening
HackNote / HackNotes Windows Security Portable Reference / O’Dea / 222785-0 / Chapter 8
P:\010Comp\HackNote\785-0\ch08.vp
Friday, June 13, 2003 8:26:48 AM
Color profile: Generic CMYK printer profile
Composite Default screen
Shell Hardware Detection (Startup: Automatic)
This service manages de
-
vice notifications and user interaction, such as when a newly inserted
CD-ROM triggers AutoPlay execution to start the installation program.
Disabling this service is recommended in environments where an at
-
tacker could easily gain physical access to the system.
Smart Card/Smart Card Helper (Startup: Manual)
These services manage
the connection to smart card reader hardware devices in environments
using same. If your environment doesn’t support smart cards, these ser
-
vices can be disabled. They are set to manual so that the service can be
started when smart card devices are discovered by Plug-and-Play.
Special Administration Console Helper (Startup: Windows 2003: Manual,
Windows 2000: N/A)
Windows 2003 introduces a new Emergency Man
-
agement Services feature that enables limited remote administration via
“out-of-band” communications in the event of a serious system failure. In
this fashion, properly equipped servers can be managed via serial-port
TTY or other solution. The Special Administration Console helper service
makes a command prompt interface available via Emergency Manage-
ment Services. Service can be disabled when Emergency Management Ser-
vices are not in use, and additional information on EMS can be found at
/>proddocs/standard/EMS_topnode.asp.
System Event Notification Service (Startup: Automatic)
Working with the
COM+ Event System, SENS provides a common interface for applica-
tions to be alerted to system events such as Synchronization Manager or
network connect/disconnect activity.
Task Scheduler (Startup: Automatic)
The Windows scheduler service, re
-
sponsible for managing at jobs and other scheduled system maintenance
activities. The scheduler service is a favorite target of attackers as a method
of executing code on the remote system when they do not yet have any in
-
teractive system control. Tasks can be managed from the Scheduled Tasks
applet in the Control Panel. Setting this service to manual may not ade
-
quately prevent attackers from starting the service remotely, so be sure to
disable the service if you don’t want to use the scheduler.
TCP/IP NetBIOS Helper (Startup: Automatic)
By name, this service appears
to be the service host for the NetBIOS over TCP/IP protocol suite, the
NetBIOS name, and datagram and session services. However, this is not
the case. This service manages many NetBIOS resource requests regard
-
less of whether or not NetBT is in use and helps legacy applications that
are unaware of direct SMB to function correctly. Disabling this service
does not disable the NetBIOS over TCP/IP services on UDP/137, UDP/
Windows Services Revealed
Chapter 8: Understanding Windows Default Services
131
HackNote / HackNotes Windows Security Portable Reference / O’Dea / 222785-0 / Chapter 8
Windows Services Revealed
P:\010Comp\HackNote\785-0\ch08.vp
Friday, June 13, 2003 8:26:48 AM
Color profile: Generic CMYK printer profile
Composite Default screen
138 and TCP/139; those services must be disabled from the Network
Control Panel applet, as described in Chapter 6.
Telephony (Startup: Manual)
The Telephony service supports the Win
-
dows Telephony API for devices such as modems, faxes, networked
faxes, or voice-over IP solutions. This service can usually be disabled.
Telnet (Startup: Windows 2000: Manual, Windows 2003: Disabled)
Telnet
provides remote logins to a command prompt terminal over the telnet
protocol. Telnet can be configured to accept only NTLM authentication,
which provides a small measure of security, but any possible use for
telnet could be better accomplished using more secure tools. This ser
-
vice should be disabled—if set to manual, an attacker could trick a user
to enable the service or enable it remotely with sufficient authentication.
Terminal Services (Startup: Windows 2003: Manual, Windows 2000: Manual)
This is the core terminal services provider that allows Windows to func
-
tion as a multi-user environment. Even if classic Terminal Services are
not offered on a host, this service may still be used for local purposes,
such as fast-user switching, or the service may masquerade as Remote
Desktop Assistance. If these services are not in use, it is safe and strongly
recommended to disable Terminal Services.
Uninterruptible Power Supply (Startup: Manual)
This service provides an
interface for uninterruptible power supplies to supply alerts to the oper-
ating system. If this service is disabled, a server will not be able to auto-
matically suspend or power-down in the event of a power emergency.
Upload Manager (Startup: Windows 2003: Manual, Windows 2000: N/A)
Intro
-
duced in Windows XP, the Upload Manager’s description indicated the
service “manages synchronous and asynchronous file transfers between
clients and servers on the network.” In Windows 2003, this description was
expanded to include the Upload Manager’s role in Windows device driver
management, uploading anonymous system data to the Microsoft Driver
Feedback server. This service can be disabled in most environments.
Virtual Disk Service (Startup: Windows 2003: Manual, Windows 2000: N/A)
This service, introduced in Windows 2003, helps administrators to sim
-
plify the use of SANs and other remote storage solutions by providing a
single unified interface to a variety of vendor devices. If no such systems
are available in your environment, you can safely disable this service.
Volume Shadow Copy Service (Startup: Windows 2003: Manual, Windows 2000: N/A)
This service manages the acquisition of point-in-time file copies as
part of a backup or network file sharing solution implementing the
Windows 2003 Shadow Copy service. Can be disabled otherwise.
132
Part III: Windows Hardening
HackNote / HackNotes Windows Security Portable Reference / O’Dea / 222785-0 / Chapter 8
P:\010Comp\HackNote\785-0\ch08.vp
Friday, June 13, 2003 8:26:48 AM
Color profile: Generic CMYK printer profile
Composite Default screen
Chapter 8: Understanding Windows Default Services
133
HackNote / HackNotes Windows Security Portable Reference / O’Dea / 222785-0 / Chapter 8
Windows Services Revealed
Web Client (Startup: Windows 2003: Disabled, Windows 2000: N/A)
The Web
Client service provides an interface for applications to access web re
-
sources as if they were file shares, but few details are available regarding
the use of this service. Leave the service disabled unless you have appli
-
cations that specifically require it.
Windows Installer (Startup: Manual)
The Windows Installer provides de
-
velopers a unified interface for developing application installers and for
adding additional controls and safeguards to software installation. Win
-
dows Installer package files (filenames end in .msi) benefit from automatic
failure recovery, and in some cases, allow users to install specific software
that they would otherwise not have sufficient access to install. Many in
-
stallers require this service. Disabling this service does not guarantee soft
-
ware installations won’t succeed, so disabling is not recommended.
Windows Management Instrumentation (Startup: Automatic)
Introduced in
Windows NT 4.0 service pack 4, the WMI service provides a standard
-
ized method for applications to communicate with kernel mode drivers
and subsystems to obtain performance data, alerts, or configuration de-
tails. SNMP services, for example, run as a subset of WMI. Because WMI
is fast becoming a core API for Windows applications, disabling this ser-
vice is not recommended. However, WMI can be accessed remotely as an
RPC service, and steps should be taken to ensure proper security. You
can review and manage WMI security from Computer Management:
1. Open the Computer Management console by selecting Start |
Run | compmgmt.msc.
2. Expand Services and Applications.
3. Right-click WMI Control and select Properties.
4. Click the Security tab.
Details on WMI services are available from Microsoft at http://
msdn.microsoft.com/library/default.asp?url=/downloads/list/wmi.asp,
and you can also download the Microsoft WMI tools to see the type of
information that is exposed through this interface.
Windows Time (Startup: Automatic)
The Windows Time service provides
clock synchronization within a domain or to a specified NTP server.
Some authentication protocols (such as Kerberos) rely on relatively ac
-
curate timestamps, so you’ll rarely want to disable this service.
WinHTTP Web Proxy Auto-Discovery Service (Startup: Windows 2003: Manual,
Windows 2000: N/A)
Microsoft offers an API for HTTP applications
called WinHTTP. WinHTTP supports a proxy-discovery protocol that is
implemented in this service. This service is for client convenience only
P:\010Comp\HackNote\785-0\ch08.vp
Friday, June 13, 2003 8:26:49 AM
Color profile: Generic CMYK printer profile
Composite Default screen
and can be disabled with no ill effects; clients will implement the auto-
discovery on their own.
Wireless Configuration (Startup: Windows 2003: Automatic, Windows 2000: N/A)
This service allows automatic configuration of wireless adapters. If wire
-
less adapters are not permitted by corporate policies, disabling this service
on client computers will make it very difficult for users to install wireless
adapters. This service can be disabled without consequence when wire
-
less networking is not used.
WMI Performance Adapter (Startup: Windows 2003: Manual, Windows 2000: N/A)
The performance adapter service supports “Hi-Perf” Windows Man
-
agement Instrumentation providers that are specifically designed to
provide very rapid data samples to select WMI clients. Refer to the WMI
discussion at the start of the chapter for additional information.
Workstation (Startup: Automatic)
The Windows Workstation service is the
client piece of the Server Message Block protocol and manages connec-
tions to file shares and services operating over named pipes. This service
can be disabled on systems that will not make client requests of other
Windows SMB servers.
SUMMARY
So how many of these services do you really need? The correct answer,
though dissatisfying, is “as few as possible.” The Windows services
host all but the lowest level operating system functions, and every ap-
plication will have its own set of dependencies—while many servers
will function perfectly without the Networked Dynamic Data Exchange
service enabled, certain legacy applications may rely on NetDDE and
will be rendered useless if the service is disabled.
However, all is not lost! In the next chapter, we will discuss the fun
-
damentals of Windows security facilities—controlling object permis
-
sions and working with security policies in the realm of a local system—
and learn how to limit the hacker’s options by implementing access con
-
trols for non-privileged users. Then, in Chapter 10, we’ll see how we can
use group policies to apply security options across multiple computers
in an Active Directory environment, and we’ll discuss Microsoft’s base
-
line security templates—a little-known support facility that can help ad
-
ministrators develop role-based security templates custom-fitted to their
various server installations.
134
Part III: Windows Hardening
HackNote / HackNotes Windows Security Portable Reference / O’Dea / 222785-0 / Chapter 8
P:\010Comp\HackNote\785-0\ch08.vp
Friday, June 13, 2003 8:26:49 AM
Color profile: Generic CMYK printer profile
Composite Default screen
Chapter 9
Hardening Local
User Permissions
135
HackNote / HackNotes Windows Security Portable Reference / O’Dea / 222785-0 / Chapter 9
blind folio 135
IN THIS CHAPTER:
■
Windows Access Control Facilities
■
Summary
P:\010Comp\HackNote\785-0\ch09.vp
Friday, June 13, 2003 7:28:18 PM
Color profile: Generic CMYK printer profile
Composite Default screen
136
Part III: Windows Hardening
HackNote / HackNotes Windows Security Portable Reference / O’Dea / 222785-0 / Chapter 9
A
n attacker breaches a system by discovering valid authentication
credentials or by exploiting some service on the system to obtain
system access with the service’s credentials. In rare cases, the ini
-
tial hack will provide administrative system access, but in most cases,
the attacker will have obtained only a domain user account or a highly
restricted system user such as the IIS IUSR_ user context. After this ini
-
tial hurdle has been crossed, the next challenge facing the intruder is to
find the limits of their permissions and set about the task of privilege es
-
calation. Depending on how tightly the system is secured, this process
can be very challenging.
In this chapter, we’ll discuss the various facilities Windows offers to
control user rights on a local system. We’ve chosen to start our discus
-
sion of these facilities below the domain or Active Directory level for the
sake of clarity, separating the actual permissions and their impact from
the deployment methods, which we’ll discuss in Chapter 10.
WINDOWS ACCESS CONTROL FACILITIES
In Chapter 5, we introduced the primary actors and operators of the
Windows security model. All access controls are applied by comparing
a user’s rights, be they individually or group assigned, to the access con-
trol list of the requested resource. This comparison is based on the secu-
rity identifiers (SIDs) that have been attached to the user’s token by the
logon process. When a match is found, the specific permissions as-
signed to the matching SID are applied to the transaction. However, we
haven’t yet discussed how those rights are assigned to resources.
It goes without saying that an access control list must be well se
-
cured itself—if any user could simply change the permissions on an ob
-
ject, there would be no point. In some cases, the administrator may not
be concerned with the permissions of a given object and may wish to
delegate that responsibility to another user. This can be accomplished
through object ownership. The administrator can transfer ownership of
a resource to another user, allowing that user to manage permissions to
the resource. In the case of lost passwords or other events, administra
-
tors can generally take ownership of all objects.
File System Permissions
The first Windows security settings the typical administrator will en
-
counter involve NTFS file system permissions. Many administrators
P:\010Comp\HackNote\785-0\ch09.vp
Friday, June 13, 2003 7:28:18 PM
Color profile: Generic CMYK printer profile
Composite Default screen
have learned to use file permissions simply to prevent users from acci
-
dentally making changes that impact normal business activity, in
cases such as when a user accidentally drags a folder from one location
to another in Windows explorer. In this section, we’ll explore Win
-
dows file permissions through a simple example of a file server at a
small business.
Let’s first take a look at the users we have configured on our Win
-
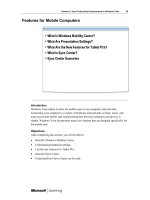
dows 2003 Server, PHALANX. Figure 9-1 shows the Computer Man
-
agement console and the local users defined on the machine. Aside from
the built-in Administrator account and the disabled Guest account, we
have our user accounts: Donna, Mary, Patrick, and Tom. These are the
users we’ll be working with in this section.
As each user was created, they were automatically added to the
Users group. Because managing permissions individually for every
user rapidly grows unwieldy, we will use this default group to define
our baseline file system permissions. This way, when the company
grows and we add more personnel, we can get them up and running
with little to no administrative effort. Of course, as authenticated users,
they will also be automatic members of the Everyone group, so we’ll
also need to keep this in mind as we set our permissions.
Chapter 9: Hardening Local User Permissions
137
HackNote / HackNotes Windows Security Portable Reference / O’Dea / 222785-0 / Chapter 9
Windows Access Control Facilities
Figure 9-1. The Computer Management console open to Local Users and Groups
P:\010Comp\HackNote\785-0\ch09.vp
Friday, June 13, 2003 7:28:19 PM
Color profile: Generic CMYK printer profile
Composite Default screen
Determining Permissions for a Resource
For starters, we’ll check the permissions available on the system drive.
Figure 9-2 shows the Local Disk (C:) Properties dialog box for our system’s
C:\ drive, which we access from Explorer:
1. In the Folders pane, right-click the Volume Name (C:) entry.
2. From the context menu, select Properties.
3. Click the Security tab.
As shown in Figure 9-2, the Everyone group has no explicit permis
-
sions to this drive. This is a new default in Windows 2003 and represents
a substantial improvement in Windows security. Under Windows 2000,
the Everyone group was initially assigned Full Control at the drive root
level. Administrators who are accustomed to configuring file system se
-
curity will be largely unaffected, but inexperienced administrators may
be caught off guard by this setting when upgrading some systems to
Windows 2003. In actuality, the Everyone group under Windows 2003 is
assigned special permissions to the drive root, allowing Read and Exe-
cute permissions to the root folder only, as we’ll see in a moment.
138
Part III: Windows Hardening
HackNote / HackNotes Windows Security Portable Reference / O’Dea / 222785-0 / Chapter 9
Figure 9-2. Security Properties for the C: drive
P:\010Comp\HackNote\785-0\ch09.vp
Friday, June 13, 2003 7:28:19 PM
Color profile: Generic CMYK printer profile
Composite Default screen
By selecting the different users and groups displayed in Figure 9-2,
we can see the defined permissions for each in the Permissions panel.
The Administrators group and the SYSTEM user both have full permis
-
sions enabled, and the default Users group is assigned Read and Exe
-
cute, List Folder Contents, and Read permissions. For each of the listed
permissions, the object owner (typically the Administrators group) can
explicitly Allow or Deny each of the rights. If you’re using Windows 2003
(or XP), by now you’ve probably discovered the last permission that
was out of the scroll list in Figure 9-2, the Special Permissions indicator.
This indicator provides a visual clue to when restricted permissions are
available for the highlighted user or group.
The security dialog box shown in Figure 9-2 provides a simple
high-level interface to the users and permissions assigned to the C: drive,
but occasionally we need to assign more granular controls. To finely
tune the security settings for the resource, we need to open the Ad
-
vanced Security Settings by clicking on the Advanced button on the Se
-
curity tab. The Advanced Security Settings for Local Disk (C:) dialog
box is shown in Figure 9-3. Windows 2000’s interface is very similar but
lacks some of the details.
Chapter 9: Hardening Local User Permissions
139
HackNote / HackNotes Windows Security Portable Reference / O’Dea / 222785-0 / Chapter 9
Windows Access Control Facilities
Figure 9-3. The Advanced Security Settings for Local Disk (C:) dialog box
P:\010Comp\HackNote\785-0\ch09.vp
Friday, June 13, 2003 7:28:19 PM
Color profile: Generic CMYK printer profile
Composite Default screen
140
Part III: Windows Hardening
HackNote / HackNotes Windows Security Portable Reference / O’Dea / 222785-0 / Chapter 9
Under Windows 2003, the Everyone group has Read and Execute
permissions for the C:\ root folder only. This allows unauthenticated
connections to see the root directory and subdirectories and the ability
to execute program files and read files in the directory, but these per
-
missions do not extend to any directories below the root. So in order for
authenticated users to have any access at all, the Users group must pick
up where Everyone left off. Selecting the permissions entries that apply
to the Users group shows that in addition to Read & Execute on the root
and its subfolders, members of Users have permission to create files ev
-
erywhere except for the root directory and create folders in the root di
-
rectory and below.
Permissions trickle down through the file system unless specifically
defined for an individual file or subdirectory. When a file system entry
has no security information itself, it inherits the permissions of its con
-
tainer, whether a subdirectory or the root directory itself. In Windows
2003, the Advanced Security Settings dialog box indicates the source of
the inherited permissions for the object. This becomes very useful as
permissions become more and more complex; with Windows 2000 you
must ascend the file system hierarchy manually to locate the source of
inherited permissions. This can lead to use of overlapping, conflicting
permissions assignments when an administrator is pressed for time.
If you are configuring Windows 2000 systems, you may want to duplicate the Win-
dows 2003 approach to file system security, assigning Administrators and SYSTEM
Full Control to the root directory, all files, and subdirectories; assigning the Users
group read/execute and create rights for the system root and all subdirectories;
and restricting Everyone to read and execute in the root directory. Many adminis
-
trators also like to restrict the Users group from creating folders in the root directory
to keep the file system clean.
Often an administrator will want to determine the effective permis
-
sions for a given user or group at an object level. For example, upon hear
-
ing that the SAM database is stored in the %windir%\System32\repair
directory, an Administrator may want to determine what access the Ev
-
eryone group has to that subdirectory or the SAM file itself. The proper
-
ties for any resource can be accessed in the same way we viewed them
for the C: drive: simply right-click the object, select Properties, and then
click the Security tab. Figure 9-4 shows the Access Control Settings for
repair dialog box for the repair directory on a Windows 2000 Server.
From this depiction, we are led to believe that the Everyone group has
no access to this resource, but this is incorrect. To see the permissions for
Everyone, we must add that group name to the panel by clicking Add.
P:\010Comp\HackNote\785-0\ch09.vp
Friday, June 13, 2003 7:28:19 PM
Color profile: Generic CMYK printer profile
Composite Default screen
Chapter 9: Hardening Local User Permissions
141
HackNote / HackNotes Windows Security Portable Reference / O’Dea / 222785-0 / Chapter 9
Windows Access Control Facilities
Under Windows 2003, there is an additional tab on the Advanced Se-
curity Settings dialog box labeled Effective Permissions. On this panel,
you can select a given user or group name, and Windows will display the
actual permissions that users will have to this object. In Windows 2000,
we can get the same information by selecting View/Edit from the Permis
-
sions panel and using the Change button to select the specific user or
group we want to query.
If we select the Everyone group on our Windows 2000 system, we can
see that in fact, on a default installation of Windows 2000, the Everyone
group has Read and Execute and List Folder contents for this resource, al
-
lowing members to view files, including the all-important SAM file. Un
-
der Windows 2003, the Everyone group has no access to this file, and
regular system users are restricted to no more than listings of the \repair
subdirectory. This simple change in default permissions represents a
huge leap forward in Windows’ out-of-the-box security posture.
Using Groups to Logically Manage Permissions
So now that we have an understanding of how Windows works with file
permissions, let’s put it together in a very brief example in the context of
Figure 9-4. Windows 2000 Access Control Settings for repair dialog box
P:\010Comp\HackNote\785-0\ch09.vp
Friday, June 13, 2003 7:28:20 PM
Color profile: Generic CMYK printer profile
Composite Default screen
our small company’s file server. As discussed, all the users in the com
-
pany were automatically added to the Users group upon creation. So the
simplest approach for the administrator in this environment would be to
assign Full Control for the Users group for any particular resources
where the users may store files. For our example, however, the adminis
-
trator is going to be a little more diligent in assigning permissions.
Figure 9-5 shows the file structure for the AC_Store_1 volume, the
primary data store for our organization. Even on such a simple system,
we have a variety of resources that require specific access controls.
■
\Critical Databases Storage location for the Sales and
Accounting databases
■
\Program Files Contains shared applications used by all users
■
\Users Home directories for each user defined on the system
The permissions for some of these resources are intuitive; for exam
-
ple, the home directories for the users should be restricted to only those
users. To determine the access that each of our users requires, we have
to interview them to better understand what they do in the office that
might require special access.
■
Donna Chief Executive, requires access to Accounting,
Sales data
■
Patrick Sales, owner of the Sales database
■
Tom Service, time-reporting via Accounting database
142
Part III: Windows Hardening
HackNote / HackNotes Windows Security Portable Reference / O’Dea / 222785-0 / Chapter 9
Figure 9-5. File structure for the AC_Store_1 disk volume
P:\010Comp\HackNote\785-0\ch09.vp
Friday, June 13, 2003 7:28:20 PM
Color profile: Generic CMYK printer profile
Composite Default screen
Chapter 9: Hardening Local User Permissions
143
HackNote / HackNotes Windows Security Portable Reference / O’Dea / 222785-0 / Chapter 9
Windows Access Control Facilities
■
Mary Accounting, owns Accounting database, requires
Sales data
■
Dan Consultant, no shared access
From these various requirements, the administrator sits down to de
-
fine access types, which are typically based on role, to determine how
best to group the users. Reviewing the list, the Administrator forms a
list of three groups that can be used to manage access now and simplify
adding new users in the future. The groups define a role within the or
-
ganization and are effectively shorthand for a security modifier, like so:
■
Sales Adds access to the Sales database
■
Accounting Adds access to the Accounting database
■
Users Baseline permissions
Finally, the administrator creates these groups and populates each
with the correct users and then applies the security settings to the direc-
tories, being sure to verify the effective permissions for the resources as
discussed earlier. First let’s create the necessary groups.
Creating a Group
1. Open the Computer Management console by selecting
Start | Run | compmgmt.msc.
2. Expand Local Users and Groups and select the Groups container.
3. Right-click in the right-hand pane and select New Group.
4. Enter the group name and a description of the group’s use.
5. Optionally, click the Add button to add group members.
6. Click Create.
With the user groups created, we can now go to the file system and
edit the permissions on the sensitive directories with respect to the
newly defined groups.
Restricting Access to a File System Resource
to a Specific Group or User
1. Use the Windows Explorer to navigate to the resource to
which you want to restrict access.
2. Right-click the file or directory and select Properties from
the context menu.
3. Select the Security tab.
P:\010Comp\HackNote\785-0\ch09.vp
Friday, June 13, 2003 7:28:20 PM
Color profile: Generic CMYK printer profile
Composite Default screen
4. Click the Advanced button.
5. Uncheck the option Inherit from parent the permission
entries that apply to child objects….
6. Windows will warn that disabling inheritance on this object
will lose all permissions that aren’t specifically defined for this
object and offer the option of copying or removing the inherited
permissions. Because we want to restrict access, click Remove.
7. Click the Add button and select the group(s) that should have
access to this resource. You can include Administrators or
not—a member of that group can always re-add themselves later.
8. Verify the effective permissions either by using the Effective
Permissions tab in Windows 2003 or by using the View/Edit
button in Windows 2000.
Understanding the Windows File System Permissions
There are 14 different permissions check boxes available for the file sys-
tem in Windows 2003 and 13 in Windows 2000 (Full Control, essentially
a select-all button, is omitted in Windows 2000). Table 9-1 lists each of
these permissions and a brief description. Note that when a permission
is divided with a / (slash), the right has different meanings depending
on whether it is applied to a directory or a file. The differences are
pointed out in the descriptions.
Admittedly, the process discussed here is an oversimplification of
managing users in Windows environments, whether the Active Direc-
tory/Domain model is in use or not. However, this example provides
the fundamentals for the hierarchical permissions assignment that oc
-
curs throughout the Windows security model. Domain rights trickle
down the Active Directory hierarchy in the same way that file system
permissions traverse subdirectories. Inheritance can be blocked on more
sensitive subdirectories (or trees), and permissions can be within a lim
-
ited scope, as we’ve seen with the Windows 2003 default rights for the
Everyone group.
In the next section, we’ll explore the interface for setting some of the
more obscure security settings in Windows 2000 and above. Some of
these are set for the computer as a whole; others are assigned on a
per-user basis. These settings can also be assigned on a domain level, al
-
lowing administrators to apply fairly strong per-system security from a
very simple interface. We’ll cover domain distribution of these settings
in the next chapter, but for now we’ll just explore their use and effects.
144
Part III: Windows Hardening
HackNote / HackNotes Windows Security Portable Reference / O’Dea / 222785-0 / Chapter 9
P:\010Comp\HackNote\785-0\ch09.vp
Friday, June 13, 2003 7:28:20 PM
Color profile: Generic CMYK printer profile
Composite Default screen
Chapter 9: Hardening Local User Permissions
145
HackNote / HackNotes Windows Security Portable Reference / O’Dea / 222785-0 / Chapter 9
Windows Access Control Facilities
Permission Description
Full Control Allows one-click enabling of all permissions,
not present in Windows 2000.
Traverse Folder / Execute File Permits access (change directory) to a
subdirectory or execution of a given file.
List Folder / Read Data Permits user to obtain a directory listing
when applied to a directory or read access
when applied to a file.
Read Attributes Allows viewing file attributes Read Only
and Hidden.
Read Extended Attributes Allows viewing file attributes Archive,
Indexing, Compression and Encryption.
Create Files / Write Data Permits user to create new files or to write
data (when applied to a directory or a file,
accordingly).
Create Folders / Append Data Permits user to create subdirectories or
add data to an existing file (when applied
to a directory or a file, accordingly).
Write Attributes Allows user to change the Read-Only or
Hidden attributes.
Write Extended Attributes Allows user to change the Archive,
Indexing, Compression and Encryption
attributes.
Delete Subfolders and Files Permits user to delete files or directories
below this object.
Delete Permits user to delete this object.
Read Permissions Permits user to view the SIDs associated
with an object to determine permissions
for other users and groups.
Change Permissions Permits a user to add or remove
permissions for an object.
Take Ownership Allows a user to assume ownership of the
object, effectively allowing full control.
Take Ownership must be exercised by the
user however, simply assigning a user
permission to take ownership does not
transfer ownership.
Table 9-1. The Windows File System Permissions
P:\010Comp\HackNote\785-0\ch09.vp
Friday, June 13, 2003 7:28:20 PM
Color profile: Generic CMYK printer profile
Composite Default screen
Local Security Settings
The Local Security Settings are accessed through the Local Security Pol
-
icy editor in the Microsoft Management Console (available from Admin
-
istrative Tools | Local Security Settings, or Start | Run | secpol.msc).
Figure 9-6 shows the Local Security Settings dialog box. The five policies
that can be edited here are shown in the left-hand pane, and these are
■
Account Policies The Account Policies are comprised of
security settings that affect all user accounts, such as password
complexity and failed login attempt limits.
■
Local Policies The Local Policies define security settings
that apply regardless of user context, such as auditing, user
authentication methods, login banners, and credential storage
options. The Local Policies also allow setting user permissions
for special system permissions, such as debugging programs
or shutting down the system.
■
Public Key Policies (PKI) The Public Key Policies expose
configuration of any PKI enabled subsystems on the local
machine. In most environments this consists only of Encrypted
File System policies for configuration of data recovery agents.
■
Software Restriction Policies The Software Restriction Policies
tree exposes methods for administrators to limit applications
that can be run on the system by execution path, file hash, Internet
zone, or by PKI certification.
■
IP Security Policies The IP Security Policies editor allows
definition of IPSec tunneling, IP Filter rules, packet integrity,
and security rules.
Our main areas of concern in the Local Security Policy editor will be
with the Account Policies and Local Policies. We’ll cover IP Security
Policies in depth in Chapter 12, and the Public Key Policies functions
will play a role in Chapter 13 when we discuss the Encrypting File Sys
-
tem. For the sake of brevity, we will not be discussing Software Restric
-
tion Policies in this text.
Working with Account Policies
You’ll recall from Chapter 6 that when an attacker is confronted with a
system that does not make use of failed login attempt lockouts, she
knows that she is home free. While over-the-wire brute forcing has to be
one of the least elegant hacks, it is nevertheless a hack, and a system with
no account lockouts set probably lacks other basic account security op
-
tions, such as minimal password length and complexity requirements.
146
Part III: Windows Hardening
HackNote / HackNotes Windows Security Portable Reference / O’Dea / 222785-0 / Chapter 9
P:\010Comp\HackNote\785-0\ch09.vp
Friday, June 13, 2003 7:28:20 PM
Color profile: Generic CMYK printer profile
Composite Default screen
Chapter 9: Hardening Local User Permissions
147
HackNote / HackNotes Windows Security Portable Reference / O’Dea / 222785-0 / Chapter 9
Windows Access Control Facilities
Not surprisingly, all of these options are defined from the same inter-
face, so it’s rare to find a system with only one or two of the account se-
curity options enabled.
From within the Account Policies tree of the Local Security Policy
editor, there are two separate folders: Password Policy and Account
Lockout Policy. As would be expected, the Password Policy tree con-
tains settings that affect user password selection; the various settings
are described in Table 9-2.
Figure 9-6. Local Security Settings dialog box
Policy
Recommended
Setting Description
Enforce
Password
History
5+ When users are forced to change their
password regularly, they will typically
try to re-use previous passwords that
they can still easily remember. This
setting causes Windows to remember
the n previous password hashes and
disallow their reuse.
Maximum
Password Age
30–90 days
depending on
system
sensitivity
This setting specifies the maximum
length of time users can go between
password changes.
Table 9-2. Windows 2000/2003 Password Policy Options
P:\010Comp\HackNote\785-0\ch09.vp
Friday, June 13, 2003 7:28:20 PM
Color profile: Generic CMYK printer profile
Composite Default screen
The other tree under Account Policy is the Account Lockout Policy.
This is where administrators control the system’s handling of repeated
failed login attempts. The options available are described in Table 9-3.
148
Part III: Windows Hardening
HackNote / HackNotes Windows Security Portable Reference / O’Dea / 222785-0 / Chapter 9
Policy
Recommended
Setting Description
Minimum
Password Age
15 days Minimum period of time between
password changes. This is available to
prevent users from rapidly cycling
through their password history to get
back to their preferred password.
Minimum
Password
Length
8 characters,
longer if
complexity not
enforced
Specifies the minimum number of
characters that will be accepted for new
passwords. This option is critical to
ensuring your passwords are brute-force
resistant.
Password must
meet
complexity
requirements
Enabled Implements the Windows password
complexity filter, often referred to by its
filename passfilt.dll. The standard
password filter requires passwords not
include all or part of the user’s login
name, be at least six characters in length,
and include characters from at least
three of the character classes [A–Z],
[a–z], [0–9], and special characters.
Table 9-2. Windows 2000/2003 Password Policy Options
(continued)
Policy
Recommended
Setting Description
Account Lockout
Duration
30–60 minutes Controls the amount of time between
when an account is first locked in
response to invalid login attempts
and when the account is automatically
unlocked by the operating system.
Any setting higher than a few minutes
will result in helpdesk calls when a
legitimate user accidentally locks out
his account, but low values can allow
a patient attacker to mount a long-term
password guessing attack.
Account Lockout
Threshold
5 attempts Sets the number of failed logins Windows
will allow before automatically locking
the account. Disabled when set to 0.
Reset account
lockout counter
after
30 minutes Sets the amount of time that must pass
since the last failed login attempt before
the failed attempt counter will reset to 0.
Table 9-3. Account Lockout Policy Options
P:\010Comp\HackNote\785-0\ch09.vp
Friday, June 13, 2003 7:28:21 PM
Color profile: Generic CMYK printer profile
Composite Default screen
Managing Local System Security Policies
Further down in Figure 9-6, we have the Local Policies tree. The options
available in the sub-trees of this policy are among the most important
security details an administrator can configure. All under one roof, we
have the paper trail capabilities of auditing, selection of which users can
assume system roles, and a host of security-related protocol and operat
-
ing system switches.
Have you ever opened the Event Viewer on a system and found the
Security log to be completely empty? Due to default auditing options in
Windows (read: none), it happens all too frequently. Thus enter the first
grouping in this tree, defining the Audit Policy for the local system. This
provides administrators a simple, easy-to-find interface for enabling
auditing for various resource types systemwide. The various audit
events are listed in Table 9-4 along with the bare minimum recom
-
mended settings.
Windows Access Control Facilities
Chapter 9: Hardening Local User Permissions
149
HackNote / HackNotes Windows Security Portable Reference / O’Dea / 222785-0 / Chapter 9
Windows Access Control Facilities
Audit Policy
Option Minimum Setting Description
Audit account
logon events
Failure This option allows logging of any time that the local
system is used to authenticate an account, even if the
logon is attempted on another computer.
Audit account
management
Success, Failure Fires for auditing on any change to a user account
creation, modification, or deletion.
Audit directory
service access
No auditing Determines whether or not to log accesses to
objects that may already have auditing defined on
the Active Directory level.
Audit logon
events
Failure Fires for all logon events that take place on the
local system. On minimally accessed systems,
successes should also be logged.
Audit object
access
No auditing Similar to audit directory service access, this option
determines whether or not to audit non-AD objects
that have their own audit policy defined.
Audit policy
change
Failure Controls whether or not to audit all changes to
local system policies, whether introduced due to
user activity or otherwise.
Audit privilege
use
No auditing Determines whether or not to audit all events
where a user takes advantage of a local system
right. Frequent failures can occur on privilege
use, so auditing this option will introduce a lot
of log noise.
Audit process
tracking
No auditing Provides detailed logging of application execution
paths.
Audit system
events
Failure Determines whether to record items such as
system startup/shutdown or other major events.
Table 9-4. Audit Policy Options
P:\010Comp\HackNote\785-0\ch09.vp
Friday, June 13, 2003 7:28:21 PM
Color profile: Generic CMYK printer profile
Composite Default screen
A common excuse for not implementing auditing is concern for disk
space required when logging a great deal of system events, but this ex
-
cuse reflects ignorance on the part of the administrator. Event logs, such
as the security log where audit events are stored, should be configured
to use cyclic log files, with reasonable space limitations, when disk
space is a concern. While cyclic logs provide a window of exposure
where logs could be intentionally filled to overwrite previous events,
any security professional with experience in forensic investigations will
tell you that an overwritten log is better than no log at all.
The next tree in the Local Policies contains the User Rights Assign
-
ments. This grouping provides administrators an interface for deter
-
mining what user contexts have permissions to conduct certain
low-level operating system activities. The options exposed here are best
thought of as assigning membership to a number of highly selective
groups whose sole purpose is to allow some form of low-level operating
system permissions. For your reference, we have included descriptions
of the most notable of these options in Table 9-5. Due to space con-
straints, we have elected to omit some of the more self-explanatory or
rarely used options.
150
Part III: Windows Hardening
HackNote / HackNotes Windows Security Portable Reference / O’Dea / 222785-0 / Chapter 9
User Right Description
Access this computer
from the network
Users tagged with this right are authorized to make
remote connections to this system.
Act as part of the
operating system
This grouping provides extremely low-level access
to the Windows operating system. No-default
Windows users require this right.
Allow logon through
Terminal Services
Unavailable for systems prior to Windows 2000 SP2,
users and groups included in this list are permitted
to log in to Terminal Services, if available.
Back up files and
directories
This special right allows specified members to
access files and directories regardless of ACLs for
purposes of system backup. This grouping has an
antecedent for system restoration purposes.
Bypass traverse
checking
Members of this group (by default, all users) are
not subject to validation of the Traverse directory
file system permission, discussed earlier. Many
third-party applications are not properly prepared
to deal with refused directory traversals, prompting
this security circumvention option. When this
option is disabled, a user may be denied access to
a third- or fourth-level subdirectory that they have
explicit permissions to because of a permissions
denial on another member of the file path.
Table 9-5. User Rights Assignments Options
P:\010Comp\HackNote\785-0\ch09.vp
Friday, June 13, 2003 7:28:21 PM
Color profile: Generic CMYK printer profile
Composite Default screen
Chapter 9: Hardening Local User Permissions
151
HackNote / HackNotes Windows Security Portable Reference / O’Dea / 222785-0 / Chapter 9
Windows Access Control Facilities
User Right Description
Change the
System Time
An attacker may change the system time to allow
a replay attack or to cause a Kerberos Denial of
Service due to excessive time drift. The members of
this option should be limited to trusted, controlled
administrators.
Create a token object This option defines users or groups who can
create Windows security tokens that are used for
validating access rights. Except under extremely
rare circumstances, this option should have no
members.
Debug programs User identifiers included in this listing can obtain
the necessary handles to debug applications at the
machine language level. Users with this right can
open a handle to any system process with full
read/write permissions, and can therefore
introduce code directly (for purposes of privilege
escalation, for example). With the exception of
Windows application developers, no users should
require membership in this advanced right.
Deny access, logons These options allow specific restrictions on a
particular user or user groups for the rights
reflected.
Load and unload
device drivers
Members of this grouping can load low-level
software defined as a hardware device driver.
A sophisticated attacker could use this right to
execute code masquerading as a device driver
(which would be permitted unfettered access to
the system), so this right should only be assigned
to highly trusted entities.
Log on as a service Members of this group can submit processes to be
handled as Windows services. If the administrator
defines alternative users as service hosts, they will
require this right.
Log on locally Users and groups listed here are permitted to log in
to the system console. Groups can be removed from
this listing to prevent standard users from using
their credentials to gain interactive access to systems
they should not have access to.
Manage auditing and
security log
Specifies what users and groups can configure
auditing on specific objects, such as Active
Directory objects or files.
Perform volume
maintenance tasks
This setting specifies what users are permitted to
perform disk maintenance such as defragmenting
and the space management utility Disk Cleanup.
Table 9-5. User Rights Assignments Options
(continued)
P:\010Comp\HackNote\785-0\ch09.vp
Friday, June 13, 2003 7:28:21 PM
Color profile: Generic CMYK printer profile
Composite Default screen
152
Part III: Windows Hardening
HackNote / HackNotes Windows Security Portable Reference / O’Dea / 222785-0 / Chapter 9
Saving the best for last, the Security Options tree contains all the re-
maining security settings that do not fit under the categories already
discussed. This includes definitions for anonymous access rights, net-
work authentication restrictions, and a variety of other configuration
options for use in restricted systems. Prior to Windows 2000, most of
these options were available only as entries in the registry; there was no
integrated interface available.
There are significant differences in how this tree is implemented in
Windows 2003 or XP as opposed to Windows 2000. Managing the list in
Windows 2000 is challenging, as each right is named in a descriptive
fashion and there are no logical groupings. Rather than extend the tree
another level, Windows 2003 and XP introduce a categorical prefix to
each option, so alphabetical ordering maintains the groups. Other op
-
tions are split out to offer more granular controls. There are more than
60 options in this tree in Windows 2003 (up from 28 in Windows 2000),
so it is fortunate that the policy names are as verbose as they are. There
is little more we can convey in our description of a policy named, for ex
-
ample, “Audit the use of Backup and Restore privilege.” We will limit
our discussion instead to the top five most notable security options,
with both their Windows 2000 and 2003 naming, in Table 9-6.
The Security Options policies allow you to specify certain minimum compatibility set
-
tings including LAN Manager authentication level, session security options, and do
-
main logon channel security options. Changing these options can have significant
and immediate impact on network clients if they are not properly prepared to meet the
protocol requirements defined. These options should not be deployed in a production
environment without adequate testing to evaluate compatibility of all clients.
User Right Description
Profile single process /
Profile system
performance
Sets which users can implement a debugging /
optimization technique known as process profiling.
Like debug programs, this right is usually only
required by application developers. This right
does not impact Performance Monitor process
monitoring.
Replace a process level
token
Defines which user contexts an application must
be run under in order to be able to spawn new
processes under a different token. Only legitimate
service accounts should require this right.
Take ownership of files
or other objects
This is a super-right—members of this group can
take control of other user’s objects, thus overriding
any defined permissions or auditing. Only trusted
administrators should be assigned this right.
Table 9-5. User Rights Assignments Options
(continued)
P:\010Comp\HackNote\785-0\ch09.vp
Friday, June 13, 2003 7:28:21 PM
Color profile: Generic CMYK printer profile
Composite Default screen