Illustrated WPF phần 6 pot
Bạn đang xem bản rút gọn của tài liệu. Xem và tải ngay bản đầy đủ của tài liệu tại đây (843.2 KB, 42 trang )
CHAPTER 9 ■ ROUTING EVENTS AND COMMANDS
238
Commands have, as part of their architecture, a way for the programmer to specify under what
circumstances a command should be available and when it should not be available. You can see this in
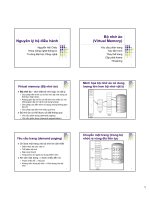
action in the buttons in the example program. Figure 9-13 shows that the buttons acting as the sources
for the Cut and Paste commands are automatically enabled or disabled appropriately for their clipboard
functions.
• In the first screenshot, neither of the buttons is enabled. This is because there is
no selected text in the first TextBox for the Cut command to work on and no text
on the system clipboard to be pasted by the Paste command.
• In the second screenshot, where there is selected text in the first TextBox, the Cut
button has automatically become enabled.
• In the third screenshot, the Cut button has been clicked, deleting the text from the
first TextBox and placing it on the system clipboard.
− Since there’s no longer any selected text in the first TextBox, the Cut button
becomes disabled.
− Since there’s now text on the system clipboard, the Paste button
automatically becomes enabled.
• Although you can’t see it in the figure, the keyboard shortcuts also work as you’d
expect.
− When the Cut button is enabled and the focus is on the first TextBox, you can
use the Ctrl+X keyboard shortcut to cut the text.
− When the Paste button is enabled and the focus is on the second TextBox, you
can use the Ctrl+V keyboard gesture to paste the text.
Notice that there is nothing explicitly in the code to create any of this behavior, and yet it does
the right things. The reason these work is that this functionality was built in to the controls, to hook up
with these predefined commands. The command architecture allows you to build similar functionality
into your own custom commands.
Figure 9-13. The Cut and Paste buttons automatically become enabled or disabled appropriately for the
conditions and their functions.
CHAPTER 9 ■ ROUTING EVENTS AND COMMANDS
239
The RoutedCommand Class
The key to the WPF command architecture is the RoutedCommand class. To create your own commands,
you’ll need to create an instance of this class, configure it, and bind it to the controls with which you
want to use it, as you’ll see in the next section.
You might be tempted to think that this class implements the actions that should be taken
when the command is invoked. It doesn’t. Its main job is to raise events that trigger actions. The
RoutedCommand class has two major methods, Execute and CanExecute.
• The Execute method is called when the command is invoked as the result of the
action of a command source.
− The Execute method, however, does not execute the code to implement the
command! Instead, it raises two routed events—PreviewExecuted and
Executed.
− These routed events traverse the tree to trigger the event handler that actually
performs the implementation of the command.
• The CanExecute method is called when a source wants to find out whether it’s
appropriate to make the command available.
− Like the Execute method, the CanExecute method also does not implement the
action it represents. It also raises two routed commands—PreviewCanExecute
and CanExecute.
− These routed commands traverse the tree to find the event handler that can
determine whether to make the command available.
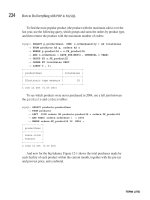
There are also two other important members of the RoutedCommand class—CanExecuteChanged
and InputGestures. Figure 9-14 shows the important members of these classes. The RoutedUICommand
class derives from the RoutedCommand class and just adds a field named Text, which you can use to label
controls or elements triggered by the command.
CanExecuteChanged is a RoutedEvent that is raised when there are changes that might affect
whether the command should be available. These signal the command source that it should call the
CanExecute method to determine whether it’s appropriate to make the command available.
InputGestures is a property that returns the collection of input gestures associated with the
command.
Figure 9-14. The important members of the RoutedCommand class
CHAPTER 9 ■ ROUTING EVENTS AND COMMANDS
240
Creating Custom Commands
The previous example showed how to use WPF’s built-in commands with controls that have command
support built in. This is very powerful and can be a huge time-saver. Sometimes, however, you might
need to create your own custom commands. In this section, we’ll create a small program that has a
custom command called Reverse, which reverses a string in a TextBox.
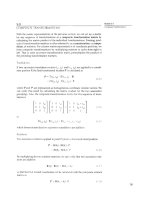
Figure 9-15 illustrates the program and shows the states of the source and target. The Reverse
button is the command source of the Reverse command. The TextBox is the command target. The other
command source is the keyboard gesture Ctrl+R. When the command is executed, by either the button
or the keyboard gesture, the text in the TextBox is reversed, as shown in the figure. If there’s no text in the
TextBox, then the button and the keyboard gesture are disabled.
Figure 9-15. The window implementing the Reverse command
Figure 9-16 shows the structure you’ll need for implementing the Reverse command. You’ll
need to do the following things:
1. Create a new class that defines the command, including the input gestures.
2. Create the command handler methods to be invoked by the Executed and
CanExecute events.
3. Create a command binding to connect the command with the command handler
code
4. Connect the command source with the command.
Figure 9-16. The command structure for implementing the Reverse command
CHAPTER 9 ■ ROUTING EVENTS AND COMMANDS
241
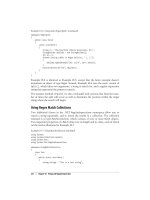
First create the custom command inside a class called CommandReverse, which will create and
supply the command through a property. Microsoft uses this pattern in its built-in commands. You’ll
place this code in a separate file called ReverseCommand.cs. The important things to notice are the
following:
• The class creates a private variable called reverse, of type RoutedUICommand to
hold the new command.
• The command is supplied to the outside through the read only Reverse property.
• The constructor creates a new KeyGesture object that represents the Ctrl+R
keyboard shortcut, and adds it to an InputGesturesCollection, which will be
associated with the new command.
• The constructor then creates a new RoutedUICommand and assigns it to the private
variable.
using System;
using System.Windows.Input; // Required
namespace CommandReverse
{
public class ReverseCommand
{
private static RoutedUICommand reverse;
public static RoutedUICommand Reverse
{ get { return reverse; } }
static ReverseCommand()
{
InputGestureCollection gestures = new InputGestureCollection();
gestures.Add
( new KeyGesture(Key.R, ModifierKeys.Control, "Control-R"));
reverse = new RoutedUICommand
( "Reverse", "Reverse", typeof(ReverseCommand), gestures);
} ↑ ↑ ↑ ↑
} Description Name of The Type Registering Collection of
} the Command the Command InputGestures
Next, create the markup, which is just used to create the source and target objects. All the other
objects you’ll create in the code-behind. This makes the markup very simple, as shown here—just a
TextBox and a Button in a StackPanel:
<StackPanel>
<TextBox Name="txtBox" Margin="10,10"
FontWeight="Bold" Background="Aqua"/>
<Button Name="btnReverse" HorizontalAlignment="Center" Padding="10,3"
FontWeight="Bold" Margin="10,0"/>
</StackPanel>
CHAPTER 9 ■ ROUTING EVENTS AND COMMANDS
242
In the code-behind, create the rest of the objects, and connect the plumbing.
• The first line after the InitializeComponent call assigns a reference to the
command to the Reverse button command source.
• The next four lines create a new CommandBinding, initialize it with a reference to the
command, and assign delegates of the event handlers to the Executed and
CanExecute events.
• The command binding is then added to the window’s collection of command
bindings.
• Below that are the two command handler methods to be invoked when the
Executed and CanExecute events are raised.
When you run the program, you can either click the button or use Ctrl+R to reverse the text in
the TextBox.
using
using CommandReverse;
public Window1()
{
InitializeComponent();
btnReverse.Command = ReverseCommand.Reverse;
CommandBinding binding = new CommandBinding();
binding.Command = ReverseCommand.Reverse;
binding.Executed += ReverseString_Executed;
binding.CanExecute += ReverseString_CanExecute;
CommandBindings.Add( binding );
}
// Reverses the string in txtBox.
public void ReverseString_Executed( object sender,
ExecutedRoutedEventArgs args )
{
char[] temp = txtBox.Text.ToCharArray();
Array.Reverse(temp);
txtBox.Text = new string(temp);
}
// Checks whether there is a string in txtBox.
public void ReverseString_CanExecute( object sender,
CanExecuteRoutedEventArgs args )
{
args.CanExecute = txtBox.Text.Length > 0;
}
CHAPTER 9 ■ ROUTING EVENTS AND COMMANDS
243
Routing Commands
One thing you might have noticed in the code-behind was that you attached the code binding object to
the CommandBindings collection of the Window1 object. This is perfectly fine and illustrates the routed part
of routed commands.
When you click the Reverse button, this raises the Executed event. WPF checks the target to see
whether it has a command binding for the command. If not, it routes the event up the element tree
trying to find an element with a binding for the command. When it finds it, it invokes it. Figure 9-17
illustrates the routing.
Figure 9-17. Routed events are routed up the element tree.
In determining where routing should start, WPF checks the command source to see whether
there is a CommandTarget set. If so, it starts routing there. If not, it starts at the element that currently has
the focus.
Figure 9-18 illustrates two situations where there are two TextBoxes at the same level, but the
CommandBinding is set in different places in the tree. In both cases, the command source does not have a
CommandTarget set. In one arrangement, both TextBoxes will always find the CommandBinding. In the other
arrangement, one of the TextBoxes will not find it.
Figure 9-18. The placing of the CommandBinding can affect the behavior.
CHAPTER 9 ■ ROUTING EVENTS AND COMMANDS
244
Summary
In this chapter, you saw that WPF has greatly expanded the definition of how events are handled. They
no longer just go to the element that raised them but are routed up and down the element tree, as
bubbling events and tunneling events.
You also saw that WPF provides a framework for creating and handling commands, giving a
higher, more abstract model of processing events from different command sources such as buttons and
input gestures.
C H A P T E R 10
■ ■ ■
245
Other Controls and Elements
The TextBox Control
Menus
ContextMenus
ToolBars
StatusBars
ToolTips
Controls That Work with Ranges
Summary
CHAPTER 10 ■ OTHER CONTROLS AND ELEMENTS
246
The TextBox Control
In Chapter 6, you learned about many of the most important WPF controls that present content. In this
chapter, you’ll learn about other controls and elements you’ll need to have a rich and smoothly
functioning application. You’ll start with the TextBox control and continue to menus, toolbars, and
miscellaneous other elements.
The TextBox is designed for displaying small amounts of text to the user and allowing the user to
enter small amounts of input text. Figure 10-1 shows a window where the user has entered his name into
the TextBox.
Figure 10-1. The TextBox is useful for retrieving small bits of text from the user.
The following are some important things to know about the TextBox:
• The TextBox does not support formatted text.
• By default the TextBox doesn’t wrap text, but you can change that by setting the
TextWrapping property to true.
• The content of a TextBox is stored in the Text property.
CHAPTER 10 ■ OTHER CONTROLS AND ELEMENTS
247
The following is the markup that produces the content in the window shown in Figure 10-1.
Notice the following about the markup:
• The TextBox is given a name so that it can be referenced in the code-behind, as
well as in the Label’s binding. (Chapter 6 describes how a Label can be bound to
another element, namely, by setting an accelerator key for the element.)
• The button’s callback method gets the text value from the TextBox and displays the
string in a message box.
<StackPanel>
<Label Target="{Binding ElementName=txtbxName}">_Enter Your Name</Label>
<TextBox Name="txtbxName"/>
<Button HorizontalAlignment="Right" Padding="10,3"
Click="Button_Click">Enter</Button>
</StackPanel>
The code-behind is the following:
public partial class Window1 : Window
{
public Window1()
{
InitializeComponent();
}
private void Button_Click( object sender, RoutedEventArgs e )
{
MessageBox.Show("You entered: " + txtbxName.Text, "TextBox Message");
} ↑
} Get the text from the TextBox.
CHAPTER 10 ■ OTHER CONTROLS AND ELEMENTS
248
Menus
Menus are lists of options the user can choose from in order to execute commands or set options. WPF
offers two types of menus: regular menus and context menus. Regular menus can be placed anywhere in
a window, although they’re usually docked at the top. A context menu, however, is associated with a
particular element. I’ll explain regular menus in this section and cover context menus shortly.
A menu consists of a single Menu object, containing a list of MenuItems, as shown in the markup
shown next. Here are some things to notice about the markup:
• The list of MenuItems contained by the Menu object comprises the top-level menu,
which is visible whenever the menu is visible.
• Each MenuItem object has a Header property that contains the string that labels the
menu item.
• You can assign an event handler to a MenuItem’s Click event, which will then
execute the handler whenever the user clicks the menu item.
<Menu>
<MenuItem Header="First" Click="MenuItemFirst_Click"/>
<MenuItem Header="Second" Click="MenuItemSecond_Click"/>
<MenuItem Header="Third" Click="MenuItemThird_Click"/>
</Menu> ↑ ↑
The Header contains This assigns the
the menu label. event handler.
On the left of Figure 10-2 is a screenshot that shows a window containing this menu. (The menu
in the figure is inside a StackPanel, which constrains its size.) The drawing on the right of the figure
shows the menu’s structure.
Figure 10-2. A menu consists of a single Menu object containing a list of MenuItem objects.
CHAPTER 10 ■ OTHER CONTROLS AND ELEMENTS
249
As I stated earlier, the Menu object contains a set of MenuItem objects that comprise the top-level
menu. MenuItems, however, can contain nested MenuItems, which act as submenus. The following markup
shows two MenuItems contained in the content part of the first MenuItem:
<Menu>
<MenuItem Header="File">
<MenuItem Header="New Game" Click="MenuItemNewGame_Click"/>
<MenuItem Header="Exit" Click="MenuItemExit_Click"/>
</MenuItem>
<MenuItem Header="Help" Click="MenuItemHelp_Click"/>
</Menu>
Figure 10-3 shows, on the left, a window that contains this menu and, on the right, the nested
structure of the menu.
Figure 10-3. “Submenus” are MenuItems nested in other MenuItems.
The event handlers in this simple example just pop up message boxes. The following is the
code-behind:
public partial class Window1 : Window
{
public Window1()
{ InitializeComponent(); }
private void MenuItemNewGame_Click( object sender, RoutedEventArgs e )
{ MessageBox.Show( "Clicked New Game", "Menu Info" ); }
private void MenuItemExit_Click( object sender, RoutedEventArgs e )
{ MessageBox.Show( "Clicked Exit", "Menu Info" ); }
private void MenuItemHelp_Click( object sender, RoutedEventArgs e )
{ MessageBox.Show( "Clicked Help", "Menu Info" ); }
}
■ Remember Submenus are implemented as nested MenuItems—not as nested Menus.
CHAPTER 10 ■ OTHER CONTROLS AND ELEMENTS
250
Adorning the MenuItem
So far, the only thing you’ve seen on a menu is text. The area occupied by a MenuItem, however, has space
for other useful information as well, as shown in Figure 10-4.
• You can set a check mark to the left of the menu label by setting the MenuItem’s
IsChecked property to true.
− You can initialize this property in the markup to be either checked or
unchecked and then change its value in the code-behind when appropriate.
− Alternatively, you can have WPF automatically toggle the check mark on the
MenuItem by setting the MenuItem’s IsCheckable property to true. With this set,
you don’t have to programmatically set the value of IsChecked to true and
false.
• You can set the Icon property to display an image. Despite the name of the
property, it can be any type of image, not just an image of the icon type.
You can also add text to the right of the menu label by assigning it to the InputGestureText
property. This is typically used to show keyboard shortcuts for the menu item. Setting this text, however,
doesn’t implement the functionality. You must still hook up the shortcut code to the menu item yourself,
which is a bit of work unless you use commands. (You’ll learn more about this in a moment.)
Figure 10-4. You can set an image or a check mark to the left of the menu label and a string to the right of
the label.
The following is the markup for the menu in Figure 10-4:
<Menu>
<MenuItem Header="File">
<MenuItem Header="New Game" Click="MenuItemNewGame_Click"
InputGestureText="Alt+N"> ← Set text on right.
<MenuItem.Icon>
<Image Source="Card.bmp"/> ← Set image on left.
</MenuItem.Icon>
</MenuItem>
<MenuItem Header="Shuffle Sound" Click="MenuItemExit_Click"
IsChecked="True" InputGestureText="Alt+S"/> ← Set check and text.
</MenuItem>
</Menu>
CHAPTER 10 ■ OTHER CONTROLS AND ELEMENTS
251
Other Content As the Menu Header
The menu labels you’ve seen so far have been text, but the Header property can be assigned an object of
any class derived from UIElement. For example, Figure 10-5 shows a menu that uses bitmap images as
the Header content.
Figure 10-5. You can use any UIElement-derived object as the menu label, including Images.
The following markup produces the menu in Figure 10-5. Notice that to set the Header to an
Image, you must use the property element syntax.
<Menu>
<MenuItem Header="File">
<MenuItem InputGestureText="Alt+K">
<MenuItem.Header> ← Property Element Syntax
<Image Source="kccard.bmp"/> ← Set the Image.
</MenuItem.Header>
</MenuItem>
<MenuItem InputGestureText="Alt+Q">
<MenuItem.Header>
<Image Source="qccard.bmp"/> ← Set the Image.
</MenuItem.Header>
</MenuItem>
<MenuItem InputGestureText="Alt+J">
<MenuItem.Header>
<Image Source="jccard.bmp"/> ← Set the Image.
</MenuItem.Header>
</MenuItem>
</MenuItem>
</Menu>
CHAPTER 10 ■ OTHER CONTROLS AND ELEMENTS
252
Attaching Commands to Menu Items
Hooking up the keyboard shortcuts to menu items by hand can be a chore. But hooking them up to a
command is easy. (Commands were covered in Chapter 9.) All you have to do is assign the command to
the MenuItem’s Command property.
For example, the following markup attaches the two menu items to the built-in application
commands New and Open:
<StackPanel>
<Menu>
<MenuItem Header="File">
<MenuItem Command="ApplicationCommands.New" />
<MenuItem Command="ApplicationCommands.Open"/>
</MenuItem>
</Menu>
</StackPanel>
Figure 10-6 shows the menu produced by the markup. WPF does several important things for
you automatically when you attach a command to a menu item:
• It automatically sets the text of the Header to the text of the command name.
• It fills the keyboard shortcuts field with the appropriate string.
• Most important, it hooks up the command to the menu item so that the command
is executed if the user either clicks the menu item or executes the keyboard
shortcut. This assumes, of course, that you’ve bound the command correctly in
the code-behind as you saw in Chapter 9.
Figure 10-6. Menu items attached to built-in application commands
CHAPTER 10 ■ OTHER CONTROLS AND ELEMENTS
253
I’m sure that, after having read Chapter 9, binding a command is now a snap for you; but just to
refresh your memory, the code-behind for our little program is shown next. The code creates the
bindings for the commands and declares the callback methods they require. These callbacks just show a
message box.
public partial class Window1 : Window
{
public Window1()
{
InitializeComponent();
CommandBinding nBinding = new CommandBinding(); ← Binding for New
nBinding.Command = ApplicationCommands.New;
nBinding.Executed += DoNew_Executed;
nBinding.CanExecute += DoNew_CanExecute;
CommandBinding oBinding = new CommandBinding(); ← Binding for Open
oBinding.Command = ApplicationCommands.Open;
oBinding.Executed += DoOpen_Executed;
oBinding.CanExecute += DoOpen_CanExecute;
CommandBindings.Add( nBinding ); ← Add bindings to window.
CommandBindings.Add( oBinding );
}
public void DoNew_Executed( object sender, ExecutedRoutedEventArgs e )
{
MessageBox.Show( "New Command Executed", "Command Info" );
}
public void DoNew_CanExecute( object sender, CanExecuteRoutedEventArgs e )
{
e.CanExecute = true;
}
public void DoOpen_Executed( object sender, ExecutedRoutedEventArgs e )
{
MessageBox.Show( "Open Command Executed", "Command Info" );
}
public void DoOpen_CanExecute( object sender, CanExecuteRoutedEventArgs e )
{
e.CanExecute = true;
}
}
CHAPTER 10 ■ OTHER CONTROLS AND ELEMENTS
254
Context Menus
A context menu is a menu of actions associated with a particular element and contains actions relevant
to that element only, in the given context. The context menu becomes visible when the user right-clicks
the element.
The following are important things to know about context menus:
• The context menu is implemented by the ContextMenu class.
• An object of the ContextMenu class must be associated with the ContextMenu
property of the element.
• Like the Menu class, a ContextMenu object contains a set of nested MenuItem objects
that comprises the actual menu tree.
For example, Figure 10-7 shows a program window that contains an Image control that has a
context menu with three menu items. The menu choices allow the user to flip the image on its vertical
axis, to flip the image on its horizontal axis, or to return the image to its original configuration. When the
user right-clicks anywhere on the image, the context menu appears at the position of the cursor.
Figure 10-7. Right-clicking the image brings up its context menu.
The following markup shows how the context menu is created and associated with the
ContextMenu property of the Image. Notice that you must define the context menu inside the content part
of the Image.ContextMenu element using property element syntax.
<Grid>
<Image Name="picture" Source="OceanPerchLeft.jpg">
<Image.ContextMenu> ← Property Element Syntax
<ContextMenu> ← Define Context Menu
<MenuItem Header="Original" Click="Original_Click"/>
<MenuItem Header="Flip on V Axis" Click="FlipVertical_Click"/>
<MenuItem Header="Flip on H Axis" Click="FlipHorizontal_Click"/>
</ContextMenu>
</Image.ContextMenu>
</Image>
</Grid>
CHAPTER 10 ■ OTHER CONTROLS AND ELEMENTS
255
The event handlers for the program are shown in the following code. As a sneak preview, these
event handlers use the ScaleTransform to flip the image around either its vertical axis or its horizontal
axis. I’ll cover the 2D transforms in Chapter 18.
public partial class Window1 : Window
{
public Window1()
{ InitializeComponent(); }
private void FlipVertical_Click( object sender, RoutedEventArgs e )
{
picture.LayoutTransform = new ScaleTransform( -1, 1 );
}
private void FlipHorizontal_Click( object sender, RoutedEventArgs e )
{
picture.LayoutTransform = new ScaleTransform( 1, -1 );
}
private void Original_Click( object sender, RoutedEventArgs e )
{
picture.LayoutTransform = new ScaleTransform( 1, 1 );
}
}
CHAPTER 10 ■ OTHER CONTROLS AND ELEMENTS
256
ToolBars
A toolbar is a container for a set of controls or elements. Typically it’s docked at the top of the window
and contains a set of buttons and ComboBoxes that allow the user to quickly access the program’s most
common functions.
Although toolbars are usually docked at the top of a window, in WPF you can place them
anywhere in the window. Additionally, in WPF, you can insert any UIElement-derived object into a
toolbar. In general, though, you should only insert controls that perform some action or set some
setting. If you stick to this, your program will conform to what users expect, helping them avoid potential
confusion.
To create and populate a toolbar, place the child elements inside the content area of the
ToolBar element, as shown in the following markup:
<StackPanel>
<ToolBar>
<Menu> ← Insert Menu.
<MenuItem Header="File">
<MenuItem Header="New Game"/>
<MenuItem Header="Change Opponent"/>
</MenuItem>
</Menu>
<Button Width="40">Bet</Button> ← Insert Button.
<Button Width="40">Fold</Button> ← Insert Button.
<ComboBox Width="70" SelectedIndex="0"> ← Insert ComboBox.
<ComboBoxItem>Clubs</ComboBoxItem>
<ComboBoxItem>Diamonds</ComboBoxItem>
<ComboBoxItem>Hearts</ComboBoxItem>
<ComboBoxItem>Spades</ComboBoxItem>
</ComboBox>
</ToolBar>
</StackPanel>
CHAPTER 10 ■ OTHER CONTROLS AND ELEMENTS
257
Figure 10-8 shows the window produced by the markup. The screenshots show the menu and
the ComboBox being accessed, respectively.
Figure 10-8. A toolbar can contain Buttons, Menus, ComboBoxes, and other UIElements
Figure 10-9 shows the same window where the size is decreased so that it isn’t large enough to
show the whole toolbar. In this case, the toolbar displays a small down arrow on the right end that allows
the user to access the overflow toolbar.
Figure 10-9. If not all the elements can fit on the toolbar, it displays an overflow menu arrow, which the
user can click to access the remaining elements.
CHAPTER 10 ■ OTHER CONTROLS AND ELEMENTS
258
StatusBars
The StatusBar element is similar to the ToolBar element, except that the StatusBar isn’t designed to be
used for input from the user. Its purpose is to display information to the user. Status bars are usually
docked to the bottom of a window, but they, like toolbars, can be placed anywhere in the window.
Figure 10-10 shows a window with a status bar that contains three items: a text message, a
progress bar, and an image.
Figure 10-10. Status bars display information to the user
As with the ToolBar, to populate a StatusBar, place the child elements in the content part of the
StatusBar element. The following markup produces the content of the window in the figure. Notice that
the StatusBar is docked to the bottom of the DockPanel.
<DockPanel LastChildFill="False">
<StatusBar DockPanel.Dock="Bottom"> ← Dock to Bottom
<TextBlock>Backup In Progress</TextBlock> ← Text Message
<ProgressBar Height="20" Width="100" Value="65"/> ← Progress Bar
<Image Height="30" Source="kccard.bmp"/> ← Image
</StatusBar>
</DockPanel>
CHAPTER 10 ■ OTHER CONTROLS AND ELEMENTS
259
ToolTips
Tooltips are the small informative windows that automatically pop up when your mouse hovers over an
element on the screen. These generally give terse descriptions of the object.
Tooltips are implemented by the ToolTip class and are assigned to the ToolTip property of the
object they describe.
For example, the following markup assigns tooltips to a Button, a ComboBox, and each of the
ComboBoxItems:
<StackPanel>
<Button ToolTip="Important Button">Start Game</Button>
<ComboBox ToolTip="Choose a Suit" SelectedIndex="0">
<ComboBoxItem ToolTip="Black Suit">Clubs</ComboBoxItem>
<ComboBoxItem ToolTip="Red Suit">Diamonds</ComboBoxItem>
<ComboBoxItem ToolTip="Red Suit">Hearts</ComboBoxItem>
<ComboBoxItem ToolTip="Black Suit">Spades</ComboBoxItem>
</ComboBox>
</StackPanel>
The screenshots in Figure 10-11 show some of the tooltips as the mouse is over different
objects. Notice that even the ComboBoxItems show tooltips.
Figure 10-11. The tooltips pop up when the mouse has hovered over an element for a short amount of
time.
Since ToolTip is a ContentControl, it can contain any UIElement—not just text. It can’t, however,
gain focus, so it is useless to put it in something like a button, since the button won’t be able to get focus
and therefore won’t be able to be clicked.
CHAPTER 10 ■ OTHER CONTROLS AND ELEMENTS
260
Controls That Work with Ranges
Several controls are based on a numeric range. Two of these are the ProgressBar and the Slider.
The range controls derive from the RangeBase class, which represents a numeric value that is
constrained to be within a set range. Since the range controls inherit from the RangeBase class, the
following are the important things you need to know about the RangeBase class:
• The numeric type represented by the range controls is of type double—not type
int, as many people expect.
• The Minimum and Maximum properties of a range control contain the minimum and
maximum values that the control can have.
• The Value property contains the current value of the control. If you attempt to set
the Value either below or above the Minimum or Maximum, respectively, the Value
property is set to the Minimum or the Maximum.
The ProgressBar
As mentioned, the ProgressBar derives from the RangeBase class. It is a simple visual element that shows
the user that the program is making progress on a particular task⎯or is at least working on it. Figure 10-
12 shows a progress bar indicating that a task is about 60 percent complete.
Figure 10-12. A progress bar showing percentage completion
The default range of the ProgressBar is 0.0 to 100.0, corresponding nicely with the definition of
percentage. The following is the markup that produces the content of the window in the figure. Notice
also how the text of the TextBlock at the bottom is bound to the value of the ProgressBar.
<StackPanel>
<TextBlock Margin="5" FontWeight="Bold">Current Percent Done</TextBlock>
<ProgressBar Name="pBar" Margin="5" Height="20" Value="60" />
<TextBlock Text="{Binding ElementName=pBar, Path=Value}" Margin="5"/>
</StackPanel>
CHAPTER 10 ■ OTHER CONTROLS AND ELEMENTS
261
As an example, the following code shows a program that increments the ProgressBar by 10
percent whenever the user clicks the Next Step button. Figure 10-13 shows several screenshots from the
program.
Figure 10-13. You can manipulate the progress shown by the ProgressBar from the code-behind.
The following is the markup for the program. Notice that the value is set to 0 in the markup.
<StackPanel>
<ProgressBar Name="pBar" Value="0" Margin="5" Height="10" />
<DockPanel HorizontalAlignment="Stretch" LastChildFill="False">
<TextBlock Text="{Binding ElementName=pBar, Path=Value}" Margin="5"/>
<Button DockPanel.Dock="Right" Margin="5" Click="Button_Click">
Next Step
</Button>
</DockPanel>
</StackPanel>
The following is the code-behind. The button event handler simply increments the Value
property of the ProgressBar.
public partial class Window1 : Window
{
public Window1()
{ }
private void Button_Click( object sender, RoutedEventArgs e )
{
pBar.Value += 10.0;
}
}
CHAPTER 10 ■ OTHER CONTROLS AND ELEMENTS
262
You can also make a ProgressBar vertical by setting the Orientation property to Vertical, as
shown in Figure 10-14 below.
Figure 10-14. A vertical ProgressBar
The following is the markup producing the window in Figure 10-14:
<Grid>
<Grid.RowDefinitions>
<RowDefinition Height="*" />
<RowDefinition Height="3*" />
<RowDefinition Height="*" />
</Grid.RowDefinitions>
<TextBlock Grid.Row="0" Margin="5" FontWeight="Bold">
Current Percent Done
</TextBlock>
<ProgressBar Orientation="Vertical" Grid.Row="1" Name="pBar"
Value="76" Margin="5" Width="20" />
<TextBlock Text="{Binding ElementName=pBar, Path=Value}"
Grid.Row="2" Margin="5"/>
</Grid>
There are also times when you can’t determine the percentage of a process in progress, or for
other reasons you might not want to update the progress bar with meaningful values. In these situations,
you can set the mode of the ProgressBar so that it repeatedly progresses from left to right. To do this, set
the IsIndeterminate property to true.