Data Sheet High-Performance, Enhanced Flash Microcontrollers phần 6 pptx
Bạn đang xem bản rút gọn của tài liệu. Xem và tải ngay bản đầy đủ của tài liệu tại đây (313.87 KB, 38 trang )
PIC18FXX2
DS39564C-page 166 © 2006 Microchip Technology Inc.
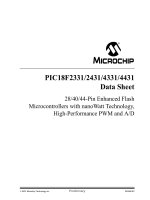
REGISTER 16-1: TXSTA: TRANSMIT STATUS AND CONTROL REGISTER
R/W-0 R/W-0 R/W-0 R/W-0 U-0 R/W-0 R-1 R/W-0
CSRC TX9 TXEN SYNC —BRGHTRMTTX9D
bit 7 bit 0
bit 7 CSRC: Clock Source Select bit
Asynchronous mode:
Don’t care
Synchronous mode:
1 = Master mode (clock generated internally from BRG)
0 = Slave mode (clock from external source)
bit 6 TX9: 9-bit Transmit Enable bit
1 = Selects 9-bit transmission
0 = Selects 8-bit transmission
bit 5 TXEN: Transmit Enable bit
1 = Transmit enabled
0 = Transmit disabled
Note: SREN/CREN overrides TXEN in SYNC mode.
bit 4 SYNC: USART Mode Select bit
1 = Synchronous mode
0 = Asynchronous mode
bit 3 Unimplemented: Read as '0'
bit 2 BRGH: High Baud Rate Select bit
Asynchronous mode:
1 = High speed
0 = Low speed
Synchronous mode:
Unused in this mode
bit 1 TRMT: Transmit Shift Register Status bit
1 = TSR empty
0 = TSR full
bit 0 TX9D: 9th bit of Transmit Data
Can be Address/Data bit or a parity bit.
Legend:
R = Readable bit W = Writable bit U = Unimplemented bit, read as ‘0’
- n = Value at POR ’1’ = Bit is set ’0’ = Bit is cleared x = Bit is unknown
© 2006 Microchip Technology Inc. DS39564C-page 167
PIC18FXX2
REGISTER 16-2: RCSTA: RECEIVE STATUS AND CONTROL REGISTER
R/W-0 R/W-0 R/W-0 R/W-0 R/W-0 R-0 R-0 R-x
SPEN RX9 SREN CREN ADDEN FERR OERR RX9D
bit 7 bit 0
bit 7 SPEN: Serial Port Enable bit
1 = Serial port enabled (configures RX/DT and TX/CK pins as serial port pins)
0 = Serial port disabled
bit 6 RX9: 9-bit Receive Enable bit
1 = Selects 9-bit reception
0 = Selects 8-bit reception
bit 5 SREN: Single Receive Enable bit
Asynchronous mode
:
Don’t care
Synchronous mode - Master:
1 = Enables single receive
0 = Disables single receive
This bit is cleared after reception is complete.
Synchronous mode - Slave:
Don’t care
bit 4 CREN: Continuous Receive Enable bit
Asynchronous mode:
1 = Enables receiver
0 = Disables receiver
Synchronous mode:
1 = Enables continuous receive until enable bit CREN is cleared (CREN overrides SREN)
0 = Disables continuous receive
bit 3 ADDEN: Address Detect Enable bit
Asynchronous mode 9-bit (RX9 = 1):
1 = Enables address detection, enable interrupt and load of the receive buffer
when RSR<8> is set
0 = Disables address detection, all bytes are received, and ninth bit can be used as parity bit
bit 2 FERR: Framing Error bit
1 = Framing error (can be updated by reading RCREG register and receive next valid byte)
0 = No framing error
bit 1 OERR: Overrun Error bit
1 = Overrun error (can be cleared by clearing bit CREN)
0 = No overrun error
bit 0 RX9D: 9th bit of Received Data
This can be Address/Data bit or a parity bit, and must be calculated by user firmware.
Legend:
R = Readable bit W = Writable bit U = Unimplemented bit, read as ‘0’
- n = Value at POR ’1’ = Bit is set ’0’ = Bit is cleared x = Bit is unknown
PIC18FXX2
DS39564C-page 168 © 2006 Microchip Technology Inc.
16.1 USART Baud Rate Generator
(BRG)
The BRG supports both the Asynchronous and Syn-
chronous modes of the USART. It is a dedicated 8-bit
baud rate generator. The SPBRG register controls the
period of a free running 8-bit timer. In Asynchronous
mode, bit BRGH (TXSTA<2>) also controls the baud
rate. In Synchronous mode, bit BRGH is ignored.
Table 16-1 shows the formula for computation of the
baud rate for different USART modes, which only apply
in Master mode (internal clock).
Given the desired baud rate and Fosc, the nearest inte-
ger value for the SPBRG register can be calculated
using the formula in Table 16-1. From this, the error in
baud rate can be determined.
Example 16-1 shows the calculation of the baud rate
error for the following conditions:
•F
OSC = 16 MHz
• Desired Baud Rate = 9600
• BRGH = 0
• SYNC = 0
It may be advantageous to use the high baud rate
(BRGH = 1) even for slower baud clocks. This is
because the F
OSC/(16(X + 1)) equation can reduce the
baud rate error in some cases.
Writing a new value to the SPBRG register causes the
BRG timer to be reset (or cleared). This ensures the
BRG does not wait for a timer overflow before
outputting the new baud rate.
16.1.1 SAMPLING
The data on the RC7/RX/DT pin is sampled three times
by a majority detect circuit to determine if a high or a
low level is present at the RX pin.
EXAMPLE 16-1: CALCULATING BAUD RATE ERROR
TABLE 16-1: BAUD RATE FORMULA
TABLE 16-2: REGISTERS ASSOCIATED WITH BAUD RATE GENERATOR
Desired Baud Rate = FOSC / (64 (X + 1))
Solving for X:
X = ( (F
OSC / Desired Baud Rate) / 64 ) – 1
X = ((16000000 / 9600) / 64) – 1
X = [25.042] = 25
Calculated Baud Rate = 16000000 / (64 (25 + 1))
= 9615
Error = (Calculated Baud Rate – Desired Baud Rate)
Desired Baud Rate
= (9615 – 9600) / 9600
= 0.16%
SYNC BRGH = 0 (Low Speed) BRGH = 1 (High Speed)
0
1
(Asynchronous) Baud Rate = F
OSC/(64(X+1))
(Synchronous) Baud Rate = F
OSC/(4(X+1))
Baud Rate = F
OSC/(16(X+1))
N/A
Legend: X = value in SPBRG (0 to 255)
Name Bit 7 Bit 6 Bit 5 Bit 4 Bit 3 Bit 2 Bit 1 Bit 0
Value on
POR, BOR
Value on
All Other
RESETS
TXSTA
CSRC TX9 TXEN SYNC —BRGHTRMT TX9D 0000 -010 0000 -010
RCSTA SPEN RX9 SREN CREN ADDEN FERR OERR RX9D 0000 -00x 0000 -00x
SPBRG Baud Rate Generator Register 0000 0000 0000 0000
Legend: x = unknown, - = unimplemented, read as '0'. Shaded cells are not used by the BRG.
© 2006 Microchip Technology Inc. DS39564C-page 169
PIC18FXX2
TABLE 16-3: BAUD RATES FOR SYNCHRONOUS MODE
BAUD
RATE
(Kbps)
F
OSC = 40 MHz
SPBRG
value
(decimal)
33 MHz
SPBRG
value
(decimal)
25 MHz
SPBRG
value
(decimal)
20 MHz
SPBRG
value
(decimal)
KBAUD
%
ERROR KBAUD
%
ERROR KBAUD
%
ERROR KBAUD
%
ERROR
0.3 NA - - NA - - NA - - NA - -
1.2 NA - - NA - - NA - - NA - -
2.4 NA - - NA - - NA - - NA - -
9.6 NA - - NA - - NA - - NA - -
19.2 NA - - NA - - NA - - NA - -
76.8 76.92 +0.16 129 77.10 +0.39 106 77.16 +0.47 80 76.92 +0.16 64
96 96.15 +0.16 103 95.93 -0.07 85 96.15 +0.16 64 96.15 +0.16 51
300 303.03 +1.01 32 294.64 -1.79 27 297.62 -0.79 20 294.12 -1.96 16
500 500 0 19 485.30 -2.94 16 480.77 -3.85 12 500 0 9
HIGH 10000 - 0 8250 - 0 6250 - 0 5000 - 0
LOW 39.06 - 255 32.23 - 255 24.41 - 255 19.53 - 255
BAUD
RATE
(Kbps)
F
OSC = 16 MHz
SPBRG
value
(decimal)
10 MHz
SPBRG
value
(decimal)
7.15909 MHz
SPBRG
value
(decimal)
5.0688 MHz
SPBRG
value
(decimal)
KBAUD
%
ERROR KBAUD
%
ERROR KBAUD
%
ERROR KBAUD
%
ERROR
0.3NA- - NA- - NA - - NA- -
1.2NA- - NA- - NA - - NA- -
2.4NA- - NA- - NA - - NA- -
9.6 NA - - NA - - 9.62 +0.23 185 9.60 0 131
19.2 19.23 +0.16 207 19.23 +0.16 129 19.24 +0.23 92 19.20 0 65
76.8 76.92 +0.16 51 75.76 -1.36 32 77.82 +1.32 22 74.54 -2.94 16
96 95.24 -0.79 41 96.15 +0.16 25 94.20 -1.88 18 97.48 +1.54 12
300 307.70 +2.56 12 312.50 +4.17 7 298.35 -0.57 5 316.80 +5.60 3
500 500 0 7 500 0 4 447.44 -10.51 3 422.40 -15.52 2
HIGH 4000 - 0 2500 - 0 1789.80 - 0 1267.20 - 0
LOW 15.63 - 255 9.77 - 255 6.99 - 255 4.95 - 255
BAUD
RATE
(Kbps)
F
OSC = 4 MHz
SPBRG
value
(decimal)
3.579545 MHz
SPBRG
value
(decimal)
1 MHz
SPBRG
value
(decimal)
32.768 kHz
SPBRG
value
(decimal)
KBAUD
%
ERROR KBAUD
%
ERROR KBAUD
%
ERROR KBAUD
%
ERROR
0.3 NA - - NA - - NA - - 0.30 +1.14 26
1.2 NA - - NA - - 1.20 +0.16 207 1.17 -2.48 6
2.4 NA - - NA - - 2.40 +0.16 103 2.73 +13.78 2
9.6 9.62 +0.16 103 9.62 +0.23 92 9.62 +0.16 25 8.20 -14.67 0
19.2 19.23 +0.16 51 19.04 -0.83 46 19.23 +0.16 12 NA - -
76.8 76.92 +0.16 12 74.57 -2.90 11 83.33 +8.51 2 NA - -
96 1000 +4.17 9 99.43 +3.57 8 83.33 -13.19 2 NA - -
300 333.33 +11.11 2 298.30 -0.57 2 250 -16.67 0 NA - -
500 500 0 1 447.44 -10.51 1 NA - - NA - -
HIGH 1000 - 0 894.89 - 0 250 - 0 8.20 - 0
LOW 3.91 - 255 3.50 - 255 0.98 - 255 0.03 - 255
PIC18FXX2
DS39564C-page 170 © 2006 Microchip Technology Inc.
TABLE 16-4: BAUD RATES FOR ASYNCHRONOUS MODE (BRGH = 0)
BAUD
RATE
(Kbps)
F
OSC = 40 MHz
SPBRG
value
(decimal)
33 MHz
SPBRG
value
(decimal)
25 MHz
SPBRG
value
(decimal)
20 MHz
SPBRG
value
(decimal)
KBAUD
%
ERROR KBAUD
%
ERROR KBAUD
%
ERROR KBAUD
%
ERROR
0.3 NA - - NA - - NA - - NA - -
1.2 NA - - NA - - NA - - NA - -
2.4 NA - - 2.40 -0.07 214 2.40 -0.15 162 2.40 +0.16 129
9.6 9.62 +0.16 64 9.55 -0.54 53 9.53 -0.76 40 9.47 -1.36 32
19.2 18.94 -1.36 32 19.10 -0.54 26 19.53 +1.73 19 19.53 +1.73 15
76.8 78.13 +1.73 7 73.66 -4.09 6 78.13 +1.73 4 78.13 +1.73 3
96 89.29 -6.99 6 103.13 +7.42 4 97.66 +1.73 3 104.17 +8.51 2
300 312.50 +4.17 1 257.81 -14.06 1 NA - - 312.50 +4.17 0
500 625 +25.00 0 NA - - NA - - NA - -
HIGH 625 - 0 515.63 - 0 390.63 - 0 312.50 - 0
LOW 2.44 - 255 2.01 - 255 1.53 - 255 1.22 - 255
BAUD
RATE
(Kbps)
F
OSC = 16 MHz
SPBRG
value
(decimal)
10 MHz
SPBRG
value
(decimal)
7.15909 MHz
SPBRG
value
(decimal)
5.0688 MHz
SPBRG
value
(decimal)
KBAUD
%
ERROR KBAUD
%
ERROR KBAUD
%
ERROR KBAUD
%
ERROR
0.3 NA - - NA - - NA - - NA - -
1.2 1.20 +0.16 207 1.20 +0.16 129 1.20 +0.23 92 1.20 0 65
2.4 2.40 +0.16 103 2.40 +0.16 64 2.38 -0.83 46 2.40 0 32
9.6 9.62 +0.16 25 9.77 +1.73 15 9.32 -2.90 11 9.90 +3.13 7
19.2 19.23 +0.16 12 19.53 +1.73 7 18.64 -2.90 5 19.80 +3.13 3
76.8 83.33 +8.51 2 78.13 +1.73 1 111.86 +45.65 0 79.20 +3.13 0
96 83.33 -13.19 2 78.13 -18.62 1 NA - - NA - -
300 250 -16.67 0 156.25 -47.92 0 NA - - NA - -
500 NA - - NA - - NA - - NA - -
HIGH 250 - 0 156.25 - 0 111.86 - 0 79.20 - 0
LOW 0.98 - 255 0.61 - 255 0.44 - 255 0.31 - 255
BAUD
RATE
(Kbps)
F
OSC = 4 MHz
SPBRG
value
(decimal)
3.579545 MHz
SPBRG
value
(decimal)
1 MHz
SPBRG
value
(decimal)
32.768 kHz
SPBRG
value
(decimal)
KBAUD
%
ERROR KBAUD
%
ERROR KBAUD
%
ERROR KBAUD
%
ERROR
0.3 0.30 -0.16 207 0.30 +0.23 185 0.30 +0.16 51 0.26 -14.67 1
1.2 1.20 +1.67 51 1.19 -0.83 46 1.20 +0.16 12 NA - -
2.4 2.40 +1.67 25 2.43 +1.32 22 2.23 -6.99 6 NA - -
9.6 8.93 -6.99 6 9.32 -2.90 5 7.81 -18.62 1 NA - -
19.2 20.83 +8.51 2 18.64 -2.90 2 15.63 -18.62 0 NA - -
76.8 62.50 -18.62 0 55.93 -27.17 0 NA - - NA - -
96 NA - - NA - - NA - - NA - -
300 NA - - NA - - NA - - NA - -
500 NA - - NA - - NA - - NA - -
HIGH 62.50 - 0 55.93 - 0 15.63 - 0 0.51 - 0
LOW 0.24 - 255 0.22 - 255 0.06 - 255 0.002 - 255
© 2006 Microchip Technology Inc. DS39564C-page 171
PIC18FXX2
TABLE 16-5: BAUD RATES FOR ASYNCHRONOUS MODE (BRGH = 1)
BAUD
RATE
(Kbps)
F
OSC = 40 MHz
SPBRG
value
(decimal)
33 MHz
SPBRG
value
(decimal)
25 MHz
SPBRG
value
(decimal)
20 MHz
SPBRG
value
(decimal)
KBAUD
%
ERROR KBAUD
%
ERROR KBAUD
%
ERROR KBAUD
%
ERROR
0.3NA- -NA- -NA- -NA- -
1.2NA- -NA- -NA- -NA- -
2.4NA- -NA- -NA- -NA- -
9.6 NA - - 9.60 -0.07 214 9.59 -0.15 162 9.62 +0.16 129
19.2 19.23 +0.16 129 19.28 +0.39 106 19.30 +0.47 80 19.23 +0.16 64
76.8 75.76 -1.36 32 76.39 -0.54 26 78.13 +1.73 19 78.13 +1.73 15
96 96.15 +0.16 25 98.21 +2.31 20 97.66 +1.73 15 96.15 +0.16 12
300 312.50 +4.17 7 294.64 -1.79 6 312.50 +4.17 4 312.50 +4.17 3
500 500 0 4 515.63 +3.13 3 520.83 +4.17 2 416.67 -16.67 2
HIGH 2500 - 0 2062.50 - 0 1562.50 - 0 1250 - 0
LOW 9.77 - 255 8,06 - 255 6.10 - 255 4.88 - 255
BAUD
RATE
(Kbps)
F
OSC = 16 MHz
SPBRG
value
(decimal)
10 MHz
SPBRG
value
(decimal)
7.15909 MHz
SPBRG
value
(decimal)
5.0688 MHz
SPBRG
value
(decimal)
KBAUD
%
ERROR KBAUD
%
ERROR KBAUD
%
ERROR KBAUD
%
ERROR
0.3NA- - NA- - NA- - NA- -
1.2NA- - NA- - NA- - NA- -
2.4 NA - - NA - - 2.41 +0.23 185 2.40 0 131
9.6 9.62 +0.16 103 9.62 +0.16 64 9.52 -0.83 46 9.60 0 32
19.2 19.23 +0.16 51 18.94 -1.36 32 19.45 +1.32 22 18.64 -2.94 16
76.8 76.92 +0.16 12 78.13 +1.73 7 74.57 -2.90 5 79.20 +3.13 3
96 100 +4.17 9 89.29 -6.99 6 89.49 -6.78 4 105.60 +10.00 2
300 333.33 +11.11 2 312.50 +4.17 1 447.44 +49.15 0 316.80 +5.60 0
500 500 0 1 625 +25.00 0 447.44 -10.51 0 NA - -
HIGH 1000 - 0 625 - 0 447.44 - 0 316.80 - 0
LOW 3.91 - 255 2.44 - 255 1.75 - 255 1.24 - 255
BAUD
RATE
(Kbps)
F
OSC = 4 MHz
SPBRG
value
(decimal)
3.579545 MHz
SPBRG
value
(decimal)
1 MHz
SPBRG
value
(decimal)
32.768 kHz
SPBRG
value
(decimal)
KBAUD
%
ERROR KBAUD
%
ERROR KBAUD
%
ERROR KBAUD
%
ERROR
0.3 NA - - NA - - 0.30 +0.16 207 0.29 -2.48 6
1.2 1.20 +0.16 207 1.20 +0.23 185 1.20 +0.16 51 1.02 -14.67 1
2.4 2.40 +0.16 103 2.41 +0.23 92 2.40 +0.16 25 2.05 -14.67 0
9.6 9.62 +0.16 25 9.73 +1.32 22 8.93 -6.99 6 NA - -
19.2 19.23 +0.16 12 18.64 -2.90 11 20.83 +8.51 2 NA - -
76.8 NA - - 74.57 -2.90 2 62.50 -18.62 0 NA - -
96 NA - - 111.86 +16.52 1 NA - - NA - -
300 NA - - 223.72 -25.43 0 NA - - NA - -
500NA- - NA- - NA- - NA- -
HIGH 250 - 0 55.93 - 0 62.50 - 0 2.05 - 0
LOW 0.98 - 255 0.22 - 255 0.24 - 255 0.008 - 255
PIC18FXX2
DS39564C-page 172 © 2006 Microchip Technology Inc.
16.2 USART Asynchronous Mode
In this mode, the USART uses standard non-return-to-
zero (NRZ) format (one START bit, eight or nine data
bits and one STOP bit). The most common data format
is 8-bits. An on-chip dedicated 8-bit baud rate genera-
tor can be used to derive standard baud rate frequen-
cies from the oscillator. The USART transmits and
receives the LSb first. The USART’s transmitter and
receiver are functionally independent, but use the
same data format and baud rate. The baud rate gener-
ator produces a clock, either x16 or x64 of the bit shift
rate, depending on bit BRGH (TXSTA<2>). Parity is not
supported by the hardware, but can be implemented in
software (and stored as the ninth data bit).
Asynchronous mode is stopped during SLEEP.
Asynchronous mode is selected by clearing bit SYNC
(TXSTA<4>).
The USART Asynchronous module consists of the
following important elements:
• Baud Rate Generator
• Sampling Circuit
• Asynchronous Transmitter
• Asynchronous Receiver
16.2.1 USART ASYNCHRONOUS
TRANSMITTER
The USART transmitter block diagram is shown in
Figure 16-1. The heart of the transmitter is the Transmit
(serial) Shift Register (TSR). The shift register obtains
its data from the read/write transmit buffer, TXREG. The
TXREG register is loaded with data in software. The
TSR register is not loaded until the STOP bit has been
transmitted from the previous load. As soon as the
STOP bit is transmitted, the TSR is loaded with new
data from the TXREG register (if available). Once the
TXREG register transfers the data to the TSR register
(occurs in one T
CY), the TXREG register is empty and
flag bit TXIF (PIR1<4>) is set. This interrupt can be
enabled/disabled by setting/clearing enable bit TXIE
( PIE1<4>). Flag bit TXIF will be set, regardless of the
state of enable bit TXIE and cannot be cleared in soft-
ware. It will reset only when new data is loaded into the
TXREG register. While flag bit TXIF indicated the sta-
tus of the TXREG register, another bit, TRMT
(TXSTA<1>), shows the status of the TSR register. Sta-
tus bit TRMT is a read-only bit, which is set when the
TSR register is empty. No interrupt logic is tied to this
bit, so the user has to poll this bit in order to determine
if the TSR register is empty.
To set up an asynchronous transmission:
1. Initialize the SPBRG register for the appropriate
baud rate. If a high speed baud rate is desired,
set bit BRGH (Section 16.1).
2. Enable the asynchronous serial port by clearing
bit SYNC and setting bit SPEN.
3. If interrupts are desired, set enable bit TXIE.
4. If 9-bit transmission is desired, set transmit bit
TX9. Can be used as address/data bit.
5. Enable the transmission by setting bit TXEN,
which will also set bit TXIF.
6. If 9-bit transmission is selected, the ninth bit
should be loaded in bit TX9D.
7. Load data to the TXREG register (starts
transmission).
FIGURE 16-1: USART TRANSMIT BLOCK DIAGRAM
Note 1: The TSR register is not mapped in data
memory, so it is not available to the user.
2: Flag bit TXIF is set when enable bit TXEN
is set.
Note: TXIF is not cleared immediately upon load-
ing data into the transmit buffer TXREG.
The flag bit becomes valid in the second
instruction cycle following the load
instruction.
TXIF
TXIE
Interrupt
TXEN
Baud Rate CLK
SPBRG
Baud Rate Generator
TX9D
MSb
LSb
Data Bus
TXREG Register
TSR Register
(8)
0
TX9
TRMT
SPEN
RC6/TX/CK pin
Pin Buffer
and Control
8
• • •
© 2006 Microchip Technology Inc. DS39564C-page 173
PIC18FXX2
FIGURE 16-2: ASYNCHRONOUS TRANSMISSION
FIGURE 16-3: ASYNCHRONOUS TRANSMISSION (BACK TO BACK)
TABLE 16-6: REGISTERS ASSOCIATED WITH ASYNCHRONOUS TRANSMISSION
Word 1
STOP bit
Word 1
Transmit Shift Reg
START bit bit 0 bit 1 bit 7/8
Write to TXREG
Word 1
BRG Output
(Shift Clock)
RC6/TX/CK (pin)
TXIF bit
(Transmit Buffer
Reg. Empty Flag)
TRMT bit
(Transmit Shift
Reg. Empty Flag)
Transmit Shift Reg.
Write to TXREG
BRG Output
(Shift Clock)
RC6/TX/CK (pin)
TXIF bit
(Interrupt Reg. Flag)
TRMT bit
(Transmit Shift
Reg. Empty Flag)
Word 1
Word 2
Word 1
Word 2
START bit
STOP bit
START bit
Transmit Shift Reg.
Word 1
Word 2
bit 0 bit 1
bit 7/8 bit 0
Note: This timing diagram shows two consecutive transmissions.
Name Bit 7 Bit 6 Bit 5 Bit 4 Bit 3 Bit 2 Bit 1 Bit 0
Value on
POR, BOR
Value on
All Other
RESETS
INTCON GIE/GIEH PEIE/GIEL
TMR0IE INT0IE RBIE TMR0IF INT0IF RBIF 0000 000x 0000 000u
PIR1
PSPIF
(1)
ADIF RCIF TXIF SSPIF CCP1IF TMR2IF TMR1IF 0000 0000 0000 0000
PIE1
PSPIE
(1)
ADIE RCIE TXIE SSPIE CCP1IE TMR2IE TMR1IE 0000 0000 0000 0000
IPR1
PSPIP
(1)
ADIP RCIP TXIP SSPIP CCP1IP TMR2IP TMR1IP 0000 0000 0000 0000
RCSTA
SPEN RX9 SREN CREN ADDEN FERR OERR RX9D 0000 -00x 0000 -00x
TXREG
USART Transmit Register 0000 0000 0000 0000
TXSTA CSRC TX9 TXEN SYNC — BRGH TRMT TX9D 0000 -010 0000 -010
SPBRG Baud Rate Generator Register 0000 0000 0000 0000
Legend: x = unknown, - = unimplemented locations read as '0'.
Shaded cells are not used for Asynchronous Transmission.
Note 1: The PSPIF, PSPIE and PSPIP bits are reserved on the PIC18F2X2 devices; always maintain these bits clear.
PIC18FXX2
DS39564C-page 174 © 2006 Microchip Technology Inc.
16.2.2 USART ASYNCHRONOUS
RECEIVER
The receiver block diagram is shown in Figure 16-4.
The data is received on the RC7/RX/DT pin and drives
the data recovery block. The data recovery block is
actually a high speed shifter operating at x16 times the
baud rate, whereas the main receive serial shifter oper-
ates at the bit rate or at F
OSC. This mode would
typically be used in RS-232 systems.
To set up an Asynchronous Reception:
1. Initialize the SPBRG register for the appropriate
baud rate. If a high speed baud rate is desired,
set bit BRGH (Section 16.1).
2. Enable the asynchronous serial port by clearing
bit SYNC and setting bit SPEN.
3. If interrupts are desired, set enable bit RCIE.
4. If 9-bit reception is desired, set bit RX9.
5. Enable the reception by setting bit CREN.
6. Flag bit RCIF will be set when reception is com-
plete and an interrupt will be generated if enable
bit RCIE was set.
7. Read the RCSTA register to get the ninth bit (if
enabled) and determine if any error occurred
during reception.
8. Read the 8-bit received data by reading the
RCREG register.
9. If any error occurred, clear the error by clearing
enable bit CREN.
10. If using interrupts, ensure that the GIE and PEIE
bits in the INTCON register (INTCON<7:6>) are
set.
16.2.3 SETTING UP 9-BIT MODE WITH
ADDRESS DETECT
This mode would typically be used in RS-485 systems.
To set up an Asynchronous Reception with Address
Detect Enable:
1. Initialize the SPBRG register for the appropriate
baud rate. If a high speed baud rate is required,
set the BRGH bit.
2. Enable the asynchronous serial port by clearing
the SYNC bit and setting the SPEN bit.
3. If interrupts are required, set the RCEN bit and
select the desired priority level with the RCIP bit.
4. Set the RX9 bit to enable 9-bit reception.
5. Set the ADDEN bit to enable address detect.
6. Enable reception by setting the CREN bit.
7. The RCIF bit will be set when reception is com-
plete. The interrupt will be acknowledged if the
RCIE and GIE bits are set.
8. Read the RCSTA register to determine if any
error occurred during reception, as well as read
bit 9 of data (if applicable).
9. Read RCREG to determine if the device is being
addressed.
10. If any error occurred, clear the CREN bit.
11. If the device has been addressed, clear the
ADDEN bit to allow all received data into the
receive buffer and interrupt the CPU.
FIGURE 16-4: USART RECEIVE BLOCK DIAGRAM
x64 Baud Rate CLK
SPBRG
Baud Rate Generator
RC7/RX/DT
Pin Buffer
and Control
SPEN
Data
Recovery
CREN
OERR
FERR
RSR Register
MSb
LSb
RX9D
RCREG Register
FIFO
Interrupt
RCIF
RCIE
Data Bus
8
÷ 64
÷ 16
or
STOP
START
(8)
7
1
0
RX9
• • •
© 2006 Microchip Technology Inc. DS39564C-page 175
PIC18FXX2
FIGURE 16-5: ASYNCHRONOUS RECEPTION
TABLE 16-7: REGISTERS ASSOCIATED WITH ASYNCHRONOUS RECEPTION
START
bit
bit7/8
bit1bit0
bit7/8 bit0STOP
bit
START
bit
START
bit
bit7/8
STOP
bit
RX (pin)
Reg
Rcv Buffer Reg
Rcv Shift
Read Rcv
Buffer Reg
RCREG
RCIF
(Interrupt Flag)
OERR bit
CREN
Word 1
RCREG
Word 2
RCREG
STOP
bit
Note: This timing diagram shows three words appearing on the RX input. The RCREG (receive buffer) is read after the third word, causing
the OERR (overrun) bit to be set.
Name Bit 7 Bit 6 Bit 5 Bit 4 Bit 3 Bit 2 Bit 1 Bit 0
Value on
POR, BOR
Value on
All Other
RESETS
INTCON GIE/GIEH PEIE/
GIEL
TMR0IE INT0IE RBIE TMR0IF INT0IF RBIF 0000 000x 0000 000u
PIR1
PSPIF
(1)
ADIF RCIF TXIF SSPIF CCP1IF TMR2IF TMR1IF 0000 0000 0000 0000
PIE1
PSPIE
(1)
ADIE RCIE TXIE SSPIE CCP1IE TMR2IE TMR1IE 0000 0000 0000 0000
IPR1
PSPIP
(1)
ADIP RCIP TXIP SSPIP CCP1IP TMR2IP TMR1IP 0000 0000 0000 0000
RCSTA SPEN RX9 SREN CREN ADDEN FERR OERR RX9D 0000 -00x 0000 -00x
RCREG USART Receive Register 0000 0000 0000 0000
TXSTA
CSRC TX9 TXEN SYNC —BRGHTRMT TX9D 0000 -010 0000 -010
SPBRG Baud Rate Generator Register 0000 0000 0000 0000
Legend: x = unknown, - = unimplemented locations read as '0'.
Shaded cells are not used for Asynchronous Reception.
Note 1: The PSPIF, PSPIE and PSPIP bits are reserved on the PIC18F2X2 devices; always maintain these bits
clear.
PIC18FXX2
DS39564C-page 176 © 2006 Microchip Technology Inc.
16.3 USART Synchronous Master
Mode
In Synchronous Master mode, the data is transmitted in
a half-duplex manner (i.e., transmission and reception
do not occur at the same time). When transmitting data,
the reception is inhibited and vice versa. Synchronous
mode is entered by setting bit SYNC (TXSTA<4>). In
addition, enable bit SPEN (RCSTA<7>) is set in order
to configure the RC6/TX/CK and RC7/RX/DT I/O pins
to CK (clock) and DT (data) lines, respectively. The
Master mode indicates that the processor transmits the
master clock on the CK line. The Master mode is
entered by setting bit CSRC (TXSTA<7>).
16.3.1 USART SYNCHRONOUS MASTER
TRANSMISSION
The USART transmitter block diagram is shown in
Figure 16-1. The heart of the transmitter is the Transmit
(serial) Shift Register (TSR). The shift register obtains
its data from the read/write transmit buffer register
TXREG. The TXREG register is loaded with data in
software. The TSR register is not loaded until the last
bit has been transmitted from the previous load. As
soon as the last bit is transmitted, the TSR is loaded
with new data from the TXREG (if available). Once the
TXREG register transfers the data to the TSR register
(occurs in one T
CYCLE), the TXREG is empty and inter-
rupt bit TXIF (PIR1<4>) is set. The interrupt can be
enabled/disabled by setting/clearing enable bit TXIE
(PIE1<4>). Flag bit TXIF will be set, regardless of the
state of enable bit TXIE, and cannot be cleared in soft-
ware. It will reset only when new data is loaded into the
TXREG register. While flag bit TXIF indicates the status
of the TXREG register, another bit TRMT (TXSTA<1>)
shows the status of the TSR register. TRMT is a read
only bit, which is set when the TSR is empty. No inter-
rupt logic is tied to this bit, so the user has to poll this
bit in order to determine if the TSR register is empty.
The TSR is not mapped in data memory, so it is not
available to the user.
To set up a Synchronous Master Transmission:
1. Initialize the SPBRG register for the appropriate
baud rate (Section 16.1).
2. Enable the synchronous master serial port by
setting bits SYNC, SPEN, and CSRC.
3. If interrupts are desired, set enable bit TXIE.
4. If 9-bit transmission is desired, set bit TX9.
5. Enable the transmission by setting bit TXEN.
6. If 9-bit transmission is selected, the ninth bit
should be loaded in bit TX9D.
7. Start transmission by loading data to the TXREG
register.
TABLE 16-8: REGISTERS ASSOCIATED WITH SYNCHRONOUS MASTER TRANSMISSION
Note: TXIF is not cleared immediately upon load-
ing data into the transmit buffer TXREG.
The flag bit becomes valid in the second
instruction cycle following the load
instruction.
Name Bit 7 Bit 6 Bit 5 Bit 4 Bit 3 Bit 2 Bit 1 Bit 0
Value on
POR, BOR
Value on
All Other
RESETS
INTCON GIE/
GIEH
PEIE/
GIEL
TMR0IE INT0IE RBIE TMR0IF INT0IF RBIF 0000 000x 0000 000u
PIR1
PSPIF
(1)
ADIF RCIF TXIF SSPIF CCP1IF TMR2IF TMR1IF 0000 0000 0000 0000
PIE1
PSPIE
(1)
ADIE RCIE TXIE SSPIE CCP1IE TMR2IE TMR1IE 0000 0000 0000 0000
IPR1
PSPIP
(1)
ADIP RCIP TXIP SSPIP CCP1IP TMR2IP TMR1IP 0000 0000 0000 0000
RCSTA SPEN RX9 SREN CREN ADDEN FERR OERR RX9D 0000 -00x 0000 -00x
TXREG USART Transmit Register 0000 0000 0000 0000
TXSTA CSRC TX9 TXEN SYNC
— BRGH TRMT TX9D 0000 -010 0000 -010
SPBRG Baud Rate Generator Register 0000 0000 0000 0000
Legend: x = unknown, - = unimplemented, read as '0'.
Shaded cells are not used for Synchronous Master Transmission.
Note 1: The PSPIF, PSPIE and PSPIP bits are reserved on the PIC18F2X2 devices; always maintain these bits
clear.
© 2006 Microchip Technology Inc. DS39564C-page 177
PIC18FXX2
FIGURE 16-6: SYNCHRONOUS TRANSMISSION
FIGURE 16-7: SYNCHRONOUS TRANSMISSION (THROUGH TXEN)
bit 0 bit 1 bit 7
Word 1
Q1Q2 Q3Q4 Q1 Q2 Q3 Q4Q1 Q2Q3 Q4 Q1 Q2 Q3 Q4Q1 Q2 Q3Q4 Q3Q4 Q1 Q2 Q3 Q4 Q1 Q2 Q3 Q4 Q1 Q2 Q3 Q4Q1 Q2 Q3 Q4 Q1 Q2Q3 Q4Q1 Q2 Q3 Q4
bit 2 bit 0 bit 1 bit 7
RC7/RX/DT
RC6/TX/CK
Write to
TXREG Reg
TXIF bit
(Interrupt Flag)
TRMT
TXEN bit
'1' '1'
Word 2
TRMT bit
Write Word1
Write Word2
Note: Sync Master mode; SPBRG = '0'. Continuous transmission of two 8-bit words.
pin
pin
RC7/RX/DT pin
RC6/TX/CK pin
Write to
TXREG reg
TXIF bit
TRMT bit
bit0
bit1
bit2
bit6 bit7
TXEN bit
PIC18FXX2
DS39564C-page 178 © 2006 Microchip Technology Inc.
16.3.2 USART SYNCHRONOUS MASTER
RECEPTION
Once Synchronous mode is selected, reception is
enabled by setting either enable bit SREN
(RCSTA<5>), or enable bit CREN (RCSTA<4>). Data is
sampled on the RC7/RX/DT pin on the falling edge of
the clock. If enable bit SREN is set, only a single word
is received. If enable bit CREN is set, the reception is
continuous until CREN is cleared. If both bits are set,
then CREN takes precedence.
To set up a Synchronous Master Reception:
1. Initialize the SPBRG register for the appropriate
baud rate (Section 16.1).
2. Enable the synchronous master serial port by
setting bits SYNC, SPEN and CSRC.
3. Ensure bits CREN and SREN are clear.
4. If interrupts are desired, set enable bit RCIE.
5. If 9-bit reception is desired, set bit RX9.
6. If a single reception is required, set bit SREN.
For continuous reception, set bit CREN.
7. Interrupt flag bit RCIF will be set when reception
is complete and an interrupt will be generated if
the enable bit RCIE was set.
8. Read the RCSTA register to get the ninth bit (if
enabled) and determine if any error occurred
during reception.
9. Read the 8-bit received data by reading the
RCREG register.
10. If any error occurred, clear the error by clearing
bit CREN.
11. If using interrupts, ensure that the GIE and PEIE
bits in the INTCON register (INTCON<7:6>) are
set.
TABLE 16-9: REGISTERS ASSOCIATED WITH SYNCHRONOUS MASTER RECEPTION
FIGURE 16-8: SYNCHRONOUS RECEPTION (MASTER MODE, SREN)
Name Bit 7 Bit 6 Bit 5 Bit 4 Bit 3 Bit 2 Bit 1 Bit 0
Value on
POR, BOR
Value on
All Other
RESETS
INTCON GIE/
GIEH
PEIE/
GIEL
TMR0IE INT0IE RBIE TMR0IF INT0IF RBIF 0000 000x 0000 000u
PIR1
PSPIF
(1)
ADIF RCIF TXIF SSPIF CCP1IF TMR2IF TMR1IF 0000 0000 0000 0000
PIE1
PSPIE
(1)
ADIE RCIE TXIE SSPIE CCP1IE TMR2IE TMR1IE 0000 0000 0000 0000
IPR1
PSPIP
(1)
ADIP RCIP TXIP SSPIP CCP1IP TMR2IP TMR1IP 0000 0000 0000 0000
RCSTA SPEN RX9 SREN CREN ADDEN FERR OERR RX9D 0000 -00x 0000 -00x
RCREG USART Receive Register 0000 0000 0000 0000
TXSTA CSRC
TX9 TXEN SYNC — BRGH TRMT TX9D 0000 -010 0000 -010
SPBRG Baud Rate Generator Register 0000 0000 0000 0000
Legend: x = unknown, - = unimplemented, read as '0'. Shaded cells are not used for Synchronous Master Reception.
Note 1: The PSPIF, PSPIE and PSPIP bits are reserved on the PIC18F2X2 devices; always maintain these bits clear.
CREN bit
RC7/RX/DT pin
RC6/TX/CK pin
Write to
bit SREN
SREN bit
RCIF bit
(Interrupt)
Read
RXREG
Q3 Q4 Q1 Q2 Q3 Q4 Q1 Q2 Q3 Q4Q2 Q1 Q2 Q3 Q4 Q1 Q2 Q3 Q4 Q1 Q2 Q3 Q4 Q1 Q2 Q3 Q4 Q1 Q2 Q3 Q4Q1 Q2 Q3 Q4 Q1 Q2 Q3 Q4
'0'
bit0 bit1 bit2 bit3 bit4 bit5 bit6 bit7
'0'
Q1 Q2 Q3 Q4
Note: Timing diagram demonstrates Sync Master mode with bit SREN = '1' and bit BRGH = '0'.
© 2006 Microchip Technology Inc. DS39564C-page 179
PIC18FXX2
16.4 USART Synchronous Slave Mode
Synchronous Slave mode differs from the Master mode
in the fact that the shift clock is supplied externally at
the RC6/TX/CK pin (instead of being supplied internally
in Master mode). This allows the device to transfer or
receive data while in SLEEP mode. Slave mode is
entered by clearing bit CSRC (TXSTA<7>).
16.4.1 USART SYNCHRONOUS SLAVE
TRANSMIT
The operation of the Synchronous Master and Slave
modes are identical, except in the case of the SLEEP
mode.
If two words are written to the TXREG and then the
SLEEP instruction is executed, the following will occur:
a) The first word will immediately transfer to the
TSR register and transmit.
b) The second word will remain in TXREG register.
c) Flag bit TXIF will not be set.
d) When the first word has been shifted out of TSR,
the TXREG register will transfer the second
word to the TSR and flag bit TXIF will now be
set.
e) If enable bit TXIE is set, the interrupt will wake
the chip from SLEEP. If the global interrupt is
enabled, the program will branch to the interrupt
vector.
To set up a Synchronous Slave Transmission:
1. Enable the synchronous slave serial port by set-
ting bits SYNC and SPEN and clearing bit
CSRC.
2. Clear bits CREN and SREN.
3. If interrupts are desired, set enable bit TXIE.
4. If 9-bit transmission is desired, set bit TX9.
5. Enable the transmission by setting enable bit
TXEN.
6. If 9-bit transmission is selected, the ninth bit
should be loaded in bit TX9D.
7. Start transmission by loading data to the TXREG
register.
8. If using interrupts, ensure that the GIE and PEIE
bits in the INTCON register (INTCON<7:6>) are
set.
TABLE 16-10: REGISTERS ASSOCIATED WITH SYNCHRONOUS SLAVE TRANSMISSION
Name Bit 7 Bit 6 Bit 5 Bit 4 Bit 3 Bit 2 Bit 1 Bit 0
Value on
POR, BOR
Value on
All Other
RESETS
INTCON GIE/
GIEH
PEIE/
GIEL
TMR0IE INT0IE RBIE TMR0IF INT0IF RBIF 0000 000x 0000 000u
PIR1
PSPIF
(1)
ADIF RCIF TXIF SSPIF CCP1IF TMR2IF TMR1IF 0000 0000 0000 0000
PIE1
PSPIE
(1)
ADIE RCIE TXIE SSPIE CCP1IE TMR2IE TMR1IE 0000 0000 0000 0000
IPR1
PSPIP
(1)
ADIP RCIP TXIP SSPIP CCP1IP TMR2IP TMR1IP 0000 0000 0000 0000
RCSTA SPEN RX9 SREN CREN ADDEN FERR OERR RX9D 0000 -00x 0000 -00x
TXREG USART Transmit Register 0000 0000 0000 0000
TXSTA CSRC TX9 TXEN SYNC
— BRGH TRMT TX9D 0000 -010 0000 -010
SPBRG Baud Rate Generator Register 0000 0000 0000 0000
Legend: x = unknown, - = unimplemented, read as '0'.
Shaded cells are not used for Synchronous Slave Transmission.
Note 1: The PSPIF, PSPIE and PSPIP bits are reserved on the PIC18F2X2 devices; always maintain these bits
clear.
PIC18FXX2
DS39564C-page 180 © 2006 Microchip Technology Inc.
16.4.2 USART SYNCHRONOUS SLAVE
RECEPTION
The operation of the Synchronous Master and Slave
modes is identical, except in the case of the SLEEP
mode and bit SREN, which is a “don't care” in Slave
mode.
If receive is enabled by setting bit CREN prior to the
SLEEP instruction, then a word may be received during
SLEEP. On completely receiving the word, the RSR
register will transfer the data to the RCREG register,
and if enable bit RCIE bit is set, the interrupt generated
will wake the chip from SLEEP. If the global interrupt is
enabled, the program will branch to the interrupt vector.
To set up a Synchronous Slave Reception:
1. Enable the synchronous master serial port by
setting bits SYNC and SPEN and clearing bit
CSRC.
2. If interrupts are desired, set enable bit RCIE.
3. If 9-bit reception is desired, set bit RX9.
4. To enable reception, set enable bit CREN.
5. Flag bit RCIF will be set when reception is com-
plete. An interrupt will be generated if enable bit
RCIE was set.
6. Read the RCSTA register to get the ninth bit (if
enabled) and determine if any error occurred
during reception.
7. Read the 8-bit received data by reading the
RCREG register.
8. If any error occurred, clear the error by clearing
bit CREN.
9. If using interrupts, ensure that the GIE and PEIE
bits in the INTCON register (INTCON<7:6>) are
set.
TABLE 16-11: REGISTERS ASSOCIATED WITH SYNCHRONOUS SLAVE RECEPTION
Name Bit 7 Bit 6 Bit 5 Bit 4 Bit 3 Bit 2 Bit 1 Bit 0
Value on
POR, BOR
Value on
All Other
RESETS
INTCON GIE/
GIEH
PEIE/
GIEL
TMR0IE INT0IE RBIE TMR0IF INT0IF RBIF 0000 000x 0000 000u
PIR1
PSPIF
(1)
ADIF RCIF TXIF SSPIF CCP1IF TMR2IF TMR1IF 0000 0000 0000 0000
PIE1
PSPIE
(1)
ADIE RCIE TXIE SSPIE CCP1IE TMR2IE TMR1IE 0000 0000 0000 0000
IPR1
PSPIP
(1)
ADIP RCIP TXIP SSPIP CCP1IP TMR2IP TMR1IP 0000 0000 0000 0000
RCSTA SPEN RX9 SREN CREN ADDEN FERR OERR RX9D 0000 -00x 0000 -00x
RCREG USART Receive Register 0000 0000 0000 0000
TXSTA CSRC
TX9 TXEN SYNC — BRGH TRMT TX9D 0000 -010 0000 -010
SPBRG Baud Rate Generator Register 0000 0000 0000 0000
Legend: x = unknown, - = unimplemented, read as '0'.
Shaded cells are not used for Synchronous Slave Reception.
Note 1: The PSPIF, PSPIE and PSPIP bits are reserved on the PIC18F2X2 devices; always maintain these bits
clear.
© 2006 Microchip Technology Inc. DS39564C-page 181
PIC18FXX2
17.0 COMPATIBLE 10-BIT
ANALOG-TO-DIGITAL
CONVERTER (A/D) MODULE
The Analog-to-Digital (A/D) converter module has five
inputs for the PIC18F2X2 devices and eight for the
PIC18F4X2 devices. This module has the ADCON0
and ADCON1 register definitions that are compatible
with the mid-range A/D module.
The A/D allows conversion of an analog input signal to
a corresponding 10-bit digital number.
The A/D module has four registers. These registers
are:
• A/D Result High Register (ADRESH)
• A/D Result Low Register (ADRESL)
• A/D Control Register 0 (ADCON0)
• A/D Control Register 1 (ADCON1)
The ADCON0 register, shown in Register 17-1, con-
trols the operation of the A/D module. The ADCON1
register, shown in Register 17-2, configures the
functions of the port pins.
REGISTER 17-1: ADCON0 REGISTER
R/W-0 R/W-0 R/W-0 R/W-0 R/W-0 R/W-0 U-0 R/W-0
ADCS1 ADCS0 CHS2 CHS1 CHS0 GO/DONE —ADON
bit 7 bit 0
bit 7-6 ADCS1:ADCS0: A/D Conversion Clock Select bits (ADCON0 bits in bold)
bit 5-3 CHS2:CHS0: Analog Channel Select bits
000 = channel 0, (AN0)
001 = channel 1, (AN1)
010 = channel 2, (AN2)
011 = channel 3, (AN3)
100 = channel 4, (AN4)
101 = channel 5, (AN5)
110 = channel 6, (AN6)
111 = channel 7, (AN7)
Note: The PIC18F2X2 devices do not implement the full 8 A/D channels; the unimplemented
selections are reserved. Do not select any unimplemented channel.
bit 2 GO/DONE
: A/D Conversion Status bit
When ADON = 1:
1 = A/D conversion in progress (setting this bit starts the A/D conversion which is automatically
cleared by hardware when the A/D conversion is complete)
0 = A/D conversion not in progress
bit 1 Unimplemented: Read as '0'
bit 0 ADON: A/D On bit
1 = A/D converter module is powered up
0 = A/D converter module is shut-off and consumes no operating current
Legend:
R = Readable bit W = Writable bit U = Unimplemented bit, read as ‘0’
- n = Value at POR ’1’ = Bit is set ’0’ = Bit is cleared x = Bit is unknown
ADCON1
<ADCS2>
ADCON0
<ADCS1:ADCS0>
Clock Conversion
0 00 F
OSC/2
0 01 F
OSC/8
0 10 F
OSC/32
0 11 F
RC (clock derived from the internal A/D RC oscillator)
1 00 F
OSC/4
1 01 F
OSC/16
1 10 F
OSC/64
1 11 F
RC (clock derived from the internal A/D RC oscillator)
PIC18FXX2
DS39564C-page 182 © 2006 Microchip Technology Inc.
REGISTER 17-2: ADCON1 REGISTER
R/W-0 R/W-0 U-0 U-0 R/W-0 R/W-0 R/W-0 R/W-0
ADFM ADCS2
— — PCFG3 PCFG2 PCFG1 PCFG0
bit 7 bit 0
bit 7 ADFM: A/D Result Format Select bit
1 = Right justified. Six (6) Most Significant bits of ADRESH are read as ’0’.
0 = Left justified. Six (6) Least Significant bits of ADRESL are read as ’0’.
bit 6 ADCS2: A/D Conversion Clock Select bit (ADCON1 bits in bold)
bit 5-4 Unimplemented: Read as '0'
bit 3-0 PCFG3:PCFG0: A/D Port Configuration Control bits
Legend:
R = Readable bit W = Writable bit U = Unimplemented bit, read as ‘0’
- n = Value at POR ’1’ = Bit is set ’0’ = Bit is cleared x = Bit is unknown
Note: On any device RESET, the port pins that are multiplexed with analog functions (ANx) are
forced to be an analog input.
ADCON1
<ADCS2>
ADCON0
<ADCS1:ADCS0>
Clock Conversion
0 00 FOSC/2
0 01 F
OSC/8
0 10 F
OSC/32
0 11 F
RC (clock derived from the internal A/D RC oscillator)
1 00 F
OSC/4
1 01 F
OSC/16
1 10 F
OSC/64
1 11 F
RC (clock derived from the internal A/D RC oscillator)
A = Analog input D = Digital I/O
C/R = # of analog input channels / # of A/D voltage references
PCFG
<3:0>
AN7 AN6 AN5 AN4 AN3 AN2 AN1 AN0 V
REF+VREF-C / R
0000 AAAA A A AAV
DD VSS 8 / 0
0001 AAAAV
REF+A AAAN3VSS 7 / 1
0010 DDDA A A AAV
DD VSS 5 / 0
0011 DDDAV
REF+A AAAN3VSS 4 / 1
0100 DDDD A D AAV
DD VSS 3 / 0
0101 DDDDV
REF+D A AAN3VSS 2 / 1
011x DDDD D D DD — —0 / 0
1000 AAAAV
REF+VREF-A A AN3AN26 / 2
1001 DDAA A A AAV
DD VSS 6 / 0
1010 DDAAV
REF+A AAAN3VSS 5 / 1
1011 DDAAV
REF+VREF-A A AN3AN24 / 2
1100 DDDAV
REF+VREF-A A AN3AN23 / 2
1101 DDDDV
REF+VREF-A A AN3AN22 / 2
1110 DDDD D D DAV
DD VSS 1 / 0
1111 DDDDV
REF+VREF-D A AN3AN21 / 2
© 2006 Microchip Technology Inc. DS39564C-page 183
PIC18FXX2
The analog reference voltage is software selectable to
either the device’s positive and negative supply voltage
(V
DD and VSS), or the voltage level on the RA3/AN3/
V
REF+ pin and RA2/AN2/VREF- pin.
The A/D converter has a unique feature of being able
to operate while the device is in SLEEP mode. To oper-
ate in SLEEP, the A/D conversion clock must be
derived from the A/D’s internal RC oscillator.
The output of the sample and hold is the input into the
converter, which generates the result via successive
approximation.
A device RESET forces all registers to their RESET
state. This forces the A/D module to be turned off and
any conversion is aborted.
Each port pin associated with the A/D converter can be
configured as an analog input (RA3 can also be a
voltage reference) or as a digital I/O.
The ADRESH and ADRESL registers contain the result
of the A/D conversion. When the A/D conversion is
complete, the result is loaded into the ADRESH/
ADRESL registers, the GO/DONE
bit (ADCON0<2>) is
cleared, and A/D interrupt flag bit, ADIF is set. The block
diagram of the A/D module is shown in Figure 17-1.
FIGURE 17-1: A/D BLOCK DIAGRAM
(Input Voltage)
VAIN
VREF+
Reference
Voltage
V
DD
PCFG<3:0>
CHS<2:0>
AN7*
AN6*
AN5*
AN4
AN3
AN2
AN1
AN0
111
110
101
100
011
010
001
000
10-bit
Converter
VREF-
VSS
A/D
* These channels are implemented only on the PIC18F4X2 devices.
PIC18FXX2
DS39564C-page 184 © 2006 Microchip Technology Inc.
The value that is in the ADRESH/ADRESL registers is
not modified for a Power-on Reset. The ADRESH/
ADRESL registers will contain unknown data after a
Power-on Reset.
After the A/D module has been configured as desired,
the selected channel must be acquired before the con-
version is started. The analog input channels must
have their corresponding TRIS bits selected as an
input. To determine acquisition time, see Section 17.1.
After this acquisition time has elapsed, the A/D conver-
sion can be started. The following steps should be
followed for doing an A/D conversion:
1. Configure the A/D module:
• Configure analog pins, voltage reference and
digital I/O (ADCON1)
• Select A/D input channel (ADCON0)
• Select A/D conversion clock (ADCON0)
• Turn on A/D module (ADCON0)
2. Configure A/D interrupt (if desired):
• Clear ADIF bit
• Set ADIE bit
• Set GIE bit
• Set PEIE bit
3. Wait the required acquisition time.
4. Start conversion:
• Set GO/DONE
bit (ADCON0)
5. Wait for A/D conversion to complete, by either:
• Polling for the GO/DONE
bit to be cleared
(interrupts disabled)
OR
• Waiting for the A/D interrupt
6. Read A/D Result registers (ADRESH/ADRESL);
clear bit ADIF if required.
7. For next conversion, go to step 1 or step 2 as
required. The A/D conversion time per bit is
defined as T
AD. A minimum wait of 2 TAD is
required before the next acquisition starts.
17.1 A/D Acquisition Requirements
For the A/D converter to meet its specified accuracy,
the charge holding capacitor (C
HOLD) must be allowed
to fully charge to the input channel voltage level. The
analog input model is shown in Figure 17-2. The
source impedance (R
S) and the internal sampling
switch (R
SS) impedance directly affect the time
required to charge the capacitor C
HOLD. The sampling
switch (R
SS) impedance varies over the device voltage
(V
DD). The source impedance affects the offset voltage
at the analog input (due to pin leakage current). The
maximum recommended impedance for analog
sources is 2.5 kΩ. After the analog input channel is
selected (changed), this acquisition must be done
before the conversion can be started.
FIGURE 17-2: ANALOG INPUT MODEL
Note: When the conversion is started, the hold-
ing capacitor is disconnected from the
input pin.
VAIN
CPIN
Rs
ANx
5 pF
V
DD
VT = 0.6V
V
T = 0.6V
I
LEAKAGE
RIC ≤ 1k
Sampling
Switch
SS
R
SS
CHOLD = 120 pF
V
SS
6V
Sampling Switch
5V
4V
3V
2V
567891011
(kΩ)
VDD
± 500 nA
Legend: CPIN
VT
I LEAKAGE
RIC
SS
C
HOLD
= input capacitance
= threshold voltage
= leakage current at the pin due to
= interconnect resistance
= sampling switch
= sample/hold capacitance (from DAC)
various junctions
© 2006 Microchip Technology Inc. DS39564C-page 185
PIC18FXX2
To calculate the minimum acquisition time,
Equation 17-1 may be used. This equation assumes
that 1/2 LSb error is used (1024 steps for the A/D). The
1/2 LSb error is the maximum error allowed for the A/D
to meet its specified resolution.
EQUATION 17-1: ACQUISITION TIME
EQUATION 17-2: A/D MINIMUM CHARGING TIME
Example 17-1 shows the calculation of the minimum
required acquisition time, T
ACQ. This calculation is
based on the following application system assump-
tions:
•C
HOLD = 120 pF
•Rs = 2.5 kΩ
• Conversion Error ≤ 1/2 LSb
•V
DD = 5V → Rss = 7 kΩ
• Temperature = 50°C (system max.)
•V
HOLD = 0V @ time = 0
EXAMPLE 17-1: CALCULATING THE MINIMUM REQUIRED ACQUISITION TIME
T
ACQ = Amplifier Settling Time + Holding Capacitor Charging Time + Temperature Coefficient
=T
AMP + TC + TCOFF
VHOLD = (VREF – (VREF/2048)) • (1 – e
(-Tc/CHOLD(RIC + RSS + RS))
)
or
T
C = -(120 pF)(1 kΩ + RSS + RS) ln(1/2048)
TACQ =TAMP + TC + TCOFF
Temperature coefficient is only required for temperatures > 25°C.
T
ACQ =2 μs + TC + [(Temp – 25°C)(0.05 μs/°C)]
T
C =-CHOLD (RIC + RSS + RS) ln(1/2048)
-120 pF (1 kΩ + 7 kΩ + 2.5 kΩ) ln(0.0004883)
-120 pF (10.5 kΩ) ln(0.0004883)
-1.26 μs (-7.6246)
9.61 μs
T
ACQ =2 μs + 9.61 μs + [(50°C – 25°C)(0.05 μs/°C)]
11.61 μs + 1.25 μs
12.86 μs
PIC18FXX2
DS39564C-page 186 © 2006 Microchip Technology Inc.
17.2 Selecting the A/D Conversion Clock
The A/D conversion time per bit is defined as TAD. The
A/D conversion requires 12 T
AD per 10-bit conversion.
The source of the A/D conversion clock is software
selectable. The seven possible options for TAD are:
•2 T
OSC
•4 TOSC
•8 TOSC
•16 TOSC
•32 TOSC
•64 T
OSC
• Internal A/D module RC oscillator (2-6 μs)
For correct A/D conversions, the A/D conversion clock
(T
AD) must be selected to ensure a minimum TAD time
of 1.6 μs.
Table 17-1 shows the resultant TAD times derived from
the device operating frequencies and the A/D clock
source selected.
17.3 Configuring Analog Port Pins
The ADCON1, TRISA and TRISE registers control the
operation of the A/D port pins. The port pins that are
desired as analog inputs, must have their corresponding
TRIS bits set (input). If the TRIS bit is cleared (output),
the digital output level (V
OH or VOL) will be converted.
The A/D operation is independent of the state of the
CHS2:CHS0 bits and the TRIS bits.
TABLE 17-1: TAD vs. DEVICE OPERATING FREQUENCIES
Note 1: When reading the port register, all pins con-
figured as analog input channels will read
as cleared (a low level). Pins configured as
digital inputs will convert an analog input.
Analog levels on a digitally configured input
will not affect the conversion accuracy.
2: Analog levels on any pin that is defined as
a digital input (including the AN4:AN0
pins) may cause the input buffer to con-
sume current that is out of the device’s
specification.
AD Clock Source (TAD) Maximum Device Frequency
Operation ADCS2:ADCS0 PIC18FXX2 PIC18LFXX2
2 T
OSC 000 1.25 MHz 666 kHz
4 TOSC 100 2.50 MHz 1.33 MHz
8 T
OSC 001 5.00 MHz 2.67 MHz
16 TOSC 101 10.00 MHz 5.33 MHz
32 TOSC 010 20.00 MHz 10.67 MHz
64 T
OSC 110 40.00 MHz 21.33 MHz
RC 011 ——
© 2006 Microchip Technology Inc. DS39564C-page 187
PIC18FXX2
17.4 A/D Conversions
Figure 17-3 shows the operation of the A/D converter
after the GO bit has been set. Clearing the GO/DONE
bit during a conversion will abort the current conver-
sion. The A/D result register pair will NOT be updated
with the partially completed A/D conversion sample.
That is, the ADRESH:ADRESL registers will continue
to contain the value of the last completed conversion
(or the last value written to the ADRESH:ADRESL reg-
isters). After the A/D conversion is aborted, a 2 T
AD wait
is required before the next acquisition is started. After
this 2 TAD wait, acquisition on the selected channel is
automatically started. The GO/DONE
bit can then be
set to start the conversion.
FIGURE 17-3: A/D CONVERSION TAD CYCLES
17.4.1 A/D RESULT REGISTERS
The ADRESH:ADRESL register pair is the location
where the 10-bit A/D result is loaded at the completion
of the A/D conversion. This register pair is 16-bits wide.
The A/D module gives the flexibility to left or right justify
the 10-bit result in the 16-bit result register. The A/D
Format Select bit (ADFM) controls this justification.
Figure 17-4 shows the operation of the A/D result justi-
fication. The extra bits are loaded with ’0’s. When an
A/D result will not overwrite these locations (A/D
disable), these registers may be used as two general
purpose 8-bit registers.
FIGURE 17-4: A/D RESULT JUSTIFICATION
Note: The GO/DONE bit should NOT be set in
the same instruction that turns on the A/D.
TAD1
TAD2
TAD3 TAD4 TAD5 TAD6 TAD7 TAD8 TAD11
Set GO bit
Holding capacitor is disconnected from analog input (typically 100 ns)
b9
b8
b7 b6
b5
b4
b3 b2
T
AD9
TAD10
b1
b0
T
CY - TAD
Next Q4: ADRESH/ADRESL is loaded, GO bit is cleared,
ADIF bit is set, holding capacitor is connected to analog input.
Conversion Starts
b0
10-bit Result
ADRESH ADRESL
0000 00
ADFM = 0
0
2 1 0 77
10-bit Result
ADRESH ADRESL
10-bit Result
0000 00
7
0 7 6 5 0
ADFM = 1
Right Justified
Left Justified
PIC18FXX2
DS39564C-page 188 © 2006 Microchip Technology Inc.
17.5 Use of the CCP2 Trigger
An A/D conversion can be started by the “special event
trigger” of the CCP2 module. This requires that the
CCP2M3:CCP2M0 bits (CCP2CON<3:0>) be pro-
grammed as 1011 and that the A/D module is enabled
(ADON bit is set). When the trigger occurs, the GO/
DONE
bit will be set, starting the A/D conversion, and
the Timer1 (or Timer3) counter will be reset to zero.
Timer1 (or Timer3) is reset to automatically repeat the
A/D acquisition period with minimal software overhead
(moving ADRESH/ADRESL to the desired location).
The appropriate analog input channel must be selected
and the minimum acquisition done before the “special
event trigger” sets the GO/DONE
bit (starts a
conversion).
If the A/D module is not enabled (ADON is cleared), the
“special event trigger” will be ignored by the A/D
module, but will still reset the Timer1 (or Timer3)
counter.
TABLE 17-2: SUMMARY OF A/D REGISTERS
Name Bit 7 Bit 6 Bit 5 Bit 4 Bit 3 Bit 2 Bit 1 Bit 0
Value on
POR, BOR
Value on
All Other
RESETS
INTCON GIE/
GIEH
PEIE/
GIEL
TMR0IE INT0IE RBIE TMR0IF INT0IF RBIF 0000 000x 0000 000u
PIR1
PSPIF
(1)
ADIF RCIF TXIF SSPIF CCP1IF TMR2IF TMR1IF 0000 0000 0000 0000
PIE1
PSPIE
(1)
ADIE RCIE TXIE SSPIE CCP1IE TMR2IE TMR1IE 0000 0000 0000 0000
IPR1
PSPIP
(1)
ADIP RCIP TXIP SSPIP CCP1IP TMR2IP TMR1IP 0000 0000 0000 0000
PIR2
— — — EEIF BCLIF LVDIF TMR3IF CCP2IF 0 0000 0 0000
PIE2
— — — EEIE BCLIE LVDIE TMR3IE CCP2IE 0 0000 0 0000
IPR2
— — — EEIP BCLIP LVDIP TMR3IP CCP2IP 1 1111 1 0000
ADRESH A/D Result Register xxxx xxxx uuuu uuuu
ADRESL A/D Result Register xxxx xxxx uuuu uuuu
ADCON0 ADCS1 ADCS0 CHS2 CHS1 CHS0 GO/DONE
—ADON0000 00-0 0000 00-0
ADCON1 ADFM ADCS2
— — PCFG3 PCFG2 PCFG1 PCFG0 -000 -000
PORTA
— RA6 RA5 RA4 RA3 RA2 RA1 RA0 0x 0000 0u 0000
TRISA
— PORTA Data Direction Register 11 1111 11 1111
PORTE
— — — — —RE2RE1RE0 -000 -000
LATE
— — — — — LATE2 LATE1 LATE0 -xxx -uuu
TRISE
IBF OBF IBOV PSPMODE — PORTE Data Direction bits 0000 -111 0000 -111
Legend: x = unknown, u = unchanged, - = unimplemented, read as '0'. Shaded cells are not used for A/D conversion.
Note 1: The PSPIF, PSPIE and PSPIP bits are reserved on the PIC18F2X2 devices; always maintain these bits clear.
© 2006 Microchip Technology Inc. DS39564C-page 189
PIC18FXX2
18.0 LOW VOLTAGE DETECT
In many applications, the ability to determine if the
device voltage (V
DD) is below a specified voltage level
is a desirable feature. A window of operation for the
application can be created, where the application soft-
ware can do “housekeeping tasks” before the device
voltage exits the valid operating range. This can be
done using the Low Voltage Detect module.
This module is a software programmable circuitry,
where a device voltage trip point can be specified.
When the voltage of the device becomes lower then the
specified point, an interrupt flag is set. If the interrupt is
enabled, the program execution will branch to the inter-
rupt vector address and the software can then respond
to that interrupt source.
The Low Voltage Detect circuitry is completely under
software control. This allows the circuitry to be “turned
off” by the software, which minimizes the current
consumption for the device.
Figure 18-1 shows a possible application voltage curve
(typically for batteries). Over time, the device voltage
decreases. When the device voltage equals voltage V
A,
the LVD logic generates an interrupt. This occurs at
time T
A. The application software then has the time,
until the device voltage is no longer in valid operating
range, to shutdown the system. Voltage point VB is the
minimum valid operating voltage specification. This
occurs at time TB. The difference TB - TA is the total
time for shutdown.
FIGURE 18-1: TYPICAL LOW VOLTAGE DETECT APPLICATION
The block diagram for the LVD module is shown in
Figure 18-2. A comparator uses an internally gener-
ated reference voltage as the set point. When the
selected tap output of the device voltage crosses the
set point (is lower than), the LVDIF bit is set.
Each node in the resistor divider represents a “trip
point” voltage. The “trip point” voltage is the minimum
supply voltage level at which the device can operate
before the LVD module asserts an interrupt. When the
supply voltage is equal to the trip point, the voltage
tapped off of the resistor array is equal to the 1.2V
internal reference voltage generated by the voltage
reference module. The comparator then generates an
interrupt signal setting the LVDIF bit. This voltage is
software programmable to any one of 16 values (see
Figure 18-2). The trip point is selected by
programming the LVDL3:LVDL0 bits (LVDCON<3:0>).
Time
Voltage
VA
VB
TA
TB
VA = LVD trip point
VB = Minimum valid device
operating voltage
Legend:
PIC18FXX2
DS39564C-page 190 © 2006 Microchip Technology Inc.
FIGURE 18-2: LOW VOLTAGE DETECT (LVD) BLOCK DIAGRAM
The LVD module has an additional feature that allows
the user to supply the trip voltage to the module from
an external source. This mode is enabled when bits
LVDL3:LVDL0 are set to 1111. In this state, the com-
parator input is multiplexed from the external input pin,
LVDIN (Figure 18-3). This gives users flexibility,
because it allows them to configure the Low Voltage
Detect interrupt to occur at any voltage in the valid
operating range.
FIGURE 18-3: LOW VOLTAGE DETECT (LVD) WITH EXTERNAL INPUT BLOCK DIAGRAM
LVDIF
VDD
16 to 1 MUX
LVDEN
LVD Control
Register
Internally Generated
Reference Voltage
LVDIN
1.2V Typical
–
+
LVD
EN
LVD Control
16 to 1 MUX
BGAP
BODEN
LVDEN
VxEN
LVDIN
Register
V
DD
VDD
Externally Generated
Trip Point
–
+