Creating 3D Game Art for the iPhone with Unity Part 9 ppsx
Bạn đang xem bản rút gọn của tài liệu. Xem và tải ngay bản đầy đủ của tài liệu tại đây (3 MB, 28 trang )
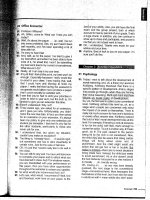
I created a different look for my game as you can see in the comparison of
the default-baked scene and the color-graded scene.
Adding Grime to Maps
The level looks great with the lightmaps applied; however, for a trash yard, the
scene looks way to clean. We need to introduce some dirt and grime to the scene.
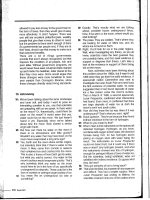
This is quite simple to do in Photoshop. First, I created a grime brush preset as
shown in Fig. 8.30.
I then created a new layer and chose my preset brush, changed some set-
tings in the brush editor so that I could stamp the grime down by simply
left-clicking. I then began to stamp random dirt across the scene as shown in
Fig. 8.31. It’s important to be mindful of the seams as due to the nature of the
lightmap UVs, there are lots of seams and careless painting can really reveal
these seams as shown in Fig. 8.32.
FIG 8.28 The Exposure Was Adjusted
in Photoshop Using the HDR Toning
Tools.
FIG 8.29 Here You Can See the
Difference That Color Grading Your
Maps Can Have on the Style and Look
of Your Levels.
206
Creating 3D Game Art for the iPhone with Unity
FIG 8.30 I Took a Grime Map from My Texture Collection and Created a Brush Preset in Photoshop.
FIG 8.31 The Dirt Was Stamped Across the Scene and Was Placed on Its Own Layer.
207
Creating Lightmaps Using Beast
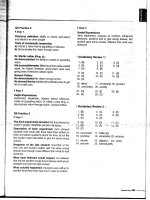
FIG 8.32 By Painting Directly on the
Seams, You Can See That the Seams
Become Visible in the Lightmap.
In Photoshop, you can then adjust the strength of the dirt by adjusting the
opacity of the layer. Again, saving the file results in the lightmap automatically
being updated in Unity iOS.
FIG 8.33 The Secondary Dirt Layer Was
Used to Create Accumulation in the
Corners and at the Base of the Walls.
Once the base layer of grime was laid down, I went back and then added a
secondary layer to further hide the tiling effect of the dirt. In this second layer
of dirt, I stayed completely away from the seams and used a combination of a
smaller version of the grime brush and the eraser tool to create dirt accumula-
tion around the edges of the walls and areas where the barrels were stacked in
corners. In Fig. 8.33, you can see the secondary dirt layer.
208
Creating 3D Game Art for the iPhone with Unity
Summary
In this chapter, we discussed the usage of lightmaps not only to optimize your
scene, but also to add a greater level of style and realism. The adoption of
Beast has quickly become one of my favorite features in Unity iOS. Its quality
and productive workflow is unparalleled, and in the spirit of being “Unity way,”
its full integration makes creating lightmaps a breeze and puts the creative
power back into the hands of the artist.
In Fig. 8.34, you can see a comparison between the default lightmap and the
lightmap with dirt applied. Notice that the scene looks much better and more
rich since the dirt layer provides a level of randomness and detail to the level,
as well as match the overstyle of the level design being that of a trash yard.
FIG 8.34 Notice That the Dirt Layer
Provides a Layer of Randomness and
Detail, Thus Improving the Look and
Style of the Level.
209
Creating Lightmaps Using Beast