3D in Photoshop The Ultimate Guide for Creative Professionals PHẦN 3 pptx
Bạn đang xem bản rút gọn của tài liệu. Xem và tải ngay bản đầy đủ của tài liệu tại đây (1.62 MB, 24 trang )
PART II
3D in Photoshop
CHAPTER 3 Getting Started with 3D in Photoshop 29
CHAPTER 4 Materials 37
CHAPTER 5 Lights, Shadows and Final Rendering 45
CHAPTER 6 Adobe Repoussé e 3D Extrusions 57
CHAPTER 7 Performance Settings and Optimization 71
In this part
Now that you have a good foundation of basic 3D concepts from Part I of this
book, we want to dive a little deeper and introduce all the 3D capabilities
within Photoshop. In this part, we will cover how all the great 3D technol-
ogies are integrated into Photoshop and how to get started with the tools.
You'll find that Photoshop is a logical place to begin learning about and using
3D in your designs, not only because Photoshop workflows are familiar but
also because Photoshop allows you to leverage all the great 2D techniques
that you already know into your 3D designs. There's a lot here so have fun!
27
This page intentionally left blank
Getting Started with
3D in Photoshop
3.1. Workspace and the 3D Panel
When creating 3D designs, it is important to understand the complete
workflow, as every step is critical in helping one complete and get to the final
vision. The fundamental workflow is creating or obtaining the 3D model,
adding/editing materials, adding/editing lights, adjusting shadows and other
effects, and then finally rendering the scene. Of course, there will be quite
a bit of back and forth between rendering your scene and re-adjusting the
lights for optimal effects. Further, you can take your 3D layer and composite
it with a 2D layer or add traditional 2D effects and touch-ups e one of the key
benefits of working with 3D in Photoshop! This chapter will cover the
essential things you need to know about working with 3D in Photoshop.
Note: For best performance, set your document up to screen resolution
(72 ppi). If your final output is print, you can then scale up and re-render. This
will optimize performance and speed when editing 3D.
CHAPTER 3
|
3D in Photoshop. DOI: 10.1016/B978-0-240-81377-6.10003-1
Copyright Ó 2010 Elsevier Inc. All rights reserved.
29
To get started, select the 3D workspace from the upper right corner of your
application bar (Figure 3.1). This will open the important panels when
working with 3D that will be referenced throughout the chapter.
With the 3D workspace selected, the panel in front view should be your 3D
Scene panel (which you can also open from Windows > 3D). This panel has
different views that dynamically update based on what component you have
selected in your scene graph or in your Layers panel. The initial view will have
controls that allow you to create or open 3D objects. This is described in
further detail in the next section.
If you have a 3D layer selected, the 3D Scene panel has four active buttons, or
filters, on the top of the panel (Figure 3.2). The first button shows you your
scene graph, or scene components (meshes, materials and lights) as well as
the scene properties you can edit. The second button filters out your meshes
and lists out all the meshes in your 3D layer, or scene, as well as Mesh
properties that you can edit. The third button filters out your materials and
lists out all the materials in the scene as well as Material properties that you
can edit. And lastly, the fourth button filters out your lights and lists out all
the lights in your scene as well as the Light properties that you can edit. Each
view of the panel and its associated properties will be discussed further in
later sections.
There are five tools sets on the left that are always available regardless of
what view of the Scene panel you are in. These tools are movement tools for
objects, cameras, meshes and lights as well as the Material Drop/Load Tool
and the Select Material Tool. How to use these tools will be described in the
following sections.
At the bottom of the panel there are three buttons. The first button on the
left allows you to toggle overlays important for navigating around your 3D
layer, or scene. These overlays are the 3D-Axis, Ground Plane, Lights and
Selection. The button in the middle is used to create new lights (it will only be
active with a light selected). The delete icon on the far right will delete
whatever light you have selected in the scene graph.
Note: Overlays are dependant on OpenGL. Be sure that you have this option
on in the Performance section of your Preferences.
FIG 3.1 3D Workspace switcher. Select this workspace to open up necessary panels when working with 3D.
FIG 3.2 3D Scene panel.
|
3D in Photoshop
30
3.2. Importing 3D
You can either download models from 3D content providers and open them
directly in Photoshop or create your own 3D models. There are many 3D
content providers that have objects supported by Photoshop. It is recom-
mended to work with Collada (dae) files but Photoshop also supports OBJ,
KMZ, U3D and 3DS. For more information on format specifics, see Appendix
A: File Formats. The easiest way to access these partner websites is by
opening up the link found in the 3D menu under the command “Browse 3D
Content Online. .” This will bring you to a 3D landing page with useful links
and content.
This book includes a plugin created by 3D Via that allows you to import 3D
objects directly from their warehouse into Photoshop CS4 or CS5 Extended.
You can download this plugin from www.3D-in-Photoshop.com or directly
from (Figure 3.3).
3.3. Converting to 3D
Creating 3D has never been easier since the introduction of 3D in Photoshop.
There are five ways now in Photoshop CS5 Extended to create real 3D
geometries. You can access the commands to create 3D from the 3D menu or
start from the 3D Scene panel Figure 3.4.
3.3.1. 3D Postcard
The easiest way to create 3D is by taking a layer and generating a 3D plane, or
postcard (Figure 3.5). With the Selected Layer(s) set as your Source, choose
3D Postcard and Photoshop will create a 3D plane based on the pixels in your
FIG 3.3 3D partner links and download for additional Material presets.
FIG 3.4 3D Scene panel: Panel view
with 2D layer selected allowing you
to create new 3D objects.
Getting Started with 3D i n Photoshop
|
31
layer. A postcard is also useful if you want to generate a plane to catch
reflections, shadows, lighting, effects, etc. You can orient the plane
perpendicular to your object and then merge the 3D objects together to
a single layer. See Corey Barker's workflow in Chapter 9 for a tutorial on this.
3.3.2. 3D Shape from Preset
You can also take this layer and warp it around any 3D shape, or primitive,
that Photoshop ships with. You can create your own 3D shape presets if
you have a modeling application that exports Collada files. This is a great way
to get started with basic 3D objects (Figure 3.6). See Bert Monroy's
workflow in Chapter 8 for a tutorial on this.
FIG 3.5 Converting a layer to a postcard.
FIG 3.6 Converting a layer to a cone shape from presets (shown with a wireframe).
|
3D in Photoshop
32
3.3.3. 3D Repoussé Object
You can take a selected layer (pixels, text or shape layers), selection or path
and convert them to an Adobe Repoussé object (Figure 3.7). This feature
allows you to extrude these layers to 3D geometry where many different
extrusion parameters can be applied (i.e., twist, bend, bevel, inflate). For more
information on creating Repoussé objects, see Chapter 7.
FIG 3.7 Converting a layer to a Repoussé object using the Type Mask Tool.
Getting Started with 3D i n Photoshop
|
33
3.3.4. 3D Mesh from Grayscale
A 3D mesh can also be generated from a grayscale image, or map
(Figure 3.8). Essentially, depth is determined by grayscale values where 50%
gray is the starting plane and anything more black is pushed back and
anything more white is pulled forward (in z-space). This is useful if you want
to generate meshes with more precision; this is especially true if you use
16- or 32-bit images, since you now have pixel level control over the
appearance of your mesh. Note that once created, you can open up your
grayscale image and re-edit it and your mesh will be regenerated.
FIG 3.8 The images on the left are depth maps used to create the 3D objects on the right.
|
3D in Photoshop
34
3.3.5. 3D Volumes
A 3D Volume is generated with two or more layers. The volume is an inter-
polation between layers and not real 3D geometry. This means that no mesh is
generated and you cannot apply many of the 3D capabilities to it. This is
primarily important for medical professionals working with DICOM images or
frames where viewing a volume rendering is useful. However, there are
interesting effects you can create by simply taking multiple layers (raster or
vector) and interpolating between the pixels to generate a volume (Figure 3.9).
3.4. Navigating 3D
There are many 3D tools in Photoshop to help you manipulate your scene
components (objects, meshes, cameras and lights) as well as tools that help
with selecting and applying materials. The easiest way to manipulate posi-
tions of scene components is with the 3D-Axis Tool (Figure 3.10).
FIG 3.9 Image with five layers selected with a volume rendering from those five layers.
Getting Started with 3D i n Photoshop
|
35
With the 3D-Axis, you can rotate, roll, scale/pan, slide/walk 3D objects,
meshes, lights and cameras depending on what tool you have selected in the
toolbar or in the 3D Scene panel. An icon in the upper left of the 3D-Axis will
indicate which component you are adjusting and the yellow handle will
appear when adjustment that type of movement. You can make a variety of
adjustments (rotate, roll, scale/pan, slide/walk) to the component you’re
manipulating without changing tools e simply by interacting with different
parts of the 3D axis.
The 3D-Axis Tool is dependant on OGL. Be sure you have this option on in the
Performance section of your Preferences.
You can also individually select scene component movement tools (i.e.,
Object Rotate, Camera Walk) from the toolbar, from the tools in the Scene
panel or from the Options Bar of any 3D tool selected.
All tools can be assigned shortcuts. By default the 3D Object Rotation Tool
has the keystroke K, and the Camera Rotation Tools have the keystroke N. Set
custom shortcuts from Edit > Keyboard Shortcuts.
FIG 3.10 3D-Axis for objects, cameras, meshes and lights e upper left icon indicates component selected and
pull on any handle to manipulate the object (i.e. roll, scale, pan, etc.).
|
3D in Photoshop
36
Materials
Materials are important as they essentially define the appearance of the 3D
object. Materials are made up of different properties that can be defined as
a single value or a texture map that varies the value over the surface of the
object. For a deeper dive on materials and what each property means, read
Chapter 1: Section 1.5. Often, because materials are made up of different
properties (i.e., bump, reflection, environment maps), you will need to
render the 3D object using the Ray Tracer in order to see its full effect. See
Chapter 2: Section 2.2 on Rendering with the Adobe Ray Tracer for more
information.
3D objects often contain many materials. To view the materials that make up
your 3D object, view the 3D Panel Materials filter to see a list (Figure 4.1).
3D objects are often divided into sections where each section can have
a different material.
4.1. Material Library and Browsing Materials
Photoshop now has its own material library and presets. By default, Pho-
toshop installs two sets of presets. One default set of materials is heavily
FIG 4.1 3D Materials Panel.
CHAPTER 4
|
3D in Photoshop. DOI: 10.1016/B978-0-240-81377-6.10004-3
Copyright Ó 2010 Elsevier Inc. All rights reserved.
37
dependent on using the Ray Tracer to enable its effects. The other set is
less dependent on the Ray Tracer as it inherently has less lighting prop-
erties. However, you will likely still get better output if you Ray Trace these
as lighting set-up in the scene can also affect how the material will look.
You can easily obtain more material presets by navigating to 3D > Browse
3D Content Online. from the application. Here you will find materials
such as Metals, Fabrics, Organics, Tiles, Stone, and more. You can also save
your created or edited materials as custom presets. From the fly-out menu
of the Material browser (Figure 4.2), choose Save Material.
FIG 4.2 The Material fly-out and menu.
|
3D in Photoshop
38
4.2. 3D Material Tools and Editing
To easily add any of the materials on to your 3D object, target the right
Material from the list in the 3D Materials panel or use the Material Selector
Tool
to select on canvas the material to target. Then, click on any material
from the Material browser. The Material Selector Tool helps you to easily
identify where in your scene graph the targeted material is (Figure 4.3).
Note: You can choose to turn on Selection overlay to see a boundary overlay
around the selected material. The color of the overlay can be changed in the
3D section of your Preferences.
4.2.1. Material Dropper/Loader Tools
The Material Drop Tool also serves as a Material Load Tool when using the
Option/Alt key. It is a very important tool when editing materials as it allows
one to load a material (with the Option/Alt key) and drop it onto any other
part of the mesh or a different mesh within the scene, or on another layer.
Alternately, you can load a material from your material presets by using the
preset fly-out in the options bar (Figure 4.4).
4.2.2. Changing Material Color
It is very easy to change the color of your material and there are several ways
to do it. The simplest way is to double-click the diffuse color and select
a different color. If there is a texture associated with the diffuse map, you will
see an icon like this:
If the Diffuse Map shows a texture associated with it
and it doesn’t contain any transparency, you will not see an effect if you
simply change the diffuse by double-clicking on the color swatch. You will
have to change the colors in the actual texture (image) or delete the texture
and then double-click the diffuse swatch. You can open up this texture via
the little popup of this same icon (Figure 4.5); choose “Open Texture” or you
can double-click the texture from the texture list in the Layers panel. If you fill
FIG 4.3 The Material Selector Tool is
grouped with the 3D Material Drop
Tool.
FIG 4.4 3D Material Dropper Tool options bar showing the Materials library browser as well as the currently
loaded material in the thumbnail (next to the Load Selected button in the options bar). You can also click this
“Load Selected” button to load the currently selected material into the 3D Material Drop Tool.
FIG 4.5 Popup menu creating,
loading, opening, editing or
removing textures associated with
materials.
Materials
|
39
this texture with a different color and hit “Save,” and then “Close this .psb
file,” you will then see the color update on the material (similar to how Smart
Objects work in Photoshop).
4.3. Painting on 3D
One of the great benefits of having 3D support in Photoshop is the ability
to paint directly on models with all the amazing painting tools. There are
seven different materials that can be painted on including Diffuse, Bump,
Glossiness, Opacity, Shininess, Self-Illumination and Reflectivity. For greater
detail on what these maps mean, refer to Chapter 1: Section 1.5. The most
common maps to paint on are diffuse maps, opacity maps and bump
maps. To target the particular map, choose the right map from the “Paint
On” menu in the 3D Scene panel or from “3D Paint Mode” in the 3D menu
(Figure 4.6).
FIG 4.6 3D Scene panel paint on map selectors.
|
3D in Photoshop
40
Photoshop 3D painting uses a projection-based model. This means that
your 3D object has to be positioned in view so that paint can be properly
applied. How the paint gets applied depends on the position of the object
as well as scale. There are many tools in Photoshop that help with painting
in 3D.
Note: It is recommended for faster performance to paint in the Interactive
(Painting) or OpenGL mode.
4.3.1. Optimal Positioning of your 3D Model for Painting
To give a quick selection of areas that are ideal to paint on with the current
position of the 3D object, from the 3D menu, choose “Select Paintable
Areas.” This will give you a marquee selection around ideal painting targets.
Further, if an area falls out of this selection, you can reposition the object
and reselect the paintable areas until your target falls within the selection.
The Paint Mask Render setting is another useful tool to help with optimal
positioning of your 3D object while painting. This can be found in the 3D
Scene panel under the Render Setting presets (Figure 4.7).
FIG 4.7 3D Scene Panel Render
Settings presets. Paint Mask mode is
important to show you which area of
your model is ideal to paint on.
FIG 4.8 This is the paint mask for the 3D dog object we've been using. At this scale and position, it is best to
paint on areas that have been mapped to white. You can tell that the red areas are not optimal for painting as
they are either not scaled correctly or not positioned directly in front of the screen.
Materials
|
41
In this mode, you cannot paint, but you have a simple way of visualizing what
areas are ideal to paint on with the current 3D position. Areas mapped as
white are ideal to paint on, areas mapped as blue are less ideal, and areas
mapped as red are not ideal to paint on (i.e., they may be too far off the edge
or not scaled optimally) (Figure 4.8). You can rotate your object (or scale) until
the areas you want to paint on are mapped as white.
You can set the minimum and the maximum angles at which the paint falls
off the edges by using the Paint Falloff command in the 3D menu.
4.3.2. Painting on Unwrapped Textures
On a Photoshop 3D layer, you can paint directly on the 3D model, or open up
any associated textures and paint in 2D space. To do so, unwrap the texture by
double-clicking it in the Layers panel or by choosing Open Texture from the
fly-out of the attached texture (found in the 3D Materials panel) (Figure 4.9).
With an unwrapped texture, you can view several overlays: Wireframe,
Normal Map or Shaded under the 3D menu > Show Overlays. These are
layers that get generated which serve as a guide when editing your
unwrapped texture.
FIG 4.9 3D Materials panel and fly-out of a texture attached to the Diffuse Map.
|
3D in Photoshop
42
4.3.3. Reparameterizing UVs
In Section 1.6 in Chapter 1, we discussed UVs and UV Mapping. Choosing
“Reparameterize UVs” uses Photoshop's built-in algorithm for assigning new
UVs to your 3D model. It is important to note that this will mean that any
textures currently applied to your model will no longer line up in the same
place. Also, Photoshop's UV generation algorithm is optimized to create UVs
that are good for painting on your 3D model; therefore, sometimes repara-
meterizing UVs can fix some unexpected painting behaviors. Unfortunately,
due to the limitations of the algorithm this means that painting on your
textures by opening them will be nearly impossible due to the texture frag-
ments being broken up into many pieces; therefore, it is recommended that
you paint directly on your 3D objects if you have reparameterized your UVs.
4.4. Tiled Painting
The Tiled Painting command takes the image and converts it into a tiled 3 Â 3
grid. This is extremely useful in creating textures where you might want edits
on edges to wrap around to the other side, or to remove seams to generate
a larger patch of texture. Essentially, any edit you make will be repeated in
the other tiles (Figure 4.10).
Photoshop essentially generates a 3D plane where the center image is the
original texture. Because it's a 3D layer, you can add maps to create different
effects. If you double-click on the diffuse map that was generated, you will
have the image that you started with and all edits will be applied to this
diffuse map. As a tiled painting, you have the flexibility of applying edits to
a single tile and having it duplicate across the grid. Many painters use this
feature so that they can have their paint strokes that fall off the edge wrap
around to the other side.
FIG 4.10 The far left image shows the original texture. After running the command to create new tiled painting, Photoshop will generate a 3 Â 3 tiled grid
(center) e original image shown here with a green boundary. The far right image shows a paint stroke (brown) on the edge gets repeated at all seams.
Materials
|
43
Final Rendering
5.1. Light Types
Photoshop ships with many light presets which you can use to light up your
scene. From the 3D Lights panel, you can easily select a preset from the drop-
down menu. You can also save light presets to be accessed here or in the
Repoussé dialog (Figure 5.1). There are four types of lights you can addor edit in
your scene. For a detailed description of these sources, check out Chapter 1:
Section 1.4.
5.2. Positioning Lights and Keyboard
Shortcuts
One way to position lights is to select a light and a light tool and use the
3D-Axis Widget to rotate, pan or slide. Point lights can only slide (you can't
rotate a point light since it isn’t a directional light). You can reposition
your lights by using the on-canvas light widget (Figure 5.2). Check that you
have 3D Ligts overlay on, a light selected in the 3D Scene Panel and a Light
tool selected (Figure 5.3).
FIG 5.1 Default Light presets found
in the 3D Lights Panel. Select any
preset to change the scene’s lighting.
CHAPTER 5
|
3D in Photoshop. DOI: 10.1016/B978-0-240-81377-6.10005-5
Copyright Ó 2010 Elsevier Inc. All rights reserved.
45
Positioning a light can be difficult to get right. There are a couple of tools in
Photoshop to help with this process. With any light tool selected, holding down
the Option/Alt key and clicking on the canvas will target where that light
should either point at (infinite and spot lights) or where the light should be
moved to (point lights). You will see the cursor change to indicate a point target
(similar to the cursor for defining a Clone Source with the Clone Stamp Tool).
Two more commands found in the 3D Lights panel can be very helpful. For
spot lights, you can click on
which will point the light at the center of your
scene. This is useful if you ended up getting your spot light point off in an
undesirable direction and are having a hard time getting it pointed back at
your scene. For all lights, you can click on
which will bring the light to
where your current camera is (for light types that have a location) and point it
in the direction of the camera (for light types that have a direction).
5.3. Editing Lights
Point, spot and infinite lights can be changed to most of the other light
sources types; however, an image-based light cannot be changed to another
FIG 5.3 Turn the 3D Lights widgets
on by showing Lights overlay from
the bottom popup menu and select
a light in the 3D Scene Panel.
FIG 5.2 Upper-left corner shows the 3D Axis Tool for Lights (must have a light tool selected to see). If you turn
on 3D Light overlay you can place your cursor over the widget (red by default) and reposition your light directly
on-canvas.
|
3D in Photoshop
46
light source. All light sources have a color and intensity applied and, further,
they can have shadows generated from them. You can turn shadows on or
off for individual lights as well as adjust the softness. The Shadow Opacity of
a mesh determines how opaque the mesh is considered to be when casting
a shadow. For some special effects, a shadow opacity of less than 100%
might be useful where the shadow will exhibit the interior structure of the
shadow caster. Typically though, the shadow opacity should be left at 100%
and the Global Ambient Color is used to fill the shadowed regions with
additional light. When an object should not cast a shadow at all, set the
Shadow Opacity to 0. Brighter Global Ambient Colors produce lower contrast
shadows. The Shadow Opacity field is found in the 3D Mesh Panel and the
Global Ambient Color can be changed from the 3D Scene Panel.
5.4. Adding and Editing Shadows
Shadows are an important element in creating a realistic look or adding
a creative effect to your design. How a shadow is generated is affected by
many different elements in your scene. First and foremost, shadows require
Ray Tracing in order to render. It is recommended that you edit your scene
shadows using the Ray Trace (Draft) mode to quickly get a snapshot of
how your shadow looks and where it's positioned. This setting can be found
in the Quality drop-down of your 3D Scene Panel (Figure 5.4 ). Lights that cast
on an object may generate a shadow onto other objects in the scene or the
FIG 5.4 The Quality menu with the option to choose
“Ray Trace (Draft)” in the 3D Scene panel. This is
important when editing and adding shadows.
Lights, Shadows and Final Rendering
|
47
ground. How these shadows look can be controlled with properties of the
Light(s) or with properties of the mesh(es).
Lights can have the options to generate shadows and determine how soft
the edges of these shadows get rendered (Figure 5.5). Meshes have the
option to catch shadows as well as cast shadows (from the light source
they intercept). Further, you can adjust how transparent these shadows are
using the same panel (Figure 5.6).
FIG 5.5 The 3D Lights panel has the option to create
shadows and determine the softness of that shadow
from each light source
FIG 5.6 The 3D Mesh panel has the options to set meshes
to catch and cast shadows as well as adjust Shadow
Opacity.
|
3D in Photoshop
48
These controls will also affect the shadows that are created between meshes
in the same scene. For example, you can have two meshes in a scene
where one mesh will catch shadows and the other will cast shadows
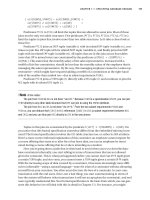
(Figure 5.7).
Further, you can target a mesh to be invisible but at the same time catch
a shadow. This is important if, for example, you want a plane to catch
a shadow of your object but you don't want the plane to be visible. This is
also a very useful technique when trying to integrate 3D renderings into an
existing photograph (see third image going clockwise from the top-left
image in (Figure 5.7). Starting from the top-left image in Figure 5.7, both the
dog as well as the cube are casting shadows onto the ground. Further,
the cube is catching a shadow from the dog. In the next image to the
right, the cube is not catching a shadow nor is it casting a shadow on the
ground. The only shadow visible on the ground is the one that the dog is
casting. The next image on the far right is where the cube is set as an invisible
mesh casting a shadow. The shadow from the dog is not set to cast onto the
ground. The bottom center image shows the dog casting a shadow and the
cube catching the shadow of the dog but it itself is not casting a shadow.
Finally, we have the bottom-left image where the dog and the cube are
casting shadows but the cube is not catching a shadow from the dog.
FIG 5.7 Different ways you can cast or catch shadows on different objects in the scene.
Lights, Shadows and Final Rendering
|
49