adobe Photoshop 6 Bibles phần 8 potx
Bạn đang xem bản rút gọn của tài liệu. Xem và tải ngay bản đầy đủ của tài liệu tại đây (1.23 MB, 105 trang )
706
Part IV ✦ Layers, Objects, and Text
Figure 15-15: The results of the four antialias settings, which you
choose from a pop-up menu on the Options bar in Photoshop 6
Applying paragraph formatting
Photoshop 6 brings the addition of paragraph formatting options, including justifi-
cation, alignment, hyphenation, line spacing, indent, and even first-line indent. With
the exception of the alignment option, all these options appear only in the new
Paragraph palette and affect text that you create inside a bounding box. (See the
section “Creating and manipulating text in a frame,” earlier in this chapter, for infor-
mation about this method of adding text.)
Figure 15-16 provides a field guide to the Paragraph palette and also shows the
palette menu. Like the Character palette menu, this one offers additional choices
related to paragraph formatting.
Photoshop can apply formatting to each paragraph in a bounding box indepen-
dently of the others. Click with the type tool inside a paragraph to alter the format-
ting of that paragraph only. To format multiple paragraphs, drag over them. If you
want to format all paragraphs in the bounding box, click the type layer in the
Layers palette, which selects the whole shebang. You also can click the type and
then press Ctrl+A.
When no text is selected, you can restore the palette’s default paragraph settings
by choosing Reset Paragraph from the Paragraph palette menu.
Tip
Note
6
Photoshop
6
707
Chapter 15 ✦ Fully Editable Text
Figure 15-16: If you create text in a bounding box, you can control
how text flows inside the box by using the options in the new
Paragraph palette.
Alignment
The alignment options, found both in the Paragraph palette and on the Options bar,
let you control how lines of type align with each other. Photoshop lets you align
text left, center, or right. Figure 15-17 labels the alignment options along with the
justification options, explained next. The lines on the alignment buttons indicate
what each option does, and they change depending on whether you’re formatting
vertical or horizontal type.
Figure 15-17: In addition to aligning
individual lines of type with each other,
you can apply paragraph justification to
text in Photoshop 6.
Align left
Align center
Align right
Alignment buttons
Indent options
Justification buttons
Paragraph spacing options
708
Part IV ✦ Layers, Objects, and Text
If you create bounding-box text, Photoshop aligns text with respect to the bound-
aries of the box. For example, if you draw a bounding box with the right alignment
option selected, the text cursor appears at the right edge of the box and moves to
the left as you type. For vertical type, the right-align and left-align options align text
to the bottom and top of the bounding box, respectively. You must choose a differ-
ent alignment option to relocate the cursor; you can’t simply click at another spot
in the bounding box.
When you create point text— that is, by simply clicking in the image window
instead of drawing a bounding box — the alignment occurs with respect to the first
spot you click and affects all lines on the current text layer.
You can change the alignment using standard keyboard tricks. Press Ctrl+Shift+L to
align selected lines to the left. Ctrl+Shift+C centers text, and Ctrl+Shift+R aligns it to
the right.
Roman Hanging Punctuation
One additional alignment option controls the alignment of punctuation marks. You
can choose to have punctuation marks fall outside the bounding box so that the
first and last characters in all lines of type are letters or numbers. This setup can
create a cleaner-looking block of text. Choose Roman Hanging Punctuation from
the Paragraph palette menu to toggle the option on and off.
Justification
The justification options adjust text so that it stretches from one edge of the bound-
ing box to another. The different options, labeled in Figure 15-18, affect the way
Photoshop deals with the last line in a paragraph.
Choose left justify to align the line to the left edge of the box; right justify to align to
the right edge; and center to put the line smack dab between the left and right edges.
With force justify, Photoshop adjusts the spacing of the last line of text so that it, too,
fills the entire width of the bounding box. This option typically produces ugly results,
especially with very short lines, because you wind up with huge gullies between
words. However, if you want to space a word evenly across an area of your image, you
can use force justify to your advantage. Drag the bounding box to match the size of
the area you want to cover, type the word, and then choose the force justify option.
If you later change the size of the bounding box, the text shifts accordingly.
You can further control how Photoshop justifies text by using the spacing options
in the Justification dialog box, also shown in Figure 15-18. To open the dialog box,
choose Justification from the Paragraph palette menu. You can adjust the amount
of space allowed between words and characters, and you can specify whether you
want to alter the width of glyphs — a fancy word meaning the individual characters
in a font. Here’s what you need to know:
✦ The values reflect a percentage of default spacing. The default word spacing is
100 percent, which gives you a normal space character between words. You can
increase word spacing to 1,000 percent of the norm or reduce it to 0 percent.
Tip
6
Photoshop
6
6
Photoshop
6
Tip
6
Photoshop
6
709
Chapter 15 ✦ Fully Editable Text
Figure 15-18: The justification options let you control how Photoshop adjusts
your text when justifying it.
✦ The default letter spacing is 0 percent, which means no space between
characters. The maximum letter spacing value is 500 percent; the minimum
is –100 percent.
✦ For glyphs, the default value is 100 percent, which leaves the characters at
their original width. You can stretch the characters to 200 percent of their
original width or squeeze them to 50 percent.
Enter your ideal value for each option into the Desired box. Whenever possible,
Photoshop uses these values. The Minimum and Maximum options tell Photoshop
how much it can alter the spacing or character width when justifying text. If you
wind up with text that’s crammed too tightly into the bounding box, raise the
Minimum values. Similarly, if the text looks too far apart, lower the Maximum val-
ues. Enter negative values to set a value lower than 0 percent.
You can’t enter a Minimum value that’s larger than the Desired value or a Maximum
value that’s smaller than the Desired value. Nor can you enter a Desired value that’s
larger than Maximum or smaller than Minimum.
If you want a specific character width used consistently throughout your text, use
the Horizontal scale option in the Character palette rather than the Glyph spacing
option. You can apply Horizontal scaling to regular text as well as paragraph text.
Tip
Note
Justify left
Justify center
Justify right
Force justify
710
Part IV ✦ Layers, Objects, and Text
As for that Auto Leading option at the bottom of the Justification dialog box, it deter-
mines the amount of leading that’s used when you select Auto from the Leading pop-
up menu in the Character palette. For information on additional paragraph spacing
controls, keep reading.
Indents and paragraph spacing
The five option boxes in the Paragraph palette control the amount of space between
individual paragraphs in a bounding box and between the text and the edges of the
bounding box. Figure 15-19 labels each option.
Figure 15-19: Enter values into the top three
option boxes to adjust the paragraph indent; use
the bottom options to change spacing before and
after a paragraph.
Photoshop’s indent options work the same as their counterparts in just about
every program on the planet. But just to cover all bases, here’s the drill:
✦ Enter values in the top two option boxes to indent the entire paragraph from
the left edge or right edge of the box.
✦ To indent the first line of the paragraph only, enter a value into the first-line
indent option box, which sits all alone on the second row of option boxes.
Enter a positive value to shove the first line to the right; enter a negative value
to push it leftward, so that it extends beyond the left edge of the other lines in
the paragraph.
✦ Use the bottom option boxes to increase the space before a paragraph (left
box) and after a paragraph (right box).
In all cases, you must press Enter to apply the change. To set the unit of measure-
ment for these options, use the Type pop-up menu in the Preferences dialog box; you
can choose from pixels, points, and millimeters. As is the case with options in the
Note
Space before
First line indent
Left indent Right indent
Space after
711
Chapter 15 ✦ Fully Editable Text
Character palette, however, you can enter the value using some other unit of mea-
surement by typing the value followed by the unit’s abbreviation (“in” for inches,
for example). When you press Enter, Photoshop converts the value to the unit you
selected in the Preferences dialog box. (Chapter 2 explains other pertinent facts
about units preferences in Photoshop 6.)
Hyphenation
In most cases, you probably won’t be entering text that requires hyphenation to
an image. I mean, if you’re entering that much text, you’re better off doing it in your
page-layout program and then importing the image into the layout.
But just to cover all bases, Photoshop offers the Hyphenate check box in the
Paragraph palette. When you select this option, the program automatically
hyphenates your text using the limits set in the Hyphenation dialog box, shown
in Figure 15-20. Choose Hyphenation from the Paragraph palette menu to open
the dialog box.
Figure 15-20: If you
ever want to hyphenate
text, set the hyphenation
controls here.
This dialog box, like several others related to text formatting, comes straight from
Adobe InDesign and Illustrator. In case you’re not familiar with the controls, they
work as follows:
✦ Enter a value into the Words Longer Than option box to specify the number of
characters required before Photoshop can hyphenate a word.
✦ Use the After First and Before Last options to control the minimum number of
characters before a hyphen and after a hyphen, respectively.
712
Part IV ✦ Layers, Objects, and Text
✦ Enter a number into the Hyphen Limit option box to tell Photoshop how many
consecutive lines can contain hyphens.
✦ Finally, specify how far from the edge of the bounding box Photoshop can
place a hyphen by entering a value into the Hyphenation Zone box.
✦ Turn off the Hyphenate Capitalized Words check box if you want Photoshop to
keep its mitts off words that start with an uppercase letter. Hope I didn’t insult
your intelligence on this one.
Line breaks and composition methods
When you create paragraph text that includes several lines, you may not like the
way that Photoshop breaks text from line to line. You may be able to improve the
situation by changing the equation that Photoshop uses to determine where lines
break.
If you choose Adobe Every-line Composer from the Paragraph palette, the program
evaluates the lines of text as a group and figures out the best place to break lines. In
doing so, Photoshop takes into account the Hyphenation and Justification settings.
Typically, this option results in more evenly spaced text and fewer hyphens.
Adobe Single-line Composer takes a line-by-line approach to your text, using a few
basic rules to determine the best spot to break a line. The program first attempts to
fit all words on the line by adjusting word spacing, opting for reduced spacing over
expanded spacing where possible. If the spacing adjustments don’t do the trick,
Photoshop hyphenates the last word on the line and breaks the line after the
hyphen.
As I’ve mentioned before, these options may not come into play very often because
most people don’t create long blocks of text in Photoshop. If you want to control
line breaks for a few lines of text, you can just create your text using the regular,
text-at-a-point method instead of putting the text in a bounding box. Then you can
just press Enter at the spot where you want the line to break, adding a hyphen to
the end of the line if needed.
Warping text
For all its glories, text in Photoshop has always lacked an option widely used by
designers creating type in drawing programs: the ability to fit text to a path. You
were limited to creating straight lines of text only — no wrapping type around a cir-
cle or otherwise bending your words.
You still can’t fit text to a path in Photoshop 6, but you may be able to get close to
the effect you want by using the new Warp Text feature. Similar to the text art fea-
tures that have been available in word processing programs for some time, Warp
Text bends and distorts text to simulate the effect of fitting text to a path. You can
choose from 15 different path shapes and choose to curve type, distort it, or both.
6
Photoshop
6
6
Photoshop
6
713
Chapter 15 ✦ Fully Editable Text
You can warp paragraph text or regular text, but the warp always affects all existing
text on the layer. So if you want to reshape just a part of a line of text — for exam-
ple, to make the last few letters in a word bend upward — put that bit of text on its
own layer.
In addition, note that you can’t warp type to which you’ve applied the faux styles
that reside on the Character palette menu. Nor can you warp bitmap fonts or fonts
for which the designer hasn’t provided the paths, or outlines, that make up the font
characters.
After selecting a text layer, click the Warp Text button on the Options bar, labeled
in Figure 15-21, or choose Layer➪ Type ➪ Warp Text. Photoshop displays the Warp
Text dialog box, also shown in the figure.
Figure 15-21: Use the controls in the Warp Text dialog box to simulate the effect
of fitting text to a path.
After choosing a warp design from the Style pop-up menu, set the orientation of
the warp by clicking the Horizontal or Vertical radio button. Then adjust the Bend,
Horizontal Distortion, and Vertical Distortion sliders until you get an effect that fits
your needs. You can preview your changes in the image window.
Warp Text
Note
Tip
714
Part IV ✦ Layers, Objects, and Text
I’m sure you could easily figure out how this dialog box works, but a few hints may
speed you on your way:
✦ When you select the Horizontal radio button, the warp occurs as the shape in
the Style pop-up menu suggests. If you choose Vertical, the warp is applied as
if you turned the shape on its side.
✦ Use the Bend value to change the direction of the curve. For the warp style
selected in Figure 15-21, for example, a positive Bend value curves the text
upward, as shown in the top example in Figure 15-21, and a negative value
curves the text in the opposite direction, as shown in the second example.
✦ You can use the Horizontal and Vertical Distortion options to create perspec-
tive effects. Horizontal Distortion puts the origin point of the perspective to
the left if you enter a positive value and to the right if you enter a negative
value. I used a positive value to create the third line of text in Figure 15-21.
Vertical Distortion, as you can probably guess, places the origin point above
the text if you enter a positive value and below the text if you enter a negative
value. I created the bottom line of type in Figure 15-21 by entering a positive
Vertical Distortion value.
✦ If you edit warped text, Photoshop reapplies the original warp to the layer.
After warping the text, you can often improve the effect by tweaking the tracking,
kerning, and other character spacing and scaling formatting. If you have trouble
achieving the distortion or perspective effect you’re after, bypass the Warp Text
dialog box and instead use Edit ➪ Free Transform to manipulate the text layer. (You
must get out of text edit mode to access the command.) The steps in the next sec-
tion offer an example of this technique.
Editing text as shapes
Way back near the beginning of this chapter, I mentioned that you can convert each
letter in a text layer to individual shapes by choosing Layer ➪ Type➪ Convert to
Shape. The command converts all text on a layer; you can’t convert part of the text
on a layer and leave the rest alone. If the command is grayed out, you’re in text edit
mode; click the Commit (check mark) or Cancel (X) button on the Options bar to
exit edit mode.
After you make the conversion, each character works just like a shape that you cre-
ate with the new shape tools. Photoshop creates points and line segments as it sees
fit for each letter, as shown in Figure 15-22. This enables you to fool with the shape
of each letter by dragging points and segments, as I’m doing in the right example in
the figure. And you can apply all the same effects to your new text shapes as you
can to any shape. (Chapter 14 provides a complete rundown of your options.)
Tip
715
Chapter 15 ✦ Fully Editable Text
Figure 15-22: Converting
text to shapes enables
you to drag line segments
and handles to reshape
individual characters, as
I did here.
Before you convert text to shapes, however, make sure that you don’t need to
make further changes to character or paragraph formatting or add or delete letters.
Photoshop sees your text purely as shapes after the conversion so you can’t edit
the text using the type tool anymore. For safety’s sake, save the text to a new layer
or image before choosing Convert to Shape.
As do regular shapes, type shapes appear jagged around the edges because of
the tiny outline that Photoshop displays around the shape. To hide the outline
and smooth out the on-screen appearance of the text, press Ctrl+H. Of course,
in Photoshop 6, this command also hides the marching ants, guides, and other
on-screen aids. The View ➪ Show ➪ Target Path command enables you to toggle
just the shape outlines.
Character Masks and Layer Effects
In Photoshop 6, you can create a text-based selection outline or mask using one of
two methods: Enter text with the type tool set to type mask mode or convert exist-
ing text to a work path. The next two sections explain both options.
Creating a text mask
In past editions of Photoshop, you used special type mask tools to create text-
shaped selection outlines. Now you use the ordinary type tool (press T to select it)
and set the tool to mask mode by clicking the Type Mask button on the Options bar,
labeled in Figure 15-23. Be sure to click the button before you create your text.
6
Photoshop
6
6
Photoshop
6
Tip
Caution
716
Part IV ✦ Layers, Objects, and Text
Figure 15-23: When you work in
type mask mode, white areas (top
row) indicate unmasked portions
of the image, just as in quick
mask mode.
After you click in the image, Photoshop covers it with a translucent overlay, as
when you work in quick mask mode. The overlay appears in whatever color, and at
whatever opacity, you set for the quick mask overlay (by double-clicking the quick
mask icon in the toolbox).
As you type, you create white characters, as shown in the top example in the figure,
giving you the same result as when you paint with white in quick mask mode— that
is, to unmask areas of the image. Only this time, Photoshop dumps the white paint
on for you. You can apply all of the same text formatting options that are available
when you work with ordinary text.
If you move your cursor away from the text while you’re in text edit mode, the
move cursor appears. You can then drag the mask around the image window to
position it without exiting text mode. When you commit the text (by pressing
Ctrl+Enter or clicking the check-mark button on the Options bar), the overlay disap-
pears and your selection outline appears, as shown in the bottom of Figure 15-23,
just as when you switch from quick mask mode back to marching ants mode.
After you create your first selection outline, you can Shift-click with the type tool
to redisplay the overlay and create a second text mask, just as you Shift-click with
standard selection outlines to add to an existing selection.
Converting type to a path
To convert existing type to a work path, choose Layer ➪ Type ➪ Create Work Path.
You see the path outline around the characters, as when you convert text to shapes,
and the new text-based path item appears in the Paths palette. All the standard path-
editing techniques apply. You can edit, stroke, and fill the path, export it as a clip-
ping path, or convert the path to a selection outline. Chapter 8 provides a full
explanation of working with paths.
Tip
Tip
Type mask
717
Chapter 15 ✦ Fully Editable Text
After you create a work path, Photoshop does not trash the original text layer. You
can continue to edit the type as usual or delete the layer if you want to keep only
the path.
Type masks on the march
The most obvious use for a type-based selection is to select a portion of an image.
In a matter of seconds, you get type filled with photographic imagery. While nifty in
theory, finding a use for photographic type is another matter. In the following steps,
I created a type mask to select a portion of an image, send it to a new layer, and
then modify brightness values to distinguish the text from its background. Though
very easy, this technique yields some interesting results.
STEPS: Selecting Part of an Image Using Character Outlines
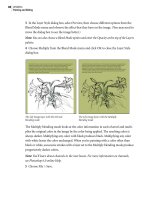
1. Assemble the image you want to mask. In my case, I start with the classic eel
erupting from a clock pictured in Figure 15-24. I know, you’re thinking, “Deke,
how do you come up with such attractive stuff?” It’s a knack, I guess. Try not
to be jealous.
Figure 15-24: I created
this image by selecting an
eel, layering it against a
clock, and using a layer
mask to blend the two
images. Then I flattened
the image and saved it.
Note
718
Part IV ✦ Layers, Objects, and Text
2. Create your text. Select the type tool, click the Type Mask button, and click
in the image window. Enter and format your type as usual. To reposition the
mask, move the cursor away from the type until you see the move cursor
and then drag in the image window. When you’re happy with the mask, press
Ctrl+Enter to convert the text mask to a selection outline.
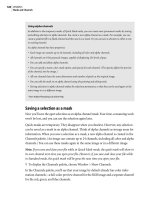
3. Modify the selection outlines as needed. I chose Select ➪ Transform
Selection and then Ctrl-dragged the corner handles to distort my character
outlines, as in Figure 15-25. (The character outlines are hard to see so I’ve
added a translucent white fill to make the text more legible. The fill is there
merely for the purpose of the screen shot.)
Figure 15-25: The Transform Selection command
enabled me to apply a perspective effect to my
character outlines before using them to select the image.
4. Send the selected text to a separate layer by pressing Ctrl+J. The selection
outlines disappear so the image looks like it did before you started. But rest
assured, you have characters filled with imagery on a separate layer.
6
Photoshop
6
719
Chapter 15 ✦ Fully Editable Text
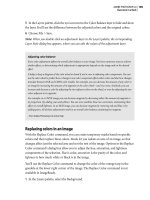
5. Return to the background layer and create a new layer by clicking the page
icon at the bottom of the Layers palette. The easiest way to distinguish text
from background image is to darken the background image and lighten the
text (or vice versa). This new layer is just the ticket.
6. Fill the layer with a dark color. Then choose the Multiply mode (Shift+Alt+M)
and lower the Opacity value. For my part, I added a black-to-white gradation
starting from the lower left and ending in the upper-right portion of the image.
Thanks to the Multiply mode, just the area behind the text was darkened, as
shown in Figure 15-26. I also lowered the Opacity to 40 percent.
Figure 15-26: To darken the area behind the type,
I added a black-to-white gradation on a new layer
and set the layer to the Multiply mode.
7. Switch to the type layer. Next, we’ll make the type a lighter color.
8. Create a new layer and fill it with a light color. Set the blend mode to Screen
(Shift+Alt+S) and adjust the Opacity value as desired. I filled my layer with
white and set the Opacity to 80 percent.
720
Part IV ✦ Layers, Objects, and Text
9. Press Ctrl+G. This groups the light layer with the type below it, as demon-
strated in Figure 15-27. The light area outside the type goes away. Now the
type stands out clearly from its background, even though you can see the
image both inside and outside the letters.
Figure 15-27: To lighten the text, I added a layer filled
entirely with white and grouped it with the type layer.
10. Apply whatever additional effects strike your fancy. I returned to the type
layer and chose Layer ➪ Layer Styles ➪ Bevel and Emboss. Then I selected the
Outer Bevel setting to create the letters shown in Figure 15-28. I also applied
the Drop Shadow effect to the text in the upper-right corner and the Pillow
Emboss effect to the Jelly-Vision logo.
As the enlarged view of the Jelly-Vision logo in Figure 15-29 shows, Photoshop’s
layer effects can work super-fast miracles on type. In a matter of seconds, I was able
to transform the top example in the figure into the bottom one.
721
Chapter 15 ✦ Fully Editable Text
Figure 15-28: I managed to transform a strange, drab
composition into this mighty attractive poster art using
nothing but text.
Figure 15-29: Creating the Jelly-Vision logo was as
simple as distorting the text and applying a Pillow
Emboss layer effect.
722
Part IV ✦ Layers, Objects, and Text
Layer effects bonanza
You’ll have a blast experimenting with layer effects and type. Layer effects are fast,
flexible, easy to use, and they were designed largely with editable type in mind.
Sure, they get overused. But as with any cool feature, you can stay ahead of the
curve by applying your effects creatively.
Figure 15-30 shows three very simple but unusual implementations of layer effects.
All three effects rely on character masks, but I created these selection outlines
using standard type layers. I clicked with the type tool, entered the words Shake,
Murder, and Imprint, and then formatted them. Then I Ctrl-clicked on the layer to
draw out the selection outlines as I needed them.
Why use a standard type layer to create selection outlines instead of the type mask
option? Simple — because type on a layer is forever editable; a type mask is not.
Editing type on a layer doesn’t affect an existing character mask, but I can Ctrl-click
to generate new masks any time I like. The upshot is that a type layer serves double
duty — to create both editable text and type masks. This one tool does everything
you need, which is why I for one never change type tools; I always work with lay-
ered type.
Figure 15-30: Three examples of childishly simple layer effects
applied creatively to character masks
Tip
723
Chapter 15 ✦ Fully Editable Text
That’s really the key to creating cool effects. The rest is just “scribbling and bib-
bling” as a dramatized Mozart once said. But because the scribbles and bibbles
may prove of minor interest to you, here’s how I made each effect:
✦ Shake: First, the boring stuff. I extracted the layer mask for the word Shake by
Ctrl-clicking on my type layer and Shift+Alt-dragging around the word Shake
with the rectangular marquee tool to deselect Murder and Imprint. Then I
switched to the background layer and pressed Ctrl+J to send Shake to an inde-
pendent layer. Finally I pressed the / key to lock the transparent pixels so I
could edit the type and only the type.
Now for the fun stuff. I created a pattern from the embossed texture back in
Figure 15-4 using Edit➪ Define Pattern. Then I used Edit ➪ Fill to fill Shake with
the pattern. After double-clicking the new layer name to open the Layer Style
dialog box, I applied a black drop shadow, setting the blend mode to Multiply,
the opacity to 100 percent, and the angle to 45 degrees. Next I applied a white
Inner Shadow, setting the blend mode to Screen, opacity to 85 percent, and
angle to –135 degrees. The upshot is that the drop shadow darkens the back-
ground and the inner shadow lightens the characters.
✦ Murder: I filled the background layer behind the word Murder with black.
Then I did all the boring stuff that I mentioned two paragraphs ago — Ctrl-
clicked the type layer, intersected Murder with the marquee tool, pressed
Ctrl+J to send Murder to its own layer, and pressed / to lock the transparent
pixels.
I set the foreground color to white and brushed across the Murder layer with
the paintbrush set to 40 percent opacity. Because the transparency of the layer
was locked, I painted inside the letters only. Finally, I opened the Layer Style
dialog box and applied a white drop shadow to the text layer, setting the blend
mode to Screen and the Angle value to –126. The result is a directional glow.
✦ Imprint: Here I filled the area behind Imprint with the same pattern I defined
for Shake, and then I mushed the pattern together using the filters Noise ➪
Median and Blur ➪ Gaussian Blur (both explained in Chapter 10). Then, as
usual, I did the boring stuff — Ctrl-clicked on the original type layer, inter-
sected Imprint with the marquee tool, and pressed Ctrl+J and the / key.
With Imprint on its own layer, I double-clicked the layer name to open the
Layer Style dialog box and applied the Bevel and Emboss effect using the
Emboss effect style. The result was a bit disappointing. Muted and dark, it
didn’t have the punch I wanted. To brighten it up, I duplicated the Imprint
layer by dragging it onto the page icon at the bottom of the Layers palette.
Then I pressed Shift+Alt+S to apply the Screen mode. The final result is the
much sharper effect you see in Figure 15-30.
✦✦✦
Essential Color
Management
Plunging Headlong into Color
Most artists react very warmly to the word color and a bit
more coolly to the word management, especially those of us
who have made the mistake of taking on managerial chores
ourselves. Put the two words together, however, and you can
clear a room. The term color management has been known to
cause the sturdiest of characters to shriek and sweat like a
herd of elephants locked in a sauna.
It’s no exaggeration to say that color management is the
least understood topic in all of computer imaging. From my
experience talking to Photoshop users, most folks expect to
calibrate their monitors and achieve reliable if not perfect
color. But in point of fact, there’s no such thing. So-called
device-dependent color — that is, synthetic color produced by
a piece of hardware — is a moving target. The best Photoshop
or any other piece of software can do is to convert from one
target to the next.
For what it’s worth, most consumer monitors (and video
boards, for that matter) are beyond calibration, in the strict
sense of the word. You can try your hand at using a hardware
calibrator — one of those devices where you plop a little suc-
tion cup onto your screen. But calibrators often have less to
do with changing screen colors than identifying them. Even if
your monitor permits prepress-quality calibration — as in the
case of $3,000 devices sold by different vendors over the
years, including Radius, Mitsubishi, and LaCie — it’s not
enough to simply correct the colors on screen; you also
have to tell Photoshop what you’ve done.
16
16
CHAPTER
✦✦✦✦
In This Chapter
Setting up your
monitor with the
Gamma Wizard
Selecting an RGB
working space
Embedding a color
profile in a saved
image
Converting colors
from one working
space to another
Using the Color
Settings command
Assigning profiles to
untagged images
Establishing color
management policies
Reacting to and
disabling alert
messages
Changing the Intent
setting
Setting up a custom
CMYK space
Transferring CMYK
settings from
Photoshop 5
✦✦✦✦
728
Part V ✦ Color for Print and the Web
Therefore, color management is first and foremost about identifying your monitor.
You have to explain your screen’s foibles to Photoshop so that it can make every
attempt to account for them. In the old days, Photoshop used the screen data to
calculate CMYK conversions and that was it. Photoshop 5 went two steps farther,
embedding a profile that identifies the source of the image and using this informa-
tion to translate colors from one monitor to another. Photoshop 6 goes a couple of
steps farther still, permitting you to work in multiple profile-specific color spaces at
the same time — great for artists who alternatively create images for print and the
Web — and specify exactly what to do with images that lack profiles.
The new Color Settings command is both wonderful and bewildering. It can just as
easily mess up colors as fix them. But if you read this chapter, you and your colors
should be able to ride the currents safely from one digital destination to the next. And
best of all, color management in Photoshop 6 is consistent with color management
found in Illustrator 9 and future Adobe applications. Learn one and the others make
a heck of a lot more sense.
A Typical Color-Matching Scenario
Photoshop 6 devotes three features to color management. The first is the Adobe
Gamma control panel, which characterizes your monitor. Choose Settings from the
Start menu, and then choose Control Panel. After the Control Panel window comes
up, double-click the Adobe Gamma icon. The second feature is Edit➪ Color Settings.
Choose this command or press Ctrl+Shift+K to display the Color Settings dialog box,
which lets you edit device-dependent color spaces and decide what to do with pro-
file mismatches. Finally, use File ➪ Save As to decide whether to embed a profile
into a saved image or include no profile at all.
I could explain each of these features independently and leave it up to you to put
them together. But peering into every tree is not always the best way to understand
the forest. So rather than explaining so much as a single option, I begin our tour of
color management by showing the various control panels, commands, and options
in action. In this introductory scenario, I take an RGB image I’ve created on my Mac
and open it up on my PC. The Mac is equipped with a PressView 21SR and the PC is
hooked up to a generic Sony Trinitron screen, so I’ve got both extremes pretty well
covered. Yet despite the change of platforms and the even more dramatic change
in monitors, Photoshop maintains a high degree of consistency so the image looks
the same on both sides of the divide. While the specifics of setting up your system
obviously vary, this walk-through should give you an idea of how color management
in Photoshop works.
If you’re well-versed in Photoshop 5 and you already have a rough idea of how
profile-based color management works, skip ahead to the section “Color Conversion
Central.” There I explain the intricacies of the Color Settings dialog box, which is
where the vast majority of the color management process occurs.
Cross-
Reference
6
Photoshop
6
6
Photoshop
6
729
Chapter 16 ✦ Essential Color Management
Setting up the source monitor
If you own a monitor with calibration capabilities, I recommend that you start off
by calibrating it. In the case of the PressView, I launch a utility called ProSense that
works with the hardware calibrator to both adjust screen colors and save screen
profiles in a variety of formats. For purposes of Photoshop for the Mac, the most
important format is ColorSync, which is Apple’s system-wide color management
extension. I also save a Photoshop Monitor File version of the profile, as shown
in Figure 16-1.
Figure 16-1: When calibrating my PressView monitor, I direct the
ProSense utility to save a ColorSync and Photoshop Monitor File version
of the screen profile.
The next step is to assign the profile to the monitor. I choose Apple ➪ Control
Panels ➪ Monitors. Then I click the Color button to display the scrolling list of
ColorSync Profile options shown on the right side of Figure 16-2. The PressView
21sr item turns out to be the profile I just created with the ProSense utility.
I select it and move on.
730
Part V ✦ Color for Print and the Web
Figure 16-2: On the Mac, choose the Monitors control panel and click the Color button
(left) to load a monitor profile that will automatically work with Photoshop.
The Gamma control panel
“Swell,” I can hear you say, “But what do those of us with more down-to-earth
monitors do?” For everyday people, Photoshop ships with the Adobe Gamma
control panel. Choose Start ➪ Settings ➪ Control Panel to bring up the Control
Panel window. Then double-click the Adobe Gamma icon. (If the control panel
displays a warning that your video card doesn’t support system-wide color
management, don’t sweat it. Most video cards don’t.) Select the Step By Step
(Wizard) option and click the Next button to walk through the setup process
one step at a time. If you see a control panel like the one on the right side of
Figure 16-3, click the Wizard button to continue.
When using the Adobe Gamma Wizard, all you have to do is answer questions
and click the Next button to advance from one screen to another. For example,
after adjusting the contrast and brightness settings, Gamma asks you to specify
the nature of your screen’s red, green, and blue phosphors. If you own a Trinitron
or Diamondtron monitor— which you’ll know because you paid more for it — select
the Trinitron settings. Or select Custom and enter values according to your moni-
tor’s documentation. If the documentation does not suggest settings, ignore this
screen and click Next to move on. So you don’t know your phosphors— that’s life.
You’ve got bigger fish to fry.
The next screen, pictured in Figure 16-4, is the most important. It asks you to
balance the red, green, and blue display functions of your monitor. But to do so,
731
Chapter 16 ✦ Essential Color Management
you need to turn off the View Single Gamma Only check box; this presents you with
separate controls over each of the three monitor channels. Then use the sliders to
make the inner squares match the outer borders. You are in essence calibrating the
monitor according to your unique perceptions of it, making this particular brand of
characterization a highly personal one.
Figure 16-3: Select the Step By Step option (left) or click the Wizard button to
advance one step at a time through the monitor setup process.
Figure 16-4: Turn off the View Single Gamma Only check box to
modify each of the three color channels independently.
732
Part V ✦ Color for Print and the Web
The next screen asks you to set the white point, which defines the general color
cast of your screen from 5,000 degrees Kelvin for slightly red to 9,300 degrees for
slightly blue. A medium value of 6,500 degrees is a happy “daylight” medium. To
find the best setting for your monitor, click the Measure button. Then click the
gray box that appears the most neutral — neither too warm nor too cool — until
you get dumped back into the Gamma Wizard. Then click Next.
When you click the Finish button, the Gamma utility asks you to name your new
monitor profile and save it to disk. Name it whatever you want, but don’t change
the location — it has to go into the Color folder inside the System or System 32
folder to be made available to Photoshop and other applications.
Adobe Gamma generates a custom monitor profile and automatically alerts
Photoshop to the change. You don’t even have to bring up the ColorSync control
panel (though you may want to just to confirm). Your screen may not look any
different than it did before you opened Gamma, but you can rest assured that
Photoshop is now officially aware of its capabilities and limitations.
Incidentally, the term gamma refers to the amount of correction required to convert
the color signal generated inside the monitor (let’s call it x) to the color display that
you see on screen (y). Imagine a simple graph with the input signal x along the bot-
tom and the output y along the side. A gamma of 1.0 would result in a diagonal line
from bottom-left to upper-right corner. A higher gamma value tugs at the center of
that line and curves it upward. As you tug, more and more of the curve is taken up
by darker values, resulting in a darker display. So a typical Mac screen with default
gamma of 1.8 is lighter than a typical PC screen with a default gamma of 2.2. For a
real-time display of gamma in action, check out the discussion of the Curves dialog
box included in Chapter 17.
Selecting the ideal working space
Now that I’ve identified my monitor, I need to select an RGB working environment,
which is a color space other than the one identified for the monitor. This is the
strangest step, but it’s one of the most important as well. Fortunately, all it
requires is a bit of imagination to understand fully.
On my Mac, I switch to Photoshop and choose Edit ➪ Color Settings. Photoshop
displays the dialog box shown in Figure 16-5. I’m immediately faced with a dizzying
array of options — no gradual immersion into the world of color management here —
but Photoshop does make a small attempt to simplify the process. The program
offers several collections of predefined settings via the Settings pop-up menu.
Among the settings are Color Management Off, which deactivates Photoshop’s
color management entirely; ColorSync Workflow, which is useful in all-Macintosh
environments; and Emulate Photoshop 4, which both turns color management
off and mimics Version 4’s screen display.
Note