Adobe Photoshop CS2 Photographers’ Guide phần 5 pps
Bạn đang xem bản rút gọn của tài liệu. Xem và tải ngay bản đầy đủ của tài liệu tại đây (3.28 MB, 39 trang )
Canceling Red Eyes
Photoshop CS2 borrowed a trick from Photoshop Elements, in the form of a very
sophisticated red-eye removal feature, called the Red Eye tool. Apparently this
tool, which was an Elements exclusive, proved too useful not to adopt for the “pro-
fessional” application, Photoshop.
This tool is highly automated. It allows you to click or paint away those glowing
pupils that affect any wide-eyed human who is close enough to the camera to
reflect light from their eyes directly back into the camera lens. Unfortunately, it
doesn’t work with the yellow or green eyes sometimes produced by animals. Use
Enhance > Color > Replace Color instead. (You’ll learn more about that feature
in Chapter 6.) Just follow these steps to put the Red Eye Brush to work.
1. Open the picture to be de-demonized.
2. Click the Red Eye tool in the Tool Palette (it’s nested with the Healing Brush,
Spot Healing Brush, and Patch Tool) to activate it (it has a crosshair cursor
and eyeball icon). Then apply any appropriate options: Adjust the Pupil Size
parameter to control the size of the “brush” you’ll be using to paint over the
red eyes. Set the Darken Amount control to adjust the degree of darkening
applied to the red eyes.
3. Click in the area that includes the red eye effect.
The tool automatically seeks out the red tone and darkens it, creating more
natural-looking eyes.
4. If both eyes are glowing (they usually are), you can repeat this process for the
second eye. Figure 4.28 shows some red eyes (before and after) and the
Options Palette for this tool.
Adobe Photoshop CS2: Photographers’ Guide136
Note
You can also reverse the order of the patching process by defining the area you want
to fix first as a selection, then dragging that area to the source for the pixels to be
used for the patch. Just click the Source button instead of the Destination button
in the Options bar. How do you decide which way is better? If you think you’ll
have a problem creating a patch that fits exactly over the problem area, define the
problem area as a selection first with the Source button marked. If you’d rather
select the area used as a patch first and aren’t fussy about the area you’re patching,
mark the Destination button and define the patch area instead.
Next Up
In the next chapter, we’re going to explore compositing, which is a much more
complex type of retouching that involves combining pieces of images into one
whole work of art. You’ll get to use most of what you know about working with
Photoshop Layers, Selections, and then some.
Chapter 4 ■ Secrets of Retouching 137
Figure 4.28 Before and after
red-eye correction.
This page intentionally left blank
Compositing was thrust into the public attention in a big way early in 2005, when
a certain home economics tycoon was released from prison and Newsweek pub-
lished a jubilant photo of her on the cover—except that it was actually only
Martha’s head superimposed on a model’s body. Photoshop had done it again!
Whether the photo is an Oprah Winfrey/Ann-Margaret hybrid (TV Guide,
August, 1989) or nudging two pyramids closer together (National Geographic,
February, 1982), when compositing is deemed to mislead, it’s often castigated and
condemned.
Fortunately, compositing is perfectly fine if you’re not a news organization or cor-
poration charged with presenting a truthful image. After all, what are you to do
when a hated ex-brother-in-law mugging in the center of a treasured family por-
trait ruins the photo for generations to come? Do you want a photograph of the
Eiffel Tower in downtown Wichita, Kansas? Would that Little League photo of
your kid be a little more interesting if you could show a baseball intersecting the
bat? Compositing is the perfect solution.
You can do the same thing as tabloid magazines, which regularly picture
Hollywood celebrities out on “dates” when, in fact, they may never have met. Even
more legitimate magazines, like the late Picture Week managed to picture Nancy
Reagan and Raisa Gorbachev having a friendly chat that never took place.
Journalists have some serious ethical considerations when creating composited
images. (Robert Gilka, former director of photography at National Geographic
magazine says that significantly manipulating images is an oxymoron on the order
5
Compositing in
Photoshop CS
of “limited nuclear warfare.”) The rest of us, however, can happily modify and
combine images to our heart’s content, as long as we’re not attempting to defraud
anyone.
This chapter concentrates on the tools and techniques you need to create com-
posites. Sometimes, your goal will be to create realistic images; other times, you’ll
simply want to combine several pictures in interesting ways, even if the end result
is obviously a fantasy. If you want to learn more about compositing, check out my
book Digital Retouching and Compositing: Photographers’ Guide, from Course
Technology. You’ll find the topics covered in this chapter in much more detail in
that guidebook. You can find information on that book on my website:
www.dbusch.com.
Your Compositing Toolkit
Ads for photographic-oriented products like image editors and printers are one
venue in which creating outlandish image combinations is definitely okay. In fact,
if you look closely at some of the ads for Epson printers in the past few years, you’d
think that high-end image editing programs and photo-quality printers are used
primarily to print images of trees made out of human bodies.
However, compositing also has more mundane applications that involve nothing
more than blending several photos with no overt intention to deceive. The goal
here is to combine the best features of four or five flawed images to produce a post-
card-quality photo that doesn’t scream fake until you look at it very closely. To
make this chapter even more interesting, we’ll work with some out-take photos.
Some of them were dark, blurry, or otherwise defective in ways that would ordi-
narily keep them out of the shoebox (or the digital equivalent, the archive CD).
I kept these rejects for the same reason the miser kept a box carefully labeled
“Pieces of string not worth saving.” You never know when an odd image can come
in handy!
Figure 5.1 shows three vacation photos that range from interesting to boring.
Figure 5.2 shows the result of one of the exercises in my Digital Retouching and
Compositing: Photographers’ Guide book (if you need more details on how it was
done). I moved the Spanish castle to the rugged shores of Ireland, enriched the
colors, and added some clouds. Figure 5.3 shows the same photos given a differ-
ent, more outlandish treatment. These obvious fantasy photos don’t stand up
under close scrutiny.
Adobe Photoshop CS2: Photographers’ Guide140
Chapter 5 ■ Compositing in Photoshop CS 141
Figure 5.2 Combining them
produced an image that doesn’t
exist in real life.
Figure 5.1 These three photos weren’t stunning on their own.
By eliminating the fantasy element, you can come up with more
realistic photos that most viewers won’t even question. Figure
5.4 shows a car parked in a grungy driveway (top) and a more
attractive setting (bottom). Some careful compositing, which
even included simulating shadows on the surface of the vehicle,
produced a more realistic picture, as you can see in Figure 5.5.
First, let’s look at exactly what you need to know to do effective
compositing. The main tools you need to master are the selec-
tion tools. If you’ve been working with Photoshop for a while,
you’ve already used the selection tools extensively, and the good
news is that there have been virtually no changes to these tools
in Photoshop CS2. To grab portions of an image for realistic
compositing, you need to be able to select precisely the object
or area that you need. Because the ability to make selections is
so crucial, I’m going to spend some time reviewing the key tools
before we begin actually butchering a few photos later in this
chapter.
Adobe Photoshop CS2: Photographers’ Guide142
Figure 5.3 Going over the
top can produce an even more
outlandish image.
Figure 5.4 These two photos can be combined
into one…
Selection Refresher Course
In order to facilitate making changes or to copy only part of an image, Photoshop
allows you to make selections. A selection is the part of the image inside the crawl-
ing selection border (called marching ants and various other names) when you
define an area with one of the selection tools. Once you’ve created a selection, you
can do the following things with the selected area:
■ Copy the area to the Clipboard and paste it down in a new layer of its own,
surrounded by transparency.
■ Paint or fill selected areas with color or pattern using all the painting tools in
any of the available modes.
■ Fill selections with the contents of other selected areas (for example, pasting
one image into another).
■ Mask selected areas to prevent them from being changed.
■ Apply a filter to a selected area.
■ Edit a selection: scale its size, skew or distort its shape, change its perspective,
flip it horizontally or vertically, rotate it, add to or subtract from it, and com-
bine it with another selection.
Chapter 5 ■ Compositing in Photoshop CS 143
Figure 5.5 …producing a
composite that most viewers
would accept as the real thing.
■ Save selections in channels or layers for later use.
■ Convert selections to vector-oriented paths that you can manipulate using the
Pen tool.
When you create a selection in Photoshop, you are essentially doing what airbrush
artists do when they cut masks out of film: You define an area in which painting
(or another process) can take place. Photoshop allows you to make masks with
three kinds of edges: anti-aliased (smoothed), feathered (fading out gradually),
and non-anti-aliased (jagged edged). In addition, masks can be opaque, semi-
transparent, or graduated in transparency. You can use Photoshop’s selection tools,
described next, or actually “paint” a selection using Quick Mask mode, which
we’ve already worked with earlier in this book (so I won’t be reviewing it in this
chapter).
Adobe Photoshop CS2: Photographers’ Guide144
PC AND MAC KEYBOARD SHORTCUTS
As you work through this chapter and those that follow, keep in mind that some
keyboard shortcuts are different for the PC and Macintosh. Most tools from the
Tool Palette can be selected by pressing the appropriate alphabetical key on the
keyboard, except when the Text tool is active. So, you can switch to one of the
Marquee tools by pressing M on both PCs and Macs. Press Shift + M to cycle
through the alternative versions of that tool, the Elliptical and Rectangular
Marquees. Use the same technique to select the Lasso tool and its variations (use
L), as well as all the other tools on the palette. Learn the keyboard shortcuts and
use them.
Some shortcuts use keys in combinations, and you’ll need to keep in mind that the
PC and Mac have the Shift keys in common, but other keys have different names
on the two platforms. In this book, I’ll separate the equivalent keys with a slash, so
when you see Ctrl/Command or Alt/Option you’ll know to press the Ctrl and Alt
keys on the PC and Command and Option keys on the Macintosh. The Mac also
has a Control key (not to be confused with the PC’s Ctrl key), which serves the
same function as a right-click with the mouse on the PC. So, right-click/Control-
click are the same command sequence on the two platforms. And, the Mac has a
Return key rather than an Enter key.
Making Rectangular, Square, Oval, and
Circular Selections
The easiest way to make rectangular, square, oval, and circular selections is with
the Rectangular and Elliptical Marquee tools. To make such a rectangular selec-
tion, just choose the tool (press M to select it), then drag in your image, releasing
the mouse when the selection is the right size. To deselect any selection at any
time, press Ctrl/Command + D or click anywhere on the screen with a selection
tool outside of the selection border. If you click outside the border with another
tool, this shortcut will not work. Hide a selection by pressing Ctrl/Command +
H. Here are some of the options you should learn when using the selection tools.
■ Click at the point where you want the rectangle or ellipse to begin, and then
drag in any direction. The selection will grow from that point in the direc-
tion you drag.
■ Hold down the Alt/Option key and click a point, then drag in any direction.
The selection will radiate outward, with that point as its center.
■ To draw a perfect square or circle, click and hold down the Shift key while
you drag. Hold down both the Shift and Alt/Option keys when you first click,
and the selection will radiate from the centerpoint where you clicked.
■ Choose Fixed Aspect Ratio from the Style drop-down list in the Option bar,
shown at the top in Figure 5.6. Leave the Width and Height values at their
default 1, and forget about holding down the Shift key. You’ll draw only per-
fect squares or circles every time you click and drag when this option is active.
■ Type other values into the Width and Height boxes to create selections with
other proportions. For example, using 8 and 1, respectively, will force the
Marquee tool to create only selections that are eight times as wide as they are
tall.
■ Choose Fixed Size from the Style drop-down list in the Option bar and type
in dimensions, in pixels, for your selection. Say you had an image that was
800 × 600 pixels and wanted to grab a 640 × 480 pixel chunk of it. Once
you’ve typed the target dimensions into the Width and Height boxes, click-
ing with the Rectangular Marquee produces a selection in that size that you
can drag around the screen to the part of the image where you want it to be.
Chapter 5 ■ Compositing in Photoshop CS 145
Figure 5.6 Choose selection
options from the Option bar.
Creating Single-Row and Single-Column Selections
Choose the single row and single column selection tools, which reside in the
same icon as the other marquee tools. Position the mouse pointer in the window,
then click and drag. You will select a single line, which extends across the entire
window. If you had chosen the single-column option, you would have drawn a
single vertical line. These lines, horizontal and vertical, have properties of selec-
tions and therefore can be filled with paint, rotated, and manipulated in many
other ways.
Making Freehand Selections with the Lasso Tool
With the Lasso tool you can make freehand selections of a part of an image. Select
the tool and drag around the outline of the area you want to select. This tool has
three modes. The default mode draws a selection as if you were sketching it with
a pencil. The Polygonal Lasso tool lets you create selections in straight lines by
clicking, dragging to the next point and clicking again, and then repeating this
process until you click back at the origin point to close the selection. The Magnetic
Lasso tool examines the image area as you drag, and
attempts to “hug” the edges of the area as closely as pos-
sible, using parameters you type into the Option bar,
shown at the bottom in Figure 5.6. You can see the
Magnetic Lasso at work in Figure 5.7.
The options available with the Magnetic Lasso include:
■ Detection Width. An area, measured in pixels,
which the tool will use to search for high contrast
areas in the path of the selection border to “hug” to.
■ Edge Contrast. The amount of contrast required in
the area (from 0 to 100 percent) to qualify as an
“edge.”
■ Frequency. The spacing between magnetized points.
The higher the number (from 0 to 100) the more fre-
quently Photoshop will add points.
■ Pen Pressure. Allows you to draw thicker lines when
you press harder with a stylus on a pressure-sensitive
tablet.
Use large width and higher-edge contrast settings with a higher frequency to cre-
ate a selection that has well-defined images. Use a smaller width, reduced contrast
settings, and a lower frequency to trace a softer-edged selection.
Adobe Photoshop CS2: Photographers’ Guide146
Figure 5.7 The Magnetic Lasso “hugs” the edges of an
area at the point of greatest contrast.
Other Selection Tips
Here are some more tips that apply to the selection tools:
■ When any selection tool is active, you can drag a selection anywhere on the
screen.
■ Mark the Anti-aliased box in the Option bar to smooth the edges of an ellip-
tical or freehand selection. Rectangles don’t need anti-aliasing, so this option
is grayed out when the Rectangular Marquee tool is active.
■ Type a value into the Feather box in the Option bar to create a selection that
fades out gradually over a range of the number of pixels you specify.
Adding, Subtracting, or Combining Selections
Once you’ve made a selection, you can modify it by adding, subtracting, or com-
bining. Here’s a refresher of the options at your command.
■ Choose a selection tool and add to an
existing selection by holding the Shift
key while you drag. You can also click
the Add To Selection icon in the
Option bar to temporarily make
adding to the selection the default
action.
■ Choose a selection tool and subtract
from an existing selection by holding
the Alt/Option key while dragging. Or,
click the Subtract from Selection icon
in the Option bar.
■ Click the Intersect with Selection icon
in the Option bar, then create a selec-
tion that overlaps the original selection.
Only the portion that overlaps the two
will be selected. This useful technique
can help you do things like create a
particularly shaped selection. Figure
5.8 shows the results of adding, sub-
tracting, and intersecting selections.
Chapter 5 ■ Compositing in Photoshop CS 147
Figure 5.8 At top, adding the two selections at left produces the final
selection at right; middle, subtracting the circular selection from the
rectangular selection at left produces the final selection at right; bottom,
Intersecting the squiggly selection at left with the rectangular selection
produces the final selection you can see at right.
Other Selection Tools
There are other tools you can use to make selections within Photoshop. Here is a
brief refresher for those tools, too.
Magic Wand
The Magic Wand, which you can activate by pressing the W key, selects all pixels
that are similar in hue and value to the pixel you first clicked on. Originally, the
Magic Wand would select only the pixels that touched each other (were contigu-
ous), but now this capability is an option (albeit, the default). If you turn off the
contiguous parameter in the Option bar, the Magic Wand will select all the pix-
els in an image that are similar in hue and value to the first pixel.
You tell the wand how choosy to be by setting its tolerance, from 0 to 255. Based
on the tolerance set, the wand extends the selection outward until it finds no more
pixels with the color values within the limits you’ve specified. For example, if the
tolerance was set to 40 and you clicked with the wand on a pixel that had a value
of 100, the Magic Wand would select all pixels with values between 60 and 140.
(Both hue and luminance are figured into a special equation as the wand decides
which pixels it can and cannot select.) A high tolerance will select a wider range
of pixels. A low tolerance will select a very narrow range of pixels.
If you want to select a wide range of a color, from bright to dark, set the tolerance
higher than the default (32) and click the wand in the middle of the range of color
values. If you click in an area of the color that is very dark or very light, you are
giving the wand less latitude. (Remember, color values can range from 0 to 255.)
The Magic Wand’s selections can be smoothed (anti-aliased) or rough, depending
on whether you’ve marked the Anti-alias box in the Option bar, and you can also
check the Use All Layers box, in which case the Magic Wand will select pixels
based on color information in all the layers of your image, rather than simply from
the active layer. For Figure 5.9 I took a simple close-up photo (made with a lowly
2-megapixel camera, by the way), and set the Tolerance first at 12 (at top) and
then at 32 (bottom), clicking with the Magic Wand in the brightest part of the
orange in both cases.
The Select Menu
You can change a selection using choices from the Select menu.
■ Select All (everything in an image; also Ctrl/Command + A), Deselect (can-
cel all selections; also Ctrl/Command + D); Reselect (the last selection made;
also Shift + Ctrl/Command + D); and Inverse (reverse the selection; also Shift
+ Ctrl/Command + I).
Adobe Photoshop CS2: Photographers’ Guide148
Chapter 5 ■ Compositing in Photoshop CS 149
Figure 5.9 The Magic Wand’s
Tolerance control was set to 12
at top, and 32 at bottom.
■ Select Color Range. Using the dialog box shown in Figure
5.10, make a selection based on colors you specify using the
Eyedropper tool.
■ Feather. (fade out a selection; also Alt/Option + Ctrl + D) Type
in a pixel value for the desired width of the fade zone.
■ Modify. Change the selection boundary to a border of a pixel
width you specify; smooth the rough edges of the selection bor-
der; expand the selection border outward by the number of pix-
els you specify; contract the selection border inward by the
number of pixels you specify.
■ Grow. Adds adjacent pixels that fall into the brightness range
specified by the Magic Wand tool’s options.
■ Select Similar. Adds pixels anywhere in the image that fall
within the Magic Wand tool’s tolerance setting.
■ Transform Selection. Produces a set of handles you can use to modify the
selection using Photoshop’s transformation tools. Right/Control (on the Mac)
+ click the selection to choose one of the transformation options, such as
Scale, Rotate, Skew, and so forth.
■ Load/Save Selection. Allows you to save the current selection, or load one
you’ve previously saved.
Making Selections with the Paths Palette
If you have used an object-oriented illustration program, you will recognize the
Pen tool as a Bézier (Bez-ee-ay) curve drawing device. With the Pen tool you can
create lines and shapes that can be fine-tuned, saved as paths, filled with color or
outlined (stroked), and used as the basis for selections. Conversely, you can change
selections into paths and edit them with the tools on the Paths Palette. The small-
est part of a path is a segment—the line connecting two anchor points. Several
segments, linked, make a subpath, and subpaths combine to form paths. A path
can be a line or a closed shape or a series of lines, a series of shapes, or a combi-
nation of lines and shapes. You can stroke and fill subpaths as well as paths.
Importantly, paths can be converted to selections, which is useful when you want
to select an area of an image that can be closely approximated by a path.
Here’s a quick refresher on the Pen tool. Open an empty document and try out
the individual tools and options to make sure you’re up to speed. There are con-
siderably more options and techniques for using the Pen tool and Freehand Pen
tool than I’ve outlined here. If you find the Pen especially useful for making selec-
tions, you’ll want to brush up on them.
Adobe Photoshop CS2: Photographers’ Guide150
Figure 5.10 Select Color Range lets you
create a selection based on hues in your image.
Figure 5.11 The dark anchor
point is the one that is
currently selected.
Drawing Straight Lines
Here’s how to draw straight lines:
1. Select the Pen tool. Click in the window to set an anchor point. It is called an
anchor point because it will anchor one end of a line. Release the mouse but-
ton. Click again a distance away to create a second anchor point; a line will
be drawn between the two.
Notice that a new anchor point is darkened as it is created, indicating that it
is selected. At the same time, the previous anchor point lightens, meaning that
it is deselected, as shown in Figure 5.11. Release the mouse button and click
to create a third anchor point and second line.
2. Release the mouse button and move the pen on top of the first anchor point.
A small loop appears to the side of the Pen tool icon, letting you know that
clicking will close the path. Click on the first anchor point to close the trian-
gle. Photoshop will create this new shape in its own shape layer, called Shape
1 by default. Each new object you create with the Pen tool will be created in
its own layer, too.
Be certain that you do not drag the mouse as you create any of these lines. If you
do, you will create curved lines, not straight-edged ones. Press Delete twice to
eliminate all lines before going on to the next part of the exercise.
Hold down the Shift key to constrain the placement of an anchor point to a 45
degree angle or a multiple of 45 degrees, such as a 90 degree angle. This also works
to constrain the angle of a direction line to 45 degrees or a multiple thereof. Both
constraints are helpful for drawing some geometric shapes.
Drawing Curves
Here’s how to draw curves:
1. Click the pen once in the window to create an anchor point in a new shape
layer, and holding down the mouse button, drag at an angle to form the first
part of a curve. As soon as you begin dragging, the pen will turn into an arrow.
The lines that emerge as you drag are called direction lines. The slope of the
curve is the same as the slope of its direction lines, and the height of the direc-
tion lines determine the height of the curve. There are two dark dots at the
end of each direction line. These are direction points.
2. Release the mouse button to finish drawing the first part of the curve.
3. Position the pen a short distance from the first point. Click, keeping the
mouse button held down. A slightly curved line will form between the two
anchor points.
Chapter 5 ■ Compositing in Photoshop CS 151
4. Still keeping the mouse button down, drag in the
direction away from the first anchor point. This
action will shape the curve connecting the two anchor
points, making it more exaggerated, as shown in
Figure 5.12.
5. Release the mouse button and click again, in line with
the first two anchor points, and drag in the direction
away from the second anchor point. Another curve is
formed. You can continue in this way, building a gen-
tly curved line.
Adobe Photoshop CS2: Photographers’ Guide152
Figure 5.12 Drawing curves with the Pen tool.
PREVIEW
Before you add an anchor point, you may want to preview the curve it will be mak-
ing. This is especially helpful when you’re outlining an image. To use this preview
option, click the down-pointing arrow in the Option bar and mark the Rubber
Band checkbox. Thereafter, when you release the mouse button, but move the pen
to set your second anchor point, a curved line will follow it. You can use this fea-
ture to assist you with anchor point placement as you outline an object.
Moving an Anchor Point or Direction Point to Change
the Shape of a Curve
You can change the shape of a curve:
1. Draw a simple path with the pen: one anchor point with direction lines, con-
nected by a curve to a second anchor point.
2. Select the arrow from the palette and place it on the first anchor point. Click
on the point and drag it. The shape of the curve will change as you do.
3. Now place the arrow on one of the direction points (at the end of a direction
line), and drag it back and forth. This is another way to change the shape of
a curve. When you select the pen again, you can continue drawing from where
you left off.
Making a Selection from a Pen Tool Path
Here’s how to transform your path into a selection:
1. Select the path you want to transform by making its layer active.
2. Right/Control + click the path and choose Make Selection from the pop-up
menu shown in Figure 5.13.
3. In the Make Selection dialog box you can set the feather radius for the selec-
tion border and, if you want, you can choose the Anti-aliased option.
4. Choose whether you want a new selection, or add, subtract, or intersect a cur-
rent selection.
5. Click on OK to change the path to a selection.
Chapter 5 ■ Compositing in Photoshop CS 153
Figure 5.13 Change a path to
a selection.
Creating a Simple Composite
Now it’s time to use your selection skills, plus some other techniques we’ll pick up
as we go along, to create a simple composite. This section will help you learn not
only the Photoshop tools you need to create realistic composites, but also some of
the visual considerations. You can follow along using the Soccer Ball and Soccer
Kick images from the website at , or work with a sim-
ilar photo of your own. The techniques can be applied broadly.
I warned you earlier in this chapter that we’d be working with out-takes. The goal
for this particular exercise is to take a photo reject, and make it more presentable.
Figure 5.14 shows the original photo we’ll work with. It’s not razor sharp, but it’s
not a bad action photo, particularly if you happen to be the parent of one of the
players pictured. The chief problem is that the soccer ball is all washed out and
excessively blurry, and, unfortunately, merges with a bit of light-colored back-
ground showing through the trees behind, making it look like the ball has a knob
growing out of the bottom. A simple composite can improve this photo while
offering the opportunity to make other changes, as well.
Follow these steps to create the transformation.
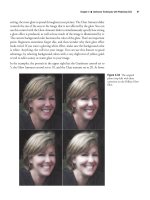
1. The first thing we can do is make the picture more dramatic by raising the
young girl an extra two or three feet off the ground. Use the Lasso to select
her, and paste her down onto a new layer. Then use the Move tool to nudge
her up higher in the picture, as shown in Figure 5.15. (I’ve dimmed the orig-
inal image background to make the pasted selection more obvious.)
2. Use a soft eraser brush to erase around the edges of the figure on the new layer
so she’ll blend in with the background behind.
3. Go back to the original background layer and use the Clone Stamp to remove
the extra shadow that appears under the player’s feet, leaving only the origi-
nal shadow beneath her. Use the Clone tool to put part of the background
image on any portions of the original player figure that show through. The
image will look like Figure 5.16. (The background is no longer dimmed, so
you can see how smoothly the background and pasted image merge.)
Adobe Photoshop CS2: Photographers’ Guide154
Figure 5.14 This action photo can be improved, a lot.
Chapter 5 ■ Compositing in Photoshop CS 155
Figure 5.15 Give the young
soccer player a lift to add to
the excitement.
Figure 5.16 Blend the
elevated portion of the image
so it merges smoothly with the
background.
4. Next, load the Soccer Ball photo from the website, and use the
Elliptical Marquee tool to select it. You can hold the Shift and
Alt/Option keys, click the approximate center of the ball, and
drag to create a perfect circle with the ball centered in the selec-
tion. If necessary, nudge the selection and/or expand or con-
tract the selection (as you learned to do earlier in this chapter)
until only the ball is selected, as shown in Figure 5.17.
5. Copy the ball and paste it down in the original photo on top
of the original soccer ball.
6. Resize the ball in its new layer so it’s exactly the size as the ball
it replaces.
7. Use the Clone Stamp tool to erase the original ball from the
background image.
8. Make the replacement ball match the photo a little more closely
by performing these modifications:
■ Use Image > Transform > Rotate to rotate the ball a little counterclockwise
so its brightest surface is upwards, matching the direction of the sunlight
in the original photo (almost exactly overhead, but a little to the right).
■ Use the Burn tool with a soft brush to darken the underside of the soccer
ball.
■ Use Image > Adjustments > Brightness/Contrast to adjust the brightness
and contrast of the ball so it looks more natural in the image. You’ll need
to judge the amount of brightness and contrast to apply visually. Just move
the sliders until the ball looks “best.”
■ Use the Filter > Blur > Motion Blur filter, with the Distance setting at 11
pixels to give the ball a little blur.
The finished photo will look like Figure 5.18. In Chapter 8 you’ll learn how to
do other interesting things with photos like these, such as add motion blur streaks
to the players themselves.
Stitching Two Photos Together
Ordinary panoramic pictures are the penultimate wide-angle photograph (the ulti-
mate being either a 360-degree panorama or, perhaps, a picture that would encom-
pass a complete sphere, with the camera at the center). In practice, 100- to
120-degree panoramas are easier to achieve simply by taking multiple pictures and
stitching them together with Photoshop. This next project will show you how to
do it, using Photoshop CS’s Photomerge feature as well as a time-tested technique
Adobe Photoshop CS2: Photographers’ Guide156
Figure 5.17 Select only the soccer ball from
the second photo.
that can be used with earlier versions of the image editor. But first, a little back-
ground.
Traditionally, panorama photos have been produced using several different meth-
ods. One elegant solution has been a special panorama camera, which uses a lens
that rotates from left to right in concert with a moving shutter, thus exposing a
long strip of negative with a very wide-angle view of the subject, something like
the one shown at top in Figure 5.19. Such cameras tended to be expensive and
required working with a tripod for best results.
Another solution is the one used by now-discontinued and not-much-lamented
APS (Advanced Photo System) cameras, which let you switch back and forth
between three different aspect ratios, including a panorama view. This system
works by taking an ordinary frame and simply ignoring the top and bottom por-
tions, enlarging a thin strip in the middle of the frame to create a panorama. There
Chapter 5 ■ Compositing in Photoshop CS 157
Figure 5.18 The finished photo is a lot more interesting with the new, composited elements and added blur.
are advantages and disadvantages to this approach. One advantage is that you don’t
need a tripod; any picture you care to take can be transformed into a panorama
by flipping a switch on the camera. The most important plus to this system is that
photofinishers are set up to handle such panorama photos automatically. The APS
camera marks the film’s magnetic strip with a code that labels a panorama picture
as such. The photolab’s automated printing equipment reads this code and prints
out your wide photos using the panorama area previewed in the camera’s
viewfinder.
The chief disadvantage is that such panoramas don’t use all the available film area,
and that’s probably one of the reasons why the APS system failed (cheap digital
cameras being another reason). You get a wide-angle shot by enlarging only a cen-
ter strip of the film. Your 4 × 10-inch panorama picture is actually just an 8 × 10
with two inches trimmed from the top and bottom. That’s cheaper and faster than
snipping an 8 × 10-inch print yourself, but you’re not getting the sharpest possi-
Adobe Photoshop CS2: Photographers’ Guide158
Figure 5.19 Special
panorama cameras expose a
wide image on a long strip of
film (top). Or, you can simply
crop the top and bottom out
of an image (bottom).
ble picture. At the bottom of Figure 5.19 you can see how such a panorama might
be derived from a full-frame photograph.
A third way to create panoramas is with one of the newer digital cameras with this
feature. When you switch to panorama mode, the digital camera shows a ghost
image of the edge of your last picture in the LCD panel on the back of the cam-
era. You then use this ghost image to line up your current image so that the two
overlap. You can repeat this step as many times as you want to create sweeping
panoramas. Of course, each portion of the panorama is created as a separate dig-
ital image. You’ll still need to stitch them together in Photoshop. (Digital cameras
with the panorama feature often are furnished with special utilities that can stitch
the images effectively.)
A fourth way to create panoramas is to take several full frame photos with a dig-
ital or film camera, lining them up as best you can by eye, and then stitching them
together to create one very wide photo. Such photos have been pasted together in
the past, and then rephotographed and printed, but Photoshop makes it easy to
mate a series of photos digitally. The advantage of this method is that each pic-
ture contains the maximum resolution possible with a full frame digital or film
camera image. Another plus is that it’s not necessary to shoot with a wide-angle
lens, which tends to load the image up with foreground and sky, while pushing
the important subject matter way, way back. You can move to a good vantage point
and take your set of pictures with a normal lens or telephoto, then join them to
create one seamless image. The chief disadvantage of this method is that it’s tricky
to produce the original images, and time-consuming to join them.
However, if you plan out your panorama as you shoot, you can avoid many of the
problems. Here are some tips for shooting good panoramas.
■ Minimize the number of photos you take to reduce the number of images you
have to stitch together. If you really, really want a 360-degree panorama you
can take one, but plan on spending a lot of time combining images.
■ There are specialized software programs you can buy, but I recommend see-
ing how well Photoshop works for you before buying one of these.
■ Use a tripod with a panning head as a way to keep all your images level. Adjust
the tripod (use an actual level if necessary) and swivel through your panorama
to make sure the transitions will be smooth before taking the first photo. Some
panheads have markings in degrees to help you align the camera.
■ Try to keep exposures, including lens opening and shutter speed, the same
between pictures so they’ll match more easily.
■ Remember to overlap your images slightly so you’ll be able to blend each
photo into the next.
Chapter 5 ■ Compositing in Photoshop CS 159
■ You should know that, technically, the camera should
rotate around the optical center of the lens, not the
center of the camera body to produce the most real-
istic perspective. Some panorama attachments for
tripods include a plate that includes a tripod mount
under the lens center, rather than in the usual loca-
tion under the camera body. Figure 5.20 shows the
right and wrong locations for your center of rotation.
This next exercise will introduce you to the basics of
stitching, using only two pictures to start. Load the
Toledo Left and Toledo Right photos from the website.
These two pictures were taken on a hill outside Toledo,
Spain, at the exact spot where the artist El Greco stood
in the 16th century to craft his immortal painting View
of Toledo. Unfortunately, the location is so far from the
town that a wide-angle picture of the entire panorama
displays more hillside and sky than actual town. Reaching
out with a telephoto lens to grab the medieval city on its
perch above the Tagus River yields a minimum of two
pictures, shown in Figures 5.21 and 5.22. I’m going to
show you two ways to create a panorama, using pre-Photoshop CS techniques (the
hard way) and the Photomerge feature introduced with Photoshop CS 1.0.
Adobe Photoshop CS2: Photographers’ Guide160
Figure 5.20 Ideally, a camera should swivel around the
optical center of the lens when creating a panorama.
Figure 5.21 The left side of
the panorama.