Flash CS5 THE MISSING MANUAL phần 5 ppsx
Bạn đang xem bản rút gọn của tài liệu. Xem và tải ngay bản đầy đủ của tài liệu tại đây (2.02 MB, 77 trang )
287
Advanced Tweens with
the Motion Editor
T
weens have always been a big tool in Flash’s animation toolbox, and, as
explained in Chapter 3, these days you have more control over tweens than
ever. Flash’s motion tween (page 98) can do more than just show a car moving
down a street—it can make the car stretch out and turn blazing red when it’s going
really fast and scrunch up when it stops. It can even make the car’s shadow change
position as the car and sun move across the screen.
You accomplish these sophisticated tweens by making multiple property changes at
multiple points in time. Want precision control over every aspect of a tween? Turn to
the Motion Editor. This chapter shows you in detail how to apply and fine-tune your
motion tweens, focusing in particular on Motion Editor control. You’ll start with a
refresher on motion presets, which are simply predesigned tweens that you can ap-
ply to objects with a couple of mouse clicks. Then you’ll learn some of the different
ways you can edit your tweens on the stage, in the timeline, and using the Motion
Editor. Along the way, you’ll learn how to apply filters for special effects and how to
create more realistic motion (easing).
Note: If you need a primer on motion tween basics, or tweens in general, head back to page 98.
Applying Motion Presets
Designing a perfect tween can be a lot of work. It’s not so much that it’s difficult, but
creating a complex motion tween where several properties change at different points
in time can be time-consuming. Fortunately, right out of the box, Flash gives you
a head start. Open the Motion Presets panel (Window➝Motion Presets), and you
288
F CS: T M M
Applying Motion
Presets
see a handful of predesigned tweens, as shown in Figure 8-1. Initially, the Motion
Presets panel comes with two folders: Default Presets, where the Adobe-designed
presets live, and Custom Presets, where you can store tweens you’ve perfected as
motion presets (see page 290). Just click a motion preset to see a minipreview at the
top of the panel.
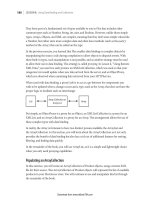
Figure 8-1:
Motion presets are saved tweens that you can attach to a
symbol or text field with a couple of mouse clicks. Flash comes
with several Adobe-designed motion presets, and you can save
and reuse your own as you work.
Preview
window
Open/close
folder
Remove item
New folder
Save selection as preset
Apply
preset
Not only are motion presets useful design tools, but they’re also great learning tools.
By dissecting some of the professionally designed presets that come with Flash, you
can see how certain effects are created. After you’ve applied presets in your project,
you can modify them, examine them, and steal some of their ideas for your own
tweens. To get started, the following steps show how to apply and modify a motion
preset called flyin-pause-flyout. As with most presets, the name gives you a pretty
good hint at the action.
First, the easiest part: applying a motion preset. Like any motion tween, a preset can
be applied only to a symbol or a text field. For this exercise, you can draw your own
simple circle, or you can use the Missing CD document 08-1_Flyin_Preset.fla from
www.missingmanuals.com/cds.
1. Open the Motion Presets panel by choosing Window➝Motion Presets.
The Motion Presets panel is small, so you can easily let it float over your work
area while you’re making a selection, and then close it after you’ve applied a
289
C : A T M E
Applying Motion
Presets
preset. You won’t need it again until you need another preset. If you’re working
in the Essentials workspace, the Motion Presets panel appears at the bottom of
the collapsed panels to the right of the stage.
2. Select the symbol you want to tween; in this case, your circle or the car from
the example file.
The symbol or text field you tween has to be by itself in a layer in the timeline.
If the layer holds more than one object, Flash creates a new layer for the object
before it applies the tween. If the object can’t be tweened (perhaps it’s not a sym-
bol), you see a warning like Figure 8-2.
Figure 8-2:
If you try to apply a motion tween to an object other than a
symbol or a text field, you see this warning.
3. In the Motion Presents panel, click the flyin-pause-flyout preset, and then click
Apply.
A motion path appears attached to the object on the stage, and a blue tween ap-
pears in the main timeline, as shown in Figure 8-3.
4. Press Enter to preview your tween in Flash.
More often than not, you’ll make changes to a preset motion after you apply it.
Start by taking a look at how the motion preset behaves. The flyin-pause-flyout
preset blurs the symbol while it’s moving, giving it a sense of speed. It slows for
a bit and then speeds on. As you’ll learn in this chapter, once you’ve applied the
preset you can change the position of the tweened symbol, its size, and even
its appearance. For example, you can increase or decrease the blurriness of the
image.
5. Modify the tween just as you would any tween you created from scratch.
For example, often the tween is working right, but you need to fine-tune the
position of both the object and the motion path. With the Selection tool, drag a
box around both the object and the motion path to select everything. Then you
can drag the whole kit and kaboodle to a new position on the stage.
Note: In different places, this book explains how to make changes to the tween using the motion path
(page 292), the timeline (page 299), the Motion Editor (page 302), and the Properties panel (page 102).
290
F CS: T M M
Applying Motion
Presets
Figure 8-3:
After you apply a
tween to a movie clip
or text field, you see a
motion path attached
to the tweened object.
A blue tween appears
in your animation’s
timeline, complete
with preset property
keyframes.
Car symbol
blurred
Motion
Path
Property
keyframe
Tween in main timeline
Default presets
Once you’ve applied a tween using a motion preset, it’s no different from a tween
you create from scratch. Also, there’s no connection between the tween and the pre-
sets panel. If you make changes to the tween in your animation, it has no effect
on the one stored in the Motion Presets panel. Vice versa is true, too. Unlike with
symbols in the Library, making changes to or deleting the tween in the Motion
Presets panel has absolutely no effect on animations to which you’ve applied the
preset.
Saving a Custom Motion Preset
Setting up the perfect motion tween can take time. Perhaps you’ve got a text ban-
ner with some 3-D effects. Or maybe you spent time getting a basketball to bounce
just right. With all that time invested, you want to be able to reuse that work, and
as usual, Flash helps you do just that. You can save your carefully crafted tween as
a motion preset, and then, in the future, apply it to new symbols and text fields
with a click or two. Furthermore, because you modify the tweens created by pre-
sets, they’re very versatile and adaptable to different uses. For example, a badminton
shuttlecock might not bounce like a basketball, but it’s probably faster to apply the
291
C : A T M E
Modifying a Motion
Preset
basketball-bounce preset to the shuttlecock and then tweak it a bit than to create a
new motion tween from scratch.
Saving a preset is easy, and you have couple of ways to do the job. Which one you use
may depend on your own preferences or where your mouse happens to hover at the
moment. You can choose one of these methods to save a motion preset:
• Right-click the tween or motion path, and then choose Save as Motion Preset
from the pop-up menu.
• Select the tween or motion path, and then click the “Save selection as preset”
button on the Motion Presets panel (Figure 8-1).
In either case, a dialog box opens where you name the preset, and then click OK. Once
that’s done, your newly named preset appears in the Custom Presets folder in the
Motion Presets panel. (Your custom preset won’t have an animated preview like the
ones that come with Flash, but you can create one as instructed in the box below.)
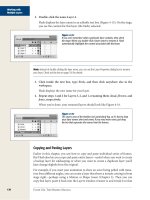
FreqUenTly ASked qUeSTion
DIY Preview
Can I create a preview for my custom motion preset?
If you’ve gone to the work of creating a custom motion
preset, you may want it to have its own nifty preview ani-
mation just like the presets Adobe designed. As it turns out,
you can do that easily. First, publish your preset to create
an SWF file that shows the animation. (The details for pub-
lishing SWF files are on page 645.) Then place the SWF file
in the folder that holds your motion presets.
That last bit is the tricky part. The motion presets storage
location is different for different computers, as shown in
the following examples. (The words in brackets, like <hard
disk> and <your name>, represent the disk drives and user
names on your computer, while <locale> represents the
locale or language for the computer; for example “en” is
used for English.)
• Mac OS X: <hard disk>/Users/<your name>/Library/
Application Support/Adobe/Flash CS5/Configuration/
<locale>/Motion Presets/
• Windows 7 and Vista: <hard disk>/Users\<your
name>\AppData\Local\Adobe\Flash CS5\<locale>\
Configuration\Motion Presets
• Windows XP: <hard disk>\Documents and Settings\
<your name>\Local Settings\Application Data\Adobe\
Flash CS5\<locale>\Configuration\Motion Presets\
Deleting motion presets
If you decide that a particular motion preset isn’t worthy, you can delete it from the
Motion Presets panel. In the Motion Presets panel, click to select the offending pre-
set, and then click the trash can icon at the bottom of the panel. The stored preset
disappears from the panel, but throwing it away has no effect on any tweens that
were created using the preset.
Modifying a Motion Preset
As discussed earlier in this chapter, Adobe gives you a bunch of snazzy motion
tweens with Flash. But one designer’s perfect tween is another designer’s, well…
nearly perfect tween. Fortunately, you can customize presets after you apply them.
292
F CS: T M M
Modifying a Motion
Preset
In fact, tweaking a motion preset is great learning ground for designing and perfect-
ing your own tweens. Editing a motion preset is no different from editing a tween
you created yourself, so the following sections on “Changing the Motion Path” (be-
low) and “Editing a Tween Span” (page 299) apply to both motion presets and the
tweens that you create from scratch.
Changing the Motion Path
Whether you use a motion preset or create your own tween, chances are you’ll want
to tweak the motion path. Perhaps the ball doesn’t bounce in just the right places, or
that car looks like it’s driving off the road. The motion path looks like a line trailing
off from the tweened object. As you drag the playhead in the timeline, you’ll notice
that the tweened object follows the motion path. If you need a practice file, down-
load 08-2_Motion_Path.fla from the Missing CD (www.missingmanuals.com/cds).
You can change this path on the stage using the same Selection tool that you use to
modify any line:
• Move the entire motion path. With the Selection tool, drag a box around any
part of the path. Then drag everything to a new spot.
• Move the starting point for the motion path. With the Selection tool, drag the
diamond-shaped selection point at the beginning of the motion path to a new
location. The end of the path remains anchored where it was, while the motion
path stretches or shrinks to accommodate the move.
• Move the ending point of the motion path. Select the diamond-shaped end
point of the path and drag it to a new location. The starting point of the tween
remains anchored in place, and the motion path adjusts to the move.
• Create a curve in the motion path. First, make sure the motion path is not se-
lected, by clicking some empty spot on the stage. Then with the Selection tool,
point to the path; when you see a curve appear next to the cursor arrow, drag to
create a curved path (Figure 8-4). You can reshape the path by dragging differ-
ent points along the path.
• Change the tweened object’s position at any point of the motion path. In the
main timeline, move the playhead to the frame where you want to reposition
the tweened object, and then drag the object to a new position. Flash creates a
new property keyframe in the timeline and adjusts the motion path to the new
position. To use this method to move the start or end point, make sure that
the playhead is on the first or last frame of the tween. This action also creates
a diamond-shaped control point in the motion path. You can use the point and
the accompanying control handles to change the shape of the motion path. It’s
similar to any line you draw using the Pen tool (page 65).
293
C : A T M E
Modifying a Motion
Preset
Figure 8-4:
Use the Selection and Subselection tools to
modify a motion path just as you would any
other line.
The example file 08-2_Motion_Path.fla includes a wheel with the bounce-smoosh
tween applied. The animation would be much more interesting if the wheel rolled
along the high step, dropped to the ground, and then bounced in a forward motion.
Here’s how to change the path for that effect:
1. Move the playhead to Frame 1 and make sure nothing is selected. Then drag
the wheel so it sits on the step, as shown in Figure 8-5.
If the entire path moves with the wheel, you’ve selected both the path and the object.
To deselect everything, click an empty spot or press Shift+Ctrl+A (Shift-c-A).
2. With the Selection tool, adjust the curve so that the wheel appears to roll
along the top of the stairstep.
When you move the cursor close to the path, it changes to show a curved line
next to the arrow. Drag to adjust the curve in the motion path. The solid line
shows the general arc of the motion, while the small dots show the actual posi-
tion of the tweened object at different points in time.
3. Adjust the end of the motion path so the wheel moves to the right as it bounces.
You can stretch the path to the right side of the stage, giving the wheel a feeling
of increased forward motion as it bounces.
294
F CS: T M M
Modifying a Motion
Preset
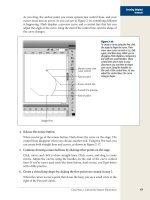
Figure 8-5:
To move the starting point of a motion path,
you can drag the square end point to a new
position.
4. Preview the animation and fine-tune it as necessary.
If you got it perfect the first time, great! If not, try zooming in a little and fine-
tuning the motion path as described in step 2.
Deleting a Motion Path
You can delete a motion path from a tween by simply selecting it and then pressing
Delete. The consequence, of course, is that your tween isn’t going anyplace. The
tweened object remains stranded at its starting point until you provide further in-
structions. For example, you can copy and paste in a new path, as described next.
Copying and Pasting a Motion Path
Flash gives you tools to create perfect shapes like circles, rectangles, polygons, and
stars, not to mention the precise control that comes with the Pen tool. You can use
any of these drawing tools to create a motion path. If you need a path that matches
a perfect shape or is extremely complex, it’s faster and easier to use Flash’s drawing
295
C : A T M E
Modifying a Motion
Preset
tools, rather than dragging tween objects around the stage to modify a motion path.
First you need to create the path with one of the tools that creates a stroke; that is,
any of the shape tools, the Pen, the Pencil, or the Line tool. Then, you paste that
stroke into an existing tween that doesn’t have a motion path.
Note: A file with a completed version of this project, 08-3_Path_Orient.fla, is available at
www.missingmanuals.com/cds.
Here are the steps:
1. In a new Flash document, create two layers, each with 48 frames.
After you create the second layer, Shift-click to select the 48th frame in both
layers, and then press F5 to add new frames on both layers.
2. Create a text field with the words not oriented, and then rename the layer not
oriented.
Make the text nice and bold and about 32 points in size. Double-click the layer
name so you can edit it.
3. Right-click a frame in the timeline of the “not oriented” layer, and then choose
Create Motion Tween from the pop-up menu.
You now have a motion tween with no motion and no tween, because you
haven’t yet made any changes to the tweened object’s properties.
4. In the other layer, use the Oval tool to draw a circle, and then rename that
layer circle.
Set the oval fill color to none by clicking the swatch with the Paint Bucket, and
then, in the upper-right corner of the panel with color swatches, click the square
with a stroke through it. Make the circle about 200 pixels in diameter. If neces-
sary, you can set the size in the Properties panel.
5. Use the Eraser tool, with a small eraser size, to erase a little bit of the circle.
You can’t use a closed shape as a motion path, so you need to break the path at
some point. When you’re done erasing, your stage should look something like
Figure 8-6.
6. Using the Selection tool, drag a box around the circle to select the entire circle.
Copy it (Ctrl+C or c-C), click the “not oriented” tween layer, and then paste
it (Ctrl+V or c-V) into the tween.
As soon as you paste the circle into the tween layer, the text field attaches it-
self to the path. At this point, it’s easier to examine your tween if you hide
the original circle by clicking the Show/Hide button in the “circle” layer
(Figure 8-6).
296
F CS: T M M
Modifying a Motion
Preset
Figure 8-6:
If you want a motion path that’s a perfect circle, square,
star, or polygon, it’s easiest to create the path with one
of Flash’s shape tools, and then paste it into your tween.
Show/hide button
Circle, but not a closed path
7. Press Enter or Return to preview the animation.
Your “not-oriented” text field moves in a circular motion, but the text isn’t ori-
ented to the circle. It remains right-side up and oriented to the stage. That looks
a little odd, but don’t fret. You’ll learn how to orient the text to the circle in the
next section.
You can use any stroke as a motion path, even complex strokes created using the Pen
tool with multiple complex Bezier curves. Just make sure you’re not using a closed
path. Even though the circle isn’t a closed path, the motion of the text looks like it’s
making a complete circle. When the movie clip loops, no one in your audience will
ever know there’s a break in the circle.
Orienting Tweened Objects to a Motion Path
Orienting text fields and symbols to a motion path is as simple as clicking a check-
box. In this section, you’ll learn how to do that, as well as another handy technique—
copying and pasting a motion from one layer to another in the same animation.
When you’re done, you’ll have one Flash file with two examples of circular motion.
In one, the text field is oriented to the circle; in the other, it’s not (Figure 8-7).
1. Click the Insert Layer button in the timeline’s lower-left corner.
A new layer appears in the timeline.
2. Rename the new layer “oriented”.
Double-click the layer, and then type the new name.
297
C : A T M E
Modifying a Motion
Preset
Figure 8-7:
The text field on the left follows the
motion path in a circular motion.
The text field on the right is oriented to
the circular path, so the top of the text
field always points to the middle of the
circle.
3. Click the “not oriented” layer name to select all the frames in that layer, and
then copy the frames (Edit➝Timeline➝Copy Frames).
When you click the layer name, Flash automatically selects all the frames in the
layer. You can also Ctrl-drag (Control-drag) over the frames to select multiple
frames.
4. Click the first frame of the “oriented” timeline, and then paste the frames
(Edit➝Timeline➝Paste Frames).
When you paste frames into the timeline, Flash inserts the pasted frames, push-
ing any existing frames on down the timeline.
Tip: You can also right-click the timeline to see a shortcut menu that has both the Copy Frames and Paste
Frames commands.
5. Shift-drag the end of the “oriented” timeline to the 48th frame so it matches
the length of other layers.
At this point, your oriented timeline is almost identical to the not-oriented
layer.
6. Edit the text field to read “oriented.”
With the Text tool still selected, you can resize the text field to fit the text by
double-clicking the box in the text field’s upper-right corner.
7. Click the motion path, and then, in the Properties panel, turn on the “Orient
to path” checkbox.
If the “Orient to path” checkbox isn’t showing, click to open the Rotation sub-
panel in the Properties panel, as shown in Figure 8-8. Notice that in the time-
line, Flash has added a property keyframe to every frame of the tween, since the
rotation of the text field changes in every single frame.
8. Preview your animation (Ctrl+Enter or c-Return).
Your animation has two text fields that follow a circular path. The text that says
“oriented” is oriented toward the circle and rotates as it makes its rounds. The
text that says “not oriented” remains upright while it follows the motion path.
298
F CS: T M M
Modifying a Motion
Preset
Figure 8-8:
Here the Rotation panel is set to align a symbol
to the motion path. Other options (not set)
control the direction, angle, and number of
rotations.
Number of times to rotate
Angle in
degrees
Rotation
direction
Orient to path
check box
Other things you can do in the Rotation subpanel
The Rotation subpanel in the Properties panel has a few other settings in addition
to “Orient to path.” You can use the Direction drop-down menu to choose clockwise
(CW) or counterclockwise (CCW) rotation for a tweened symbol or text field. This
rotation refers to the tweened object rotating around its center point, not to its path
around the circular motion path; in other words, it makes a text field or symbol spin
during the tween. Above the Direction drop-down menu, you can set the number of
times the object spins and its angle at a particular point in time.
Note: If you turn on “Orient to path”, these other settings are reset, as shown in Figure 8-8. Vice versa is
true, too. Setting Direction to any setting other than “none” deselects the “Orient to path” option.
Swapping the Tweened Object
Suppose you create the perfect tween for a logo or a text banner. It spins, it moves in
3-D, and even the transparency changes so it fades in and out at just the right mo-
ments. Then your client informs you of a big change—there’s a new company logo or
different text. Before you pull your hair out, read on to see how easy it is to swap the
object of a motion tween. Remember, a motion tween is applied to a single object, so
it’s simply a matter of shifting all the property value changes over to a new movie clip
or text field. To swap a symbol for a tweened object, follow these steps:
1. In the original tween, select the symbol.
The symbol’s properties appear in the Properties panel.
299
C : A T M E
Editing a Tween Span
2. In the Properties panel, click the Swap button.
The Swap button appears beneath the symbol’s name and type.
3. In the Swap Symbol box, select the new symbol, and then click OK.
The new symbol replaces the old symbol and performs all the same property
changes.
Editing a Tween Span
The tween span in the timeline deserves a closer look (Figure 8-9), since it gives you
a good overview of what’s going on in a tween. When you create a motion tween,
Flash colors it blue to set it off from the other layers, so you can easily find your
way around. Property keyframes are diamond-shaped in the timeline to distinguish
them from the circle-shaped standard keyframes. Clicking anywhere on the tween
selects the entire tween and moves the playhead to that frame in the tween. What if
you need to select a single frame in a tween? Perhaps you want to copy a tweened
symbol’s properties at that point in the timeline. In that case, Ctrl-click (c-click)
the timeline to select a single frame. Then, right-click the frame and choose Copy
Properties from the shortcut menu.
Figure 8-9:
The tween layer is a
light blue to distinguish
it from the other layers.
The small diamond-
shaped markers are
property keyframes.
Tween layer Playhead Property keyframes
When you apply a motion tween to an object, Flash automatically sets aside a certain
number of frames for the tween, marking them with the blue highlight. If there’s
only one keyframe in the layer, Flash uses all the layer’s frames for the tween. Other-
wise, if there are several keyframes on a layer, Flash uses all the frames between two
keyframes. So, being the clever designer you are, you take this into account when
you create your motion tweens; you lengthen or shorten the available space in the
timeline to make your tweens just the right length. Still, there are times when you
need to make a tween longer or shorter after the fact. The main thing to consider
when you change the number of frames in your tween is the effect the change has
300
F CS: T M M
Editing a Tween Span
on your carefully positioned property keyframes. For example, suppose you have the
perfect tween for a basketball bouncing, but it seems to be running too slowly. You
want to speed up the bouncing motion but keep the relative positions of the property
keyframes the same. In that case, use the first option in Table 8-1—drag the end of
the timeline. In another case, you may want to trim a few frames off the end of your
timeline, making it shorter, but you don’t want the property keyframes to change
position at all. To do that, Shift-drag the end of the timeline.
Table 8-1. Want to lengthen or shorten the timeline of your motion tween? Here are the commands and the
way they affect the property keyframe.
Action How to do it… Effect on property
keyframes
Make a motion tween
longer or shorter.
Drag the end of the timeline. Property keyframes move pro-
portionately, keeping their rela-
tive position along the tween.
Keep a tweened object on
the stage after its motion
is complete.
Shift-drag the end of the
timeline.
Has no effect on property
keyframes.
Remove frames from a
tween.
Ctrl-drag (c-drag) to select
the frames to be deleted.
Then press Shift-F5 to remove
frames.
The number of frames between
property keyframes stays the
same, except for the segment
where the frames are removed.
Insert frames into a tween. Ctrl-drag (c-drag) to select
the number of frames to
insert in the timeline. Then
right-click the selected
frames. Choose Insert Frame
from the timeline.
Inserts frames at the point of
selection. Keyframes before
the insertion point remain in
the same position. Keyframes
beyond the insertion point move
down the timeline.
Move a tween span in the
same layer.
Drag the tween span to a
new point in the timeline.
The relationship of all the key-
frames stays the same; however,
the move erases the existing
frames at the new location.
Change the breakline
between two adjacent
tween spans.
Drag the breakline to a new
point.
Property keyframes move pro-
portionately, keeping their rela-
tive position along the tween.
Delete a tween span. Right-click the tween span,
and then choose Remove
Frames or Clear Frames to
replace the selection with
standard frames.
Deletes all the property
keyframes.
Viewing and Editing Property Keyframes in the Timeline
Property keyframes appear in the tween span at the point when any property
changes. Those properties can include the following:
• Position shown as X/Y coordinates in the Properties panel.
• Scale shown as H/W (height and width) coordinates.
301
C : A T M E
Editing a Tween Span
• Skew, created with the Transform tool.
• Rotation around the transformation point.
• Color, including tint, brightness, and alpha (transparency)
• Filters, like Drop Shadow, Blur, and Glow.
Suppose you want to change the width of a symbol or text field in the middle of
a motion tween. So, you drag the playhead to the point in the timeline where you
want the change to happen. Then, with the tweened object selected, you make the
width change using the W setting in the Properties panel. Flash automatically adds a
diamond-shaped property keyframe to the tween span to mark the change. As seen
on page 299, a single tween span can end up with bunches of property keyframes
scattered all up and down the timeline. Single property keyframe markers can rep-
resent more than one property change, too; for example, you may have both a color
change and a scale change in the same frame. Sometimes when you’re working with
your tween, you want to zero in on property keyframes for specific types of changes.
Perhaps you want to double-check all the color property keyframes. In that case,
right-click the timeline, and then choose View Keyframes from the shortcut menu,
as shown in Figure 8-10. Toggle the different options until only the Color option is
checked.
Figure 8-10:
You can select which property keyframes you want
marked in the timeline. Right-click a tween span,
and then choose View Keyframes to see this menu.
Tip: As you’re trying out different effects with the Motion Editor, you may experiment your way
from a good motion tween to a not-so-good motion tween. Don’t forget about the History panel
(Windows➝Other Panels➝History), where you can backtrack to a previous (and better) point
in your work. Just drag the arrow handle on the left side of the panel back to where things looked
good.
302
F CS: T M M
A Tour of the Motion
Editor
Copying Properties Between Property Keyframes
There may be times when you want to duplicate the properties in one property key-
frame to another elsewhere in the tween span, or perhaps to an entirely different
tween span. For example, it’s a great way to freeze the action for a certain number of
frames. (Create two motion keyframes with identical properties. Insert frames in-
between the keyframes to lengthen the amount of time the action freezes. Or remove
frames to make it shorter.)
Start by Ctrl-clicking (c-clicking) the property keyframe you want to copy to select
a single frame. Right-click that frame, and then choose Copy Properties from the
shortcut menu. Head over to the destination frame where you want to paste the
properties and select that single frame using a Ctrl-click (c-click). Then, right-click
that selected frame; you can then choose Paste Properties to paste in all the proper-
ties, or Paste Properties Special, where you can specify which properties to paste.
FreqUenTly ASked qUeSTion
No Longer a Tween
Can I change a tween to a frame-by-frame animation?
Yes. Sometimes you may want to work with the individual
frames inside a tween. Perhaps you want to copy and use
them in another scene. Before you do that, you need to
convert the tween to a frame-by-frame animation. What
you’re basically doing is changing every frame in your
tween to a keyframe that contains a copy of the tweened
object with all the adjusted position, scale, rotation, and
color properties. Keep in mind, though, that doing so sub-
stantially increases the size of your Flash animation.
Right-click the tween span you want to convert. Choose
Convert to Frame by Frame Animation from the shortcut
menu. The blue tween highlight disappears from the time-
line and is replaced with keyframes lined up like dominoes,
as shown in Figure 8-11. These are standard keyframes,
mind you, not property keyframes.
Figure 8-11:
When you convert a tween
to frame-by-frame anima-
tion, each and every frame
holds a standard keyframe.
Here the “oriented” layer
has been converted to a
frame-by-frame animation.
Standard layer Motion tween span Tween converted
to frame-by-frame
A Tour of the Motion Editor
The Motion Editor is like a powerful microscope that lets you examine a motion
tween’s innards. Combining the features of the timeline and the Properties panel,
the Motion Editor focuses on a single tween span, showing you its workings at a
seemingly molecular level. Not only that, but the Motion Editor also gives you the
303
C : A T M E
A Tour of the Motion
Editor
power to make a change to any tweenable property at any point in time. With all this
firepower, you can create very complex tweens and control them with better preci-
sion than ever before.
To open the Motion Editor, go to Window➝Motion Editor. The Motion Editor won’t
show its stuff unless you select either a tweened object on the stage or a tween span
in the timeline. (If you want to experiment with an existing tween, you can down-
load 08-4_Motion_Editor.fla from the Missing CD page at www.missingmanuals.
com/cds.) At first glance, the Motion Editor may look a little intimidating, with lots
of properties, numbers, widgets, and graph lines. Don’t be put off—it’s not tough to
master these elements and bend those motion tweens to your iron will. If you’ve
used Flash’s custom easing feature before (it’s been around since Flash 8), you have
a head start.
Tip: Using the Essentials workspace, which this book uses throughout, the Motion Editor appears as a tab
below the stage, next to the timeline (Figure 8-12). If you have room, though, you may want to drag the
tab to a new location—like a second monitor. Giving the Motion Editor more room makes your work easier
and faster.
Figure 8-12:
At first, the Motion
Editor may seem
more like a tool for
math geeks than one
for graphic artists.
Give it a chance,
though. Master a
couple of Motion
Editor principles,
and you’ll enjoy the
control and precision
it provides.
Property Value Ease Keyframe Graph
There’s a lot going on with the Motion Editor, so it’s best to introduce yourself a sec-
tion at a time. At the very top, there are labels for each of its sections:
• Below the Property label, you see the same properties that you’ve used in the
Properties panel, like the X/Y position coordinates, the W/H (width and height)
properties, and so on.
304
F CS: T M M
A Tour of the Motion
Editor
• The Value settings should look familiar by now. For each property, you can click
and type a new value, or you can drag to scrub in a value.
• The Ease tools (covered on page 312) let you speed up or slow down specific
portions of your tweens. For example, you could make a moving car start off
slowly and then gain speed.
• The triangle buttons under Keyframe give you a way to jump forward and
backward among the property keyframes. You use the diamond button to add
and delete property keyframes.
• The Graph gives you a visual representation of the way properties change over
time, showing the property values as they increase and decrease. The vertical
axis displays property values, while the horizontal axis measures time—just the
way things are in the main timeline. The squares on the graph represent prop-
erty keyframes. The graph isn’t just some way to show you the geeky innards of
your tween; it’s a design tool. You can drag the graph elements around to make
changes in your animation. (More on that on page 302.)
Workflow for Common Tweens
You won’t see anything at all in the Motion Editor unless you select a tween span in
the timeline or a tweened object on the stage. Most of the time, you want to set up
the basic framework of your tween in the main timeline before you work with the
Motion Editor. That way, you can establish the timing for the major events in the
tween, using some of the steps described on page 299. Using a famous cartoon ex-
ample, you might have the roadrunner run off a cliff at Frame 6; then up to Frame 12
the Coyote hangs in midair, feet churning; from Frame 12 to Frame 18, the Coyote
drops to the desert floor, and so on. After you have the basic timing for these major
positions worked out, you can turn to the Motion Editor to perfect the details. The
Motion Editor breaks down all the tweenable properties into five categories:
• “Basic motion” is where you change the X, Y, and Z properties, positioning
tweened objects in two and three dimensions. (You can move only movie clips
and text fields in three dimensions, so those are the only types of objects to
which you can apply the Z property.)
• Under Transformation, you tween properties like Scale X (width), Scale Y
(height), Skew X, and Skew Y.
• Color Effect includes properties for Alpha, Brightness, Tint, and Advanced Col-
or (a combination of color effects).
• Use the Filters panel to apply filters like Glow, Blur, and Drop Shadow.
• Eases give you the ability to speed up or slow down property changes at specific
points in the timeline. The details are on page 312.
Within each of those categories you can do the following:
• Add and remove property keyframes (page 305).
• Move property keyframes to change values and timing (page 306).
305
C : A T M E
A Tour of the Motion
Editor
• Fine-tune and smooth property changes using Bezier curves (page 306).
• Add and remove color effects and filters (page 307).
• Apply easing to change the timing of property changes (page 312).
Tip: Keep in mind that a visual effect, like the aforementioned Coyote, can be composed of several differ-
ent tweened objects. The spinning legs can be a movie clip that stretches as gravity takes effect—the legs
keep spinning but become elongated. Facial features like the mouth and eyes can be separate tweened
objects on different layers, giving you the opportunity to create lots of different facial expressions.
Adding and Removing Property Keyframes
In the Motion Editor, every property has its own graph line, as shown in Figure 8-13.
Move from left to right along that graph line, and you’re marking the passage of time.
Like the main timeline, it’s measured in frames on a scale at the top of the Motion
Editor. The vertical axis of the graph tracks changes in value for that particular prop-
erty. The units used differ according to the property. For example, if it’s the Y coordi-
nate in the “Basic motion” panel, the value relates to the vertical position of an object
on the stage, and it’s measured in pixels. If it’s the alpha value in the Color Effect group,
it’s a percentage indicating the transparency (0%) or opacity (100%) of an object.
Figure 8-13:
Each property has
a graph where the
horizontal axis marks
time in frames and the
vertical axis shows the
change in property
values.
Property value
Add
property
keyframe
Time Property
keyframe
306
F CS: T M M
A Tour of the Motion
Editor
You apply tweens to values by placing property keyframes along the timeline;
Flash calculates the changes for all the values between two property keyframes
(Figure 8-13). To add a property keyframe, move the playhead to the frame where
you want to record a change in value, and then click the diamond-shaped button un-
der Keyframe. This button is a toggle: If there aren’t any keyframes at that position,
Flash creates one. If there’s a keyframe at that position, Flash removes it.
There are other ways to add property keyframes to a graph line. One of the quickest
is simply to right-click at a point in the graph line and then choose Add Keyframe
from the shortcut menu. Another way to add keyframes is to drag the playhead to
a specific frame, and then make a change in a property’s value. Flash automatically
creates the property keyframe.
The Motion Editor uses a solid line in the graph to indicate values in between
keyframes—values that are changing. A dashed line indicates that the values of the
property aren’t changing—static, in Flash-speak.
Moving Property Keyframes
When you work with tweens, timing is everything. Whether you’re controlling the
movement of a jumping cheetah or changing the color of a building as it explodes,
you control the timing by moving property keyframes up and down the timeline.
You reposition property keyframes in the Motion Editor’s graph by dragging them
with the Selection or Subselection tools. By moving the property keyframe up and
down, you increase or decrease the value of that property. If you drag a property key-
frame left or right along the graph’s timeline, you change the frame (time) at which
the property change happens.
There’s another way you can move property keyframes up and down the timeline—
with roving keyframes. Using this method, Flash keeps track of the relationship of
keyframes even as you make changes to the timeline. See the box on page 316 for
the details.
Tip: Sometimes when you move a property keyframe, the entire graph line moves. That’s because you’ve
somehow selected more than one property keyframe. To deselect all the property keyframes, just click an
empty spot on the graph, and then try your move again.
Fine-Tuning Property Changes
In the Motion Editor, the basic motion properties X, Y, and Z go everywhere hand in
hand. Whenever you change one of the properties, the Motion Editor registers the
values for the other two. It’s Flash’s way of keeping tweened objects pinned down in
time and space. The basic motion properties are also the only properties that you
can’t fine-tune using Bezier line tools.
For any properties other than the basic motion properties, you can use Bezier con-
trols in the Motion Editor graph to create smooth changes that increase or decrease
307
C : A T M E
A Tour of the Motion
Editor
over time. It’s just like editing a line that you draw on the stage. The property key-
frames can be either sharp-angled corner points where a value changes abruptly, or
they can be gradual curves. Initially, property keyframes are corner points. Right-
click a property keyframe to change a corner point to a curve, as shown in Figure 8-14.
If there are property keyframes on both sides of the one you click, you can choose
whether to add a single Bezier control handle (“Smooth left” or “Smooth right”)
or add two handles (Smooth point). If you right-click a property keyframe that’s
already a curve, you can turn it back into a corner point.
Figure 8-14:
Right-click a property keyframe to change a
corner point to a curve. The menu shows dif-
ferent options depending on the position of the
property keyframe.
Adding and Removing Color Effects
Your tween span has no color effects until you apply them (in the Properties panel
or the Motion Editor). To add a color effect using the Motion Editor, position the
playhead on the frame where you want to make a change, click the + button, and
then choose the effect you want to add: Alpha, Brightness, Tint, or Advanced Color.
Once you choose an effect, its subpanel appears under Color Effect. Click the Value
setting to the right of the property name, and then type a new value.
Note: Alpha sets the transparency for an object. If you want to apply a combination of alpha, brightness,
and tint, use the Advanced Color option.
To remove a color effect, click the – button, and then choose the name of the effect
from the pop-up menu. Flash removes the property changes from the tweened
object, and the effect’s subpanel goes away.
Using Filters in Tweens
Flash includes a handful of standard filters that you apply to movie clips and text
fields, and when you apply filters using the Motion Editor, you can change the values
of these filters over time. Want a drop shadow to change its angle as the sun moves
across your animation? You can do it with the Motion Editor (Figure 8-15).
308
F CS: T M M
A Tour of the Motion
Editor
Figure 8-15:
Filters sometimes have
multiple properties.
The Drop Shadow
filter shown here has
properties for the
shadow’s blurriness,
strength, quality, and
angle. Not shown,
there are even more
properties for the
color and type of
shadow created.
Don’t be afraid to experiment with the filter effects. A single filter can create
dramatically different effects, as shown in Figure 8-16.
Figure 8-16:
You don’t have to settle for the first effect a filter gives you.
The Drop Shadow filter, for example, gives some remark-
ably different effects.
Top: When you first apply a drop shadow, it looks like this.
Middle: Adjusting the inner shadow gives the car a more
3-D look.
Bottom: The Knockout property makes the car look like a
paper cutout.
Customizing Your Motion Editor View
Working with Flash, you fight a constant battle to get a good view of the stage, the
timeline, and all the panels and windows. It’s a balancing act where you’re constantly
expanding this and shrinking that. Adding the Motion Editor to the mix just makes
the problem tougher. It’s so packed with properties, graphs, and widgets that it
309
C : A T M E
A Tour of the Motion
Editor
requires tweaking to achieve a workspace that works for you. If you plan to do a lot
of work in Flash and you don’t have a two-monitor system, think seriously about
upgrading to one. With two monitors, you can leave your Motion Editor open on
one monitor and keep your stage and main timeline open on another. To move the
Motion Editor, or remove it from a docked position, drag it by the tab with its name
on it.
Initially, Flash gives you a fairly skimpy view of each property. Some of the panels are
closed, depending on the kinds of changes in your tween. To open and close panels,
click the triangle toggle buttons, as shown in Figure 8-17.
Getting the best view property graphs
Unlike some windows, you can’t change the amount of horizontal space occupied by
labeled sections like Property, Value, and Ease, but you can change the vertical space
in a number of ways. That vertical space is what’s important when you’re trying to
get a good view of the property graphs while you perfect, for example, a custom
ease (page 315). You can expand a single property graph by clicking anywhere in
the panel to the left of the graph. That graph remains expanded until you click the
panel again or click another property panel to expand a different graph. This feature
means that only one graph can be expanded at a time. Two settings in the lower-left
corner of the Motion Editor control the height of graphs. A third setting controls the
number of frames displayed in the Motion Editor timeline:
• Graph Size sets the height of all the graphs.
• Expanded Graph Size sets the height of the one expanded graph.
• Viewable Frames sets the number of frames showing in the graph timeline.
Figure 8-17:
Don’t be afraid to
make adjustments to
the Motion Editor to im-
prove your workspace.
In the bottom-left cor-
ner are three settings
that change the size
of all the graphs, the
expanded graph, and
the number of frames
shown in the timeline.
Open/close
property panel
Expanded
graph
Graph size
Expanded graph size
Viewable frames
310
F CS: T M M
Changing
Transparency with
the Motion Editor
Changing Transparency with the Motion Editor
Now it’s time to turn some of that Motion Editor theory to practice. By now, you
know how to tween dimensions (page 102) and position (page 98); now you’ll learn
how to change the transparency of a tweened symbol. As shown in Figure 8-18, the
Missing CD file 08-5_Tween_Alpha.fla shows an animated sign for a car company,
but you can use your own symbol if you prefer. In the sample file, the sign spins and
bounces as it gets bigger, giving the impression that it’s coming at the audience. In
the following steps, you adjust the transparency so that the sign goes from an alpha
value of 20 percent to a value of 100 percent, making it completely opaque at the end
of the motion.
Figure 8-18:
The Motion Editor is made up
of numerous subpanels. Each
subpanel gives you access to
tweenable properties. Here the
Rotation Z property is set to
1800. You can click and type
a value or drag to “scrub in”
a value.
Motion path
Tweened symbol
Basic motion
subpanel
Rotation Z
Motion editor
Note: Techies often refer to transparency as the alpha channel. Typically, computer video has RGB
channels for red, green, and blue. To store information about the opacity and transparency of an image,
programmers needed another channel, and they dubbed it the alpha channel, because they needed
another letter and why not start at the beginning of the alphabet?
1. Drag the playhead to Frame 1, and then click the layer to make sure that the
motion tween is selected.
Your sign is back to its starting position on the motion path. When you select
the motion tween, the words “Motion Tween” appear at the top of the Properties
panel.
311
C : A T M E
Changing
Transparency with
the Motion Editor
2. Click the Motion Editor tab next to the Timeline tab.
If you don’t see the Motion Editor tab, choose Window➝Motion Editor to make
it visible, as shown in Figure 8-19.
Figure 8-19:
The Motion Editor is
Command Central for
tweaking every little
detail in your motion
tween. It’s made up
of several panels that
give you access to
properties, effects,
and filters. Click the
triangles to expand
and collapse the
different panels. Click
the + and – buttons
to add and remove
effects and filters.
Click triangle to
expand/collapse
Motion editor tab
Alpha amount
value
3. In the Motion Editor window, find the Color Effect section, and then click the
+ to add an alpha color effect to the tween.
If some of the panels are expanded, you may not see the Color Effect panel right
away. Either close the open panels by clicking their expand/collapse triangles,
or use the scroll bar to find the Color Effect panel. When you click the + button,
a shortcut menu gives you four color-related choices: Alpha, Brightness, Tint,
and Advanced Color. After you choose Alpha, a new subpanel opens, showing
an alpha amount as a percentage.
4. Next to “Alpha amount”, change the value to 20%.
You can click the number and type 20, or you can scrub the value until 20 appears
in the box. Notice how the graph to the right changes as you change the value.
5. Click the Timeline tab, and then drag the playhead to the last frame.
By moving the playhead to a new location, you can enter a different alpha value
to create the tween.
6. Click the Motion Editor tab, and then change the Alpha amount to 100%.
Setting the Alpha amount to 100% makes the sign symbol completely opaque.
7. Test your animation in Flash or using the Flash Player.
At this point, the animation looks pretty much the same whether you run it
inside Flash (Enter) or you compile the animation and test it in the Flash Player
(Ctrl+Enter or c-Return). Position, size, and alpha properties are all visible in-
side Flash, but that’s not always the case with some filters, components, timeline
effects, and ActionScript code.