Oracle XSQL combining sql oracle text xslt and java to publish dynamic web content phần 3 pdf
Bạn đang xem bản rút gọn của tài liệu. Xem và tải ngay bản đầy đủ của tài liệu tại đây (1.05 MB, 60 trang )
Parameter XML Representation
In the previous examples, you saw how to reference parameters from your XSQL page.
But what if you want the parameters to be part of the result? This is the job of two actions:
<xsql:include-request-param> and <xsql:include-request-params>. This
action outputs all of the parameters to the XML. Here is an example of <xsql:include
-request-param>:
<?xml version=”1.0”?>
<page xmlns:xsql=”urn:oracle-xsql”>
<xsql:include-param name=”conn” />
<xsql:include-param name=”fields” />
<xsql:include-param name=”tables” />
</page>
Now save this as include-param.xsql. You can either pass the parameters in on
the URL as before or change the action of your very-unsecure.html form to
include-params.xsql. In either case, this page should produce the result shown in
Figure 6.2.
Figure 6.2 XML representation of parameters.
100 Chapter 6
In this case, you have to specify the parameters one at a time. If you know that you
want all of the parameters—or, if you want so many parameters that it’s easier to just
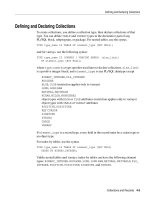
grab all of them—then you can use the <xsql:include-request params> action.
You can create the following XSQL page as include-request-params.xsql. With
only one line of code, you’ll have every parameter:
<?xml version=”1.0”?>
<page xmlns:xsql=”urn:oracle-xsql”>
<xsql:include-request-params />
</page>
The result for this, when you use the same parameters as before, is shown in Figure 6.3.
The XML schema is very simple. Even if there are no parameters at all, you’ll always
have the following skeleton:
<request>
<parameters>
</parameters>
<session>
</session>
<cookies>
</cookies>
</request>
Figure 6.3 Result of <xsql:include-request-params>.
XSQL Parameters 101
The parameters are children of the respective elements. As you can see in the
previous example, parameters received from forms are children of the <parameters>
element. For each parameter, a child element with the same name as the parameter
encloses the parameter’s value. This works the same for session parameters and cook-
ies. Here is an example where two of each are set:
<request>
<parameters>
<param1>param-value1</param1>
<param2>param-value2</param2>
</parameters>
<session>
<session1>session-value1</session1>
<session2>session-value2</session2>
</session>
<cookies>
<cookies1>cookies-value1</cookies1>
<cookies2>cookies-value2</cookies2>
</cookies>
</request>
Parameter Types
There are several different types of parameters in XSQL. So far, you’ve been dealing
with request parameters. This section covers the other types of parameters. A quick
definition of request parameters is given first. Next, page-private parameters are cov-
ered. These are parameters that are defined inside of a page. Last, session and cookie
parameters are covered. These can only be used in conjunction with the XSQL servlet.
Request Parameters
In the previous examples, you used request parameters. Request parameters come in
as part of the request. When you are using XSQL in conjunction with the XSQL servlet,
they are passed as either an HTTP GET or POST request. If you are using XSQL from the
command line or it is embedded in your code, you can also pass in request parameters.
Exactly how you do this is a bit beyond the scope of this chapter, but you’ll learn how
to do this in Chapters 15 and 17, respectively.
For now, you should focus on how request parameters are used with HTTP. You did
this in the earlier example when you accessed the URL http://localhost
/xsql/ref-params.xsql?conn=demo&fields=ename&tables=emp&.
In this case you are using an HTTP GET method to query your data. The GET method
is the most common HTTP method—it is what you use most any time that you click on
a link. The second most common method is POST—this is what your HTML forms usu-
ally use. You can reference parameters in XSQL with both GET and POST. For this
example, let’s say that you want to create a simple form for processing queries. Here is
the HTML for the form.
102 Chapter 6
<html>
<body>
<h1>Sample Form </h1>
<form action=”ref-params.xsql” method=”post”>
<table border=”0”>
<tr>
<td>Connection:</td>
<td><input type=”text” name=”conn” /></td>
</tr>
<tr>
<td>Fields:</td>
<td><input type=”text” name=”fields” /></td>
</tr>
<tr>
<td>Tables:</td>
<td><input type=”text” name=”tables” /></td>
</tr>
<tr>
<td colspan=”2” align=”center”>
<input name=”submitButton” type=”submit” value=”Select” />
</td>
</tr>
</table>
</form>
</body>
</html>
You can now do essentially any Select statement with this form. Figure 6.4 shows
how to fill out the form so you can query on just the employee names from the emp table.
Figure 6.4 Using parameters with an HTML form.
XSQL Parameters 103
When you click Select, you should get the results shown in Figure 6.4. You would
get the exact same results with the URI specified earlier and shown in Figure 6.1.
Page-Private Parameters
You can think of page-private parameters as being local to the page, whereas session
parameters and cookie parameters can span multiple page calls. Page-private parame-
ters aren’t limited solely to HTTP transactions. The XSQL command line and XSQL
request object can also provide page-private parameters. The important characteristic
of page-private parameters is that they are gone after the result is returned. Subsequent
transactions won’t know about the parameters unless they are explicitly passed.
Sometimes, you may wish to set page-private parameters explicitly in your XSQL
page. You do this with the <xsql:set-page-param> action. It allows you two ways
to set parameters. The first way equates a parameter with a string value, whereas the
second way allows you to set a parameter based on a SQL query. Examples of both
ways to set parameters follow:
<?xml version=”1.0”?>
<page xmlns:xsql=”urn:oracle-xsql” connection=”demo”>
<xsql:set-page-param name=”ename” value=”ADAMS” />
<xsql:set-page-param name=”deptno”>
select deptno from emp where ename=’{@ename}’
</xsql:set-page-param>
<xsql:include-param name=”ename” />
<xsql:include-param name=”deptno” />
<xsql:query>
select * from emp where deptno={@deptno}
</xsql:query>
</page>
Session Parameters
So far, all of our examples about parameters have been of page-private parameters.
These parameters function much like parameters to scripts. Session parameters, on the
other hand, exist across invocations of XSQL. Your servlet engine maintains the session
on behalf of the XSQL servlet. This has the implication that only servlets will be able to
make use of session parameters.
Setting session parameters is quite simple. You set them just like you set cookie
parameters. The following XSQL will set a session parameter named ename and one
named deptno:
<?xml version=”1.0”?>
<page xmlns:xsql=”urn:oracle-xsql” connection=”demo”>
<xsql:set-session-param name=”ename” value=”{@r-p-ename}” />
<xsql:set-session-param name=”deptno”>
select deptno from emp where ename=’{@ename}’
</xsql:set-session-param>
</page>
104 Chapter 6
Now, save the file as set-session-param.xsql, and access it with the URL
http://localhost/xsql/momnpup/set-session-param.xsql?r-p-ename
=ADAMS&.
If you now go back to the include-request-params.xsql page that you cre-
ated earlier, you’ll see the output that is shown in Figure 6.5. These parameters will be
part of your session until the session ends. Your servlet engine ultimately controls the
session itself. It usually continues until the browser window is closed or until some
period of inactivity.
If you know that a given XSQL page will only be called within a session, then you
can use session parameters instead of having to deal with the complexities of request
parameters or page-private parameters. For instance, let’s suppose that you want var-
ious kinds of information about a particular employee. You can create a simple form
that has an input field named r-p-ename and then set its action to the set-
session-param.xsql page you created previously. Alternatively, you can just use
the URL that you just used.
WARNING Notice that our request parameter, r-p-ename, and our session
parameter, ename, have different names, though they refer to the same entity. A
session parameter can’t be assigned the value of a request parameter of the
same name. (It is legal for parameters of different types to have the same
name—the rules for resolving the naming of conflicts are laid out later in this
section.)
Figure 6.5 Session parameters and <xsql:include-request-params>.
XSQL Parameters 105
Now, the ename and the deptno parameters are set for the entire session. If
you want a list of everyone in the department, you can do that with a very simple
XSQL page:
<?xml version=”1.0”?>
<?xml-stylesheet type=”text/xsl” ?>
<page xmlns:xsql=”urn:oracle-xsql” connection=”demo”>
<xsql:query>
select * from emp where deptno={@deptno}
</xsql:query>
</page>
Cookies
HTTP cookies try to solve a fundamental problem of HTTP. How do you create state
when using a stateless protocol? You saw cookies at work in the previous section. If
you look back at Figure 6.5, you’ll see an entry in the cookies element. This cookie is
actually the one that is used by the servlet engine to control the session.
The basic mechanism is that a cookie is set on the Web browser. The cookie itself is
really just a string. The Web browser stores that cookie in some way on the local
machine. That cookie is passed back on subsequent requests. The browser will only
pass a cookie back on requests for which the cookie was specifically meant. This means
that if www.yahoo.com sets a cookie, there is no way that the cookie will be passed to
your Web application, assuming that your Web application isn’t running in the
yahoo.com domain. Further, you can restrict cookies so that they are only sent back to
certain URLs within your own domain. Cookies can be either session based (i.e., they
are erased when the Web browser closes down) or long lived. Long-lived cookies can
stay on the browser virtually forever.
When the cookies return, your application is able to assume that the current transac-
tion is originating from the same Web browser as previous transactions. Thus, you are
able to maintain state on the server side. This is exactly what the servlet engine does
with the cookie that it sets. It attaches all of the session information to that particular
cookie on the server side. That single cookie can act as a key to a lot of different infor-
mation. When you set cookies manually, you can create the same kind of architecture.
This is the way cookies generally work. However, it is very important to understand
that the individual users ultimately have control of whether cookies will work this way
for them. Users can set their browser so that they don’t accept cookies, or don’t accept
long-lived cookies. They can go in and choose to delete cookies that your application
uses. If you depend on cookies for authentication, you may find your users trading
their cookies around. When using cookies, it’s important to remember that you can’t
depend fully on their full and appropriate use. Cookies certainly make the developer’s
life easier. If you can require your users to have cookies enabled on their browser, then
you’ll have an easier time designing your application. However, if you can’t, you need
to consider ways that your application will degrade gracefully.
106 Chapter 6
With an understanding of the problems of cookies, let’s look at how to use cookies
with XSQL. The basic model is the same as with page-private parameters and session
parameters, but with some extensions. Let’s cover the basics first. The following XSQL
page will set the employee name and the department number as cookies:
<?xml version=”1.0”?>
<page xmlns:xsql=”urn:oracle-xsql” connection=”demo”>
<xsql:set-cookie name=”ename” value=”{@r-p-ename}” />
<xsql:set-cookie name=”deptno”>
select deptno from emp where ename=’{@ename}’
</xsql:set-cookie>
<xsql:include-request-params />
</page>
Save this as set-cookies.xsql. You can call it with http://localhost/xsql
/momnpup/set-cookie-param.xsql?r-p-ename=SMITH&. You can then invoke
the include-request-params.xsql page that you developed previously and see
the results that are shown in Figure 6.6.
Figure 6.6 Setting cookies with XSQL.
XSQL Parameters 107
An obvious question is, “Why would I want to set cookies manually instead of just
using the session?” In most cases, you wouldn’t. Cookies do have one advantage over
session parameters: You can request that cookies live past the current session. You are
able to do this with the max-age attribute as follows:
<?xml version=”1.0”?>
<page xmlns:xsql=”urn:oracle-xsql” connection=”demo”>
<xsql:set-cookie name=”long-living-cookie” max-age=”999999”
value=”To_Life” />
<xsql:set-cookie name=”deptno”>
select deptno from emp where ename=’{@ename}’
</xsql:set-cookie>
<xsql:include-request-params />
</page>
If you invoke this XSQL page, shut down your browser, and then restart it, the cookie
will survive. A call to include-request-params.xsql will confirm this. The
max-age value is in seconds, so in our example, the cookie will live for about 11 days.
You can also control the URLs to which a cookie should be returned. Previously, you
learned that your application isn’t going to receive cookies set by www.yahoo.com. In
fact, by default, no URL outside of the original directory where XSQL first set the
cookie will see it. To demonstrate this, create another directory named test-cookies
in the demo directory and copy include-request-params.xsql in it. When you
go to http://localhost/test-cookies/include-request-params.xsql,
you won’t see the long-living cookie. Go back to the original include-request
-params.xsql page, and there you will find it.
For many applications, this is too restrictive. If nothing else, it means that all of your
application must be in the same directory or subdirectories. Luckily, you can control
this behavior very easily. Using the path attribute of the xsql:set-cookie action,
you can make the cookie generally available to all of the application. This XSQL page
sets another cookie that should be available anywhere on your server:
<?xml version=”1.0”?>
<page xmlns:xsql=”urn:oracle-xsql” connection=”demo”>
<xsql:set-cookie name=”long-living-remote-cookie” value=”To_Life”
path=”/” max-age=”999999”/>
</page>
You can reference cookies just like you can any other parameter by using the
{@cookie-name} syntax. You aren’t limited solely to parameters set by XSQL. You
can reference any cookies that come your way, including cookies set by other applica-
tions in your system.
Setting Default Parameters
In the previous section, you learned that you can’t depend on cookies always being
available. If you can’t depend on them, then can you set a default value? Can you set
default values for other parameters? You can, and the mechanism is pretty simple.
108 Chapter 6
Let’s look back at our very-unsecure.xsql page. For that example, you had to
specify three parameters for the action to work at all. This is an ideal case for setting
default values. The following XSQL will accomplish this. You should save it as very
-unsecure-with-defaults.xsql.
<?xml version=”1.0”?>
<page fields=”*” conn=”demo” tables=”emp” xmlns:xsql=”urn:oracle-xsql”
connection=”{@conn}” >
<xsql:include-request-params />
<xsql:query>
select {@fields} from {@tables}
</xsql:query>
</page>
If you execute this page with no arguments, you’ll get the same results as before.
Attaching arguments will yield different results, of course, providing that the default
values are more graceful and reusable. If you only get one parameter, you don’t fail
entirely.
You can provide multiple default values for the same parameter. This is useful if you
have multiple queries in the same XSQL page. The following example sets the default
for the max attribute for all queries, while still allowing a lesser default for a couple of
queries.
<?xml version=”1.0”?>
<page max=”10” conn=”demo” xmlns:xsql=”urn:oracle-xsql”
connection=”{@conn}” >
<xsql:query>
select * from table1
</xsql:query>
<xsql:query max=”5” max-rows=”{@max}”>
select * from table2
</xsql:query>
<xsql:query>
select * from table3
</xsql:query>
<xsql:query max=”7” max-rows=”{@max}”>
select * from table4
</xsql:query>
<xsql:query>
select * from table5
</xsql:query>
</page>
Using Bind Variables
So far, you’ve been using lexical parameters when you’ve made references with
{@param}. When the XSQL document is parsed, a lexical substitution is made. After
this parsing, it’s as if all of the parameters were hard-coded. This is fine in a lot of ways,
XSQL Parameters 109
but it isn’t optimal for SQL statements. Before explaining why, let’s look at how bind
variables are used. In this example, you get a list of the employees with a particular job
in a particular department.
<?xml version=”1.0”?>
<page deptno=”20” job=”CLERK” xmlns:xsql=”urn:oracle-xsql”
connection=”demo” >
<xsql:query bind-params=”deptno job”>
select * from emp where deptno=? and job=?
</xsql:query>
</page>
Instead of having the parameter reference inside of the SQL, you have question
marks. The question marks are replaced, in order, by the values of the parameters
listed in the <bind-params> attribute. Notice that you don’t have to put quotation
marks around the question mark for job. This is taken care of for you.
Bind variables make it easier to optimize SQL statements. When you don’t use bind
variables, the SQL optimizer can only optimize the statements one at a time. The
optimizer has no way to know that there are going to be lots of statements of the same
basic structure. By using bind parameters, the SQL optimizer can optimize with the
expectation that there will be more queries like the first one. In this case, it knows that
it will be looking for rows in the emp table with a particular department number and
a particular job. By using bind parameters, some optimization work of previous
queries from this page can be reused in subsequent pages.
Resolving Conflicting Parameter Names
You may have noticed that the different types of parameters were all resolved with the
same syntax. This begs the question: How does XSQL resolve conflicts? What happens
if you have a cookie that has the same name as a page-private parameter, a session
parameter, and a request parameter? Luckily, the result isn’t undefined. The following
algorithm, which resolves parameter names, stops when one of the questions is
answered yes or is at the last step:
1. Is there a page-private parameter with this name? (If yes, use the value of the
page-private parameter.)
2. Is there a cookie with this name? (If yes, use the value of the cookie.)
3. Is there a session parameter with this name? (If yes, use the value of the session
parameter.)
4. Is there a request parameter with this name? (If yes, use the value of the request
parameter.)
5. Is there a default value provided in the current action element? (If yes, use the
default value specified in the current action element.)
110 Chapter 6
6. Is there a default value provided in any ancestor element? (If yes, use the nearest
default value specified [e.g., a default value specified in the parent element
would be preferred over the default value specified in the grandparent element].)
7. If all answers are no and this is a bind variable, null is assigned.
8. If all answers are no and this is a lexical parameter, the empty string is
assigned.
Generally, you want to avoid the last two cases. They’ll probably cause errors for
SQL statements. Instead, you should provide default values so that your SQL state-
ments will execute. However, in some cases, you may prefer that the SQL statements
don’t execute and just toss an error. In Chapter 14, you’ll learn how to gracefully han-
dle errors from inside your stylesheets.
Stylesheets and Parameters
XSLT stylesheets can have their own parameters. As you’ll learn in Chapter 13, these
parameters can be used for a variety of reasons. Here, you’ll see how you can pass
parameters to XSLT stylesheets. When you are doing this, you are communicating with
the XSLT processor that the XSQL page processor invokes.
You set XSLT parameters using the xsql:set-stylesheet-param action. It
works like the other parameter-setting actions that you’ve seen. You can set a parame-
ter directly or based on a SQL statement. In our example, you’ll set a stylesheet with
the parameters ename and deptno.
<?xml version=”1.0”?>
<?xml-stylesheet type=”text/xsl” href=”stylesheet-params.xsl”?>
<page xmlns:xsql=”urn:oracle-xsql” connection=”demo”>
<xsql:set-stylesheet-param name=”ename” value=”{@ename}” />
<xsql:set-stylesheet-param name=”deptno”>
SELECT deptno
FROM emp
WHERE ename=’{@ename}’
</xsql:set-stylesheet-param>
</page>
The stylesheet, stylesheet-params.xsl, receives the parameters. Stylesheet
parameters are covered thoroughly in Chapters 13 and 14, respectively. Here is a sim-
ple example for now. The following stylesheet defines the parameters ename and
deptno. They are outputted as part of the output of the transformation. This is what
the stylesheet looks like:
<?xml version = ‘1.0’?>
<xsl:stylesheet xmlns:xsl=” />version=”1.0”>
XSQL Parameters 111
<xsl:param name=”ename”/>
<xsl:param name=”deptno”/>
<xsl:template match=”/page”>
<html>
<head></head>
<body>
<H1>Stylesheet Param Sampler</H1>
<p>
<b>Ename: </b><xsl:value-of select=”$ename”/>
</p>
<p>
<b>Deptno: </b><xsl:value-of select=”$deptno”/>
</p>
</body>
</html>
</xsl:template>
</xsl:stylesheet>
The result of the XSQL page is displayed in Figure 6.7
Figure 6.7 Stylesheet parameters example.
112 Chapter 6
This particular result was produced by setting ename equal to ADAMS as part of
the request. The following request would do it: http://localhost/xsql/momnpup
/stylesheet-params.xsql?ename=ADAMS&.
There is a lot more that you can do with stylesheet parameters than the simple
examples shown here, and you’ll learn more about them later in the book. For now,
here is a brief description of what is going on. In the stylesheet, the stylesheet parame-
ters ename and deptno are defined with the xsl:param element. The parameter
names match exactly the parameters that you set using the xsql:set-stylesheet
-param element in the XSQL page. Inside the stylesheet, the parameters are referenced
by prefixing the name with a $. Because they are specified in an xsl:value-of
element, the value of the parameter is written to the page.
From this example, you see how you can pass the parameter values directly to
your stylesheet for output. There is more that you can do with stylesheet parameters
from inside the stylesheet, but that’s for later in the book. You’ll learn all about that in
Chapter 13.
Moving On
Now that you have a strong understanding of how parameters work with XSQL, you
are well on your way to building applications with XSQL. Because your applications
almost always consist of more than one page, now you will be able to tie your XSQL
pages together. The next chapter will complete the discussion of XSQL basics with a
look at how to modify the database with XSQL. When you develop an XSQL applica-
tion in Chapter 14, you’ll again look closely at parameter passing and see how it works
with a real-world application.
XSQL Parameters 113
115
Database-driven Web applications generally have two purposes: accessing the data in
the database and adding to or modifying the database in some way. In this chapter, you
will learn more about inputting data to the database. The actions that you will use in
this section have already been discussed in Chapter 5. The intent here is to move
beyond reference and see how the pieces can fit together.
The first step is to review the canonical schema that XSQL uses. You learned about it
in Chapter 5. Now you will be using it in a different way—to get data into the database.
Next, you will see how to input HTML forms in two different ways—by using
xsql:insert-request, xsql:update-request, and xsql:delete-request;
and by using xsql:dml. Finally, you will learn how to handle XML documents.
Inputting HTML Forms
There is scarcely a Web application that does not have an HTML form. Sooner or later,
you will need to have your users fill out some text fields and make some selections. In
some cases, the users will just be interacting with your application. Perhaps they will
be logging in, or maybe they will be choosing the options of a particular query. In many
cases, they will be providing data that will need to be inserted into the database. This
process is the focus of this section.
Database Modifications
with XSQL
CHAPTER
7
This is not an exhaustive survey. Rather, this section attempts to further explain the
concepts behind the data modification actions covered in Chapter 5. You will first learn
about the built-in actions for inserting, updating, and deleting data and how to use them
with forms. These are good for simple cases, but become difficult to use in complex ones.
Thus, you will then learn how to use the xsql:dml action for more complex cases.
The example for both of these exercises will be a newsletter service. The example
newsletter table has columns for e-mail, name, and organization. To keep everything
simple, the table will have no constraints on it. When you begin building real applica-
tions, everything necessary for a production application will be considered. The
following SQL will create this table. You should create it under the momnpup user.
All of the examples that you see here will consist of a single SQL statement per page.
However, there is no reason that you could not have more than one per page.
Form Parameters and the Canonical Schema
In Chapter 5, you learned about the canonical schema. It is the default method of
returning data when you use xsql:query. It also plays a role when inputting data.
The built-in actions that allow you to create, modify or delete data in your database
also expect it as input. The process works as the reverse of the process that you learned
about earlier. Instead of writing a stylesheet that takes XML in the canonical format as
input and produces the output that you desire, you have to write a stylesheet that
expects the form parameters and writes a document that follows the canonical schema.
This difference is diagrammed in Figure 7.1.
Figure 7.1 The role of the canonical schema on input versus output.
<ROWSET>
<ROW>
</ROW>
</ROW>
</ROW>
</ROWSET>
Client
XSQL
Result
xsql:query
XSLT
Stylesheet
(a)
HTML
Result
<xsl:stylesheet>
</xsl:stylesheet>
<html>
</html>
<request>
<parameters>
</parameters>
</session>
</session>
<cookies>
</cookies>
</request>
<ROWSET>
<ROW>
</ROW>
</ROW>
</ROW>
</ROWSET>
Client
Parameters
xsql:insert-request
XSLT
Stylesheet
(b)
XSQL
Input
(or xsql:update-request,
xsql:delete-request,
xsql:insert-param)
<xsl:stylesheet>
</xsl:stylesheet>
116 Chapter 7
This is probably different from what you have seen before, so here is a full example.
Your first step is to create the HTML form. Here is a very simple one that you will use
for inserting data into the newsletter table. There are a couple of things to note about
this example. First, the action of your form is an XSQL page. You will make this XSQL
page next. Most important is the method. As you would expect, it is post. To work
with XSQL, your form must have a post method.
<html> <body>
<h1>Sign Up For Newsletter</h1>
<form action=”dummy.xsql” method=”post”>
<table border=”0”>
<tr>
<td>Name:</td> <td><input type=”text” name=”name”/></td>
</tr>
<tr>
<td>Email:</td>
<td><input type=”text” name=”email”/></td>
</tr>
<tr>
<td>Organization:</td>
<td><input type=”text” name=”org”/></td>
</tr>
<tr>
<td colspan=”2” align=”center”><input type=”submit” value=”Sign Me
Up!” /></td>
</tr>
</table>
</form>
</body>
</html>
The next step is to create the XSQL page that will insert the data. However, it is
important to understand the overall process. As you probably know, the HTTP POST
request passes the form parameters as name-value pairs. XSQL implicitly changes
those to a simple XML document. Your stylesheet than transforms the request XML
document to the canonical XML form required by the data modification actions.
For now, take one step at a time. The xsql:include-request-parameters
action shows you what the transformation will look like. The following XSQL page
will display the parameters in the XML schema that XSQL uses:
<?xml version=”1.0”?>
<xsql:include-request-params />
When you save this file as dummy.xsql in the momnpup directory alongside the
newsletter-insert.html file, it will produce the output shown in Figure 7.2. You
saw this format in Chapter 6. It is the canonical schema. As you look at the output,
notice the <parameters> element nested inside of the <request> element. Each of
your form’s parameters is represented by an element of the parameter element. Also,
notice the <cookies/> and <session/> elements. There are a couple of cookie ele-
ments, but this does not matter. They will not interfere with the insertion or modifica-
tion of the parameter data.
Database Modifications with XSQL 117
Figure 7.2 Form parameters as XML.
From here, the request needs to be transformed to this format.
<ROWSET>
<ROW>
<EMAIL>emailValue</EMAIL>
<NAME>nameValue</NAME>
<ORGANIZATION>orgValue</ORGANIZATION>
</ROW>
</ROWSET>
This transformation can be completed with the following stylesheet. This is an
example of an XML-to-XML transformation. You need not delve into this transforma-
tion now. Stylesheets will be covered in depth in Chapter 13.
<?xml version = ‘1.0’?>
<ROWSET xmlns:xsl=” />xsl:version=”1.0”>
<ROW>
<EMAIL>
118 Chapter 7
<xsl:value-of select=”/request/parameters/email”/>
</EMAIL>
<NAME>
<xsl:value-of select=”/request/parameters/name”/>
</NAME>
<ORGANIZATION>
<xsl:value-of select=”/request/parameters/org”/>
</ORGANIZATION>
</ROW>
</ROWSET>
Using xsql:insert-request
Your next step is to create insert-request.xsql file. Before creating it, you should
go back to the newsletter-insert.html file. The action needs to be changed from
dummy.xsql to insert-request.xsql. After that has been changed, you can make
the insert-request.xsql file as follows:
<?xml version=”1.0”?>
<page connection=”momnpup” xmlns:xsql=”urn:oracle-xsql”>
<xsql:insert-request table=”newsletter” transform=”transform-
request.xsl”/>
</page>
When you go back to newsletter-insert.html and fill out the form, you
should get the result that is shown in Figure 7.3 in your browser. If you login as
momnpup and select * from newsletter you should see the data that you
entered into your form.
Figure 7.3 Result of insert-request action.
Database Modifications with XSQL 119
Your users do not need to see the results in this form, of course. If you would just
like to say “Thanks,” you can do so with this very simple stylesheet. It hides the
raw XML.
<?xml version=”1.0”?>
<xsl:stylesheet xmlns:xsl=” />version=”1.0”>
<xsl:template match=”/”>
<html>
<h1>Thanks!</h1>
</html>
</xsl:template>
</xsl:stylesheet>
To use the stylesheet, you need to add the following line as the second line in your
insert-request.xsql file:
<?xml-stylesheet type=”text/xsl” href=”thanks.xsl” ?>
Using xsql:update-request
The use of xsql:update-request is very similar to the use of xsql:insert
-request. The general process is exactly the same. First, you create your HTML form
and set the action to an XSQL page. When the form is submitted, the XSQL servlet will
pass the parameters as XML to the XSQL page processor. You need a stylesheet to
transform the passed XML to the canonical XML schema.
The key difference really relates to the difference between SQL inserts and updates.
An insert adds an entirely new row to your table. An update, on the other hand, mod-
ifies an existing row. To perform an update, XSQL needs to know which row (or rows)
in the database will be modified. This is done through the key-columns attribute of
the xsql:update-request element. It lists the columns that have to match for a par-
ticular row of data to be updated.
First things first. For this example, you can use the exact same form as was used for
xsql:insert-request. Assume that the e-mail address is staying the same and that
the user wants to modify the organization and name. It would be simple enough to
populate the fields in the form, but you aren’t quite ready to do that yet. For now, life
is hard for your users. Here is the modified HTML form that you should save as
newsletter-update.html:
<html>
<body>
<h1>Sign Up For Newsletter</h1>
<form action=”update-request.xsql” method=”post”>
<table border=”0”>
<tr>
120 Chapter 7
<td>Name:</td> <td><input type=”text” name=”name”/></td>
</tr>
<tr>
<td>Email:</td>
<td><input type=”text” name=”email”/></td>
</tr>
<tr>
<td>Organization:</td>
<td><input type=”text” name=”org”/></td>
</tr>
<tr>
<td colspan=”2” align=”center”>
<input type=”submit” value=”Sign Me Up!” />
</td>
</tr>
</table>
</form>
</body>
</html>
Now you are ready to code your update-request.xsql file. It looks very much
like the insert-request.xsql file that you coded before. The difference is the
key-columns attribute. This attribute tells XSQL that you want to make changes in
any of the rows where the email field matches the e-mail address that is entered.
<?xml version=”1.0”?>
<?xml-stylesheet type=”text/xsl” href=”thanks.xsl” ?>
<page connection=”momnpup” xmlns:xsql=”urn:oracle-xsql”>
<xsql:update-request table=”newsletter” key-columns=”email”
transform=”transform-request.xsl”/>
</page>
After saving this file as update-request.xsql, you should get the same
“Thanks!” screen when you fill out the form of newsletter-update.html. You can
see that this XSQL page is linked to the same thanks.xsl file as the insert
-request.xsql file. There is another interesting similarity: Both XSQL pages use the
same transform-request.xsl file. You are able to do this because the names of the
form parameters are the same for both pages. Coincidence? Somewhat. The lesson to
learn here is that with a little discipline, you can save yourself some recoding.
Using xsql:delete-request
The purpose of this request is to remove data from the database. All of the steps are the
same as with the xsql:update-request. The main difference is that you only need
to submit the data that matches the key-columns that you specify. This data is used
to determine which rows should be deleted.
Database Modifications with XSQL 121
Your first step is to create the HTML form. This is the same form as in the other two
examples here, except that only the email field is needed. This is the key to tell you
when to delete rows.
<html>
<body>
<h1>Sign Up For Newsletter</h1>
<form action=”delete-request.xsql” method=”post”>
<table border=”0”>
<tr>
<td>Email:</td>
<td><input type=”text” name=”email”/></td>
</tr>
<tr>
<td colspan=”2” align=”center”>
<input type=”submit” value=”Delete Me!” />
</td>
</tr>
</table>
</form>
</body>
</html>
Your next step is to create the delete-request.xsql file. It has only one differ-
ence from the update-request.xsql file. Instead of using the xsql:update
-request action, the xsql:delete-request action is used.
<?xml version=”1.0”?>
<?xml-stylesheet type=”text/xsl” href=”thanks.xsl” ?>
<page connection=”momnpup” xmlns:xsql=”urn:oracle-xsql”>
<xsql:delete-request table=”newsletter” key-columns=”email”
transform=”transform-request.xsl”/>
</page>
Modifying with xsql:dml
Using the built-in actions covered in the preceding section is easy—if your form para-
meters map easily to the underlying table. However, the required stylesheet compli-
cates things a bit, especially if you are already familiar with SQL. In this section, you
will use the xsql:dml action to complete the same tasks as in the preceding examples.
These examples assume that you have some knowledge of SQL. If you don’t, you’ll
learn all about SQL in Chapter 8.
You can reuse the newsletter-insert.html form almost entirely. Only one
change is necessary—the action should point at your new dml-insert.xsql. Here is
line that needs to be changed:
<form action=”dml-insert.xsql” method=”post”>
122 Chapter 7
Here is the dml-insert.xsql file that you need to create. The form parameters
are interpolated directly to the SQL statement. This is your first glimpse at parameter
handling with XSQL. You will see more of this in the next section of this chapter.
<?xml version=”1.0”?>
<page connection=”momnpup” xmlns:xsql=”urn:oracle-xsql”>
<xsql:dml>
BEGIN
INSERT INTO newsletter (email,name,organization)
VALUES(‘{@email}’,’{@name}’,’{@org}’);
COMMIT;
END;
</xsql:dml>
</page>
If you are familiar with SQL, this is far simpler than creating a XSLT stylesheet to
transform the request XML. If you are not familiar with SQL, then just wait until
Chapter 8, you are sure to find the xsql:dml action to be the simpler route for your
data modification needs. To complete the example, you need to cook up a dml
-update.xsql. Here it is.
<?xml version=”1.0”?>
<?xml-stylesheet type=”text/xsl” ?>
<page connection=”demo” xmlns:xsql=”urn:oracle-xsql”>
<xsql:update-request table=”newsletter” key-columns=”email”
transform=”include-request.xsl”/>
</page>
The last example is deletion. Again, it has the same pattern as the other examples.
<?xml version=”1.0”?>
<page connection=”momnpup” xmlns:xsql=”urn:oracle-xsql”>
<xsql:dml>
BEGIN
UPDATEnewsletter SET
email=’{@email}’,name=’{@name}’,organization’{@org}’;
COMMIT;
END;
</xsql:dml>
</page>
Handling XML Documents
In the preceding section, you learned how to use the built-in action handlers with
built-in HTML forms. You performed the appropriate action by interpreting an XML
Database Modifications with XSQL 123
document containing the form parameters. In conjunction with HTML forms, their use
probably seemed a bit clumsy. However, in conjunction with Web services and
browsers capable of sending XML, their use is easier and starts to make more sense.
You will see how this works in this section. In addition to seeing how the
xsql:insert-request, xsql:update-request, and xsql:delete-request
actions work with XML documents, you will learn about the xsql:insert
-request-parameter action. This action is used when a parameter has, as its value,
an XML document.
Handling Posted XML
Before beginning with the xsql:insert-request action, your first step is to under-
stand how XML is posted. The action itself works the same—you specify the table and
a stylesheet to transform the XML to the canonical form. What works differently is how
the data arrives. With HTML forms, the key-value pairs arrive contained in the XML
request element. In this case, the XML document arrives within the XML request.
To understand the difference, it is important to understand what an HTTP POST
looks like. When you hit Submit on an HTML form, your Web browser starts an HTTP
transaction. There isn’t much mysterious about the transaction. In plain text, it sends
the following message to the Web server:
POST /xsql/insert-request.xsql HTTP/1.0
User-Agent: Mozilla/4.7 (X11; Linux)
Accept: */*
Content-length: 41
Content-type: application/x-www-form-urlencoded
email=someEmail&name=someName&org=someOrg
The XSQL servlet receives the parameters and does the translation to XML. The data
is inserted, and a result is returned. That is the complete HTTP transaction. If you can
type fast enough, you can actually manually execute the exact same insertion that your
Web browser performs when you fill out the form. Just enter telnet localhost 80
and start typing!
The case you are working at here is one in which you are receiving an XML docu-
ment directly as part of the body of the HTTP POST request. In this case the transaction
looks like the preceding request. The difference is that the XML is already formatted—
the XSQL servlet doesn’t need to conjure up XML out of a list of name-value pairs. As
you will see, from here you simply have to transform the XML to the canonical format.
If you have been doing Web work for a while, you may be asking yourself: “The old
way of submitting forms is great. Why should I bother with this new way?” There are
a few reasons why posting XML in this manner is important. First, a lot of work often
goes into transforming name-value pairs to a more usable data structure. In a lot of
cases, the problem is figuring out how the different name-value pairs are related to
each other. XML is simply a more powerful way to represent data than simple name-
value pairs. The second most important reason is that a lot of Web services applications
work on this principle. The XML is passed from a machine to your application over
HTTP, and then you handle the XML. You will learn more about this in Chapter 16.
124 Chapter 7