Wile Adobe Creative 5 suite Design Premium aio for dummies phần 2 ppt
Bạn đang xem bản rút gọn của tài liệu. Xem và tải ngay bản đầy đủ của tài liệu tại đây (2.15 MB, 84 trang )
Book I
Chapter 8
Printing Documents
77
Printing Your Work
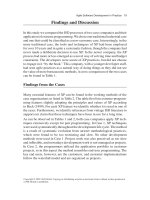
Figure 8-2:
The Print
dialog box in
Photoshop
CS5 for
Windows.
2. From the Printer drop-down list, choose Adobe PDF.
If you want to choose the settings for an installed printer, you can also
select it here.
3. If necessary, scale the image to fit the paper and then click the Print
Settings button.
A second Print dialog box appears, as shown in Figure 8-3.
Figure 8-3:
The
secondary
Print dialog
box in
Photoshop
CS5.
12_607466-bk01ch08.indd 7712_607466-bk01ch08.indd 77 5/24/10 10:02 PM5/24/10 10:02 PM
78
Printing Your Work
4. Choose the quality of PDF that you want to create from the Default
Settings drop-down list.
5. (Optional) If you want to see your PDF file right after it’s created,
choose View Adobe PDF Results and then click OK.
You return to the Print dialog box.
6. Click Print.
The Save PDF File As dialog box appears.
7. Enter a name for the PDF, navigate to the location where you want to
save the file, and click Save.
The document is saved as a PDF file.
Because most printers have custom interfaces for defining settings, you may
need to consult your printer’s documentation for detailed information on
using the printer’s features.
12_607466-bk01ch08.indd 7812_607466-bk01ch08.indd 78 5/24/10 10:02 PM5/24/10 10:02 PM
Book II
InDesign CS5
13_607466-pp02.indd 7913_607466-pp02.indd 79 5/25/10 9:16 AM5/25/10 9:16 AM
Contents at a Glance
Chapter 1: What’s New in InDesign CS5 . . . . . . . . . . . . . . . . . . . . . . . . 81
Chapter 2: Introducing InDesign CS5 . . . . . . . . . . . . . . . . . . . . . . . . . . . 87
Chapter 3: Working with Text and Text Frames. . . . . . . . . . . . . . . . . 105
Chapter 4: Drawing in InDesign. . . . . . . . . . . . . . . . . . . . . . . . . . . . . . . 129
Chapter 5: Understanding Page Layout . . . . . . . . . . . . . . . . . . . . . . . . 149
Chapter 6: Clipping Paths, Alignment, and Object Transformation . . . 169
Chapter 7: Understanding Color and Printing . . . . . . . . . . . . . . . . . . . 179
Chapter 8: Integrating InDesign with Other
Creative Suite Applications . . . . . . . . . . . . . . . . . . . . . . . . . . . . . . . . . . 191
Chapter 9: Exporting Documents for Printing and as Graphics. . . . 201
13_607466-pp02.indd 8013_607466-pp02.indd 80 5/25/10 9:16 AM5/25/10 9:16 AM
Chapter 1: What’s New in
InDesign CS5
In This Chapter
✓ Creating content for print or Web
✓ Creating interactive documents
✓ Using multiple page sizes in the same document
✓ Tracking changes to an InDesign document
✓ Working with layers
✓ Taking a look at minor productivity enhancements
B
efore the CS5 version existed, InDesign was used almost exclusively
for print publishing. But in InDesign CS5, Adobe has added all sorts of
new features for creating Web pages and interactive documents. Interactive
documents that used to be created only in Flash, or Web pages that used to
be created using only Dreamweaver, can now be developed using InDesign.
Of course, you can still create print documents, but one big change between
CS4 and CS5 is the addition of new types of files you can create.
If you’re new to InDesign, you should know that your initial designs for any
type of project can be created using InDesign. Because Adobe is just starting
to add Web and interactive design tools to InDesign, you’re better off using
Dreamweaver to create Web pages or Flash to build most interactive proj-
ects. Interactive documents are just starting to get used, and because the
iPad does not support the Flash format to which InDesign exports, you’ll be
limited primarily to PDF as the export option.
In this chapter, you’ll discover some new features added to InDesign CS5
and references to chapters within this minibook where you can find more
details. We haven’t included every single new feature so that this chapter
doesn’t become a laundry list. Instead, we picked out the biggest changes
and describe them here, and you’ll find references to smaller changes in rel-
evant chapters throughout this minibook.
14_607466-bk02ch01.indd 8114_607466-bk02ch01.indd 81 5/24/10 10:03 PM5/24/10 10:03 PM
82
Creating Web Content
Creating Web Content
The first time you create a new document, you see that InDesign lets you
create more than print documents. In the New Document dialog box, shown
in Figure 1-1, you specify whether you’re creating content for Web or print
and, if you’re creating for the Web, you can specify measurements in pixels
(the measurement used on computer displays) rather than inches or centi-
meters, which you might use in print.
Figure 1-1:
The New
Document
dialog box
now lets
you specify
whether
you’re
creating for
print or the
Web.
If you plan to create for the Web, you can have InDesign create Cascading
Style Sheets (CSS) when you export to XHTML.
Creating Interactive Documents
InDesign CS5 provides three new panels you can use to create and work with
interactive documents:
✦ Media panel: When you create interactive documents, you want to be
able to include movies, so Adobe now lets you import FLV and MP3 files
into an InDesign layout. After you import the movies, you can use the
new Media panel to specify which frame from the video is displayed
as the placeholder — the poster — and you can set options, such as
whether the video plays only one time or should loop continuously.
✦ Animation panel: You can use the new Animation panel, shown in
Figure 1-2, to create animations, or if you want to animate an object in
your layout using a preset option, you can take advantage of the new
motion presets. You can also animate objects along a path by creating a
motion path.
14_607466-bk02ch01.indd 8214_607466-bk02ch01.indd 82 5/24/10 10:03 PM5/24/10 10:03 PM
Book II
Chapter 1
What’s New in
InDesign CS5
83
Choosing from Multiple Page Sizes
✦ Timing panel: The new Timing panel lets you set the time when objects
play, and the States panel lets you create buttons that look different
when the mouse rolls over them or when they’re clicked.
Figure 1-2:
Animate an
object along
a path or
use motion
presets.
Export selected items on a page to Adobe Flash Player, and when exporting
to Flash, choose more options such as resolution and background color.
Choosing from Multiple Page Sizes
Before this version of InDesign, all page sizes within a document had to be
the same. It didn’t matter if you needed a smaller size for a document such
as a fold-out panel of a brochure, you could select and use only one size.
But Adobe has decided to trust you with more than one size in your docu-
ments. Using the Pages panel, you can select specific pages and change the
page size, as shown in Figure 1-3. Master pages, which act as templates for
document pages, can be of varying sizes as well.
As a designer, you might want to create a business card, letterhead, and
envelope all in the same file — even though they’re different sizes. Or, bro-
chures and publications may have a gatefold that allows for a page to fold
out from a design.
14_607466-bk02ch01.indd 8314_607466-bk02ch01.indd 83 5/24/10 10:03 PM5/24/10 10:03 PM
84
Tracking Changes to Your Documents
Figure 1-3:
Set the size
of individual
pages from
the Pages
panel.
Tracking Changes to Your Documents
When several people are working on the same document, determining what
they have modified can be difficult. Adobe, borrowing an idea from Microsoft
Word, now lets you track the changes made to the text of an InDesign docu-
ment by each user. Change to Story Editor view to look at your text and you
can see any proposed edits, such as deleting, moving, or inserting text, as
shown in Figure 1-4. You can then accept or reject proposed edits by using
the Track Changes panel.
Figure 1-4:
Tracking
changes
made to
text.
14_607466-bk02ch01.indd 8414_607466-bk02ch01.indd 84 5/24/10 10:03 PM5/24/10 10:03 PM
Book II
Chapter 1
What’s New in
InDesign CS5
85
Exploring Minor Productivity Changes
Working with Layers
The Layers panel has been updated in InDesign CS5, making it similar to the
one used in Illustrator. Here are some of the ways you can use this panel:
✦ View the stacking order of documents on a layer by clicking the triangle
next to the layer name in the Layers panel, shown in Figure 1-5.
Figure 1-5:
The Layers
panel in
InDesign
CS5 lets you
work with
individual
objects
within a
layer.
✦ Expand groups, buttons, and multistate objects to see the stacking order
of objects and select them.
✦ If you don’t like the default names of the program’s more generic
objects, such as the shape type or text frames, which are named by the
first few words within the frame, you can rename the objects.
✦ Just as with layers, you can move objects vertically within a layer to
change their stacking order so that one object can appear on top of or
below another object.
✦ You can change the visibility of individual items on a page and lock or
unlock them. Locked objects cannot be edited without first unlocking
them.
Exploring Minor Productivity Changes
Adobe changed or added many smaller features in InDesign CS5. Some of the
more noteworthy changes include:
✦ Color swatches have been added to the Control panel. You can still
access from the Swatches panel any color swatch used in a document.
✦ Pouring content into your layouts is easier. If you frequently place
many objects at a single time, merely select several items to place —
either text or graphics — and put them on the page.
14_607466-bk02ch01.indd 8514_607466-bk02ch01.indd 85 5/24/10 10:03 PM5/24/10 10:03 PM
86
Exploring Minor Productivity Changes
✦ You can now more easily access the metadata and have it used as cap-
tions in documents. You can print lots of images and use their metadata
as captions, such as the photographer name, product name, caption, or
copyright information.
✦ Mini Bridge makes it possible to locate and place images into docu-
ments without leaving InDesign. Mini Bridge provides a small panel
in which you can navigate your computer or network, locate items you
might want to use in the layout, and place them into your document.
The window is rather small, and you might still find it easier to simply
click and drag items from your operating system, or you can use the
Place command.
✦ Adobe has added new review and commenting features. You can share
your designs across the Internet so that other people can provide feed-
back and input if you initiate them by using the new Review panel.
14_607466-bk02ch01.indd 8614_607466-bk02ch01.indd 86 5/24/10 10:03 PM5/24/10 10:03 PM
www.zshareall.com
Chapter 2: Introducing
InDesign CS5
In This Chapter
✓ Opening InDesign
✓ Creating new documents
✓ Looking at and setting up the workspace
✓ Creating your first publication
I
nDesign is a sophisticated page layout program. You can use it to create
professional-looking documents, including newsletters, books, and maga-
zines. You can also use it to create HTML pages and PDF documents that
include interactivity or videos. InDesign has become a tool that lets you
publish just about anywhere. For example, you can create a document that
includes hyperlinks and video and export it to PDF, or you can export XML
(Extensible Markup Language) from InDesign. You can even export XHTML
and then import it into Dreamweaver to create Web pages.
As powerful an application as InDesign is, you’d think it would be difficult to
use, but it isn’t. This minibook shows you how to use InDesign to make cre-
ative page layouts. In this chapter, you discover the InDesign interface and
start your first publication.
Getting Started with InDesign CS5
InDesign is used for creating page layouts that include type, graphics
(such as fills and strokes), and images. The InDesign document you see in
Figure 2-1 includes elements from Adobe Illustrator (logos) and Photoshop
(images). If this file were to be exported as a PDF or HTML file, it could
include video and even Flash files.
In the following sections, you get familiar with creating and opening docu-
ments in InDesign. In Chapters 3 through 9 in this minibook, you see how to
add various elements to your pages.
15_607466-bk02ch02.indd 8715_607466-bk02ch02.indd 87 5/24/10 11:40 PM5/24/10 11:40 PM
88
Getting Started with InDesign CS5
Figure 2-1:
A sample
page layout
created
using
InDesign
CS5.
Creating a new publication
After you launch InDesign, you can create a new InDesign document. Just
follow these steps to create a new publication:
1. Choose File➪New➪Document.
The New Document dialog box opens, as shown in Figure 2-2.
Figure 2-2:
Setting
up a new
document
with
InDesign.
15_607466-bk02ch02.indd 8815_607466-bk02ch02.indd 88 5/24/10 11:40 PM5/24/10 11:40 PM
Book II
Chapter 2
Introducing
InDesign CS5
89
Getting Started with InDesign CS5
2. Select whether you’re designing for Print or Web from the Intent
drop-down menu.
3. Enter a value in the Number of Pages text field for the number of
pages in the document.
This value can be between 1 and 9999. If you want a text frame on the
master page, select the Master Text Frame check box.
You can discover more about text frames in Chapter 3 of this minibook.
4. For this example, select the Facing Pages check box to have the pages
arranged as spreads with left and right pages.
With this option selected, pages in your document are arranged in pairs,
so you have spreads, which are facing or adjacent pages in a layout. For
example, you select this option if you’re creating a publication that will
be arranged like a book or magazine. If you deselect this option, pages
are arranged individually, which is a good choice for a single-page flyer
or a flyer with only a front and back side.
5. Choose a page size for the document from the Page Size drop-down list.
The page size should be set to the size of paper you intend to print on
or the size at which the content will be displayed. The Width and Height
values below this drop-down list change, depending on the size you
choose.
You can also enter your own settings to create a custom size. The
Orientation setting changes from Portrait (tall) to Landscape (wide)
based on the settings you enter in the Width and Height fields of the
Page Size section.
The Page Size drop-down list also includes resolution sizes such as 1024
x 768, which is helpful if you’re creating a Web page or an interactive
PDF.
You can enter page sizes using most common forms of measurement or
just use the appropriate abbreviation. For example, you enter 8 in. for 8
inches or 15 cm for 15 centimeters. You can use most forms of measure-
ment in all InDesign dialog boxes and panels; just make sure to specify
the form of measurement you want to use.
6. Choose a number for the columns on the page.
This step sets nonprinting guides for columns, which helps you organize
your page. You can also enter a value in the Gutter field, which specifies
the space between each of the columns. For more information about
using columns in page layout, see Chapter 5 of this minibook.
7. Choose values for the page margins.
Notice the Make All Settings the Same button, which is a chain icon, in
the middle of the four text fields where you enter margin values. Click
this button to set all margins to the same value.
15_607466-bk02ch02.indd 8915_607466-bk02ch02.indd 89 5/24/10 11:40 PM5/24/10 11:40 PM
90
Getting Started with InDesign CS5
If you see Top, Bottom, Inside, and Outside, you’re specifying margins
for a page layout that has facing pages, which you specified earlier. If
you see Top, Bottom, Left, and Right, you’re creating a page layout with-
out facing pages. The inside margins refer to the margins at the middle
of the spread, and the outside margins refer to the outer left and right
margins of a book or magazine. You can set the Inside setting to accom-
modate the binding of a book, which may need wider margins than the
outside.
If you use the same settings repeatedly, saving those settings as a preset
is a good idea. Get your settings the way you want them and then click
the Save Preset button in the New Document dialog box before you click
OK. Enter a name for the preset and then click OK. After you save your
settings, you can select settings from the Document Preset drop-down
list (refer to the top of Figure 2-2) whenever you create a new document.
8. When you’re finished, click OK.
After you click OK in the New Document dialog box, the new document
is created with the settings you just specified.
Margins, columns, orientation, and page size are discussed in more detail in
Chapter 5 of this minibook.
Opening an existing publication
You may have InDesign files on your hard drive that you created or have
saved from another source. To open existing InDesign documents (files that
end with .indd), follow these steps:
1. Choose File➪Open.
The Open dialog box appears.
2. Browse your hard drive and select a file to open.
Select a file by clicking the document’s title. To select more than one
document, press Ctrl (Ô on the Mac) while you click the filenames.
3. Click the Open button to open the file.
The file opens in the workspace.
Looking at the document setup
If you need to change the size of your pages or the number of pages in a doc-
ument that’s already open in the workspace, you can make those changes
in the Document Setup dialog box. To access and modify settings in the
Document Setup dialog box, follow these steps:
1. Choose File➪Document Setup.
The Document Setup dialog box opens.
15_607466-bk02ch02.indd 9015_607466-bk02ch02.indd 90 5/24/10 11:40 PM5/24/10 11:40 PM
Book II
Chapter 2
Introducing
InDesign CS5
91
Touring the Workspace
Note: You can change the value in the Number of Pages text field if you
need the number of pages in your document to be greater than or less
than the current value.
The number of pages in your document updates after you close
this dialog box. You can also change this number later by choosing
Layout➪Pages➪Insert Pages or by using the Pages panel.
2. Select a new option from the Page Size drop-down list or manually enter
values into the Width and Height text fields to change the page size.
You can also click the up and down arrows in the Width and Height text
fields to choose a new value.
3. Click the Portrait or Landscape button to change the page orientation.
The page orientation updates in the workspace after you close this
dialog box.
4. Click OK when you finish changing your document setup.
The modifications are applied to the open document.
If you make changes to the Document Setup dialog box when you have
no documents open, the changes become the default settings for all new
documents you create.
Touring the Workspace
Just like the other applications in the CS5 Suite, InDesign has a standardized
layout. Using panels that can be docked and a single-row Tools panel, you
can keep much more space open in your work area.
The InDesign workspace, or user interface, is designed to be intuitive and effi-
cient. You’ll use several panels over and over again, so keep them accessi-
ble. Many of these panels are already docked to the right in the default user
workspace. Figure 2-3 shows how the InDesign workspace layout looks on a
Macintosh. The Windows workspace is slightly different from the Macintosh
version. You’ll notice a difference in the main menu bar.
Here are the elements that create the InDesign workspace:
✦ Page: The main area of the InDesign workspace is a page. It’s the area
that’s printed or exported when you finish making a layout.
✦ Master page: You can define how certain text elements and graphics
appear in an entire document (or just portions of it) by using a master
page. It’s much like a template for your document because you can
reuse elements throughout the pages. For example, if you have an ele-
ment you want on each page (such as page numbering), you can create
it on the master page. If you need to change an element on the master
15_607466-bk02ch02.indd 9115_607466-bk02ch02.indd 91 5/24/10 11:40 PM5/24/10 11:40 PM
92
Touring the Workspace
page, you can change it at any time and your changes are reflected on
every page that the master page is applied to. You find out more about
master pages in Chapter 5 of this minibook.
✦ Spread: A spread refers to a set of two or more pages that will be
printed side-by-side. You usually see spreads in magazines and books
when you open them — just like the book you’re holding now.
✦ Pasteboard: The pasteboard is the area around the edge of a page. You
can use the pasteboard to store objects until you’re ready to put them
into your layout. Pasteboards aren’t shared between pages or spreads.
For example, if you have certain elements placed on a pasteboard for
pages 4 and 5, you can’t access these elements when you’re working on
pages 8 and 9 — so each page or spread has its own pasteboard.
Figure 2-3:
The
InDesign
Windows
default
workspace.
Control panel
Menu bar
Page Pasteboard
Panel docking area
Page field
Tools panel
15_607466-bk02ch02.indd 9215_607466-bk02ch02.indd 92 5/24/10 11:40 PM5/24/10 11:40 PM
Book II
Chapter 2
Introducing
InDesign CS5
93
Touring the Workspace
Tools
The Tools panel is where you find tools to edit, manipulate, or select ele-
ments in your document. Simply use the cursor and click a tool to select it.
See Figure 2-4 for the default Tools panel layout.
Figure 2-4:
The Tools
panel
contains
tools
needed
to create,
select,
and edit
elements.
Direct selection tool
Gap tool
Line tool
Pencil tool
Rectangle tool
Free Transform tool
Gradient Feather tool
Eyedropper tool
Zoom tool
Stroke
Formatting Affects type
Fill
Default Fill and Stroke Color
Gradient tool
Note tool
Normal view
Hand tool
Page tool
Type tool
Pen tool
Rectangular Frame tool
Scissors tool
Selection tool
Formatting Affects container
Apply Color
If you decide that a single row of tools just isn’t for you, you can go back to
an older version’s Tools panel by clicking the two arrows in the gray bar at
the top of the Tools panel. If you want to relocate the tools, click the silver
bar at the top of the tools and drag to a new location.
You can find out more about these tools and how to use them in the related
chapters of this minibook. For example, we discuss the drawing tools in
Chapter 4 of this minibook.
With the tools in the Tools panel, you can
✦ Create stunning new content on a page using drawing, frame, and text
tools.
15_607466-bk02ch02.indd 9315_607466-bk02ch02.indd 93 5/24/10 11:40 PM5/24/10 11:40 PM
94
Touring the Workspace
✦ Select existing content on a page to move or edit.
✦ View the page in different ways by moving (panning) and magnifying the
page or spread.
✦ Edit existing objects, such as shapes, lines, and text. Use the Selection
tool to select existing objects so that you can change them.
When a tool has a small arrow next to the button’s icon, more tools are
hiding behind it. When you click the tool and hold down the mouse button, a
menu opens that shows you other available tools. While pressing the mouse,
move the cursor to the tool you want and release the mouse button after it’s
highlighted.
Menus
The menus on the main menu bar are used to access some of the main com-
mands and control the user interface of InDesign. They also allow you to
open and close panels used to edit and make settings for the publication.
InDesign menu commands such as New, Open, and Save are similar to most
other applications you’re probably familiar with. The InDesign menus also
include commands that are especially used for page layout, such as Insert
with Placeholder Text. For more information on using menus, see Book I,
Chapter 2. Remember to refer to the common commands and shortcuts that
are also detailed in that chapter.
The InDesign main menu has the following options:
✦ File: This menu includes some of the basic commands to create, open,
and save documents. It also includes the Place command to import new
content and many options to control document settings, exporting docu-
ments, and printing.
✦ Edit: You can access many commands for editing and controlling selec-
tions in this menu — such as copying and keyboard shortcuts. The dic-
tionary and spell checker are on this menu, too.
✦ Layout: Use this menu to create guides. These options help you lay ele-
ments on the page accurately and properly align them. Use the menu to
navigate the document’s pages and spreads.
✦ Type: From this menu, you can select fonts and control characters in the
layout. You can access the many settings related to text from this menu,
which opens the associated panel where you make the changes.
✦ Object: You can modify the look and placement of objects on the page
with this menu. Which options are available on this menu depends on
which element you’ve selected in the workspace, such as a text field or
an image.
15_607466-bk02ch02.indd 9415_607466-bk02ch02.indd 94 5/24/10 11:40 PM5/24/10 11:40 PM
Book II
Chapter 2
Introducing
InDesign CS5
95
Touring the Workspace
✦ Table: Use this menu to create, set up, modify, and control tables on the
page.
✦ View: You can modify the view of the page from this menu, including
zooming in and out, as well as work with guides, rulers, or grids to help
you lay out elements.
✦ Window: Use this menu to open and close panels or switch between
open documents.
✦ Help: This menu is where you can access the Help documents for
InDesign and configure any plug-ins you have installed.
Panels
In the default layout, you see a large area for the document, typically
referred to as the page. To the right of the page are several panels that snap
(are docked) to the edge of the workspace. Panels are used to control the
publication and edit elements on pages. Docked panels are panels attached
to the edge of the user interface. Panels can be maximized and minimized
away from the main work area, moved around, or closed altogether.
To expand a panel, you can simply click the panel name and it automatically
expands. The magic of this improved panel system is that the panels you
expand are automatically collapsed again when a different panel is selected.
If you’d rather work with all panels expanded, simply click the left-facing
double arrows on the gray bar above the panels. You can collapse all the
panels again by clicking the right-facing double arrows on the gray bar above
the expanded panels.
Even though some InDesign panels perform different functions, similar
panels are grouped together depending on what they’re used for. You can
change the groupings by clicking and dragging a panel’s tab into another
grouping.
Some panels work intelligently when you’re manipulating content on an
InDesign page. If you work with a particular element, for example, the associ-
ated panel is activated. Throughout Chapters 3 through 9 of this minibook,
you discover these specific panels as you create layouts. For now, we briefly
show you two general InDesign panels: Control and Pages.
Control panel
The Control panel is used to edit just about any element in InDesign, as
shown for the Type tool in Figure 2-5. This panel is context sensitive, so it
changes depending on which element you’ve selected on a page. For exam-
ple, if you have selected text on the page, the Control panel displays options
allowing you to edit the text. If you have a shape selected, the panel displays
options allowing you to modify the shape.
15_607466-bk02ch02.indd 9515_607466-bk02ch02.indd 95 5/24/10 11:40 PM5/24/10 11:40 PM
96
Touring the Workspace
Figure 2-5:
The Control
panel,
when the
Type tool is
active.
Figure 2-6 shows the Control panel when a frame is selected using the
Selection tool. The Control panel menu allows you to select options for the
frame.
Figure 2-6:
The Control
panel, when
a frame is
selected
using the
Selection
tool.
Pages panel
You can control pages by using the Pages panel, as shown in Figure 2-7. This
panel allows you to arrange, add, and delete pages in your document. You
can also navigate among pages with this panel, which we discuss further in
Chapter 5 of this minibook.
You can also add and delete pages by choosing Layout➪Pages, and even
use a keyboard shortcut to add pages, Ctrl+Shift+P (Windows) or Ô+Shift+P
(Mac).
You can hide all open panels (including the Control panel) by pressing the
Tab key; press Tab for them to return to view. In InDesign CS5, you can leave
tools and panels hidden and access them when you want by moving the
cursor to the left or right side of the work area. Pause when you see a tinted
vertical gray bar appear, and the tools or panels (depending on which side
of the workspace you’re in) reappear! By the way, they go away again after
you leave the area.
15_607466-bk02ch02.indd 9615_607466-bk02ch02.indd 96 5/24/10 11:40 PM5/24/10 11:40 PM
Book II
Chapter 2
Introducing
InDesign CS5
97
Touring the Workspace
Figure 2-7:
Use the
Pages panel
to add,
delete, and
move pages.
You can navigate the document’s pages by using the left and right arrow
buttons on either side of the page number in the lower left corner of the
document window. You can also move to a specific page by entering a page
number into the page field and pressing Enter or by selecting the page from
the drop-down list in the lower left corner of the document window.
Contextual menus
Contextual menus (or context menus) are menus that pop up when you
right-click (Windows) or Control-click (Mac) the mouse. Contextual menus
change depending on which element you click and which tool you’re using.
If you have no elements selected, the contextual menu opens for the overall
InDesign document, allowing you to select options such as Zoom, Paste,
Rulers, and Guides. If you have an element selected, your options include
transforming, modifying, and editing the object.
Contextual menus are context sensitive (hence the name!). Remember to
select an element on the page before you right-click to open the contextual
menu. If you don’t select the object first, the menu is for the document
instead of for the object.
You can find out more about editing and transforming elements in Chapters
3 and 4 of this minibook.
15_607466-bk02ch02.indd 9715_607466-bk02ch02.indd 97 5/24/10 11:40 PM5/24/10 11:40 PM
98
Setting Up the Workspace
Setting Up the Workspace
Workspace settings are important because they help you quickly create
the type of layout you need. Overall document settings control elements
such as grids or guides that help you align elements on the page. Grids and
guidelines are pretty much the same thing, except that grids are designed to
repeat across the page and be a specified distance apart. Neither guides nor
grids print when you print your document.
Showing and hiding grids and guides
Use grids when you need to align elements across a document. You can have
objects on a page snap to the grid, which helps you to align or space several
objects accurately. Guides are only slightly different, because they’re often
created individually, but they’re also nonprinting lines. Guides can be placed
anywhere on the page (or pasteboard) and are used to accurately position
objects in a layout. Objects can snap to guides just like they can snap to a
grid. Grids differ from guides in that grids aren’t freely placed anywhere on
the page.
The document grid is used for aligning elements on the page, and the baseline
grid is used for aligning the bottom of text across multiple columns.
✦ To show or hide the document grid, choose View➪Grids & Guides➪
Show (or hide) Document Grid.
✦ To show or hide the baseline grid, choose View➪Grids & Guides➪
Show (or hide) Baseline Grid.
You can immediately see the difference between these two kinds of grids.
To snap objects in your page layout to a guide or the document grid, you
must have snapping enabled. To enable snapping, choose View➪Grids &
Guides➪Snap to Guides or View➪Grids & Guides➪Snap to Document Grid. If
these options are already selected, clicking them will turn them off.
To create a guide and show or hide guides, follow these steps:
1. Make sure that rulers are visible by choosing View➪Show Rulers.
Rulers appear in the workspace. If you already have rulers visible, the
option View➪Hide Rulers is on the View menu. Do not hide the rulers.
2. Move the cursor to a horizontal or vertical ruler.
Make sure that the cursor is over a ruler.
3. Click the ruler and drag the mouse toward the page.
A ruler guide shows on the page as a line.
15_607466-bk02ch02.indd 9815_607466-bk02ch02.indd 98 5/24/10 11:40 PM5/24/10 11:40 PM
Book II
Chapter 2
Introducing
InDesign CS5
99
Setting Up the Workspace
4. Release the mouse where you want the guide.
You just created a ruler guide!
5. To hide the guide, choose View➪Grids & Guides➪Hide Guides.
This step hides the guide you created but doesn’t delete it. You can
make the guide reappear easily in the next step.
6. To see the guide again, choose View➪Grids & Guides➪Show Guides.
The guide you created is shown on the page again.
You can edit the color of the ruler guide you created by positioning the
mouse over it, clicking once to select it, and then right-clicking (Windows) or
ctrl-clicking it (Mac) and selecting a new color from the Ruler Guides option.
You can find out more about the different kinds of guides and how to use
them in page layout in Chapter 5 of this minibook.
You can also control the color of the guides and grid in your prefer-
ences. Access them by choosing Edit➪Preferences➪Grids (Windows) or
InDesign➪Preferences➪Grids (Mac). When the Preferences dialog box
opens, you can change the color and spacing of the lines. Click Guides &
Pasteboards in the list on the left to change the color settings for guides.
Snapping to a grid or a guide
You can have elements on the page snap to a grid or a guide. Grid or guide
snapping is useful so that you don’t have to eyeball the alignment of sev-
eral elements to one another, because they’re precisely aligned to a grid or
guide. In fact, grids and guides are fairly useless unless you have elements
snap to them! To make sure that this setting is enabled, choose View➪
Grids & Guides➪Snap to Document Grid or View➪Grids & Guides➪Snap
to Guides.
Using smart guides
Give yourself an added hand when aligning objects on the InDesign page
with Smart Guides. Illustrator and Photoshop users may be familiar with
these interactive guides, but if you’re not, read on to discover how you can
take advantage of them.
You can experiment with this new feature by creating two objects in an
InDesign document. It doesn’t matter which object or shape — any will do!
With the Selection tool, click and drag one object in a circular motion
around the other. You’ll notice guides appear and disappear, indicating
when the objects are aligned either on the top, center, or bottom of the
other object, as shown in Figure 2-8.
15_607466-bk02ch02.indd 9915_607466-bk02ch02.indd 99 5/24/10 11:40 PM5/24/10 11:40 PM
100
Setting Up the Workspace
Figure 2-8:
Click and
drag one
shape
around
another
to see the
interaction
with Smart
Guides.
As a default, pink guides appear when you align an object with the center of
the page, as shown in Figure 2-9.
Figure 2-9:
Know when
your object
is at the
exact center
of the
page when
a guide
crosshair
appears.
You can see a print preview of your document by clicking the Preview Mode
button at the bottom of the Tools panel. When you click this button, all
object bounding boxes, guides, and the grid disappear.
Saving a custom workspace
You’ve seen that InDesign has a number of panels. If you find that you’re
using some panels more than others, you can have InDesign remember the
grouping of panels you use most frequently — InDesign calls it a workspace.
The next time you want a certain group of panels open together, you can
return to the workspace you previously saved. The workspace isn’t attached
to a particular document, so you can have one workspace for editing text
and another for working with a layout.
15_607466-bk02ch02.indd 10015_607466-bk02ch02.indd 100 5/24/10 11:40 PM5/24/10 11:40 PM
Book II
Chapter 2
Introducing
InDesign CS5
101
Working with Documents
To save a custom workspace, follow these steps:
1. Have the InDesign workspace configured in the way you want to save
it — with any panels open that you might want to access together.
The open panels are saved as a custom workspace.
2. Choose Window➪Workspace➪New Workspace.
The New Workspace dialog box opens.
3. Type a new name for the workspace in the Name text field.
When you finish, this name is displayed on the Workspaces menu. Save
it using a name that reflects the type of work you do in that workspace,
such as text editing or layout.
4. Click OK.
The custom workspace is saved.
To access your workspace, choose Window➪Workspace➪Your Workspace
(where Your Workspace is the name you gave the workspace in Step 3).
You can delete the workspace if you no longer want it saved. Simply choose
Window➪Workspace➪Delete Workspace.
Working with Documents
After you’re comfortable getting around the InDesign workspace, you’re
ready to begin working with a new document. After you’ve started working
on a document, you should find out how to import content from other pro-
grams and to save that document on your hard drive. A lot of the content
you use when creating layouts with InDesign is imported from other pro-
grams. You use InDesign to organize, modify, and integrate text and graphics
into a layout. To begin, we show you the steps needed to import content and
save new files.
We show you how to open new and existing documents earlier in this chap-
ter, in the sections “Creating a new publication” and “Opening an existing
publication.”
You may also be working with a template, which is a layout you reuse by
applying it to a document that requires a particular predesigned format. For
example, a company may use a template for its official letterhead because
every new letter requires the same page format and design. InDesign tem-
plates use the .indt file extension.
15_607466-bk02ch02.indd 10115_607466-bk02ch02.indd 101 5/24/10 11:40 PM5/24/10 11:40 PM