BeginningMac OS X Tiger Dashboard Widget Development 2006 phần 3 docx
Bạn đang xem bản rút gọn của tài liệu. Xem và tải ngay bản đầy đủ của tài liệu tại đây (1.65 MB, 36 trang )
@”You will be awarded some great honor.”, /cpw
@”You are soon going to change your present line of work.”, //cpw
@”You will have gold pieces by the bushel.”, //cpw
@”You will be fortunate in the opportunities presented to you.”, //cpw
@”Someone is speaking well of you.”, //Melina
@”Be direct, usually one can accomplish more that way.”, //Melina
@”You need not worry about your future.”, //Toni
@”Generosity and perfection are your everlasting goals.”, //Katherine
};
The placeholder for the fortune appears in the body of the Fortune.html file.
<body onclick=”next()”> <! If a click occurs anywhere on this widget, go to the
next fortune >
<img src=”Default.png”> <! The fortune cookie/paper image >
<div id=”quote”>Click here to obtain a fortune.</div> s<! Basic placeholder
text >
</body>
The placeholder text Click here to obtain a fortune is replaced by the JavaScript from the plugin
whenever you click in the widget.
Enabling Dashboard Developer Mode
In addition to using Safari as the development environment, you can also run Dashboard in developer
mode so that the widget is always available while you are making changes to it. The advantage of this is
that you do not have to activate Dashboard and wait while widgets update. For example, if you have a
widget that gets information from the system or an Internet site, you have to wait while the widget
refreshes before you can refresh your widget to see the changes you’ve made. If the widget is always
available, you have only to set the focus to the widget by clicking it and then press Command-R to
reload it.
To use this technique, you have to enable Dashboard development mode and then drag the widget to
the desktop so it is available. To do this, open Terminal and type:
defaults write com.apple.dashboard devmode YES
followed by a Return. To activate debugging mode after you have executed this command, you must log
out and log back in. Once you have logged back in, activate Dashboard by pressing F12 — or the assigned
key — and begin dragging the widget. Press F12 again and let go of the mouse button. Dashboard closes
and the widget opens.
This is equivalent to having a small Safari window that floats above all of your applications open all
of the time. You won’t be able to minimize the window and it will not be available in the Dock or the
Application Switcher when you cycle through applications. You will be able, however, to use the reload
command to refresh the widget.
47
Widget Development Environment
07_778257 ch03.qxp 6/9/06 9:31 AM Page 47
To move the widget back to Dashboard, begin dragging the widget and press F12. Dashboard activates
and when you release the mouse button, the widget will be back inside of Dashboard.
If you don’t want to log out and back in to activate developer mode, you can also activate it by killing
and restarting the Dock. Do this through the Activity Monitor. Select the Dock in Activity Monitor and
click the Quit Process button at the top of the window (Figure 3-13).
Figure 3-13
You can turn the developer mode off by executing the command again replacing the YES with NO.
defaults write com.apple.dashboard devmode NO
Leaving developer mode enabled will not have any impact on OS X, but you may want to disable the
ability to run widgets outside of Dashboard and return Dashboard to its normal state once you have
finished developing your widget.
48
Chapter 3
07_778257 ch03.qxp 6/9/06 9:31 AM Page 48
Debugging Tools
Debugging tools are important for finding elusive problems during development. Debugging can be as
simple as following error messages in the Console.log to stepping through the source code and examining
the variables to locate problems. Being able to see error messages as you are working helps you identify
problems. Usually the error messages tell you what the problem is so that you can fix it in your code.
Stepping through the code is slower, but allows you to watch everything that happens in your widget.
However, you don’t have to purchase a debugger to be able to find and fix problems in your code.
Using Safari as Your Debugger
If you are using Safari as your development environment, you can enable the Debug menu in Safari and
use it as your debugger. The Debug menu is a hidden feature that you have to enable to use. You can
enable the menu using Terminal by entering the following code and pressing return.
defaults write com.apple.safari IncludeDebugMenu 1
The next time you open Safari, you will see a Debug menu. You can disable the menu with the same
command replacing the 1 with a 0.
defaults write com.apple.safari IncludeDebugMenu 0
You can also enable the Debug menu without touching Terminal by using an application from Marcel
Bresink Software-Systeme called TinkerTool (Figure 3-14). Dr. Bresink’s TinkerTool allows you to tweak
hidden options in some programs and the operating system. For instance, you can turn on two headed
arrows in your scroll bars. TinkerTool has a Safari pane that allows you to change some of the hidden
options in the application.
Figure 3-14
49
Widget Development Environment
07_778257 ch03.qxp 6/9/06 9:31 AM Page 49
When you restart Safari, the Debug menu appears as the last item on the menu bar (Figure 3-15). Select
Log JavaScript Exceptions to log as much information as possible about JavaScript errors generated by
running your widget in Safari. Select Show JavaScript Console to display the console where you can
watch the errors as you test your widget. You’ll also notice that you can view the DOM tree from the
Debug menu in Safari.
Once you have the JavaScript Console open, you can watch for JavaScript errors. The status bar in the
Safari page will also tell you about some errors. For instance, missing file errors will be flagged in the
status bar along with information about the error.
Figure 3-15
Third-Party Debugging Tools
Widgetarium’s debugger is probably the best and most direct tool for debugging JavaScript in a widget.
You can set breakpoints in the JavaScript file and run the widget until you reach the breakpoint and then
examine the values of the variables (Figure 3-16).
50
Chapter 3
07_778257 ch03.qxp 6/9/06 9:31 AM Page 50
Figure 3-16
From the break point you can step through the code — stepping into, out of, and over calls — or run to
the next break point or until complete. Widgetarium also allows you to set trace points in your JavaScript.
Try It Out Debugging Error Messages
Now that you know a little about the debugging tools that you have at your disposal, let’s use one of
them to see how an error would appear. To set this up, show the package contents of the installed
Fortune widget and remove the SimplePlugin.widgetplugin folder that you installed earlier. If you have
the Fortune widget loaded in Dashboard, you will also need to remove it and add it again.
1. Show the JavaScript console by selecting it from Safari’s Debug menu. Position the console so
you can see it and the Safari window at the same time.
2. Open the Fortune.html file in Safari. With the plugin removed, you should see only the “Click
here to obtain a fortune” placeholder text.
3. Click the fortune cookie in the Safari window.
51
Widget Development Environment
07_778257 ch03.qxp 6/9/06 9:31 AM Page 51
4. Look in the console window and you’ll see the error message about the missing plugin
(Figure 3-17).
Figure 3-17
How It Works
The JavaScript Console gets any JavaScript errors that are generated in Safari. But these error messages
also find their way into the OS X console.log (Figure 3-18). You can see these by opening the Console
application in the Utility folder in the Applications folder.
Figure 3-18
To see the console.log, you may need to click the Logs button at the top of the window and select the
console.log in the list on the left. The line at the bottom of the window is the error you see in the
JavaScript console.
52
Chapter 3
07_778257 ch03.qxp 6/9/06 9:31 AM Page 52
[227] file:///Users/pfterry/Projects/fortune/Fortune/Fortune.html:ReferenceError -
Can’t find variable: FortunePlugin
The line in console.log gives you the file that generated the error. If you look in the Fortune.html file,
you’ll see the link to the JavaScript file.
<! The JavaScript for this widget >
<script type=’text/javascript’ src=’Fortune.js’ charset=’utf-8’/>
As you saw earlier, the JavaScript is supposed to get the fortune from the plugin and place it in the
widget.
As you can see, the system’s console.log file contains more information about the error than the
JavaScript console, so you may prefer to use it when you are trying to track down difficult problems.
The downside of using the console.log is that you see information from all of the processes running on
your machine. If you have enough screen real estate, you can use Tynsoe’s GeekTool preference pane to
display the console.log file in your desktop to reduce the number of windows that you have open and
allow you to check for problems with a glance at your desktop.
Summary
You could purchase third-party tools for your widget development, but you don’t have to. Most of the
tools that you need are freely available and ship with OS X. Third-party tools can speed your develop-
ment cycles because they directly support widget development and may have features that work around
system limitations.
In this chapter, you learned:
❑ What the available programming tools are for developing widgets
❑ How to compile a plugin
❑ How to use a debugging tool
In Chapter 4, you create your first widget. Before you turn to Chapter 4, you may want to run through
these exercises to review what you’ve learned in this chapter.
Exercises
1. How do you allow the Fortune widget to use the SimplePlugin?
2. Will the SimplePlugin display the next fortune if you are testing the Fortune widget in Safari?
3. How can you edit a widget installed in the /Macintosh HD/Library/Widgets/ folder?
53
Widget Development Environment
07_778257 ch03.qxp 6/9/06 9:31 AM Page 53
07_778257 ch03.qxp 6/9/06 9:31 AM Page 54
4
Creating a Widget
In Chapter 3 you looked at the different tools available for developing Dashboard widgets and
learned that you could use any text editor to create your source files and that you could use Safari
for testing your widget. You also learned some strategies for testing your widget during develop-
ment and how to compile a plugin. In this chapter, you create a widget from scratch, building it
from the HTML and CSS through the JavaScript functionality.
By the end of this chapter, you will know:
❑ How to begin developing a basic widget
❑ How to use HTML and cascading styles sheets to give shape to the widget
❑ How to incorporate JavaScript into your widget
HTML Beginnings
In the previous chapters you spent some time looking at the way widgets have been assembled,
now let’s use what you’ve learned to create a widget from scratch.
You can develop a widget from any website that you visit on a regular basis or routine tasks that
can be accessed through the filesystem or performed by script. Or to put it more succinctly, any-
thing you can do in a browser can be developed into a widget.
I check the weather maps for my region of the country at least twice a day. If storms are moving
into the area, I may check them once an hour. I can reduce my trips to the browser by creating a
widget that displays the maps I always check. Let’s call it WeatherMaps.
Beginning the Project
Everyone starts a project from a different point. If you are working with a team of programmers
developing a large and complex program for the marketplace, you typically begin with specifica-
tions and use case interviews and diagrams. Widgets lend themselves to a much smaller scope.
08_778257 ch04.qxp 6/9/06 9:31 AM Page 55
You don’t need a specifications document, but you may want to decide on the functionality of your
widget before you begin hacking HTML and JavaScript. This need not be complicated; just a listing of
features that you want in the widget and how you want them to behave will suffice. This will change,
of course, as you develop your widget and you spend time using it.
The real advantage of developing a list of features (or formal specifications or use case scenarios, for that
matter) is that you start thinking about how to organize the development. I know I want this widget to
accomplish the following tasks:
❑ It should get the current radar.
❑ It should get the current temps map.
❑ It should get the overnight temps map.
❑ It should get tomorrow’s temps map.
I may decide that this is the only way to view weather maps and add a few more to the list. When I look
at the map, I’ll see that it is pretty large for my PowerBook screen, so showing multiple maps at once is
probably not an option (Figure 4-1).
Figure 4-1
56
Chapter 4
08_778257 ch04.qxp 6/9/06 9:31 AM Page 56
The size of the map probably won’t even allow enough space for the other widgets I normally keep
open. The size of the maps also makes using them on the typical widget backgrounds not an option.
As I check the maps that I want to display, I also notice that they are two different sizes. Whatever I use
as a background for the current weather map will leave a noticeable gap when I display the current tem-
perature maps. The following questions become design considerations as I’m working on the widget:
❑ Can the current weather map be resized so it is the same size as the current temps and
overnight temperature maps?
❑ If all of the maps won’t fit on the screen at the same time, how can switching among them be
made easier?
❑ What can I use as a widget background?
❑ If the widget is going to be shared, how can others set the maps they want to view?
You may be able to think of several or a dozen additional things to consider, but you get the idea. By
making a list of the features you want your widget to have and then thinking about their uses, you will
be able to come up with a list of items to consider as the widget takes shape. You can keep the list on
paper or in a text editor file, but keep it nearby while you are developing the widget so you can review
and add to it.
Begin with HTML
Because Dashboard widgets are essentially web pages, the best place to begin is with the HTML that you
will use to retrieve the maps.
<!DOCTYPE html PUBLIC “-//W3C//DTD XHTML 1.0 Strict//EN”
“ /><html xmlns=” /><head>
<title>WeatherMaps</title>
</head>
<body>
<img src=” /><!
/> /> />pg
/> >
</body>
</html>
This is a bit of straightforward HTML wrapped around the radar map. This widget allows you to check
the current radar map without loading all of the ads and content on the web page that you aren’t inter-
ested in at the moment. You can find the URL of the radar map by right-clicking it and selecting the
Open Image in New Window or Open Image in New Tab options. When you do this, the map loads in a
separate page with the URL of the map itself in the location window.
57
Creating a Widget
08_778257 ch04.qxp 6/9/06 9:31 AM Page 57
You can gather the URLs of the other maps that you want to retrieve and include them in a comment at
the bottom of the page. This makes it easier for you to check the sizes of the other maps as you begin to
develop your widget.
The link to this radar map and the temperature maps discussed later in this chapter were obtained by
Control-clicking the map at weather.com’s website. You may want to insert maps for your region or part
of the world.
If you look back to your list of design considerations, you’ll see that the size of the maps is the first thing
you’re thinking about. HTML has a way of resizing images as they are loaded that may work for your
widget. You do this by setting the height and width of the image in the source line like so:
<img src=” />width=”432” height=”290”>
Setting the height and width of the image in the source line results in a weather map that is a size more
conducive to display on screen (Figure 4-2).
Figure 4-2
58
Chapter 4
08_778257 ch04.qxp 6/9/06 9:31 AM Page 58
Setting the height and width of the image in the source line solves two design considerations at once: the
large size of the maps and making the maps the same size. The trick is to display the resized maps with
the same proportions as the original ones. If you just type in any numbers, you could have an elongated
mess. You can try trial and error until the maps look right, but you can’t automate that process very well
in the future if the map sizes change. You can start with the current temps map because it tells you the
image size is 720 × 486 in the name of the map. Multiply these numbers by .60 to reduce the size of the
maps by 60 percent. This calculation returns an image size of 432 × 290, which — as you can see in
Figure 4-2—is proportional.
As a test that all of the images look good with their new sizes, you can move all of the commented URLs
into the body of the HTML so they are all displayed together in the web page. Once you are satisfied
that the maps are the same size and can be swapped without leaving any space around them, you can
work on putting together the remaining portions of the widget.
You now have the basic HTML document that you can use for your widget. You are ready to create a
background that will serve as the user interface as you add more functionality.
Adding a Background
If you look at the backgrounds of different widgets, you’ll see that they can be very elaborate or quite
simple. As you noticed in Chapter 2, the Weather widget has a simple background, and the weather
information comes from the graphics representing day and night and the different weather conditions
placed on top of it. The Stocks widget is also based on a simple rectangle with the information provided
through the share price and charts.
Because one of the design considerations is how to switch among the different maps, you know that you
may want to add controls along the top or bottom of the widget. For the moment, however, you’ll just
need to create a background on which to display your maps.
You can create your background image in any graphics application that you prefer. The only require-
ment is that the application should be able to save your background as a PNG file. Graphics Converter, a
shareware graphics application, can save files in this format. If you have a copy of Widgetarium, it can
export your background image as PNG and will even name it Default.png. In Widgetarium, you can
open the Panel Maker window and enter the width and height values of your background as well as the
style and color of the background (Figure 4-3).
When you have your background the size and color that you want, you can save it using the Export
Graphic command. If you do this inside of a Widgetarium project, saving the background is done for
you automatically and the back side and icon images are created for you at the same time.
When you assemble all of the pieces in your widget directory, Dashboard automatically picks up the
PNG file named Default.png that is in the widget directory. If you want to test the background image in
Safari with your maps before you install the widget in Dashboard, you need to add the Default.png to
your HTML file.
<!DOCTYPE html PUBLIC “-//W3C//DTD XHTML 1.0 Strict//EN”
“ /><html xmlns=” />59
Creating a Widget
08_778257 ch04.qxp 6/9/06 9:31 AM Page 59
<head>
<title>weathermaps</title> </head>
<body>
<img src=”Default.png”>
<img src=” />width=”432” height=”290”>
<!
/> /> />pg
/> >
</body>
</html>
When you have done this, you can open your widget’s HTML file in Safari to preview what it will look
like. Though the map isn’t overlaid on your background, you can see that the map will fit inside of the
background image you’ve created for the widget (Figure 4-4).
Figure 4-3
60
Chapter 4
08_778257 ch04.qxp 6/9/06 9:31 AM Page 60
Figure 4-4
Now that you have the basic HTML for your widget and the Default.png created, you will need to create
a Cascading Style Sheet for it in order to place the maps on top of your background and position them
accurately.
Creating Widget Structure with CSS
If you have worked with Cascading Style Sheets, you know that they are a painless way to apply style
attributes to all of the elements in your HTML pages without the niggling problem of touching the tag
for each individual element. More important, Cascading Style Sheets give you precise layout control of
your HTML pages in ways that HTML tables never allowed you to. For Dashboard widgets, this means
that you are able to mix text and graphics in a way that gives your widget the polished and professional
look of a commercial application.
If you test your Cascading Style Sheet in Safari while you are working out alignment issues, you will
make your widget’s transition to Dashboard easier.
You can create a very basic CSS file to align the weather maps with the background. The Cascading Style
Sheet needs only to contain a section for the body of the page, the location of the map, and the location
of the background image.
61
Creating a Widget
08_778257 ch04.qxp 6/9/06 9:31 AM Page 61
/*
pfterry, weathermaps, 2005
*/
body {
margin: 0;
}
#mapImage {
position: absolute;
top: 55px;
left: 16px;
}
.backgroundImage {
position: absolute;
top: 0px;
left: 0px;
}
In this CSS, the body rule is the first item and is a margin property with a value of 0. The next rule is the
style used for the map image and it is named
#mapImage. The hash sign before the name indicates that it
is an ID selector and will be applied only to the element in your HTML page that has an ID selector with
the same value.
<img id=”mapImage”
src=” />width=”432” height=”290”>
You can also see that the mapImage rule has position, top, and left properties, and their values.
ID selectors should be used only once in your HTML file to make applying the style easy and so the
Javascript
getElementByID() function will work.
The style used for the background is called .backgroundImage. The period before the name indicates
that it is a class selector. Like the ID selector, the .backgroundImage style will be applied only to the
HTML element with the value backgroundImage.
When the style sheet is applied to the widget, the body has no margins. Because the maps and any but-
tons or links will be placed on the background image, the image has an absolute position of 0 pixels
from the top and 0 pixels from the left. All of the other items in the widget will be offset from the top and
left edges of the background. The position of the map image, for instance, is 55 pixels from the top of the
background and 16 pixels from the left.
To test the CSS file, you must save it with the same name as the HTML file and .css as the extension.
You will need to make two modifications to the weathermaps.html file to incorporate the Cascading
Style Sheet into the widget. First, the lines
<style type=”text/css”>
@import “weathermaps.css”;
</style>
62
Chapter 4
08_778257 ch04.qxp 6/9/06 9:31 AM Page 62
are added above the body and below the head in weathermaps.html. When the base HTML page of
the widget loads, the weathermaps.css file is imported and used as the style sheet. Second, you need to
give the image the ID selector
id=”mapImage” to place the map on the background image via JavaScript
and CSS.
<!DOCTYPE html PUBLIC “-//W3C//DTD XHTML 1.0 Strict//EN”
“ /><html xmlns=” /><head>
<title>weathermaps</title>
</head>
<style type=”text/css”>
@import “weathermaps.css”;
</style>
<body>
<img src=”Default.png”>
<img id=”mapImage”
src=” />width=”432” height=”290”>
<!
/> /> />pg
/> >
</body>
</html>
Figure 4-5 shows the result of placing the map at the bottom of the widget background and leaving
space at the top for buttons or links to switch among the other maps.
At this point you could bundle your pages and create the widget, but you still have more work to do to
add the links to load the other maps. You probably want to continue working in Safari while you add
the remainder of the functionality to the widget.
<div> Regions
As you can see from the use of IDs in the weathermaps.html, you can use selectors in the CSS file to
control placement in your widget as well as manipulate the content using JavaScript. You can also use
<div> tags to create divisions for content in your widget. The <div> tag allows you to add logical divi-
sions to your HTML page. It creates a division for the map, and you can use the ID selector with the
<div> tag as the location to place the other maps as the user cycles through them.
By giving the
<div> tag an ID, you are able to use that selector to change that portion of your widget
with the style sheet. In this case, the position of the map on the background is determined by the
#mapImage ID selector of the Cascading Style Sheet.
63
Creating a Widget
08_778257 ch04.qxp 6/9/06 9:31 AM Page 63
Figure 4-5
By extension, you can see that you can create multiple divisions in your widget and give them each a
different style via the
<div> tag. For instance, you can add buttons or links for the three additional maps
that you want to display in the widget: current temps, overnight temps, and tomorrow’s temps. You could
add buttons above the map (Figure 4-5), but buttons take extra space. If you added the names of the
maps above the current map, they will take less space than buttons and provide the same functionality.
Because you want to position the map names and you may want to use JavaScript to reference them, you
need to use the <div> tag again. For instance, you can add a <div> tag with an ID selector for each one
of the maps that you plan to display in your widget.
<!DOCTYPE html PUBLIC “-//W3C//DTD XHTML 1.0 Strict//EN”
“ /><html xmlns=” /><head>
<title>weathermaps</title>
</head>
<style type=”text/css”>
@import “weathermaps.css”;
</style>
64
Chapter 4
08_778257 ch04.qxp 6/9/06 9:31 AM Page 64
<body>
<img src=”Default.png”>
<div id=”radar”>Radar</div>
<div id=”curTemp”>Current Temps</div>
<div id=”nightTemp”>Overnight Temps</div>
<div id=”tomorrowHigh”>Tomorrow’s Highs</div>
<img id=”mapImage”
src=” />width=”432” height=”290”>
<!
/> /> />pg
/> >
</body>
</html>
For each map that you plan to display in the widget, you have added an ID selector and included its
name: Radar, Current Temps, Overnight Temps, and Tomorrow’s Highs.
Try It Out Positioning Text Using CSS
Now that you see how to use the Cascading Style Sheet to position text and graphics on your widget back-
ground, you can modify the weathermaps.css file for the four map names in the weathermaps.html file.
1. Open the weathermaps.css file and place the cursor above the #mapImage line and press Return.
2. Add a rule for the radar map assigning a font, font size, weight, and color. Your rule and its dec-
laration should look something like this.
#radar {
font: 10px “Lucida Grande”;
font-weight: bold;
color: white;
}
3. Place the cursor after the font color and press Return. Enter absolute for position, and enter the
offset of 20 pixels from the top and 20 pixels from the left side of the widget for your text. The
remainder of the #radar rule should look like this.
position: absolute;
top: 20px;
left: 20px;
4. If you haven’t already, open weathermaps.html in Safari and press Command-R to reload your
widget. You’ll see the map name Radar at the top of the widget window (Figure 4-6). When your
widget is finished, this will take you back to the radar map that you see whenever the widget
loads after you have looked at the temperature maps.
65
Creating a Widget
08_778257 ch04.qxp 6/9/06 9:31 AM Page 65
Figure 4-6
5. Under the radar rule, add rules for the Current Temps, Overnight Temps, and Tomorrow’s
Highs maps. As you add each rule, you will need to adjust the Left offset value to move the
next map name to the right.
When you have finished your edits, the weathermaps.css file should look like this.
/*
pfterry, WeatherMaps, 2005
*/
body {
margin: 0;
}
#radar {
font: 10px “Lucida Grande”;
font-weight: bold;
color: white;
66
Chapter 4
08_778257 ch04.qxp 6/9/06 9:31 AM Page 66
position: absolute;
top: 20px;
left: 20px;
}
#curTemp {
font: 10px “Lucida Grande”;
font-weight: bold;
color: white;
position: absolute;
top: 20px;
left: 75px;
}
#nightTemp {
font: 10px “Lucida Grande”;
font-weight: bold;
color: white;
position: absolute;
top: 20px;
left: 170px;
}
#tomorrowHigh {
font: 10px “Lucida Grande”;
font-weight: bold;
color: white;
position: absolute;
top: 20px;
left: 280px;
}
#mapImage {
font: 20px “Lucida Grande”;
font-weight: bold;
text-align: center;
color: white;
position: absolute;
top: 55px;
left: 16px;
}
.backgroundImage {
position: absolute;
top: 0px;
left: 0px;
}
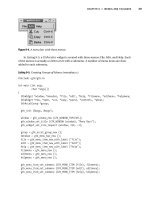
Once you save your changes and reload the HTML file, you’ll see the names of the maps listed along the
top of your widget (Figure 4-7).
67
Creating a Widget
08_778257 ch04.qxp 6/9/06 9:31 AM Page 67
Figure 4-7
How It Works
In a Cascading Style Sheet, each rule has two parts: the selector and the declaration. The declaration
contains the properties and values of the style. In a typical rule, the selector and declaration matches a
standard HTML element. In this rule, for instance,
h1 {font: 18px Verdana; color: grey}
Head 1 is the selector. It determines what the rule is applied to. The rule contains two declaration blocks
between the curly braces — font and color, with their two values—separated by a semicolon. The rule
can be written as a line, or it can be written like the ID selectors in your weathermaps.css file.
#radar {
font: 10px “Lucida Grande”;
font-weight: bold;
color: white;
position: absolute;
68
Chapter 4
08_778257 ch04.qxp 6/9/06 9:31 AM Page 68
top: 20px;
left: 20px;
}
In the rule above, radar is the selector the declaration will be applied to. In this case, however, it is an
ID selector instead of a standard HTML element. Placing each declaration block on a separate line makes
the rule easier to read. When Dashboard displays the widget, the rule in the CSS is applied to the
radar
ID selector when it is found in weathermaps.html.
<div id=”radar” onclick=’replaceMap(“radar”)’>Radar</div>
The division marker identifies the portion of the HTML file the CSS rule is applied to.
Doing the Work with JavaScript
Now that you have the basis for the widget, you can add the functionality of switching between the dif-
ferent temperature maps. You could just add the links to the maps as
HREF tags in the weathermaps.html
file, but that would give the map names the unmistakable look of a link on a web page. Because you are
trying to create a widget that has the illusion of being an application rather than point to the widget’s
web origins, you should use JavaScript to load the maps as you click the map names.
When you are developing a JavaScript to power your widget it is sometimes easier to begin inside of the
HTML file. This is especially useful if you are using Safari and a text editor as your development envi-
ronment. Keeping the JavaScript inside the HTML file means that you have to make your changes in one
file only. When you have finished developing the script, you can move it into a separate file. If you are
developing a complex JavaScript, however, you may want to separate HTML from CSS from JavaScript
sooner to take advantage of a modular approach. In the end, the choice is a matter of personal preference
and development style. For the purposes of this discussion, the JavaScript begins its life inside of the
main HTML file.
If you think about the functionality that you are trying to achieve, you want the map to change each
time you click one of the map names at the top of the widget. To accomplish this, you need a function
that can take the result of a mouse click in the widget, associate that result with a map URL, and insert
the correct map.
The simple JavaScript function would determine the correct map to insert by testing the result of
the mouse click. Whenever you click in your widget, the name of the map is passed back to the
replaceMap(mapLink) function as the mapLink value. The correct URL is then determined by
comparing that value to the four possible values in a series of
if . . . else if conditions.
function replaceMap(mapLink)
{
if (mapLink == “radar”) {
69
Creating a Widget
08_778257 ch04.qxp 6/9/06 9:31 AM Page 69
var theImage = (src=’ />usen.jpg’);
} else if (mapLink == “curTemp”) {
var theImage = (src=’ />720x486.jpg’);
} else if (mapLink == “nightTemp”) {
var theImage = (src=’ />night1_3usc_enus_600x405.jpg’);
} else if (mapLink == “tomorrowHigh”) {
var theImage = (src=’ />3usc_enus_600x405.jpg’);
}
document.getElementById(“mapImage”).src = theImage;
}
For example, if your onclick returns the value nightTemp in the mapLink variable, the JavaScript com-
pares that in each else if condition. When it makes the comparison, it sets the variable theImage to
the source URL and then executes the next statement in the JavaScript, which sets the mapImage <div>
in the widget with the new map URL. It does this using the
getElementByID() function.
This is what the JavaScript looks like incorporated into the weathermaps.html file.
<!DOCTYPE html PUBLIC “-//W3C//DTD XHTML 1.0 Strict//EN”
“ /><html xmlns=” /><head>
<title>WeatherMaps</title>
<script type=”text/javascript”>
// simple script to switch between the different maps
function replaceMap(mapLink) {
if (mapLink == “radar”) {
var theImage =
(src=’ />} else if (mapLink == “curTemp”) {
var theImage =
(src=’ />} else if (mapLink == “nightTemp”) {
var theImage =
(src=’ />x405.jpg’);
} else if (mapLink == “tomorrowHigh”) {
var theImage = (src=’ />hitmpf_day2_3usc_enus_600x405.jpg’);
70
Chapter 4
08_778257 ch04.qxp 6/9/06 9:31 AM Page 70
}
document.getElementById(“mapImage”).src = theImage;
}
</script>
<meta name=”generator” content=”BBEdit 8.2” />
</head>
<style type=”text/css”>
@import “weathermaps.css”;
</style>
<body>
<img src=”Default.png”>
<div id=”radar” onclick=’replaceMap(“radar”)’>Radar</div>
<div id=”curTemp” onclick=’replaceMap(“curTemp”)’>Current Temps</div>
<div id=”nightTemp” onclick=’replaceMap(“nightTemp”)’>Overnight Temps</div>
<div id=”tomorrowHigh” onclick=’replaceMap(“tomorrowHigh”)’>Tomorrow’s Highs</div>
<img id=”mapImage” src=” />large_usen.jpg” width=”432” height=”290”>
<!
/> /> />jpg
/> >
</body>
</html>
Notice that the JavaScript is set apart in the HTML file with the <script type=”text/javascript”>
tag at the beginning of the script. In the old days of browser incompatibilities, this tag hid the JavaScript
from browsers that could not execute it. You don’t have to worry about Dashboard not recognizing
JavaScript; the tag tells Dashboard what language the script is written in and then executes it.
You can also see the mechanism that links the map names to the appropriate map URLs in the HTML
file. Each ID selector contains an onclick event that calls the
replaceMap function and passes it the ID
name as the mapLink. Once you have the JavaScript added to your HTML file, you can reload your wid-
get in Safari and test the functionality of swapping between the maps.
After you have tested the JavaScript in your widget, move the JavaScript out to its own file. It should
look like this.
// pfterry, WeatherMaps, 2005
// a simple script to switch between the different maps in the WeatherMaps widget
function replaceMap(mapLink)
{
if (mapLink == “radar”) {
71
Creating a Widget
08_778257 ch04.qxp 6/9/06 9:31 AM Page 71