Cloud Computing Implementation Management and Security phần 5 ppsx
Bạn đang xem bản rút gọn của tài liệu. Xem và tải ngay bản đầy đủ của tài liệu tại đây (1.21 MB, 34 trang )
98 Cloud Computing
the virtual operating system and all related resources that are managed by it
rather than an actual, physical implementation of that operating system.
Full application virtualization requires a virtualization layer.
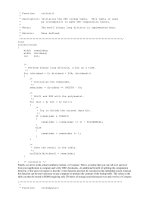
31
The vir-
tualization layer must be installed on a machine to intercept file and registry
operations performed by a virtualized application, where it can transpar-
ently redirect those operations to a virtualized destination. The application
that performs file operations never knows that it is not directly accessing a
physical resource. Using this approach, applications can be made portable
by redirecting their I/O tasks to a single physical file, and traditionally
incompatible applications can be executed side by side.
Using application virtualization allows applications to run in non-
native environments. For example, Wine allows Linux users to run
Microsoft Windows applications from the Linux platform. Virtualization
also helps protect the operating system and isolate other applications from
poorly written or buggy code. With application virtualization, physical
resources can be shared so an implementation uses fewer resources than a
separate virtual machine. Simplified operating system migrations are possi-
ble because administrators are able to maintain a standardized configuration
in the underlying operating system and propagate that configuration across
multiple servers in an organization, regardless of whatever applications may
be used. In the next few sections, we will take a look at some of the more
popular virtualization environments in use today.
VMWare
The VMware virtualization platform is built to virtualize hardware
resources found on an x86-based computer (e.g., the CPU, RAM, hard
disk, and network controller) to create a fully functional virtual machine
that can run its own operating system and applications just like a standard
computer. Each virtual machine is completely encapsulated in order to
eliminate any potential conflicts. VMware virtualization works by inserting
a thin layer of software directly on the computer hardware or on a host
operating system. This layer is actually a monitor called a Hypervisor, and
its task is to allocate hardware resources dynamically and transparently.
Multiple operating systems can run concurrently on a single computer and
share that computer’s hardware. A virtual machine is completely compatible
with all standard x86 operating systems, applications, and device drivers. It
30. retrieved 11 Feb 2009.
31. Amir Husain, “How to Build an Application Virtualization Framework,” />wp/?p=15, retrieved 11 Feb 2009.
Chap3.fm Page 98 Friday, May 22, 2009 11:25 AM
Where Open Source Software Is Used 99
is possible to run several operating systems and applications simultaneously
on a single computer, and each operating system has access to the physical
resources it needs on demand.
Readers interested in trying virtualization may consider using VMware
ESXi (a free download from the official web site).
32
With ESXi, you can cre-
ate virtual machines quickly and easily. A menu-driven startup and auto-
matic configurations enable you to get virtual machines set up and running
in minutes. You can even import a virtual appliance using the VMware Vir-
tual Appliance Marketplace. For more information on VMware, the reader
is encouraged to visit the official web site.
Xen
Xen is a unique open source technology
33
invented by a team led by Ian
Pratt at the University of Cambridge. Xen was originally developed by the
Systems Research Group at the University of Cambridge Computer Labo-
ratory as part of the XenoServers project, funded by the UK-EPSRC.
XenoServers aimed to provide a public infrastructure for global distributed
computing. Xen plays a key part in that, allowing one to efficiently parti-
tion a single machine to enable multiple independent clients to run their
operating systems and applications in an environment. This environment
provides protection, resource isolation, and accounting. The project web
page contains further information as well as pointers to papers and techni-
cal reports.
34
Using Xen server virtualization, the Xen Hypervisor is installed directly
on the host hardware and exists as a thin layer between the hardware and the
operating system. This abstraction layer allows the host device to run one or
more virtual servers. It isolates hardware from the operating system and its
applications. Xen is licensed under the GNU General Public License
(GPL2) and is available at no charge in both source and object format.
According to the official web site, “Xen is, and always will be, open sourced,
uniting the industry and the Xen ecosystem to speed the adoption of virtu-
alization in the enterprise.”
The Xen Hypervisor supports a wide range of guest operating systems
including Windows, Linux, Solaris, and various versions of the BSD operat-
ing systems. The Xen Hypervisor has an exceptionally lean footprint. The
Xen Hypervisor offers a smaller code base, greater security, and up to 10
32. .
33. .
34. retrieved 11 Feb 2009.
Chap3.fm Page 99 Friday, May 22, 2009 11:25 AM
100 Cloud Computing
times less overhead than alternative virtualization approaches. That means
that it has extremely low overhead and near-native performance for guests.
Xen reuses existing device drivers (both closed and open source) from Linux,
making device management easy. Xen is robust to device driver failure and
protects both guests and the Hypervisor from faulty or malicious drivers.
Virtual device monitors (which are also known as hypervisors) are often
used on mainframes and large servers seen in data center architectures.
Increasingly, they are being used by Internet service providers (ISPs) to pro-
vide virtual dedicated servers to their customers. Xen support for virtual-
machine live migration from one host to another allows workload balancing
and avoids system downtime. Some of the main advantages of Xen server
virtualization are
Consolidation and increased utilization
The ability to rapidly provision and start a virtual machine
Better ability to dynamically respond to faults by rebooting a vir-
tual machine or moving a virtual machine to a different hardware
platform
The ability to securely separate virtual operating systems on the
same platform
The ability to support legacy software as well as new operating sys-
tem instances on the same computer
Xen may also be used on personal computers configured in a dual-boot
configuration (e.g., those that run Linux but also have Windows installed).
Traditionally, such systems provided the user the option of either running
Windows or Linux, but with Xen it is possible to start Windows and allow
it to run from in a separate Window on the Linux desktop, enabling the
user to run applications from both systems simultaneously.
For operating system development tasks, virtualization has a signifi-
cant additional benefit—running the new system as a guest avoids any
need to reboot the computer whenever a bug is encountered. This pro-
tected or insulated environment is known as a “sandbox,” and such sand-
boxed guest systems are useful in computer security research and
development. In order to study the effects of malware, viruses, and worms
without compromising the host system, developers often prefer to use a
sandbox. Hardware appliance vendors increasingly have begun to ship
Chap3.fm Page 100 Friday, May 22, 2009 11:25 AM
Chapter Summary 101
their products preconfigured with several guest systems. This allows them
to deliver complex solutions that are able to execute various software
applications running on different operating systems.
Xen touts a para-virtualization technology that is widely acknowledged
as the fastest and most secure virtualization software in the industry. Para-
virtualization takes full advantage of the latest Intel and AMD hardware vir-
tualization advancements and has fundamentally altered the way virtualiza-
tion technology is built. Virtual servers and the Hypervisor cooperate to
achieve very high performance for I/O, CPU, and memory virtualization.
According to the Xen User Manual,
35
the Xen system has multiple lay-
ers, the lowest and most privileged of which is Xen itself. Xen can host mul-
tiple guest operating systems. Each operating system is run within a secure
virtual machine environment known as a domain. In order to make effec-
tive use of the available physical CPUs, such domains are scheduled by Xen.
Each guest operating system is responsible for managing its own applica-
tions. This management includes scheduling each application within the
time allotted by Xen to the virtual machine. The primary domain, domain
0, is created automatically when the system boots, and it has special man-
agement privileges. Domain 0 builds other domains and manages their vir-
tual devices. Domain 0 also performs administrative tasks such as
suspending, resuming, and migrating other virtual machines. Within
domain 0, a process called xend is responsible for managing virtual
machines and providing access to their consoles.
3.9 Chapter Summary
In this chapter we discussed what it takes to build a cloud network, evolu-
tion from the managed service provider model to cloud computing and
SaaS and from single-purpose architectures to multipurpose architectures,
the concept and design of data center virtualization, the role and impor-
tance of collaboration, service-oriented architectures as an intermediary step
and the basic approach to data center-based SOAs, and the role of open
source software in data centers and where and how it is used in cloud archi-
tecture. Cloud computing provides an end-to-end, unified solution that
maximizes the ability to address the performance, scalability, virtualization,
and collaboration requirements being driven by today’s global business chal-
lenges and opportunities. It should be clear that a properly designed and
35. retrieved 11 Feb 2009.
Chap3.fm Page 101 Friday, May 22, 2009 11:25 AM
102 Cloud Computing
implemented cloud infrastructure provides the benefit of substantially low-
ering the total cost of ownership over the traditional hosting environment
though the use of virtualization and the use of open source software. Cloud
infrastructure maximizes the potential for creating value through collabora-
tion. In future chapters we will discuss the ability of cloud computing to
provide a solution to current challenges in presence and identity while
enhancing security and privacy. First, however, we will give you a chance to
see for yourself the value and process in implementing and using cloud
computing. In the next chapter, we will give guide you through a practicum
on the how you can build a virtualized computing infrastructure using open
source software.
Chap3.fm Page 102 Friday, May 22, 2009 11:25 AM
103
Chapter 4
Virtualization Practicum
4.1 Chapter Overview
In this chapter, we are going to download and install the Sun VirtualBox
product. Then, we will show you how to install and configure it. Next, we
will add a virtual operating environment on top of your existing operating
system. The beauty of virtualization solutions is that you can run multiple
operating systems simultaneously on a single computer. To really understand
how powerful an ability that is, you need to see it for yourself. The following
illustration shows a draft version of this chapter being written on an Open-
Solaris virtual guest operating system running on Windows XP host.
Chap4.fm Page 103 Friday, May 22, 2009 11:25 AM
104 Cloud Computing
4.2 Downloading Sun xVM VirtualBox
This practicum will provide you with some guided hands-on experience and
help you gain confidence in using virtualization technologies. To begin, the
first thing to do is to
download the Sun VirtualBox product.
To do this,
you need to open a browser and go to the web site
/>
where you will see this page:
Choose the type of download file that is most suitable to the operating
system you are using and download the product. Save the file—in Microsoft
Windows, you will be prompted to save the file from the
File Download –
Security Warning
dialog:
Chap4.fm Page 104 Friday, May 22, 2009 11:25 AM
Downloading Sun xVM VirtualBox 105
Choose
Save
and you will be shown a
Save As
file selection dialog to
choose where you wish to save the downloaded file. The dialog box should
look like this:
Select a location for the file to be saved to and click the
Save
button to
continue. The download status dialog will appear:
Chap4.fm Page 105 Friday, May 22, 2009 11:25 AM
106 Cloud Computing
4.3 Installing Sun xVM VirtualBox
Once the download has completed, you must locate the file wherever you
saved it and execute the installer. If you are not using a Microsoft operating
system, the procedure for executing the installer will be slightly different
than what is shown here. Regardless of which non-Microsoft operating sys-
tem you may be using, launch the installer according to your specific oper-
ating system’s instructions. The VirtualBox installation can be started from a
Windows environment by double-clicking on its Microsoft Installer archive
(MSI file) or by entering this command from the prompt of a command-
line interface:
msiexec /i VirtualBox.msi
The figure below shows the highlighted selection of the Sun VirtualBox
(Windows version) installer from the root of the D: drive.
Chap4.fm Page 106 Friday, May 22, 2009 11:25 AM
Installing Sun xVM VirtualBox 107
Using just the standard settings, VirtualBox will be installed for all
users on the local system. If this is not what you want, it is necessary to
invoke the installer from a command-line prompt as follows:
msiexec /i VirtualBox.msi ALLUSERS=2
Executing the installer in this fashion will install VirtualBox for the cur-
rent user only.
Once the installer begins executing, the first thing you will see is the
installation welcome dialog, which looks like this:
Click
Next >
to continue on to the
End-User License Agreement
(EULA), as shown below. In order to proceed, you must accept this agree-
ment to use the product. Click the
Next >
button to continue.
Chap4.fm Page 107 Friday, May 22, 2009 11:25 AM
108 Cloud Computing
Once the EULA is accepted, the
Custom Setup
screen will appear, as
shown below.
Here you can change the default settings, choosing where and how Vir-
tualBox will be installed. Usually, the defaults are satisfactory for installa-
tion. If you choose this option, all features will be installed.
In addition to the VirtualBox application, the components for USB sup-
port and networking are available. These packages contains special drivers for
your Windows host that VirtualBox requires to fully support networking and
USB devices in your virtual machine (VM). The networking package con-
tains extra networking drivers for your Windows host that VirtualBox needs
to support Host Interface Networking (to make your VM’s virtual network
cards accessible from other machines on your physical network).
Depending on your Windows configuration, you may see warnings
about “unsigned drivers” or similar messages. Select
Continue
on these
warnings, because otherwise VirtualBox may not function correctly after
installation. Click
Next >
to continue to the
Ready to Install
dialog box,
shown below.
Chap4.fm Page 108 Friday, May 22, 2009 11:25 AM
Installing Sun xVM VirtualBox 109
To start the installation process, just click
Install.
It may take a minute
or so for the installer to complete, depending on your system’s processor and
memory resources. You will see an installation progress dialog, similar to
this one:
On Microsoft Windows operating systems, you may see the
Software
Installation
dialog box shown below, warning you that the product you are
installing has not passed Windows Logo testing to verify its compatibility
with Windows XP. Click the
Continue Anyway
button to proceed.
Chap4.fm Page 109 Friday, May 22, 2009 11:25 AM
110 Cloud Computing
You will be notified when the installation has completed, and given the
opportunity to launch the application automatically. Be sure the box in the
following dialog is checked:
Click
Finish
to complete the installation process and continue. The
VirtualBox Registration Dialog
will appear:
Chap4.fm Page 110 Friday, May 22, 2009 11:25 AM
Installing Sun xVM VirtualBox 111
Registration is very simple, and it is recommended that you register
your product. Just fill in your name and an email address. Once the registra-
tion form has been completed, a
Confirm
button will appear. You can
choose to allow Sun to contact you or not by checking or unchecking the
box above the
Confirm
button. Once you have clicked
Confirm,
instant
kudos appear:
Click
OK
and you are rewarded with the initial display of the Sun
xVM VirtualBox product. For Microsoft Windows-based systems, the
installer will create a
VirtualBox
group in the Programs folder of the Start
menu, which will allow you to launch the application and access its docu-
mentation. If you choose later to uninstall this product, VirtualBox can be
safely uninstalled at any time by choosing the program entry in the
Add/
Remove Programs
applet in the Windows
Control Panel.
For non-Win-
dows operating systems, you must uninstall according to your system’s rec-
ommended procedures. However, let’s not do that yet! The following
Chap4.fm Page 111 Friday, May 22, 2009 11:25 AM
112 Cloud Computing
picture shows you what the opening screen looks like after you have
installed and filled out the product registration form:
4.4 Adding a Guest Operating System to VirtualBox
VirtualBox allows you to run
guest operating systems
using its own virtual
computer system, which is why it is called a “virtual machine.” The guest
system will run in its VM environment just as if it were installed on a real
computer. It operates according to the VM settings you have specified (we
will talk about settings a bit more later in this chapter). All software that
you choose to run on the guest system will operate just as it would on a
physical computer.
With the options available, you have quite a bit of latitude in deciding
what virtual hardware will be provided to the guest. The virtual hardware
you specify can be used to communicate with the host system or even with
other guests. For instance, if you provide VirtualBox with the image of a
CD-ROM in the form of an ISO file, VirtualBox can make this image avail-
able to a guest system just as if it were a physical CD-ROM. You can also
give a guest system access to the real network (and network shares) via its
virtual network card. It is even possible to give the host system, other guests,
or computers on the Internet access to the guest system.
4.5 Downloading FreeDOS as a Guest OS
For our first guest, we will be adding an open source operating system called
FreeDOS to the host machine. In order to do this, we must first go to the
Chap4.fm Page 112 Friday, May 22, 2009 11:25 AM
Downloading FreeDOS as a Guest OS 113
Internet and download FreeDOS. Minimize the VirtualBox application for
now and open a web browser. Go to
/>
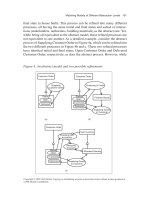
When your browser has brought up the site, it should look similar to
the figure below. You will see a list of virtual operating systems, with the
sponsoring web site for each one in parentheses.
Towards the bottom of the page, you will find the FreeDOS entry. The
reader is encouraged to go to the web site of each operating system and
check it out before downloading a file. Click on the FreeDOS
entry to start
the download process. When you click on any of the operating system links,
you will be taken to that system’s download page. There, you are given the
choice of which architecture (i.e., 32-bit or 64-bit) you want to install.
What is important for almost every operating system displayed on this page
is that you must
write down the passwords for the root user and default user
.
An example similar to what you will see is shown below:
FreeDOS
There are several FreeDOS images available.
Chap4.fm Page 113 Friday, May 22, 2009 11:25 AM
114 Cloud Computing
FreeDOS 1.0
Size
(compressed/uncompressed): 82.3 MBytes / 394 MBytes
Link
: />Of course, FreeDOS is the exception to the rule above, since it does not
require a root or user password. Click the link to download the image and
save it to a location you will remember—later in this practicum, you will
need to unzip this file and extract the images. We recommend that you
choose to save the files on a drive with plenty of space available.
4.6 Downloading the 7-Zip Archive Tool
Next, you will need to download an open source product called 7-zip (it
works on both Linux and Windows platforms), which can be accessed from
/>
Once the download is complete, perform the following steps
in
sequence:
1. Pick a drive with plenty of spare room on it and create a folder
named
VirtualGuests.
2. Download the
7-zip file
to the VirtualGuests folder and install it
using the standard options.
3. Once you have installed 7-zip, find the FreeDOS file you down-
loaded previously.
4. Highlight the file and right-click on it—choose the
7-zip extrac-
tion
option to extract files.
5. Extract the files to your VirtualGuests folder.
6. Your VirtualGuests folder will now contain two folders,
Machines
and
VDI.
The virtualBox image for FreeDOS will be
in the VDI folder.
Chap4.fm Page 114 Friday, May 22, 2009 11:25 AM
Adding a Guest OS to Sun xVM VirtualBox 115
4.7 Adding a Guest OS to Sun xVM VirtualBox
Now you will add the FreeDOS guest operating system to your virtualBox
host. Start by clicking on the
New
button.
The
New Virtual Machine Wiz-
ard
dialog box will appear:
The wizard is an easy-to-follow guided setup for installation of your
guest operating system. Click
Next >
to continue and you will be presented
with the
Virtual Machine Name and OS Type
dialog box:
Type
FreeDOS
in the
Name
field. Select
Other
for the
Operating Sys-
tem,
and for the
Version
we will choose
DOS.
Click
Next >
to continue on
to the dialog for memory configuration. In this part of the wizard, you have
the option of increasing or decreasing the amount of memory that will be
Chap4.fm Page 115 Friday, May 22, 2009 11:25 AM
116 Cloud Computing
used for the guest operating system. For those of us old enough to remem-
ber DOS, 32 MB of memory is plenty.
Just accept the default settings for now (you can always change them
later) and click
Next >
to proceed to the next section of the wizard, the
Vir-
tual Hard Disk
dialog box:
This dialog box allows you to select the virtual device image file (.vdi
file) that was previously downloaded and saved to the VirtualGuests folder
you created. What you see displayed in the dialog box is the name of the last
image added. In this case, it was an image of Damn Small Linux (dsl). If no
images have been installed on the host, the default selection will be similar
to the one shown below:
Chap4.fm Page 116 Friday, May 22, 2009 11:25 AM
Adding a Guest OS to Sun xVM VirtualBox 117
If you had previously created any virtual hard disks which have not
been attached to other virtual machines, you could select from among those
using the drop-down list in the Wizard window. Since we have downloaded
and extracted a new image of FreeDos, it won’t be in the list. Click the
Existing
button to continue on to the
Virtual Media Manager.
In the
figure below, FreeDOS is listed as an available selection. If it is not listed,
then you need to add it by clicking on the
Add
button at the top of the dia-
log box.
VirtualBox’s Virtual Media Manager keeps an internal registry of all
available hard disk, CD/DVD-ROM, and floppy disk images. This registry
can be viewed and changed in the Virtual Disk Manager, which you can
access from the
File
menu in the VirtualBox main window. The
Disk
Image
Manager
shows you all images that are registered with VirtualBox,
Chap4.fm Page 117 Friday, May 22, 2009 11:25 AM
118 Cloud Computing
grouped in three tabs for the three supported formats. These are hard disk
images, either in VirtualBox’s own Virtual Disk Image (VDI) format or the
widely supported
V
irtual
M
achine
D
is
K
(VMDK) format. CD and DVD
images in standard ISO format are supported. There is support for floppy
images in standard RAW format. As you can see in the figure below, for each
image, the Virtual Disk Manager shows you the full path of the image file
and other information, such as the virtual machine the image is currently
attached to, if any.
Clicking the
Add button will bring you to the Select a hard disk
image file dialog box, as shown below:
Chap4.fm Page 118 Friday, May 22, 2009 11:25 AM
Adding a Guest OS to Sun xVM VirtualBox 119
Using this file dialog, you must navigate to your VirtualGuests folder.
In your VirtualGuests folder, open the VDI folder and highlight the Free-
DOS .vdi file. Once you have it highlighted, simply click on the Open but-
ton. You are returned to the Virtual Hard Disk dialog box, where you
earlier clicked the Existing button:
Click Next > to complete the addition of the FreeDOS virtual image. A
summary screen, as shown below, will appear:
Here, simply click the Finish button and you will be returned to the
Sun xVM VirtualBox main display. FreeDOS should be displayed in the left
panel (it should be the only entry on your system) similar to the list shown
in the following image:
Chap4.fm Page 119 Friday, May 22, 2009 11:25 AM
120 Cloud Computing
Before we explore the FreeDOS environment, it is a good idea to
check the settings to ensure that the guest system will work the way you
want. The Settings button (in the figure above, it looks like a gear) in the
toolbar at the top of the VirtualBox main window brings up a detailed
window where you can configure many of the properties of the VM that is
currently selected:
Chap4.fm Page 120 Friday, May 22, 2009 11:25 AM
Adding a Guest OS to Sun xVM VirtualBox 121
Click your desired settings—but be careful. Even though it is possible
to change all VM settings after installing a guest operating system, certain
changes after installation may prevent a guest operating system from func-
tioning correctly.
Since you have just created an empty VM, you will probably be most
interested in the settings in the CD/DVD-ROM section if you want to
make a CD-ROM or a DVD-ROM available the first time you start Free-
DOS, so that you can use it with your guest operating system. This will
allow your VM to access the media in your host drive, and you can proceed
to install from there. Check the box in the CD/DVD section if you want to
use an optical device.
For now, that is all you need to do in Settings to prepare to run your
virtual image. The next part of our practicum will take you inside the virtual
guest system to use and and see for yourself that it is a real, functioning
environment. We will show you how to set up a graphical user interface
within the DOS environment using an open source product called Open-
GEM. OpenGEM was modeled after GEM, one of the earliest GUI envi-
ronments widely available on the DOS platform.
Chap4.fm Page 121 Friday, May 22, 2009 11:25 AM
122 Cloud Computing
To start FreeDOS, highlight FreeDOS in the selections panel and click
the green Start arrow as shown below.
When you first start FreeDOS, you are presented with a “Load” menu,
as shown below. Usually, the default selection best for your system is high-
lighted automatically. Choose the default option and press Enter (or just let
the 5-second timer expire).
Chap4.fm Page 122 Friday, May 22, 2009 11:25 AM