Common UNIX Printing System Sweet phần 3 doc
Bạn đang xem bản rút gọn của tài liệu. Xem và tải ngay bản đầy đủ của tài liệu tại đây (5.33 MB, 69 trang )
< previous page page_94 next page >
Page 94
Deny from all Allow from 127.0.0.1 </Location>
Assuming that your local network has an address of 192.168.0.0 and a netmask of 255.255.0.0, the
following change will enable remote printing from clients:
<Location /> Order deny,allow Deny from all Allow from 127.0.0.1 Allow from
192.168.0.0/255.255.0.0 </Location>
NOTE:
Early versions of CUPS allowed connections from all hosts by default.
Unless you will be providing an Internet-wide printing service, do not allow connections from all
hosts. Although adding an ''Allow from all" line would seem to be the easiest way to configure your
server, it will needlessly open your print server to unwanted print jobs and other denial-of-service
attacks from outside systems.
Next you need to enable broadcasting from your server by specifying the network broadcast address for
your local network. Add the following directive to set the broadcast address to 192.168.255.255:
BrowseAddress 192.168.255.255
After saving the changes to cupsd.conf, restart the server. All of your CUPS clients will now see the
printers on the server and be able to print to them.
NOTE:
CUPS provides printer-browsing support to clients using UDP broadcasting. The BrowseAddress
directive is so-named to allow for other types of browsing in the future such as multicasting, SLP,
and LDAP.
Easy Web Browsing
Normally CUPS listens for HTTP requests on the IPP port, port 631. Users access the CUPS server with the
following URL:
< previous page page_94 next page >
< previous page page_95 next page >
Page 95
http://server:631
To make it easier for clients to access the CUPS server, add a second port directive to the cupsd.conf file
to make the CUPS server listen on the normal HTTP port (80):
Port 631 Port 80
Now your users will also be able to access the CUPS server with the following (simpler) URL:
http://server
Enhanced Security
The default configuration of CUPS runs the CUPS server as the root user, but runs all external programs
as an unprivileged user. Although this provides excellent security against unpriviledged access to system
resources, because the server is running as root it may be possible to exploit an undiscovered bug to gain
root access.
CUPS provides a RunAsUser directive to run the server as an unpriviledged user after setting up the
network services. Add the following line to cupsd.conf to enable this mode:
RunAsUser Yes
NOTE:
When running the server as an unpriviledged user, the SIGHUP reconfigure mechanism is disabled.
Any files under /etc/cups (and the /etc/cups directory itself) must be owned by the unpriviledged
user as well.
Also, any local devices (parallel, serial, and USB ports) must be accessible to the unpriviledged user,
otherwise a ''permission denied" message will result when you print.
Finally, some networked LPD printers may not work in unpriviledged mode because the LPD backend
will be unable to reserve a privileged port as required by RFC 1179.
Encryption
CUPS supports 128-bit encryption of any request or response sent to the server. Encryption scrambles the
data sent between the client and server so that an eavesdropper is unable to understand it. The most
common use of encryption is to scramble passwords that are sent when doing administration tasks from a
remote machine. It is also often used to print sensitive documents over the Internet.
< previous page page_95 next page >
< previous page page_96 next page >
Page 96
Before you can enable encryption on your server, you must get an encryption certificate. This can be one
purchased from one of the many Certificate Authorities (see Table 5.2) or an unsigned one you create by
using the tools provided with the OpenSSL library.
NOTE:
Encryption certificates can be signed by a Certificate Authority or unsigned. A signed certificate
includes information that identifies it as coming from an official source, whereas an unsigned
certificate does not.
Because unsigned encryption certificates are not generated by an official Certificate Authority, most
browsers will generate a warning message when you access your server for the first time. The user
must approve the new certificate before it can be used, so make sure your users are aware of this.
Unsigned certificates are just as secure as signed certificates in most circumstances. However, it is
more likely that successful man-in-the-middle attacks can be carried out with the unsigned certificate
because your users are expecting the warning dialog and won't know whether the certificate is valid.
For this reason, don't use unsigned certificates to provide encryption beyond your LAN.
TABLE 5.2 Commercial Certificate Authorities
Company URL
128i Ltd.(New Zealand)
BelSign NV/SA
CertiSign Certificadora
Digital Ltda.
Certplus SA (France)
Deutsches Forschungsnetz />Entrust.net Ltd. />Equifax Inc. />GlobalSign NV/SA
IKS GmbH />NetLock Kft.(Hungary)
NLsign B.V.
TC TrustCenter (Germany) />Thawte Consulting />Verisign, Inc. />Generating an Unsigned Encryption Certificate
If you decide to use the OpenSSL library to generate your own unsigned certificate, run the following
commands:
< previous page page_96 next page >
< previous page page_97 next page >
Page 97
openssl req -new -x509 -keyout /etc/cups/ssl/server.key \ -out /etc/cups/ssl/server.crt -
days 365 -nodes
ENTER
Using configuration from /usr/ssl/openssl.cnf Generating a 1024 bit RSA private
key ++++++ ++++++ writing new private key to '/etc/cups/ssl/server.key' You
are about to be asked to enter information that will be incorporated into your certificate request. What
you are about to enter is what is called a Distinguished Name or a DN. There are quite a few fields but
you can leave some blank For some fields there will be a default value, If you enter '.', the field will be left
blank. Country Name (2 letter code) ?: US
ENTER
State or Province Name (full name) [Some-State]:
Maryland
ENTER
Locality Name (eg, city) []:Hollywood
ENTER
Organization Name (eg, company)
[Internet Widgits Pty Ltd]:Easy Software Products
ENTER
Organizational Unit Name (eg, section) []:
ENTER
Common Name (eg, YOUR name) []:host.easysw.com
ENTER
Email Address []:mike@host.
easysw.com
ENTER
chmod 600 /et/cups/ssl/server.*
ENTER
The openssl command creates the server key and certificate files in the /etc/cups/ssl directory. The
chmod command makes sure that only the root user can read them.
Getting a Signed Certificate
If you decide to get a signed certificate, request a certificate to be used with the Apache or Stronghold
Web servers—these certificates will be in the correct format for CUPS.
Requesting a certificate involves some more openssl commands to generate the server key and certificate
request. Start by generating the server key:
openssl genrsa -des3 -out /etc/cups/ssl/server.key 1024
ENTER
Generating RSA private key,
1024 bit long modulus ++++++ ++++++ e is 65537 (0×10001) Enter PEM pass
phrase:password
ENTER
Verifying password - Enter PEM pass phrase:password
ENTER
The password you use is not important—you will be removing it in the last step of this process.
< previous page page_97 next page >
< previous page page_98 next page >
Page 98
Next, generate your certificate request file with the following:
openssl req -new -key /etc/cups/ssl/server.key -out /etc/cups/server.csr
ENTER
Using
configuration from /usr/ssl/openssl.cnf Enter PEM pass phrase: password
ENTER
You are about to be
asked to enter information that will be incorporated into your certificate request. What you are about to
enter is what is called a Distinguished Name or a DN. There are quite a few fields but you can leave some
blank For some fields there will be a default value, If you enter '.', the field will be left blank. Country
Name (2 letter code) ?:US
ENTER
State or Province Name (full name) [Some-State]:Maryland
ENTER
Locality Name (eg, city) []:Hollywood
ENTER
Organization Name (eg, company) [Internet Widgits Pty
Ltd]:Easy Software Products
ENTER
Organizational Unit Name (eg, section) []:
ENTER
Common Name
(eg, YOUR name) []:host.easysw.com
ENTER
Email Address []:
ENTER
Please enter the following 'extra' attributes to be sent with your certificate request A challenge password
[]:
ENTER
An optional company name []:
ENTER
Send the file /etc/cups/ssl/server.csr to your Certificate Authority. They will provide you with a signed
certificate that can be used with your CUPS server. The certificate should be copied to the file /etc/cups/
ssl/server.crt.
Finally, remove the password from your server key with these commands
cd /etc/cups/ssl
ENTER
mv server.key server.old
ENTER
openssl rsa -in server.old -out server.
key
ENTER
rm server.old
ENTER
and then make sure that the files can be read only by the server
chmod 600 server.*
ENTER
That's it! You now have an official, signed certificate for your server!
Enabling Encryption in Your Server
Now that your server certificate and key are installed, you need to tell CUPS to use them. CUPS provides
two encryption methods—the dedicated https-type of service as
< previous page page_98 next page >
< previous page page_99 next page >
Page 99
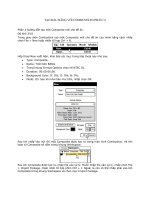
well as the newer HTTP Upgrade method. The https service encrypts the connection to the server immediately,
while the HTTP Update method upgrades the connection only when the client or server requests it. Figure 5.1
shows how the two methods work.
FIGURE 5.1
CUPS encryption methods.
If you will be doing remote administration using a Web browser, you'll want to enable the https service. The
SSLPort directive tells CUPS to use https on the specified port number:
SSLPort 443
Port 443 is the standard port for https URLs. If you already have a secure Web server running on your system
on port 443 you can generally use any other port number in addition to 80 and 631.
The Encryption directive is another you'll want to use. It specifies the level of encryption that is required for
various resources. For remote administration you'll need to update the following section reading:
<Location /admin> # # You definitely will want to limit access to the administration functions. # The default
configuration requires a local connection from a user who # is a member of the system group to do any admin
tasks. You can change # the group name using the SystemGroup directive. #
< previous page page_99 next page >
< previous page page_100 next page >
Page 100
AuthType Basic AuthClass System ## Restrict access to local domain Order Deny, Allow Deny From All
Allow From 127.0.0.1 #Encryption Required </Location>
Assuming that your local network has an address of 192.168.0.0 and a netmask of 255.255.0.0, the
following changes will enable remote administration with encryption:
</Location /admin> # # You definitely will want to limit access to the administration functions. # The
default configuration requires a local connection from a user who # is a member of the system group to
do any admin tasks. You can change # the group name using the SystemGroup directive. # AuthType
Basic AuthClass System ## Restrict access to local domain Order Deny, Allow Deny From All Allow From
127.0.0.1 Allow from 192.168.0.0/255.255.0.0 Encryption Required </Location>
Advanced Access Control
CUPS supports access control based on the client address, the user certificate or username and password,
and encryption.
Address-based access control enables you to limit access to specific systems, networks, or domains.
Although this does not provide authentication, it does enable you to limit the potential users of your
system efficiently.
Certificates, usernames, and passwords provide ways to limit access to individual people or groups.
< previous page page_100 next page >
< previous page page_101 next page >
Page 101
Finally, you can require encryption on specific resources; this is often used to provide secure remote
administration access, as described in the previous section titled ''Enabling Encryption in Your Server."
Basics of Access Control
CUPS maintains a list of locations that have access control, authentication, and encryption enabled.
Locations are specified using the Location directive:
<Location /resource> AuthClass AuthGroupName AuthType Encryption Order Allow from
Deny from </Location>
Locations generally follow the directory structure of the DocumentRoot directory; however, CUPS does
have several virtual locations for administration, classes, jobs, and printers. Table 5.3 lists the virtual
locations that CUPS provides.
TABLE 5.3 CUPS Virtual Locations
Resource Description
/admin The resource for all administration operations
/classes The resource for all classes
/classes/
name
The resource for class
name
/jobs The resource for all jobs
/jobs/
id
The resource for job
id
/printers The resource for all printers
/printers/
name
The resource for printer
name
/printers/
name.ppd
The PPD file for printer
name
Authentication of Users
CUPS supports user authentication through HTTP Basic and Digest authentication. Basic authentication
uses Unix accounts and passwords, whereas Digest authentication uses a special MD5 password file just
for CUPS.
< previous page page_101 next page >
< previous page page_102 next page >
Page 102
NOTE:
Basic authentication sends the username and password Base64-encoded from the client to the
server, so it offers no protection against eavesdropping unless you are using encryption on the
connection. This means that a malicious user can monitor network packets and discover valid users
and passwords that could result in a serious compromise in network security. Use Basic
authentication only in conjunction with encryption.
Unlike Basic authentication, Digest passes the MD5 sum (basically a complicated checksum) of the
username and password instead of the strings themselves. Also, Digest authentication does not use
the Unix password file, so if an attacker does discover the original password it is less likely to result
in a serious security problem as long as you use a different Digest password from the corresponding
Unix password.
Because most Web browsers do not support Digest authentication, your best choice is Basic
authentication with Encryption enabled.
CUPS also supports a local certificate-based authentication scheme that can be used in place of Basic or
Digest authentication by clients connecting on the local machine. Certificate authentication is not
supported or enabled from remote clients.
Authentication is enabled using the following AuthType directive inside a location section:
<Location /printer/DeskJet> AuthType Basic Encryption Required </Location>
This example requires a Unix password when a user prints a file to a printer queue named DeskJet. To
use Digest passwords instead, use the following:
<Location /printer/DeskJet> AuthType Digest Encryption Required </Location>
Digest authentication works with users and passwords defined in the /etc/cups/ passwd.md5 file. The
lppasswd command is used to add, change, or remove accounts from the passwd.md5 file. To add a user
to the default system group, type the following:
lppasswd -a user
ENTER
Password: password
ENTER
Password: again: password
ENTER
After this is added, a user can change his/her password by typing
lppasswd
ENTER
Old password: password
ENTER
Password: password
ENTER
Password again:
password
ENTER
< previous page page_102 next page >
< previous page page_103 next page >
Page 103
To remove a user from the password file, type the following:
lppasswd -x user
ENTER
Authentication of Groups
Group authentication adds an extra requirement that the user is part of a Unix or Digest group. The
default CUPS configuration uses group authentication to require that administration requests be
performed by valid administrative users in the ''root,""sys," or "system" group, depending on your OS.
The AuthClass directive specifies the type of group authentication to perform. Table 5.4 lists the
authentication classes:
TABLE 5.4 Authentication Classes
Class Description
None No group membership is required.
System Membership in the system group is required.
Group Membership in the named group is required.
For System authentication, the user must be a member of the system group, which by default is set to the
"root,""sys," or "system" group on your system. This group can be explicitly set using the SystemGroup
directive:
SystemGroup administrators <Location /admin> AuthType Basic AuthClass System Encryption
Required </Location>
For Group authentication, the AuthGroupName directive is used instead:
<Location /admin> AuthType Basic AuthClass Group AuthGroupName administrators Encryption
Required </Location>
< previous page page_103 next page >
< previous page page_104 next page >
Page 104
NOTE:
The root user is considered by CUPS to be a member of every group.
Address-Based Access Control
Address-based access control restricts access based on the IP address of the client. The Allow and Deny
directives specify hosts or networks that are allowed or not allowed to access the resource:
<Location /printer/DeskJet> Deny from all Allow from 192.168.0.1 Allow from 192.168.0.2 Allow
from 192.168.1.0/255.255.255.0 </Location>
This would allow clients at IP addresses 192.168.0.1,192.168.0.2, and 192.168.1.0 to access the printer
named DeskJet. The last line for the 192.168.1 network could also be written as
Allow from 192.168.1
or:
Allow from 192.168.1.0/24
The /24 indicates that the top 24 bits of the network address are significant.
Name-Based Access Control
Name-based access control restricts access based on the host or domain name. The hostname is resolved
from the client's IP address. For name-based access control to work, you must first enable hostname
resolution:
HostNameLookups on
NOTE:
Hostname lookups can add a large performance penalty because of the time it takes to do the
reverse-lookup on the IP address. Use name-based access control only if you absolutely must.
After that, use the name in the Allow or Deny lines:
< previous page page_104 next page >
< previous page page_105 next page >
Page 105
<Location /printer/DeskJet> Deny from all Allow from host.foo.bar.com Allow from *.easysw.com
Allow from .bar.net </Location>
Log Files
CUPS maintains three log files for the accesses, errors, and pages that are processed by the server. The
log files are normally located in the /var/log/cups directory.
The log files are normally rotated when they reach 1MB. The MaxLogSize directive controls when they are
rotated:
MaxLogSize 0 MaxLogSize 65536 MaxLogSize 64k MaxLogSize 1024k MaxLogSize 1m
A max size of 0 disables log rotation.
The Access Log File
The access log file contains a log of all HTTP requests processed by the CUPS server. It is a text file in the
so-called ''common log format" and can be analyzed using most Web server log analysis tools.
Each line looks like this:
host group user date-time \"method resource version\" status bytes
127.0.0.1 - - [20/May/1999:19:20:29
+0000] "POST /admin/ HTTP/1.1" 401 0 127.0.0.1 - mike [20/May/1999:19:20:31 +0000] "POST /admin/
HTTP/1.1" 200 0
The
host
field is normally only an IP address unless you have enabled the HostNameLookups directive in
the cupsd.conf file.
The
group
field always contains"-" in CUPS.
The
user
field is the authenticated username of the requesting user. If no username and password are
supplied for the request then this field contains "-".
The
date-time
field is the date and time of the request in local time and is in the format
[DD/MON/YYYY:HH:MM:SS +ZZZZ]
< previous page page_105 next page >
< previous page page_106 next page >
Page 106
where ZZZZ is the timezone offset in hours and minutes from Greenwich Mean Time (also known as GMT
also known as ZULU).
The
method
field is the HTTP method used (for example, GET, PUT, or POST).
The
resource
field is the the filename of the requested resource.
The
version
field is the HTTP specification version used by the client. For CUPS clients this will always be
HTTP/1.1.
The
status
field contains the HTTP result status of the request. Usually it is 200, but other HTTP status
codes are possible. For example, 401 is the ''unauthorized access" status in the preceding example.
The
bytes
field contains the number of bytes in the request. For POST requests the bytes field contains
the number of bytes that was received from the client.
The Error Log File
The error log file lists messages from the scheduler (errors, warnings, and so forth):
level date-time message
I [20/May/1999:19:18:28 +0000] Job 1 queued on 'DeskJet' by 'mike'. I [20/
May/1999:19:21:02 +0000] Job 2 queued on 'DeskJet' by 'mike'. I [20/May/1999:19:22:24 +0000] Job 2
was cancelled by 'mike'.
The
level
field contains the type of message, as shown in Table 5.5:
TABLE 5.5 Message Levels
Level Description
X An emergency condition exists.
A An alert occurred.
C A critical error occurred.
E An error occurred.
W The server was unable to perform some action.
N Notice message.
I Informational message.
D Debugging message.
d Detailed debugging message.
The
date-time
field contains the date and time that the error occurred. The format of this field is identical
to the data-time field in the access_log file.
The
message
field contains a free-form textual message.
< previous page page_106 next page >
< previous page page_107 next page >
Page 107
The Page Log File
The page log file lists each page that is sent to a printer. Each line contains the following information:
printer user job-id date-time page-number num-copies job-billing
DeskJet root 2 [20/May/1999:19:21:05
+0000] 1 0 acme-123
The
printer
field contains the name of the printer that printed the page. If you send a job to a printer
class, this field will contain the name of the printer that was assigned the job.
The
user
field contains the name of the user (the IPP requesting-user-name attribute) that submitted this
file for printing.
The
job-id
field contains the job number of the page being printed.
The
date-time
field contains the date and time that the page started printing. The format of this field is
identical to the data-time field in the access_log file.
The
page-number
and
num-pages
fields contain the page number and number of copies being printed of
that page. For printers that cannot produce copies on their own, the num-pages field will always be 1.
The
job-billing
field contains a copy of the job-billing attribute provided with the IPP create-job or print-
job requests or ''-" if none was provided.
Summary
CUPS uses several text configuration files that determine how the server operates and what services are
provided to remote machines. CUPS supports access control and authentication to restrict access to the
server and encryption to protect the privacy of the data or print that files you send.
The log files are plain text files that are automatically rotated by the CUPS server. The access log file is
stored in common log format so it can be analyzed easily using most Web server tools.
< previous page page_107 next page >
< previous page page_108 next page >
Page 108
This page intentionally left blank.
< previous page page_108 next page >
< previous page page_109 next page >
Page 109
CHAPTER 6
Client Configuration
< previous page page_109 next page >
< previous page page_110 next page >
Page 110
This chapter discusses several ways to configure CUPS clients for printing.
The Basics
A client is any machine that sends print jobs to another machine for final printing. Clients can also be
servers if they communicate directly with printers of their own.
Each client can have a local server that spools jobs before sending them to the remove server, or the
client can run without a local server and send jobs directly to the server.
CUPS supports the following methods of configuring client machines:
1. Manual configuration of print queues
2. Specifying a single server for printing
3. Automatic configuration of print queues
4. Specifying multiple servers for printing
5. Relaying printers to other clients
WHICH CONFIGURATION SHOULD I USE?
The choice of client configuration depends a great deal on your network and client machines.
Running a local CUPS server on a client provides the best overall functionality, but does use a small
amount of system resources to print the files in the background and monitor the network for
available printers.
If you have many servers or printers, consider tuning the BrowseInterval and BrowseTimeout
settings on both the server and client machines to minimize network congestion. For very busy
networks, the hardwired remote printer approach may be necessary, but often a combination of
BrowsePoll and BrowseRelay on selected client machines will be a better solution that involves less
maintenance.
If you choose to disable the local server and print files directly to a remote server, your clients will
require less memory and disk space but will be exposed to a single point of failure—the remote
server. In a large network, this can often be catastrophic to both the users and network
administrator.
Manual Configuration of Print Queues
The most tedious method of configuring client machines is to configure each remote queue by hand using
the lpadmin command:
lpadmin -p
name
-E -v ipp://
server
/printers/
name
ENTER
The
name
is the name of the printer on the server machine. The
server
is the hostname or IP address of
the server machine. Repeat the lpadmin command for each remote printer you want to use.
< previous page page_110 next page >
< previous page page_111 next page >
Page 111
NOTE:
Manual configuration of print queues is not recommended for large numbers of client machines
because of the administration nightmare it creates. For busy networks, consider subnetting groups
of clients and polling and relaying printer information instead.
Specifying a Single Server for Printing
CUPS can be configured to run without a local spooler and send all jobs to a single server. However, if
that server goes down then all printing will be disabled. Use this configuration only as absolutely needed.
The default server is normally ''localhost". To override the default server, create a file named, etc/cups/
client.conf and add a line reading:
ServerName
server
to the file. The
server
name can be the hostname or IP address of the default server.
The default server can also be customized on a per-user basis. To set a user-specific server, create a file
named ~/.cupsrc and add a line reading
ServerName
server
to the file. The
server
name can be the hostname or IP address of the default server.
Automatic Configuration of Print Queues
CUPS supports automatic client configuration of printers on the same subnet. To configure printers on the
same subnet, set the BrowseAddress on the server and do nothing on the clients. Each client should see
the available printers within 30 seconds automatically. The printer and class lists are updated
automatically as printers and servers are added or removed.
If you want to see printers on other subnets as well, use the BrowsePoll directive as described next.
NOTE:
The BrowseAddress directive enables broadcast traffic from your server. The default configuration
broadcasts printer information every 30 seconds. Although this printer information does not use
much bandwidth, typically about 80 bytes per printer, it can add up with large numbers of servers
and printers.
< previous page page_111 next page >
< previous page page_112 next page >
Page 112
Use the BrowseInterval and BrowseTimeOut directives to tune the amount of data that is added to
your network load. In addition, subnets can be used to minimize the amount of traffic that is carried
by the ''backbone" of your large network.
Specifying Multiple Servers for Printing
If you have CUPS servers on different subnets then you should configure CUPS to poll those servers.
Polling provides the benefits of automatic configuration without significant configuration on the clients,
and multiple clients on the same subnet can share the same configuration information.
Polling is enabled by specifying one or more BrowsePoll directives in the /etc/cups/cupsd.conf. file. Each
BrowsePoll line shows the hostname or IP address of the server:
BrowsePoll
server
Multiple BrowsePoll lines can be used to poll multiple CUPS servers. To limit the amount of polling you do
from client machines, you can have only one of the clients do the polling and relay that information to the
others on the same subnet (described next).
Relaying Printers to Other Clients
When you have clients and servers spread across multiple subnets, the polling method is inefficient. CUPS
provides a BrowseRelay directive that enables a single client to relay (broadcast) the polled printer
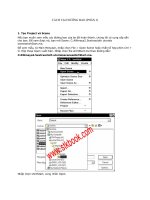
information to the local subnet. Figure 6.1 shows a typical corporate network with multiple subnets.
Server A and Server B are on subnet 1 and subnet 2, while the clients are on subnet 3. To provide
printers to all of the clients in subnet 3, client C will be configured with the following directives in /etc/
cups/cupsd.conf:
# Poll the two servers BrowsePoll ServerA BrowsePoll ServerB # Relay the printers to the
local subnet BrowseRelay 127.0.0.1 192.168.3.255
The BrowseRelay line specifies a source address and mask. Any browse packets coming from a matching
address will be sent to the given broadcast address. In this case, we want the packets from the local
machine (127.0.0.1) relayed to the other clients.
As printers are found using polling, they are relayed from client C to the rest of the clients through a
broadcast on subnet 3. The rest of the clients can use the standard cupsd.conf configuration.
< previous page page_112 next page >
< previous page page_113 next page >
Page 113
FIGURE 6.1
A typical corporate network with multiple subnets.
NOTE:
The BrowseRelay directive can also be used to relay browsing packets from one network interface to
another. For example, if client C in the previous example had network interfaces attached to both
subnet 1 and subnet 2, it could use the BrowseRelay directive exclusively:
# Relay the printers from subnet 1 and 2 to subnet 3
BrowseRelay 192.168.1 192.168.3.255
BrowseRelay 192.168.2 192.168.3.255
Load Balancing and Failsafe Operation
When using server polling or broadcasting, CUPS clients can automatically merge identical printers on
multiple servers into a single implicit class queue. Clients assume that
< previous page page_113 next page >
< previous page page_114 next page >
Page 114
printers with the same name on multiple servers are in fact the same printer or type of printer being
served by multiple machines.
If you have two printers, LaserJet@ServerA and LaserJet@ServerB, a third implicit class called LaserJet
will be created automatically on the client that refers to both printers. If the client also has a local printer
with the name LaserJet then an implicit class named AnyLaserJet will be created instead.
The client will alternate between servers and automatically stop sending jobs to a server if it goes down,
providing a load-balancing effect and fail-safe operation with automatic switchover.
Add the following line to the /etc/cups/cupsd.conf file to disable implicit classes:
ImplicitClasses off
NOTE:
Implicit classes are enabled by default. If you want to provide classes for some printers, but not all,
you should set up printer classes by hand on the client machines using the lpadmin command or the
Web interface.
Printing from LPD Clients
CUPS supports limited functionality for LPD-based clients. With LPD you can print files to specific printers,
list the queue status, and so forth. However, the automatic client configuration and printer options are not
supported by the LPD protocol, so you must manually configure each client for the printers it needs to
access.
The cups-lpd program provides support for LPD clients and is used as a ''inetd" type of daemon. If you are
using the inetd super-daemon (most versions of Unix), edit the /etc/inetd.conf file and add a line reading:
printer stream tcp nowait lp /usr/lib/cups/daemon/cups-lpd cups-lpd
After you have added this line, send the inetd process a HUP signal or reboot the system.
In IRIX and some servers of Linux, the command will be the following:
killall -HUP inetd
ENTER
For other Unix systems, use the kill command after finding the ID for the inetd process:
kill -HUP
pid
ENTER
< previous page page_114 next page >
< previous page page_115 next page >
Page 115
Many Linux systems use the newer xinetd daemon, which stores this information in /etc/xinetd.conf or /
etc/xinetd.d/cups:
service printer { socket_type = stream protocol = tcp wait = no user = lp server = /usr/lib/
cups/daemon/cup-lpd }
The xinetd daemon checks the configuration files for changes and automatically reads them as needed.
Printing from Mac OS Clients
CUPS does not provide Mac OS support directly. However, several free and commercial software packages
do.
Columbia Appletalk Package (CAP)
CAP is probably the oldest EtherTalk server around. It is probably the most portable of the solutions
available, but also the slowest.
Because the CAP LaserWriter server (lwsrv) does not support specification of PPD files, we do not
recommend that you use CAP with CUPS. However, you can run the lpsrv program for limited printing
with the command
lwsrv -n
''Share Name"
-p
name
-a /usr/lib/adicts -f /usr/lib/LW+Fonts ENTER
where
"Share Name"
is the name you want to use when sharing the printer, and
name
is the name of the
CUPS print queue.
XINET KA/Spool
KA/Spool is a commercial solution that is popular on high-end Unix boxes. To use your system as a print
server for Mac OS clients, configure each printer using a papserver in the /usr/adm/appletalk/services file,
specifying the corresponding PPD file in the /etc/cups/ppd directory for each printer. For a printer named
MyPrinter the entry would look like the following:
/usr/etc/appletalk/papserver -I -L -P /etc/cups/ppd/MyPrinter.ppd
"Printer Description" MyPrinter
< previous page page_115 next page >
< previous page page_116 next page >
Page 116
NetATalk
NetATalk is a popular free EtherTalk package for Linux and Solaris. To use your system as a print server
for Mac OS clients, configure each printer in the papd.conf file, specifying the corresponding PPD file in
the /etc/cups/ppd directory for each printer. For a printer named MyPrinter the entry would look like
Printer Description:MyPrinter@MyServer:\ :pr=|/usr/bin/lp -d MyPrinter:\ :op=daemon:\ :
pd=/etc/cups/ppd/MyPrinter.ppd
Printing from Windows Clients
Although CUPS does not provide Windows support directly, the free SAMBA software package does.
SAMBA version 2.0.6 is the first release of SAMBA that supports CUPS. You can download SAMBA from the
following Web site:
Windows 98, Me, and 2000 also support the Internet Printing Protocol for printing.
Configuring SAMBA 2.0.x
To configure SAMBA 2.0.0–2.0.5 for CUPS, edit the smb.conf file and replace the existing printing
commands and options with the lines:
printing = sysv printcap = lpstat print command = lp -d%p -oraw %s; rm -f %s
To configure SAMBA 2.0.6 and 2.0.7 for CUPS, edit the smb.conf file and replace the existing printing
commands and options with the lines:
printing = cups printcap = lpstat
That's all there is to it! Remote users will now be able to browse and print to printers on your system.
Configuring SAMBA 2.2.x
SAMBA 2.2.0 and later include support for downloading printer drivers from Windows clients. Start by
editing the smb.conf file and replacing the existing printing commands and options with the following lines:
< previous page page_116 next page >
< previous page page_117 next page >
Page 117
printing = cups printcap = cups
Then run the cupsaddsmb program to add the printers you want to share
cupsaddsmb
name ENTER
where
name
is the name of the printer you want to share. To share all printers, type:
cupsaddsmb -a
ENTER
Configuring Windows Clients with IPP
If you are using Windows 98, Me, or 2000, you can add a printer as a network printer using the IPP URI
for the printer:
ipp://
server
/printers/
name
The
server
is the hostname or IP address of the server. The
name
is the name of the printer on the server.
Summary
CUPS supports many types of client configurations, including non-CUPS clients. The basic CUPS client
configuration offers automatic load-balancing and fail-safe operation of remote printer when two or more
servers are set up with the same printers. When clients and servers are on different subnets, polling and
relaying can be used to join the subnets and propagate the printers to clients.
LPD clients can submit jobs, but lack the capability to send job options or participate in auto-configuration.
MacOS clients are supported by a variety of third-party programs and can usually provide PPD files to
clients and support job options.
Windows clients are supported through SAMBA or IPP.SAMBA 2.2.x supports printer driver downloads
using the cupsaddsmb command. Older versions of SAMBA and IPP require a local Windows printer driver
to be used.
< previous page page_117 next page >
< previous page page_118 next page >
Page 118
This page intentionally left blank.
< previous page page_118 next page >