Hacking Windows XP 2004 phần 2 ppsx
Bạn đang xem bản rút gọn của tài liệu. Xem và tải ngay bản đầy đủ của tài liệu tại đây (1.5 MB, 38 trang )
16
Part I — Customizing Your System
select an image for you, but this selection can easily be changed. If you do not like the images
that Windows has to offer, you can select any other image.
The process of changing a user’s image is very simple. Just perform the following steps and you
will have it changed in no time:
1.
Open up the user manager by clicking the Start menu and selecting Run. Then type in
nusrmgr.cpl and click OK. This is a shortcut to User Accounts that will save you time
going to Control Panel and then clicking the User Accounts icon.
2.
This will start up the New User Accounts Manager. To change a user’s picture, just click
the user name.
3.
Then, click Change My Picture text and you will see a screen with all of the different
images that are built into Windows XP.
4.
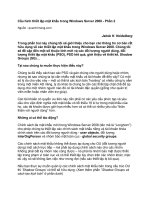
If you see one you like, just select it by clicking it and then click the Change Picture but-
ton. If you do not like any of them, click the Browse for More Pictures option, as shown
in Figure 1-9.
F
IGURE
1-9: User Accounts’ change image screen showing the option to select additional images for a
user’s picture.
WY026-P01[001-038].qxd 23/6/2004 5:16 PM Page 16 Quark09 Quark09:Books:WY026-Sinchak:Chapter:
17
Chapter 1 — Customizing the Look of the Startup
5.
This will pop up a Browse dialog box. Browse though your files and select the image that
you want to use, and click Open. Any image that you select will automatically be resized
to fit. If you want to make a image that will take up all of the space, the correct aspect
ratio is 1 to 1, as the size of the square that is displayed is 48 ϫ 48 pixels.
Now you have changed a user’s Welcome screen image and also the image that is displayed in
that user’s Start panel.
Removing a user from the Welcome screen
One of the unfortunate side effects of the Welcome screen is the listing of all of the user
accounts on the computer. What if there is an account that you do not want the whole world to
see? Using the same feature that Microsoft uses to hide system accounts from the Welcome
screen, you can hide user accounts as well.
Hiding user accounts can be done by a simple hack in the registry. Hidden away in the local
system settings is a list of accounts that Microsoft does not want to appear on the Welcome
screen. These accounts are primarily system accounts under which different processes that run
in the background use to execute.
To hide a user from the Welcome screen, all you have to do is create an entry on the list for the
user you want to hide. Follow these steps to find out how to add a user to the list:
1.
Click the Start button and select Run, then type regedit in the box and click OK.
2.
This will start up the system Registry Editor. You are going to want to expand the fol-
lowing keys: HKEY_LOCAL_MACHINE, SOFTWARE, Microsoft, Windows NT,
CurrentVersion, Winlogon, SpecialAccounts, and UserList.
3.
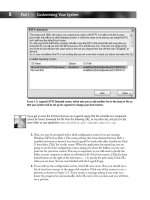
You should now see the list of the account names, and parts of account names, that the sys-
tem will look for and will hide. To add a name to the list, just right-click and select New
1 DWORD value, as shown in Figure 1-10. A DWORD is a specific data type of an entry
in the system registry. In short, the DWORD data type allows an integer value to be stored.
4.
When the new key is created, enter in the name of the user’s account as the name of the
key. Once you have done this, you can close regedit.
After log off and back on or reboot, the user will not be displayed on the Welcome screen.
If you ever want to log into the account that you hid from the Welcome screen, just press
CtrlϩAltϩDelete on your keyboard once, twice, and you will be able to type in the name of
the user under which you want to log in. This way, you can hide an account from your family or
friends but can still log into it.
If you ever change your mind and want the account to be displayed on the Welcome screen
again, just delete the entry that you made in the list in the System Registry and everything will
be back the way it was.
Changing the Welcome screen
The new blue Welcome screen looks great, but after a while, a change would be nice. Also,
modifying the Welcome screen is another way you can customize your computer and make it
WY026-P01[001-038].qxd 23/6/2004 5:16 PM Page 17 Quark09 Quark09:Books:WY026-Sinchak:Chapter:
18
Part I — Customizing Your System
more unique. You can change the Welcome screen by two different methods using different
tools. As with the methods to change the boot screens, there are different advantages to each.
The first way to change the Welcome screen will be a manual approach that may not be the
easiest method available but will allow you to use any of the thousands of hacked logon screens
on the Web. The other method will be much easier, but it will be limited to only using
Welcome screens that were made especially for the program.
Manually changing the Welcome screen
Changing the Welcome screen manually is not as complicated as you would think. A value in
the registry needs to be changed to point to the Welcome screen you want to use. Once you do
that, you are finished.
To get started, you are going to want to download a few Welcome screens (also referred to as
logon screens) from the Web. The following are two sites from which you can download thou-
sands of Welcome screens:
F
IGURE
1-10: Using the Registry Editor to add another DWORD value for the name of a user that will be
hidden on the Welcome screen.
WY026-P01[001-038].qxd 23/6/2004 5:16 PM Page 18 Quark09 Quark09:Books:WY026-Sinchak:Chapter:
19
Chapter 1 — Customizing the Look of the Startup
Ⅲ ThemeXP: www.themexp.org/cat_login.php
Ⅲ Belchfire: www.belchfire.net/showgallery-6.html
Visit both of these sites and download some different logon screens and then experiment with
them. When selecting a boot screen, you need to find one that will look good with your screen’s
current resolution. If you have a very large monitor (19-inch and greater) and are using a large
resolution (1280 ϫ 1024 or greater), you may have difficulty finding Welcome screens that
were made for your computer’s high resolution. If you are an owner of a large monitor or reso-
lution, the only workaround or solution to the problem would be to create a logon screen of
your own or write the author of the screen asking them to release a version for your specific
resolution. Additionally, you will need to make sure the Welcome screens are compatible with
your computer’s operating system version.
Just like the hacked system files for the boot screens, these Welcome screens are just another
hacked system file, so you still have to watch out for version conflicts. Although if you acciden-
tally downloaded a Welcome screen that is the wrong version, then you will have a far less seri-
ous problem than if you downloaded the wrong version of a boot screen.
You will find that a lot of the Welcome screens that you download do not have a version
marked. To find what version you are selecting, just extract the ZIP file or self extracting
archive, right-click it, and select Properties. Doing so will bring up the properties, and you will
be able to see the version. If the version says 6.0.2600.0, then you have a Welcome screen file
from the very first version of XP. On a computer with Windows XP Service Pack 1 installed,
the
logonui.exe file has a version number of 6.0.2800.1106. If the version is not similar to
6.0.2XXX.X then you may not have downloaded a valid file. In theory, if you replace a file with
an earlier version, you might run into some problems.
I replaced my newer Service Pack 1 Welcome screen with a Welcome screen that was made
with a system file from the original version of Windows. I did not experience any problems,
but I cannot guarantee that if you do the same you also will be problem-free. Also, security
fixes or other enhancements might appear in the later version of the code, so if you replace the
latest code with old code, you might be missing out on important updates. Experiment with
caution and be aware of the risks.
Now that you know what to watch out for, you are ready to start replacing the Welcome screen
manually. To do so, follow these steps:
1.
Click the Start button and select Run. Then type regedit in the box and click the OK
button. This will start up the Registry Editor.
2.
Expand HKEY_LOCAL_MACHINE, SOFTWARE, Microsoft, Windows NT,
CurrentVersion, and lastly Winlogon. Now you will see several different values on the
right side of the screen for many different logon properties. The property that we are
interested in is named UIHost.
3.
The UIHost property specifies the path to the Welcome screen that will be loaded
and displayed. Right-click UIHost from the list and select Modify, as shown in
Figure 1-11.
WY026-P01[001-038].qxd 23/6/2004 5:16 PM Page 19 Quark09 Quark09:Books:WY026-Sinchak:Chapter:
20
Part I — Customizing Your System
4.
Next, just type in the full path to the logonui.exe file or whatever you named your
new Welcome screen. One thing to keep in mind: avoid storing your Welcome screens in
a directory path that has spaces in the names of the directories. I suggest you create a
folder on your hard drive called WelcomeScreens. So you will be changing the value of
UIHost to
C:\WelcomeScreens\CoolNewLogonUI.exe.
5.
Once you make the change, it will go into effect immediately. If you click the Windows
keyϩL at the same time, this will lock your computer and will bring up the new
Welcome screen.
If you ever want to revert to the default Windows XP Welcome screen, just change the UIHost
property back to
logonui.exe. (You may have to change the C to the correct drive letter on
which you installed Windows.)
To make this process faster, I have included an undo file on the companion CD called
welcome_undo.reg that will automatically revert to the default Welcome screen.
F
IGURE
1-11: Registry Editor modifying the UIHost property.
WY026-P01[001-038].qxd 23/6/2004 5:16 PM Page 20 Quark09 Quark09:Books:WY026-Sinchak:Chapter:
21
Chapter 1 — Customizing the Look of the Startup
There must be a better way to change your screen than doing it manually, right? Well, yes
and no. A few programs are available on the Web that will automate the editing of the
system registry. One of the most popular programs is called Logon Loader, by Daniel
Milner. Logon Loader allows you to easily change the Welcome screen by only clicking a
few buttons.
Using LogonStudio to change the Welcome screen
LogonStudio is a software app that was developed by Stardock. This application is similar
to the BootSkin application, discussed previously, in that it does not modify the system
files. Although this method is very simple to use, the Welcome screens must be designed to
work with LogonStudio. This is not a big deal, because there are hundreds of Welcome
screens that people already made for this program, but users will find that they will not be
able to use any of the thousands of Welcome screens made from hacked system files.
Depending on what Welcome screen you like, you may or may not be able to use it with this
program.
Although you have to give up a little flexibility in the screens that you can use, you will have
added safety and ease of use. Because you will not be working with hacked system files, you
don’t have to worry about getting the correct version and the possible problems that running an
older version could cause. Also, using LogonStudio is very easy. You can change your Welcome
screen with just a few clicks.
To get started, you will need to download a copy of LogonStudio at Stardock’s Web site:
www.stardock.com/products/logonstudio/download.html. Once you have the
app downloaded and installed, most likely you will want to download a cool Welcome
screen to use with it. You can download hundreds of Welcome screens from the following
sites:
Ⅲ WinCustomize:
www.wincustomize.com/skins.asp?library=26
Ⅲ SkinPlanet: www.skinplant.com/library.cfm?lib=5
Ⅲ DeviantArt: skins.deviantart.com/windows/xplogon/
Ⅲ Skinbase: www.skinbase.org/section.php?sections=logonstudio
Once you have downloaded a few screens, you can install them by just double-clicking them if
they have a
.logonxp file extension, which will open them up. If the files that you download
do not have a
.logonxp file extension and instead just have a .zip file extension, rename the
files to
.logonxp so that you can easily import them into LogonStudio. LogonStudio will
then be started automatically and will display the new Welcome screen in the preview box, as
shown in Figure 1-12, when the files are double-clicked.
If for some reason the Welcome screen that you download does not have a
.logonxp file
extension, and is just a
.zip file with a folder containing several bitmap image and configura-
tion files, you can still install the Welcome screen. If you have a Welcome screen that fits that
description, then you will just have to manually copy the folder with the Welcome screen files
to the LogonStudio folder that is normally located at
C:\ProgramFiles\WinCustomize\
LogonStudio
.
WY026-P01[001-038].qxd 23/6/2004 5:16 PM Page 21 Quark09 Quark09:Books:WY026-Sinchak:Chapter:
22
Part I — Customizing Your System
When you browse to the LogonStudio folder, you will notice that each Welcome screen has its
own folder with the files for the Welcome screen inside. If you ever want to delete a Welcome
screen, just delete the folder with the corresponding name.
Changing the Welcome screen with LogonStudio is very easy to do. Just click the name of the
screen from the available logons list. A preview will show up in the preview box, and if you like
it, click Apply or OK and you are finished.
Depending on your computer setup, you may experience problems when using some Welcome
screens with monitors that are set at a large resolution. If you experience a problem like this
with a specific Welcome screen, you are out of luck. Try finding a different version of the
Welcome screen that was made for higher resolutions. This can be very difficult because resolu-
tion data is usually not posted with the Welcome screens.
If you ever want to revert to the original system Welcome screen, just click the Restore Default
XP Logon button and it will uninstall the LogonStudio app and prevent it from taking over the
Welcome screen. You will also have to do this if you are using LogonStudio to display a Welcome
screen and then want to use a hacked system file Welcome screen. First, you will have to start up
F
IGURE
1-12: LogonStudio showing new Welcome screen installed.
WY026-P01[001-038].qxd 23/6/2004 5:16 PM Page 22 Quark09 Quark09:Books:WY026-Sinchak:Chapter:
23
Chapter 1 — Customizing the Look of the Startup
LogonStudio and click the Restore Default button, and then you can edit the registry to point to
the new Welcome screen. If you do not click the Restore button in LogonStudio, then you will
never see your new hacked system file because LogonStudio will still be active and will automat-
ically replace it.
Creating your own Welcome screen from a hacked system file
When users first started to change their Welcome screen, they used the same approach that
was used with the boot screens. Resource-hacking tools such as Resource Hacker were used to
replace the bitmaps that are stored inside the logonui.exe file. Then, they would adjust the
string values within the file with the same tool to change the layout of the screen. Although
there are now apps that were built to make Welcome screens easier, I still believe that the best
way to create a Welcome screen by hacking your system file is to use Resource Hacker. I have
had problems with other tools that attempt to automate the process of hacking the system file
resources because the programs will usually only work with one version of the system file. If
you have a newer system file than the program was designed to work with, then you won’t see
the Welcome screen.
As I stated earlier, the best way to create a Welcome screen from a hacked system file is to do it
manually using a cool app called Resource Hacker (
www.users.on.net/johnson/
resourcehacker
), written by Angus Johnson. This method will allow you the greatest
amount of flexibility because you are not limited to the features of a Welcome screen editor.
Although this method is a little complex, it is the best way to create a high-quality and unique
Welcome screen.
I am going to show you the basics of how to get started, but I am not going to go into great
detail on all of the great things that you can do because there are just too many. Instead, at the
end, I will tell you about some great Web sites that I use as references when I want to make a
Welcome screen from scratch.
1.
The first step is to make a copy of your logonui.exe file.This file can be found in
the System32 directory inside the Windows directory. The exact path is usually
C:\WINDOWS\system32. Copy the file to a new folder, maybe your Welcomescreen
folder. Also, feel free to rename the file at this time. You can name it anything you want,
because when you want to install it, you just have to enter the path and the file name in
the registry as you did above when installing a custom hacked system file Welcome
screen.
2.
Next, you can start editing the bitmaps in the file. To do this, I recommend using
Resource Hacker. You can download a copy of Resource Hacker by visiting
www.users.on.net/johnson/resourcehacker. Once you get a copy up and
running, open up the
logonui file that you just copied. You can do this by clicking the
file menu bar item and selecting the file from your drive.
3.
Once the file loads in Resource Hacker, you will see an interface similar to Windows
Explorer. You will have four folders: UIFILE, Bitmap, String Table, and Version Info. To
get started, expand the Bitmap folder. You will then see several more folders that are
numbered. Every numbered folder contains a different image. Expand the numbered
folder for a preview of the image that is stored inside it.
WY026-P01[001-038].qxd 23/6/2004 5:16 PM Page 23 Quark09 Quark09:Books:WY026-Sinchak:Chapter:
24
Part I — Customizing Your System
4.
Now let’s assume that you want to extract one image out of Resource Hacker so that you
can modify it using your favorite paint program and then replace the old image with your
modified one. To extract an image, make sure that the image you want is selected and
displayed in the preview pane and then click the Actions item from the menu and select
Save [Bitmap : XXX : XXXX ], where the X’s are numbers. Once you have an image
modified, or if you want to completely replace an existing image, click the Action menu
bar item again. Select Replace Bitmap. This will bring up a new screen that will list all of
the bitmaps in the file. Click the Open File With New Bitmap button and select the
image you want to import. Make sure it is a Windows Bitmap file, as JPEGs and GIFs
will not work! Next, scroll through the list, as shown in Figure 1-13, and select the image
that you want to replace. Click the Replace button and you are finished.
F
IGURE
1-13: Using Resource Hacker to replace bitmaps in the logonui.exe Welcome screen file.
WY026-P01[001-038].qxd 23/6/2004 5:16 PM Page 24 Quark09 Quark09:Books:WY026-Sinchak:Chapter:
25
Chapter 1 — Customizing the Look of the Startup
5.
Once you get all of the bitmap images swapped out with ones you made yourself, you can
move on to editing some of the strings in the string table folder. This is where all of the
font names and text that appear on the Welcome screen is stored. You can edit the text
just like using a text editor. Just be careful that you do not accidentally delete a quote
from the ends of the strings. Also, do not change the index numbers or you will run into
problems. Once you are finished editing a specific string table, just click the Compile
Script button and you are finished with the strings.
6.
The next part allows you to be really creative but it also can be really complex. The
UIFILE folder stores all of the detailed configuration information for the screen. Items
such as transparency levels and font sizes are stored here. When you first view the
UIFILE 1033 resource, you may not see anything at all. Just scroll down and you will
begin to see the script. Just like the string table, when you are finished editing it, click
the Compile Script button.
7.
The last step is to save your changes to the file by clicking the File menu bar item again
and just click Save. Now, you can edit the registry to test out your new screen.
It will probably take you a little while to finally get the screen the way you want it. One site
that I use as a reference is called Windows XP Logon Screen Secrets, written by Paul Andrews,
which is located at
webpages.charter.net/joolsie/LogonScreens.htm. This is a
great site that will tell you all of the details on how to modify the UIFILE so that you can get
the most out of your Welcome screen.
Creating a Welcome screen with LogonStudio
LogonStudio is not only a great program to change your Welcome screen with, but it also is a
good program to create it with too. If you do not want to waste a few hours manually perfect-
ing your Welcome screen and do not desire the flexibility the manual approach offers, then
using LogonStudio is the app for you.
Creating a Welcome screen with LogonStudio is very simple. Also, you can easily edit
Welcome screens that you downloaded by clicking the Edit button from within LogonStudio
when you have selected a screen. However, some of the screens will not be able to be edited
because significant changes have been made to Logon Studio recently that make some of the
earlier Welcome screens incompatible with the editor.
To create a new Welcome screen from scratch, follow these steps:
1.
First, if LogonStudio is not already started, start it up from the Start menu’s All
Programs menu in the WinCustomize folder. Once it is started, click the New button, as
shown in Figure 1-14. This will bring up a new window that will ask you for details on
the new Welcome screen, such as the name and the author’s information. Fill it out, and
then click the Create button.
2.
Next, the editor will show up and you will see what looks like the default Windows XP
Welcome screen. The best way to get started is to just start playing around with different
features. When working in the editor, there are two different ways to select an item to
work on. You can just click most items, but if you want to get to an item faster, or an
item that you cannot click, use the Elements browser. Using the editor is a lot like
WY026-P01[001-038].qxd 23/6/2004 5:16 PM Page 25 Quark09 Quark09:Books:WY026-Sinchak:Chapter:
26
Part I — Customizing Your System
programming in Microsoft’s Visual Basic. When you click an element, you will see a list
of properties appear in the Properties browser.
3.
For example, let’s assume that you want to change the background color. To do this, you
can click the blue background, or you can select the Center Panel from the Elements
browser. Once the Center Panel is selected, you will see several properties appear in the
Property browser.The ones that you will be interested in working with to change the back-
ground color are
Firstcolor and Lastcolor. To change the color, just click the color
boxes in the Property browser and select a new color, as shown in Figure 1-15.
4.
Working with images is also very easy with the editor. If you want to set a photo or an
image you made as the background for the Welcome screen, you can just select the
[Bitmap] property of the picture properties item from the Center Panel element browser.
Once you select your bitmap and it is displayed, you may want to change how it is dis-
played such as if it is a pattern and you want it titled or if you want it stretched across the
screen. To do that, just click the Style properties drop-down box and select the style you
want.
5.
Replacing the images for the different buttons is also very easy. Just use your mouse to
select the image that you want to change, and then one property, called [Bitmap], will
F
IGURE
1-14: Using LogonStudio to create a new Welcome screen
WY026-P01[001-038].qxd 23/6/2004 5:16 PM Page 26 Quark09 Quark09:Books:WY026-Sinchak:Chapter:
27
Chapter 1 — Customizing the Look of the Startup
appear in the Properties browser. Just click the three dotted icon in the Properties
browser. A new dialog box will pop up, giving you the option to edit or browse. If you
click Edit, the image will open up in MS Paint for you to edit it. If you already have a
new image that you want to use, then just click Browse and select the replacement.
When you are creating graphics for your Welcome screen and want parts of the image to be
transparent, such as the background around a button you made, just paint the background with
the light pink color (Red: 255, Green: 0, Blue: 255). This is the default color for transparency in
Windows.
6.
You will not always want some elements in the Welcome screen. For example, you proba-
bly won’t want the dividers that appear in the center of the screen and the dividers at the
top and bottom sections. These dividers are just images. One easy way to get rid of
them is to click the center divider line to bring up the Dividers property browser, then
just click the three dotted icons and uncheck the Use Picture box when the dialog box
pops up.
F
IGURE
1-15: LogonStudio Editor showing how to change the color.
WY026-P01[001-038].qxd 23/6/2004 5:16 PM Page 27 Quark09 Quark09:Books:WY026-Sinchak:Chapter:
28
Part I — Customizing Your System
7.
Editing the text of the Welcome screen is just like editing the text in any word process-
ing program. Just click the text, and you will see all of the properties in the Property
browser for the font, size, and color. You can even change what the text says by modify-
ing the Caption property.
8.
The area that displays the users account, known as the User Account element, may take
the most time to get it looking the way you want. Dozens of different properties are in
this area, one of which specifies the location of the user’s accounts on the Welcome
screen. This property is called the Account property. It shows a number that signifies a
region on the screen. Click the button to the right of the number and you will get a
visual map of the different locations. Select a location by clicking it. Another type of
property in this section is the Alpha properties, which has three subproperties. These
have to do with how visible the accounts are at different stages. 0 is not visible at all and
255 is completely visible. The Alpha Mouse subproperty is used to adjust the Alpha
levels when the mouse is hovering over the name block. Alpha Selected is when the
user has clicked the name and Alpha Normal is when the name has not been selected
and the mouse is not hovering over it.
BackColor is the name of another property in
the section as well, which sets the background color for the account. When using this
part of the editor, I discovered a small bug in the preview window. For some reason, the
preview does not show the back color of the user’s account. Instead, it just displays the
blue gradation bitmap from the default Welcome screen. Don’t worry too much about
this bug, because it is only in the preview screen and will not affect your Welcome
screen when it is in use. Once you change the color, the color change is saved, just not
displayed.
9.
You now know about all of the different parts of the editor and the basics of how to
make a good-looking Welcome screen. Once you are finished, click the Save button (the
two disks) and you are finished. If you want to save and view the Welcome screen at the
same time, click the Logon menu bar item and select Save and Apply.
You now know the ins and outs of creating your own Welcome screen using LogonStudio. I
personally use the method to create and manage my Welcome screens. It is just easier than
using the resource hacker and I can live without the added flexibility that the resource hacker
provides.
LogonStudio also has a feature that allows you to import hacked system file Welcome screens
that you used in the first section on changing the Welcome screen. Although this feature makes
it a little easier to convert the Welcome screen to the new format by extracting the images, usu-
ally the layout and all of the strings are messed up and require adjustment. If you have a lot of
free time, try experimenting with this feature. I have not yet been able to get it to work 100
percent of the time.
Working with the classic logon screen
The classic logon screen, also known as the Windows 2000 style screen, has many benefits over
the new Welcome screen for some users. Users that are concerned about the security of their
system often do not want a list of all of the user’s accounts to be displayed when they turn on
the computer.
WY026-P01[001-038].qxd 23/6/2004 5:16 PM Page 28 Quark09 Quark09:Books:WY026-Sinchak:Chapter:
29
Chapter 1 — Customizing the Look of the Startup
In corporate environments, the classic logon screen provides the capability to log into domains
(Windows network security servers), although the Welcome screen does not have this capabil-
ity. Additionally, some people just do not like change that much and they do not like the new
Welcome screen. Also, if you are a minimalist and like to keep things simple and uncluttered,
you may like the classic logon screen better because it is very simple and only takes up a small
amount of your screen.
This next section is dedicated to showing you how to turn on the classic logon screen as well as
customize it a bit.
Switching to classic logon
The classic logon can always be reached on the Welcome screen by pressing CtrlϩAltϩDelete
two times. If you want to completely get rid of the Welcome screen, doing so is very simple.
Before you disable the Welcome screen, you should also be aware that doing so will disable Fast
User Switching. Fast User Switching gives you the ability to switch between accounts on your
computer without having to log out of one account to log on to another. Most users never use
this feature, so having it disabled will not change anything. Follow these steps to kill the new
Welcome screen:
1.
Click the Start menu and select Run. Then type nusrmgr.cpl in the box and click OK.
This will start up the User Accounts control panel applet.
2.
Once you see the User Accounts app, click Change The Way Users Log On Or Off.
Then, uncheck the box next to Use The Welcome Screen, as shown in Figure 1-16, and
click Apply Options.
3.
Now, you will no longer see the Welcome screen.
If you ever want to use the Welcome screen again, just go back into the User Accounts control
panel applet and check the box for the Use The Welcome Screen.
Now that you have the classic logon screen activated, there are a few things that you can do to
make it look a little better and unique.
Changing the logon screen background color as well as the visual style and color scheme of
the logon screen are all examples of ways you can hack the classic logon screen to make it
unique.
Changing the Logon Background
Ever want to change the background color of the classic logon screen from light blue to some
new color? Windows makes this difficult, because there are no options anywhere in graphical
user interfaces of Windows to change it. However, with the help of the Registry Editor, you
can easily change the color of the logon screen. To get started, follow these steps:
1.
First, you will want to start up the Registry Editor by clicking the Start menu and select-
ing Run. Then type regedit in the box and click OK.
2.
Once the Registry Editor starts up, you will want to expand HKEY_USERS,
.DEFAULT, Control Panel, and then Colors.
WY026-P01[001-038].qxd 23/6/2004 5:16 PM Page 29 Quark09 Quark09:Books:WY026-Sinchak:Chapter:
30
Part I — Customizing Your System
3.
Once you have expanded the Colors key, you will see all of the different default user set-
tings. These are all of the settings that are used on the logon screen. The entry that you
will be interested in is called Background. You will notice that the background entry has
a value that contains three different numbers. Each of these numbers represents a differ-
ent color makeup in the RGB color format. The first number is red, the second is green,
and the third is blue. The numbers can range from 0 to 255. A RGB Value of “255 255
255” is white; “0 0 0” is black. Changing the color is not as simple as replacing the num-
bers with the word red; first you have to convert the color that you want to use to the
correct RGB numbers.
An easy way to convert a color to a RGB number value is to use Microsoft Paint, which can be
found in the Start menu under Accessories. Once you have Paint up and running, double-click one
of the colors in the color palette; this will bring up the Edit Colors window. Next, click the Define
Custom Colors button. This will expand the window and will show you the Red, Green, and Blue
values for any color you select. Click the boxes in the Basic Colors section to see their RGB values
or if you do not see a color you like, use your mouse to click around on the color image to the right
to get a custom color. Once you have found a color you like, just write down the number of Red,
Green, and Blue. These values can be found in the lower-right corner of the screen.
F
IGURE
1-16: Disabling the Welcome screen using the User Accounts Control Panel applet.
WY026-P01[001-038].qxd 23/6/2004 5:16 PM Page 30 Quark09 Quark09:Books:WY026-Sinchak:Chapter:
31
Chapter 1 — Customizing the Look of the Startup
4.
When you have found the color that you want to use as the background and have also
converted it to the Red, Green, and Blue format, you are ready to edit the entry. Right-
click the entry, as shown in Figure 1-17, and select Modify.
5.
In the Edit String box, replace the numbers so that the first number is the number of
red, followed by a space. Then, repeat that format for the other two colors so that your
entry looks something like this entry for orange, “255 128 0”. Click OK when you are
finished to save the change.
Once you change the color, the next time you reboot and the classic logon screen is displayed,
you will see your new background color.
If you ever want to revert your computer back to the default blue color, repeat the steps above
to change the color and set the value of the background entry to “0 78 152”.
Setting a background image for the logon screen
If you do not want to change the color of the screen, perhaps you have an image that you
would like to set as the background to appear behind the logon window. Once again, the only
F
IGURE
1-17: Changing the background color of the logon screen with the system Registry Editor.
WY026-P01[001-038].qxd 23/6/2004 5:16 PM Page 31 Quark09 Quark09:Books:WY026-Sinchak:Chapter:
32
Part I — Customizing Your System
way to set this is to use the Registry Editor to hack the default user settings which are displayed
on the logon screen. To get started, follow these steps:
1.
Click the Start menu and select Run. Then type regedit in the box and click OK. This
will start up the Registry Editor.
2.
Once the Registry Editor has loaded, you will want to expand HKEY_USERS,
.DEFAULT, Control Panel, and the Desktop key. Next, you should see all of the different
entries for desktop properties. The entries that you will be interested in are Wallpaper
and WallpaperStyle.
3.
Right-click the Wallpaper entry and select Modify. Then type in the full path to the
image that you want to use on your computer. Let’s assume that you want to set the nice
grassy hills photo as your background. This file is located at
C:\WINDOWS\Web\
Wallpaper
. The name of the file is bliss.bmp. Therefore, the full path of the image
file is
C:\WINDOWS\Web\Wallpaper\bliss.bmp.
4.
Once you have the path to the file set, you can click the OK button to save the change.
Now you can change the WallpaperStyle entry if you want to change how the wall-
paper will be displayed. You have three different options: 0 ϭ centered, 1 ϭ tiled, 2 ϭ
stretched to full screen. If you want to change the way it is displayed, just right-click the
WallpaperStyle entry and select Modify, then enter the corresponding number value for
the style you want to use. Click OK to save, and you are finished!
Now you have worked with customizing the look of the background, let’s move on to changing
the way the sign-in box looks.
Changing the visual style and color scheme
Changing the visual style and color scheme can greatly increase the visual appeal of the classic
logon screen. Instead of using the default blue Windows XP style on the screen, you can spec-
ify any style that is installed on your computer as well as the different color schemes that some
styles have. This hack works great in combination with setting a background image. You can
create a nice clean look that still looks good without using the Welcome screen.
To get started, you will be using the Registry Editor again. Also, before you can change the
visual style, you should be aware that you will need to apply a patch to your system so that you
can run Visual styles that other people have made for Windows XP. More on this in Chapter 4,
where you will find out where to get Visual styles from and how to install them. Just be aware
that you will not be able to change the visual style of the classic logon window until you have
read Chapter 4. If you attempt to change it now, on an unpatched system, you will run into
problems. However, if you just want to change the color scheme of the default Windows XP
style, then you will have no problems right now at all. Now that I have warned you about the
possible problems you may encounter, let’s get started:
1.
Click the Start menu and select Run. Then type regedit in the box and click OK.
2.
Once the Registry Editor is open, navigate through HKEY_USERS, .DEFAULT,
Software, Microsoft, Windows, CurrentVersion, and ThemeManager. You will now see
all of the theme properties for the logon screen. The two entries that you will be working
WY026-P01[001-038].qxd 23/6/2004 5:16 PM Page 32 Quark09 Quark09:Books:WY026-Sinchak:Chapter:
33
Chapter 1 — Customizing the Look of the Startup
with are ColorName and DllName. ColorName specifies the color scheme of the current
visual style that is specified in the
DllName property.
3.
First, let’s change the color scheme of the default Windows XP style. You have three dif-
ferent choices for the ColorName value: NormalColor (default blue look), Metallic (sil-
ver), Homestead (olive green look). To change this property, just right-click it and select
Modify. Then change the value to the corresponding value for the color scheme you want
to use, such as Homestead, as shown in Figure 1-18. For example, if you want to use the
olive green look on the classic logon screen, you will want to set the ColorName value to
Homestead.
4.
If you want to change the visual style of the classic logon screen, and have already read
Chapter 4 and have patched your computer, then you will want to edit the
DllName prop-
erty. Right-click it and select Modify. Then, type in the path to the visual style you want to
use. The path for the default Windows XP style is
%SystemRoot%\Resources\
themes\Luna\Luna.msstyles
. The %SystemRoot% in the path is just an environ-
ment variable that the system interprets as
C:\Windows or whatever folder where you
F
IGURE
1-18: Modifying the color scheme of the default Windows XP visual style with the Registry
Editor.
WY026-P01[001-038].qxd 23/6/2004 5:16 PM Page 33 Quark09 Quark09:Books:WY026-Sinchak:Chapter:
34
Part I — Customizing Your System
installed XP. Once you have the new path entered that points to the visual style that you
downloaded or made, click OK to save your changes.
5.
When you have changed the visual style, you will also have to update the ColorName
property to reflect the names of the different color schemes within the visual style. By
default, you should set this property to
NormalColor for most Visual styles. Once you
have completed this, you are finished!
Once you reboot or log out, you will see the changes that you made. If you are having display
problems after you install a new visual style, make sure that you have properly patched your
computer. Remember, you have to patch your computer, not just install a program like Style
XP. Refer to Chapter 4 for much more information on Visual styles.
Clearing the last user logged on
Every time a user logs into your computer, their username is stored, and that name is displayed
the next time the classic logon screen is displayed. This can be a nice feature, but it also can be
a feature that causes a security problem. Knowing a user’s username is half the battle of break-
ing into a computer. If you have sensitive information on your computer, I suggest that you
follow these instructions to hide the last user logged on:
1.
Start up the Registry Editor again by clicking the Start menu and selecting Run. Then
type regedit in the box and click OK.
2.
Navigate through HKEY_LOCAL_MACHINE, SOFTWARE, Microsoft, Windows,
CurrentVersion, policies, and system. Locate the DontDisplayLastUserName entry.
3.
Right-click the entry and select Modify. Then type in a 1 to activate the feature, as
shown in Figure 1-19. Click OK, and you are finished.
If you ever want to reverse this hack, just repeat the instructions above and replace the 1 with a
0 for the value of DontDisplayLastUserName.
Global logon/Welcome settings
A few hacks can modify the system logon for users of both the Welcome screen and the classic
logon interface. These features can improve the quality of the screens, turn on different key-
locks, and fine-tune other settings such as the screensaver.
Turn on clear type
Users of flat-panel LCD monitors as well as users of laptops can take advantage of a cool
new feature in Windows XP called ClearType. This new technology is an advanced version
of the font-smoothing technologies that existed in previous Windows versions. When this
new font-smoothing technology is turned on, the entire screen will look significantly
better.
Normally, this feature is only available after a user logs into the computer, but with the help of
a cool registry hack, you can enable this feature to start up before a user logs in. Follow these
steps to get started:
WY026-P01[001-038].qxd 23/6/2004 5:16 PM Page 34 Quark09 Quark09:Books:WY026-Sinchak:Chapter:
35
Chapter 1 — Customizing the Look of the Startup
1.
Start up the Registry Editor by clicking the Start menu and selecting Run. Then type
regedit in the box and click OK.
2.
Once Registry Editor starts up, navigate through HKEY_USERS, .DEFAULT, Control
Panel, and Desktop.
3.
Locate the ForegroundFlashCount entry and right-click it and select Modify. There are
three different options for the value of this property. 0 indicates that font smoothing will
be disabled, 1 indicates to use standard font smoothing, and 2 indicates to use ClearType
font smoothing.
4.
Replace the value of the property with 2 to enable ClearType and then click OK to save
the change.
That’s it—you are finished. You will notice that your logon screen is now much smoother than
before. Some users do not like this new smooth look, so if you are one of those that miss the
extra-crispy look, repeat the preceding instructions but replace the 2 with a 1 to set it back to
the default settings.
F
IGURE
1-19: Making the computer clear the last user that logged on using the Registry Editor editing
the DontDisplayLastUserName entry.
WY026-P01[001-038].qxd 23/6/2004 5:16 PM Page 35 Quark09 Quark09:Books:WY026-Sinchak:Chapter:
36
Part I — Customizing Your System
Users of CRT monitors (the once-standard cathode ray tube-based monitors) can attempt to
use this tweak, but ClearType was designed especially for LCD monitors, so if you are using a
CRT monitor, you will not see much improvement, if any. But it doesn’t hurt to try!
Working with the screensaver
If you do not sign on to your computer after a specific amount of time, it will turn on the
screensaver. Changing the screensaver and modifying its settings is not as easy as changing the
screensaver that is displayed when you are already logged on. You can not change the screen-
saver of the Logon/Welcome screen from within Display properties as you would normally
change a screensaver. The only way to edit these settings is through registry hacks. Follow
these steps to change the screensaver as well as the inactivity time before the screensaver is
activated:
1.
First, you will need to start up the Registry Editor. Click the Start button and select
Run. Then type regedit in the box and click OK.
2.
Once the Registry Editor starts up, navigate through HKEY_USERS, .DEFAULT,
Control Panel, and Desktop.
3.
First, change the amount of time the system waits after the last activity detected before
starting the screensaver. To do this, right-click the ScreenSaveTimeOut entry and select
Modify. The amount of time to wait is stored in seconds. By default, the system will wait
600 seconds (10 minutes) before starting up the screensaver. If you want to change this
value to something shorter, such as 1 minute, then just enter in a new value, which for
one minute would be 60. Next, click OK to save your changes.
4.
Next, change the screensaver that is displayed. By default, the boring flat Windows XP
logo screensaver is displayed. Try something a little more exciting, such as the 3D flying
Windows logo. To change the screensaver that is displayed, you will want to modify
the
SCRNSAVE.EXE entry. Right-click this entry and select Modify. You will want to
change the value of logon.scr to reflect the name of the file for the screensaver that you
want to use that is located in the
C:\Windows\System32 directory. Because I did not
know the name of the file for the 3D Windows XP screensaver, I had to do a search for
all of the files on my computer that had a
.scr extension by using the search feature in
the Start menu and searching for
*.scr, as shown in Figure 1-20. The name of the .scr
files are usually very descriptive, so you will have no problem finding the right file. If for
some reason you do, just double-click each file to launch a preview of the screensaver.
After the search, I identified that the file for the 3D Windows screensaver was named
3D Windows XP.scr. One you have the name of the screensaver that you want to use,
just replace
logon.scr from the value window with the name of the file you want to
use, such as
3D Windows XP.scr.
5.
Click OK to save your changes, and the next time that your computer boots up, your
new screensaver will be shown.
You can also use other screensavers that you have downloaded from the Internet. If the
.scr
file for the screensaver is not located in the Windows or Windows\System32 directory, you
will have to enter in the whole path to the screensaver file instead of just the name.
WY026-P01[001-038].qxd 23/6/2004 5:16 PM Page 36 Quark09 Quark09:Books:WY026-Sinchak:Chapter:
37
Chapter 1 — Customizing the Look of the Startup
Enable Num Lock to be turned on by default
If you have a password that has both numbers and letters and you frequently use the number
pad to enter in part of your password, this hack is for you. I cannot count the number of times
that I started to type in my password and then was faced with a logon error screen telling me
that my password was not correct. I would sit there staring at the screen for a second before I
realized that my Num Lock on my keyboard was not on.
This is a great hack for every desktop computer with a full-size keyboard with a separate num-
ber pad. Turning on the Num Lock by default on a laptop may not be a very good idea, because
usually most laptops do not have a separate number pad. Enabling this feature on a laptop will
result in almost half of your keyboard to function as the number pad and you would just be
much better off using the numbers above the letters.
1.
Start up Registry Editor by clicking the Start menu and selecting Run. Then type
regedit in the text box and click OK.
2.
Once Registry Editor loads, navigate through HKEY_USERS, .DEFAULT, Control
Panel, and Keyboard.
F
IGURE
1-20: Using the search feature of Windows XP to find the filenames of the installed screensavers.
WY026-P01[001-038].qxd 23/6/2004 5:16 PM Page 37 Quark09 Quark09:Books:WY026-Sinchak:Chapter:
38
Part I — Customizing Your System
3.
Next, locate the InitialKeyboardIndicators entry, right-click it, and select Modify. You
can enter various codes into this property, but all of them except for the code for Num
Lock are pointless. For example, would you want your computer to start up caps-lock,
which is code 1? Of course not. To enable Num Lock, you will want to enter 2 into the
box.
4.
Then click OK to save the changes, and that’s it!
If you are on a laptop and you attempted to enable Num Lock even though I told you not to
and need to fix your system, repeat the above directions but replace the value of
InitialKeyboardIndicators to 0 to disable the feature.
Summary
This first chapter can be thought of as the first step in the complete customization of every
aspect of your Windows XP. It started from the very beginning with the boot screen and
worked through the different logon methods and how to customize each one. Then, it showed
you how to make your computer even better by using a few nifty features to make it look and
act great.
The next chapter will pick up on the next part of customizing your computer. First, you will
learn all about customizing the new Windows XP Start panel. This chapter will show you how
to get the most out of this new feature. Then, it will show you how you can revert to the old
Start menu style and customize that as well.
After you have customized the heck out of your Start menu, you will be shown many cool ways
to customize and improve the taskbar. Changing the makeup of the taskbar and the text of the
Start button are a few sample topics from this section.
WY026-P01[001-038].qxd 23/6/2004 5:16 PM Page 38 Quark09 Quark09:Books:WY026-Sinchak:Chapter:
Customizing User
Navigation
C
ustomizing user navigation is the next stop on the Windows XP cus-
tomizing road trip. In the last chapter, with the help of some cool
hacks, you were able to change and improve the boot and logon
screens. This chapter will pick up where Chapter 1 left off and will show
you how to customize and improve the visual navigation elements of
Windows XP.
This chapter starts off with customizing the look and contents of the cool
new Start panel. This new screen can show a lot more than just your
recently run programs. If you do not like the new Start panel, you can find
out how to get the old classic Start Menu back. Then, you will learn some
cool hacks to improve and customize the classic Start Menu. You cannot
customize the Start panel and then leave out customizing the program list-
ings. I will show you some cool hacks that will customize this as well.
To finish this chapter up, you’ll learn how to customize the taskbar on the
bottom of your screen. The taskbar is a very essential part of navigating your
computer. I will show you how to customize and improve its features and
will give you some new ideas on how you can use it that may dramatically
improve your experiences with Windows XP.
Customizing the Start Panel
The Start panel is what I call the new replacement for the traditional Start
Menu that we are all familiar with from using previous versions of
Windows. I call this the Start panel because it is not just a menu anymore. It
is now a collection of various links and features all thrown onto one panel
that pops up. It offers many new features, such as a dynamic list that places
your most frequently run programs on the panel so that you can easily
access them without having to navigate throughout the entire program list-
ings. Additionally, the Start panel has replaced all of the icons on the desk-
top except for the Recycle Bin so that your desktop will look much cleaner
and uncluttered.
Different tools and hacks are available that will allow you to customize the
Start panel. Almost everything on it is customizable. You can add and remove
items that are displayed, and you can even change the way it looks. With
Customizing the
Start Panel
Customizing the
Start Menu
Customizing the
Program List
Customizing the
Task Bar
chapter
in this chapter
WY026-P02[039-072].qxd 23/6/2004 5:18 PM Page 39 Quark09 Quark09:Books:WY026-Sinchak:Chapter:
40
Part I — Customizing Your System
the many different options available, you can customize the way that different parts of the panel
works. For example, you can change the number of frequently run programs that are displayed.
When you have finished reading these next few sections, you will have transformed your Start
panel into something that is even more useful for your everyday tasks.
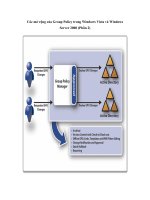
Using Group Policy Editor to customize the Start panel
The Group Policy Editor is a great tool that makes customizing the Start panel a snap. It is a
very powerful tool that was not originally designed to be a tool that can customize but a tool
for workplace management. Group policies were originally designed so that administrators can
limit what a user can do on their computer. Let’s say you are responsible for hundreds of
Windows machines at work. Most likely, you will want to limit what users can do on their
computers so that they don’t accidentally install a harmful program or change a system setting
that renders their computer useless. Group policies make it possible to limit a user’s access to
critical areas of the operating system.
The most common use of the Group Policy Editor is to edit policy information on a domain
controller. The domain controller can be thought of as a computer on a corporate network that
is in charge of security. It is like a database of usernames, passwords, and configuration infor-
mation. The Group Policy Editor is used by administrators to modify the user configuration
data. The next time a user logs onto their computer, new policy information is downloaded and
applied. Now the user is limited in what they can do on their computer.
Although the Group Policy Editor is primarily used for computer management in a business, it
can also be used to customize an individual computer running Windows XP Professional.
Because Microsoft wanted to support both small and large businesses, they have included a
copy of the Group Policy Editor with every copy of Windows XP Professional. With that
inclusion, even if a company was not large enough to have a domain controller, they could still
limit and fine-tune a user’s experience. Unfortunately, Windows XP Home does not come with
a copy of the Group Policy Editor. This exclusion was not by accident. Microsoft chose not to
include a copy of this utility with XP Home because the Group Policy Editor was designed to
be a business utility. And, well, XP Home is meant for use in the home.
Think you can get the Group Policy Editor to work by copying over the program file to a com-
puter running Windows XP Home? Sorry, but I tried doing so, and the program would not start.
So, the discussion in this section will only apply to those working with Windows XP Professional.
If you are running XP Home, you will not be missing out on too much; the next section about
adding and removing the different navigation icons will be compatible with your version.
Now that you know all about the Group Policy Editor, it is time to learn how you can use it to
customize the Start panel. The Editor will enable you to enable and disable various different
features. First, you’re going to find out how to get the Editor up and running. Then, you can
check out a list of all of the relevant features you can use to customize the Start panel.
To begin customizing, follow these steps:
1.
Click the Start Menu and select Run. Then type gpedit.msc into the box and click OK.
This will start up the Group Policy Editor. If you get an error, make sure that you have
typed the name of the file correctly and that you are running Windows XP Pro.
WY026-P02[039-072].qxd 23/6/2004 5:18 PM Page 40 Quark09 Quark09:Books:WY026-Sinchak:Chapter: