Hacking Windows XP 2004 phần 3 ppsx
Bạn đang xem bản rút gọn của tài liệu. Xem và tải ngay bản đầy đủ của tài liệu tại đây (1.21 MB, 38 trang )
54
Part I — Customizing Your System
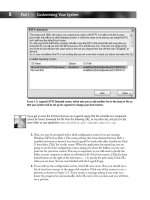
A registry import file can be found to automate the preceding process in the Chapter 2 folder of the
companion CD-ROM, called website_link.reg. Just right-click the registry file and select import
to automatically merge the file with your registry. If you do not like the effect, I have created an easy
undo file that will remove the link in your Start panel, called remove_website_link.reg.
Also, as I mentioned before, if you own a Web site, creating a Start panel button would be a cool
feature to give your visitors. You can create a registry file of your registry that you can distribute
to other users. Then, all they have to do is double-click the file and click Yes on the import
screen. To make a registry file, just select the {2559a1f6-21d7-11d4-bdaf-00c04f60b9f0} folder
and right-click it. Then select Export from the menu and save the file. The file should only be a
few bytes, so it will be easy to distribute the file on the Web. Keep in mind that this registry file
will only work on Windows XP machines, so be sure to relay that information to visitors of your
Web site if you choose to offer your registry file up for download.
Customizing the Classic Start Menu
The classic Start Menu, also known as the Windows 2000/98 style, has its advantages and also
its share of downfalls. It provides a clean and small interface to your programs but does not
offer nearly as much access to your computer as the new Start panel does. Some users like the
old Start Menu and dislike the big bulky Start panel. If you are one of those users, these next
few sections are for you.
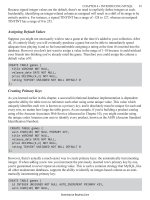
Turning the classic Start Menu back on
Don’t like the new Start Menu? The new Start panel can be overwhelming for some users and
is just not as clean looking as the old Start Menu. Getting the old Start Menu back is actually
very simple. There must have been mixed emotions within the Windows XP team about the
new Start Menu because they still included the classic Start Menu and made it so easy to
change. To get started, just follow these steps:
1.
Right-click the Start button and select Properties.
2.
Then select Classic Start Menu as shown in Figure 2-8 and click OK.
Now that you have the classic Start Menu back, you can begin customizing the way it looks
and what it includes.
Customizing the classic Start Menu
Just as it is possible to customize the new Start panel, it is possible to make changes to the
classic Start Menu to make it look the way you want. Not as many things can be done to
customize the classic Start Menu as can be done to customize the Start panel, but still a hand-
ful of features can be customized.
To get started, assume that you want to display your expanding Internet Explorer Favorites
menu directly on your Start Menu. I will walk you through how to turn this feature on or off
and will then provide you with more information on all of the different features that are avail-
able on the same screen. Follow these steps to start customizing:
WY026-P02[039-072].qxd 23/6/2004 5:18 PM Page 54 Quark09 Quark09:Books:WY026-Sinchak:Chapter:
55
Chapter 2 — Customizing User Navigation
1.
Use your mouse to right-click the Start Menu and select Properties. This will bring up
the Taskbar and Start Menu Properties screen.
2.
Click the lower Customize button to bring up the Customize Classic Start Menu
properties.
3.
Now you will see a list of all of the different features available in the Advanced Start
Menu options box. You can scroll through this box to view all of the different features.
Locate the Display Favorites option and check it to enable it.
4.
Click the OK button to save your changes.
5.
Click the OK button once more to exit the Properties window.
That’s it. As you can see, customizing the Start Menu is very easy. If you want to disable a fea-
ture, just uncheck it.
Table 2-3 gives a list of all of the different features and a description of what they can do.
Customizing the Start Menu/Panel Program Listings
Now that you have selected what you want your Start Menu to display as well as customized it
to suit your needs, you are ready to move on to customizing the way the programs are listed.
There are a variety of features that will impact the way the programs are listed on the screen.
F
IGURE
2-8: Turning on the classic Start Menu.
WY026-P02[039-072].qxd 23/6/2004 5:18 PM Page 55 Quark09 Quark09:Books:WY026-Sinchak:Chapter:
56
Part I — Customizing Your System
Table 2-3 Customizable Features of the Start Menu
Feature Name Description
Display Administrative Tools The administrative tools provide users with even more control
over their system. I suggest that you enable this feature by
checking the box so that you will be able to take advantage of
the easy access to your system controls
Display Favorites The favorites can be useful depending on how often you use
them in Internet Explorer. If you are like me, and do not use
your favorites very often, then consider leaving this one off. If
you would like to add your favorites to your Start Menu, then
this will place an expanding menu that will display all of your
links
Display Run This feature will display the Run command on the Start Menu. I
do not recommend that you remove this from the Start Menu
because it is used throughout this book in almost every chapter
to start up hidden programs
Expand Control Panel I like this feature the most out of all of the features that you can
customize. Enabling this feature will make the Control Panel
automatically expand and show you each of the Control Panel
applets. This way, you can get almost anywhere in your computer
controls easily without even having to load the Control Panel first.
You can jump directly to where you want to go instead
Expand My Documents I personally do not use this feature because I have way too many
documents in the My Documents folder. Trying to find the correct
document is a waste of time when you have to scroll through the
list. It is must faster to leave this one alone and then just browse
through the icons when you open up your documents
Expand My Pictures As I mentioned before when I covered this option as a feature
on the Start panel, this feature is pretty much useless when you
have more than a few photos. Because most pictures that you
take are saved in a numbered fashion, it is very hard to find a
particular photo. Instead, don’t enable this one so that it
remains just a link. That way, you will be able to take advantage
of the new filmstrip view when browsing your photos
Expand Network Connections I recommend that you enable this feature because it will allow
you to easily access and connect to your various communications
devices. If you use a dialup connection, your dialup connection
will be displayed and you can connect by right-clicking the name
and selecting Connect. If you have a network adapter, you can
access your network properties and status easily from this menu
as well
WY026-P02[039-072].qxd 23/6/2004 5:18 PM Page 56 Quark09 Quark09:Books:WY026-Sinchak:Chapter:
57
Chapter 2 — Customizing User Navigation
These next few sections will help you get rid of some of the new annoying features, such as the
personalized menus and the scrolling program listings.
There are basically two slightly different program listing methods. When you are using the
new Start panel, the programs listing is slightly different in the way it looks and acts when
compared to the classic Start Menu listing. Follow the corresponding sections below for the
menu option that you are running.
Feature Name Description
Expand Printers Have a lot of printers installed on your computer? Or, do you
use a lot of network printers? This is an easy way to access all
of the different printers that you use. You can view the print
queue as well as delete jobs for a specific printer
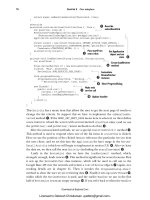
Show Small Icons in Start Menu This is my favorite feature on the list. This basically shrinks your
whole Start Menu by removing the Windows XP banner from
the left and replacing the large icons with small icons. This
allows the Start Menu to take up far less space than before.
Take a look at Figure 2-9 for a comparison between when this
feature is on and off
F
IGURE
2-9: Comparison between the normal and small Start Menu, with the Show Small Icons setting
enabled.
WY026-P02[039-072].qxd 23/6/2004 5:18 PM Page 57 Quark09 Quark09:Books:WY026-Sinchak:Chapter:
58
Part I — Customizing Your System
Changing program listing display options for
users of the Start panel
As I mentioned earlier, the Start panel All Programs listing works a little differently than its
classic counterpart. The new program listing has some features that the classic version does not
and that is why it is necessary to have two different sections. In the following sections, you will
find two very common topics that users are interested in changing.
Disabling new program highlights
One of the features I thought was a great idea when I first started to use Windows XP was the
program highlight feature. This feature will automatically highlight any new programs that you
install so that you can easily find them on the Start Menu the first few times that you want to
run the application. After I started to use XP for a few months, I noticed that this feature did
not always work correctly. Some programs that I install never get highlighted, although others
seem to be highlighted for weeks after I have installed them.
After a while, I decided that I had enough of this highlighting, so I decided to turn the feature
off. Thankfully, Microsoft has made turning off this feature fairly simple. Just follow these steps
to get rid of those annoying highlights:
1.
Right-click the Start button and select Properties.
2.
Click the top Customize button for the Start panel.
3.
Click the Advanced tab.
4.
Uncheck Highlight Newly Installed Programs, as shown in Figure 2-10.
5.
Click OK to save your changes.
6.
Click OK once more to close the Properties window.
Now you will not have to worry about the programs that sometimes seem to be highlighted
randomly.
Fun with the Scroll Programs feature
Some people love the program scroll feature, and others hate it. Personally, I don’t like this fea-
ture that much. I like to see all of my programs installed on my screen at once instead of having
to move the mouse to the bottom of the list and clicking the down arrow or waiting for the list
to move up automatically when the feature is enabled.
If you do not like having your menus take up a lot of space on your screen, enabling the scroll
programs feature will cut your programs list down in size dramatically if you have a lot of
programs installed.
Some computer manufacturers ship their machines with this feature automatically enabled;
other don’t have it enabled. So if this feature sounds interesting to you, feel free to try it out by
following these steps. If you hate this feature, then follow these steps to remove it:
WY026-P02[039-072].qxd 23/6/2004 5:18 PM Page 58 Quark09 Quark09:Books:WY026-Sinchak:Chapter:
59
Chapter 2 — Customizing User Navigation
1.
Right-click the Start button and select Properties.
2.
Click the top Customize button for the Start panel settings.
3.
Next, click the Advanced tab.
4.
Locate the Start Menu items scroll box in the middle of the window and scroll down all
the way to the bottom until you locate the Scroll Programs entry.
5.
Check the box to enable; uncheck to disable.
6.
Click OK to save your changes.
7.
Click OK once more to exit the Start Menu settings.
Now you will have full control over your scrolling program list.
Changing program listing display options for users
of the classic Start Menu
The classic Start Menu has some of the features that were in older versions of the Windows
operating system, such as the personalized menus feature. This feature can be more of an
annoyance than a convenience, so I have dedicated a whole section to it. Also, you will learn
F
IGURE
2-10: Customize Start Menu window showing how to turn off program highlights.
WY026-P02[039-072].qxd 23/6/2004 5:18 PM Page 59 Quark09 Quark09:Books:WY026-Sinchak:Chapter:
60
Part I — Customizing Your System
how to manage the scroll programs feature for the classic menu users because it is slightly dif-
ferent than for users of the Start panel. Before you get started, make sure that you have the
classic Start Menu enabled in order to use the following hacks.
Disabling personalized menus
Personalized menus is a feature in Windows that has been around for a little while. It uses your
program run history to hide all of the other programs in your Start Menu program listing that
you don’t use or don’t use often. After a user has used his computer for a short while, Windows
will hide all of the programs that the user does not run so that he can find his most frequently
run programs more easily.
Personalized menus sound like a great feature, but really think about it. Why would you have
programs in your Start Menu that you don’t use? If there is a program that is installed and
never used on my computer, I uninstall it. You don’t need to be wasting your storage space with
useless programs.
Additionally, I have had experience with some beginning computer users complaining that
Windows deleted all of their programs because they are no longer showing up in the Start
Menu programs listing. Well as you probably know, they are still listed; the user just didn’t real-
ize that if they click the down arrow, it will expand the Start Menu back to its original size so
they can view all the programs.
When considering all of these issues with personalized menus, I can’t see why you would want
to have this feature enabled. Follow these steps to take back your computer:
1.
Right-click the Start Menu and select Properties.
2.
Click the bottom Customize button to bring up the Customize Classic Start Menu
window.
3.
Locate the Advanced Start Menu options box, and scroll down all the way to the
bottom.
4.
You should now be able to see the Use Personalized Menus setting. Just uncheck the box
to disable the feature.
5.
Click OK to save your changes.
6.
Click OK once more to close the Taskbar and Start Menu Properties window.
Now you will no longer have to deal with your programs disappearing. I highly recommend
that you disable this feature on any beginner computer user’s computer as well, to save yourself
a headache explaining to them that Windows didn’t really delete everything.
Working with the scroll programs feature
The scroll feature works the exact same as when it is enabled for users of the new Start panel.
Instead of showing all the programs on your list on-screen at once, it will show only one col-
umn of programs that you will be able to scroll through.
WY026-P02[039-072].qxd 23/6/2004 5:18 PM Page 60 Quark09 Quark09:Books:WY026-Sinchak:Chapter:
61
Chapter 2 — Customizing User Navigation
Some computer manufacturers ship their systems with this feature enabled, although some
have it disabled. Follow these steps to modify this feature for your computer:
1.
Right-click the Start button and select Properties.
2.
Click the Customize button at the bottom.
3.
Then locate the Advanced Start Menu Options box and scroll all the way to the bottom
again.
4.
Locate the Scroll Programs feature and check it to enable; uncheck it to disable.
5.
Click OK to save your changes.
6.
And click OK once more to close the Properties window.
Now your program scrolling is under your control.
Removing pop-up Help for users of both the Start
panel and Menu
Ever notice that when you hover your mouse over a program listing in the Start Menu, a little
yellow Help box will pop up? This Help feature is called balloon help. If a user does not know
what a program does, she can hold the mouse over the program for a second or so and a little
message will fade in telling her what it is, if the programmer has set up this feature of the user’s
program. For other programs that do not have this feature set up in their shortcut, it will just
tell the user where the program is located on her computer.
This feature can be very useful for a beginning computer user. Sometimes the pop-up Help can
become an annoyance and just blocks your screen. If you do not need this feature, why not dis-
able it? Follow these steps to get rid of this feature:
1.
Click the Start Menu and select Run and then type regedit in the box and click OK.
2.
Once the Registry Editor is loaded, navigate though HKEY_CURRENT_USER,
Software, Microsoft, Windows, CurrentVersion, Explorer, and Advanced.
3.
Right-click the entry called ShowInfoTip and select Modify.
4.
Set the value equal to 0 to disable this feature, and click OK.
5.
Close the Registry Editor and log off and back so the feature can be removed.
You are now finished with the last section on customizing the Start Menu and program listing.
Now on to customizing the taskbar.
A registry file can be found in the Chapter 2 folder on the companion CD-ROM that will allow
you to easily undo the pop-up Help hack. It is called restore_popup_help.reg.
WY026-P02[039-072].qxd 23/6/2004 5:18 PM Page 61 Quark09 Quark09:Books:WY026-Sinchak:Chapter:
62
Part I — Customizing Your System
Customizing the Taskbar
The Windows XP taskbar has many new features, such as the ability to group programs and
the new system tray that automatically hides icons that are not active. On top of these new fea-
tures, there were enhancements such as new animations and graphical refinements that make
the taskbar look so much better.
The taskbar normally is used to switch between active programs and provides some system
information, such as the current time and other system events in the system try. Now it can be
used for so much more, as you will see in the next few sections.
Using and adjusting program grouping
The program grouping feature can be very useful, or it can be an annoyance. When you have
more than just a few programs open, the taskbar can become cluttered. To fight this, as the
taskbar fills up, programs that have more than one window open are grouped together. If you
have a bunch of Internet Explorer windows open, they will all be grouped together into one
entry on the taskbar. Then, if you want to switch between them or close one, you have to select
the entry on the taskbar and a new menu will pop up showing you all of the different windows
open for the specific application.
One great feature of grouping is it gives you the ability to close several windows at once. When
all of the Internet Explorer windows are grouped together, you can just right-click the entry on
the taskbar and select Close Group. Doing so will automatically close all of the browser win-
dows at once.
The downside to this is it takes an extra step to navigate through the grouped program items.
Some people do not like this option very much and would rather have a taskbar that is more
cluttered, because they will be able to switch between programs faster.
You can do a number of different things to customize this feature. Using a program called
Tweak UI, which is a PowerToy released by Microsoft for Windows XP, you can easily change
the behavior of how programs are grouped. But first, I am going to show you how to enable
program grouping, if it is not set up on your computer. You’ll also find out how to disable it, if
you do not like it. Follow these steps to enable/disable program grouping:
1.
Right-click a blank part of the taskbar and select Properties.
2.
This will bring up the Taskbar and Start Menu Properties window that you used previ-
ously. This time, you are going to be concerned with what is on the Taskbar tab. Locate
the Group Similar Taskbar Buttons item in the taskbar appearance section.
3.
Check the box to enable this feature and uncheck to disable.
4.
Click OK to save your changes.
Now that you have the feature turned on, you are ready to use Tweak UI to customize the way
it behaves. First, download a copy of Tweak UI from Microsoft’s PowerToys Web site, located
at
www.microsoft.com/windowsxp/pro/downloads/powertoys.asp. Make sure
WY026-P02[039-072].qxd 23/6/2004 5:18 PM Page 62 Quark09 Quark09:Books:WY026-Sinchak:Chapter:
63
Chapter 2 — Customizing User Navigation
that you download the normal version of Tweak UI and not the version for Itanium-based sys-
tems unless you have a 64-bit system. When you have Tweak UI installed, follow these steps:
1.
Launch Tweak UI by clicking the Start button, selecting All Programs, and then
PowerToys for Windows XP.
2.
When Tweak UI is started, expand Taskbar and Start Menu and select Grouping.
3.
You will be shown three different options that determine the behavior of the grouping
feature. Group Least Used Applications First will group the applications that are the
oldest on the taskbar and have more than one window open. Group Applications With
The Most Windows First will just group programs that have the most windows open
when the taskbar starts to become cluttered. Group Any Application With At Least X
Windows is the setting that gives you the most control over grouping. Select this behav-
ior and then enter the number of windows an application must have open before they are
grouped. I personally prefer this feature and set it to a value of 4 so that when I have a lot
of Internet Explorer windows open, I can still switch between them quickly when I have
a few open, but it groups them when I have a lot open so my taskbar is not all cluttered.
4.
Once you have selected the behavior you prefer, click the OK button on the bottom of
the window to save your changes.
Once you log off and back on or reboot, your changes will be active.
Quick Launching your programs
The Quick Launch bar is a great way to start up your programs. You can completely bypass the
Start Menu and launch your programs with just one click. By default, the Quick Launch bar is
not enabled. This section will show you how you can enable the Quick Launch bar and how
you can make it very useful. First, enable the Quick Launch bar and then customize it by doing
the following:
1.
Right-click an open space on your taskbar and expand Toolbars and then select Quick
Launch. This will make the Quick Launch bar appear.
2.
By default, there are three icons on it: Internet Explorer, Show Desktop, and Windows
Media Player. You can easily add more icons to the Quick Launch bar by just dragging
them onto the toolbar. You can even specify where you want the icon to be placed by
dragging the icon between two icons. The best way to add programs to your Quick
Launch bar is to browse through your Start Menu and drag icons to the bar while hold-
ing down the Alt key. Holding down the Alt key will ensure that you create a copy of the
shortcut in the Start Menu to be placed on the Quick Launch bar. Otherwise, when you
drag a shortcut from the Start Menu, it will be removed from the Start Menu and placed
only on the Quick Launch toolbar. I like to add my drives from My Computer to my
Quick Launch bar as well for easy access. Just open up My Computer and drag them on
down to the toolbar.
3.
Once you have all of the icons set up on your Quick Launch bar, have some fun changing
the position of the bar. To do this, you will have to unlock your taskbar. Right-click an
WY026-P02[039-072].qxd 23/6/2004 5:18 PM Page 63 Quark09 Quark09:Books:WY026-Sinchak:Chapter:
64
Part I — Customizing Your System
open part of the taskbar and select Lock the Taskbar only if there is already a check next
to it, as shown in Figure 2-11. If there is not a check, then your taskbar is not locked and
you are ready to proceed.
Now that you made sure that the taskbar is not locked, you are ready to move the bar
around. Let’s expand the taskbar up so that you can have one row of Quick Launch icons
and then your open programs will be listed below. You can do this by placing and hold-
ing down the left mouse button on top of the taskbar, as shown in Figure 2-12, and
moving the mouse up, while still holding the button down on the mouse, until the
taskbar expands upward.
Once the taskbar moves up one notch, you can move the Quick Launch bar up. You can
do this by grabbing the left side of the menu on the dotted vertical line with the mouse
and moving the mouse up while holding down the left mouse button. When you are fin-
ished, your taskbar should look like what’s shown in Figure 2-13. Notice that when you
have expanded your taskbar up one notch, the system clock expands to show the date as
well as the day.
4.
When you have the taskbar unlocked, you can easily change the size of the icons that are
placed on the Quick Launch bar.This can be done by right-clicking somewhere on the
bar that is taken up by an icon, and selecting View. You will then see two choices: large
and small icons. By default, the Small Icons are shown. The Large Icons look pretty cool
because they make your taskbar look very different. I suggest you play around with this
feature and get your icons looking the way you like them best.
5.
Once you are finished making all of your changes to the taskbar, I suggest that you lock
it again so that you won’t accidentally move things around the taskbar.
Now you have customized your Quick Launch bar and have greatly improved your navigation
by creating your own list of programs. This will speed up the amount of time it takes to start up
any program.
Hacking the Start button to replace the Start text
One of my favorite hacks for Windows XP is the Start button hack. It is possible to use
resource editing tools such as Resource Hacker as well as a bunch of other adjustments to
F
IGURE
2-11: Taskbar properties, showing the taskbar locked.
WY026-P02[039-072].qxd 23/6/2004 5:18 PM Page 64 Quark09 Quark09:Books:WY026-Sinchak:Chapter:
65
Chapter 2 — Customizing User Navigation
replace the Start text to anything that you want. I changed my Start Menu button on Hacking
Windows XP, as shown in Figure 2-14.
You can edit the text on the Start button in a number of different ways. The most popular
method is to use a hex editor. First, open up the Windows Explorer file and edit the string (a
string is computer lingo for text), if you can find it in the file. Then, you will have to make
some changes to the system file protection to allow you to run a hacked version of Explorer.
After you have made those changes, you have to boot into Safe mode and swap the Explorer
F
IGURE
2-13: What the taskbar can look like when you have finished moving it to the Quick Launch
bar, adjusted the taskbar size, and added more programs to your Quick Launch bar.
F
IGURE
2-12: Expanding the taskbar by placing the mouse on top of the taskbar and moving the mouse
up when the left button is held down.
WY026-P02[039-072].qxd 23/6/2004 5:18 PM Page 65 Quark09 Quark09:Books:WY026-Sinchak:Chapter:
66
Part I — Customizing Your System
file with the version that you hacked. Additionally, with that method, you are limited to only
five characters on the Start Menu button.
That method is just too complicated and has a lot of unnecessary steps. After experimenting
with several different ideas that I came up with, I discovered an even better way to change the
Start button text. Using my method, you will not have to mess with the system file protection
at all, boot into Safe mode, or even be limited to five characters on the Start button. Sound
good? Okay, let’s get started:
1.
First, you will need to start up the Resource Hacker that you used in Chapter 1. If you
no longer have a copy of Resource Hacker, you can download another copy from
www.users.on.net/johnson/resourcehacker. Once you have Resource
Hacker started up, go to the next step.
2.
You are going to want to open up the Windows Explorer main file, called explorer.exe.
This file is stored in the C:\Windows directory. To open the file up, click the file menu
bar item and select Open, then just navigate over to the Windows directory and select
explorer.exe.
3.
When explorer.exe is loaded, you should see a bunch of folders on the left side of the
screen. Expand the String Table folder and then expand the 37 folder and select 1033.
4.
You will not see a bunch of text on the right side of the screen. Locate where it says
Start, and replace it with the text that you want to use. I am going to replace it with
“Hacking Windows XP.” Make sure that you only enter your text between the quotes;
see Figure 2-14 for more clarification.
5.
Next, you will have to click the Compile Script button, as shown in Figure 2-15.
6.
Now, you have to save the file that you just edited and recompiled. Click the File menu
bar item again and this time select Save As. Then save the file with a name other than
explorer.exe. I suggest you call it “ExplorerHacked.exe.” Make sure that you add the
.exe to the end of the file name or else it will not work.
7.
You are now finished hacking the Explorer file. You can close the Resource Hacker. Now
you just have to tell Windows to use your new Explorer file the next time you log in.To
do this, click the Start button and select Run.
8.
Type regedit in the box and click OK.
9.
Next, when the Registry Editor is loaded, expand HKEY_LOCAL_MACHINE,
SOFTWARE, Microsoft, Windows NT, CurrentVersion, and Winlogon.
10.
Inside the WinLogon folder, you will want to look for the Shell entry. Right-click it and
select Modify, as shown in Figure 2-16.
F
IGURE
2-14: The Start button text changed.
WY026-P02[039-072].qxd 23/6/2004 5:18 PM Page 66 Quark09 Quark09:Books:WY026-Sinchak:Chapter:
67
Chapter 2 — Customizing User Navigation
12.
Type in the name of the file that you saved in Step 6. I used “ExplorerHacked.exe,” so
that is what I will replace all of the text with.
13.
When you are finished, click OK to save your changes. You may now close the Registry
Editor because you are finished with the hack.
Just log off and log back on or restart to see the new changes in effect. If you did not edit the
registry correctly, such as specifying the exact correct file as the value for shell, you will not be
able to use your computer properly because Explorer will not load. If that is the case, after you
log on, eventually you will be shown just your background image. You will need to start up
Explorer manually by pressing CtrlϩAltϩDelete to bring up the Task Manager. Once the Task
Manager is displayed, click the New Task button on the Applications tab and type in regedit.
This will launch the Registry Editor again so that you can edit the shell entry again. Go back
through Step 9 to get back to the shell entry. Make sure that you type in the full correct file
name with the extension as the value. If you want to revert to the original Windows Explorer
with Start as the text on the Start button, just change this value back to explorer.exe. Then just
log off your computer by using the shutdown menu bar item in the Task Manager and you will
be back to normal when you log back on.
F
IGURE
2-15: Using Resource Hacker to recompile explorer.exe to rename the Start Menu button.
WY026-P02[039-072].qxd 23/6/2004 5:18 PM Page 67 Quark09 Quark09:Books:WY026-Sinchak:Chapter:
68
Part I — Customizing Your System
Modifying the taskbar location
You always see the taskbar appear on the bottom of your screen. That does not always have to
be the case. It is possible to move the taskbar to every side of the screen. This allows you to
really change the look of Windows XP. Figure 2-17 shows what your screen could look like if
you moved your taskbar to the left side of the screen.
Moving the taskbar is very simple. There are just three basic steps:
1.
You will want to unlock the taskbar if it is already locked. Right-click an open part of the
taskbar and select Lock the Taskbar, if there is a check next to the entry.
2.
Click and hold your mouse on any part of the taskbar where there are no icons, such as
the system clock, and drag the taskbar to different sides by moving your mouse in the
general direction.
3.
When you have the taskbar where you want it, you may want to readjust your toolbars
inside the taskbar, such as the Quick Launch bar. Then lock it back up again by right-
clicking it and selecting Lock the Taskbar.
F
IGURE
2-16: Using the Registry Editor to replace the original Explorer shell.
WY026-P02[039-072].qxd 23/6/2004 5:18 PM Page 68 Quark09 Quark09:Books:WY026-Sinchak:Chapter:
69
Chapter 2 — Customizing User Navigation
Using the Taskbar Magnifier PowerToy
Microsoft has released many different PowerToys, some of which we have already used (Tweak
UI). Another PowerToy that is pretty cool is the Taskbar Magnifier.The Taskbar Magnifier
turns the mouse into a magnifying glass. When you activate the Taskbar Magnifier, a new bar
will be displayed in your taskbar that is like a little TV screen, as shown in Figure 2-18. It will
display a magnified image of what the mouse is currently over. If you know someone whose
eyes are not as good as they used to be, the Taskbar Magnifier is a good aid for them. Also, if
you do a lot of graphic work and care about the details of your work, instead of having to zoom
in all the time, you can use the Taskbar Magnifier to see a zoomed-in view that will reveal
details.
Getting the Taskbar Magnifier PowerToy setup is easy; just download it from Microsoft’s
PowerToys Web site, located at
www.microsoft.com/windowsxp/pro/downloads/
F
IGURE
2-17: Windows XP with the taskbar on the left side of the screen.
WY026-P02[039-072].qxd 23/6/2004 5:18 PM Page 69 Quark09 Quark09:Books:WY026-Sinchak:Chapter:
70
Part I — Customizing Your System
powertoys.asp and follow these steps:
1.
Once you have the PowerToy installed, you just have to enable the toolbar on the
taskbar. First, you will have to unlock your taskbar.
2.
Next, right-click an open part of the taskbar and expand Toolbars and then select
Taskbar Magnifier. This will cause the Taskbar Magnifier to show up on the taskbar.
3.
You may want to resize the taskbar a little, such as dragging the t of the bar up to make it
a little larger so your magnifier screen is bigger.
4.
Also, you can remove the text next to the magnifier by right-clicking the magnifier
object on the taskbar when the taskbar is unlocked and selecting Show Title to
unselect it.
If you ever want to remove the Taskbar Magnifier, just right-click an open part of the
taskbar and expand the toolbars menu again and select Taskbar Magnifier to uncheck the
item.
F
IGURE
2-18: The Taskbar Magnifier PowerToy.
WY026-P02[039-072].qxd 23/6/2004 5:18 PM Page 70 Quark09 Quark09:Books:WY026-Sinchak:Chapter:
71
Chapter 2 — Customizing User Navigation
Removing the notification area
The notification area is the right side of the taskbar, where all of the little system tray icons are
located. This item is not critical to the operation of the system and can be removed if you want
more room for your open programs and other toolbars. However, any program such as an
instant messenger program, that might minimize itself to the notification area will be a little
more difficult to get to. The only way to remove the notification area is to use the Group Policy
Editor. Unfortunately, this will only work if you are using Windows XP Pro. If you are running
Windows XP Pro, then follow these steps to remove the notification area:
1.
Launch the Group Policy Editor by clicking the Start button and then selecting Run.
Type gpedit.msc in the box and click OK.
2.
Once the policy editor has loaded, expand Administrative Templates, and then select
Start Menu and Taskbar.
3.
Locate and select Hide the Notification Area. Right-click it and select Properties.
4.
Then, just click Enable and click the OK button to save your changes.
The next time you log on, your notification area will be gone. If you want to free up even more
room, consider removing the clock by reading the next section.
Removing the clock from the taskbar
The clock can be very useful if you don’t have any other clocks in the same room as your com-
puter. Otherwise, it is just taking up space. After all, how many clocks do you really need? If
you want the maximum amount of space for your toolbars and open programs on the taskbar, I
suggest that you also remove the clock.
Removing the clock is extremely simple. Follow these quick instructions:
1.
Right-click the system clock and select Properties.
2.
Then, under the Notification Area on the Taskbar and Start Menu Properties window,
uncheck Show the Clock.
3.
Click OK to save your changes and the clock will be gone.
Summary
This chapter has taken you through the steps of customizing the Start Menu and then onto the
task bar. You made your Start panel work the way you want it to and made it even more conve-
nient. If you liked the classic Start Menu, you were shown how to change the settings so that you
could use it. Then you were shown how to customize and improve the way the taskbar works.
The next chapter will concentrate on customizing the desktop. You’ll find out how you can use
great tools, such as the multiple desktop PowerToy, to create several different desktops for one
user. Then, you will learn how to change other desktop settings to customize your desktop.
WY026-P02[039-072].qxd 23/6/2004 5:18 PM Page 71 Quark09 Quark09:Books:WY026-Sinchak:Chapter:
WY026-P02[039-072].qxd 23/6/2004 5:18 PM Page 72 Quark09 Quark09:Books:WY026-Sinchak:Chapter:
Hacking the
Desktop
S
tudies have shown that customizing your desktop will result in a 64
percent increase in productivity as well as a 248 percent increase in
happiness levels of computer users. I was unable to contact the institute
where these numbers purportedly came from to confirm this information,
but even if these numbers are slightly off (or completely made up),
customizing the desktop is still very beneficial.
This chapter will show you some cool tricks and tools to make your desktop
look and work much better so that you can also benefit from a customized
desktop. Starting with the icons, it will show you how to remove, enlarge,
replace, and adjust the special effects, such as the drop shadows. Then, it
will move on to customizing the way your desktop behaves and operates by
using Active Desktop and a cool desktop PowerToy.
The desktop seems like a pretty simple part of the operating system, but
there is a lot you can do to it to make using your computer more efficient as
well as fun.
Customizing Desktop Icons
The first time I started up Windows XP, I was shocked to find only the
Recycle Bin icon on the desktop. Where were the rest of the icons? Did the
install screw up? Microsoft is starting to transition away from the desktop
that we are all used to with previous versions of Windows. With the intro-
duction of the Start panel, the same icons on the desktop are just not
needed. Now, the desktop looks much cleaner and more visually appealing
because there are not 50 icons on the screen blocking your view of the
wallpaper.
I have to admit, I like the clean interface, but I miss some of the icons that
used to be on the desktop.Thankfully, you can do a number of different
things to customize the desktop to bring back some of the old icons and
also customize them so that you can preserve the clean look while restoring
functionality. The next several sections will show you how you can get your
desktop looking the way you want it to by taking advantage of hidden
features and tricks.
Customizing
Desktop Icons
Working with
Shortcuts
Changing Visual
Effects
Customizing the
Behavior of the
Desktop
chapter
in this chapter
WY026-P03[73-90].qxd 23/6/2004 5:19 PM Page 73 Quark09 Quark09:Books:WY026-Sinchak:Chapter:
74
Part I — Customizing Your System
Removing all icons from the desktop
No matter how hard I try, I always end up with a lot of junk on my desktop. From programs
that I download and documents that I was too lazy to save elsewhere as well as new program
links that seem to pop up from nowhere, there is never an end to the war that I fight with my
desktop to keep it clutter-free. I like to be able to see my desktop wallpaper and not have my
view of the wallpaper blocked by useless icons. One great way to win the never-ending desktop
war is to just disable the desktop’s ability to show the icons and instead place the most common
desktop icons, such as My Computer and the Recycle Bin, on the Quick Launch bar.
Disabling the icons on the desktop is actually a very simple task. Most people never know
about this feature, because it is placed where you would really never expect it. To get started,
just right-click Desktop.Then expand Arrange Icons By and select Show Desktop Icons to
unselect it. After a few seconds, the icons will disappear.
Don’t worry, the icons and folder on your desktop were not deleted. If you ever want to turn
the icons back on, just repeat the preceding steps once more.
This is a very simple way to quickly clean up the desktop. It’s sort of like sweeping the dirt
under a rug. The desktop clutter is still there, but you just can’t see it.
Customizing the icon drop shadow effect
One cool new feature of Windows XP is the Use Drop Shadows for Icon Labels on the
Desktop.This new effect really makes the icons stand out from your wallpaper and makes
them much easier to read when you are using a background, such as a photo, that has both
light and dark spots. Unfortunately, depending on your computer’s hardware configuration, you
may or may not be able to experience this cool new effect. If you have a newer computer that
has an average graphics card, you will have no problem using this feature. But if you have an
older graphics card, then you may be out of luck.
The Use Drop Shadows for Icon Labels on the Desktop can be turned on or off. Depending
on the wallpaper that you are using, you may like or dislike the feature. I really like the new
effect, but if you like having a clean and crisp interface, I recommend disabling the effect.
Follow these steps to turn the feature on or off:
1.
Click the Start button, and select Run.
2.
Key in sysdm.cpl and click OK to launch system properties.
3.
Click the Advanced tab, and then click the Settings button under the Performance
section.
4.
While on the Visual Effects tab, scroll down to the bottom of the box.
5.
Locate Use Drop Shadows for Icon Labels on the Desktop, as shown in Figure 3-1, and
check or uncheck the value, depending on what you would like to do.
6.
Click OK to save your changes.
7.
Click OK once more to close the System Properties window.
WY026-P03[73-90].qxd 23/6/2004 5:19 PM Page 74 Quark09 Quark09:Books:WY026-Sinchak:Chapter:
75
Chapter 3 — Hacking the Desktop
If you enable the effect by checking the box and the effect still does not show up after you
reboot your computer, this is a sign that your computer does not support the feature.
Displaying the traditional Windows icons
Now that Windows XP includes the new Start panel with shortcuts to My Computer, My
Documents, My Network Places, and Internet Explorer, the shortcuts on the desktop are less
important and Microsoft decided to remove them. If you are a user that doesn’t like clutter on
F
IGURE
3-1: Turning the drop shadow effect on and off for icons on the desktop.
WY026-P03[73-90].qxd 23/6/2004 5:19 PM Page 75 Quark09 Quark09:Books:WY026-Sinchak:Chapter:
76
Part I — Customizing Your System
your desktop, then this feature is great for you. But if you like the old way of using Windows, and like
the desktop to be the center of your navigation instead of the Start panel, then you are out of luck.
However, just as with other new features in Windows XP, with the desktop you can revert to
the old way of doing things. Turning the desktop icons back on involves a little more effort
than just switching back to the classic Start Menu, but doing so still is not very difficult.
Follow these steps and you will be able to select which icons you want back:
1.
Right-click the desktop and select Properties.
2.
Click the Desktop tab and then click the Customize Desktop button at the bottom of
the window.
3.
Then, on the General tab, just select the check box next to the icons you want to display,
as shown in Figure 3-2.
F
IGURE
3-2: Selecting which icons to display on the desktop.
WY026-P03[73-90].qxd 23/6/2004 5:19 PM Page 76 Quark09 Quark09:Books:WY026-Sinchak:Chapter:
77
Chapter 3 — Hacking the Desktop
4.
Click OK to save your changes.
5.
Click OK once more to close display properties.
You will see the icons on your desktop immediately after you complete the steps.
Enabling large icons on the desktop
Windows XP has support for larger and more colorful icons than any other previous Windows
version. The support for high-quality graphics is one of the reasons why Windows XP
looks so much better than previous versions of Windows. This section will show you how
to take advantage of the new graphical enhancements to make your desktop look cool.
Two different sizes of icons are used on the Windows XP desktop. The normal size for icons in
Windows XP is 32
ϫ 32 pixels. Windows XP also has support for larger icons, which are 48 ϫ
48 pixels. Figure 3-3 shows the difference in size between the two icons. Use of the larger icons
will not only help your vision but will also make your desktop look more visually pleasing,
because the larger icons are more detailed.
I recommend that you turn the large icons on, to see how you like it. If you have a large moni-
tor, chances are that you will love the large icons. Some of you, however, may not like them
because they take up more space than the smaller icons and decrease the amount of icons that
can fit on your desktop. Although this is a tradeoff, I feel the high-resolution icons are worth
it. To get started, follow these steps:
1.
Right-click the desktop and select Properties.
2.
Click the Appearance tab and then click the Effects button.
3.
Check the Use Large Icons box, as shown in Figure 3-4.
4.
Click OK to save your changes.
5.
Click the OK button again to close display properties.
F
IGURE
3-3: Large and normal size icons.
WY026-P03[73-90].qxd 23/6/2004 5:19 PM Page 77 Quark09 Quark09:Books:WY026-Sinchak:Chapter:
78
Part I — Customizing Your System
The large icons should be displayed immediately after the change. You will notice that some
other icons will also enlarge. This is a side effect of using this tip, because it is impossible to
adjust just the size of the icons on the desktop. However, only the icons that you see when you
browse your computer and use the Control Panel are slightly larger. None of the other icons are
changed.
To revert to the normal-sized icons, just repeat the preceding step and uncheck Use Large Icons.
Removing the text below the icons
Icons and text always go together. Every single icon on your desktop has to have a label below
it. If you have a lot of icons on your desktop, the text under the icon is very valuable. However,
if you have few icons on your desktop, you can get away with just using the icons alone. Doing
so will result in a much cleaner interface. Amazingly, your desktop will look much simpler and
cleaner without the labels below the icons.
How is it possible not to display the text? Well, it is actually just a trick. You are not really
removing the text under the icons. Instead, you are replacing the name of the icon with some
characters that the computer will not display. Renaming the icons would be very easy if all that
was involved was clicking the name and pressing the spacebar a few times. Unfortunately, that
is not the case, because Windows does not allow you to enter in a space with the spacebar.
Instead, you can use the ASCII code for a space. Every character that is used in the computer
is stored in the PC as a code for a character. For example, the ASCII code for an s is 0115, the
ASCII code for a copyright sign is 0169, and so on. You will be interested in the ASCII code
F
IGURE
3-4: Enabling large icons.
WY026-P03[73-90].qxd 23/6/2004 5:19 PM Page 78 Quark09 Quark09:Books:WY026-Sinchak:Chapter: