Hacking Windows XP 2004 phần 5 doc
Bạn đang xem bản rút gọn của tài liệu. Xem và tải ngay bản đầy đủ của tài liệu tại đây (1.27 MB, 38 trang )
130
Part I — Customizing Your System
Ⅲ The Details view is not exactly a new view, but it has been expanded to include many
new fields that display useful file information, such as ID3 tags and image data like
dimensions and camera info.
The Details view can be customized like no other view can. All of the columns that are
displayed can be resized, removed, rearranged, and more can be added. This can all be accom-
plished by using some of the lesser-known tricks of the interface. To start off, customize a
folder that contains a bunch of MP3 files. By now, you should have already changed the
template for this folder to one of the music templates so that you can use the advanced music
specific features. If you have not already done that, go back to the last section to find out how.
When you are ready, follow these steps to customize all of the different parts of the Detail
view:
1.
Start off by resizing the columns. To do so, just place the mouse on the vertical line that
is displayed between the columns and click and hold the left mouse button while you
drag the mouse back and forth.
2.
Now, add some of the new columns that display information from the ID3 tags from the
MP3 files. Just right-click the column heading and select one of the many new options,
such as bit rate. You can even select more items to add from the bottom of the pop-up
F
IGURE
5-8: New Filmstrip view.
WY026-P05[117-136].qxd 23/6/2004 5:24 PM Page 130 Quark09 Quark09:Books:WY026-Sinchak:Chapter:
131
Chapter 5 — Hacking Windows Explorer
menu, as shown in Figure 5-9. Repeat this step until you have added all of the new
columns that you want.
3.
Most likely, there will be some columns that you just don’t need. To remove these
columns from the Details view, just right-click the column heading and select the item
once again to uncheck it. This will instantly remove the column from view.
4.
The last part of customizing the view is to set the order of the columns in a way that you
like the best. To change the order of a column, just grab the column header and drag it
around by holding down the left mouse button and moving the mouse.
If you want to customize the detailed view of a folder that contains other multimedia files such
as videos or photos, just repeat the previous steps and you will see additional column features
with which you will be able to customize your detailed view.
F
IGURE
5-9: Adding new columns to the detailed view.
WY026-P05[117-136].qxd 23/6/2004 5:24 PM Page 131 Quark09 Quark09:Books:WY026-Sinchak:Chapter:
132
Part I — Customizing Your System
Applying your folder settings to all folders
When you first use Windows XP, all of the folders are configured to use the Tiles view.
Personally, I don’t always like to use the Tiles view for my folders. It takes up so much screen
space and I usually end up scrolling through the long lists while trying to find the file that I
want. Instead, I like to use the Detail view on all of the windows by default.
To do this, you could change the settings of every folder, but there is a much easier way.
Instead, just customize one folder on your computer using the preceding sections so that you
can get it looking great, then follow these steps to apply the same configuration to all of the
other folders on your computer.
1.
While the folder that you customize is still open, click the Tools menu bar item and
select Folder Options.
2.
Next, click the View tab.
3.
Click the Apply to All Folders button and click Yes on the confirmation screen. Also,
keep in mind that when you do that, you will overwrite your configuration on all of the
other folders on your computer.
4.
Click OK to close the Folder Options window and you are finished.
If for some reason you don’t like what you did and want to restore all of the folders on your
computer to the original look, just click the Reset All Folders button that was next to the
Apply to All Folders button on the View tab in Folder Options.
Working with Hidden Files
Just like every other Windows version, Windows XP likes to hide files. When you are inter-
ested in tweaking and customizing your computer, this hiding of files can become problematic,
as many of the system files with which you want to work are often hidden. These next two sec-
tions will show you how to make Windows XP display all hidden and system files as well as the
super hidden files.
Unhiding hidden files
When you are tweaking your computer, you often need to edit different configuration files for
different applications. This can cause a problem because those configuration files are often hid-
den. The only way to edit them would be if you knew the exact file name and typed it in the
Browse box manually. Otherwise, you would be out of luck.
Telling Explorer to show hidden files and folders is the only solution to this problem. Making
Explorer show hidden files is just a matter of getting to the right place. Follow these steps to
show all hidden files:
1.
Open up a copy of Explorer My Computer by clicking the icon on the Desktop or Start
panel.
WY026-P05[117-136].qxd 23/6/2004 5:24 PM Page 132 Quark09 Quark09:Books:WY026-Sinchak:Chapter:
133
Chapter 5 — Hacking Windows Explorer
2.
Then go to the Tools menu bar item and select Folder Options.
3.
When the window appears, click the View tab to see all of the different file display
options.
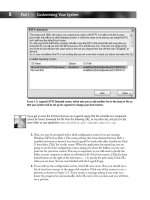
4.
Scroll down the list until you see the entries for Hidden Files and Folders. Select Show
Hidden Files and Folders, as shown in Figure 5-10.
5.
When you are finished, just click OK to save your changes and exit the configuration
window.
You should now see all of the hidden files on your computer that are hidden using the ϩh file
attribute. However, you may notice that there still are some files that are not showing up.These
are the system files. To show these files, continue on to the next section.
F
IGURE
5-10: Revealing hidden files.
WY026-P05[117-136].qxd 23/6/2004 5:24 PM Page 133 Quark09 Quark09:Books:WY026-Sinchak:Chapter:
134
Part I — Customizing Your System
Revealing the super hidden files
Microsoft has added many features to Windows XP to protect the critical files of the operating
system. The system file checker, for example, continually monitors the system files versions to
ensure that no application will replace your system files with a version that Windows XP was
not designed to work with. The new super hidden files feature allows Windows to protect itself
even further by hiding some of its most critical files from the user. If they can’t get to it, they
can’t hurt it, right?
Revealing the super hidden system files is not very difficult at all. You can uncheck the box
on the list on the View tab of Folder Options, but where is the fun in that? Use the Registry
Editor to turn this feature off:
1.
Click the Start button and select Run.
2.
Type regedit in the box and click OK to start up the Editor.
3.
Once regedit appears, navigate through HKEY_CURRENT_USER\Software\
Microsoft\Windows\CurrentVersion\Explorer\Advanced.
4.
Right-click ShowSuperHidden and select Modify.
5.
Change the value to 1 and click OK to save your changes.
Now you will be able to see all of the files on your computer, including the super hidden system
files.
Disabling the Common Tasks Pane
Every time you use Explorer, you are forced to view the new Common Tasks pane. The
Common Tasks pane is the new panel that is displayed on the left side of the screen that pro-
vides you with links to various parts of the operating system as well as useful utilities. This new
feature looks visually pleasing and seems to be a very nice and useful feature. However, that is
not always the case. I do not think that I have ever used any link on my tasks pane or any of the
other information that is shown on it. If you are like me and do not use your Common Tasks
pane, why not remove it to recover some space that could be used to display more icons on your
screen?
Removing the Common Tasks pane is very easy using the Folder Options that can be accessed in
any Explorer window. Follow these steps to remove the Common Tasks pane from your windows:
1.
Click the Tools menu bar item from any open Explorer window and select Folder
Options. If you do not have an open Explorer window, just open My Computer.
2.
On the General tab, just select Use Classic Folders under the Tasks settings on the top.
3.
Click OK to save your changes.
You have now removed the Common Tasks pane from all of your Explorer windows.
WY026-P05[117-136].qxd 23/6/2004 5:24 PM Page 134 Quark09 Quark09:Books:WY026-Sinchak:Chapter:
135
Chapter 5 — Hacking Windows Explorer
Summary
This chapter has shown you many different ways to customize how Explorer looks and works.
You discovered how to change file associations as well as how certain file types look when
viewed in Explorer. Then, you found out how to customize the context menu as well as how to
clean it up. The last part of this chapter showed you how to customize the different views of
Windows XP so that you can take advantage of the cool new features and increase your pro-
ductivity as well.
The next chapter will be the last chapter in Part I of this book. In it, you will discover many
more ways to customize the interface of Windows XP, including many interesting utilities,
such as the graphical task switcher and effects apps, that will make your computer look great.
Additionally, it will show you how you can customize Internet Explorer and refine other
elements of Windows to complete this customizing journey.
WY026-P05[117-136].qxd 23/6/2004 5:24 PM Page 135 Quark09 Quark09:Books:WY026-Sinchak:Chapter:
WY026-P05[117-136].qxd 23/6/2004 5:24 PM Page 136 Quark09 Quark09:Books:WY026-Sinchak:Chapter:
Exploring Other
Windows
Enhancements
W
elcome to the last chapter of Part I of this book, which deals
with customization. So far, you have found out how to customize
the way your computer looks from the moment you hit the
power switch to the moment you start running your favorite applications.
This chapter will show you even more ways to customize your computer by
customizing Internet Explorer and several other little tweaks that will
fine-tune your PC.
Customizing your computer is a great way to be more productive—and sim-
ply makes your computer look great. The next few sections will show you
how you can customize the toolbars of Internet Explorer, as well as some
cool address bar tricks that you can use to change the way you browse the
Web. Then, you will discover some different ways that you can expand func-
tionality, as well as add some fascinating special effects, to the windows.The
chapter will finish up by going over customizing the last bits and pieces of
the user interface, such as branding your computer and adjusting the clear
type effect. When you are finished with this chapter, you will have com-
pleted one of the most thorough customizations of Windows XP possible.
Modding Internet Explorer
Most of us spend a lot of time with Internet Explorer (IE) as an Internet
browser. IE can be customized a few ways. The most popular tweak to
Internet Explorer is to change the Windows logo animation. It’s time to get
started with customizing Internet Explorer by changing the animated logo.
Changing the logo animation
Every time you submit data on a Web page or visit a new page, your
browser will start the animation of the Windows flag (also known as a
throbber) in the upper-right corner of your screen. The Windows flag is a
nice animation, but why not replace that animation with one you made
Customizing IE
Changing the Task
Switcher
Special Effects
Branding
Using Clear Type
chapter
in this chapter
WY026-P06[137-156].qxd 23/6/2004 5:26 PM Page 137 Quark09 Quark09:Books:WY026-Sinchak:Chapter:
138
Part I — Customizing Your System
yourself? Many very cool animated GIFs are available on the Web that you can download for
free. This section will show you how to use those animated GIF image files that you can down-
load as a replacement for the Windows flag.
To do this, you will need to have two applications downloaded and installed. The first application
is Microsoft’s Tweak UI PowerToy. This can be downloaded at the PowerToy’s Web site, located
at
www.microsoft.com/windowsxp/pro/downloads/powertoys.asp. The other
application that you will use is a free app called BitStrip, which is developed by Darrell L. A copy
of this free application can be downloaded from his site at
www.virtualplastic.net/
redllar/bitstrip.html
. Once you have installed Tweak UI and extracted BitStrip, you
are ready to get started.
To change the throbber, perform the following steps:
1.
First, find the image that you want to use as your new animation. Many animation sites
can be found on the Internet. My favorite site is called the Animation Factory. Located
at
www.AnimationFactory.com, you will find thousands of high-quality animated
graphics. The default size of the small animation is 26 ϫ 26 pixels (this is the default
animation that is shown on most computers). The large animation is 38 ϫ 38. You will
want to find an image that is smaller than or the same size as those dimensions. If you
can only find a large image, try resizing the image with an animated GIF editor. If you
cannot properly resize the image, you will not have any problems other than it just might
look a little strange. Once you have found an image that you want to use, you are ready
to prep the image file.
2.
Internet Explorer only accepts replacement animations in a specific format. All replace-
ment animations must be saved as a bitmap. However, bitmaps cannot be used to store
animations like GIFs can. To solve that problem, Internet Explorer reads the bitmap like
it is a film projector. Therefore, we need to convert the animated GIF file into one tall
bitmap image that has all of the frames arranged vertically. To do this, use the BitStrip
program. Start up BitStrip and open up your source animated GIF that you want to
convert by clicking the Browse to GIF File button.
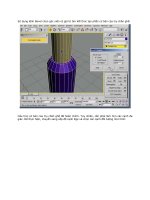
3.
Once you have the image file selected, click the Vertical button and you should see a
preview similar to Figure 6-1 on your screen.
F
IGURE
6-1: A compatible bitmap file.
WY026-P06[137-156].qxd 23/6/2004 5:26 PM Page 138 Quark09 Quark09:Books:WY026-Sinchak:Chapter:
139
Chapter 6 — Exploring Other Windows Enhancements
4.
If it looks good, then save the file as a bitmap by clicking the Save Output As button.
5.
You now have converted your animated GIF into a format that the browser can read.
The next step is to tell the browser to use the new file. To do this, you will want to start
up Tweak UI, which is listed in the Start Menu under Windows XP PowerToys.
6.
When Tweak UI has started up, expand Internet Explorer and select either small or large
animation depending on which one your computer is currently displaying. By default,
Windows XP shows the small animation unless you have changed it.
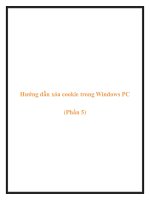
7.
You will now see all of the throbber settings for Internet Explorer. Click the Custom radio
button, as shown in Figure 6-2, so that you can specify your own file to use for the animation.
8.
Next, click the Change Busy Image button and select the bitmap file that you just
converted in step 4.
9.
After you have selected your image, it should show up in the Preview box. If the image
looks good, click the OK button to save your changes.
F
IGURE
6-2: Using Tweak UI to change Internet Explorer’s animation/throbber.
WY026-P06[137-156].qxd 23/6/2004 5:26 PM Page 139 Quark09 Quark09:Books:WY026-Sinchak:Chapter:
140
Part I — Customizing Your System
You are not done with changing the browser animated logo. To see the new animation in
action, you will have to restart all instances of Internet Explorer that were open while you were
changing the animation. The next time you start up IE, the new animation should be dis-
played. If that is not the case, then try using BitStrip again on the source animated graphic file
to create a new bitmap and then repeat step 8.
Changing the toolbar background
Changing the background of the toolbar is one of the oldest tweaks for Windows. It has been
around ever since Windows 95 and still works on the latest version of Windows. Because I am
writing a book on customizing Windows XP, I just had to include this classic.
Back in Windows 95, the only way to display an image as the background for the menu bar
and toolbar of Internet Explorer was to hack the registry. Now, using Tweak UI, changing the
toolbar background is very easy. If you do not already have Tweak UI, download a copy now. If
you already have it or have just finished installing it, you are ready to get started:
1.
Start up Tweak UI from the PowerToys for Windows XP entry in the All Programs
menu of the Start Menu.
2.
Next, expand the Internet Explorer item from the list and select Toolbar Background.
3.
You will be shown two different options. You can specify a bitmap to be shown just on
the Internet Explorer toolbar or you can specify a bitmap to be shown on the Explorer
windows (My Computer, My Documents, and so on.). For the purpose of this section,
you will just be using the first option. The next step is to check the Use Custom
Background for Internet Explorer Toolbar.
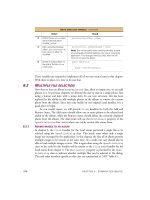
4.
Once you have put a check in the box, the Change button will become active. Click the
button and select the image bitmap that you want to use. You can use any bitmap image
on your computer. However, certain files, such as photos, don’t always look the best. I
like to create my own bitmap using Adobe Photoshop and making a simple image that is
just a gradation. This gives a nice appearance as the back of the toolbar, as shown in
Figure 6-3. You don’t have to use Adobe Photoshop to create an image that is a simple
gradation of two shades of a color; you can use any image editing program that has the
gradient feature. Just about all popular Paint programs have that feature.
Once you have picked out or created your image file and have selected it with the Change but-
ton, you are finished and will be able to see your new toolbar background by opening up a new
instance of Internet Explorer.
Making your own quick search address command
You can do a lot of interesting tricks with the Address bar. One of my favorite hacks is to add a
special command to the address bar interpreter that will allow you to visit a Web site just by
typing in a keyword. This alone is a nice feature, but to make it even better, you can set it up so
that you can even pass other words to that Web page. For example, it is possible to set up your
browser so that when you type Google TweakXP, it will automatically go to
google.com and
do a search for TweakXP. This can be a very convenient feature if you do a lot of searches on
the Web. It basically eliminates the first step of going to the Web site.
WY026-P06[137-156].qxd 23/6/2004 5:26 PM Page 140 Quark09 Quark09:Books:WY026-Sinchak:Chapter:
141
Chapter 6 — Exploring Other Windows Enhancements
To add this cool feature to the address bar, you will need to use our favorite utility, Tweak UI.
By now, you should have Tweak UI installed, but if you don’t, go to
www.microsoft.com/
windowsxp/pro/downloads/powertoys.asp
and download a copy. Once you have
Tweak UI installed, follow these steps:
1.
Start up Tweak UI by expanding the PowerToys for Windows XP entry in the All
Programs menu and selecting Tweak UI.
2.
Expand the Internet Explorer entry and select Search.
3.
Click the Create button on the bottom right of the Search Prefixes box.
4.
Now you will want to enter the name of the command that you want to type in the pre-
fix box. This is where you should type in Google, Search, or whatever you want your
command to be called.
5.
Next, in the URL box, you will want to add www.google.com/search?q؍%s so that your
command points to Google’s site, as shown in Figure 6-4. Notice the %s in the URL?
That is a system variable that catches all of the text to the right of your command (where
the search words are).
6.
When you are finished filling in both boxes, click OK and your new command will be
created.
F
IGURE
6-3: Internet Explorer with an image used at the background of the toolbar
WY026-P06[137-156].qxd 23/6/2004 5:26 PM Page 141 Quark09 Quark09:Books:WY026-Sinchak:Chapter:
142
Part I — Customizing Your System
You are now finished and can close Tweak UI. To test your new command, just open up a new
instance of IE and type in Google search terms. You should be taken to Google with your
search terms displayed as the results.
If you like the new command, you can always make more for other search engines or for quick
links to Web sites. I also like to create a command called
weather. I just type in weather
followed by a ZIP code and then am taken to the weather channel’s site. To make this work,
I have my URL set to
/>Other Visual Enhancements
A few more hacks and utilities can enhance and customize the different visual elements even
further. These next few sections will show you some great apps that will add interesting special
effects to your user interface as well as a few hacks that will help you fine-tune other elements
of your computer.
F
IGURE
6-4: Creating an address bar command.
WY026-P06[137-156].qxd 23/6/2004 5:26 PM Page 142 Quark09 Quark09:Books:WY026-Sinchak:Chapter:
143
Chapter 6 — Exploring Other Windows Enhancements
Replacing the task switcher
The task switcher is the little application that pops up when you press Alt and Tab to switch
between active applications. To use it, just hold down the Alt key and press Tab. Then keep the
Alt key held down and tap the Tab key to select a different app to switch to. The task switcher
is a no-thrills app that just shows you the icon and the name of the application when it is
displayed. Most people rarely use the task switcher to switch between programs because the
taskbar is usually much easier. However, Microsoft has released a new PowerToy that is a
replacement for the task switcher that might make you think twice about using the taskbar to
switch between apps because of its cool new appearance and features.
The new replacement task switcher, shown in Figure 6-5, is updated to reflect the new XP look
and includes a new image preview of the application that you can switch to. Operating the
replacement task switcher is exactly the same, just use Alt and Tab.
Now that you know a little about the new task switcher, it’s time to get it installed on your
computer. Installing it on your computer is very easy. Just download a copy of the app from the
PowerToys Web site, located at
/>F
IGURE
6-5: Microsoft’s new Alt؉Tab replacement.
WY026-P06[137-156].qxd 23/6/2004 5:26 PM Page 143 Quark09 Quark09:Books:WY026-Sinchak:Chapter:
144
Part I — Customizing Your System
loads/powertoys.asp. It is located on the top of the list on the right side of the page.
When you have finished downloading it, open up the file and keep clicking Next to install it.
When the installation exits, the new task switcher is ready to be used without a system reboot.
Just click the Alt and Tab keys to see the new task switcher on your computer. Remember, the
task switcher will not function if you have just one app open. It requires a minimum of two
applications to be open in order for it to work. After all, why would you need to switch
between apps if you have only one app open?
Adding Special Effects to your Windows
Thousands of tiny apps are available on the Web that will add both visual effects and features
to your windows. Three nifty apps are a must for any user who is interested in customizing her
or his computer and making it unique. I have selected a few of my favorite apps that represent
several different special effects, such as animation, fades, shadows, and more.
Using WindowsFX
WindowsFX is a program developed by Stardock that offers a suite of special effects that will
help make your computer look great. It gives users the ability to add drop shadows on all active
windows, window transitions, and transparency. But the most impressive feature, and the rea-
son why I am including this app, are the animations that appear when you drag a window
around on the screen. As shown in Figure 6-6, when you drag a window across the screen, the
window has an effect as if it is some sort of gelatin.
This is an effect that you will really have to experience first hand to understand. Therefore,
follow these steps to get WindowsFX installed on your computer and the dragging effect up
and running:
1.
Visit Stardock’s Web site at www.stardock.com/products/windowfx/ and
download a copy of WindowsFX.
2.
Once you have WindowsFX installed, start it up by expanding the Object Desktop entry
in the All Programs menu and select WindowsFX.
3.
Under the side menu for 2000 / XP Only, select Window Dragging to bring up the
settings.
4.
On the Window Dragging screen, select Basic Swaying Windows, as shown in Figure 6-7.
5.
Once you have selected Basic Swaying Windows, click Apply Changes, located in the
lower-left portion of the window just under WindowFX.
Once you have applied your changes, you will notice the new effect when you drag windows
around on the screen. A lot of different dragging effects are available that you can use, but
unless you purchase the full version of the app, those will not be available to you.
Adding shadows to your windows
Drop shadows are a cool feature to add to your windows. They make your applications stand
out a lot more when you have a lot of windows open and make Windows XP look like OSX or
WY026-P06[137-156].qxd 23/6/2004 5:26 PM Page 144 Quark09 Quark09:Books:WY026-Sinchak:Chapter:
145
Chapter 6 — Exploring Other Windows Enhancements
as they are expected to look in Longhorn, the next Windows operating system due out within a
few years. Drop shadows are possible through a variety of applications on the Web. My favorite
application to use for this is called Lokai Shadows XP.This free application, written by Brandon
Sneed, can be downloaded from his Web site at
/>One of the reasons why I like this application so much is because it works (a lot of them I could
not get to work) and because it also can run as a service in the background. The quality of the
drop shadows on the windows is also of high quality, as shown in Figure 6-8.
Visit the author’s Web site and download a copy of Lokai Shadows XP and follow these steps
to install the app and get it up and running:
1.
Once you have downloaded Lokai Shadows XP, extract the ZIP file to a permanent
home on your hard drive. Make sure that you do not put it in a directory that has a space
in the name or else you will have a problem with step 2.
2.
Now that you have extracted the files for the app, you have to register it on your computer
as a service. Let’s assume that you extracted the shadow app to
c:\ShadowXP. Click the
Start button and select Run. Then type c:\ShadowXP\ lokaishadow_svc.exe /install in
the box and click OK. If everything went OK, then you should get a pop-up confirmation
box telling you it was installed successfully.
F
IGURE
6-6: WindowsFX’s animated drag.
WY026-P06[137-156].qxd 23/6/2004 5:26 PM Page 145 Quark09 Quark09:Books:WY026-Sinchak:Chapter:
146
Part I — Customizing Your System
3.
Now that you have registered the service, turn it on. Click the Start Menu again and
select Run. Type
services.msc in the box and click OK.
4.
The Services dialog box should load. Look through the list of services and right-click
Lokai Shadows XP and select Start.
5.
Close the Services dialog box and you are finished.
After the service is started, any new windows that you open up will automatically have drop
shadows displayed. Also, do not worry about having to manually start the service each time you
turn on your computer. By default, the service is set to Automatic. That tells the computer to
start it up every time the computer boots.
Using Glass2k to make your windows transparent
Would you like to see through your windows? Do you often have to rearrange windows on
the screen to get to information that is hidden below another window? I always run into that
F
IGURE
6-7: Selecting Basic Swaying Windows to enable the dragging animation.
WY026-P06[137-156].qxd 23/6/2004 5:26 PM Page 146 Quark09 Quark09:Books:WY026-Sinchak:Chapter:
147
Chapter 6 — Exploring Other Windows Enhancements
problem when I am doing a lot of tasks on my computer at once. Being able to make a window
or application transparent, as shown in Figure 6-9, by just clicking a few hotkeys on your
keyboard is an easy and cool-looking solution to that problem.
Windows XP has transparency, also known as alpha settings, built into the operating system
but it does not use any of these features on windows or the taskbar. Programs that add the
transparency capability are just turning this feature on for use on other parts of the user inter-
face, such as the windows and the taskbar. My favorite app for making windows transparent is
called Glass2k, developed by Chimes Software. This is a great little app that is free and is also
very simple to use and install. The whole program consists of just one file that you don’t even
have to worry about extracting from a ZIP file. Follow these steps to get Glass2k installed and
running on your computer:
1.
Visit the Glass2k Web site at www.chime.tv/products/glass2k.shtml and
download a copy.
2.
Once you have a copy on your computer, just double-click the app to start it up.
3.
You will see the Glass2k setting screen, as shown in Figure 6-10, when it has started up.
Here you will see several options. If you want the app to start up every time the com-
puter starts up, check the Auto-Load box.
4.
One of the most valuable features of the Glass2k is the ability to remember the applica-
tion’s transparency settings. Check this feature box to make sure that this feature is
turned on for you.
F
IGURE
6-8: Lokai Shadows XP in action.
WY026-P06[137-156].qxd 23/6/2004 5:26 PM Page 147 Quark09 Quark09:Books:WY026-Sinchak:Chapter:
148
Part I — Customizing Your System
F
IGURE
6-9: Using Glass2k to make windows transparent.
F
IGURE
6-10: Glass2k settings screen.
WY026-P06[137-156].qxd 23/6/2004 5:26 PM Page 148 Quark09 Quark09:Books:WY026-Sinchak:Chapter:
149
Chapter 6 — Exploring Other Windows Enhancements
5.
The transparency pop-up menu allows you to right-click any open application or win-
dow and a menu for Glass2k will be shown, along with any normal right-click menu.
I recommend that you disable that option because I find it to be more of an inconve-
nience than a convenience. To disable it, just select Disabled from the top of the drop-
down list.
6.
Taskbar transparency is another feature of Glass2k that looks great but has little
purpose. To enable this feature, just click along the horizontal bar to the right of the
taskbar transparency label. The further you click to the right of the bar, the less trans-
parent it is.
7.
Once you have your settings all figured out and set up the way you want, you are ready to
start using the app to make windows and apps transparent. Before you can do that, you
should click the Save button to save all of your changes.
8.
Making an app or window transparent is very easy. When Glass2k is running, just
hold down the Ctrl and Shift buttons and press a number (0—9: 0 ϭ solid, 1 ϭ lightest,
9 ϭ darkest) when any window or app is displayed.
Now that you know how to change the transparency of a window, have fun changing all of your
applications. If you ever want to make adjustments to the settings of Glass2k, just right-click
its icon (the three stacked cubes) in the system tray and select Settings.
Glass2k is a great app that will change the way you use your computer. It may take a little time
to get used to the new Ctrl and Shift shortcuts, but once you get that down, you will be flying
through your windows.
Making your windows roll up
How would you like to make your windows roll up as if they were shades? If you own an
Apple computer, you will know that this is one feature that Apple has had for a long time.
Unfortunately, for legal or other reasons, Microsoft has decided not to implement a rollup
feature in Windows XP. However, with the help of an interesting utility called FreeShade,
developed by hmmnsoft, it is now possible to make your windows roll up into the top bar of
the window. This is a great feature because it allows you to easily hide apps temporarily so that
you can see what is behind them or organize them on the screen.
FreeShade by hmmnsoft works just like other rollup apps on different operating systems. Just
double-click a window and it will roll up into the title bar, as shown in Figure 6-11. Then to
pull the shade back down, just double-click the title bar again and the window will be
restored. When you are ready, follow these steps to get FreeShade up and running on your
computer:
1.
Visit FreeShade’s Web site at www.hmmn.org/FreeShade/ and download a copy of
the latest version. Once you have downloaded the file, double-click it and follow the
onscreen directions to install it.
F
IGURE
6-11: A window that has been rolled up.
WY026-P06[137-156].qxd 23/6/2004 5:26 PM Page 149 Quark09 Quark09:Books:WY026-Sinchak:Chapter:
150
Part I — Customizing Your System
2.
After you have installed FreeShade, you will have two icons on your desktop, one that
will start the app, and one that will stop it. Click the FreeShade icon to start up
FreeShade. Nothing visually will happen, but when you double-click a window you will
notice that it now rolls up.
3.
If you ever want to close FreeShade, just click the Stop icon that is located on your
desktop or in the Start Menu.
FreeShade also offers a few other enhancements that affect how the window is sized. In
order to use the other enhancements, you will have to use special keyboard shortcuts. Refer
to Table 6-1 for a list of the keyboard shortcuts and what they will do.
Fine-Tuning ClearType
One of the best features of Windows XP is the new ClearType font smoothing engine. This
new font smoothing feature uses a graphic technique known as anti-aliasing, which smoothes
all of the rough edges of the fonts on the screen and greatly improves the look of Windows XP
for users of LCD flat panel monitors. If you are an owner of a LCD monitor, you should
definitely turn on this feature, as it will make your screen look amazing. Figure 6-12 shows a
comparison between when the feature is turned on and when it is turned off. The image on
the bottom, which has ClearType enabled, may look a little blurry on the page, but on a LCD
the image looks very sharp.
If you do not have ClearType enabled, follow these steps to get it turned on:
1.
Right-click the desktop and select Properties.
Table 6-1 FreeShade Keyboard Shortcuts
Keys Result
ALTϩ 5 on num pad Rollsup/unrolls window
ALTϩ “ϩ” on num pad Displays FreeShade properties
CTRL ϩ ALT ϩ “-” on num pad Closes FreeShade
ALTϩ 1 on num pad Moves window to lower-left of screen
ALTϩ 2 on num pad Moves window to bottom of screen
ALTϩ 3 on num pad Moves window to lower-right of screen
ALTϩ 4 on num pad Moves window to left of screen
ALTϩ 6 on num pad Moves window to right of screen
ALTϩ 7 on num pad Moves window to top-left of screen
ALTϩ 8 on num pad Moves window to top of screen
ALTϩ 9 on num pad Moves window to top-right of screen
WY026-P06[137-156].qxd 23/6/2004 5:26 PM Page 150 Quark09 Quark09:Books:WY026-Sinchak:Chapter:
151
Chapter 6 — Exploring Other Windows Enhancements
2.
Click the Effects button on the Appearance tab.
3.
In the second drop-down box, select ClearType under Use The Following Method To
Smooth The Edges Of The Screen Fonts.
4.
Click OK to save your changes.
5.
Select OK once more to close Display Properties and to apply the new settings.
Now that you have ClearType turned on, it’s time to fine-tune its settings. Some users
complain that the new ClearType feature causes the text on their screen to look a little blurry
compared to standard font smoothing. ClearType was designed to smooth the fonts on the
screen replacing jagged edges. If you are one of the users that do not like how ClearType looks,
with the help of a very cool online tool, you can customize how ClearType looks. Using the
online tool that is developed by Microsoft, it is possible to change the darkness and thickness
of the text. This will allow you to make the text that appears on your monitor look crisper.
Follow these steps to fine-tune your ClearType settings:
1.
Open up Internet Explorer and browse to www.microsoft.com/typography/
cleartype/
.
2.
Navigate to the ClearType Web interface to fine-tune the settings located on the right
side of the Web page.
F
IGURE
6-12: Normal font smoothing versus ClearType.
WY026-P06[137-156].qxd 23/6/2004 5:26 PM Page 151 Quark09 Quark09:Books:WY026-Sinchak:Chapter:
152
Part I — Customizing Your System
3.
As the ClearType Web interface is loading, you will be prompted to install the
ClearType Tuning Control. Click Yes on your screen so that this component will be
installed.
With the release of Windows XP Service Pack 2, Internet Explorer was locked down to provide
better security. If the ClearType Tuning Control does not automatically download and install,
then you may need to adjust your ActiveX security settings in Internet Options.
4.
On the step 1 screen, click Next to move to the next step, because you already have
ClearType started.
5.
On step 2 of the ClearType Tuning Control, you have to select if your monitor uses a
red-green-blue (RGB) color scheme or a blue-green-red (BGR) scheme. All LCD com-
puter monitors are made up of very tiny vertical lines of alternating colors. There are two
different ways that monitors lay out the lines on the screen. Some monitors alternate red,
green, and blue lines (RGB) on the screen, whereas other monitors alternate blue, green,
and red lines (BGR). ClearType has recently been updated to also support the BGR
format, and now users that have BGR monitors can select this feature. Don’t know
which one to select? It’s easy; just select the option that looks sharper on your screen and
then click Next.
6.
On step 3, you will be shown six different settings that you can choose to fine-tune
ClearType. Just select the item that looks best to you and click Finish.
Your new settings will instantly go into effect. If you do not like the changes, just follow the
preceding instructions and start over. If you notice that the coloration of some of the characters
on your screen is a little strange, specifically the I’s, then you might have the wrong screen
mode selected. Follow the preceding instructions again and select the other color scheme.
If you don’t own a LCD monitor, you can still try to use ClearType. It will not create any prob-
lems but also might not help out all that much either. I recommend that you still experiment
with it. You might be surprised.
Branding Windows XP
Did you ever notice how when you buy a computer from one of the big computer manufactur-
ers your computer has their name and logo in many different parts of the computer? How
would you like to replace their branding information with your own? Or if you built your own
computer, why not brand it? These next two sections will show you how you can brand the
system information screen and Internet Explorer.
Branding system properties
Every time you right-click My Computer and select Properties or click the System applet item
in the Control Panel, you will be shown branding information on the general information
screen of System Properties. This screen is usually customized by computer manufacturers to
display their logo, as well as general information such as the model number and support notes.
If you would like to change this information or brand a PC that you made yourself, this section
WY026-P06[137-156].qxd 23/6/2004 5:26 PM Page 152 Quark09 Quark09:Books:WY026-Sinchak:Chapter:
153
Chapter 6 — Exploring Other Windows Enhancements
will show you how to accomplish this in just a few easy steps. To get started, assume that your
computer is not branded and that you are going to be doing this for the first time. If your com-
puter was already branded, then instead of creating the files that I will mention, just replace
them with your versions. Follow these steps to do branding of your own:
1.
There are two parts to branding your computer. The first part is creating an image to be
displayed on the System Properties General tab. The image must be a bitmap and be no
larger than 180 ϫ 115 pixels. Once you have created your file, name it oemlogo.bmp
and save it in
C:\Windows\System32 folder.
2.
Now that you have to get the logo out of the way, you will need to create a file with all of
the text that you want to appear on the screen next to it. To do this, open up Notepad
and key in the following code. Feel free to replace the text to the right of the ϭ with
anything you want.
[General]
ManufacturerϭStevePC
ModelϭHighwaySpecial 18G
[Support Information]
Line1ϭNo support is provided in English
Line2ϭGuaranteed to work for at least 5 days
Line3ϭ87% restocking fee for all returns
Line4ϭReturns only accepted at Kuznetsk warehouse in Russia
3.
Once you have your text in the right format, click the File menu bar item and select
Save As.
4.
Save the file as oeminfo.ini in your C:\Windows\System32 folder
. Make sure to
change the Save As file type to All Files instead of .txt so that the file is saved with the
correct file extension.
A copy of the oeminfo.ini file can be found in the Chapter 6 folder on the book’s companion
CD-ROM.
If everything went well, the next time you look at the System Properties screen, you should see
your new branding information. Figure 6-13 is an example of what my branded screen looks
like.
Branding IE
Internet Explorer is another part of the operating system that is often branded by computer
manufacturers and Internet Service Providers. Not a lot can be done to brand Internet Explorer
other than to add some text to the title bar of the browser. Back when dialup Internet was the
only means of accessing the Net, I remember trying to figure out how to remove text that the
dialup software distributed from providers such as CompuServe and Prodigy. Every time I
would open up Internet Explorer, it would say Prodigy Online along with Microsoft Internet
Explorer as the title of the window. Back then, the only solution for getting rid of the excess
type was to manually hack the registry and fix the entry responsible for storing the name of the
WY026-P06[137-156].qxd 23/6/2004 5:26 PM Page 153 Quark09 Quark09:Books:WY026-Sinchak:Chapter:
154
Part I — Customizing Your System
window. Now a really great utility is available, called Rebrand, by Advent Code, that greatly sim-
plifies the editing of the Internet Explorer window title. Follow these steps to edit your title bars:
1.
Visit Advent Code’s Web site at www.adventcode.net/rebrand.html and down-
load a copy of Rebrand. Then, run the file and extract the files to your computer.
2.
Start up Rebrand by browsing to the directory from which you extracted it and clicking
on
rebrand.exe.
3.
To change the title of Internet Explorer, just type new text in the top box, as shown in
Figure 6-14, and then click the Apply button to save your changes.
Once you are finished editing the title and have clicked the Apply button, you can close
Rebrand. Your changes should take effect immediately.
F
IGURE
6-13: Creating your own branded system screen.
WY026-P06[137-156].qxd 23/6/2004 5:26 PM Page 154 Quark09 Quark09:Books:WY026-Sinchak:Chapter: