Introducing Microsoft Windows sever 2008 r2 phần 4 pdf
Bạn đang xem bản rút gọn của tài liệu. Xem và tải ngay bản đầy đủ của tài liệu tại đây (1.07 MB, 20 trang )
Live Migration CHAPTER 3 43
12. Select the disk to add and click OK. The disk will be added to the cluster in the Storage
node.
13. In the tree pane, select Cluster Shared Volumes. In the Actions pane, click Add Storage
to open the Add Storage dialog box shown in Figure 3-16.
FIGURE 3-16 Adding a cluster disk to CSV storage.
14. Select the iSCSI disk just added, and click OK to move it from general cluster storage to
CSV storage. The disk is now available for Hyper-V storage.
Create a New VM Using the Failover Cluster Manager
The final stage of the process is to create a new VM that is configured for live migration. To
do this, you need to start the process from the Failover Cluster Manager, or use Windows
PowerShell with the FailoverClusters module loaded. The basic steps are as follows:
n
Create the VM.
n
Assign CSV storage.
n
Set Automatic Start Action to None.
n
Enable High Availability for the VM.
Use the following steps to create the new VM and make it available for live migration:
1. Open the Failover Cluster Manager and connect to the cluster to which you want to
add the VM.
2. In the tree pane, right-click Services And Applications, and select Virtual Machines,
New Virtual Machine, and then select the initial node that will host the VM, as shown
in Figure 3-17.
44 CHAPTER 3 Hyper-V: Scaling and Migrating Virtual Machines
FIGURE 3-17 Creating a new virtual machine using the Failover Cluster Manager.
3. In the New Virtual Machine Wizard, specify a name and then browse to a location to
store the VM files. Specify a CSV location, as shown in Figure 3-18.
FIGURE 3-18 Specify a CSV location for the virtual machine.
4. Complete the rest of the New Virtual Machine Wizard. The VHD you specify must also
reside on CSV.
Live Migration CHAPTER 3 45
5. When the New Virtual Machine Wizard completes, it will launch the High Availability
Wizard, as shown in Figure 3-19. If everything worked correctly, you’ll have a success
report, as shown. If not, click View Report to identify the problem and correct it.
FIGURE 3-19 The High Availability Wizard.
6. Open the Hyper-V Manager and configure any additional settings for the new VM.
Ensure that Automatic Start actions are set to None and that all storage is on CSV
storage.
7. Start the VM and install an operating system as you would normally. The VM is config-
ured to support live migration.
Once a VM is configured to support live migration, the process is simple. Open the Failover
Cluster Manager, select the VM to migrate in the tree pane, and in the Actions pane click Live
Migrate Virtual Machine To Another Node. Specify the target node, and the migration pro-
ceeds. When it’s completed, you’ll see that the new owner of the VM is the target node.
Optimizing Virtual Machine Performance
Windows Server 2008 R2 improves overall Hyper-V performance significantly compared to
Windows Server 2008, while reducing power consumption and allowing greater VM den-
sity per physical host. The two main areas of performance improvement are scalability and
networking.
Scalability Improvements in VM Performance
Windows Server 2008 R2 supports up to 64 logical processors on the physical host com-
puter. This allows greater VM density per physical host, reducing costs and power consump-
tion, and gives IT administrators greater flexibility in assigning CPU resources to VMs. Also,
46 CHAPTER 3 Hyper-V: Scaling and Migrating Virtual Machines
Hyper-V now supports Second Level Address Translation (SLAT), which uses new features on
today’s CPUs to improve VM performance while reducing processing load on the Windows
Hypervisor.
Power consumption of the VM physical host is also reduced because of Windows Server
2008 R2’s support for core parking, which allows unused processor cores to be dynamically
turned off and on according to the processor requirements and load.
Networking Improvements in VM Performance
Hyper-V in Windows Server 2008 R2 uses several new networking technologies to improve
overall VM networking performance. The three key areas of improvement are the following:
n
New VM Chimney (also called TCP Offload)
n
Support for Jumbo Frames
n
Support for the Virtual Machine Queue (VMQ)
VM Chimney allows a VM to dump its network processing load onto the NIC of the host
computer. This works the same as in a physical TCP Offload scenario; Hyper-V now simply
extends this functionality into the virtual world. This benefits both CPU and overall network
throughput performance and is fully supported by live migration.
VM Chimney is disabled by default in Windows Server 2008 R2. VM Chimney requires
compatible networking hardware but can significantly reduce the host server’s CPU burden
when dealing with VM network traffic. This translates into better host system performance
and a simultaneous boost to VM network throughput.
Support for Jumbo Frames was introduced with Windows Server 2008. Hyper-V in
Windows Server 2008 R2 simply extends this capability to VMs. Jumbo Frames support in
Hyper-V adds the same basic performance enhancements to virtual networking, including up
to six-times-larger payloads per packet, which not only improves overall throughput but also
reduces CPU utilization for large file transfers.
VMQ essentially allows the host’s single NIC card to appear as multiple NICs to the VMs
by allowing the host’s NIC to direct memory access (DMA) packets directly into individual VM
memory stacks. Each VM device buffer is assigned a VMQ, which avoids needless packet cop-
ies and route lookups in the virtual switch. The result is less data in the host’s buffers and an
overall performance improvement in input/output (I/O) operations.
48 CHAPTER 4 Remote Desktop Services and VDI: Centralizing Desktop and Application Management
works with the rest of the Remote Desktop services to provide virtual desktops to users. For
users who need a consistent but personal desktop, Windows Server 2008 R2 can provide a
personal virtual desktop regardless of which computer you are using. It can also provide a
standard corporate desktop from a pool of virtual desktops to users on demand.
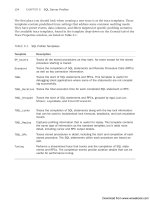
TABLE 4-1 Windows Server 2008 R2 Remote Desktop Services Naming
WINDOWS SERVER 2008 R2 NAME WINDOWS SERVER 2008 NAME
Remote Desktop Services Terminal Services
Remote Desktop Session Host (RD Session Host) Terminal Server
Remote Desktop Virtualization Host (RD Virtualiza-
tion Host)
No equivalent
Remote Desktop Connection Broker (RD Connec-
tion Broker)
Terminal Services Session Broker
Remote Desktop Web Access (RD Web Access) Terminal Services Web Access
RemoteApp TS RemoteApp
Remote Desktop Gateway TS Gateway
Remote Desktop Client Access License (RD CAL) TS CAL
Remote Desktop Easy Print Terminal Services Easy Print
Providing a Rich Remote Desktop
Remote Desktop Services provides an improved and more seamlessly integrated remote
experience to the user. Remote applications can now take full advantage of multiple moni-
tors, the Windows Aero look and feel, and a full audio experience, while also integrating more
seamlessly into the Taskbar, Start menu, and system tray.
Administration and management of RemoteApps and of virtual desktops is improved in
Windows Server 2008 R2, with the addition of a Windows PowerShell module (including a
Windows PowerShell provider), and an improved RD Web Access Configuration using the
RemoteApp and Desktop Connection Web application shown in Figure 4-1.
(Re)introducing Remote Desktop Services and VDI CHAPTER 4 49
FIGURE 4-1 The RemoteApp and Desktop Connection application.
The RemoteApp and Desktop Connection can be customized to meet your needs, but
defaults to a name of Enterprise Remote Access, as shown.
Remote Desktop Administration and Management
The RemoteApp and Desktop Connection Web application gives IT administrators a single
place to manage and assign resources for their users. Changes made here are directly
reflected in the RemoteApp and Desktop Connection Control Panel for Windows 7 users,
and in the applications and virtual desktops that users connecting from earlier versions of
Windows see when they log in to the RD Web Access server, as shown in Figure 4-2.
50 CHAPTER 4 Remote Desktop Services and VDI: Centralizing Desktop and Application Management
FIGURE 4-2 The RemoteApp and Desktop Connection page from a Windows XP SP3 computer.
The Windows 7 computer of the same user directly integrates these same links into the
user’s Start menu, as shown in Figure 4-3.
FIGURE 4-3 RemoteApp and Desktop Connections are directly integrated into the Windows 7 Start menu.
Whenever an administrator makes changes to the available programs or virtual desktops,
both the RD Web Access page and the user’s Start menu are dynamically updated without
further intervention.
(Re)introducing Remote Desktop Services and VDI CHAPTER 4 51
Windows PowerShell Module
Windows Server 2008 R2 includes a new Windows PowerShell module, the RemoteDesktop-
Services module, that includes both cmdlets and a full RDS Provider, as shown in Figure 4-4.
FIGURE 4-4 The RemoteDesktopServices module for Windows PowerShell includes both cmdlets and a
provider.
For those new to Windows PowerShell, a brief explanation of providers is in order. In
Windows PowerShell, providers are a way to view and navigate information in a hierarchical
way as if the providers were drives on the computer. In fact, the FileSystem is implemented as
a provider. This means that when you type dir c:\ at the Windows PowerShell prompt, what
you’re actually doing is asking Windows PowerShell to give you the children of the C drive
of the FileSystem provider. (The dir command is an alias for Get-ChildItem.) Windows
PowerShell implements the Windows Registry as a provider as well, so you issue the com-
mand dir HKLM:\System\CurrentControlSet to see what the HKeyLocalMachine registry
hive has in the System\CurrentControlSet container.
With the RemoteDesktopServices provider, the “drive” is RDS:. Beneath that top level we
have RDSConfiguration, GatewayServer, LicenseServer, RDSFarms, ConnectionBroker, and
RemoteApp containers. With the RDS Windows PowerShell module, you can configure and
manage all RDS role services and components using Windows PowerShell. For example, you
can do the following:
52 CHAPTER 4 Remote Desktop Services and VDI: Centralizing Desktop and Application Management
n
View and edit configuration settings of Remote Desktop Server
n
Publish RemoteApp applications
n
Configure License Server
n
Create and configure a Remote Desktop server farm
n
Configure and assign virtual Internet Protocol (IP) addresses to either sessions or appli-
cations
n
Create and manage RDV (VDI) pools
n
Create and manage Gateway Resource Access and Client Access policies
For example, with Windows PowerShell, you can quickly get a list of the personal virtual
desktop assigned to a particular user:
PSH> import-module RemoteDesktopServices
PSH> $cred = Get-Credential
PSH> Get-VirtualDesktop –user example\charlie –credential $cred
Name AssignedTo Host
xmpl-vdi-92.example.local EXAMPLE\Charlie HOST-9.example.local
Because the RDS team implemented their Windows PowerShell support primarily as a pro-
vider, it’s easy to navigate and investigate the functionality available, and also easy to get help
on how to do tasks. So, for example, if you want to know what the parameters are for creating
a new RemoteApp using Windows PowerShell, you just ask Windows PowerShell to tell you,
as shown in Figure 4-5.
You can also use Windows PowerShell to quickly get or set the value of various RDS set-
tings, as shown in Figure 4-6.
(Re)introducing Remote Desktop Services and VDI CHAPTER 4 53
FIGURE 4-5 Using the Get-Help command with the –path parameter to get specific help on creating
RemoteApps.
FIGURE 4-6 Getting the ConnectionBrokerSettings.
To change the session settings to disable new connections, the command would be as
follows:
RDS:\RDSConfiguration> Set-Item –path .\SessionSettings\AllowConnections 0
54 CHAPTER 4 Remote Desktop Services and VDI: Centralizing Desktop and Application Management
Windows 7 and RDS (Better Together)
Users running Windows 7 will have an enhanced user experience when using Remote Desk-
top. Not only will they have more direct access to applications and desktops through the
RemoteApp and Desktop Connection (RAD) link in the Control Panel, but the overall experi-
ence is more natural and integrated. RemoteApps are directly integrated into the Start menu,
Taskbar, and system tray, so that many users will be unable to tell whether a program is run-
ning locally or remotely.
Improved User Experience
The improved user experience with Remote Desktop Services and Windows 7 clients includes
the following features:
n
Multimedia redirection This feature provides high-quality multimedia by redirect-
ing multimedia files and streams so that audio and video content is sent in its original
format from the server to the client and rendered using the client’s local media play-
back capabilities.
n
True multimonitor support Remote Desktop Services enables support for up
to 10 monitors in almost any size, resolution, or layout with RemoteApp and remote
desktops. Applications will behave just like they do when running locally in multimon-
itor configurations.
n
Audio input and recording VDI supports any microphone connected to a user’s
local machine and enables audio recording support for RemoteApp and Remote Desk-
top. This is useful for Voice over Internet Protocol (VoIP) scenarios and also enables
speech recognition.
n
Windows Aero support VDI provides users with the ability to use the Windows
Aero user interface for client desktops, ensuring that remote desktop sessions look and
feel like local desktop sessions.
n
DirectX redirection Improvements in DirectX 9, 10, and 11 application render-
ing, and support for the new DirectX 10.1 application programming interfaces (APIs)
that allow DirectX (2D& 3D) graphics to be redirected to the local client to harness the
power of the graphical processing unit (GPU) on the user’s local device, remove the
need for a GPU on the server.
n
Improved audio/video synchronization Remote Desktop Protocol (RDP)
improvements in Windows Server 2008 R2 are designed to provide closer synchroniza-
tion of audio and video in most scenarios.
n
Language bar redirection Users can control the language setting of RemoteApp
programs using the local language bar.
n
Task Scheduler Improvements keep scheduled applications from interacting with
users running RemoteApps, avoiding confusion.
Enabling VDI CHAPTER 4 55
RAD Control Panel
The RAD Control Panel applet, part of Windows 7, provides a simple way to configure
RemoteApp and VDI directly into the user’s Start menu. Plus, once the initial connection is
made, applications and desktops are automatically updated as the administrator configures
the available applications and desktops, simplifying management and deployment.
Configuring RemoteApp and Desktop Connection
To change the settings for RAD, use the Remote Desktop Connection Manager console, as
shown in Figure 4-7.
FIGURE 4-7 The Remote Desktop Connection Manager console.
The Remote Desktop Connection Manager connects to an RD Connection Broker, and
allows you to configure the RD Virtualization Host servers and the personal and pooled
virtual desktops they provide, along with designating the RemoteApp sources that will be
available to the RD Connection Broker.
Enabling VDI
Windows Server 2008 R2 adds support for both personal and pooled virtual desktops.
Enabling that VDI support requires setting up and configuring an RD Virtualization Host, an
RD Session Host, an RD Connection Broker, and an RD Web Access server, although these
56 CHAPTER 4 Remote Desktop Services and VDI: Centralizing Desktop and Application Management
different roles can be combined as appropriate for your environment. The basic steps to
enabling VDI are as follows:
n
Enable the RD Virtualization Host role service of the Remote Desktop Services role.
This will also enable the Hyper-V role.
note Enabling the Hyper-V role requires hardware that supports hardware virtualiza-
tion. This might require an updated BIOS. The BIOS must be configured to support both
hardware virtualization and hardware Data Execution Protection.
n
Enable an RD Session Host. This is required both for VDI and to provide RemoteApp
programs.
n
Enable an RD Connection Broker and an RD Web Access server.
n
Export the Secure Sockets Layer (SSL) certificate for the RD Web Access computer. This
will be imported onto the virtual machines (VMs).
n
Create the VMs that will be used, configuring them as appropriate. These will be used
either as part of a VDI pool or as personal VMs.
•
Add the SSL machine certificate from the RD Web Access computer to them.
•
Enable Remote Access.
•
Allow Remote RPC for RDS in the registry.
•
Enable Remote Service Management in Windows Firewall.
•
Add RDP protocol permissions to the VMs.
•
Configure the VMs for rollback if they’re part of a VDI pool.
n
Add the RD Web Access computer to the TS Web Access Computers local group on the
RD Connection Broker.
n
Add the RD Connection Broker computer as a source for the RD Web Access computer,
as shown in Figure 4-8.
Enabling VDI CHAPTER 4 57
FIGURE 4-8 Configure RD Web Access to use an RD Connection Broker as a source.
n
Configure the VDI Pool and assign any Personal Virtual Desktops on the RD Connec-
tion Broker as shown in Figure 4-9.
FIGURE 4-9 Adding virtual machines to a Virtual Desktop Pool.
58 CHAPTER 4 Remote Desktop Services and VDI: Centralizing Desktop and Application Management
n
Add applications to the RemoteApp server and make them available as RemoteApps.
n
Log on to the client computer as an administrator and import the machine SSL certifi-
cate from the RD Web Access server.
n
Log on to the client computer and set up the RemoteApp and Desktop Connection.
Yes, this is fairly complicated, but most of these steps are performed one time only, or can
be easily automated.
Integrating Remote and Local Applications with
RemoteApp
RemoteApp for Windows Server 2008 R2 gives you the ability to provide your users with an
integrated and transparent mixture of local and remote applications. For applications that
behave best when run locally, or that are used when not connected to the network, you can
install the applications locally, while providing access to other applications using RemoteApp
where appropriate. Applications running remotely can even control the file extensions on the
client computer, providing a transparent experience for the user.
To configure remote applications to take over the local file extensions, you need to create
a Windows Installer (.msi) package for them and install the package locally (or use Group
Policy to deploy the resulting .msi package), following these steps:
1. Open RemoteApp Manager and connect to the RD Session Host that hosts the applica-
tion you want to deploy.
2. Click Add RemoteApp Program to open the RemoteApp Wizard. Click Next and select
the program or programs you want to add, as shown in Figure 4-10.
FIGURE 4-10 Adding a program with the RemoteApp Wizard.
Working Over the Web: Web Access CHAPTER 4 59
3. Click Next and then click Finish to return to the RemoteApp Manager.
4. Select the program in the list of RemoteApp programs and click Create Windows
Installer Package in the Actions pane.
5. Click Next to open the Specify Package Settings page. Make any changes here that are
appropriate for your environment.
6. Click Next to open the Configure Distribution Package page shown in Figure 4-11.
FIGURE 4-11 The Configure Distribution Package page of the RemoteApp Wizard.
7. Select the Associate Client Extensions For This Program With The RemoteApp Program
check box. Also select the Desktop check box if you want the user to have a shortcut to
this application on his or her desktop.
8. Click Next and then click Finish to create the .msi package, which can be installed on
users’ computers.
Working Over the Web: Web Access
Windows Server 2008 R2 provides access to RemoteApp programs and desktops using the RD
Web Access role for all versions of Windows that support at least RDP version 6.0 or later. This
includes Windows Vista SP1 and Windows XP SP3.
Users can connect to the resources of your RDS environment, including virtual desktops,
from supported clients using direct RemoteApp and Desktop Connection, or over the Web
using the Remote Desktop Gateway. This enables users to have consistent access to corpo-
rate resources without having to use a virtual private network (VPN) connection. Figure 4-12
shows the typical RD Web Access connection through an RD Gateway.
60 CHAPTER 4 Remote Desktop Services and VDI: Centralizing Desktop and Application Management
FIGURE 4-12 The RD Web Access connection through an RD Gateway.
RD Web Access can be configured to provide virtual desktops as well as RemoteApps, and
also provides a gateway to allow users to connect to their own workstation if corporate policy
allows it.
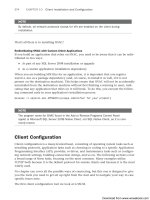
Licensing
The Remote Desktop Services role and its role services are included as part of the standard
Windows Server license and do not require any additional licenses. The RD Session Host
license is also covered by the Windows Server license with the same considerations as any
other Hyper-V host.
Each user or device that directly or indirectly accesses a computer running Windows
Server to interact with a remote graphical user interface (using the Windows Server 2008 R2
RDS functionality or other technology) must have a Windows Server 2008 RDS Client Access
License (CAL) in addition to the Windows Server CAL. RDS functionality is considered those
features or services that are enabled with the RDS role and/or role service(s) in Windows
Server 2008 R2. This includes, but is not limited to, RD Gateway, RemoteApp, RD Web Access,
and RD Connection Broker.
RDS CALs are available as Per User or Per Device CALs. RD Session Host servers are config-
ured for Per Device or Per User mode, and require an appropriate RDS CAL for access.
Licensing CHAPTER 4 61
Each Per Device RDS CAL allows one device to connect to the RDS resources, regardless
of how many users use the device. Conversely, a Per User RDS CAL allows a single user access
to the RDS resources from as many devices as he or she happens to have. Companies should
carefully consider their users and the type of devices and access they need to RDS resources
before purchasing CALs and deciding what mode RD Session Host servers will use.
Windows Server 2008 R2 RDS CALs and Windows Server 2008 TS CALs are equivalent and
can be used interchangeably. However, RDS CALs can only be managed from Windows Server
2008 SP2 Terminal Server License servers or Windows Server 2008 R2 RD License servers. The
RD Licensing Manager, shown in Figure 4-13, adds important new capabilities, including the
ability to automatically migrate licenses and dynamically activate or deactivate license servers.
FIGURE 4-13 The RD Licensing Manager.
License Server Assignment and Activation
Windows Server 2008 R2 changes how RDS Session Hosts locate and connect to license serv-
ers. In Windows Server 2008, Terminal Servers used a discovery mechanism to find and con-
nect to a license server. This created problems if the license server was unavailable, or if the
discovery process encountered problems, and it became the source of a significant number of
support calls. In Windows Server 2008 R2, this is changed so that RD Session Hosts explicitly
specify the RD License servers they will connect to, as shown in Figure 4-14, and when a spe-
cific license server is unavailable, licenses are automatically migrated.
62 CHAPTER 4 Remote Desktop Services and VDI: Centralizing Desktop and Application Management
FIGURE 4-14 The RD Licensing Server is specified in the RD Session Host Configuration console.
When an RD Session Host is initially installed, it has a 120-day grace period before a
license server needs to be specified. If no license server is specified and available at the end
of that grace period, the RD Session Host will stop accepting connections. This grace period
cannot be reset and is not an “evaluation” or “temporary” license.
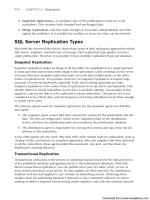
Virtual Desktop Licensing
Complete and correct licensing of a Microsoft VDI environment requires licensing of both the
Windows client operating system running in a centralized location and the infrastructure and
management components that enable an end-to-end VDI environment.
Virtual Enterprise Centralized Desktop (VECD) is the license for Windows as a guest operat-
ing system in the data center. VECD is available for client devices that are covered by Software
Assurance (VECD for SA), and those that are not, including devices such as thin clients. VECD
or VECD for SA is required for any VDI environment running Windows as the guest operating
system.
Most VDI environments also include management components such as System Center
Virtual Machine Manager (SCVMM) or System Center Operations Manager to manage the
environment. For licensing the infrastructure and management components of a Microsoft
VDI environment, there are essentially two options: You can license the infrastructure com-
ponents (RD Session Host, RD Virtualization Host, RD Connection Broker, etc.) with RDS CALs
and license the management components separately; or, if you’re a Volume License customer,
you have a pair of new options—the Microsoft Virtual Desktop Infrastructure Standard Suite
and the Microsoft Virtual Desktop Infrastructure Premium Suite. These two suites combine
the products for an optimum VDI experience in a value package.