Microsoft SQL Server 2000 Programming by Example phần 9 doc
Bạn đang xem bản rút gọn của tài liệu. Xem và tải ngay bản đầy đủ của tài liệu tại đây (1.1 MB, 71 trang )
Chapter 13. Maintaining Data Consistency: Transactions and Locks
553
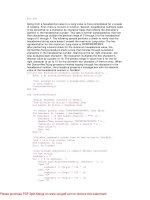
Start a transaction
BEGIN TRAN
Get OBJECT_ID to interpret the sp_lock output
SELECT OBJECT_ID('Products') as 'Products'
Get current locks to use as a baseline to further executions of sp_lock
PRINT 'Initial lock status'+ CHAR(10)
EXEC sp_lock
SELECT ProductID, ProductName, UnitPrice
FROM Products (SERIALIZABLE)
WHERE CategoryID = 3
PRINT CHAR(10) + 'lock status after SELECT'+ CHAR(10)
EXEC sp_lock
ROLLBACK TRAN
Products
117575457
(1 row(s) affected)
Initial lock status
spid dbid ObjId IndId Type Resource Mode Status
51 4 0 0 DB S GRANT
52 4 0 0 DB S GRANT
53 10 0 0 DB S GRANT
54 7 0 0 DB S GRANT
55 6 0 0 DB S GRANT
56 10 0 0 DB S GRANT
57 6 0 0 DB S GRANT
58 6 0 0 DB S GRANT
61 6 0 0 DB S GRANT
61 1 85575343 0 TAB IS GRANT
62 6 0 0 DB S GRANT
63 6 0 0 DB S GRANT
68 6 0 0 DB S GRANT
69 6 0 0 DB S GRANT
ProductID ProductName UnitPrice
16 Pavlova 17.4500
19 Teatime Chocolate Biscuits 9.2000
Microsoft SQL Server 2000 Programming by Example
554
20 Sir Rodney's Marmalade 81.0000
21 Sir Rodney's Scones 10.0000
25 NuNuCa Nuß-Nougat-Creme 14.0000
26 Gumbär Gummibärchen 31.2300
27 Schoggi Schokolade 43.9000
47 Zaanse koeken 9.5000
48 Chocolade 12.7500
49 Maxilaku 20.0000
50 Valkoinen suklaa 16.2500
62 Tarte au sucre 49.3000
68 Scottish Longbreads 12.5000
(13 row(s) affected)
lock status after SELECT
spid dbid ObjId IndId Type Resource Mode Status
51 4 0 0 DB S GRANT
52 4 0 0 DB S GRANT
53 10 0 0 DB S GRANT
54 7 0 0 DB S GRANT
55 6 0 0 DB S GRANT
56 10 0 0 DB S GRANT
57 6 0 0 DB S GRANT
58 6 0 0 DB S GRANT
61 6 0 0 DB S GRANT
61 6 117575457 0 TAB IS GRANT
61 6 117575457 1 KEY (310027bf2c96) S GRANT
61 6 117575457 1 KEY (3200c9109984) S GRANT
61 6 117575457 1 KEY (3e0071af4fce) S GRANT
61 6 117575457 1 KEY (2f008b9fea26) S GRANT
61 6 117575457 2 KEY (1700bde729cb) RangeS-S GRANT
61 6 117575457 2 KEY (1e00ebf74a93) RangeS-S GRANT
61 6 117575457 1 KEY (1b007df0a359) S GRANT
61 6 117575457 1 KEY (14002be0c001) S GRANT
61 6 117575457 1 PAG 1:276 IS GRANT
61 6 117575457 2 PAG 1:277 IS GRANT
61 6 117575457 2 KEY (32001d9803ec) RangeS-S GRANT
61 6 117575457 2 KEY (4100e7a8a604) RangeS-S GRANT
61 6 117575457 2 KEY (3400b1b8c55c) RangeS-S GRANT
61 6 117575457 2 KEY (35005f17704e) RangeS-S GRANT
61 6 117575457 1 PAG 1:360 IS GRANT
61 1 85575343 0 TAB IS GRANT
61 6 117575457 1 KEY (440089efcdca) S GRANT
61 6 117575457 1 KEY (300042d8902e) S GRANT
61 6 117575457 2 KEY (1c00603f4339) RangeS-S GRANT
61 6 117575457 2 KEY (1d008e90f62b) RangeS-S GRANT
61 6 117575457 2 KEY (160004dffe56) RangeS-S GRANT
61 6 117575457 2 KEY (1300ea704b44) RangeS-S GRANT
61 6 117575457 2 KEY (1800d8809573) RangeS-S GRANT
61 6 117575457 1 KEY (15004e877cb9) S GRANT
61 6 117575457 1 KEY (130092d8179c) S GRANT
61 6 117575457 1 KEY (10007c77a28e) S GRANT
61 6 117575457 1 KEY (1900f638aaf3) S GRANT
61 6 117575457 1 KEY (1a0018971fe1) S GRANT
61 6 117575457 2 KEY (3300d4df79e4) RangeS-S GRANT
61 6 117575457 2 KEY (0f006da996c9) RangeS-S GRANT
61 6 117575457 2 KEY (47001fe82400) RangeS-S GRANT
62 6 0 0 DB S GRANT
Chapter 13. Maintaining Data Consistency: Transactions and Locks
555
63 6 0 0 DB S GRANT
68 6 0 0 DB S GRANT
69 6 0 0 DB S GRANT
A Serious Problem to Avoid: Deadlocks
Imagine that your database application has two users: Paul and Mary.
Paul starts a transaction and modifies some attributes of the Acme Ltd. customer. Later, inside the same
transaction, Paul tries to modify this customer's payments. However, Paul cannot modify these payments
because Mary holds an exclusive lock on these payment records. Paul must wait for these records to be
unlocked before completing the transaction.
Mary is modifying customers' payments, and that's why this information is locked. Inside the same transaction,
Mary tries to modify some data about the Acme Ltd. customer. At this moment, Paul, who modified this record
just a few minutes ago, locks this information.
Mary cannot update this information because Paul is holding an exclusive lock on it, so Mary must wait for this
resource to be unlocked before proceeding with her transaction. However, Paul cannot continue with his
transaction because he's waiting for Mary to unlock the information he needs to update.
This situation of mutual blockings is called deadlock. If SQL Server detects this situation, it decides which
process has a bigger execution cost, and selects this process as a winner. After the winner is selected, SQL
Server notifies the other processes waiting in this deadlock situation with error 1205, telling them that they
have been selected as victims in a deadlock situation.
If the processes involved in a deadlock situation are blocking one another in a circular reference, SQL Server
selects which process can be selected to break the deadlock with the least overall cost, and notifies this
process with error 1205.
Note
You can propose your specific session as a potential deadlock victim by using the statement SET
DEADLOCK_PRIORITY LOW.
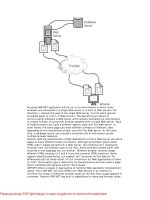
Two processes can create a deadlock situation when they access resources in opposite orders and try to
convert a shared lock into an exclusive lock at the same time. Figure 13.8 illustrates this scenario:
Figure 13.8. A typical deadlock situation.
Microsoft SQL Server 2000 Programming by Example
556
1. Connection A starts a transaction and reads the UnitPrice column from the Product 37. This
connection uses the HOLDLOCK locking hint to maintain the shared lock on the row corresponding to
Product 37.
2. Connection B starts a transaction and reads the average UnitPrice from the Order Details
table for Product 37. This connection uses the HOLDLOCK locking hint to maintain the shared lock on
the Order Details rows from Product 37.
3. Connection A tries to update the Order Details table to reset the unit price of Product 37 to the
value stored in the Products table. To execute this statement, Connection A needs an exclusive lock
on the affected rows, but this exclusive lock must wait because Connection B holds a shared lock on
the same rows.
4. Connection B tries to update Product 37 in the Products table with the average unit price retrieved
from the Order Details table. Connection B requests an exclusive lock on Product 37, but this lock
must wait because Connection A holds a shared lock on it.
5. SQL Server detects this deadlock situation, selects Connection B as victim of this situation, and sends
message 1205 to Connection B. Resources locked by Connection B are unlocked.
Chapter 13. Maintaining Data Consistency: Transactions and Locks
557
6. After Connection B has been selected as a victim and its locks have been released, Connection A can
continue its operation.
Another typical case is when two transactions want to convert an existing shared lock on a common locked
resource into an exclusive lock. To prevent this situation, you should use the UPDLOCK locking hint in
transactions in which you read data with intentions of updating it later in the same transaction.
Caution
When a transaction is selected as a victim in a deadlock situation, the process is cancelled and
changes applied are rolled back. However, the calling application could usually resend the
transaction and, hopefully, the previous locks have disappeared.
Avoiding deadlock is not always possible; however, you can help to reduce deadlocks by following these
guidelines:
• Keep transactions as short as possible.
• Avoid user interaction inside transactions. In other words, start a transaction only when required and
release it as soon as possible.
• Always access resources in the same order and check for potential circular references.
• Use the READ COMMITTED isolation level if possible, because it produces fewer locks than higher
isolation levels. Try to avoid SERIALIZABLE as much as possible.
• If an application uses several connections, bind them to share the same locking space. You can
execute the stored procedure sp_bindsession to keep more than one session in the same
transaction.
What's Next?
Transactions and locks are key aspects to provide the adequate concurrency to your database application in a
multiuser environment. However, they are restricted, as covered in this chapter, to a single-server operation.
The following two chapters focus on the multiserver environment from two different perspectives:
• Chapter 14 shows how to transfer data to and from SQL Server databases stored in the same or
different servers. Data Transformation Services (DTS) is a feature-rich application which, integrated in
SQL Server or as a standalone subsystem, transfers data between hetero-geneous systems,
including all the required transformations.
• Chapter 15 discusses the multiserver environment and the implications of the distributed
transactions. In Chapter 15, you learn how to use linked servers to maintain data in multiple servers,
as an alternative to DTS and Replication.
Chapter 14. Transferring Data to and from SQL Server
559
Chapter 14. Transferring Data to and from SQL Server
In a standard business environment, it is quite common to have different system platforms, different operating
systems, heterogeneous networks, and different database systems. Linking existing data from different
sources is a convenient way to work with heterogeneous data to gain data consistency through the company
without creating any data redundancy. However, in some cases, you might need to transfer data from one
system to another.
Importing and exporting data is a common task for a database administrator, and it is not our intention to
cover this subject in detail. However, as a database programmer, you should know the basics of importing
and exporting data, and this chapter will teach you how to solve this problem.
This chapter teaches you the following:
• Why you need to transfer and transform data
• SQL Server 2000 tools for transferring data
• How to use the BULK INSERT statement
• How to use the bcp command-line utility
• How to use the Copy Database Wizard
The Need for Transferring Data
If your company has a single database, in a single server, and you never need to receive data from other
systems or send data to other servers, you could skip this chapter.
Many systems receive their data through direct user input. However, there are some cases where transferring
data is important:
• You want to migrate to a new system and you want to populate the new database with data coming
from your old system.
• Your accounting system works in a mainframe and you do not want to change this system. However,
it would be useful to have some accounting information in the SQL Server Sales database. In this
case, you must periodically refresh this information from the mainframe.
• The post office changes the national postal code information and they distribute this new information
as a CSV file. You need to import this file into your system to update the Customer Management
application.
• The Inland Revenue changes their requirements and now the annual accounts must be sent in a
different format. You must create the process of exporting data in exactly the way they require.
• You create a testing server in your network and you want to have the same databases as in your
production server to test a new indexing strategy.
• Your sales managers visit customers, and they want to have a copy of the Sales System database in
their laptops so they can look at sales figures when they are at the customer site.
• Your corporation has many different companies in different countries, and you want to receive
periodic financial information from them. Every one of these companies uses a different system, and
the only way to receive data is by text files, so you can import them easily.
• You have a Documents database and you receive many documents from different sources. You want
to import them into the Documents database efficiently.
• You are running a Geographical Information System and your field teams send you files every week
with their field measurements. You need to integrate this new data with your existing GIS database.
• You just finished a new Agricultural Census in your county and you want to compare this new data
with the latest census's data. The old data is in a different system and you want to import the old data
to consolidate both databases.
• Your remote offices need to produce reports about their local sales figures. They complain because
they need to access your central mainframe to produce these reports, but the mainframe connection
is not always available. You decide that a good solution is to have a local database with local data to
produce reports locally. You need to refresh these local databases periodically to have their data
synchronized with the central database.
• Your network administrators are concerned about a potential bottleneck on your central database
system. A feasible solution is to install departmental servers with replicated data. In this way, users
Microsoft SQL Server 2000 Programming by Example
560
can receive data from a local server, in the same network segment, without traversing the entire
network to arrive to the data center.
SQL Server 2000 provides different tools to transfer data from any source to any destination. Depending on
your specific requirements, one tool can be more appropriate than another. You will learn about the SQL
Server 2000 tools used to transfer data in the next section of this chapter.
In other cases, the problem is not only transferring data, but also modifying data from the source database to
meet the requirements of the destination database system. Some examples are as follows:
• You have a relational database and you need to create a data warehouse database with a different
database schema; in this case, it could be a star schema.
• Your legacy system in the USA stores dates in a different format (mmddyyyy) from the legacy system
you have in France (ddmmyyyy). You want to make sure you can import dates correctly to your
central server in Indonesia, which uses the ISO/ODBC standard format (yyyy-mm-dd).
• After a company merge, you need to consolidate data from two different systems. In one system, the
codes used in lookup tables are different from the codes used in the other system. In the Spanish
system, end users can be S (solteros), C (casados), D (divorciados o separados), V (viudos). In the
British system, end users can be S (single), M (married), D (divorced), W (widow or widower). You need
to agree about new codes and transform the old ones.
• You just bought a bank in Morocco, and you see that their database system identifies customer
accounts by their full name, including title. You want to provide a new account identification number
and store title, family name, and first name in separate fields.
• You work in an international project and you need to integrate data in different currencies. Your
system selects Euro as the standard internal currency and you must transform all quantities into
Euros and store the exchange rate applied to every amount in a different field.
• You created a weather database to help on global weather forecasts. This system receives
continuous information from weather systems around the world, each one using different units for
temperature, rainfall, pressure, and so on. You must convert the data to uniform units to be able to
produce consistent results.
Data Transformation Services 2000 can help you create complex packages that transfer and transform the
data to meet the requirements of the destination database.
Tools for Transferring Data Using SQL Server 2000
SQL Server 2000 offers many different choices to transfer data. Every tool has advantages and
disadvantages. You can use the following examples as guidelines to select the data distribution tool to use:
• Using distributed queries, you can directly access data from different servers. Chapter 15,
"Working with Heterogeneous Environments: Setting Up Linked Servers," covers distributed
queries in detail.
• You can use replication to copy data from one server to another, on demand or at regular intervals. If
you need to distribute data to mobile users, and they need to modify data locally, merge replication is
an excellent solution. Transactional replication is a very efficient mechanism to distribute data
changes to remote servers, if the latency inherent to replication is acceptable in your case. Replication
is not covered in this book. Books Online contains a full section about replication, with comprehensive
information about how replication works.
• You can back up a database in a SQL Server 7.0 or 2000 server and restore it in another SQL Server
2000 server. If you restore a SQL Server 7.0 database into SQL Server 2000, the restore process
modifies the database internal physical structure to adapt it to the new SQL Server 2000 physical
structure. Restoring SQL Server 2000 databases into SQL Server 7.0 is not supported. Backup is not
covered in this book because it is an administrative task. Books Online contains the "Backing Up and
Restoring Databases" section, where you can find more information about this topic.
Note
Chapter 14. Transferring Data to and from SQL Server
561
Contrary to what happened with SQL Server 7.0, in SQL Server 2000 you can restore databases
from servers with different collations, because every database has its own collation, independent
from the server default collation.
• You can detach a database from a server running SQL Server 7.0 or 2000, copy the database files to
another server, and attach them to the destination server. This procedure is more efficient than using
backup and restore. After you attach a SQL Server 7.0 database into SQL Server 2000, it is converted
to the new database structure. Attaching SQL Server 2000 databases into SQL Server 7.0 is not
supported. Look in Books Online for information on how to use the stored procedures sp_detach_db
and sp_attach_db.
Note
In SQL Server 2000, you can attach databases that have been detached from servers with different
collations, because every database has its own collation, independent from the server default
collation.
• You can convert SQL Server 6.5 databases into SQL Server 2000 running the SQL Server Upgrade
Wizard. Look in Books Online for information on "Upgrading Databases from SQL Server 6.5
(Upgrade Wizard)."
• Data Transformation Services (DTS) is a flexible and powerful tool that you can use to import and
export data, and transform the data as well. You will learn how to import and export data using DTS
later in this chapter, in the "Using Data Transformation Services" section.
• Use the bcp command-line utility to import and export data to and from SQL Server 2000. You learn
how to use bcp in the next section of this chapter.
• Use the new BULK INSERT statement in a batch or stored procedure to import data from a file into a
SQL Server 2000 table. The next section of this chapter covers this tool in detail.
• You can use the ODBC bulk copy application programming interface (API), as the bcp utility does,
using any programming language to create your own transferring application. To get more information
about this interesting programming solution, search in Books Online for the section "How to Bulk Copy
with the SQL Server ODBC Driver (ODBC)."
• You can write an application using the SQL-DMO library, and use the Transfer and Transfer2
objects'properties and methods to transfer data and schema between SQL Server 2000 or SQL
Server 7.0 servers. Search in Books Online for the "Transfer Object" topic.
The BULK INSERT Statement and bcp
You can use the bcp command-line utility to export a table or the result of a query to an external data file. You
can copy this file over the network or the Internet, or use any media to send it to its destination. It also can be
used to import the data file into a single table.
You can use the bcp native mode to export data to and from SQL Server databases. If you export data from
SQL Server in native mode, you cannot import that data into any other database system than SQL Server.
However, using character-based files provides better flexibility, because the data can be exported to any
database system that supports importing from text files.
Tip
Microsoft SQL Server 2000 Programming by Example
562
Using bcp in native mode, between SQL Server databases, is more efficient than using character
mode.
To use bcp, you must open a command prompt window and execute this utility from there.
If you want to import data from a data file into SQL Server, using Transact-SQL language, you can use the
new BULK INSERT statement. This method of importing data is highly efficient, and you should use it to
perform simple import operations of big data files.
Using bcp and BULK INSERT is faster than inserting the same information, row by row, either manually or
from a client application.
By default, constraints and triggers are ignored when importing data using bcp or BULK INSERT, providing a
faster inserting operation. However, you should check the data to guarantee that it complies with the existing
constraints.
Tip
If you define triggers in your tables to maintain denormalized data in other tables, you should
create a stored procedure with similar functionality to apply to the imported data after the bulk
operation terminates. In this case, it is better if the stored procedure executes both operations in
sequence: the import process and the post-import maintenance operations.
In the next section, you will see how to enable or disable constraint checking and trigger execution during the
bulk copy operations.
If your destination database uses a full recovery model, the import operation must be fully logged, and you will
be potentially running out of space in the transaction log.
The fastest way to import data into SQL Server is by executing a minimally logged bulk-copy operation, which
can be performed if all these conditions are met:
• The database recovery model is set to simple or bulk-logged.
• The destination table is not replicated.
• The destination table does not have any triggers.
• The destination table is empty or does not have any indexes.
• You run the bulk copy operation, specifying the TABLOCK hint.
If the destination of the bulk copy operation does not meet any of these conditions, the operation will be
logged.
Tip
Chapter 14. Transferring Data to and from SQL Server
563
If the destination table has indexes, it is recommended to drop the indexes before importing the
data and re-creating them after the data is imported. In this case, the sequence should be as
follows:
1. Drop nonclustered indexes.
2. Drop the clustered index, if it exists.
3. Import the data.
4. Create the clustered index.
5. Create the nonclustered indexes.
However, for extremely big tables, when the data to import does not represent an appreciable
percentage of the existing volume of data, this technique is not recommended, because the internal
index maintenance during the importing process will be more efficient than the full rebuild of
existing indexes.
Tip
The first time you import a new type of file using a bulk-copy operation, you should import the data
to a provisional table first, check the data you just imported to see whether the importing process is
done correctly, and when you are certain that the operation works as expected, you can consider
the process as valid, and perform the bulk-copy operation on the destination table.
Using the bcp Command-Line Utility
The bcp command-line utility copies data from SQL Server to an external data file and imports data from an
external data file into SQL Server.
Note
The bcp utility uses the ODBC Bulk Copy Application Programming Interface (API). It is compatible
with any version of SQL Server.
To test the bcp utility, open a command prompt window and execute bcp /?, as in Listing 14.1.
Listing 14.1 Get Syntax Help About How to Execute bcp
C:\TEMP>bcp /?
Microsoft SQL Server 2000 Programming by Example
564
usage: D:\Program Files\Microsoft SQL Server\80\Tools\BINN\bcp.exe {dbtable |
query} {in | out | queryout | format} datafile
[-m maxerrors] [-f formatfile] [-e errfile]
[-F firstrow] [-L lastrow] [-b batchsize]
[-n native type] [-c character type] [-w wide character type]
[-N keep non-text native] [-V file format version] [-q quoted identifier]
[-C code page specifier] [-t field terminator] [-r row terminator]
[-i inputfile] [-o outfile] [-a packetsize]
[-S server name] [-U username] [-P password]
[-T trusted connection] [-v version] [-R regional enable]
[-k keep null values] [-E keep identity values]
[-h "load hints"]
In this section, we will take a look at some of these options, step by step.
Now, in the same command prompt window, you can write the instruction from Listing 14.2 to export the
Northwind.dbo.Region table to the external file region.txt in character format, and use your NT or
Windows 2000 credentials to connect to SQL Server.
Listing 14.2 Export the Region Table to the region.txt External File Using bcp
C:\TEMP>bcp northwind.dbo.region out region.txt -S YourServer\YourInstance -T -c
Starting copy
4 rows copied.
Network packet size (bytes): 4096
Clock Time (ms.): total 20
Looking at the instruction you just typed, see the following options:
• bcp is the program to execute.
• northwind.dbo.region is the fully qualified name of the table to export. You can specify the name
of a view, an inline user-defined function, or a table-valued function, as shown in Listing 14.3.
• out specifies that you want to export data.
• region.txt is the name of the file to fill with the exported data.
• -S YourServer\YourInstance specifies the server and instance to connect to. If you want to
export from the default instance, use –S YourServer instead.
• -T instructs bcp to use your NT or Windows 2000 credentials to connect to SQL Server, using
integrated authentication.
• -c means the data is exported using text mode.
Listing 14.3 Export the Result of the dbo.TopTenOrders Inline User-Defined Function to the
topten.txt External File Using bcp
Chapter 14. Transferring Data to and from SQL Server
565
C:\TEMP>bcp northwind.dbo.toptenorders() out topten.txt -S
YourServer\YourInstance -T -c
Starting copy
10 rows copied.
Network packet size (bytes): 4096
Clock Time (ms.): total 541
Note
You created the TopTenOrders inline user-defined function in Listing 10.14 from Chapter 10,
"Enhancing Business Logic: User-Defined Functions (UDF)."
To look at the file region.txt, you can use the type command, as seen in Listing 14.4.
Listing 14.4 Inspect the Contents of the Exported File region.txt
C:\TEMP>type region.txt
1 Eastern
2 Western
3 Northern
4 Southern
Now, you can try to import the file into a new table, using bcp again. In the same command-prompt window,
write the instruction contained in Listing 14.5.
Listing 14.5 Import the region.txt File into a New Table Called NewRegions Using bcp
C:\TEMP>bcp northwind.dbo.NewRegions in region.txt -S YourServer\YourInstance -T
-c
Microsoft SQL Server 2000 Programming by Example
566
SQLState = S0002, NativeError = 208
Error = [Microsoft][ODBC SQL Server Driver][SQL Server]Invalid object name
'northwind.dbo.NewRegions'.
You got an error message because bcp can import data only into existing tables, either directly, through
appropriate views, or inline user-defined functions.
To solve this problem, you must create the destination table first. You can do it easily from Query Analyzer
with the CREATE TABLE statement, or graphically in Enterprise Manager. However, you can do it as well from
the command prompt, using the osql utility to connect to SQL Server and execute the CREATE TABLE
statement. Listing 14.6 shows the execution of both osql and bcp.
Listing 14.6 Create the NewRegions Table and Import the region.txt File
C:\TEMP>osql -S YourServer\YourInstance -E -d Northwind -Q "CREATE TABLE
NewRegions (ID
int, Name nchar(50))"
C:\TEMP>bcp northwind.dbo.NewRegions in region.txt - S YourServer\YourInstance -T
–c
Starting copy
4 rows copied.
Network packet size (bytes): 4096
Clock Time (ms.): total 311
Now, you can use osql again, as in Listing 14.7, to look at the new table NewRegions and test whether the
import operation succeeded.
Listing 14.7 Use osql to Read Data from the NewRegions Table
C:\TEMP>osql -S YourServer\YourInstance -E -d Northwind -Q "SELECT * FROM
NewRegions"
ID Name
1 Eastern
2 Western
3 Northern
4 Southern
(4 rows affected)
You can use bcp to export the result from any query into a file, using the queryout option, as in Listing
14.8.
Chapter 14. Transferring Data to and from SQL Server
567
Listing 14.8 Export the Result of a Query to the query.txt External File Using bcp and the queryout
Option
C:\TEMP>bcp "SELECT CategoryID, CategoryName FROM Northwind.dbo.Categories"
queryout
query.txt -S YourServer\YourInstance -T -c
Starting copy
10 rows copied.
Network packet size (bytes): 4096
Clock Time (ms.): total 1
You can limit the number of errors to accept during the bulk copy operation by using the -m option. The
default value is 10. Every row that produces an error is disregarded by bcp, and the execution continues
until the number of errors is greater than 10 or the number specified within the –m option, in which case the
operation is cancelled.
Using the –e err_file option, bcp sends rows with transfer errors to the err_file file. You can later
review this file, correct any error, and retry the import operation only with these rows.
If you want to import specific rows only from the data file, use -F first_row and –L last_row to specify
the first and last rows to import. If you do not use the –F option, the transfer process starts from the first row. If
you do not use the –L option, the transfer continues to the end of the file.
The default field terminator is the tab character (\t or CHAR(9)), but you can specify your own field
terminator with the –t option. The default row terminator is the newline character (\n or CHAR(10)), but you
can specify your own row terminator with the –r option.
In the examples from Listings 14.1 through 14.8, we always used character format. However, bcp accepts
more formats:
• -n uses native SQL Server mode; therefore, every field is exported using its native storage format.
This mode is very efficient if you need to transfer data between SQL Server databases. Use the –N
option to send character data as UNICODE, and any other data type in its native format.
• -c uses the character data type. This option uses the tab character (\t) as field separator and the
newline character (\n) as row terminator. Use this format to transfer data to non-SQL Server
databases. Use the –w option if you want to output data in UNICODE (double byte) format.
• -V60, -V65, -V70 uses data types from old versions of SQL Server.
If the query to execute is too long to be written inline with the bcp command, you can create a text file and
use it as an input file with the –i input_file option. For similar reasons, if you expect too many messages
to fit in the command-prompt window, you can specify an output file with the –o output_file option.
In the preceding examples, we used integrated authentication (with the –T option) to connect bcp to SQL
Server, but you can use SQL Server authentication using the –U login_id and -P password options.
By default, bcp does not fire any AFTER INSERT or INSTEAD OF INSERT triggers on the destination table,
but you can force the execution of triggers using the –h "FIRE_TRIGGERS" hint. This option is valid only if
the in option is specified. The triggers are fired only once per batch during the bulk copy operation, and the
inserted and deleted tables contain the complete set of imported rows on that batch.
As with triggers, constraints are not checked during data import operations using bcp. If you want to enforce
constraints for every imported row, you can use the –h "CHECK_CONSTRAINTS" hint.
If you want to perform a minimum logged bulk copy operation, you must use the –h "TABLOCK" hint as well,
as mentioned earlier in this chapter.
If you want to use more than one hint, you can specify them using a single –h option with every hint separated
by commas, such as –h "FIRE_TRIGGERS, CHECK_CONSTRAINTS, TABLOCK".
Microsoft SQL Server 2000 Programming by Example
568
You can use the format option, instead of the in, out, or queryout options, to produce a format file. By
editing the format file, you can perform complex import operations, such as selecting which columns to import
from the file, change the order of the columns to import, or specify different delimiters for every column. Later
in this chapter, you will see how to use the format file to import WAV files into SQL Server. You can search in
Books Online for the "Using Format Files" topic to get information about the different options you have when
using the format file.
Using the BULK INSERT Statement
The BULK INSERT statement imports a data file into a table either directly or through a view. This way is
similar to the bcp utility, but you use BULK INSERT from Transact-SQL, not from the command prompt.
Listing 14.9 shows a simple example to import data from the region.txt file created in Listing 14.2. To
execute this example, you can open a session in SQL Server using Query Analyzer.
Listing 14.9 the BULK INSERT Statement to Import a Data File into a Table
USE Northwind
GO
TRUNCATE TABLE NewRegions
GO
SELECT *
FROM NewRegions
GO
BULK INSERT NewRegions FROM 'C:\Temp\region.txt'
GO
SELECT *
FROM NewRegions
ID Name
(0 row(s) affected)
(4 row(s) affected)
ID Name
1 Eastern
Chapter 14. Transferring Data to and from SQL Server
569
2 Western
3 Northern
4 Southern
(4 row(s) affected)
You can use the FIRSTROW and LASTROW options in the same way you used the –F and –L options in bcp.
Listing 14.10 show an example of importing rows 5 to 8 from the topten.txt file produced in Listing 14.3.
Listing 14.10 Use the FIRSTROW and LASTROW Options to Specify Which Rows to Import
USE Northwind
GO
Create the destination table
with no rows and the same structure as
the result set from TopTenOrders function
SELECT *
INTO TopTen
FROM dbo.TopTenOrders()
where OrderID < 1000
GO
Import rows 5 to 8 from the file
BULK INSERT TopTen FROM 'C:\Temp\topten.txt'
WITH
(
FIRSTROW = 5,
LASTROW = 8
)
GO
Test the rows imported
SELECT OrderID, CustomerID
FROM TopTen
ID Name
(0 row(s) affected)
(4 row(s) affected)
Microsoft SQL Server 2000 Programming by Example
570
ID Name
1 Eastern
2 Western
3 Northern
4 Southern
(4 row(s) affected)
BULK INSERT has a similar functionality as bcp for importing operations. Table 14.1 maps every option in
the bcp utility to the corresponding option in the BULK INSERT statement.
Table 14.1. Options Equivalence Between BULK INSERT and bcp
BULK INSERT bcp
FROM 'data_file' in data_file
BATCHSIZE = batch_size -b batch_size
CHECK_CONSTRAINTS -h "CHECK_CONSTRAINTS"
CODEPAGE = 'ACP' -C ACP
CODEPAGE = 'OEM' -C OEM
CODEPAGE = 'RAW' -C RAW
CODEPAGE = 'code_page' -C code_page
DATAFILETYPE = 'char' -c
DATAFILETYPE = 'native' -n
DATAFILETYPE = 'widechar' -w
DATAFILETYPE = 'widenative' -N
FIELDTERMINATOR = 'field_terminator' -t field_term
FIRSTROW = first_row -F first_row
FIRE_TRIGGERS -h "FIRE_TRIGGERS"
FORMATFILE = 'format_file' -f format_file
KEEPIDENTITY -E
KEEPNULLS -k
KILOBYTES_PER_BATCH = kb_per_batch
(Not available)
(Not available)
-a packet_size
BULK INSERT bcp
LASTROW = last_row -L last_row
MAXERRORS = max_errors -m max_errors
ORDER (column [ASC|DESC], n) -h "ORDER (column [ASC|DESC], n)"
ROWS_PER_BATCH = rows_per_batch -h "ROWS_PER_BATCH = bb"
ROWTERMINATOR = 'row_terminator' -r row_term
(Not available)
out
(Not available)
queryout
(Not available)
format
(Not available)
-e err_file
(Not available)
format
(Not available)
-V 60
(Not available)
-V 65
(Not available)
-V 70
(Not available)
-6
(Not available)
-q
(Not available)
-o output file
(Not available)
-i input file
Chapter 14. Transferring Data to and from SQL Server
571
(Not available)
-S server_name\instance
(Not available)
-U login_id
(Not available)
-P password
(Not available)
-T
(Not available)
-v
(Not available)
-R
Note
For descriptions of individual options not described in this chapter, look at the "BULK INSERT"
topic in Books Online.
Caution
Only members of the sysadmin role can execute the BULK INSERT statement. SQL Server uses
the SQL Server service account to read the file. Therefore, you should make sure that the service
account has permissions to read the file.
It is not required to be a member of the sysadmin role to execute the bcp command-line utility,
but the user needs to have appropriate permissions on the source and destination tables, as well
as the files and directories used by bcp.
BULK INSERT imports data into a table, but you do not have a BULK EXPORT statement to export data from
a table to an external file. You can execute bcp from the command prompt to export data from SQL Server to
a file. Can you execute bcp from Transact-SQL?
You can use the xp_cmdshell system stored procedure to execute any OS command, and that includes
bcp. Listing 14.11 shows an example of how to export a table to an external file, using bcp with
xp_cmdshell, create a new destination table, and import the file into the new table using BULK INSERT.
Listing 14.11 Use bcp with xp_cmdshell to Export Data from Transact-SQL
USE Northwind
GO
PRINT CHAR(10)
Microsoft SQL Server 2000 Programming by Example
572
+ 'Exporting the Products Table in widenative mode'
+ CHAR(10)
EXECUTE master.dbo.xp_cmdshell 'bcp northwind.dbo.products out
c:\temp\products.txt -S
MSSQLFGG\S2K -T -N'
GO
PRINT CHAR(10)
+ 'Creating the NewProducts table '
+ 'with the same structure as '
+ CHAR(10)
+ 'the Products table but empty'
+ CHAR(10)
SELECT *
INTO NewProducts
FROM Products
WHERE ProductID = -1
GO
PRINT CHAR(10)
+ 'Checking the NewProducts table'
+ CHAR(10)
SELECT COUNT(*)
FROM NewProducts
GO
PRINT CHAR(10)
+ 'Importing the Products.txt file into the NewProducts Table'
+ CHAR(10)
BULK INSERT NewProducts FROM 'c:\temp\Products.txt'
WITH
(
DATAFILETYPE = 'widenative'
)
GO
PRINT CHAR(10)
+ 'Checking the NewProducts table'
+ CHAR(10)
SELECT COUNT(*) AS NRows
FROM NewProducts
GO
Exporting the Products Table in widenative mode
output
NULL
Starting copy
Chapter 14. Transferring Data to and from SQL Server
573
NULL
77 rows copied.
Network packet size (bytes): 4096
Clock Time (ms.): total 411
NULL
(7 row(s) affected)
Creating the NewProducts table with the same structure as
the Products table but empty
(0 row(s) affected)
Checking the NewProducts table
0
(1 row(s) affected)
Importing the Products.txt file into the NewProducts Table
(77 row(s) affected)
Checking the NewProducts table
NRows
77
(1 row(s) affected)
Another common problem is inserting images, or any document, from individual files into a table. This case is
more difficult than reading data from a single file because in this case, the individual files are not part of any
data file exported from a database application.
To solve this problem, you must create a format file to import every file, one by one. As an example, you can
create the WAVFiles table, as in Listing 14.12, to store WAV files, and you want to save the WAV files
included in the WINNT\MEDIA directory in this table. Using one of these files (START.WAV), you must first
know how big it is, to write a format file for it. When you look at the directory, you will find that the START.WAV
file is exactly 1,192 bytes in size. The format file to create it is included in Listing 14.12. Create a file called
wav.fmt in the WINNT\MEDIA directory with the contents of Listing 14.13.
Listing 14.12 Create the WAVFiles Table
USE Northwind
GO
CREATE TABLE WAVFiles (
ID int NOT NULL
IDENTITY(1,1)
PRIMARY KEY,
Microsoft SQL Server 2000 Programming by Example
574
FullFileName varchar(1024) NULL,
WAV image NULL)
GO
Listing 14.13 WAV.FMT File to Import the START.WAV File Using BULK INSERT
8.0
1
1 SQLIMAGE 0 1192 "" 3 wav ""
The WAV.FMT file created on Listing 14.13 contains the following sections:
• First line (8.0)— This is the version number of the bcp.exe application, corresponding to SQL Server
2000.
• Second line (1)— This is the number of fields the source file contains. In this case, the file contains a
single field: the wav field.
• Third line (1)— Field number in the file. There is only one field in this case:
SQLIMAGE
Data file in the destination database. Because this is nontext BLOB information, the data type
should be SQLIMAGE.
0
Prefix length. In this case, you want to read from the beginning of the file.
1192
Length of the field. In this case, it is the length of the file: 1192 bytes.
""
Field terminator. In this case, it must be empty, because there is only one field in the file.
3
Import this information in the third field of the table.
wav
Target field name.
""
Target field collation. It must be empty for an image field.
Now, you execute the BULK INSERT statement to import this file into the table, as in Listing 14.14. After
importing the file, the script updates the record with the original filename and tests the length of the
information just imported.
Listing 14.14 Import the WAV File into the WAVFile Table
USE Northwind
GO
DECLARE @ID int
BULK INSERT WAVFiles FROM 'd:\winnt\media\start.wav'
WITH (
FORMATFILE = 'd:\winnt\media\wav.fmt'
Chapter 14. Transferring Data to and from SQL Server
575
)
SET @ID = IDENT_CURRENT('WAVFiles')
UPDATE WAVFiles
SET FullFileName = 'D:\WINNT\MEDIA\start.wav'
WHERE ID = @ID
SELECT ID,
DATALENGTH(wav) AS WAVELength,
FullFileName
FROM WAVFiles
WHERE ID = @ID
ID WAVELength FullFileName
1 1192 D:\WINNT\MEDIA\start.wav
To automate the process, you can create the stored procedure ImportWavFiles, as defined in Listing
14.15. The ImportWavFiles stored procedure uses the CreaWavFmt stored procedure, defined in Listing
14.15 as well, to automatically create the WAV.FMT file for every WAV file in the required directory.
Tip
The CreaWavFmt stored procedure uses the DOS ECHO command to write text to a file. You can
use xp_cmdshell to execute ECHO commands and write information to a short file from Transact-
SQL, as in this example.
Listing 14.15 Stored Procedures to Import WAV Files from Any Directory into the WAVFile Table
USE Northwind
GO
CreaWavFmt
CREATE PROCEDURE CreaWavFmt
@dir varchar(255), directory ended with '\'
@length int file length
AS
Microsoft SQL Server 2000 Programming by Example
576
/*
** This is the required step to import
** image files with BULK INSERT
**
** We should do it manually, but we
** have xp_cmdshell for?
*/
DECLARE @cmd varchar(8000)
Remove wav.fmt file if exists
SET @cmd = 'del '
+ @dir + 'wav.fmt'
EXEC master.dbo.xp_cmdshell @cmd, no_output
Create the first line of the format file
SET @cmd = 'echo 8.0 >>'
+ @dir + 'wav.fmt'
EXEC master.dbo.xp_cmdshell @cmd, no_output
Write the second line to the file
SET @cmd = 'echo 1 >>'
+ @dir + 'wav.fmt'
EXEC master.dbo.xp_cmdshell @cmd, no_output
/*
** Add the third line to the file, specifying:
** 1 (the first field = entire file)
** SQLIMAGE as datatype
** 0 as field prefix length
** length of the field (file in this case)
** no field separator
** third field on the table
** Wav field
** Empty collation
*/
SET @cmd = 'echo 1 SQLIMAGE 0 '
+ CONVERT(varchar(10), @length)
+ '"" 3 wav "" >>'
+ @dir + 'wav.fmt'
EXEC master.dbo.xp_cmdshell @cmd, no_output
wav.fmt is created already for this file
GO
InsertWavFiles
CREATE PROCEDURE InsertWavFiles
@dir varchar(255)
AS
Chapter 14. Transferring Data to and from SQL Server
577
DECLARE @sdir varchar(256)
/*
** Create temporary table to hold
** directory contents
*/
CREATE TABLE #tdir(
FileDir varchar(200) NULL,
length int NULL)
SET @sdir = 'dir '
+ @dir + '*.WAV'
INSERT #tdir (FileDir)
EXEC master.dbo.xp_cmdshell @sdir
Filter undesired rows
you can add your own conditions
DELETE #tdir
WHERE FileDir NOT LIKE '%.WAV'
OR FileDir IS NULL
Obtain file length and
filename cleansing
You could check with
EXEC master.dbo.xp_cmdshell 'dir c:\*.*'
that lengths are correct
UPDATE #tdir
SET length = CONVERT(int,
CONVERT(money,
LTRIM(RTRIM(SUBSTRING(FileDir, 20, 20))), 1)),
FileDir = LTRIM(RTRIM(SUBSTRING(FileDir, 40, 40)))
DECLARE @file varchar(256)
DECLARE @length int
DECLARE @sql varchar(8000)
DECLARE c_files CURSOR
FOR SELECT FileDir, length
FROM #tdir
OPEN c_files
FETCH NEXT FROM c_files INTO @file, @length
WHILE @@FETCH_STATUS = 0
BEGIN
Create bcp.fmt file to import the file
EXEC CreaWavFmt @dir, @length
Import the file
SET @sql ='BULK INSERT WAVFiles FROM '''
+ @dir
+ @file