Linux Server Hacks Volume Two phần 3 pps
Bạn đang xem bản rút gọn của tài liệu. Xem và tải ngay bản đầy đủ của tài liệu tại đây (5.5 MB, 41 trang )
Because the X Window session running in VNC is using an alternate display, you may
need to make sure that you set the DISPLAY environment variable correctly within it in
order to start other X Window System applications. For example, if you are running
Xvnc on port 5908, you may need to set the display in your shell appropriately using a
command such as export DISPLAY=:8.0.
2.5.4. Troubleshooting Xvnc Startup
If you're lucky, you're already looking at Figure 2-7 and thinking "problems what problems?" However, if your vncviewer
simply hangs or terminates with information-packed messages such as "vncviewer: ConnectToTcpAddr: connect:
Connection refused" or "Unable to connect to VNC server," don't despair. These problems are easily resolved.
If your vncviewer connection to the remote machine simply hangsi.e., you press Return and nothing happenschances are that
81
81
the ports associated with your VNC setup are being firewalled on the remote machine, the local machine, or somewhere in
between. Check to make sure that whatever ports you put in /etc/services on the remote system are actually available and
that a process is listening on the XDMCP port. An easy way to do this is by executing the netstat -an command and
filtering its output for port 177, the port used by XDMCP, as in the following example:
$ netstat -an | grep 177
udp 0 0 :::177 :::*
If you do not see any output from this command, make sure you have correctly configured XDMCP support in your display
manager and that the Xvnc entries in /etc/xinetd.d/vnc are not disabled. Worst-case, you can reboot your system to make
sure everything starts up correctly.
If you still can't establish a VNC connection to your system, make sure no firewall rules are blocking any of the ports used
by XDMCP or Xvnc. An easy (but completely insecure) way to do this is to temporarily terminate your firewalls or punt all
your active rules using a command such as iptables -F. First try this on the system that you are trying to connect to;
then, if you still can't connect, try it on the system you are trying to connect from. If you can connect successfully after
disabling the firewall, review your system's firewall configuration and relax the appropriate rules to enable remote VNC
connections. Remember to reactivate your firewalls after reconfiguring themyou don't want the entire seventh-grade class of
PS150 in Seoul to be able to try getting graphical logins on your machine!
2.5.5. See Also
"Access Systems Remotely with VNC" [Hack #10]•
"Secure VNC via SSH" [Hack #12]•
Linux Server Hacks, by Rob Flickenger (O'Reilly)•
•
•
Hack 14. Put Your Desktops on a Thin Client Diet
Centralize administration by using the Linux Terminal Server Project and existing or inexpensive desktop
systems to give your users the computing power they need at a price you can afford.
Though the cost of hardware is constantly decreasing, it is still greater than zero. Putting a high-powered
workstation on everyone's desk is a nice idea, but not everyone needs a dual-processor Mac or Linux box to
get their work done. The key requirement for most users is access to the applications and data they're working
on and enough memory to work with them.
The Linux Terminal Server Project (LTSP; ) lets you boot desktop systems from a remote
server, gives users access to their applications and data when they log in, and provides a graphical, X Window
System working environment that is functionally identical to booting from a local disk. This can provide
substantial cost savings by enabling you to deploy or reuse less-expensive hardware on your users' desktops,
since it reduces the amount of local storage and other hardware that any desktop system requires. A processor
that is too slow to keep up with the demands of today's applications can still function quite nicely when its
sole function is to update a display and respond to mouse and keyboard input.
82
82
Centralizing system resources on high-powered servers also provides substantial benefits to system
administrators by eliminating the need to individually maintain and upgrade desktop operating systems and
application software. All the software that a desktop system requires beyond a boot floppy or network boot
information is stored on the server.
The LTSP also provides a great alternative to deploying and maintaining dual-boot systems throughout your
enterprise or installing X Window System software on every Windows box if users only need to run Linux
software occasionally. Give the users LTSP boot disks configured for their desktop systems and have them
reboot using these disks. Problem solved! They have Linux systems on their desktops until they reboot.
Version 4.1 of the LTSP was the latest version at the time this book was
written. Installation, configuration, and conceptual information should be
similar for any newer version that may exist by the time that you read this.
2.6.1. Understanding the LTSP Client Boot Process
In case the notion of systems booting and getting all their software over a network is new to you, this section
provides an overview of the boot process for an LTSP client system. Being able to visualize how LTSP clients
and servers interact will minimize configuration problems and will also be useful if you need to diagnose
performance or connectivity problems in the future.
LTSP client and servers interact in the following way when you boot an LTSP client:
The client boots and contacts a DHCP server to obtain its IP address, the name of the Linux kernel to
download and boot, and the NFS location of a directory structure that it should use as the root
filesystem for that kernel.
1.
The client contacts the TFTP server on the LTSP kernel and downloads the specified kernel into local
memory.
2.
The client boots the downloaded kernel, using the NFS root filesystem as the root filesystem for that
kernel.
3.
The client runs the standard Linux startup script /etc/rc.sysinit, which starts various services required
by the system, sets up swapping, and so on.
4.
The client uses the information in /etc/lts.conf in the NFS-mounted root filesystem to contact
whatever X Window System display manager is running on the specified system and display an X
display manager login screen on the client's screen.
5.
Once you log in, you are logged in on the LTSP server system. The client system is running only the X
Window System software necessary to manage network connections, run an X Window System server, and so
on.
Though you can use lower-powered systems as LTSP clients, this doesn't
mean that every PC currently serving as a doorstop at your site can be
recycled as a desktop LTSP client system. The PCs you use as LTSP clients
must have sufficient resources to run the X Window System, use a reasonable
screen resolution, display multiple windows that may be graphically
complex, and be able to exchange data over the network relatively quickly.
Pentium systems running at 166 MHz or greater, with a minimum of 32 MB
of memory and a 4-MB video card, are quite suitable for use as LTSP clients.
Adding 100-MB Ethernet cards, more memory, and 8-MB or greater video
cards will provide a better user experience and will enable you to configure
83
83
the X Window System to operate at higher resolutions and with greater color
depth.
2.6.2. Downloading and Installing the LTSP Software
You can download the LTSP administrative and configuration utilities as a tarball with an installer
( or as an RPM ( You
can also download the latest LTSP software by following the download link from its Sourceforge project site
at />As part of the initial configuration process, the LTSP administration utility downloads additional packages
that the LTSP server(s) and clients require. These additional packages provide the kernel, X Window System
utilities, and other components of the root filesystem used when LTSP clients boot from the server in order to
start their X sessions. During the LTSP configuration process, you can either download these additional
packages over the network or load them from a local CD-ROM or directory that provides them. To save time
during the installation process and simplify installation in general, you should download an ISO image of a
CD-ROM that contains all of these packages from />If you've downloaded a tarball of the LTSP utilities, unpack it and execute the install.sh script to install the
utilities on the system that you want to be your LTSP server. If you've downloaded the RPM, simply install it
with your favorite RPM invocation. Mine is:
# rpm -Uvvh ltsp-utils-0.11-0.noarch.rpm
If you've download the ISO of the packages required by the LTSP server, burn it to a CD-ROM and mount the
CD-ROM (or mount the ISO using a loopback device if you're in a hurry or don't have a CD burner handy).
Now the real fun begins!
2.6.3. Configuring and Starting the LTSP Server
To actually install the packages that an LTSP server needs and create your default LTSP configuration file,
su to root (use su - to provide a pristine root environment) and execute the ltspadmin command. This
command provides a terminal-oriented interface that enables you to install the packages and configure the
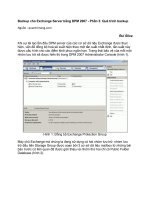
system services required by required by an LTSP server. Figure 2-8 shows the ltspadmin utility's initial screen
in an xterm.
Figure 2-8. The initial screen of the ltspadmin utility
84
84
The first step in configuring an LTSP server is to configure the installer itself. Use the arrow keys to select the
"Configure the installer options" menu option. The installer prompts you for the location from which to
retrieve the packages required by the installer, providing a network source by default. If you've installed them
locally, supply the pathname to the directory containing the packages in the form of a URL that begins with
file://, followed by the full pathname. (This means that your URL must begin with three slashes: two for the
protocol specification and one for the beginning of the path to the directory containing the packages. For
example, if you burned a CD-ROM and mounted it as /mnt/cdrom, your URL would be file:///mnt/cdrom.)
Next, you'll be prompted for the directory in which you want to install these packages on your server. You'll
need to have about 350 MB free on the partition where this directory is located in order to do a complete
install of all the LTSP software.
Finally, identify any HTTP or FTP proxies you want to use (or specify none), and then enter y to accept the
values that you've entered. The screen shown in Figure 2-8 will be displayed again.
The next step is to select the Install/Update LTSP Packages option, which displays the screen shown in Figure
2-9.
Figure 2-9. The ltspadmin utility's Select Packages screen
Press A to select all the packages listed, and press Q to exit this screen and begin installing those packages.
You'll have to answer y to an "are you really, really sure" prompt, and then package installation to the
specified directory will begin.
Once all the packages are installed, press Enter and select the Configure LTSP option. This starts the ltspcfg
utility and begins LTSP configuration. ltspcfg first checks and summarizes the status of all the services that
LTSP requires on your server. Press Enter to continue, and you'll see two options: S to summarize the status
of required services of your LTSP server, and C to actually configure them. Figure 2-10 shows the summary
screen.
Figure 2-10. The ltspcfg utility's Summary screen
85
85
Selecting C displays the screen shown in Figure 2-11, which lists the various aspects of the LTSP server that
have to be configured for the terminal server.
Figure 2-11. The ltspcfg utility's Configuration screen
An LTSP server must provide or have access to the following services in order to function correctly:
DHCP
Assigns the client's IP address and specifies values such as the location of the kernel that the client
must download and boot, the path of the NFS root filesystem used by the client's kernel, and so on.
The DHCP server doesn't need to be running on the LTSP server, but it must be configured correctly
wherever it is running to provide the information required by LTSP clients.
NFS
Enables the client to access the root filesystem exported by the LTSP server, use swapfiles that live on
the LTSP server over NFS, and so on.
86
86
TFTP
Enables the client to download the kernel that it will boot. The TFTP server does not need to be
running on the LTSP server, but it must be configured correctly wherever it is running to provide the
bootable kernel image required by LTSP clients.
XDMCP
Enables users to log in on the client system and establish an X Window System connection to the
LTSP server.
I find it easier to run all the services required by LTSP clients on the LTSP server, to
simplify administrative tasks such as updating the kernel boot image or changing
DHCP parameters. The overhead of maintaining special DHCP and TFTP servers on
the LTSP server is usually less than that of making updates on multiple systems.
However, as discussed in the list above, only NFS and XDMCP must actually be
running on the LTSP server.
We're all sysadmins here, so rather than walking through each step and listing each keypress, I'll just highlight
the services that you have to activate and the types of values that you need to enter:
Runlevel
Set the runlevel at which your LTSP server starts. The LTSP server typically needs to be running at
runlevel 5 to enable graphical logins via XDMCP, though the runlevel associated with graphical
logins differs across Linux distributions. You can also use runlevel 3 (or whatever your nongraphical,
multi-user runlevel is) and manually start the X Window System after each login, but that's less fun.
Interface selection
Identify the Ethernet interface over which the LTSP server accepts connections. This information is
used in setting up the DHCP and NFS services. Some sites use multiple network interface cards
(NICs) in their LTSP servers and attach all LTSP clients to a specialized subnet on a dedicated
interface to improve performance and minimize the chance of DHCP collisions.
DHCP configuration
Add entries to the DHCP configuration file (/etc/dhcpd.conf) that your LTSP clients require when
they get Ethernet addresses from your DHCP server, and make sure that the DHCP server is started by
default at the previously specified runlevel. If the DHCP configuration file doesn't already exist, the
ltspcfg utility creates a template configuration file. You must subsequently edit this to reflect your
local domain, network configuration, and so on. Here are some examples of the key entries in the
DHCP configuration file for LTSP:
option routers 192.168.6.32;
option domain-name-servers 192.168.6.32;
option domain-name "vonhagen.org";
option root-path "192.168.6.32:/opt2/ltsp-4.1/i386";
subnet 192.168.6.0 netmask 255.255.255.0 {
use-host-decl-names on;
option log-servers 192.168.6.32;
range 192.168.6.100 192.168.6.120;
87
87
filename "/lts/vmlinuz-2.4.26-ltsp-2";
}
"Quick and Easy DHCP Setup" [Hack #20] has more detailed information about setting up DHCP and all the
entries in the /etc/dhcpd.conf file.
If you need to provide specific settings for distinct LTSP clients, you can uniquely
identify clients by their MAC addresses and provide client-specific configuration
information in your DHCP configuration file.
TFTP configuration
Make sure the TFTP server is enabled in /etc/xinetd.d/tftp and the directory where it stores files exists.
Portmapper configuration
Make sure the portmapper, required to map ports to Remote Procedure Call (RPC) services, is
running on the LTSP server so that NFS (and, optionally, NIS) services will work correctly.
NFS configuration
Configure the LTSP server to start NFS at boot time if it doesn't already do so.
XDMCP configuration
Determine which of the available X display managers (gdm, kdm, or xdm) are installed on the LTSP
server, and identify the one that is currently used in runlevel 5. This option also adds entries to the
configuration file used by that display manager so that it will accept connection requests from remote
LTSP clients.
Create /etc/hosts entries
Create entries in the LTSP server's /etc/hosts for the range of IP addresses used by LTSP clients. Most
RPC-based services, such as NFS, need to be able to map an IP address to a hostname and back again.
If you are using DNS, you can also add these entries to your DNS server.
Create /etc/hosts.allow entries
Add entries to the /etc/hosts.allow file for the NFS portmapper and TFTP services required by LTSP
clients. The /etc/hosts.allow file is used by xinetd's TCP wrappers to enable access from specified
hosts or subnets.
Create /etc/exports entries
Add entries to the /etc/exports file used by NFS to identify directories to export, the hosts that can
mount them, and how to mount and access those directories. The entries added by the ltspcfg program
identify the NFS-mounted root filesystem used during the LTSP client boot process and the NFS
directory that contains swapfiles for LTSP clients.
88
88
Create the lts.conf file
Create a default Linux Terminal Server configuration file in etc/lts.conf, relative to the root of your
NFS-mounted root filesystem (in other words, relative to the directory named in the root-path
directive in your /etc/dhcp.conf file). This file provides initial values that a client uses for local
configuration and to connect to the LTSP server, and it enables you to provide client-specific settings
when necessary. You may have to modify this file to reflect differences between systems such as
graphics resolutions or PS/2, serial, and USB mice. See the LTSP documentation for more
information about its possible contents.
At this point, you should reboot your LTSP server and verify that all the mandatory services have started
automatically (DHCP, portmapper, NFS, and an X display manager) and that other mandatory services such
as TFTP are enabled. Almost there!
2.6.4. Preparing LTSP Client Boot Media
Once the LTSP server is configured, the next step is to figure out how you want to boot your clients. There are
a variety of ways of booting LTSP clients:
Via the Pre-boot Execution Environment (PXE), if supported by your Ethernet card. PXE is limited to
booting files that are smaller than 32K (which doesn't include the Linux kernel), so you'll have to
configure it to load a network bootstrap program (NBP) first, which then loads the kernel. Some
network cards or motherboards with onboard networking require the use of specialized PXE
bootloaders. LTSP Versions 4.0 and greater provide a PXE bootstrap program known as pxelinux.0.
For more information about using pxelinux.0, see Another open
source PXE bootstrap program often used with LTSP is bpbatch. You can get additional information
about bpbatch from its web site () or from
/>•
Via Etherboot or Netboot, two open source Linux projects for creating boot ROMs that you can plug
into any network card that supports a boot ROM.
•
Via floppy disk, by creating an Etherboot image customized for your network card that you write to a
floppy and boot from.
•
Of these, the most common and easiest to start with is booting from floppy. You simply write the customized
Etherboot image to a floppy and then ensure that the client system is configured to boot from its floppy disk
drive first. The client boots the image on the floppy, which initializes your client's network interface, then
sends out a DHCP request and uses the boot-file and root-path images to download the kernel and boot using
the specified root filesystem.
Creating an Etherboot image customized for your client's network card would be completely outside the scope
of this hack if it weren't for the amazing ROM-O-Matic web site ()simply identify
your network card, and the web site will generate a boot image for you and download it to your system. It
doesn't get much easier than that!
To create the right ROM image, you need to know the exact PCI ID of your network card. If you're not sure
which card you have, the easiest thing to do is to boot your client using a rescue disk [Hack #90] or other
bootable CD (the Knoppix Live CD included with Knoppix Hacks, also from O'Reilly, is a personal favorite).
After logging in, you can run the lspci command to identify your Ethernet card and then run the lspci
-n command to display the PCI identifiers (two four-digit, colon-separated numbers) for your card. You can
then match these against the versions of your card listed on the ROM-O-Matic site, click Get ROM, and save
the ROM image to your system. You can then write it to a floppy disk using a command like the following (as
root):
# cat ROM-filename > /dev/fd0
89
89
You're now seconds away from turning an old PC into a useful X terminal.
2.6.5. Booting an LTSP Client
Before booting your LTSP client, make sure that all the services required by the LTSP server are running on
the server, and that the client is configured to boot from its floppy disk first.
Drumroll, please! Insert the floppy disk in the client's floppy drive and power on the system. After the generic
POST messages, you should see a message about loading the ROM image, followed by some Ethernet
configuration information and the message "(N)etwork Boot or (Q)uit." Press N, and your system will
download and boot the Linux kernel from your LTSP server. After the standard Linux boot messages, you
will see a screen that displays the login dialog shown in Figure 2-12.
Figure 2-12. An LTSP client's GDM login dialog
Congratulationsyour doorstop is now a useful X terminal!
Once you have an LTSP server configured and set up, the only thing you have to do to create additional client
systems is to generate ROM images for the appropriate Ethernet cards, put each on a floppy, and boot the new
client with an appropriate boot floppy. This is especially easy if you tend to buy your PCs in batches or from a
single vendorchances are that many of them will have the same Ethernet cards and can use the same boot
floppies.
2.6.6. See Also
•
"Quick and Easy DHCP Setup" [Hack #20]•
"Rescue Me!" [Hack #90]•
•
Knoppix Hacks, by Kyle Rankin (O'Reilly)•
90
90
Hack 15. Run Windows over the Network
Stop deploying Windows systems and software for people who only need occasional access to a few
applications.
Regardless of how you feel about Microsoft, you can't escape the Windows operating system and the
applications that require it. Even companies that live on Linux for development and testing still need
to provide developers with access to Windows systems so that they can share various types of
documents with management in formats that management can understand. This quickly gets
expensive, and it's generally a hassle for the system administrators who have to deploy and manage
these machines, set up the Windows shares de jour on each computer or in user profiles, install the
right software packages, and so on.
Many companies take a first stab at saving money by putting two computers under many desks, and
sharing a monitor, keyboard, and mouse between them using a KVM switch. That's fine, except that
your company pays for the extra systems, Windows licenses, and KVM switches and has to deal with
the administrative and security hassles inherent in deploying two desktops per user. As an alternative,
some companies use the open source WINE project or its commercial variant Crossover Office
(which is a great package, by the way), to run Windows applications natively on Linux machines.
If you need to give users occasional access to Windows-only applications but want to minimize costs
and administrative hassles, a good solution is to install Windows Terminal Services on a reasonably
beefy Windows system and purchase a pool of Client Access Licenses that are assigned to the users
who need to be able to use the applications. Remote clients can then attach to the Terminal Services
server and run virtual Windows sessions in windows on their desktops. Install the software that
people need to use on the Terminal Services server or in shares defined in your user profiles, and any
remote users connected to the server will be able to run the software they need. Luckily, access to
Windows Terminal Services doesn't even require a Windows system anymoreLinux users, including
those working in an LTSP environment [Hack #14] can easily access Windows Terminal servers
using rdesktop, an open source software package that speaks the Remote Desktop Protocol (RDP)
used by Windows Terminal Services. This hack shows you how it works.
2.7.1. Opening Your Connection
Because rdesktop is a graphical application, you must execute it from a Linux system that is running
the X Window System. This hack discusses options that are found only in more recent versions of
rdesktop, which was at Version 1.4.0 when this book was written. Though it's found on many Linux
distributions, you can always get the latest and greatest version of rdesktop from the sites listed at the
end of this hack.
The most minimal command line that you can use to connect to a system running Windows Terminal
Services is rdesktop host, where host is the name or IP address of the system running Windows
Terminal Services. Once connected, a window displaying the standard Windows login screen appears
on your Linux desktop, as shown in Figure 2-13.
91
91
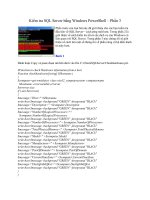
Figure 2-13. The Windows Terminal Services login screen in rdesktop
After you log in and specify the domain that you want to log into (if necessary), your rdesktop
window will display the standard Windows desktop, as shown in Figure 2-14.
If you centralize Windows services by running Terminal Services on your
domain controller, make sure the users who want to connect to it have the
"Log on Locally" user right or belong to a group with that right. Otherwise,
users will receive the message "The local policy of this system does not
permit you to log on interactively" and be unable to connect.
Like most programs, rdesktop provides a number of options that can simplify access to Windows
Terminal Services. Though they're all on the manpage, I'll go through my favorites here:
Table 2-2.
-d
The domain to
which you
want to
authenticate.
-f Full-screen
mode. This
displays the
desktop in a
92
92
decorationless
window that
takes over your
desktop. You
can toggle
decorations
(and therefore
window
controls) by
pressing
Ctrl-Alt-Enter.
-p
Your password
in the remote
domain.
-u
The name of
the user that
you want to log
in as.
Figure 2-14. A successful Windows Terminal Services login in rdesktop
93
93
2.7.2. Mapping Local Devices to Your Remote Session
If the system running Windows Terminal Services is running Microsoft Windows XP, Windows Server 2003,
or any newer version of Windows, one especially cool option not listed in the previous section is the -r
option, which lets you directly map resources on your Linux system to your Windows Terminal Services
connection. This is useful when you want to map a local print queue to a virtual printer in your Windows
Terminal session or access a local drive in your Terminal session (using -r printer
:local-queue-name and -r disk:share-name=/device/path, respectively). For example, to
attach PRN1 to a local print queue named Silentwriter, you would add -r printer:Silentwriter to
your command-line options when executing the rdesktop command. Figure 2-15 shows how your local
print queue shows up in a generic Windows print dialog.
To map your local CD-ROM drive to a share called cdrom, you could add -r disk:cdrom=/dev/cdrom
to the rdesktop command line. If you still use floppies, you could map your local floppy drive to a share
called floppy by adding -r disk:floppy=/dev/fd0 to your rdesktop command line. The name that
you specify as the share must be eight characters or less.
94
94
Figure 2-15. A print queue mapped by rdesktop
2.7.3. See Also
man rdesktop•
rdesktop home page: •
rdesktop project at Sourceforge:
95
95
Hack 16. Secure, Lightweight X Connections with FreeNX
The standard X Window System is very network-intensive. FreeNX compresses and optimizes X communications and is
ideally suited for slow connections such as dialups.
FreeNX is a free, GPL implementation of NoMachine's NX Server (). NoMachine has developed
a compression technology that substantially reduces the size of X Window System communications and adds other
performance improvements through caching and general protocol optimization. NoMachine provides several informative
white papers about their technology and its performance at If you're already
a VNC fan, NX is definitely worth a look, for performance reasons as well as for the fact that it inherently uses SSH for
secure communications between client and server.
The free and commercial versions of the NX server differ in terms of capabilities (and, of course, cost). FreeNX provides all
of the core capabilities of the commercial NX server for remote connection, but it does not currently include the SMB and
printing (CUPS) support provided by the commercial NX server. At the moment, commercial server licenses for
NoMachine's personal edition cost around 55 euros, which is cheap. They also offer small business and enterprise licenses,
which you may be interested in if you want to have product support, get updates, and get SMB and CUPS support now,
rather than waiting for them to appear and mature in FreeNX. Personally, though I use FreeNX, I bought a server license
because it seemed like the right thing to do. I use the free NoMachine client everywhere, and I also feel that the NoMachine
folks deserve my support for having come up with a great technology and released it as open source.
This hack explains how to install and configure the open source versions of NoMachine's NX server, the FreeNX package,
and the free commercial NX client from NoMachine.
2.8.1. Installing the FreeNX Server
The FreeNX server consists of two packages: the nx package, which consists of binaries and libraries compiled from the
open source packages from NoMachine; and the freenx package, which is a set of client scripts that invoke the NX binaries
in the right ways. Depending on the Linux distribution that your server is running, you can obtain these packages from
different locations:
Debian
By adding deb ./to your /etc/apt/sources.list file
Fedora
From />Gentoo
From the Gentoo forums at />Knoppix
From (overlays for the standard NoMachine server overlays)
96
96
Red Hat 9
From or by adding the appropriate entries to your
apt or yum configuration files, as explained at />SUSE 9.2
On the distribution DVD/CDs or from />Ubuntu
By adding deb ./to your /etc/apt/sources.list file
If you're using a distribution that isn't listed in the previous section, or you have a policy of installing nothing on your server
without having the source code, you can build the GPL version of the NoMachine NX server from scratch in several ways:
retrieve the source code from using wget -r and then follow
the instructions at or download the source RPM from one of
the distributions listed above (SUSE's SRPM for the open source NX server is at
install it using rpm or extract its contents
into a tarball using alien, and then follow the instructions in the nx.spec file to see how to build it yourself. I prefer the
latter approach, since the source includes any mandatory patches to build the official RPMs for SUSE, which is my
desktop/server distribution of choice.
As good open source citizens, NoMachine provides a document about building the open source portions of the NX products
in the Documentation center at />If you manually downloaded RPMs, install them in the standard fashion, as in the following example (from a Red Hat 9
system):
# rpm -Uvvh nx-1.4.0-4.1.rh9.at.i386.rpm
# rpm -Uvvh freenx-0.3.1-0.1.rh9.at.noarch.rpm
Next, use the nxsetup application to do the initial configuration of your NX server by specifying the install option, as
shown below:
# /usr/bin/nxsetup install
Setting up /etc/nxserver …done
Setting up /var/lib/nxserver/db …done
Setting up /var/log/nxserver.log …done
Setting up known_hosts and authorized_keys2 …done
Setting up permissions …done
Ok, nxserver is ready.
PAM authentication enabled:
All users will be able to login with their normal passwords.
PAM authentication will be done through SSH.
Please ensure that SSHD on localhost accepts password authentication.
You can change this behaviour in the file.
Have Fun!
This step creates the nx user in the server's /etc/passwd file and sets up the files, directories, and keys used by FreeNX.
Next, add any users that you want to be able to use the NX server to its user database and set their passwords, as in the
following example:
# nxserver adduser wvh
97
97
NX> 100 NXSERVER - Version 1.4.0-03 OS (GPL)
NX> 1000 NXNODE - Version 1.4.0-03 OS (GPL)
NX> 716 Public key added to /home/wvh/.ssh/authorized_keys2
NX> 1001 Bye.
NX> 999 Bye
# nxserver passwd wvh
NX> 100 NXSERVER - Version 1.4.0-03 OS (GPL)
New password:
Password changed.
NX> 999 Bye
Now you're ready to install and configure the NX client on any systems from which you want to access the FreeNX server.
2.8.2. Installing the NX Client
NoMachine's free NX clients for various Linux distributions, various flavors of Microsoft Windows, Apple's Mac OS X, and
even Sun's Solaris are available from The name of the NoMachine client binary
is, surprisingly enough, nxclient. Though a free NX client for the KDE environment (called knx) is actively under
development, the NoMachine NX clients are nicely done, work fine, and are free. You'll have to put up with seeing
NoMachine's logo each time you start one up, but that's a small price to payand it's a cool logo!
SUSE fans can get the knx client from the DVDs/CDs or from
You can subscribe to a mailing list about
the knx client and FreeNX in general at />If you've downloaded the RPM for the NoMachine NX client, you can install it using a standard RPM invocation such as:
# rpm Uvvh rh9-nxclient-1.4.0-91.i386.rpm
Note that the version of the file that you've downloaded, and therefore its name, may have changed by the time you read
this.
After downloading and installing the client on a desktop system, you'll need to copy the FreeNX server's key to your client
installation. This key is located in the file /var/lib/nxserver/home/.ssh/client.id_dsa.key on a Linux FreeNX server, and it
should be copied to the file /usr/NX/share/client.id_dsa.key on any Linux system where you've installed the NoMachine
client. You must also make this file readable by mere mortals, so chmod it to 644. Windows client users should copy this
file to the directory C:\Program Files\NX Client for Windows\share.
2.8.3. Configuring and Starting Your NX Client
NX client and server applications are installed in /usr/bin, which is probably already in your path, so no path munging is
required to start an NX client. NoMachine's NX client enables you to create configuration files that specify parameters with
which the nxclient application can be invoked. To create a configuration file, execute the following command:
$ nxclient wizard
98
98
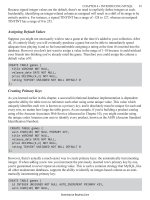
A friendly but content-free dialog displays. Click Next, and the dialog shown in Figure 2-16 displays. Enter a logical name
for the connection in the Session text box, and specify the hostname or IP address of the NX server in the Host text box. You
can then modify the slider settings to specify the type of network/Internet connection you're using, so that the NX client will
select appropriate compression and optimization settings for your connection speed.
Figure 2-16. The initial NX Client configuration dialog
When you click Next, the dialog shown in Figure 2-17 displays. For standard X connections to a remote Linux or Unix
server, leave the system type set to Unix, and click the KDE drop-down to select the type of desktop that you'd like the NX
server to start for you. Next, click the Available Area drop-down and select the size of the remote desktop that you'd like to
create. I tend to select 1024 x 768 because that's always smaller than the size of my desktop machine's monitor. Using the
default Available Area setting is a better choice if you're using the NX client on a laptop that may or may not be connected
to an external monitor.
Figure 2-17. Specifying NX Client protocols and size
This dialog also enables you to provide an additional level of security by enabling SSL encryption. This encrypts all traffic
between the client and the server, including your initial password exchange.
99
99
The settings you specify when configuring a NoMachine client are saved in text configuration
files in the ~/.nx/config directory, with the name of your NX client and a .conf extension. You can
subsequently edit these with a text editor if you decide to modify the existing settings quickly.
When you click Next, a final dialog displays that enables you to create a desktop shortcut or open the Advanced
Configuration dialog, shown in Figure 2-18. The tabs in this dialog enable you to further optimize connections between your
client and the FreeNX server, customize the paths to various files on your system, and so on.
Once you've created a configuration, the standard NX Client dialog displays. Enter your password for the NX server, and the
fun begins. The NX client authenticates to the remote NX server, negotiates connection parameters, and then displays a
window in which a remote desktop session starts. You also get to see the NoMachine logo for a few seconds, which reminds
you who should be thanked for this way-cool technology! Figure 2-19 shows a remote Linux desktop connection to a Red
Hat 9 system running the GNOME desktop
Figure 2-18. The optional NX Client Advanced configuration dialog
To terminate your NX client session, simply close the window as you would any other application. Like VNC connections,
NX client connections can be suspended rather than simply terminated, so you'll see a dialog that asks if you want to
suspend the session, terminate the session, or cancel the termination request. If you select Suspend, your existing connection
to the remote NX server will be renewed the next time you start NX Client with the current configuration.
2.8.4. See Also
•
100
100
"Secure VNC Connections with FreeNX" [Hack #17]•
"Secure Windows Terminal Connections with FreeNX" [Hack #18]•
Figure 2-19. A remote FreeNX desktop shown in nxclient
Hack 17. Secure VNC Connections with FreeNX
FreeNX isn't just for the X Window Systemit can also provide secure VNC connections.
If "Secure, Lightweight X Connections with FreeNX" [Hack #16] got you excited about the performance and possibilities of
the FreeNX server for displaying X Window System desktops over slow connections, just wait there's more! FreeNX also
101
101
supports translating the protocols used by VNC into X Window System protocols that it can then exchange with a standard
NX client. If you install an NX client (such as NoMachine's excellent nxclient) on your desktop system, you can use a single
application to both communicate with remote X Window sessions on your NX server and also proxy through to any VNC
server that you can access from the NX server. The VNC server does not have to be running on the same system as the NX
serverthe NX server just needs to be able to contact it over the network.
Communications between the VNC server and the NX server are not encrypted, but communications between your NX
client and the NX server are. This can be especially useful if you are working remotely and want to access a VNC server
inside your company's network, but you need any communication taking place over the public Internet to be secure. Your
corporate firewall already supports SSH, so you don't even need to open any other ports to support VNC.
2.9.1. Creating an NX Client Configuration for VNC
The previous hack explained how to obtain and install NoMachine's excellent NX client. To create a configuration for
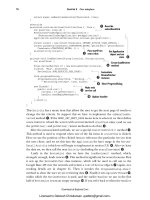
accessing VNC through your NX client, click the Unix drop-down shown in Figure 2-17, and select VNC. The dialog shown
in Figure 2-20 will display.
Figure 2-20. VNC configuration in NX Client
In this dialog, specify the hostname or IP address of the system on which your VNC server is running, and the port on which
it is running. By default, the port will be 5900 plus the number of the display that the VNC server is using. For example, if
the VNC server was running on display:1 on the remote system, you would enter 5901 as the port number.
Next, specify the password for the remote VNC server, and check the "Remember my password" checkbox if you want to
make this a permanent part of your configuration. Click OK to close this dialog, proceed with your standard NX client
configuration and save your NX/VNC configuration.
When you start nxclient with that configuration, you'll see a screen like the one shown in Figure 2-21congratulations, you're
securely connected!
Figure 2-21. A remote VNC session in NX Client
102
102
2.9.2. See Also
•
"Secure, Lightweight X Connections with FreeNX" [Hack #16]•
"Secure Windows Terminal Connections with FreeNX" [Hack #18]•
Hack 18. Secure Windows Terminal Connections with FreeNX
FreeNX isn't just for the X Window System and VNCit can also provide secure Windows Terminal Services
connections.
If "Secure, Lightweight X Connections with FreeNX" [Hack #16] and "Secure VNC Connections with
FreeNX" [Hack #17] got you excited about the performance and possibilities of the FreeNX server for
103
103
displaying X Window System and VNC desktops over slow connections, get ready because FreeNX has even
more tricks up its sleeve. FreeNX also supports translating the Remote Desktop Protocol (RDP) used by
Windows Terminal Services into X Window System protocols that it can then exchange with a standard NX
client. If you install an NX client system (such as NoMachine's excellent nxclient) on your desktop, you can
use a single application to communicate with remote X Window sessions on your NX server, proxy through to
any VNC server you can access from the NX server or proxy through to any Windows Terminal server you
can access from the NX server. Like the VNC server, the Windows Terminal server does not have to be
running on the same system as the NX server which is just as well, because the NX server used by both
FreeNX and NoMachine's NX runs only on Unix and Linux boxes!
Like VNC through FreeNX, communications between the Windows Terminal server and the NX server are
not encrypted, but communications between your NX client and the NX server are. This can be especially
useful if you are working remotely and want to access a Windows Terminal server inside your company's
network, but you need any communication taking place over the public Internet to be secure. Your corporate
firewall already supports SSH, so you don't even need to open any other ports to support the Windows
Terminal server.
2.10.1. Creating an NX Client Configuration for a Windows Terminal Server
"Secure VNC Connections with FreeNX" [Hack #17] explained how to obtain and install NoMachine's
excellent NX client. To create a configuration for accessing a Windows Terminal server through your NX
client, click the Unix drop-down shown in previously in Figure 2-17, and select RDP. The dialog shown in
Figure 2-22 will display.
In this dialog, specify the hostname or IP address of your Windows Terminal server, whether you want to use
existing credentials to auto-login or see the standard Windows login screen, and whether you want to run a
specific application or the standard Windows desktop.
Click OK to close this dialog, proceed with your standard NX client configuration, and save your
NX/Windows Terminal configuration. When you start nxclient with that configuration, you'll see a screen like
the one shown in Figure 2-23. Congratulationsyou're securely connected!
2.10.2. See Also
•
"Secure, Lightweight X Connections with FreeNX" [Hack #16]•
"Secure VNC Connections with FreeNX" [Hack #17]•
Figure 2-22. Windows Terminal configuration in NX Client
104
104
Hack 19. Remote Administration with Webmin
Webmin provides secure access to logfiles, system statistics, and many common administration tasks, all from your favorite
web browser.
Administering a system can be a tough job. With user accounts to create, services to configure, logs to check, and all the
other duties system administrators face, it can become quite a load. Thankfully, there's some software out there that can help
make life easier for the weary sysadmin. One of these pieces of software is called Webmin. Webmin allows you to control a
large portion of the functionality of your server from an easy-to-use web interface. Most major services are covered,
including Apache, BIND, SSH, LDAP, Samba, WU-FTP, Sendmail, MySQL, and many others.
Figure 2-23. A Windows Terminal server connection in nxclient
105
105