MacBook For Dummies phần 7 ppsx
Bạn đang xem bản rút gọn của tài liệu. Xem và tải ngay bản đầy đủ của tài liệu tại đây (1.37 MB, 39 trang )
Using Magic iDVD
Magic iDVD is the newcomer on the block, and it falls neatly between total
automation (with OneStep DVD) and total manual control. Click the Magic
iDVD button on the top-level menu (as shown in Figure 14-2). If you’ve
already opened a project, you can choose File➪Magic iDVD from the menu
bar to choose a theme, drop specific movies and photos into filmstrips, and
choose an audio track.
Unlike OneStep DVD, you get to preview the finished product. If it’s to your
liking, you can choose to either burn the disc directly or create a full-blown
iDVD project with the results. Sweet.
You’ll find out more about the new Magic iDVD feature later in the “A Word
about Automation” section.
Creating a DVD from Scratch
Doing things the old-fashioned, creative, and manual way (following the
examples in this section) involves four basic steps:
1. Design the DVD Menu.
Choose a theme and any necessary buttons or links.
2. Add media.
iTunes.
3. Tweak.
Adjust and fine-tune your DVD Menu settings.
4. Finish things up.
Preview and burn your DVD, or save it to your hard drive.
Choosing just the right theme
The first step to take when manually designing a new DVD Menu system is to
add a theme. In the iDVD world, a theme is a preset package that helps deter-
mine the appearance and visual appeal of your DVD Menu, including a back-
ground image, menu animation, an audio track, and a group of settings for
text fonts and button styles.
iDVD helps those of us who are graphically challenged by including a wide
range of professionally designed themes for all sorts of occasions, ranging
from old standbys such as weddings, birthdays, and vacations to more
214
Part IV: Living the iLife
21_04859X ch14.qxp 7/20/06 10:42 PM Page 214
generic themes with the accent on action, friendship, and technology. To
view the included themes, click the Themes button in the lower-right corner
of the iDVD window (see Figure 14-3).
To choose a theme for your project — or to see what a theme looks like on
your menu — click any thumbnail and watch iDVD update the Menu display.
If you decide while creating your DVD Menu that you need a different theme,
you can change themes at any time. iDVD won’t lose a single button or video
clip that you add to your DVD Menu. You’ll be amazed at how the look and
sound of your DVD Menu completely changes with just the click of a theme
thumbnail.
Adding movies
Drop zones and themes are cool, but most folks want to add video to their
DVD. To accomplish this, iDVD uses buttons as links to your video clips. In
fact, some iDVD Movie buttons display a preview of the video they will dis-
play! To play the video on a DVD player, you select the Movie button with
the remote control, just like you do for a commercial DVD.
Figure 14-3:
Select a
new theme
from the
Themes
pane.
215
Chapter 14: Creating DVDs on the Road with iDVD
21_04859X ch14.qxp 7/20/06 10:42 PM Page 215
To add a Movie button, drag a QuickTime movie file from the Finder and drop
it onto your DVD Menu display. (Note that only MPEG-4 QuickTime movies
are supported — older MPEG-1 and MPEG-2 movie clips may be rejected.)
Alternatively, launch iMovie HD and drag a clip from the iMovie HD clip
palette into the iDVD window, or click the Add button and choose Add Movie
from the drop-down menu.
iDVD and iMovie HD are soul mates, so you can also display the iDVD Media
pane and then click Movies from the pop-up menu. Now you can drag clips
from your Movies folder.
No matter the source of the clip, when you drop it onto your DVD menu,
iDVD adds a Movie button, as you can see in Figure 14-4. Note that some but-
tons appear as text links rather than actual buttons. The appearance of a
Movie button in your DVD menu is determined by the theme you choose.
A Movie button doesn’t have to stay where iDVD places it! To move a Movie
button to another location, click-and-drag it to the desired spot. By default,
iDVD aligns buttons to an invisible grid. If you don’t want such order imposed
on your creativity, turn off this grid function by clicking the button to select
it, clicking the Buttons button (at the bottom of the Media pane), and select-
ing the Free Positioning radio button.
216
Part IV: Living the iLife
Taking advantage of drop zones
Most of Apple’s animated themes include spe-
cial bordered areas marked as drop zones.
These locations have nothing to do with skydiv-
ing; rather, a
drop zone
is a placeholder in the
Menu that can hold a single video clip or photo-
graph. When you drag a video clip or an image
to a drop zone, that clip or picture is added to
the animation in Apple’s theme! Think about that
for a moment; I know I did. You can actually per-
sonalize a Hollywood-quality animated DVD
menu with
your own photos and video!
Most of the themes included with iDVD 6
include at least one drop zone, and some are
practically jam-packed with drop zones. For
example, the amazing Baby Mobile theme has
a whopping six drop zones! If you think a menu
looks just fine without anything in a drop zone,
however, you don’t have to put anything there.
The words
Drop Zone
disappear when you pre-
view or burn your DVD.
To add a video clip or image to a drop zone,
simply drag the clip or photo from a Finder
window and drop it on the drop zone. You can
also drag clips or photos from other sources,
including the Movie and iPhoto panes in iDVD,
the iMovie HD window, or the iPhoto window.
(Remember, Apple is anything but strict on
these matters.) Remember, drop zones don’t act
as links or buttons to other content — the stuff
you add to a menu’s drop zones appear only as
part of the theme’s animation cycle.
If you’re adding something to a dynamic drop
zone (which disappears and reappears during
the menu animation cycle), click the Motion
button to activate the animation, and then click
it again to stop the animation cycle. Now click-
and-drag the scrubber bar until the desired drop
zone is in view. To delete the contents of a drop
zone, Control-click (or right-click) the drop zone
and choose Clear.
21_04859X ch14.qxp 7/20/06 10:42 PM Page 216
You can have up to 12 buttons on your iDVD Menu. To add more content than
12 buttons allow, add a submenu by clicking the Add button and choosing
Add Submenu from the drop-down menu. Now you can click the submenu
button to jump to that screen and drag up to another 12 movie files into it.
Keep in mind your target audience while you create your DVD. Standard TV
sets have a different aspect ratio (height to width) and resolution (number of
pixels on the screen) than a digital video clip, and a standard TV isn’t as pre-
cise in focusing that image on the tube. If you selected the Standard aspect
ratio when you created the project, you can make sure that your DVD content
looks great on a standard TV screen by following these steps:
1. Click View on the old-fashioned iDVD menu (the one at the top of the
screen).
2. Choose the Show TV Safe Area command.
You can also press the convenient Ô+T shortcut. iDVD adds a smaller
rectangle within the iDVD window to mark the screen dimensions of a
standard TV.
If you take care that your menu buttons and (most of) your background
image fit within this smaller rectangle, you’re assured that folks with a stan-
dard television can enjoy your work. To turn off the TV Safe Area rectangle,
press Ô+T again.
Figure 14-4:
A new
Movie
button
appears on
your pristine
DVD Menu.
217
Chapter 14: Creating DVDs on the Road with iDVD
21_04859X ch14.qxp 7/20/06 10:42 PM Page 217
If your entire family is blessed with a fleet of HD TVs (or you chose the
Widescreen aspect ratio for this project), leave the Show TV Safe Area option
off. Today’s widescreen displays can handle just about any orientation.
Great, now my audience
demands a slideshow
Many Mac owners don’t realize that iDVD can use not only video clips but
also digital photos as content. In fact, you can add a group of images to your
DVD Menu by using Slideshow buttons, which allow the viewer to play back a
series of digital photographs. iDVD handles everything for you, so there’s no
tricky timing to figure out or weird scripts to write. Just click the Add button
at the bottom of the iDVD window and choose Add Slideshow. iDVD places a
Slideshow button on your DVD Menu.
After the Slideshow button is on tap, you need to add the content — in this
case, by choosing the images that iDVD adds to your DVD Menu. Follow these
steps to select your slideshow images:
1. Double-click the Slideshow Menu button — the one you just added to
the menu — to open the Slideshow display (see Figure 14-5).
Figure 14-5:
Who needs
a projector
anymore?
iDVD can
create a
great
slideshow.
218
Part IV: Living the iLife
21_04859X ch14.qxp 7/20/06 10:42 PM Page 218
2. Click the Media button (bottom right of the screen).
3. Click the Photos button (top right of the screen) to display your iPhoto
library and photo albums.
4. Drag your favorite image thumbnails from the Photos list and drop
them into the My Slideshow window.
You can also drag images straight from a Finder window or the iPhoto
window itself. (Those Apple folks are sooooo predictable.)
5. Drag the photos in the My Slideshow window around to set their
order of appearance in your slideshow.
6. To add audio to these pictures, drag your favorite audio file from the
Finder and drop it in the Audio well in the My Slideshow window.
The Audio well is the box bearing the speaker icon, next to the volume
control below the My Slideshow window.
Alternatively, click the Audio button to select an audio track from your
iTunes library, iTunes playlists, or GarageBand creations.
7. Click the Return button to return to your DVD Menu.
You can choose which image you want to appear on the Slideshow button.
Click the Slideshow button that you added and see the slider that appears
above the Slideshow button. Drag this slider to scroll through the images
you added. When you find the image that you want to use for the Slideshow
button in the DVD Menu, click the Slideshow button again to save your
changes.
Now for the music . . .
Most of the Apple-supplied themes already have their own background music
for your menu, so you might not even need to add music to your DVD Menu.
However, if you want to change the existing background music (or if your
menu currently doesn’t have any music), adding your own audio to the cur-
rent menu is child’s play!
1. Click the Media button.
2. Click the Audio button to reveal the musical Shangri-La shown in
Figure 14-6.
3. Drag an audio file from the iTunes playlist or GarageBand folder dis-
play and drop it on the menu background.
iDVD 6 accepts every sound format that you can use for importing (or
encoding) in iTunes: AIFF, MP3, AAC, Apple Lossless, and WAV audio
files.
219
Chapter 14: Creating DVDs on the Road with iDVD
21_04859X ch14.qxp 7/20/06 10:42 PM Page 219
Alternately, you can click the song you’d like to use and then click Apply.
4. Click the Motion button (labeled in Figure 14-1) to watch your DVD
Menu animation cycle set to the new background audio.
5. Click the Motion button again to stop the animation and return to seri-
ous work.
Giving Your DVD the Personal Touch
You can easily make changes to the default settings provided with the theme
you chose. iDVD offers all sorts of controls that allow you to change the
appearance and behavior of buttons, text, and the presentation of your con-
tent. In this section, I show you how to cast out iDVD’s (perfectly good)
defaults and then tweak things to perfection.
Figure 14-6:
You’ll do a
lot of fine-
tuning from
the Settings
pane.
220
Part IV: Living the iLife
21_04859X ch14.qxp 7/20/06 10:42 PM Page 220
Using Uncle Morty for your
DVD Menu background
Hey, Uncle Morty might not be a supermodel, but he has birthdays and
anniversaries, and iDVD is more than happy to accommodate you in docu-
menting those milestones! Follow these steps to change the background
of your DVD Menu:
1. Click the Menu button.
2. Get an image using one of the following methods:
• Drag an image from the Finder and drop it into the Background
well in the Menu section.
• Drag the image directly into the Menu display.
• To use an image from your iPhoto library, click the Media button
and choose Photos, and then drag the desired image into the Menu
display.
iDVD updates the DVD menu to reflect your new background choice.
Adding your own titles
The one tweak you’ll probably have to perform in every iDVD project is
changing titles. Unfortunately, the default labels provided by iDVD are pretty
lame, and they appear in two important places:
ߜ Menu title: Your large main title usually appears at the top of the DVD
Menu.
ߜ Button captions: Each Movie and Slideshow button that you add to your
menu has its own title.
To change the text in your Menu title or the titles below your buttons, follow
these steps:
1. Select the text by clicking it.
2. Click it again to edit it.
A rectangle with a cursor appears to indicate that you can now edit the
text.
3. Type the new text and press Return to save the change.
221
Chapter 14: Creating DVDs on the Road with iDVD
21_04859X ch14.qxp 7/20/06 10:42 PM Page 221
Changing buttons like a
highly paid professional
Customizing Movie buttons? You can do it with aplomb! Follow these steps:
1. Click Buttons.
2. Click any Movie button from the DVD Menu to select it.
A slider appears above the button, which you can drag to set the thumb-
nail picture for that button in your DVD Menu. (Naturally, this is only for
animated buttons, not text buttons.)
Enable the Movie check box to animate the button.
3. To create a Movie button with a still image, drag a picture from a
Finder window or the Media pane and drop it on top of the button.
4. Adjust the properties for the button as desired with the controls in the
Button section of the Media panel.
Table 14-1 describes the button properties.
Table 14-1 Button Settings You Can Customize
Movie Button Property What It Does
Style thumbnail Changes the frame shape of the Movie button.
Snap to Grid Forces placement of a Movie button on an imaginary grid.
Free Positioning Unlike Snap to Grid, allows Movie buttons to be placed in
a freeform arrangement.
Transition Determines the transition that occurs when the button is
clicked (before the action occurs).
Size Adjusts the size of the button and the caption text. Move
the slider to the right to increase the button and caption
size.
Give my creation motion!
Earlier in this chapter, you found out how to use a different image for your
background, but what about using an animated background? You can use any
QuickTime movie from your iMovie HD library to animate your DVD Menu
background! Didn’t I tell you that this iDVD thing was huge?
222
Part IV: Living the iLife
21_04859X ch14.qxp 7/20/06 10:42 PM Page 222
Keep in mind that your background movie should be a short clip; 20–30 sec-
onds is optimal. A clip with a fade-in at the beginning and a fade-out at the
end is the best choice because iDVD loops your background clip continu-
ously, and your animated background flows seamlessly behind your menu.
I’m not talking drop zones here. (See the sidebar, “Taking advantage of drop
zones.”) By using a movie clip as a background, you’re replacing the entire
animation sequence rather than just a single area of the background.
Follow these steps to add a new animated background:
1. Click your old friend, the Menu button.
2. Drag a movie from the Finder and drop it into the Background well.
You can click the Movies button in the Media pane to instantly display
your iMovie collection.
3. Click the Motion button in the iDVD window to try out your new
background.
4. Click the Motion button again to stop the animation cycle.
Previewing Your Masterpiece
Figure 14-7 captures the elusive Preview remote control — truly an awesome
sight. When you click Preview, the Media pane disappears, and your DVD
Menu appears exactly as it will on the finished DVD.
Ah, but appearances aren’t everything: You can also use your DVD Menu!
Click the buttons on the remote control to simulate the remote on your DVD
player, or think outside the box and click a menu button directly with your
mouse pointer. iDVD presents the video clip, runs the slideshow, or jumps to
a submenu, just as it will with the completed disc.
This is a great time to test-drive a project before you burn it to disc. To make
sure you don’t waste a blank DVD, make certain that everything you expect
to happen actually happens. Nothing worse than discovering that Aunt
Edna’s slideshow from her Hong Kong trip actually displays your family’s
summer trip to the zoo (whoops). If you made a mistake or something needs
tweaking, click the Preview button again, and you’re back to the iDVD
window proper, where you can edit or fine-tune your project.
223
Chapter 14: Creating DVDs on the Road with iDVD
21_04859X ch14.qxp 7/20/06 10:42 PM Page 223
iDVD 6 allows you to save your project as a standard Mac OS X disc image
rather than as a simple project file (or a physical DVD) — a good idea for
those laptops without a SuperDrive on board, because you can use Apple’s
Disk Utility to open and mount the disc image as if it were a burned disc. If
you move the disc image to another Mac with a SuperDrive, you can use Disk
Utility to burn it on that machine. To save an iDVD project as a disc image,
choose File➪Save as Disc Image (or press Ô+Shift+R). For the complete word
on disc images, visit Chapter 21 — hey, you didn’t think I’d leave you out in
the cold, did you?
A Word about Automation
At the beginning of the chapter, I mention the easy way to produce an iDVD
disc or project, using either OneStep DVD (for complete automation) or
Magic iDVD (for partial automation). In this section, I provide you with the
details.
Figure 14-7:
Preview
mode — an
incredible
simulation
indeed.
224
Part IV: Living the iLife
21_04859X ch14.qxp 7/20/06 10:42 PM Page 224
One-click paradise with OneStep DVD
If you’re in a hurry to create a DVD from clips on your DV camcorder and you
don’t mind losing your creative input, OneStep DVD is just the ticket. In short,
iDVD 6 allows you to plug in your DV camcorder, answer a question or two,
and then sit back while the application does all the work. iDVD 6 imports the
DV clips, creates a basic menu design, and burns the disc automatically!
Using OneStep DVD will appeal to any laptop owner with a SuperDrive. Right
after a wedding or a birthday, for example, why not produce a DVD that
you can give as a gift? Photographers who cover those same special events
might consider selling a DVD made with OneStep DVD. If you happen to cap-
ture something incredibly unique — such as a UFO landing or an honest
politician — you can use OneStep DVD to create an instant backup of the
clips on your DV camcorder. You can even keep your friends and family up-
to-date with the progress of your vacation by sending them a daily DVD of
your exploits! (You gotta admit, even Grandma would consider that eminently
sassy!)
Follow these steps to start the OneStep DVD process:
1. Click the OneStep DVD button on the iDVD 6 top-level menu (refer to
Figure 14-2).
Alternately, choose File➪OneStep DVD. iDVD displays the dialog box
shown in Figure 14-8.
If you want to use OneStep DVD with an existing movie on your laptop’s
hard drive, choose File➪OneStep DVD from Movie instead. iDVD
prompts you for the video clip to use.
2. Following the prompts, connect the FireWire cable from your DV cam-
corder; then turn on the camcorder and set it to VCR mode.
3. Click OK.
4. Load a blank DVD.
Figure 14-8:
Connect
your DV
camcorder,
and
OneStep
DVD does
the rest.
225
Chapter 14: Creating DVDs on the Road with iDVD
21_04859X ch14.qxp 7/20/06 10:42 PM Page 225
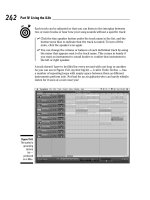
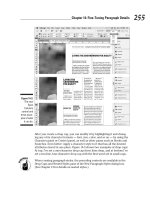
Exercising control with Magic iDVD
Got a little extra time? For those who prefer to make just a few choices and
let iDVD do the rest, the new Magic iDVD feature just plain rocks! However,
you can’t import clips directly from your DV camcorder like you can with
OneStep DVD — instead, you select one of the following:
ߜ An iDVD theme
ߜ Video clips you’ve already created with iMovie HD or dragged from the
Finder
ߜ Photos from your iPhoto library or dragged from the Finder
ߜ Audio from your iTunes playlist or dragged from the Finder
Follow these steps to start the OneStep DVD process:
1. Click the Magic iDVD button on the iDVD 6 top-level menu (refer to
Figure 14-2).
iDVD displays the window you see in Figure 14-9.
2. Click in the DVD Title box and type a name for your disc (or project).
3. Click to select a theme from the Theme strip.
Figure 14-9:
With Magic
iDVD, you
make some
basic
choices and
iDVD does
the work.
226
Part IV: Living the iLife
21_04859X ch14.qxp 7/20/06 10:42 PM Page 226
4. Click the Movies button and drag the desired clips into the Drop
Movies Here strip.
5. To add a slideshow, click the Photos button and drag the desired
photos into the Drop Photos Here strip.
6. To add audio for your slideshow, click the Audio button and drag the
desired song into the Drop Photos Here strip (a speaker icon appears
in the first cell of the strip to indicate that you’ve added a sound-
track).
7. Click Preview to see a preview of the finished project, complete with
remote control. To exit Preview mode, click Exit.
8. To open the project in its current form in the main iDVD window,
click Create Project.
9. To record your completed project directly to DVD, load a blank DVD
and click Burn.
To return to the iDVD main window at any time, just click the Close button on
the Magic iDVD window.
Recording a Finished Project
to a Shiny Disc
When you’re ready to record your next Oscar-winning documentary on family
behaviors during vacation, just follow these simple words.
1. Click the Burn button at the bottom of the iDVD window.
I have to admit, the Burn button that appears has to be my favorite
single control in all my 20+ years of computing! It looks powerful, it looks
sexy . . . it wants to burn. (Sorry about that.)
2. After iDVD asks you to insert a blank DVD-R into the SuperDrive, load
a blank DVD-R, DVD-RW, DVD+R, or DVD+RW (depending on the
media your Mac laptop can handle).
Your SuperDrive might be able to burn and read a DVD+R, DVD-RW, or
DVD+RW, but what about your DVD player? Keep in mind that only DVD-Rs
are likely to work in older DVD players. The latest generation of DVD play-
ers are likely DVD+R compatible as well, but I’ve seen only a handful of
DVD players that can handle rewriteable media at the time of this writing.
Therefore, remember the destination for the discs you burn and choose
your media accordingly.
After a short pause, iDVD begins burning the DVD. The application
keeps you updated with a progress bar.
227
Chapter 14: Creating DVDs on the Road with iDVD
21_04859X ch14.qxp 7/20/06 10:42 PM Page 227
Hey, while you’re waiting, how about a timely book recommendation? If you
want to discover how to burn all sorts of data, audio, and exotic CD and DVD
formats, I can heartily recommend another of my books, CD & DVD Recording
For Dummies, 2nd Edition (Wiley). It’s a comprehensive manual for recording
on the Mac. You’ll find complete coverage of the popular Toast recording
application from Roxio, too.
When the disc is finished, you’re ready to load it into your favorite local DVD
player, or you can load it back into your Mac and enjoy your work using
Apple’s DVD Player.
Either way, it’s all good!
228
Part IV: Living the iLife
21_04859X ch14.qxp 7/20/06 10:42 PM Page 228
Chapter 15
GarageBand on the Go
In This Chapter
ᮣ Touring the GarageBand window
ᮣ Adding tracks to your songs and podcasts
ᮣ Resizing, repeating, adding, and moving loops
ᮣ Adding just the right effect
ᮣ Recording with a microphone or MIDI instrument
ᮣ Importing your new hit into iTunes
D
o you dream of making music? I’ve always wanted to join a band, but I
never devoted the time nor learned to play the guitar. You know the
drill: Those rock stars struggled for years to gain the upper hand over an
instrument, practicing for untold hours, memorizing chords, and . . . wait a
second. I almost forgot. You don’t need to do any of that now!
Apple’s GarageBand 3 (included in the iLife ’06 suite) lets a musical wanna-be
(like yours truly) make music with my MacBook Pro — complete with a dri-
ving bass line, funky horns, and a set of perfect drums that never miss a beat.
In fact, the thousands of prerecorded loops on tap in GarageBand even allow
you to design your music to match that melody running through your head,
from techno to jazz to alternative rock.
Oh, and did I mention that GarageBand 3 also produces podcasts? That’s
right, you can record your voice and easily create your own show, and then
share it with others from your iWeb site! Heck, add photos if you like. You’ll
be the talk of your family and friends and maybe even your Mac user group.
This chapter explains everything you need to know to create your first song
(or your first podcast). I also show you how to import your hit record into
iTunes so you can listen to it on your iPod with a big silly grin on your face
(like I do) or add it to your next iMovie HD or iDVD project as a royalty-free
soundtrack.
22_04859X ch15.qxp 7/20/06 10:38 PM Page 229
Oh, and don’t be too smug when you think of all that practicing and hard
work you missed out on. What a shame!
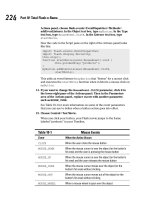
Shaking Hands with Your Band
As you can see in Figure 15-1, the GarageBand window isn’t complex at all,
and that’s good design. In this section, I list the most important controls so
you know your Play button from your Loop Browser button.
Track list
LoopPlayhead
Podcast artwork track
Create a new track
View/hide loop browser
Timeline
Return to beginning
Play Time/tempo Volume Track info
View/hide media browser
Figure 15-1:
The Garage-
Band
window —
edged in
wood grain,
no less.
230
Part IV: Living the iLife
22_04859X ch15.qxp 7/20/06 10:38 PM Page 230
Your music-making machine includes
ߜ Track list: In GarageBand, a track is a discrete instrument that you set
up to play one part of your song. For example, a track in a classical piece
for string quartet would have four tracks — one each for violin, viola,
cello, and bass. This list contains all the tracks in your song arranged so
that you can easily see and modify them, like the rows in a spreadsheet.
A track begins in the list, stretching out to the right all the way to the
end of the song. As you can see in the upper-left of Figure 15-1, I already
have one track defined — a Grand Piano.
If you’re creating a podcast, a Podcast artwork track like the one you see
at the very top of the list in Figure 15-1 can also appear.
ߜ Timeline: This scrolling area holds the loops (see the following bullet)
that you add or record, allowing you to move and edit them easily. As a
song plays, the timeline scrolls to give you a visual look at your music.
(Bear with me; you’ll understand that cryptic statement in a page or two.)
ߜ Loop: This is a prerecorded clip of an instrument being played in a spe-
cific style and tempo. Loops are the building blocks of your song. You
can drag loops from the loop browser to a track and literally build a bass
line or a guitar solo. (It’s a little like adding video clips to the timeline in
iMovie HD to build a film.)
ߜ Playhead: This vertical line is a moving indicator that shows you the
current position in your song as it scrolls by in the timeline. You can
drag the playhead to a new location at any time. The playhead also acts
like the insertion cursor in a word processing application: If you insert a
section of a song or a loop from the clipboard, it appears at the current
location of the playhead. (More on copying and inserting loops later, so
don’t panic.)
ߜ Create a New Track button: Click this button to add a new track to your
song.
ߜ Track Info button: If you need to display the instrument used in a track,
click the track to select it and then click this button. You can also control
settings such as Echo and Reverb from the dialog box that’s displayed.
ߜ View/Hide Loop Browser button: Click the button with the striking eye
icon to display the Loop Browser at the bottom of the window; click it
again to close it. You can see more tracks at a time without scrolling by
closing the Loop Browser.
ߜ View/Hide Media Browser button: Click this button (which bears icons
of a filmstrip, slide, and musical note) to display the media browser at
the right side of the window; click it again to close it. By closing the
media browser, you’ll see more of your tracks. If you’re already familiar
with iDVD or iMovie HD, you recognize this pane in the GarageBand
window — it allows you to add media (in this case, still images or video
clips) to your GarageBand project for use in a podcast.
231
Chapter 15: GarageBand on the Go
22_04859X ch15.qxp 7/20/06 10:38 PM Page 231
ߜ Return to Beginning button: Clicking this button immediately moves
the playhead back to the beginning of the timeline.
ߜ Play button: Hey, old friend! At last, a control that you’ve probably
used countless times before — and it works just like the same control
on your audio CD player. Click Play, and GarageBand begins playing your
entire song. Notice that the Play button turns blue. To stop the music,
click Play again; the button loses that sexy blue sheen, and the playhead
stops immediately. (If playback is paused, it begins again at the playhead
position when you click Play.)
ߜ Time/Tempo display: This cool-looking LCD display shows you the cur-
rent playhead position in seconds. You can also click the time/tempo
indicator (the blue LED numerical display at the bottom of the window)
to change the tempo (or speed) of your song.
ߜ Volume slider: Here’s another familiar face. Just drag the slider to raise
or lower the volume.
Of course, more controls are scattered around the GarageBand window, but
these are the main controls used to compose a song . . . which is the next
stop!
Composing and Podcasting Made Easy
In this section, I cover the basics of composition in GarageBand, working
from the very beginning. Follow along with this running example:
1. Press Ô+N.
GarageBand displays the Project Select dialog box.
2. Click New Music Project to create a new song.
GarageBand displays the New Project dialog box, as shown in Figure 15-2.
Figure 15-2:
Start
creating
your new
song here.
232
Part IV: Living the iLife
22_04859X ch15.qxp 7/20/06 10:38 PM Page 232
3. Type a name for your new song, and then drag the Tempo slider to
select the beats per minute (bpm).
A GarageBand song can have only one tempo (or speed) throughout,
expressed as beats per minute.
4. If you want to adjust the settings for your song, you can select the
• Time signature (the Time box)
• Key (the Key box).
If you’re new to music theory (the rules/syntax by which music is cre-
ated and written), just use the defaults. Most of the toe-tappin’ tunes
that you and I are familiar with fit right in with these settings.
5. Click the Create button.
You see the window shown in Figure 15-1. (The Emotional Piano 03 sec-
tion in the middle of Figure 15-1 — which I show you how to add in the
next section — is an example of a typical loop.)
Adding tracks
Although I’m not a musician, I am a music lover, and I know that many classi-
cal composers approached a new work in the same way you approach a new
song in GarageBand: by envisioning the instruments that you want to hear. (I
imagine Mozart and Beethoven would have been thrilled to use GarageBand,
but I think they did a decent job with pen and paper too.)
If you’ve followed along to this point, you’ve noticed two problems with your
GarageBand window:
ߜ The tiny keyboard in the middle of your GarageBand window. You can
record the contents of a software instrument track by “playing” the key-
board, clicking the keys with your mouse. (As you might imagine, this
isn’t the best solution.) If you’re a musician, the best method of record-
ing your own notes is with a MIDI instrument, which I discuss later in the
chapter. For now, you can banish the keyboard window by clicking the
window’s Close button.
ߜ The example song has only one track. If you want to write the next clas-
sical masterpiece for Grand Piano (the default track when you create a
new song in GarageBand), that’s fine. Otherwise, on the GarageBand
menu bar, choose Track➪Delete Track to start with a clean slate.
233
Chapter 15: GarageBand on the Go
22_04859X ch15.qxp 7/20/06 10:38 PM Page 233
These are the four kinds of tracks you can use in GarageBand 3:
ߜ Software instrument tracks: These tracks aren’t audio recordings.
Rather, they’re mathematically precise algorithms that your Mac renders
(or builds) to fit your needs. If you have a MIDI instrument connected to
your laptop, you can create your own software instrument tracks —
more on MIDI instruments later in this chapter.
In this chapter, I focus on software instrument tracks, which are the easi-
est for a non-musician to use.
ߜ Real instrument tracks: A real instrument track is an actual audio
recording, such as your voice or a physical instrument without a MIDI
connection.
ߜ Podcast artwork track: You get only one of these — they hold photos
that will appear on a video iPod (or a window on your iWeb site) when
your podcast is playing.
ߜ Video tracks: the video sound track appears if you’re scoring (adding
music) to an iMovie HD movie. Along with the video sound track, you
get a cool companion video track that shows the clips in your movie.
(More on this in the sidebar titled “Look, I’m John Williams!” later in
this chapter.)
Time to add a software instrument track of your very own. Follow these steps:
1. Click the Create a New Track button (which carries a plus sign),
labeled in Figure 15-1.
GarageBand displays the New Track dialog box.
2. Click the Software Instrument button and then click Create.
See all those great instruments in the Track Info pane on the right?
3. Choose the general instrument category by clicking it.
I chose Drum Kits.
4. From the right column, choose your specific style of weapon, such as
Jazz Kit for a jazzy sound.
Figure 15-3 illustrates the new track that appears in your list when you
follow these steps.
If you’re creating a podcast and you want to add a series of still images that
will appear on a video iPod’s screen (or on your iWeb page), follow these
steps:
1. Click the View Media Browser button (labeled in Figure 15-1).
2. Click the Photos button.
234
Part IV: Living the iLife
22_04859X ch15.qxp 7/20/06 10:38 PM Page 234
GarageBand displays all of the photos in your iPhoto library and film
rolls.
3. Drag an image from your iPhoto library in the media browser to the
Track list.
The Podcast track appears at the top of the Track list, and you can add
and move images in the list at any time, just like the loops that you add
to your instrument tracks. (More on adding and rearranging the con-
tents of a track later in this section.)
Choosing loops
When you have a new, empty track, you can add something that you can hear.
You do that by adding loops to your track from the loop browser — Apple
provides you with thousands of loops to choose from — and photos from
your media browser. Click the Loop Browser button (which bears the all-
seeing eye) to display your collection, as shown in Figure 15-4.
Figure 15-3:
The new
track
appears,
ready to
rock.
235
Chapter 15: GarageBand on the Go
22_04859X ch15.qxp 7/20/06 10:38 PM Page 235
If your browser looks different from what you see in Figure 15-4, that’s
because of the view mode you’re using, just like the different view modes
available for a Finder window. The three-icon button in the lower-left corner
of the loop browser toggles the browser display between column, musical
button, and podcast sounds view. Click the middle of the three buttons to
switch to button mode.
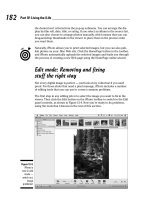
Looking for just the right loop
The track in this running example uses a jazz drum kit, but we haven’t added
a loop yet. (Refer to Figure 15-3.) Follow these steps to search through your
loop library for just the right rhythm:
1. Click the button that corresponds to the instrument you’re using.
In our example, this is the Kits button in the loop browser. Click it, and a
list of different beats appears in the pane to the right of the browser
window. (Check out Figure 15-4 for a sneak peek.)
View: column/button/podcast sounds
Search Software instrument loop icon
Figure 15-4:
The loop
browser,
shown in
button view.
236
Part IV: Living the iLife
22_04859X ch15.qxp 7/20/06 10:38 PM Page 236
2. Click one of the loops with a green musical note icon.
Go ahead, this is where things get fun! GarageBand begins playing the
loop nonstop, allowing you to get a feel for how that particular loop
sounds.
Because I’m using only software instruments in this track (and through-
out this chapter), you should choose only software instrument loops,
which are identified with a green musical note icon.
3. Click another entry in the list, and the application immediately
switches to that loop.
Now you’re beginning to understand why GarageBand is so cool for both
musicians and the note-impaired. It’s like having your own band, with
members that never get tired and play whatever you want while you’re
composing. (Mozart would have loved this.)
If you want to search for a particular instrument, click in the Search box
(labeled in Figure 15-4) and type the text you want to match.
GarageBand returns the search results in the list.
4. Scroll down the list and continue to sample the different loops until
you find one that fits like a glove.
For this reporter, it’s Lounge Jazz Drums 01.
5. Drag the entry to your Jazz Kit track and drop it at the very beginning
of the timeline (as indicated by the playhead).
Your window should look like Figure 15-5.
If you want that same beat throughout the song, you don’t need to add any
more loops to that track (more on extending that beat in the next section).
However, if you want the drum’s beat to change later in the song, you add
a second loop after the first one in the same track. For now, leave this track
as-is.
Whoops! Did you do something that you regret? Don’t forget that you can
undo most actions in GarageBand by pressing the old standby Ô+Z immedi-
ately afterward.
Second verse, same as the first
As you compose, you can add additional tracks for each instrument that you
want in your song:
ߜ Each track can have more than one loop.
ߜ Loops don’t have to start at the beginning; you can drop a loop any-
where in the timeline.
237
Chapter 15: GarageBand on the Go
22_04859X ch15.qxp 7/20/06 10:38 PM Page 237
For example, in Figure 15-6, you can see that my drum kit kicks in first, but
my bass line doesn’t begin until some time later (for a funkier opening).
You put loops on separate tracks so they can play simultaneously on differ-
ent instruments. If all your loops in a song are added on the same track, you
only hear one loop at any one time, and all the loops use the same software
instrument. By creating multiple tracks, you give yourself the elbow room to
bring in the entire band at the same time. It’s uber-convenient to compose
your song when you can see each instrument’s loops and where they fall in
the song.
Click the Reset button in the loop browser to choose another instrument or
genre category.
Resizing, repeating, and moving loops
If you haven’t already tried listening to your entire song, try it now. You can
click Play at any time without wreaking havoc on your carefully created
tracks. Sounds pretty good, doesn’t it?
Figure 15-5:
A track with
a loop
added.
238
Part IV: Living the iLife
22_04859X ch15.qxp 7/20/06 10:38 PM Page 238