Microsoft introducing windows server 2008 Resource Kit phần 2 pdf
Bạn đang xem bản rút gọn của tài liệu. Xem và tải ngay bản đầy đủ của tài liệu tại đây (543.41 KB, 49 trang )
Chapter 3 Windows Server Virtualization 37
Server virtualization. Also, it’s designed not for the server end but for deploying applications
to desktops easily and updating them as necessary.
Essentially, what SoftGrid can do using its streaming delivery mechanism is to transform any
Windows program into a dynamic service that then follows users wherever they might go.
These services can then be integrated into Microsoft’s management infrastructure so that they
can be configured and managed using standard policy-based methods. At this point, SoftGrid
isn’t directly associated with Windows 2008 Server or Windows Server virtualization, but it’s
a new Microsoft technology you should be aware of as the virtualization landscape continues
to evolve.
Conclusion
It would have been nice to have looked in greater depth at how Windows Server virtualization
in Windows Server 2008 works. Unfortunately, at the time of this writing the bits aren’t there
yet. Still, you have to admit that this is one of the hottest features of Windows Server 2008,
both from the perspective of the day-to-day needs of IT professionals and as a prime selling
point for Windows Server 2008. I’ve tried to give you a taste of how this new technology will
work and a glimpse of what it looks like, but I hope you’re not satisfied with that—I’m not. I
can’t wait till all this comes together, and the plain truth of the matter is that in only a few
years virtualization will be inexpensive and ubiquitous. So get ready for it now.
Bring back the mainframe!!
Additional Reading
If you want to find out more about the underlying processor enhancements from Intel and
AMD that will support and be required by Windows Server virtualization, check out the
following sources:
■ See for information concern-
ing Intel VT technology
■ See />0,,30_118_8826_14287,00.html for information about AMD-V technology
For information on how Microsoft and XenSource are collaborating to support running Linux
on Windows Server 2008, read the following article on Microsoft PressPass:
The starting point for finding out more about current (and future) Microsoft virtualization
products is on
Microsoft.com.
38 Introducing Windows Server 2008
For more information about System Center Virtual Machine Manager and how you can join
the beta program for this product, see />virtualization/default.mspx on the Microsoft Web site. From there, you can jump to pages
describing Virtual Server 2005 R2, Virtual PC 2007, System Center Virtual Machine Manager,
and most likely Windows Server virtualization on Windows Server 2008 in the near future
as well.
If you’re interested in finding out more about SoftGrid Application Virtualization, see
although the Softricity Web site will probably be folded
soon into Microsoft.com.
Finally, be sure to turn to Chapter 14, “Additional Resources,” if you want to find more
resources about Windows Server virtualization in Windows Server 2008. In that chapter,
you’ll find links to webcasts, whitepapers, blogs, newsgroups, and other sources of
information on this feature and other Microsoft virtualization technologies.
39
Chapter 4
Managing Windows Server 2008
In this chapter:
Performing Initial Configuration Tasks. . . . . . . . . . . . . . . . . . . . . . . . . . . . . . . . . . . . .39
Using Server Manager. . . . . . . . . . . . . . . . . . . . . . . . . . . . . . . . . . . . . . . . . . . . . . . . . . .42
Other Management Tools. . . . . . . . . . . . . . . . . . . . . . . . . . . . . . . . . . . . . . . . . . . . . . . .56
Conclusion . . . . . . . . . . . . . . . . . . . . . . . . . . . . . . . . . . . . . . . . . . . . . . . . . . . . . . . . . . . .69
Additional Resources. . . . . . . . . . . . . . . . . . . . . . . . . . . . . . . . . . . . . . . . . . . . . . . . . . . .69
I was kidding, of course, when I said we should bring back the mainframe. After all, remember
how much fun it was managing those machines? Sitting at a green screen all day long, drop-
ping armfuls of punch cards into the hopper what fun! At least running an IBM System/360
could be more fun than operating a PDP-11. When I was a university student years ago
(decades actually), I worked one summer for the physics department, where there was a
PDP-11 in the sub-sub-basement where the Cyclotron was located. I remember sitting there
alone one night around 3 a.m. while an experiment was running, watching the lights blink on
the PDP and flipping a switch from time to time to read a paper tape. And that was my intro-
duction to the tools used for managing state-of-the-art computers in those days—specifically,
lights, switches, and paper tape.
Computers have come a long way since then. Besides being a lot more powerful, they’re also
a lot easier to manage. So before we examine other new and exciting features of Microsoft
Windows Server 2008, let’s look at the new and enhanced tools you can use to manage the
platform. These tools range from user interface (UI) tools for configuring and managing
servers to a new command-line tool for installing roles and features, tools for remote adminis-
tration, Windows Management Instrumentation (WMI) enhancements for improved scripted
management, Group Policy enhancements, and more.
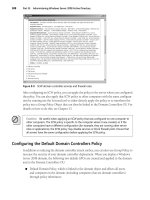
Performing Initial Configuration Tasks
The first thing you’ll notice when you install Windows Server 2008 is the Initial Configuration
Tasks screen (shown in Figure 4-1).
40 Introducing Windows Server 2008
Figure 4-1 The Initial Configuration Tasks screen
Remember for a moment how you perform your initial configuration of a machine running
Windows Server 2003 Service Pack 1 or later, where you do this in three stages:
1. During Setup, when you specify your administrator password, network settings, domain
membership, and so on
2. Immediately after Setup, when a screen appears asking if you want to download the
latest updates from Windows Update and turn on Automatic Updates before the server
can receive inbound traffic
3. After you’ve allowed inbound traffic to your server, when you can use Manage Your
Server to install roles on your server to make it a print server, file server, domain
controller, and so on
Windows Server 2008, however, consolidates these various server configuration tasks by
consolidating during- and post-Setup tasks together and presenting them to you in a single
screen called Initial Configuration Tasks (ICT). Using the ICT you can
■ Specify key information, including the administrator password, time zone, network
settings, and server name. You can also join your server to a domain. For example,
clicking the Provide Computer Name And Domain link opens System Properties with
the Computer Named tab selected.
Chapter 4 Managing Windows Server 2008 41
■ Search Windows Update for available software updates, and enable one or more of the
following: Automatic Updates, Windows Error Reporting (WER), and participation in
the Customer Experience Improvement Program.
■ Configure Windows Firewall on your machine, and enable Remote Desktop so that the
server can be remotely managed using Terminal Services.
■ Add roles and features to your server—for example, to make it a DNS server or domain
controller.
In addition to providing a user interface where you can perform these tasks, ICT also displays
status information for each task. For example, if a task has already been performed, the link
for the task changes color from blue to purple just like an ordinary hyperlink. And if WER has
been turned on, the message “Windows Error Reporting on” is displayed next to the corre-
sponding task item.
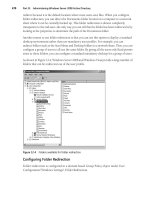
Once you’ve performed the initial configuration of your server, you can click the Print, E-mail
Or Save This Information link at the bottom. This opens Internet Explorer and displays a
results page showing the settings you’ve configured.
This results page can be found at %systemdrive%\users\<username>\AppData\
Roaming\Microsoft\Windows\ServerManager\InitialConfigurationTasks.html, and it can be
saved or e-mailed for reporting purposes.
42 Introducing Windows Server 2008
A few more notes concerning Initial Configuration Tasks:
■ Performing some tasks requires that you log off or reboot your machine. For example, by
default when you install Windows Server 2008, the built-in Administrator account is
enabled and has no password. If you use ICT to change the name of this account or
specify a password, you must log off and then on again for this change to take effect.
■ If Windows Server 2008 detects that it is deployed on a restricted network (that is,
quarantined by NAP) when you first log on, the Update This Server section of the ICT
displays a new link named Restore Network Access. Clicking this link allows you to
review current network access restrictions and restore full network access for your
server, and until you do this your server is in quarantine and has only limited network
access. The reason that the other two items in this section (Enable Windows Update And
Feedback and Download And Install Updates) are not displayed in this situation is that
machines in quarantine cannot access Windows Update directly and must receive their
updates from a remediation server. For more information about this, see Chapter 10,
“Network Access Protection.”
■ OEMs can customize the ICT screen so that it displays an additional section at the
bottom that can include an OEM logo, a description, and task links that can launch
EXEs, DLLs, and scripts provided by the OEM. Note that OEM task links cannot display
status information, however.
■ The ICT is not displayed if you upgrade to Windows Server 2008 from a previous
version of Windows Server.
■ The ICT is also not displayed if the following Group Policy setting is configured:
Computer Configuration\Administrative Templates\System\Server Manager\Do Not
Open Initial Configuration Tasks Windows At Logon
Using Server Manager
OK, you’ve installed your server, performed the initial configuration tasks, and maybe
installed a role or two—such as file server and DHCP server—on your machine as well. Now
what? Once you close ICT, another new tool automatically opens—namely, Server Manager
(shown in Figure 4-2). I like to think of Server Manager as “Computer Management on
steroids,” as it can do everything compmgmt.msc can do plus a whole lot more. (Look at
the console tree on the left in this figure and you’ll see why I said this.)
Chapter 4 Managing Windows Server 2008 43
Figure 4-2 Main page of Server Manager
The goal of Server Manager is to provide a straightforward way of installing roles and features
on your server so that it can function within your business networking environment. As a tool,
Server Manager is primarily targeted toward the IT generalist who works at medium-sized
organizations. IT specialists who work at large enterprises might want to use additional tools
to configure their newly installed servers, however—for example, by performing some initial
configuration tasks during unattended setup by using Windows Deployment Services (WDS)
together with unattend.xml answer files. See Chapter 13, “Deploying Windows Server 2008,”
for more information on using WDS to deploy Windows Server 2008.
Server Manager also enables you to modify any of the settings you specified previously using
the Initial Configuration Tasks screen. For example, in Figure 4-2 you can see that you can
enable Remote Desktop by clicking the Configure Remote Desktop link found on the right
side of the Server Summary tile. In fact, Server Manager lets you configure additional
advanced settings that are not exposed in the ICT screen, such as enabling or disabling the
Internet Explorer Enhanced Security Configuration (IE ESC) or running the Security
Configuration Wizard (SCW) on your machine.
44 Introducing Windows Server 2008
Managing Server Roles
Let’s dig a bit deeper into Server Manager. Near the bottom of Figure 4-2, you can see that
we’ve already installed two roles on our server using the ICT screen. We’ll learn more about
the various roles, role services, and features you can install on Windows Server 2008 later in
Chapter 5, “Managing Server Roles.” For now, let’s see what we can do with these two roles
that have already been installed.
Clicking the Go To Manage Roles link changes the focus from the root node (Server Manager)
to the Roles node beneath it. (See Figure 4-3.) This page displays a list of roles installed on the
server and the status of each of these roles, including any role services that were installed
together with them. (Role services will be explained later in Chapter 5.)
Figure 4-3 Roles page of Server Manager
The status of this page is updated in real time at periodic intervals, and if you look carefully at
these figures you’ll see a link at the bottom of each page that says “Configure refresh.” If you
click this link, you can specify how often Server Manager refreshes the currently displayed
page. By default, the refresh interval is two minutes.
Chapter 4 Managing Windows Server 2008 45
Selecting the node for the File Server role in the console tree (or clicking the Go To File Server
link on the Roles page) displays more information about how this role is configured on the
machine (as shown in Figure 4-4). Using this page, you can manage the following aspects of
your file server:
■ View events relevant to this role (by double-clicking on an event to display its details).
■ View system services for this role, and stop, start, pause, or resume these services.
■ View role services installed for this role, and add or remove role services.
■ Get help on how to perform role-related tasks.
Figure 4-4 Main page for File Server role
Note the check mark in the green circle beside File Server Resource Manager (FSRM) under
Role Services. This means that FSRM, an optional component or “role service” for the File
46 Introducing Windows Server 2008
Server role, has been installed on this server. You probably remember FSRM from Windows
Server 2003 R2—it’s a terrific tool for managing file servers and can be used to configure vol-
ume and folder quotas, file screens, and reporting. But in Windows Server 2003 R2, you had
to launch FSRM as a separate administrative tool—not so in Windows Server 2008. What’s
cool about Server Manager is that it is implemented as a managed, user-mode MMC 3.0 snap-
in that can host other MMC snap-ins and dynamically show or hide them inline based on
whether a particular role or feature has been installed on the server.
What this means here is that we can expand our File Server node, and underneath it you’ll
find two other snap-ins—namely, File Server Resource Manager (which we chose to install as
an additional role service when we installed the File Server role on our machine) and Shared
Folders (which is installed by default whenever you add the file server role to a machine.) And
underneath the FSRM node, you’ll find the same subnodes you should already be familiar
with in FSRM on Windows Server 2003 R2. (See Figure 4-5.) And anything you can do with
FSRM in R2, you do pretty much the same way in Windows Server 2008. For example, to
configure an SMTP server for sending notification e-mails when quotas are exceeded, right-
click on the File Server Resource Manager node and select Properties. (In addition to hosting
the FSRM snap-in within Server Manager, adding the FSRM role service also adds the FSRM
console to Administrative Tools.)
Figure 4-5 File Server role showing hosted snap-ins for File Server Resource Manager and
Shared Folders
Chapter 4 Managing Windows Server 2008 47
Here are a few more important things to know about Server Manager. First, Server Manager is
designed to be a single, all-in-one tool for managing your server. In that light, it replaces both
Manage Your Server (for adding roles) and the Add/Remove Windows Components portion
of Add Or Remove Programs found on previous versions of Windows Server. In fact, if you go
to Control Panel and open Programs And Features (which replaced Add Or Remove Programs
in Windows Vista), you’ll see a link called Turn Windows Features On And Off. If you click
that link, Server Manager opens and you can use the Roles or Features node to add or remove
roles, role services, and features. (See Chapter 5 for how this is done.)
Also, when Server Manager is used to install a role such as File Server on your server, it makes
sure that this role is secure by default. (That is, the only components that are installed and ports
that are opened are those that are absolutely necessary for that role to function.) In Windows
Server 2003 Service Pack 1 or later, you needed to run the Security Configuration Wizard
(SCW) to ensure a server role was installed securely. Windows Server 2008 still includes the
SCW, but the tool is intended for use by IT specialists working in large enterprises. For
medium-sized organizations, however, IT generalists can use Server Manager to install roles
securely, and it’s much easier to do than using SCW. In addition, while Server Manager can
be used for installing new roles using smart defaults, SCW is mainly designed as a post-
deployment tool for creating security policies that can then be applied to multiple servers to
harden them by reducing their attack surface. (You can also compare policies created by SCW
against the current state of a server for auditing reasons to ensure compliance with your cor-
porate security policy.) Finally, while Server Manager can only be used to add the default
Windows roles (or out-of-band roles made available later, as mentioned in the extensibility
discussion a bit later), SCW can also be used for securing nondefault roles such as Exchange
Server and SQL Server. But the main takeaway for this chapter concerning Server Manager vs.
SCW is that when you run Server Manager to install a new role on your server, you don’t need
to run SCW afterward to lock down the role, as Server Manager ensures the role is already
secure by default.
Server Manager relies upon something called Component Based Servicing (CBS) to discover
what roles and services are installed on a machine and to install additional roles or services or
remove them. For those of you who might be interested in how this works, there’s a sidebar in
the next section that discusses it in more detail. Server Manager is also designed to be exten-
sible. This means when new features become available (such as Windows Server Virtualiza-
tion, which we talked about in Chapter 3, “Windows Server Virtualization”), you’ll be able to
use Server Manager to download these roles from Microsoft and install them on your server.
Server Manager is designed to manage one server only (the local server) and cannot be used
to manage multiple servers at once. If you need a tool to manage multiple servers simulta-
neously, use Microsoft System Center. You can find out more about System Center products
and their capabilities at and it will be well worth your
time to do so. In addition, the status information displayed by Server Manager is limited to
48 Introducing Windows Server 2008
event information and whether role services are running. So if you need more detailed
information concerning the status of your servers, again be sure to check out System Center,
the next generation of the SMS and MOM platforms.
Unlike using Computer Management, you can’t use Server Manager to remotely connect to
another server and manage it. For example, if you right-click on the root node in Server Man-
ager, the context menu that is displayed does not display a Connect To A Different Computer
option. However, this is not really a significant limitation of the tool because most admins will
simply enable Remote Desktop on their servers and use Terminal Services to remotely manage
them. For example, you can create a Remote Desktop Connection on a Windows Vista com-
puter, use it to connect to the console session on a Windows Server 2008 machine, and then
run Server Manager within the remote console session. And speaking of Computer
Management, guess what happens if you click Start, right-click on Computer, and select
Manage? In previous versions of Windows, doing this opened Computer Management—what
tool do you think opens if you do this in Windows Server 2008?
Finally, a few more quick points you can make note of:
■ Server Manager cannot be used to manage servers running previous versions of the
Windows Server operating system.
■ Server Manager cannot be installed on Windows Vista or previous versions of Microsoft
Windows.
■ Server Manager is not available on a Windows server core installation of Windows Server
2008 because the supporting components (.NET Framework 2.0 and MMC 3.0) are not
available on that platform.
■ You can configure the refresh interval for Server Manager and also whether the tool is
automatically opened at logon by configuring the following Group Policy settings:
Computer Configuration\Administrative Templates\System\Server Manager\Do Not
Open Server Manager Automatically At Logon
Computer Configuration\Administrative Templates\System\Server Manager\
Configure The Refresh Interval For Server Manager
Chapter 4 Managing Windows Server 2008 49
From the Experts: The Security Configuration Wizard in
Windows Server 2008
The Security Configuration Wizard (SCW) reduces the attack surface of Windows
Servers by asking the user a series of questions designed to identify the functional
requirements of a server. Functionality not required by the roles the server is performing
is then disabled. In addition to being a fundamental security best practice, SCW reduces
the number of systems that need to be immediately patched when a vulnerability is
exposed. Specifically, SCW:
■ Disables unneeded services.
■ Creates required firewall rules.
■ Removes unneeded firewall rules.
■ Allows further address or security restrictions for firewall rules.
■ Reduces protocol exposure to server message block (SMB), LanMan, and
Lightweight Directory Access Protocol (LDAP).
SCW guides you through the process of creating, editing, applying, or rolling back a
security policy based on the selected roles of the server. The security policies that are
created with SCW are XML files that, when applied, configure services, Windows
Firewall rules, specific registry values, and audit policy. Those security policies can be
applied to an individual machine or can be transformed into a group policy object and
then linked to an Organizational Unit in Active Directory.
With Windows Server 2008 some important improvements have been made to SCW:
■ On Windows Server 2003, SCW was an optional component that had to be
manually installed by administrators. SCW is now a default component of
Windows Server 2008 which means Administrators won’t have to perform extra
steps to install or deploy the tool to leverage it.
■ Windows Server 2008 will introduce a lot of new and exciting functionality in
Windows Firewall. To support that functionality, SCW has been improved to
store, process, and apply firewall rules with the same degree of precision that the
Windows Firewall does. This was an important requirement since on Windows
Server 2008 the Windows Firewall will be on by default.
■ The SCW leverages a large XML database that consists of every service, firewall
rule and administration option from every feature or component available on
Windows Server 2008. This database has been totally reviewed and updated for
Windows Server 2008. Existing roles have been updated, new roles have been
added to the database, and all firewall rules have been updated to support the new
Windows Firewall.
50 Introducing Windows Server 2008
■ SCW now validates all XML files in its database files using a set of XSD files that
contains the SCW XML schema. This will help administrators or developers
extend the SCW database by creating new SCW roles base on their own
requirements or applications. Those XSD files are available under the SCW
directory.
■ All SCW reports have been updated to reflect the changes made to the SCW
schema regarding support for the new Window Firewall. Those reports include the
Configuration Database report, the Security Policy report and the Analysis report
that will compare the current configuration of Windows Server 2008 against an
SCW security policy.
SCW provides an end to end solution to reduce the attack surface of Windows Server
2008 machines by providing a possible configuration of default components, roles,
features, and any third-party applications that provide an SCW role.
SCW is not responsible for installing or removing any roles, features, or third-party
applications from Windows Server 2008. Instead, Administrators should use Server
Manager if they need to install roles and features, or use the setup provided with any
third party application. The installation of roles and features via Server Manager is made
based on security best practices.
While SCW complements well Server Manager, its main value is in the configuration of
the core operating system and third-party applications that provide an SCW role. SCW
should be used every time the configuration of a default component on Windows Server
2008 needs to be modified or when a third-party application is added or removed. In
some specific scenarios, like for remote administration, running SCW after using Server
Manager might provide some added value to some specific roles or features. Using SCW
after modifying a role or feature through Server Manager is not a requirement, however.
–Nils Dussart
Program Manager for the Security Configuration Wizard (SCW), Windows Core Operating
System Division
ServerManagerCmd.exe
In addition to the Server Manager user interface, there is also a command-line version of
Server Manager called ServerManagerCmd.exe that was first introduced in the IDS_2 build of
Windows Server 2008 (that is, the February CTP build). This command-line tool, which is
found in the %windir%\system32 folder, can be used to perform the following tasks:
■ Display a list of roles and features already installed on a machine.
■ Display a list of role services and features that would be installed if you chose to install
a given role.
■ Add a role or feature to your server using the default settings of that role or feature.
Chapter 4 Managing Windows Server 2008 51
■ Add several roles/features at once by providing an XML answer file listing the roles/
features to be installed.
■ Remote roles or features from your server.
What ServerManagerCmd.exe can’t do includes the following:
■ Install a role or feature, and change its default settings.
■ Reconfigure a role or feature already installed on the machine.
■ Connect to a remote machine, and manage roles/features on that machine.
■ Manage roles/features on machines running a Windows server core installation of
Windows Server 2008.
■ Manage non-OOB roles/features—such as Exchange Server or SQL Server.
Let’s take a look at the servermanagercmd –query command, which displays the list of
roles and features currently available on the computer, along with their command-line names
(values that should be used to install or remove the role or feature from the command line).
When you run this command, something called discovery runs to determine the different roles
and features already installed.
After discovery completes (which may take a short period of time), the command generates
output displaying installed roles/features in green and marked with “X”.
52 Introducing Windows Server 2008
You can also type servermanagercmd –query results.xml to send the output of this
command to an XML file. This is handy if you want to save and programmatically parse the
output of this command.
Let’s now learn more about ServerManagerCmd.exe from one of our experts at Microsoft:
From the Experts: Automating Common Deployment Tasks with
ServerManagerCmd.exe
Rolling out a new internal application or service within an organization frequently
means setting up roles and features on multiple servers. Some of these servers might
need to be set up with exactly the same configuration, and others might reside in remote
locations that are not readily accessible by full-time IT staff. For these reasons, you might
want to write scripts to automate the deployment process from the command line.
One of the tools that can facilitate server deployment from the command line is
ServerManagerCmd.exe. This tool is the command-line counterpart to the graphical
Server Manager console, which is used to install and configure server roles and features.
The graphical and command-line versions of Server Manager are built on the same syn-
chronization platform that determines what roles and features are installed and applies
user-specified configurations to the server.
ServerManagerCmd.exe provides a set of command-line switches that enable you to
automate many common deployment tasks as follows:
View the List of Installable Roles and Features
You can use the –query command to see a list of roles and features available for
installation and find out what’s currently installed. You can also use –query to look up
the command-line names of roles and features. These are listed in square brackets [] after
the display name.
Install and Uninstall Roles and Features
You can use the –install and –remove commands to install and uninstall roles and
features. One issue to be aware of is that ServerManagerCmd.exe enables you only to
install and uninstall. Apart from a few notable exceptions for required settings, you
cannot specify configuration settings as you can with the graphical Server Manager con-
sole. You need to use other role-specific tools, such as MMC snap-ins and command-line
utilities, to specify configuration settings after installing roles and features using Server-
ManagerCmd.exe.
Run in “What-If” Mode
After you create a script to set up the server with ServerManagerCmd.exe, you might
want to check that the script will perform as expected. Or you might want to see what
will happen if you type a specific command with ServerManagerCmd.exe. For these
scenarios, you can supply the –whatif switch. This switch tells you exactly what would be
Chapter 4 Managing Windows Server 2008 53
installed and removed by a command or answer file, based on the current server
configuration, without performing the actual operations.
Specify Input Parameters via an Answer File
ServerManagerCmd.exe can operate in an interactive mode, or it can be automated using
an answer file. The answer file is specified using the –inputPath <answer.xml> switch,
where <answer.xml> is the name of an XML file with the list of input parameters. The
schema for creating answer files can be found in the ServerManagerCmd.exe
documentation.
Redirect Output to a Results File
It is usually a good practice to keep a history of configuration changes to your servers in
case you need to troubleshoot a problem, migrate the settings of an existing server to a
new server, or recover from a disaster or failure. To assist with record keeping, you can
use the resultPath <results.xml> switch to save the results of an installation or removal
to a file, where <results.xml> is the name of the file where you want the output to be
saved.
–Dan Harman
Program Manager, Windows Server, Windows Enterprise Management Division
You’ll learn more about using ServerManagerCmd.exe for adding roles and features in
Chapter 5, but for now let’s move on and look at more tools for managing Windows
Server 2008.
Remote Server Administration Tools
What if you want to manage our file server running Windows Server 2008 remotely from
another machine? We already saw one way you could do this—enable Remote Desktop on the
file server, and use Terminal Services to run our management tools remotely on the server.
Once we have a Remote Desktop Connection session with the remote server, we can run tools
such as Server Manager or File Server Resource Manager as if we were sitting at the remote
machine’s console.
In Windows Server 2003, you can also manage remote servers this way. But you can also
manage them another way by installing the Windows Server 2003 Administration Tools Pack
(Adminpak.msi) on a different Windows Server 2003 machine, or even on an admin worksta-
tion running Windows XP Service Pack 2. And once the Tools Pack is installed, you can open
any of these tools, connect to your remote server, and manage roles and features on the server
(provided the roles and features are installed).
Is there an Adminpak for Windows Server 2008? Well, there’s an equivalent called the Remote
Server Administration Tools (RSAT), which you can use to install selected management tools
on your server even when the binaries for the roles/features those tools will manage are not
54 Introducing Windows Server 2008
installed on your server. In fact, the RSAT does Adminpak one better because Adminpak
installs all the administrative tools, whereas the RSAT lets you install only those tools you
need. (Actually, you can just install one tool from Adminpak if you want to, though it takes a
bit of work to do this—see article 314978 in the Microsoft Knowledge Base for details.)
What features or roles can you manage using the RSAT? As of Beta 3, you can install
management tools for the following roles and features using the RSAT:
■ Roles
❑ Active Directory Domain Services
❑ Active Directory Certificate Services
❑ Active Directory Lightweight Directory Services
❑ Active Directory Rights Management Services
❑ DNS Server
❑ Fax Server
❑ File Server
❑ Network Policy and Access Services
❑ Print Services
❑ Terminal Services
❑ Web Server (IIS)
❑ Windows Deployment Services
■ Features:
❑ BitLocker Drive Encryption
❑ BITS Server Extensions
❑ Failover Clustering
❑ Network Load Balancing
❑ Simple SAN Management
❑ SMTP Server
❑ Windows System Resource Management (WSRM)
❑ WINS Server
How do you install individual management tools using the RSAT? With Windows Server
2008, it’s easy—just start the Add Feature Wizard, and select the RSAT management tools you
want to install, such as the Terminal Services Gateway management tool. (See Figure 4-6. Note
that installing some RSAT management tools might require that you also install additional
features. For example, if you choose to install the Web Server (IIS) management tool from the
Chapter 4 Managing Windows Server 2008 55
RSAT, you must also install the Configuration APIs component of the Windows Process
Activation Service [WPAS] feature.)
Figure 4-6 Installing a management tool using the RSAT feature
The actual steps for installing features on Windows Server 2008 are explained in Chapter 5.
For now, just note that when you install an RSAT subfeature such as TS Gateway, what this
does is add a new shortcut under Administrative Tools called TS Gateway. Then if you click
Start, then Administrative Tools, then TS Gateway, the TS Gateway Manager console opens. In
the console, you can right-click on the root node, select Connect To TS Gateway Server, and
manage a remote Windows Server 2008 terminal server with the TS Gateway role service
installed on it without having to enable Remote Desktop on the terminal server.
Finally, the Windows Server 2003 Adminpak can be installed on a Windows XP SP2
workstation, which lets you administer your servers from a workstation. Can the RSAT be
installed on a Windows Vista machine so that you can manage your Windows Server 2008
machines from there?
As of Beta 3, the answer is “not yet.” Plans for how RSAT will be made available for Windows
Vista are uncertain at this moment, but it’s likely we can expect something that can do this
around or shortly after Windows Vista Service Pack 1. We’ll just have to wait and see.
56 Introducing Windows Server 2008
Other Management Tools
There are other ways you can manage Windows Server 2008 besides the tools we’ve discussed
so far. Let’s examine these now. Specifically, we’re going to look at the following items:
■ Group Policy
■ Windows Management Instrumentation (WMI)
■ Windows PowerShell
■ Microsoft System Center
Group Policy
Group Policy in Windows Vista and Windows Server 2008 has been enhanced in several
ways, including:
■ Several new areas of policy management, including configuring Power Management
settings, blocking installation of devices, assigning printers based on location, and more.
■ A new format for Administrative Templates files called ADMX that is XML-based and
replaces the proprietary-syntax ADM files used in previous versions of Windows.
■ Network Location Awareness to enable Group Policy to better respond to changing
network conditions and remove the need for relying on ICMP for policy processing.
■ The ability to use local group policy objects, the capability of reducing SYSVOL bloat by
placing ADMX files in a central store, and several other new features and enhancements.
A good source of information about Group Policy in Windows Vista (and therefore also in
Windows Server 2008, because the platforms were designed to fit together) is Chapter 13,
“Managing the Desktop Environment,” in the Windows Vista Resource Kit from Microsoft Press.
Meanwhile, while your assistant is running out to buy a couple of copies of that title (I was
lead author for that title and my retirement plans are closely tied to the royalties I earn from
sales, so please go buy a dozen or so copies), let’s kick back and listen to one of our experts
at Microsoft telling us more about post-Vista enhancements to Group Policy found in Win-
dows Server 2008:
Chapter 4 Managing Windows Server 2008 57
From the Experts: What’s New in Group Policy in Windows
Server 2008
The following is a description of some of the Group Policy enhancements found in
Windows Server 2008.
Server Manager Integration
The first noticeable change in Windows Server 2008 is how the Group Policy tools are
presented. In past operating systems, other than Windows Vista, an admin would have
to go to the Microsoft Web site to download the Group Policy Management Console
(GPMC) and install it on every administrative workstation where Group Policy manage-
ment is performed. In Windows Server 2008, the installation bits are delivered with the
operating system. No more downloads, no more wondering where the installation
media is—it is just there.
A difference in this new environment is how optional Windows components are
installed. Windows Server 2008 introduces a new management console for servers
called Server Manager. This is the tool that is used to install server roles, as well as
optional Windows components. If you choose to go the old-school route and add
Windows components from the Add/Remove Control Panel, it will launch Server
Manager.
Not only do you use Server Manager to install the optional components, but the GPMC
console itself is hosted within the Server Manager console. This means all of your admin-
istrative tools are kept in one place and are easily discoverable. Of course, you will still be
able to find the tools in the common locations, such as Administrative Tools.
Search/Filters, Comments, and Starter GPOs
These features really enhance the administrative experience around managing and
authoring policy. They are, technically, multiple features, but they work well when
described as a “feature set,” as they all address the same business problem—difficulty in
authoring policy. As you are probably aware, in the Windows Vista/Windows Server
2008 wave of operating systems there are hundreds of new settings to be managed. This
means the total number of settings approaches 3000. That is a lot of manageable set-
tings. Even though this provides a ton of value to the IT Professional, it increases the
complexity when it comes to actually locating the setting or policy item that you are
trying to manage. Microsoft has provided a “settings” spreadsheet that contains all the
Group Policy settings in one relatively easy-to-use document, but it really doesn’t solve
the problem. Microsoft has received feedback from many IT pros that there needs to be
a method within the Group Policy tool itself to make finding the right settings easier.
Now with Search and Filters, when you are authoring a policy right in the editor you
have a great mechanism to locate the setting you are looking for. You will see a new Filter
button in the toolbar, and if you right-click on the Administrative Templates node in the
editor you will see a menu item called Filter Options. Filter Options allows you to set the
58 Introducing Windows Server 2008
criteria that you are looking to search on. For example, you can narrow your view to only
configured items, specific key words, or the system requirements (for example, Internet
Explorer 6.0 settings). Filter Options provides a very intuitive interface and has great
flexibility to help in locating the settings that you are looking for. Once you set Filter
Options and turn on the Filter (global setting), the editor displays only settings that you
are targeting. The Group Policy team is really excited to bring these features to you
because we know it will reduce some of the administrative burden of what is otherwise
a fantastic management technology.
You can also filter for settings that have Comments. This is also a new feature introduced
in Windows Server 2008. You can now place a comment on any setting that you want.
This means when admins are authoring policy, they can document their intentions at
author time and other administrators can use that Comment as a search criteria. This
feature is incredible at helping Group Policy administrators communicate to themselves,
or other administrators, why specific settings are being managed and what the impact of
those settings is.
The last piece of this feature set is called Starter GPOs. Starter GPOs are a starting point
for administration. When a GPO is created, you can still create a blank GPO, or you can
choose to create your GPO from one of the pre-existing Starter GPOs. Starter GPOs are
a collection of preconfigured Administrative Template settings, complete with com-
ments. You will see a node in the Group Policy Management Console (GPMC) called
Starter GPOs. Simply right-click on this node and choose New. You will have a Starter
GPO that is available to edit. There is delegation available on the Starter GPO container
to ensure that only specific administrators can modify it
This feature set—Search/Filters, Comments, and Starter GPOs—comes together to greatly
enhance the authoring and management experience around Group Policy. It provides
ease of authoring and discovering settings, inline documentation of Group Policy
settings, and baseline configurations for starting the process.
ADMX/ADML
ADMX/AMDL files were introduced in Windows Vista to replace the legacy data format
of the ADM files that we have become used to. ADMX files are XML files that contain the
same type of information that we have become familiar with to build the administrative
experience around Administrative Template settings. Using XML makes the whole pro-
cess more efficient and standardized. ADML files are language-specific files that are crit-
ical in a multilanguage enterprise. In the past, all localization was done right within each
ADM file. This caused some confusing version control issues when multiple administra-
tors were managing settings in a GPO from workstations using different languages. With
ADMX/ADML, all administrators work off of the same GPOs and simply call the
appropriate ADML file to populate the editor.
Another value associated with ADML/ADMX files is that GPOs no longer contain the
ADM files themselves. Prior to Windows Vista/Windows Server 2008, each GPO created
Chapter 4 Managing Windows Server 2008 59
would contain all the ADM files. This was about 4 MB by default. This was a contributing
factor in SYSVOL bloat.
Take a look at to read more on ADMX/ADML.
You can also find the ADMX migration utility to help in moving to this new environment
at />default.mspx. Just a note that ADM and ADMX can coexist; read up on it on one of the
sites just referenced.
Central Store
Related to ADMX files is the Central Store. As was previously stated, ADM files used to
be stored in the GPO itself. That is no longer the case. Now the GPO contains only the
data that the client needs for processing Group Policy. In Windows Vista/Windows
Server 2008, the default behavior for editing is that the editor pulls the ADMX files from
the local workstation. This is great for smaller environments with few administrators
managing Group Policy, but in larger, more complex environments or environments that
need a bit more control, a Central Store has been introduced. The Central Store provides
a single instance in SYSVOL that holds all of the ADMX/ADML files that are required.
Once the Central Store is set up, all administrators load the appropriate files from the
Central Store instead of the local machine. Check out one of the Group Policy MVP’s
Central Store Creation Utility at You can also find
more information on the Central Store at
Summary
Windows Server 2008 and Windows Vista have introduced a lot of new functionality
for Group Policy. Administrators will find that these new features for management, along
with the around 700 new settings to manage, will increase the ease of use of Group
Policy and expand the number of areas that can be managed with policy.
–Kevin Sullivan
Lead Program Manager for Group Policy, Windows Enterprise Management Division
Pretty cool enhancements, eh? Sorry, that’s the Canadian coming out of me, or through me, or
channeling through me—whatever.
Windows Management Instrumentation
WMI is a core Windows management technology that administrators can use to write scripts
to perform administrative tasks on both local and remote computers. There are no specific
enhancements to WMI in Windows Server 2008 beyond those included in Windows Vista,
60 Introducing Windows Server 2008
but it’s important to know about the Windows Vista enhancements since these apply to
Windows Server 2008 also. Here are a few of the more significant changes to WMI in
Windows Vista and Windows Server 2008:
■ Improved tracing and logging The WMI service now uses Event Tracing for Windows
(ETW) instead of the legacy WMI log files used on previous Windows platforms, and
this makes WMI events available through Event Viewer or by using the Wevtutil.exe
command-line tool.
■ Enhanced WMI namespace security The NamespaceSecuritySDDL qualifier can now
be used to secure any namespace by setting WMI namespace security in the Managed
Object Format (MOF) file
■ WMI namespace security auditing WMI now uses the namespaces system access con-
trol lists (SACL) to audit namespace activity and report events to the Security event log.
■ Get and Set security descriptor methods for securable objects new scriptable
methods to get and set security descriptors have been added to Win32_Printer,
Win32_Service, StdRegProv, Win32_DCOMApplicationSetting, and __SystemSecurity.
■ Manipulate security descriptors using scripts The Win32_SecurityDescriptorHelper
class now has methods that allow scripts to convert binary security descriptors on
securable objects into Win32_SecurityDescriptor objects or Security Descriptor
Definition Language (SDDL) strings.
■ User Account Control User Account Control (UAC) affects what WMI data is
returned, how WMI is remotely accessed, and how scripts must be run.
What all this basically means is that WMI is more secure and more consistent in how it works
in Windows Server 2008, which is good news for administrators who like to write WMI
scripts to manage various aspects of their Windows-based networks.
Still, from personal experience, I know that writing WMI scripts isn’t always easy, especially
if you’re trying to get them to run properly against remote machines. Windows Vista and
Windows Server 2008 complicate things in this regard because of their numerous security
improvements, including User Account Control (UAC). So it’s instructive if we sit back and
listen now to one of our experts at Microsoft, who will address this very issue in detail (this
sidebar is worth its weight in gold):
From the Experts: WMI Remote Connection
Talking about management obviously implies the need to connect remotely to the
Windows systems you want to manage. Speaking about remote connection immediately
implies security. Management and security are not always easy to combine. It is not rare
to see situations where management represents a breach of security, or the other way
around; it is not rare either to see security settings preventing the proper management of
Chapter 4 Managing Windows Server 2008 61
a system. In this respect, WMI is not different from any other technologies; it provides
remote management capabilities involving some security considerations.
Windows Vista and Windows Server 2008 come with a series of new security features.
The most important one is called User Account Control (UAC). It is very likely that every
administrator in the world will be challenged by the presence of UAC, especially if you
use the Local Accounts part of the Administrator group to perform remote access. This
is because any token account used in this context is automatically filtered and finally acts
as a normal user in the remote system. Therefore, it is wise to consider the various secu-
rity aspects to properly and securely manage your remote systems.
Before looking at the UAC aspects, let step back and look at the requirements to call
WMI remotely. This applies to any Windows platform since Windows 2000. We will
examine the Windows Vista and Windows Server 2008 aspects next.
To connect remotely, four conditions must be met:
1. Firewall Introduced with Windows XP, the Windows Firewall must be properly
set up to enable connectivity for the WMI RPC traffic. Usually, you get an “RPC
connection failure” if the Windows Firewall is enabled and RPC is disallowed. If
you get an “access denied” message, the firewall is not the root cause of the issue.
Keep in mind that the firewall is the key component to go through before anything
else happens. Before Windows Vista and Windows Server 2008, RPC traffic must
be enabled to allow the WMI traffic to go through. With Windows Vista and
Windows Server 2008, a dedicated set of Firewall WMI rules is available to enable
only WMI traffic. (This can be done with the FW.MSC MMC snap-in, Group
Policies, Scripting, or NETSH.EXE.) Note that if you use WMIDiag (available on
Microsoft Download Center), it will tell you which NETSH.EXE command to use
to configure your firewall properly.
2. DCOM Once the firewall gate is passed, it is time to consider the DCOM security.
The user issuing the remote call must have the right to “Launch and Activate”
(which can be viewed and changed with DCOMCNFG.EXE) for both the My
Computer and Windows Management and Instrumentation objects. By default,
only users who are part of the Administrators group of the remote machine have
the right to remotely “Launch and Activate” these DCOM objects.
3. WMI namespace Once the DCOM security is verified, WMI namespace security
comes next. In this case, the user connecting to a remote WMI namespace must
have at the minimum the Enable Remote and Enable Account rights granted for
the given namespace. By default, only users who are part of the Administrators
group of the remote machine have the Enable Remote right granted. (This can
be updated with WMIMGMT.MSC.)