MCITP Windows Server 2008 Server Administrator Study Guide phần 9 potx
Bạn đang xem bản rút gọn của tài liệu. Xem và tải ngay bản đầy đủ của tài liệu tại đây (1.92 MB, 53 trang )
Encrypting File System
381
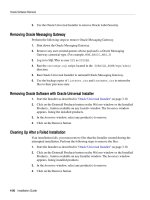
FIGURE 8.5 Encrypting a file with EFS
1 2
3 4
Symmetric Key
Created
Data Encrypted with
Symmetric Key
Encrypted Symmetric
Key Stored in File
Data Decryption
Field (DDF)
Encrypted File
Encrypted Data
Unencrypted File
Symmetric Key
Encrypted with
User’s Public Key
The symmetric key is stored with the file so that the file can be decrypted when necessary.
Since it is stored with the file, it needs to be protected. The symmetric key is encrypted with
the user’s public key (step 3) and then stored in the data decryption field of the file (step 4).
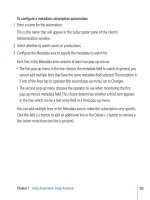
Figure 8.6 shows the process when a file is opened and decrypted. When the user
attempts to open the file, the user’s EFS certificate (which holds the user’s private key) is
accessed (step 1). The encrypted symmetric key is retrieved from the DDF (step 2). Note
that the data is still encrypted at this point.
The user’s private key is then used to decrypt the symmetric key (step 3). With the sym-
metric key decrypted, it can then be used to decrypt the data (step 4).
At the core of this process is the user’s private key, which is kept in the user’s EFS certifi-
cate. Once a user logs on, she will have automatic access to the certificate. If another user
attempts to open the file, he won’t have access to the first user’s certificate and the private
key. Without the private key, the data can’t be decrypted.
Although you may occasionally read that EFS-protected data is compromised, it’s not
because the EFS encryption is hacked. Instead, a user’s password is guessed or hacked.
Once the user’s password is known, anyone can log on as that user and gain automatic
access to EFS-protected files. Using strong passwords can go a long way toward protecting
users’ accounts and EFS-protected data.
93157c08.indd 381 8/8/08 9:46:56 AM
382
Chapter 8
N
Planning Windows Server 2008 Security
FIGURE 8.6 Decrypting a file with EFS
Encrypted Data
Data Decryption
Field (DDF)
1 2
3 4
User’s Private Key
Retrieved from
User’s EFS
Certificate
Encrypted Symmetric
Key Retrieved from DDF
Data Encrypted with
Symmetric Key
Decrypted Data
Symmetric Key
Encrypted with
User’s Private Key
Recovering EFS-Encrypted Files
Since the EFS keys are stored as part of the operating system, you can lose access to the
keys if you install a new operating system after a failure. The primary protection against
this data loss is to ensure you have a backup of your certificate and encryption keys.
If you have a backup of your certificate, then you can import your certificate into the new
operating system and use it to decrypt the files encrypted in the previous operating system.
Backing Up Your EFS Certificate
You can export your certificate and then store the certificate on removable media such as a
USB flash drive or CD-ROM. When you need to recover EFS files (such as after a server’s
operating system is rebuilt), you can import the certificate into the certificate store.
Exercise 8.4 shows the steps involved in exporting your EFS certificate. These steps
assume there is a certificate to export. Remember, the certificate is created the first time
you encrypt a file or folder. If you haven’t done so with your current account, do so now.
EXERCISE 8.4
Exporting Your EFS Certificate
1. Launch a Microsoft Management Console (MMC) by clicking Start and entering
MMC in the Start Search box.
2. Press Ctrl+M to add a snap-in.
93157c08.indd 382 8/8/08 9:46:56 AM
Encrypting File System
383
EXERCISE 8.4
(continued)
3. In the Available Snap-ins section, select Certificates, and click Add.
4. On the Certificates Snap-in page, ensure My User Account is selected, and click Finish.
5. In the Add or Remove Snap-Ins page, click OK.
6. In Certificates console, browse to Certificates Personal Certificates. Select the
certificate with the Intended Purpose of Encrypting File System setting. Right-click
the certificate, and view the All Tasks selections. Your view will look similar to the
following graphic.
7. Select Export from the All Tasks menu. On the Welcome to the Wizard page, click Next.
8. On the Export Private Key page, select Yes, Export the Private Key and then click Next.
9. On the Export File Format page, Personal Information Exchange -PKCS #12 (.PFX) will
be selected. Select the Export All Extended Properties check box. Leave all the other
check boxes unchecked. Click Next.
10. On the Password page, enter the password of P@ssw0rd in the Password and Con-
firm Password boxes. You can also choose your own password. Click Next.
11. On the File to Export page, click the Browse button. In the Save As dialog box, select
Browse Folders (on the bottom left) if the folders aren’t visible. Browse to the root of
C:\ (or another folder of your choosing). Enter EFSExportCert in the File Name text
box, and click Save.
12. Back on the File to Export page, click Next.
13. On the Completing the Wizard page, review the information, and click Finish. A Certifi-
cate Export Wizard dialog box will appear indicating the export was successful.
93157c08.indd 383 8/8/08 9:46:57 AM
384
Chapter 8
N
Planning Windows Server 2008 Security
You can now copy the certificate to a floppy, USB flash drive, or CD so that it can be
stored in a safe place.
Importing Your EFS Certificate
If you have to rebuild your server’s operating system, you won’t have access to the files that
were encrypted in the original operating system unless you have access to the original key.
If you have a backup of your EFS certificate, you can import the certificate, and you will
then have access to your EFS files.
Exercise 8.5 shows the steps involved in importing your EFS certificate. These steps
assume you have completed Exercise 8.4.
EXERCISE 8.5
Importing Your EFS Certificate
1. Launch the Certificate Manager by clicking Start and entering certmgr.msc in the
Start Search box.
2. In the Certificates console, browse to Certificates Personal. Right-click the Certifi-
cates container, and view the All Tasks selections. Your display will look similar to the
following figure.
3. Select Import to launch the Import Certificate Wizard.
4. On the Welcome to the Wizard page, click Next.
5. On the File to Import page, browse to the file location where you exported the certifi-
cate in Exercise 8.4.
6. Change the extension that the system is looking for by selecting the drop-down box
above the Open button. Select the Personal Information Exchange (*.pfx, *p12), as
shown in the following graphic.
93157c08.indd 384 8/8/08 9:46:58 AM
Encrypting File System
385
EXERCISE 8.5
(continued)
7. Select your certificate, and click Open.
8. Back on the File to Import page, click Next.
9. On the Password page, enter P@ssw0rd (or the alternate password you may have
chosen). Select the Mark This Key as Exportable check box. Notice that you can also
enable strong private key protection from this page. Click Next.
10. On the Certificate Store page, accept the default to place all certificates in the following
store (with the Personal Certificate Store shown). Click Next.
11. On the Completing the Wizard page, click Finish.
12. A dialog box will appear indicating that the import was successful.
Data Recovery Agent
Imagine this: I work at your company, and I’ve been working on some research and develop-
ment projects. All the data is stored on a server and protected using EFS, and I’m the only user
who has access to the data. Then, a wonderful thing happens. I win the lottery! Woo hoo!
Somehow I forget about these project files and start a vacation that ultimately lasts several
months. In the meantime, you’re trying to access these files that can be accessed using only my
private key. But since you don’t have my private key, you can’t access the files.
93157c08.indd 385 8/8/08 9:46:59 AM
386
Chapter 8
N
Planning Windows Server 2008 Security
For many companies, this is unacceptable. A back door to the data is needed. The data
recovery agent (DRA) is the back door. A data recovery agent is a designated person who
has the ability to open encrypted files.
Figure 8.7 shows an EFS-protected file with a data recovery field (DRF). The data recovery
field is similar to the data decryption field. It holds an encrypted version of the symmetric key
used to encrypt the data. The difference is that the symmetric is encrypted with the DRA’s
public key and can be decrypted only with the DRA’s public key.
FIGURE 8.7 DRF within an EFS-protected file
Encrypted Data
EFS-Protected File
Data Decryption
Field (DDF)
Data Recovery
Field
Someone responsible is designated as the data recovery agent. From then on, any files
that are encrypted include a DRF. The DRA is then able to access any files using the key
available in the DRA’s certificate.
A new feature available within Windows Server 2008 is the ability to embed a DRA’s
certificate onto a smart card.
Key Recovery Agent
A key recovery agent (KRA) is similar to a data recovery agent. The difference is that the
KRA can recover private keys, while the DRA is used to recover data.
When key recovery is implemented, private keys are stored in a key archival data store.
If a user’s private key becomes lost or damaged, the KRA can retrieve the private key from
the store and return it to the user. Recovered keys can also be issued to other users who will
act on behalf of the original user.
KRA vs. DRA
In any organization, you can implement a key recovery agent, a data recovery agent, both,
or neither. What is done is largely subjective.
The existence of either a DRA or a KRA creates a back door to retrieve data. However,
both also present a security risk. If attackers gain access to the DRA or KRA keys, they can
then retrieve data that was intended to be protected. For some companies, the risks out-
weigh the benefits, and neither a DRA nor a KRA is implemented.
93157c08.indd 386 8/8/08 9:46:59 AM
Auditing for Server Security
387
Auditing for Server Security
One of the primary things you can do when implementing server security is to watch what’s
happening on the server by implementing an auditing policy. With Windows Server 2008
you can do regular auditing or specialized Active Directory auditing.
Regular auditing is the same type of auditing that has been available on Windows Server
products since Windows Server 2000. Windows Server 2008 has introduced more detailed
auditing capabilities with Active Directory. When enabled, directory service access events
can be logged with more detailed information.
Auditing can watch for certain events, and when these events occur, it will log the event
in the Security log. You can configure auditing of both success and failure events. You can
view the Security log using Event Viewer.
With auditing, you can monitor several types of events. Figure 8.8 shows the Group Policy
settings for these settings, and the following text explains each category. Once enabled, events
will be logged in the Security log and can be viewed using Event Viewer.
FIGURE 8.8 Enabling auditing via Group Policy
Account logon events Account logon events are generated when a user attempts to authenti-
cate against a domain controller. Failure events are logged when authentication isn’t successful,
and success events are logged when the user enters the correct credentials.
Account management Account management events are generated when a user, group,
or computer account is created, modified, or deleted. Both success and failure events can
be audited.
Directory service access Auditing can be enabled on any individual directory service object.
It’s important to note that there is a two-step process for enabling directory service access.
You would first enable directory service access auditing. Then you would go to the individual
object where you want to audit.
93157c08.indd 387 8/8/08 9:47:00 AM
388
Chapter 8
N
Planning Windows Server 2008 Security
Each directory service object (users, computers, groups, OUs, and so on) has a security
access control lists (SACLs). Each SACL lists users or groups by security identifier (SID)
and the auditing requirement.
Logon events Logon events are generated when a user attempts to authenticate against a
local computer (not a domain controller).
Object access Object access enables auditing for objects. For example, you may want
to know when a file, folder, or registry key is accessed, modified, or deleted. By enabling
object access auditing via Group Policy, you can then enable auditing at individual objects.
Just as enabling directory service access auditing is a two-step process, enabling object
access auditing is a two-step process. Each object has a security access control lists. Each
SACL lists users or groups by security identifier and the auditing requirement.
Policy change Policy change can audit any changes to user rights assignment policies,
audit policies, and trust policies.
Privilege use Privilege use auditing can track each time a user exercises a user right.
In general, a right is something a user is allowed to do, such as change the system time.
(Rights and permissions are sometimes confused; permissions grant you a specific type
of access to an object.)
Not all privileges are audited by default. To enable auditing of the following user rights,
you need to modify the FullPrivilegeAuditing registry key:
Bypass traverse checking
ÛN
Debug programs
ÛN
Create a token object
ÛN
Replace process-level token
ÛN
Generate security audits
ÛN
Back up and restore operations
ÛN
Process tracking Process tracking auditing is used to log events in response to specific
applications (or individual process) events. These include events such as program activation,
process exit, and indirect object access.
System events System events auditing is used to log specific events from a computer. Some
common events that are logged include when a computer is restarted or shut down.
Auditing Detailed Active Directory Events
If desired, you can enable the logging of more detailed Active Directory events. You
first must enable the logging of directory service access success and failure events. Once
enabled, you can then enable the logging of the following subcategories:
Directory Service Access
ÛN
Directory Service Changes
ÛN
93157c08.indd 388 8/8/08 9:47:00 AM
Auditing for Server Security
389
Directory Service Replication
ÛN
Detailed Directory Service Replication
ÛN
You can enable the Directory Service Access auditing policy on the Default
Domain Controllers GPO, which is linked to the Domain Controllers OU. It
has meaning only on domain controllers, so it wouldn’t be set at a site level,
at the domain level, or at OUs that hold other servers or workstations.
The Directory Service Access subcategory logs additional details when Active Directory
objects are accessed.
The Directory Service Changes subcategory logs information that many administra-
tors want on a regular basis. For example, when a change is made, both the old and new
values are logged so an administrator can see what the value was both before and after the
change. If an object is moved, both the old and new locations will be logged.
Information on replication is useful when troubleshooting replication problems.
To enable any of these subcategories, you would use the
auditpol command-line tool.
The basic syntax of
auditpol when enabling the detailed Active Directory auditing is
shown in the following commands:
Enable success for the subcategory:
ÛN
auditpol /set /subcategory:”subcategory name” /success:enable
Enable failure for the subcategory:
ÛN
auditpol /set /subcategory:”subcategory name” /failure:enable
Disable success for the subcategory:
ÛN
auditpol /set /subcategory:”subcategory name” /success:disable
Disable failure for the subcategory:
ÛN
auditpol /set /subcategory:”subcategory name” /failure:disable
All the subcategory names are entered just as they’ve been described previously but are
listed here for clarity. Note that since each of the subcategories has spaces, you must include
the quotes in the command. As an example, when enabling detailed success auditing for
directory service changes, you would enter the following command:
auditpol /set /subcategory:”directory service access” /success:enable
Enabling Directory Service Access Auditing
sEnable Audit Directory Service Access via Group Policy.
ÛN
Enable auditing at the object level.
ÛN
93157c08.indd 389 8/8/08 9:47:01 AM
390
Chapter 8
N
Planning Windows Server 2008 Security
The following high-level steps identify how to enable auditing for directory service
access events:
1. Enable Audit Directory Service Access via Group Policy as shown in the previous section.
2. In Active Directory Users and Computers, enable the viewing of advanced features by
selecting Advanced Features from the View menu.
3. Right-click an object that you want to audit (such as an OU).
4. Click the Security tab. Click the Advanced button. Figure 8.9 shows the current auditing
enabled on the Domain Controllers OU.
FIGURE 8.9 Enabling auditing on a directory service object
The entries on the Auditing tab are referred to as the object’s security
access control list (SACL). Each entry has a security identifier that is
converted to a friendly name and the specific access that will be audited.
You can compare this to the discretionary access control list (DACL),
which is an access control list that includes the SIDs and permissions
for individual objects.
5. Click the Add button, and add the user or group you want to audit. You can choose
Everyone to audit access for any user.
6. Pick the individual actions that you want to audit. If you want to audit all possible access,
select Full Control for the Successful and Failed columns, as shown in Figure 8.10.
93157c08.indd 390 8/8/08 9:47:01 AM
Auditing for Server Security
391
FIGURE 8.10 Enabling Full Control access auditing on an OU for the Everyone group
If you want to enable more detailed auditing for the directory service subcategories, use
the
auditpol command-line tool as described previously.
Enabling Object Access
Similar to how Active Directory Access is a two-step process, it’s also a two-step process
to enable object access auditing for any regular objects. In this context, an object would be
items such as a file, folder, registry key, or printer.
The two distinctive steps required to enable directory service auditing are as follows:
Enable object access via Group Policy.
ÛN
Enable auditing at the object level.
ÛN
The following high-level steps identify how to enable auditing for object access:
1. Enable object access via Group Policy as shown earlier.
2. Access the properties page of the object you want to audit. For example, if you wanted
to audit access to the
C:\Data directory, you’d access the properties page of C:\Data.
3. Access the Security tab of the object, and click the Advanced button.
4. Select the Auditing tab. This will show you the security access control list.
5. Add a user by clicking Edit and clicking Add.
6. After you’ve added a user, identify the access you want to audit. For example, if you
want to know whether a user ever attempts or succeeds in deleting data, select the
Delete for Successful and Failed check box, as shown in the Figure 8.11.
93157c08.indd 391 8/8/08 9:47:03 AM
392
Chapter 8
N
Planning Windows Server 2008 Security
FIGURE 8.11 Auditing deletes in the data folder by the Everyone group
If you enable only object access auditing via Group Policy, nothing will be audited by
default. Similarly, if you enable object access auditing at individual objects but don’t enable
object access auditing via Group Policy, nothing will be audited.
Network Security
You can also implement security at the network level. The three primary network security
elements discussed in this section are as follows:
Firewalls Used to protect the network from Internet attacks and internal clients from
emerging threats (such as viruses or worms released internally).
Remote access When providing access to your internal network from an external network
(such as the Internet), you need to implement security measures to protect your network.
This includes using Network Policy Access Services to ensure the health of remote clients
and deciding which tunneling protocol to use with VPNs (PPTP, L2TP, or SSTP).
Network Encryption with IPSec Data being transmitted is vulnerable to sniffing attacks.
Data can be protected by encrypting it prior to transmission.
Firewalls
Firewalls are placed at the edge of your network, primarily to block out unwanted Internet
traffic, and are also enabled on internal hosts (servers and client computers) to protect them
93157c08.indd 392 8/8/08 9:47:04 AM
Network Security
393
from internal threats such as viruses or worms that may have been inadvertently brought in
by a user.
The basic premise of a firewall is to block all traffic except what is specifically autho-
rized. Exceptions are added in the form of rules that specify what traffic is allowed. If a
rule is met, the traffic is allowed. Otherwise, the traffic is blocked.
Figure 8.12 shows how firewalls can be placed at the edge of a network (between the
internal network and the Internet) and also enabled on hosts in the network. The figure
also shows a common configuration of a demilitarized zone (DMZ).
FIGURE 8.12 Firewalls in a network
Internet
DMZ
Internal Network
A DMZ is used to provide a safer environment for servers that need to be accessible
from the Internet. For example, you may have a web server that needs to be accessible on
the Internet, but instead of placing it directly on the Internet, you place it in the DMZ. You
can then use the Internet-facing firewall to filter out unwanted traffic and allow only what
is desire.
Packet Filtering
Packet filtering is the basic method used by firewalls to allow or disallow traffic. Packet fil-
ters can filter traffic based on the following:
IP addresses
ÛN
Ports
ÛN
Some protocols
ÛN
In general, packet filtering starts by blocking all traffic. Then, one by one, you create
rules to allow the specific traffic you want to allow.
It’s worthwhile to review some basic networking concepts here. Within a network, the IP
address is used to get a data packet to a host (such as a server). When the packet reaches the
server, the server then needs to process it. The server looks within the packet to determine
the port or the protocol that is being addressed. Once determined, the server then passes the
packet information to the appropriate service to process the packet.
93157c08.indd 393 8/8/08 9:47:04 AM
394
Chapter 8
N
Planning Windows Server 2008 Security
Ports are divided into three ranges by the Internet Assigned Numbers Authority (IANA).
The first two ranges have specific services defined that run on specific ports:
Well-known ports These are the first 1,024 ports (port 0 through 1023). Some common
ports you should be familiar with from this book are 80 (HTTP), 443 (HTTPS), and 389
(Lightweight Directory Access Protocol). Well-known ports are used by system processes or
by programs executed by privileged users.
Registered ports These are ports 1024 through 49151. These are less commonly known
but have many ports that are reserved. On most systems, these ports can be used by user
processes or programs executed by ordinary users.
Dynamic (or private) ports These ports can be dynamically assigned by services. Typically
these ports are used by clients as source ports so that the returning packet can be processed.
Dynamic ports are in the range of 49152 to 65,535.
Figure 8.13 shows the process of port. In step 1, the user submits an HTTP request to the
web server to retrieve a web page. The destination port is port 80, which is the well-known
port for HTTP. Additionally, the client would designate a source port in the dynamic range
so the system knows where to send the returning packet. For this example, I’ve chosen port
number 57575, but it could be any port in the dynamic range.
FIGURE 8.13 Packet filtering in a firewall
Internet
1
2 3
4
HTTP Request
Using Destination
Port 80 and
Source Port
57575
Port 80 open.
Traffic allowed.
Port 80 closed.
Traffic blocked.
Web Server
Processes Request
Using Destination
Port 57575 and
Source Port 80
Client3
In step 2, the Internet-facing firewall receives the packet. Since the packet has a destination
of port 80, the packet would be allowed. The packet filter could also specify that only packets
addressed to the specific IP address of the web server and using port 80 would be allowed.
To protect the internal network, port 80 would be closed on the internal firewall as shown
in step 3. Traffic that is allowed through the external firewall would be blocked internally.
Step 4 shows the web server processing the request. The traffic is coming from a web
server, so the source port is port 80. Since the client chose port 57575 as its source port,
this same port must be used as the destination port.
93157c08.indd 394 8/8/08 9:47:04 AM
Network Security
395
Firewalls are typically programmed to allow returning traffic, so since it allowed the
traffic to the web server, it would allow the returning traffic. When the client receives
the packet, it knows that it used port 57575, so it would pass the information to process
that initiated the request.
Server Internal Firewall
In addition to implementing a firewall at the edge of your network, you can also enable the
firewall on each of your individual hosts. Windows XP, Windows Vista, Windows Server
2003, and Windows Server 2008 all have firewall technologies that can be implemented.
These host-based firewalls are basic packet-filtering firewalls. However, they can be
significant in increasing the protection of your systems, especially if a virus or worm makes
its way into your network.
For stand-alone Windows Server 2008 computers, you can configure the firewall using
the Windows Firewall with Advanced Security console. You can access this by clicking
Start and typing Firewall in the Start Search box.
Figure 8.14 shows the Windows Firewall console. In the figure, the Firewall console was
launched on a server in a domain, and it indicates that the domain profile is Active.
FIGURE 8.14 Windows Firewall console
The Windows Firewall on Windows Server 2008 supports three different profiles. These
different profiles are used to group firewall rules and connection security rules into common
settings. Only one profile is applied at a time.
Domain profile If a computer is connected to the same network where it has a computer
account, the domain profile is applied. When set to the domain profile, only firewall rules
set to the domain profile through Group Policy apply.
93157c08.indd 395 8/8/08 9:47:05 AM
396
Chapter 8
N
Planning Windows Server 2008 Security
Private profile If a computer is connected to network where its domain account is not
located (in other words, it doesn’t authenticate with a domain controller), the private profile
is applied. These settings are more restrictive than the domain profile.
Public profile The public profile is applied for a computer not connected to a domain and
located in a public place such as an airport or a coffee shop. This is the most restrictive set
of rules for the firewall.
Although the private and public profiles make sense for end users running desktop
operating systems, they don’t make much sense for servers. I can’t imagine carrying a
server through an airport and firing it up while waiting for my next flight. With this in
mind, when studying Windows Server 2008, you should concentrate on understanding the
domain profile.
Within a domain, the firewall settings can be manipulated via Group Policy. The path to
the firewall settings is Computer Configuration Policies Administrative Templates
Network Network Connections Windows Firewall. Figure 8.15 shows the Group Policy
Management Console opened to the Windows Firewall settings.
FIGURE 8.15 Group Policy firewall settings
The domain profile in Group Policy is the profile you will manipulate for systems within
your domain. It has the following settings, all of which start with Windows Firewall:
Allow Local Program Exceptions
ÛN
Define Inbound Program Exceptions
ÛN
Protect All Network Connections
ÛN
Do Not Allow Exceptions
ÛN
Allow Inbound File and Printer Sharing Exceptions
ÛN
Allow ICMP Exceptions
ÛN
93157c08.indd 396 8/8/08 9:47:05 AM
Network Security
397
Allow Logging
ÛN
Prohibit Notifications
ÛN
Allow Local Port Exceptions
ÛN
Define Inbound Port Exceptions
ÛN
Allow Inbound Remote Administration Exception
ÛN
Allow Inbound Remote Desktop Exceptions
ÛN
Prohibit Unicast Response to Multicast or Broadcast Requests
ÛN
Allow Inbound UPnP Framework Exceptions
ÛN
All the firewall settings have detailed explanations in the Group Policy
Management Editor. For more information about any of these settings,
double-click the setting within the editor, and click the Explain tab.
One of the neat features of the Windows Firewall on Windows Server 2008 is that each
time you add a new feature or role, the firewall is automatically configured to support the
new functionality. This prevents some needless hair pulling as you try to figure out why
the new feature or role isn’t working. However, if you add third-party applications, you may
need to configure the server to support the application.
Internet Security and Acceleration
The Internet Security and Acceleration (ISA) server is Microsoft’s firewall product. It is
a full-featured server product similar to SQL Server or Exchange. In other words, it’s not a
free role or service that you can add to Windows Server 2008 but instead a server applica-
tion available for purchase.
ISA has long been respected among firewall-evaluation agencies. It was approved for
certification of Common Criteria Evaluation Assurance Level 4+ (EAL 4+), which is the
highest level possible recognized by all countries participating in the Common Criteria
certification.
Typically, you would deploy ISA as the only application running on the server. One of
the core security principles is to reduce the attack surface of any server, so running addi-
tional services with ISA presents additional security risks.
In addition to doing traditional packet filtering, ISA can do more advanced inspection of
traffic. Microsoft has announced that the next generation of ISA will be known as the Fore-
front Threat Management Gateway (Forefront TMG).
Remote Access
Remote access is the process of providing access to your internal network from an external
source. You can do this via direct-dial methods (using phone lines) or via a public network
such as the Internet. When using a public network, tunneling protocols are used to create a
virtual private network (VPN).
93157c08.indd 397 8/8/08 9:47:06 AM
398
Chapter 8
N
Planning Windows Server 2008 Security
In Windows Server 2008, the server role that performs this function is the Network
Policy role.
Figure 8.16 shows a diagram using a remote access server. In the diagram, both dial-up
remote access and a VPN are shown. For dial-up remote access, the client has a modem and
phone line and directly dials the remote access server (which also has a modem and phone
line). The remote access server then provides access to the internal network.
FIGURE 8.16 Remote access
The VPN server and the remote access server are one and the same, just
as a car and a race car could be the same thing. A race car is more descrip-
tive. A race car is always a car, but a car is not always a race car. Similarly,
VPN server is more descriptive than remote access server; it describes the
connection type of remote access. Although a VPN server could always
be referred to as a remote access server, a remote access server wouldn’t
always be a VPN server. A remote access server could use dial-up or VPN
connections.
A VPN differs in the connectivity to the remote access server. Instead of connecting
directly to the remote access server via a telephone line, the client tunnels through the Inter-
net. Any time the client connects via a phone line, the Point-to-Point Protocol (PPP) is used.
First, the client gains access to the Internet through a local Internet service provider
(ISP). If it’s dial-up, the client uses PPP to connect, but it’s also possible the client has a
broadband connection to the Internet.
93157c08.indd 398 8/8/08 9:47:06 AM
Network Security
399
Once connected to the Internet, the client then uses the tunneling protocols to reach the
VPN server. Once the server is reached, the client is granted access to the internal network.
Understanding Confidentiality, Integrity, and Authentication.
When discussing information technology security, three terms are commonly used. They
are often referred to as CIA: confidentiality, integrity, and authentication.
Confidentiality means that if the data is intercepted, it can’t be read. Confidentiality is
achieved through the use of encryption. Different tunneling protocols utilize different
methods of encrypting data.
Integrity ensures that the data has not been modified in transit. Integrity is achieved by
using hashing or checksums. A hash is calculated before the data is sent, and then the
data is sent with the hash. When the data is received, the hash is calculated again and
compared to the original hash. If the two hashes are different, the data has been modi-
fied. Not all tunneling protocols verify data integrity.
Authentication verifies that a user or host is who they claim to be. Authentication is
achieved through the use of credentials such as usernames and passwords or certificates.
Both user-level authentication and machine-level authentication are possible. Not all tun-
neling protocols provide machine-level authentication.
When planning for a VPN server, you’ll need to decide on which tunneling protocol to
use. The following tunneling protocols can be used with a Microsoft VPN server:
PPTP The Point-to-Point Tunneling Protocol (PPTP) is the oldest of the three. It is sup-
ported by Windows 2000 and newer operating systems. It can be used with IP-based con-
nections. Data is encrypted using Microsoft Point to Point Encryption (MPPE), providing
data confidentiality. PPTP does not provide data integrity or machine-level authentication.
L2TP The Layer 2 Tunneling Protocol (L2TP) is supported by clients running Windows
2000 or newer operating systems. L2TP is commonly used with IPSec, and you’ll often see
it as L2TP/IPSec. IPSec provides data confidentiality and integrity to L2TP. Machine-level
authentication can be achieved through the use of a preshared key or computer certificates.
One of the drawbacks to L2TP when used with IPSec is that it can’t pass through a Net-
work Access Translation (NAT) server. If a NAT was needed, administrators often had to
move backward to a PPTP solution that sacrificed security.
SSTP The Secure Socket Tunneling Protocol (SSTP) is the newest tunneling protocol.
It is supported only on clients running Windows Vista SP1 or newer operating systems.
SSTP uses Secure Sockets Layer (SSL) to encrypt the data and provide data confidentiality.
Further, it uses HTTPS over TCP port 443 to pass traffic through firewalls, making it an
easier solution to implement without requiring modifications to firewalls. Port 443 is often
93157c08.indd 399 8/8/08 9:47:06 AM
400
Chapter 8
N
Planning Windows Server 2008 Security
already open on firewalls. Unlike L2TP/IPsec, SSTP can pass through a NAT. SSL within
SSTP also provides data integrity and machine-level authentication.
Network Policy and Access Services
Windows Server 2008 includes the role of the Network Policy and Access Services (NPAS)
to support remote access. NPAS provides the following services:
Routing and Remote Access
ÛN
Network Policy Server (NPS)
ÛN
Health Registration Authority (HRA)
ÛN
Host Credential Authorization Protocol
ÛN
This section is addressing only the Routing and Remote service of NPAS. In Chapter 4,
the topic of Network Access Protection was presented, which included the other elements
of NPAS.
Network Access Protection (NAP) is a significant addition to Windows Server 2008.
As a reminder, it can be used to examine the health of clients such as ensuring that certain
service packs or hotfixes are installed, antivirus software is running and up-to-date, and
much more. The health requirements are determined by the administrator and enforced in
a health policy. Healthy clients are issued a health certificate and granted access to the net-
work, while unhealthy clients are quarantined and allowed access only to a restricted area
of the network.
Since remote access clients are accessing the network from external locations, the ability
to examine their health is very important. Expect any remote access solution to include net-
work access elements today.
To add remote access services, you would add the Network Policy and Access Services
role. Exercise 8.6 shows the steps to add this role to your server.
EXERCISE 8.6
Adding the Network Policy and Access Services Role
1. Launch Server Manager by clicking Start Administrative Tools Server Manager.
2. In the left pane, right-click Server Manager, and select Add Roles.
3. Review the information on the Before You Begin page, and click Next.
4. On the Select Server Roles page, select the Network Policy and Access Services
check box, and click Next.
5. On the Network Policy and Access Services page, review the information, and
click Next.
93157c08.indd 400 8/8/08 9:47:06 AM
Network Security
401
EXERCISE 8.6
(continued)
6. On the Select Role Services page, select Remote Access Service. Your display will
look similar to the following graphic. Click Next.
7. On the Confirm Installation Selections page, click Install.
8. Once the installation is complete, click the Close button.
To successfully configure the remote access service, you will need either two NICs or one
NIC and one modem. One NIC would be used to connect to your back-end network, and
the other NIC (or the modem) would be used to accept connections from remote clients.
RADIUS
You can also create a Network Policy Server to perform as a Remote Authentication
Dial-In User Service (RADIUS) server. A RADIUS server performs centralized authenti-
cation, authorization, and accounting for remote access (dial-up and VPN) servers and
even wireless access points.
For example, you could have multiple VPN servers. Instead of having each VPN server
handle all the authentication and logging activities, you could create a RADIUS server to
perform these functions. Each VPN server can then pass the authentication requests to the
RADIUS server. It will handle the details of the authentication and can also be configured
to log details such as accounting and period status information about the session.
When configuring a RADIUS server, one of the things you’ll need to plan for is how to
do logging. You have two choices:
Local file logging With local file logging, the data is logged into comma-separated text
files. Although all the information is available, it isn’t easy to view and manipulate the data
in its native format. These text files are sometimes imported into Microsoft Excel spread-
sheets for better viewing. Use local file logging when you need to minimize costs.
SQL Server logging Using a SQL Server to store the logged data provides you with much
more capabilities. Since the data is stored in a database, it’s easy to query and manipulate
93157c08.indd 401 8/8/08 9:47:06 AM
402
Chapter 8
N
Planning Windows Server 2008 Security
the information. The drawback is that SQL Server costs additional money. Use SQL Server
logging when you need to easily query the data and your budget can afford it.
Network Encryption with IPSec
Earlier in this chapter, you learned about BitLocker Drive Encryption and Encrypting
File System. Both of these technologies allow data to be encrypted on the hard drive.
However, when BitLocker or EFS protected data is sent over the network, it is sent in an
unencrypted format.
Sniffers can be used to capture, analyze, and exploit traffic sent in an unencrypted for-
mat. One of the core methods to ensure against unauthorized disclosure of information
sent over a network is to encrypt it.
A sniffer (such as the freeware Wireshark or Microsoft’s Network Monitor)
is used to capture packets on the network. If data is sent in unencrypted
format, a sniffer is able to capture and read the data.
If you want to encrypt data on the network, you can use IPSec. IPSec is a set of proto-
cols used to protect data at the IP layer. Because it works at the IP layer, it will work with a
broad range of applications.
IPSec provides two layers of protection: authentication and encryption. The Authentica-
tion Header (AH) in an IPSec packet can be used to authenticate both hosts in a session. If
AH is used alone, the data is not encrypted. The Encapsulating Security Protocol (ESP) can
be used to encrypt data. If ESP is used, AH must also be used.
When you implement IPSec, you can use one of the three default policies or create
your own policy. Each of the policies can be assigned either locally or via Group Policy.
Figure 8.17 shows the Group Policy settings. You can find these settings in the Computer
Configuration Policies Windows Settings Security Settings IP Security Policies on
Active Directory.
FIGURE 8.17 Group Policy IPSec policy settings
93157c08.indd 402 8/8/08 9:47:06 AM
Summary
403
The three default policies are as follows:
Client (Respond Only) Clients with this policy can communicate with other servers that
request or require IPSec. However, these clients will never initiate an IPSec session.
As an example, you could set the Client (Respond Only) policy at the domain level via
Group Policy so that it would apply to all clients within the domain. This would ensure
that all clients would be able to communicate via IPSec with any other hosts that request
an IPSec session.
Server (Request Security) Servers (or any host) with the Server (Request Security) policy
will try to initiate an IPSec session with any other hosts that try to connect. However, if the
other host cannot communicate with IPSec, the server will still communicate using unse-
cure methods.
For example, you could have some servers that you want to use IPSec whenever possible, but
you also have some clients that cannot communicate with IPSec. By placing all the servers
in an OU and creating a Group Policy object and linking it to the OU, you can assign this
policy. It will use IPSec with most clients (assuming they have an IPSec policy assigned) but
will still communicate with clients even if they can’t communicate with IPSec.
Secure Server (Require Security) Servers that have the Secure Server (Require Security)
policy will try to initiate an IPSec session with any other hosts that try to connect. If the
other host cannot communicate with IPSec, the connection will be terminated.
For example, if you have some servers with highly confidential data that you never wanted
to be transmitted on the network in an unencrypted format, you could assign this policy to
it. Clients could connect only if they were able to talk via IPSec.
The three default policies are generic and refer to all types of traffic. However, you can
modify these policies (or create your own) to encrypt specific traffic. For example, if you
want to ensure that zone transfer traffic between two DNS servers is encrypted, you can set
the policy encrypt all traffic on TCP port 53 between the two servers. Since DNS queries
occur on UDP port 53, this rule would not affect DNS queries, but only zone transfer traffic.
Summary
In this chapter, you learned about security aspects at the disk level, the server level, and the
network level, including some information on VPN protocols.
You learned that entire volumes can be protected with BitLocker Drive Encryption
and about the requirements to enable and recover BitLocker. You also learned about EFS,
including how to recover EFS files with a DRA and recover keys with a KRA.
For server security, you learned the basics of auditing and how to enable more detailed
auditing for directory services.
When implementing a VPN, you learned about the different tunneling protocols that are
available including the newer SSTP. Although SSTP works with only Windows Vista SP1
93157c08.indd 403 8/8/08 9:47:06 AM
404
Chapter 8
N
Planning Windows Server 2008 Security
or newer clients, it has the significant benefit of using port 443, which is often open on the
firewall for HTTPS. You also learned how IPSec can be used to encrypt traffic as it travels
on the network.
Exam Essentials
Know the requirements for BitLocker Drive Encryption. You should know that BitLocker
requires Trusted Platform Module (TPM) 1.2 to fully implement the features. You should
also know that it requires two partitions, both NTFS, and that the BitLocker partition (the
unencrypted partition) must be at least 1.5GB in size.
Understand BitLocker Recovery requirements. You should know what’s required to
recover a BitLocker drive if it becomes locked. This includes using either the recovery pass-
word or a USB flash drive with the recovery key.
Know how to implement multifactor authentication with BitLocker. Multifactor authen-
tication can be implemented by requiring users to take extra steps on computer startup or
when resuming from hibernation. You should know the two multifactor authentication
methods supported by BitLocker: requiring a user to enter a PIN or requiring a user to
insert a USB flash drive with the startup key.
Understand the Encrypting File System (EFS). You should have a basic understanding of
EFS, how it works, and what it can protect. This includes knowing how to encrypt files and
knowing that it can be used in conjunction with BitLocker.
Know how to recover EFS data. You should know how to recover both EFS files and EFS
keys. This includes an understanding of the data recovery agent (DRA) and the key recovery
agent (KRA).
Understand auditing and how to implement auditing. You should know the basics of audit-
ing on any server and how to do more advanced auditing on a domain controller. Be familiar
with the procedures of enabling auditing via Group Policy and using the
auditpol command.
Understand firewalls. You should know the basics of firewalls and how packet filtering
is used to block or allow traffic. You should also be aware of the built-in firewall available
in Windows Server 2008 products, Group Policy settings that can apply to all clients, and
Microsoft’s dedicated firewall product Internet Security Accelerator (ISA).
Know the available tunneling protocols. You should know the different tunneling pro-
tocols and their strengths and weaknesses. This includes PPTP, L2TP, and SSTP. PPTP is
the oldest and provides the least protection. SSTP is the newest protocol and uses port 443
to easily traverse firewalls. SSTP works only with Windows Vista SP1 or newer operating
systems.
Understand encryption techniques when transmitting data. You should know that data
can be encrypted on the wire within a network with IPSec. IPSec has three default rules
that can be implemented: Client, Server, and Secure Server.
93157c08.indd 404 8/8/08 9:47:07 AM
Review Questions
405
Review Questions
1. You are deploying a Windows Server 2008 server to a remote office. The server will hold
files that you want to protect, but the remote office doesn’t have adequate physical security.
How should you protect the files?
A. Use NTFS permissions.
B. Use a RODC.
C. Use BitLocker.
D. Encrypt the data with SSL.
2. You are considering enabling BitLocker on a Windows Server 2008 server. Of the following,
what are the minimum requirements? (Choose all that apply.)
A. TPM 1.2
B. One partition
C. Two partitions
D. USB flash drive using a PIN
3. You manage a Windows Server 2008 server that has been protected with BitLocker. After
the system experienced a failure and was repaired, it enters only the BitLocker Recovery
Console. What can you insert into the system to get past the BitLocker Recovery Console?
A. A USB flash drive with the startup PIN
B. A USB flash drive with a recovery password
C. A USB flash drive with a recovery key
D. A USB flash drive with a startup key
4. You manage a Windows Server 2008 server that has been protected with BitLocker. The
recovery password was stored on a USB flash drive. After the system experienced a failure
and was repaired, it enters only the BitLocker Recovery Console. How can you unlock
the disk?
A. Enter the password using the function keys.
B. Insert the USB flash drive when prompted.
C. Insert the USB flash drive with the recovery key.
D. Boot into the system and disable BitLocker. Enter the recovery password when prompted.
93157c08.indd 405 8/8/08 9:47:07 AM