Microsoft Press 70 284 training kit exchange server 2003 phần 3 ppsx
Bạn đang xem bản rút gọn của tài liệu. Xem và tải ngay bản đầy đủ của tài liệu tại đây (844.67 KB, 82 trang )
4-10 Chapter 4 Coexistence with Microsoft Exchange Server 5.5
F04es02
Figure 4-2 Selecting ADC components to install
6. The next page of the wizard prompts you to choose an installation location. You
can accept the default location of \Program Files\MSADC or you can choose a dif-
ferent location. After selecting an installation location, click Next.
7. Next, you must supply a service account to be used by the ADC service. The
Account Name will default to the account you are currently logged in with. If you
created a service account for Exchange Server, use it instead. Enter the password
as required, and then click Next.
8. Setup copies the required files to your server and configures its service. Click
Finish when it is done. If a screen still appears prompting you to click Next when
the installation is done, do so, and then click Finish.
Exercise 2: Prepare Exchange Server 5.5 for Directory Synchronization
1. On Server01, from the Start menu, point to Programs, point to Microsoft Exchange,
and click Exchange Administrator.
2. Expand the Site container, and then expand the Configuration container. Click the
Protocols container, and then double-click LDAP (Directory) Site Defaults.
3. Because Server01 is an Active Directory domain controller, the default LDAP port
(389) is already in use and cannot be used by the ADC. You will need to change
the LDAP port to something else that is not in use, so change the LDAP port num-
ber to 1389, and click OK.
4. From the Start menu, point to Programs, point to Administrative Tools, and click
Services. Restart the Microsoft Exchange System Attendant service, and click Yes
when prompted to restart all the services that depend on it. Close Services when
done.
Lesson 1 Connecting Exchange Server 5.5 to Active Directory 4-11
Exercise 3: Configure Directory Synchronization Using ADC Tools
To configure the ADC using ADC Tools, perform the following steps:
1. Click the ADC Tools link to the left of the Active Directory Connector Services con-
sole. Click Set. This will bring up the Tool Settings screen, shown in Figure 4-3.
F04es03
Figure 4-3 Setting the server options for the ADC
There are a few things to note about this configuration step. First, the Server field
is where you specify your Exchange Server 5.5 server. Second, the Port field refers
to the LDAP port for communicating with the Exchange Server 5.5 server. The
default LDAP port (389) must be changed if you installed the ADC on a domain
controller. This is because Active Directory uses LDAP, and there will be conten-
tion for the port. Whatever you changed the port to in the previous lesson using
the Exchange Server 5.5 (if you followed my recommendation, the port should be
1389) Administrator utility will need to be matched here. Finally, note the Logging
Location for the log files. This path defaults to the My Documents folder of the
user that is currently logged in, but you can change it to any folder.
Tip If you change the default LDAP port on the Exchange Server 5.5 server, you must
restart the Microsoft Exchange services on the Exchange Server 5.5 server for the changes
to take effect.
2. Click Run, which causes the wizard to collect information about your Exchange
Server 5.5 site or sites. The Information field in ADC Tools displays information
about the data collection—what was found and what steps will need to be
performed to resolve any problems. The following is an example of output from
this task:
Pass 1 of 4: Resource Mailbox Scan (objects processed: 14)
Warning: The Data Collection tool found objects that must be marked as resource
mailboxes before they can be replicated to Active Directory. Running the Resource
Mailbox Wizard in Step 3 will resolve these issues.
Pass 2 of 4: Active Directory Connector Object Replication Check (objects
processed: 19)
Warning: The Data Collection tool found objects that are not replicated from the
4-12 Chapter 4 Coexistence with Microsoft Exchange Server 5.5
Exchange 5.5 directory to Active Directory. Running the Connection Agreement Wizard
in Step 4 will resolve these issues.
Pass 3 of 4: Active Directory Object Replication Scan (objects processed: 0)
Active Directory Object Replication Scan completed. No unreplicated objects found.
Pass 4 of 4: Active Directory Unmarked Resource Mailbox Scan (objects processed: 0)
Active Directory Unmarked Resource Mailbox Scan completed. No problems found.
The Data Collection tool found objects that must be marked as resource mailboxes
before they can be replicated to Active Directory. Running the Resource Mailbox
Wizard in Step 3 will resolve these issues.
Finished Data Collection.
3. Next to Step 3, click Run. This will start the Resource Mailbox Wizard. This wizard
helps to resolve any problems with Active Directory user accounts being mapped
to multiple Exchange Server 5.5 mailboxes. As shown in Figure 4-4, you can
choose the primary mailbox for each object found by the wizard. To set a
resource, click the mailbox for the user, and then click Set As Primary (or Set As
Resource if you are setting a resource mailbox). The reason for this is that there is
a one-to-one relationship between Active Directory user accounts and Exchange
Server mailboxes—a relationship that didn’t exist under Windows NT 4 and
Exchange Server 5.5. In the latter, it was common to have a resource mailbox,
such as a mailbox called Payroll, associated with a user account. That user account
might also be associated with a personal mailbox. To resolve this issue, when the
wizard finds multiple mailboxes associated with a user account, you are prompted
to define the mailbox as the primary mailbox for the user account, or as a resource
mailbox. If you set it as a resource mailbox, a new disabled user account is created
in Active Directory and is associated with the mailbox. When finished, click Next.
Alternatively, you can export the list to a .csv file for further manipulation.
F04es04
Figure 4-4 The Resource Mailbox Wizard
Lesson 1 Connecting Exchange Server 5.5 to Active Directory 4-13
4. Next, you will set the site credentials. As shown in Figure 4-5, supply an adminis-
trative account and password for each Exchange Server 5.5 site. Note that if you
have changed your default LDAP port, you will need to choose Specify A Server
rather than Automatically Discover A Server. Click Next to continue.
F04es05
Figure 4-5 Establishing administrative credentials for each site
5. The last page of the Resource Mailbox Wizard is a summary of actions the wizard
will take. Click Next, and the wizard completes. Click Finish when it is done to
return to the ADC Tools page.
6. Next, verify the results of the Resource Mailbox Wizard. Click Verify to complete
this step. You will see the wizard perform a verification step. When finished, you
should see text that tells you that verification completed without a problem. If
there are problems, the text advises you what you need to fix by re-running the
Resource Mailbox Wizard.
7. After verification completes, click Run in Step 4 to start the Connection Agreement
Wizard. The wizard uses the information collected in Step 1 to recommend con-
nection agreement settings between the Exchange Server 5.5 organization and
Active Directory.
8. After the Welcome page, the first configuration step is to select a Default Windows
Destination, as shown in Figure 4-6. This is the container in Active Directory that
will be used as the default location for new objects that are replicated with the
Exchange Server 5.5 directory. Usually the built-in Users container is a good
choice, but depending on your organizational unit (OU) structure, you may
choose another container. Select a container, and then click Next.
4-14 Chapter 4 Coexistence with Microsoft Exchange Server 5.5
F04es06
Figure 4-6 Configuring a default Windows destination
9. The next page of the wizard is the Site Connections page, shown in Figure 4-7.
Choose whether to configure a two-way connection agreement between Active
Directory and Exchange Server 5.5 or a one-way connection agreement. A two-
way connection agreement replicates in both directions, which means that
changes made in Active Directory are replicated to the Exchange directory and
vice versa. A one-way connection agreement can be established in either direc-
tion, if desired. The default is a two-way connection agreement, which you should
accept by clicking Next.
F04es07
Figure 4-7 Configuring connection agreements
Lesson 1 Connecting Exchange Server 5.5 to Active Directory 4-15
10. On the Site Credentials page, you must supply an administrative account and pass-
word for each Exchange Server 5.5 site. To do this, click the first Exchange Server
5.5 site and click Set Credentials. You can either type in the name of an adminis-
trative account or browse for one. Once you’ve entered an account, click OK to
return to the Site Credentials page. Repeat the process for each Exchange Server
5.5 site, and then click Next to continue.
11. The next page of the wizard is the Domain Credentials page. Whereas site creden-
tials validate your account in the Exchange Server 5.5 directory, domain
credentials validate your account information in Active Directory. Click Set
Credentials and enter the username and password for an account that has domain
administrator permissions. Click OK, and then click Next to continue.
12. The wizard prompts you to choose what connection agreements to create. As
shown in Figure 4-8, by default one agreement for users and mailboxes and one
agreement for public folders are created. However, you can choose one or the
other, if desired. After selecting the connection agreements, click Next.
F04es08
Figure 4-8 Configuring connection agreements
13. An installation summary similar to the one shown in Figure 4-9 lists the actions the
wizard will perform. When you click Next, the connection agreements will be
configured. When the process finishes, click Finish to return to the ADC Tools
page.
4-16 Chapter 4 Coexistence with Microsoft Exchange Server 5.5
F04es09
Figure 4-9 Connection agreement installation summary
14. Finally, verify the results of ADC Tools by clicking Verify in Step 4 next to Verify
The Results Of ADC Tools. When verification is complete, the Information field
will display the following:
ADC Tools are complete and Active Directory Connector is successfully configured.
Return to the Deployment Tools to continue your Exchange deployment.
Finished verifying the results of the ADC Tools.
Exercise 4: Verify Directory Synchronization
1. Start Exchange Administrator if it is not open.
2. Navigate to the Recipients container and click it.
3. Click File, and then click New Mailbox.
4. Create a mailbox for Chris Meyer, choosing to create a new Windows NT account.
5. Create the user account as Chris, and click OK when Exchange prompts you that
the account will be created with a blank password.
6. Click OK to finish creating the mailbox.
7. Open Active Directory Users And Computers and navigate to the Users container.
8. Observe that there is a user account for Chris Meyer, which verifies that the con-
nector works. Quit the program.
Lesson 1 Connecting Exchange Server 5.5 to Active Directory 4-17
Exercise 5: Create a Connection Agreement Manually
1. Right-click the Active Directory Connector (servername) container in the console
and point to New. You’ll see that as in the ADC Tools Wizard, you can configure
a Recipient Connection Agreement or a Public Folders Connection Agreement.
Click Recipient Connection Agreement.
First, assign a name to the connection agreement. It should be something descrip-
tive since complex organizations might have multiple ADCs with many connection
agreements configured. The replication direction dictates how the replication data
will flow, and if you have multiple ADCs in your Exchange organization, you can
choose which server will manage the connection. Once you have filled in this
information, click the Connections tab, shown in Figure 4-10.
F04es10
Figure 4-10 The Connections tab
2. On the Connections tab, fill in both sections for configuring two-way replication.
You can also choose what authentication method to use. Note that on this tab, in
the Exchange Server Information section, you can specify which port to use. This
is for LDAP communication between the ADC and the Exchange Server 5.5 direc-
tory. If you need to change the port from the default 389, such as if the ADC is
installed on a domain controller, you must match what you put here in the
Exchange Server 5.5 directory.
3. The Schedule tab, shown in Figure 4-11, allows you to configure a schedule for
replication. Depending on the size of your network and traffic patterns, you may
want to alter the default schedule. Generally, you will not choose Always unless
you are running on a small network or in a lab environment or if changes will not
be made very regularly.
4-18 Chapter 4 Coexistence with Microsoft Exchange Server 5.5
F04es11
Figure 4-11 The connection agreement schedule
4. Figure 4-12 shows the From Exchange tab, where you define what information
you want to replicate from Exchange Server 5.5 to Windows (Active Directory).
When you click Add, you are presented with a page that shows the Recipients
container and any other custom containers you might have created. Select what
you want to replicate and click OK. If you are setting up a one-way agreement
replicating from Active Directory to Exchange, you won’t need to configure any-
thing on this page. The From Windows page, shown in Figure 4-13, defines what
information is replicated from Active Directory to Exchange.
F04es12
Figure 4-12 Configuring replication from Exchange to Active Directory
Lesson 1 Connecting Exchange Server 5.5 to Active Directory 4-19
F04es13
Figure 4-13 Configuring replication from Active Directory to Exchange
Note This is an example of the power of configuring a connection agreement manually
rather than using the ADC Tools Wizard. Here, you can specify multiple Active Directory OUs
from which to draw data, whereas you can choose only a single OU when using ADC Tools.
5. Figure 4-14 shows the Deletion tab of a Properties dialog box with the default
settings. Here you are able to establish how deleted items are handled.
F04es14
Figure 4-14 Configuring deleted item replication
6. The final configuration tab, the Advanced tab, is shown in Figure 4-15. There are
a number of configuration options here. The first set of options is to define the
page settings for Windows and Exchange replication. Paging groups together
objects that will be replicated, resulting in better performance. Increasing the
4-20 Chapter 4 Coexistence with Microsoft Exchange Server 5.5
default setting of 20 will result in more objects being replicated at once, which
translates into fewer replication requests. However, increasing the number also
increases the amount of memory used. You can also define whether the connec-
tion agreement is inter-site or intra-site. By default, a connection agreement
replicates between an Active Directory domain and an Exchange Server organiza-
tion within the domain. However, you can also set the connection agreement to
be an inter-organization agreement, which replicates between an Exchange Server
5.5 organization and an Active Directory domain that contains another Exchange
Server 5.5 organization.
Other configuration options include whether the connection agreement is a pri-
mary connection agreement with respect to the Windows domain and the
Exchange organization. A primary connection agreement is capable of creating
new objects in its respective directory, whereas if you clear this check box, only
existing objects are replicated. If you have multiple connection agreements, only
one should be set as the primary agreement; otherwise, you could end up with
duplicate objects being created. Another configuration option on this tab is what
action to take when mailboxes are replicated and there is no corresponding Active
Directory user account. The default action is to create a new disabled user
account, but you can also choose to create a new enabled user account (created
with a blank password) or to create a contact in Active Directory.
F04es15
Figure 4-15 The Advanced tab
Lesson 1 Connecting Exchange Server 5.5 to Active Directory 4-21
Lesson Review
The following questions are intended to reinforce key information presented in this
lesson. If you are unable to answer a question, review the lesson materials and then try
the question again. You can find answers to the questions in the “Questions and
Answers” section at the end of this chapter.
1. You are the network administrator for Litware, Inc. Your network consists of the
litwareinc.com domain, as well as texas.litwareinc.com, dev.texas.litwareinc.com,
and nebraska.litwareinc.com. The dev.texas.litwareinc.com domain has its own
administrator, who administers only that domain. The administrator calls you and
explains that they are trying to connect their Exchange Server 5.5 site to Active
Directory in order to migrate it to Exchange Server 2003. However, when he
attempts to install the ADC on one of the Windows 2000 Server SP4 domain con-
trollers, Setup fails with an error that he doesn’t have enough permissions. He is
unsure what to do because he is using the domain administrator account for the
procedure. What is the problem and how do you fix it for him?
2. You have a mixed-mode Windows Server 2003 domain with a Windows NT 4
member server running Exchange Server 5.5. You want to migrate to Exchange
Server 2003, so you upgrade the server to Windows 2000 Server and attempt to
install the ADC. However, Setup fails. You verify that your account has member-
ship in the Schema Admins, Enterprise Admins, and Domain Admins groups.
Where else would you look to resolve the problem?
3. You are the administrator of an Exchange Server 5.5 site that is being migrated to
Exchange Server 2003. You install the ADC on your Windows 2000 Server domain
controller and use ADC Tools to set up the directory synchronization. When you
run the Resource Mailbox Wizard portion of the configuration and try to verify the
settings, an error is returned that the server cannot be contacted. Up to this point,
everything worked fine. What step did you miss in the process?
a. Setting the LDAP port in the Exchange Server 5.5 site
b. Manually specifying a server rather that automatically discovering one
c. Supplying the correct Exchange Server 5.5 site credentials
d. Running ADC Tools with an Enterprise Admins user account
4-22 Chapter 4 Coexistence with Microsoft Exchange Server 5.5
4. You are performing a migration from Exchange Server 5.5 to Exchange Server
2003 for your organization, which has Active Directory domains contoso.com and
fabrikam.com located in the same forest. There is a single Exchange Server 5.5
server in the contoso.com domain that handles e-mail for both domains. You
install and configure the ADC on a Windows 2000 Server member server in
contoso.com and configure directory synchronization. Later, you test and find that
synchronization is working in the contoso.com domain but not in the
fabrikam.com domain, even though it is the same Exchange Server 5.5 site. Why
is synchronization not working?
Lesson Summary
■ The ADC is used to provide directory synchronization between Active Directory
and Exchange Server 5.5.
■ To install the ADC, both Windows 2000 Server and Exchange Server 5.5 must be
running SP3 or later.
■ The user account used to install the ADC must be a member of the Enterprise
Admins group, as well as the Schema Admins and Domain Admins groups.
■ ADC Tools provides a series of wizards to help you configure directory
synchronization.
■ Advanced connection agreements can be configured manually with the Active
Directory Connector Services management console.
Lesson 2 Installing Exchange Server 2003 into an Existing Exchange Server 5.5 Organization 4-23
Lesson 2: Installing Exchange Server 2003 into an Existing
Exchange Server 5.5 Organization
After directory synchronization has been established between Active Directory and the
Exchange Server 5.5 site, the next phase of the Exchange Server 2003 deployment
begins. There are two ways to deploy Exchange Server 2003: to upgrade one or more
Exchange Server 5.5 servers directly to Exchange Server 2003, which is discussed in
Lesson 1 of Chapter 5, “Migrating from Microsoft Exchange Server and Other Mail
Systems,” or to install Exchange Server 2003 as an additional server alongside existing
Exchange Server 5.5 servers, which is the focus of this lesson.
After this lesson, you will be able to
■ Install Exchange Server 2003 into an existing Exchange Server 5.5 organization
■ Configure the Site Replication Service
Estimated lesson time: 120 minutes
Installing Exchange Server 2003 into an Exchange Server 5.5
Organization
Installing Exchange Server 2003 into an existing Exchange Server 5.5 organization is
relatively easy once you have the ADC installed and synchronizing Active Directory
with the Exchange Server 5.5 directory. In addition, there are deployment utilities on
the Exchange Server 2003 installation CD that make installing Exchange Server 2003
even simpler. One such utility is Exchange Deployment Tools, which provides a
number of configuration options to install Exchange Server 2003 into your existing
environment. When you insert the CD and Autorun starts the Welcome page, you have
the option to run Exchange Deployment Tools to guide you through installing
Exchange Server 2003 in a number of scenarios, including installing Exchange Server
2003 into an existing Exchange Server 5.5 organization.
Note Exchange Server 5.5 does not run on Windows Server 2003, but it is possible to have
both Windows 2000 Server and Windows Server 2003 servers in your Active Directory
domain. You can install Exchange Server 2003 into either operating system, with the caveat
that Windows 2000 Server requires SP3 or later to support the Exchange Server 2003
installation.
Exchange Deployment Tools is a collection of tools that you can run either individually
or in a series of steps in a wizard-like fashion. The latter is recommended unless you
have a specific need to run the tools as individual components. The setup process for
Exchange Server 2003 runs some of the tools automatically, and not all the tools are
4-24 Chapter 4 Coexistence with Microsoft Exchange Server 5.5
run for all installation types. For example, if you are running Setup to join an existing
organization, only a subset of the tools is run. The full complement of Exchange
Deployment Tools consists of the following:
■ DSConfigSum Reports the total number of Exchange Server 5.5 sites and the
total number of servers in each site.
■ DSObjectSum Reports the total number of public folders, distribution lists, dis-
tribution lists with hidden membership, and contact objects.
■ UserCount Reports the total number of users in each Exchange Server 5.5 site
and the total number of users in the Exchange Server 5.5 directory.
■ VerCheck Determines whether the organization contains the server versions
required for upgrade to Exchange Server 2003.
■ OrgCheck Performs the following functions:
❑ Validates the schema extensions created by ForestPrep.
❑ Ensures that the proper domain groups exist and are populated.
❑ Ensures that the correct security descriptors are assigned.
❑ Confirms that the Exchange configuration container exists.
❑ Ensures that a global catalog server is available in a domain in which
DomainPrep has been run.
❑ Ensures that a global catalog server is available in the same site as the
Exchange Server 2003 server or a site directly adjacent to the Exchange Server
2003 server’s site.
■ PolCheck Checks that all domain controllers in the local domain have the
Manage auditing and security logs permission for the Exchange Enterprise Servers
group and reports any domain controllers that do not have this permission.
■ OrgNameCheck Checks for Exchange Server 5.5 organization and site names
that do not comply with RFC 2821, which states the following:
❑ All names may contain a maximum of 64 characters, with no leading or trail-
ing spaces.
❑ The LDAP display name must not contain the following characters: , = + < >
# \ "
❑ The display name (admin-display-name attribute) must not contain the fol-
lowing characters: ~ ! @ # $ % ^ & * ( ) _ + = { } [ ] | \ : ; " ' < , > . ? /
■ PubFoldCheck Uses the Exchange Server 5.5 Directory Service/Information
Store (DS/IS) consistency adjuster to ensure that the directory and the informa-
tion store are synchronized. Inconsistencies between the directory and the
Lesson 2 Installing Exchange Server 2003 into an Existing Exchange Server 5.5 Organization 4-25
information store occur when there is an entry for a public folder in the directory
database without a corresponding entry in the information store, or vice versa.
■ ADCConfigCheck Ensures that Exchange Server 5.5 directory configuration
objects were properly replicated from the Exchange Server 5.5 directory to Active
Directory by searching Active Directory using the Exchange Server 5.5 object’s
ADCGlobalNames attribute. ADCConfigCheck lists any Exchange Server 5.5 con-
figuration objects that are missing from Active Directory.
■ ADCObjectCheck Ensures that non-user, non-configuration objects in the
Exchange Server 5.5 directory properly replicated to Active Directory. It confirms
consistency of public folders, distribution lists, and contact objects between the
Exchange Server 5.5 directory and Active Directory. If a public folder is not repli-
cated to Active Directory, it recommends a public folder connection agreement.
ADCObjectCheck also recommends custom recipient connection agreements and
distribution list connection agreements.
■ ADCUserCheck Identifies the locations of user accounts and mailboxes and
uses this information to recommend the connection agreements that you should
set up. ADCUserCheck also uses the search process in Active Directory Connector
to compare user objects in the Exchange Server 5.5 directory to objects in the
Active Directory global catalog and reports any users in the Exchange Server 5.5
directory who are missing from Active Directory.
■ ADUserScan Verifies that mail-enabled users in Active Directory are replicated
to the Exchange Server 5.5 directory. ADUserScan searches objects in Active Direc-
tory by targetaddress, emailaddress, proxyaddress, msExchHomeServerName, and
legacyExchageDN. Then it searches the Exchange Server 5.5 directory for each
object’s counterpart using the legacy distinguished name (DN). If objects have not
replicated from Active Directory to the Exchange Server 5.5 directory, ADUserScan
recommends connection agreements.
■ ConfigDSInteg Runs configuration object checks that are designed to detect
problems in Active Directory after Active Directory Connector has been running.
■ PrivFoldCheck Uses the Exchange Server 5.5 Directory Service/Information
Store (DS/IS) consistency adjuster to ensure that the directory and the informa-
tion store are synchronized. Inconsistencies between the directory and the
information store occur when there is an entry for a mailbox in the directory data-
base without a corresponding entry in the information store, or vice versa.
PrivFoldCheck runs the DS/IS consistency adjuster with the following options:
❑ Synchronize with the directory and create new directory entries for mailboxes
that do not have a corresponding directory entry. PrivFoldCheck creates an
entry in the directory if a mailbox entry exists in the information store but not
in the directory. PrivFoldCheck does not delete mailbox entries from the
directory.
4-26 Chapter 4 Coexistence with Microsoft Exchange Server 5.5
❑
Remove unknown user accounts. PrivFoldCheck removes users that are no
longer valid from private information store folder permissions.
■ RecipientDSInteg Runs checks on each recipient object (User, Group, Contact,
or Public Folder) in Active Directory. These checks are designed to detect prob-
lems in Active Directory after the Active Directory Connector has been running.
Later, when actually going through the graphical Exchange Deployment Tools utility,
you will be able to see which tool is running during various stages of the process. This
information is located under the column called Reference.
The Exchange Deployment Tools are executed by the exdeploy.exe command. By
clicking on the link on the first Exchange Server 2003 installation screen, you start the
graphical version of the utility.
Tip Alternatively, you can run exdeploy.exe with commands from a command prompt if
you need to automate some tasks through scripts. When you start \Support\Exdeploy\
Exdeploy.exe from a command prompt, you see a help screen similar to the one shown in
Figure 4-16.
F04es16
Figure 4-16 The ExDeploy command-line utility
Lesson 2 Installing Exchange Server 2003 into an Existing Exchange Server 5.5 Organization 4-27
It is possible to run Setup directly, as you did in Chapter 2, “Planning a Microsoft
Exchange Server 2003 Infrastructure,” without using Exchange Deployment Tools. In
simple single-site environments with only one or two servers, installing Exchange
Server 2003 is relatively easy. However, the deployment tools are useful for providing
a checklist of requirements and stepping you through the process so you don’t over-
look something.
Managing Mixed-Mode Servers
When you have a mixed-mode Exchange organization containing both Exchange
Server 5.5 and Exchange Server 2003 servers, administration of the two types of servers
remains separate. That is, you use Exchange Administrator to manage your Exchange
Server 5.5 servers, and you use Exchange System Manager to administer your
Exchange Server 2003 servers. While you can view properties of Exchange Server 5.5
servers in Exchange System Manager, you cannot perform any configuration tasks. The
Exchange Administrator program will display Exchange Server 2003 servers because of
the Site Replication Service, but you cannot manage Exchange Server 2003 servers this
way. The reason for the incompatibility between versions is related to the significantly
different architectures on which the products are based.
However, you can use the Active Directory Users And Computers console to manage
mailboxes for users on both types of servers because of the synchronization provided
by the ADC. Users will have Exchange attributes on their mailboxes relevant to what
type of server their mailbox is stored on. Figure 4-17 shows the Exchange Features tab
for a user stored on an Exchange Server 5.5 server in the Litwareinc organization, and
Figure 4-18 shows the Exchange Features tab for a user stored on an Exchange Server
2003 server in the same organization.
F04es17
Figure 4-17 Exchange Features for an Exchange Server 5.5 mailbox
4-28 Chapter 4 Coexistence with Microsoft Exchange Server 5.5
F04es18
Figure 4-18 Exchange Features for an Exchange Server 2003 mailbox
If you want to make Exchange Server 2003 functionality available to users whose mail-
boxes are still on the Exchange Server 5.5 server, the only option is to move those
mailboxes from the Exchange Server 5.5 server to the Exchange Server 2003 server.
Site Replication Service
The Site Replication Service is installed and configured automatically during Exchange
Server 2003 setup. This service runs only in a mixed-mode Exchange environment
where Exchange Server 5.5 servers coexist with Exchange 2000 Server and/or
Exchange Server 2003 servers. The Site Replication Service provides mail-based direc-
tory replication between Exchange Server 2003 administrative groups and Exchange
Server 5.5 sites. More specifically, the Site Replication Service is used to integrate
Exchange Server 2003 into an Exchange Server 5.5 site by making the Exchange Server
2003 server running on Active Directory appear as an Exchange Server 5.5 directory
service to the other Exchange Server 5.5 servers. This works in conjunction with the
ADC to provide full integration.
The Site Replication Service is automatically configured when you install the first
Exchange Server 2003 server into an existing Exchange Server 5.5 site. You can have
only a single Site Replication Service on a given Exchange Server 2003 server, though
you can install multiple Site Replication Services in the organization for redundancy.
You cannot delete the last Site Replication Service as long as there are Exchange Server
5.5 servers in the organization.
There might be situations in which you want to move the Site Replication Service to
another Exchange Server 2003 server in the organization. Exchange Server 2003 does
not support moving the Site Replication Service directly, but you can accomplish the
same task by installing and configuring the Site Replication Service on another
Exchange Server 2003 server and then deleting the original.
Lesson 2 Installing Exchange Server 2003 into an Existing Exchange Server 5.5 Organization 4-29
To create a Site Replication Service on another Exchange Server 2003 server, perform
the following steps:
1. Open Exchange System Manager and expand the Tools container.
2. Right-click Site Replication Service, point to New, and click Site Replication
Service.
3. Click Yes at the prompt asking you to confirm your action, and then enter the
required Exchange service account username and password. When finished,
Exchange Server 2003 creates the Site Replication Service and automatically cre-
ates a configuration connection agreement.
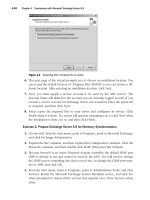
Practice: Installing Exchange Server 2003 into an Existing Exchange
Server 5.5 Organization
In this practice, you will install Exchange Server 2003 onto Server02 in the
litwareinc.com domain. The server should have Windows Server 2003 installed,
although configuring it as a domain controller is optional. Server01 must be online to
complete the process.
Exercise 1: Install Exchange Server 2003 into an Existing Exchange Server 5.5
Organization
1. Complete the pre-installation tasks of installing ASP.NET, Simple Mail Transport Pro-
tocol (SMTP), Network News Transfer Protocol (NNTP), and the World Wide Web
service on Server02. For more information on this, refer to Lesson 1 of Chapter 2.
2. Click the link for Exchange Deployment Tools, which will display the dialog box
shown in Figure 4-19.
F04es19
Figure 4-19 The graphical Exchange Server Deployment Tools
4-30 Chapter 4 Coexistence with Microsoft Exchange Server 5.5
Here, you will find your current environment. Click the link that corresponds. In
this instance, the second option describes the environment, where you have
already connected Exchange Server 5.5 to Active Directory. Click the Coexistence
With Mixed Mode Exchange 2000 And Exchange Server 5.5 link. The next dialog
box of Exchange Server Deployment Tools, shown in Figure 4-20, describes what
coexistence entails. Before installing Exchange Server 2003, you must first upgrade
any ADCs to the Exchange Server 2003 version. This isn’t an issue here, where the
Exchange Server 2003 version of the ADC was used to connect Active Directory to
Exchange Server 5.5, but in a real-world environment, it could be an issue if you
have servers running Exchange Server 5.5 and Exchange 2000 Server on your net-
work. Select the option to Install Or Upgrade The First Exchange Server.
F04es20
Figure 4-20 Meeting coexistence prerequisites
3. The next dialog box of Exchange Server Deployment Tools, shown in Figure 4-21,
provides a checklist of steps to install Exchange Server 2003. Most of the steps are
familiar, as they are the same steps for installing Exchange Server 2003 as in Chap-
ter 2. Once you have completed the checklist, click Run Setup Now at the bottom
of the page. Setup will default to the installation you ran Setup from to initially get
to the Exchange Deployment Tools.
Lesson 2 Installing Exchange Server 2003 into an Existing Exchange Server 5.5 Organization 4-31
F04es21
Figure 4-21 Exchange Server 2003 installation checklist
4. The Microsoft Exchange Installation Wizard starts. The installation process is sim-
ilar to what you have performed previously, though there are some differences in
the options you choose when installing Exchange Server 2003 into an existing
Exchange Server 5.5 organization. Click Next to begin.
5. Click I Agree To Accept The EULA, and then click Next.
6. Click Custom Installation and install the Microsoft Exchange Server 5.5 Administra-
tor. This makes administration more convenient since you can manage your
Exchange Server 5.5 servers and Exchange Server 2003 servers from one system.
7. The Microsoft Exchange Installation Wizard will detect an existing Exchange
Server 5.5 organization, and then you are prompted to choose whether to create
a new organization or to join an existing one. Click Join An Existing Exchange
Server 5.5 Organization, and then click Next.
8. Next, you must enter the name of an existing Exchange Server 5.5 server. The
installation wizard advises you that it will test some prerequisite conditions and
that it will take a few minutes. Click OK to continue.
9. Once the installation wizard resumes, you are prompted to accept the License
Agreement. Do so, and then click Next.
4-32 Chapter 4 Coexistence with Microsoft Exchange Server 5.5
10. The next step requires that you enter the password for the existing Exchange
Server 5.5 Installation Service Account. The Username and Domain fields will
already be filled in, so you have to type only the password, and then click Next.
11. The Installation Summary shows you the actions that the installation wizard will
perform, and once you click Next, it will install Exchange Server 2003 onto your
server. When Setup is complete, click Finish.
When Setup completes, you can either use Exchange Server Deployment Tools to
install additional Exchange Server 2003 servers in the organization or you can exit the
utility.
Lesson Review
The following questions are intended to reinforce key information presented in this
lesson. If you are unable to answer a question, review the lesson materials and then try
the question again. You can find answers to the questions in the “Questions and
Answers” section at the end of this chapter.
1. You install Exchange Server 2003 into an existing Exchange Server 5.5 site. The
existing Exchange Server 5.5 server is Server01, and the new Exchange Server
2003 server is Server02. After installation, you decide to use Exchange System
Manager to manage both of your servers. However, when you attempt to config-
ure settings for Server01, all the settings are unavailable. Why?
2. You have a mixed-mode Exchange organization that contains two Exchange
Server 5.5 servers and three Exchange 2000 Server computers. Since directory syn-
chronization is already in place between Active Directory and the Exchange Server
5.5 directory, you attempt to install an Exchange Server 2003 server into the orga-
nization by running Setup.exe from the installation CD. However, Setup fails and
generates an error message that Exchange Server 2003 cannot be installed into the
organization as it is presently configured. What configuration step do you need to
perform prior to installing Exchange Server 2003?
Lesson 2 Installing Exchange Server 2003 into an Existing Exchange Server 5.5 Organization 4-33
3. You install Exchange Server 2003 into your existing Exchange Server 5.5 site and
want to make some of the new features available to your existing users.
Specifically, you want to enable some of the Mobile Information Services. Will you
be able to make these features available to your Exchange Server 5.5–hosted
mailboxes?
Lesson Summary
■ The Exchange Server Deployment Tools utility provides a graphical interface that
steps you through the process of installing Exchange Server 2003.
■ Exchange Server Deployment Tools can also be run through the command-line
exdeploy.exe utility.
■ The Site Replication Service emulates an Exchange Server 5.5 directory service,
working in conjunction with the ADC to provide seamless integration and connec-
tivity between Exchange Server 2003 and Exchange Server 5.5.
■ The Active Directory Users And Computers console can manage mailboxes for
users on both Exchange Server 5.5 and Exchange Server 2003 servers, but
Exchange System Manager can be used to administer only Exchange Server 2003,
and Exchange Administrator can be used to administer only Exchange Server 5.5.
■ The Site Replication Service can run only in a mixed-mode organization.
4-34 Chapter 4 Coexistence with Microsoft Exchange Server 5.5
Lesson 3: Troubleshooting Connectivity Between Active
Directory and Exchange Server 5.5
Ideally, following the planning and installation instructions will lead to a seamless
Exchange Server 2003 deployment. Realistically, there might be times when you have
problems, as an Exchange organization can be very complex when it includes multiple
sites with multiple servers. Effectively troubleshooting connectivity between Exchange
Server 2003 and Exchange Server 5.5 is essential to administering a mixed-mode
organization.
After this lesson, you will be able to
■ Merge duplicate accounts
■ Troubleshoot the ADC
■ Troubleshoot the Site Replication Service
Estimated lesson time: 20 minutes
Merging Duplicate Accounts
When you merge multiple directories, the possibility exists that you will encounter
duplicate accounts. To handle this situation, Exchange Server 2003 comes with the
Active Directory Account Cleanup Wizard (ADclean.exe). Duplicate accounts can result
in performance problems with an Exchange organization and difficulty in authenticat-
ing users. However, handling duplicate accounts is not always as simple as deleting
one account or the other that isn’t needed. Sometimes both accounts contain informa-
tion about the user that needs to be preserved. The Active Directory Account Cleanup
Wizard solves this problem by allowing you to merge duplicate accounts, combining
the settings from both.
The wizard attempts to identify duplicate accounts in Active Directory. You can have
the wizard search Active Directory automatically and identify accounts, or you can
manually specify accounts to be merged. You can also use a mixture of the two meth-
ods, by having the wizard do the bulk of the work by using its search capability, but
manually specifying accounts that it does not recognize. Once the identification phase
is complete, you have the ability to review and modify the merge operations that will
take place. Once you are satisfied with the settings, you can either perform the actual
merge operations or export the list of accounts to a .csv file to complete the merge pro-
cess at a later time. This is useful if you are running the Active Directory Account
Cleanup Wizard initially for informational purposes but do not want to have to redo
the entire process later to perform the merge. At that time, you can import the .csv file
into the wizard and complete the merge process.