Microsoft Press 70 284 training kit exchange server 2003 phần 5 docx
Bạn đang xem bản rút gọn của tài liệu. Xem và tải ngay bản đầy đủ của tài liệu tại đây (648.89 KB, 82 trang )
7-32 Chapter 7 Managing Recipient Objects and Address Lists
1. Select the Extract And Import (One-Step Procedure) option, and click Next to
continue.
2. Next, you are prompted to select a Source Server, as shown in Figure 7-26.
F07es26
Figure 7-26 Selecting the source server
3. You can control the behavior of the mailbox merge procedure by clicking Options
after entering the source server name. You will be presented with multiple pages
that allow you to configure different aspects of the merge.
4. The options you can configure are as follows:
❑ Data—The Data page allows you to control how much data you migrate. The
default setting, User Messages And Folders, shown in Figure 7-27, migrates
only user messages and folders. If you want to migrate additional items, such
as the user’s dumpster items (items held by the Deleted Item Retention
period) or folder permissions, you can select the appropriate options.
Lesson 1 Configuring Recipient Objects 7-33
F07es27
Figure 7-27 The Data page
❑ Import Procedure—The Import Procedure page, shown in Figure 7-28, allows
you to define how the data should be written to the destination mailbox
store. You can copy the data to the target store (which could create duplicate
items), merge the data, replace existing data, or archive the data (deletes it
from the source store after copying).
F07es28
Figure 7-28 The Import Procedure page
7-34 Chapter 7 Managing Recipient Objects and Address Lists
❑
Folders—The Folders page, shown in Figure 7-29, allows you to configure
what folders are processed in the migration. By default, all folders in a
mailbox are migrated, though you can choose to limit the migration to
specific folders or to exclude certain folders.
F07es29
Figure 7-29 The Folders page
❑ Dates—On the Dates page, shown in Figure 7-30, you can select messages
between specific dates and times to be migrated. This is useful if you have
users who have years worth of e-mail, tasks, and calendar items saved, and
you wish to keep only items dating back to a certain date. The default is to
migrate everything, regardless of date.
F07es30
Figure 7-30 The Dates page
Lesson 1 Configuring Recipient Objects 7-35
❑ Message Details—The Message Details page, shown in Figure 7-31, allows
you to extract items based on message subjects or attachment names. This is
especially useful if you are working with a very large mailbox, and you want
to extract only specific types of messages.
F07es31
Figure 7-31 The Message Details page
5. After configuring your options, click OK, and then click Next to continue the
wizard. This brings you to the Destination Server page, shown in Figure 7-32.
F07es32
Figure 7-32 Selecting the destination server for the migrated mailboxes
7-36 Chapter 7 Managing Recipient Objects and Address Lists
6. Type the name of the destination server for the migration, and then click Next to
continue the wizard. The Mailbox Selection page, shown in Figure 7-33, opens,
and you can choose the mailboxes you want to migrate. Select the mailboxes you
want to migrate, and then click Next.
F07es33
Figure 7-33 Selecting the specific mailboxes to be migrated
7. Next, you are prompted to choose the default locale for the target mailboxes. If
your destination is in the same country, such as the United States, then you
probably have only a single locale in your Exchange organization. If you are mov-
ing the mailboxes to a server in a different locale, select the one that is appropriate
from the drop-down list, and then click Next.
8. Next, choose a folder on the Exchange server to store the temporary .pst files used
during the migration process. When you select a folder, you will see the amount
of disk space required and how much space the drive containing the selected
folder contains, as shown in Figure 7-34.
Lesson 1 Configuring Recipient Objects 7-37
F07es34
Figure 7-34 Selecting a folder to store the temporary .pst files used in the migration
9. Before the migration process begins, you will have the option to save the settings
for use at a later date. This is useful if you want to run the migration later as part
of a batch and not have to redefine all the settings. After you decide whether to
save your settings, click Next to start the migration. A Process Status window will
display, showing you vital statistics about the migration, including the elapsed
time and how many successes and failures have occurred. When the operation
completes, you can click Finish to exit. If there were any errors, an ExMerge.log
file will be created in your \Exchsrvr\Bin folder. You can view it to see what went
wrong in the process.
Managing Mail-Enabled Groups
As discussed earlier in this chapter, mail-enabled groups are typically Active Directory
security and distribution groups that have been assigned an e-mail address, and when
mail is sent to the group address, it is routed automatically to each member of the
group. Mail-enabling an existing group is done through the Exchange Task Wizard by
choosing the Create An E-Mail Address task from the list. Mail-enabling a new group as
you create it adds one extra step, as Exchange extends the New Object creation wizard
to prompt you with the option to create an e-mail address and assign the object to an
administrative group.
Before mail-enabling Active Directory groups, you should have a clear understanding
of the effects of group scope on the Exchange Server messaging capability of these
groups. There are three scopes for groups: domain local, global, and universal.
■ Domain local group Membership of this group is not published to the global
catalog server. This means that Exchange Server users cannot view full
7-38 Chapter 7 Managing Recipient Objects and Address Lists
membership of a mail-enabled domain local group when their user accounts are
located in domains other than the domain in which the group exists.
■ Global group Membership of this group is not published to the global catalog
server. This means that Exchange Server users cannot view full membership of a
mail-enabled global group when their user accounts are located in domains other
than the domain in which the group exists.
■ Universal group Membership of this group is published to all global catalog
servers in a forest. This means that Exchange Server users in any domain can view
full membership of mail-enabled universal groups. If you have multiple domains
in your environment, it is recommended that you mail-enable only universal
groups and not domain local or global groups.
Expansion Servers
An expansion server is a server that is used to resolve or expand the membership of a
mail-enabled group whenever a message is sent to that group. Because of the limited
scopes of a domain local group or a global group, Exchange users in one domain are
not able to view the membership of groups defined in another domain. Exchange is
unable to deliver messages sent by users in one domain to groups defined in another
domain. To resolve group membership, you must use an expansion server when mail-
enabling domain local groups or global groups in environments that have multiple
domains. The expansion server that you choose must exist in the same domain as the
mail-enabled group. Expansion servers are identified on a group-by-group basis by
editing the properties of the group in the Active Directory Users And Computers con-
sole and then clicking the Exchange Advanced tab. The default setting is to use any
server in the organization, but you can click the drop-down list and choose a specific
server.
Query-Based Distribution Groups
A query-based distribution group is a new type of distribution group introduced in
Exchange Server 2003. A query-based distribution group provides essentially the same
functionality as a standard distribution group; however, instead of specifying static user
memberships, a query-based distribution group enables you to use a Lightweight
Directory Access Protocol (LDAP) query to specify membership in the distribution
group dynamically (for example, all employees in an accounting department or all
employees in a particular office building). Therefore, adding a user account in the
accounting department would result in their automatic membership in a query-based
distribution list for the accounting department. The use of query-based distribution
groups can considerably lower the administrative overhead in maintaining certain dis-
tribution groups, especially those that have memberships that undergo frequent
changes.
Lesson 1 Configuring Recipient Objects 7-39
Query-based distribution groups are not without disadvantages though. They place
more of a performance load on server resources. Every time an e-mail message is sent
to a query-based distribution group, an LDAP query is executed against Active
Directory to determine the membership of the query-based distribution group. In addi-
tion, a query-based distribution group can only be created in an organization that is
running Exchange Server 2003 or later and that has been switched to Native mode.
To create a query-based distribution group, perform the following steps:
1. Start the Active Directory Users And Computers console, then right-click the Users
container and select New, and then click Query-Based Distribution Group.
2. The New Object wizard starts, and the first page prompts you for the name of the
group and an alias for it (by default the alias will be the same as the name).
Complete the two fields, and then click Next to continue.
3. The next step is to build the LDAP query by filtering the types of addresses you
want to include in the query. You can also specify what Active Directory container
the query should begin at (all subcontainers will be included), shown in
Figure 7-35. Select the address types, and then click Next to continue.
F07es35
Figure 7-35 Selecting the address types that the LDAP query should filter for
4. The wizard will prompt you to confirm your selections and then will create the
group when you click Finish.
You can preview the results of the query-based distribution group by editing the
properties of the group in Active Directory Users And Computers and going to the
Preview tab. The preview will show you the contents of the group, as well as the syn-
tax of the LDAP query that is being run. If the results are not what you intended, you
7-40 Chapter 7 Managing Recipient Objects and Address Lists
can simply click the General tab and modify the query, then preview it again to see if
the changes corrected the problem.
Limiting Access to Mail-Enabled Groups
In certain situations, you might want to limit access to your mail-enabled groups to
only members of the group. For example, if you have a mail-enabled group that is
intended for a particular purpose, such as receiving customer feedback from external
customers, you might want to limit the amount of unwanted internal messages sent to
this group. Similarly, you might want to prevent users from sending messages to a mail-
enabled group if it contains sensitive information, as in the case of a mail-enabled
group that is reserved for management.
There are two ways to limit access to a mail-enabled group: hiding the mail-enabled
group and restricting access to the mail-enabled group.
■ Hiding a mail-enabled group When you hide a mail-enabled group, it will not
appear in Exchange address lists, so users will not be able to look up the mail-
enabled group and send e-mail to it. However, users can still use the SMTP
address of the mail-enabled group to send messages to it. To hide a mail-enabled
group from Exchange address lists, edit its properties in the Active Directory Users
And Computers console and click the Exchange Advanced tab. Select the option
to Hide Group From Exchange Address Lists. This solution prevents users who
legitimately need to use the mail-enabled group from being able to browse to it in
Exchange address lists.
■ Restricting access to a mail-enabled group By configuring a mail-enabled
group to specifically identify the users who can send messages to the group or
who can receive messages sent to the group, you can effectively limit who uses
the mail-enabled group to only those users that have been granted permission.
This is a more effective solution than simply hiding a group because it allows the
group to be displayed for the people who legitimately use it but prevents users
who shouldn’t use the group from being able to send to it. Configuring message
restrictions is done from the Exchange General page of the group’s properties. By
default, everyone can send to the group, but you can also set it to allow only
authenticated users or to allow only a specific list of users.
Note Groups exist to provide a convenient way to send e-mail to a number of users simulta-
neously, but they do not preclude users from simply selecting all of the individual members
they wish to send to. Therefore, while restricting group access can limit the convenience fac-
tor of sending e-mail, it cannot prevent a determined user from selecting every individual user
in the GAL to get around the restriction.
Lesson 1 Configuring Recipient Objects 7-41
Practice: Configuring Recipient Objects
In this practice, you will create four mailbox-enabled users, two mail-enabled groups,
configure properties for the objects, and move a mailbox from one server to another.
Exercise 1: Create Recipient Objects
1. Using the Active Directory Users And Computers console, create mailbox-enabled
accounts for the following users, placing them in the mailbox store on Server01:
❑ Chris Preston
❑ Kim Akers
❑ Alan Shen
❑ Willis Johnson
2. Create the following mail-enabled distribution groups in Active Directory Users
And Computers, placing them in the mailbox store on Server02:
❑ Engineering
❑ Marketing
3. Add Chris Preston and Kim Akers to the Engineering group, and add Alan Shen
and Willis Johnson to the Marketing group.
4. Open Outlook and send an e-mail to each user you created in order to initialize
his or her mailbox.
5. Verify the presence of the mailboxes in Exchange System Manager by opening the
Mailboxes folder in the mailbox store containing the mailboxes.
Exercise 2: Delete and Reconnect a Mailbox
1. In the Active Directory Users And Computers console, right-click Chris Preston
and select Exchange Tasks to start the Exchange Task Wizard.
2. From the list of tasks, choose Delete Mailbox and follow the wizard to delete
Chris’s mailbox.
3. Open Exchange System Manager and navigate to the Mailboxes folder in the mail-
box store that holds the mailboxes.
4. If Chris Preston’s mailbox does not have a red X on it, right-click the Mailboxes
folder and select Run Cleanup Agent, and then refresh the view.
5. Right-click the mailbox for Chris Preston and choose Reconnect. Follow the
prompts to reconnect the mailbox to Chris Preston’s user account.
7-42 Chapter 7 Managing Recipient Objects and Address Lists
Exercise 3: Forward a Mailbox
Alan Shen has left his position at Contoso, Ltd. Before he left, he was working on a
marketing proposal with multiple clients. Willis Johnson will be taking over those
accounts, and he needs to ensure that if anyone sends an e-mail to Alan’s mailbox, it
goes to him instead.
1. Open the Active Directory Users And Computers console and edit the properties
of Alan Shen’s user account.
2. Click on the Exchange General tab, and then click Delivery Options.
3. Under Forwarding Address, select Forward To: and click Modify to add an
address.
4. Type in Willis Johnson, and then click Check Names. Active Directory should
identify the user account and underline it. Click OK.
5. Leave the check box cleared to Deliver Messages Both To Forwarding Address
And Mailbox. Since Alan no longer works for Contoso, there’s no need for his
mailbox to receive the new messages.
6. Click OK to exit the properties of Alan Shen’s account.
7. From Outlook, send an e-mail from yourself to Alan Shen.
8. Open Willis Johnson’s Inbox by clicking File, then clicking Open, and then select-
ing Other User’s Folder. Note that the e-mail you sent to Alan Shen is in Willis
Johnson’s Inbox. Open Alan Shen’s Inbox and confirm that the message was not
delivered there.
Exercise 4: Move a Mailbox
To reduce the load on Server01, you decide to move some users to Server02.
1. Open Exchange System Manager and navigate to the Mailboxes folder in the mail-
box store on Server01.
2. Select both Willis Johnson and Kim Akers, then right-click and choose Exchange
Tasks.
3. From the task list, choose Move Mailbox.
4. Select Server02 from the drop-down list for the server, and note that the mailbox
store changes to the store on Server02.
5. Complete the wizard, monitoring the progress of the mailbox moves.
6. Verify by clicking the Mailboxes folder on Server02 that its mailbox store now con-
tains the two mailboxes (you may have to refresh the view manually).
Lesson 1 Configuring Recipient Objects 7-43
Exercise 5: Restrict Access to a Mail-Enabled Group
1. In the Active Directory Users And Computers console, edit the properties of the
Engineering group.
2. Click on the Exchange General tab.
3. Under Message Restrictions, select Accept Messages: From Everyone Except: and
add Alan Shen.
4. Create Outlook mail profiles for Alan Shen, Willis Johnson, and Kim Akers.
5. Log on to Outlook as Kim Akers and send an e-mail to the Engineering distribu-
tion group. Since Kim is a member of the Engineering group, she will receive the
message sent to the group address in her Inbox.
6. Close Outlook, change profiles to Willis Johnson, and then log on to Outlook as
him. Send an e-mail to the Engineering distribution group. Close Outlook and
then reopen it using Kim’s profile. Note that she received the e-mail sent from
Willis.
7. Close Outlook and then reopen it using Alan Shen’s profile. Send an e-mail to the
Engineering distribution group. Note that Alan will almost immediately receive a
non-delivery report from System Administrator, and the error will inform him that
he does not have permission to send to that address.
Lesson Review
The following questions are intended to reinforce key information presented in this
lesson. If you are unable to answer a question, review the lesson materials and then try
the question again. You can find answers to the questions in the “Questions and
Answers” section at the end of this chapter.
1. You are the Exchange Server administrator for Contoso, Ltd. You have just finished
creating a new mailbox-enabled user for a new employee named Jenny who will
start work next week, but shortly after you are done, you realize that you put the
mailbox on the wrong server. You open Exchange System Manager and navigate
to the Mailboxes folder on the server that currently holds her mailbox but find that
the mailbox is not listed, even after refreshing the view. You check the mailbox
store on the other server and it is not there either. Why might this be happening?
7-44 Chapter 7 Managing Recipient Objects and Address Lists
2. You are an Exchange Server administrator responsible for 25 servers running
Exchange Server 2003, Standard Edition, and approximately 10,000 mailboxes
contained within a single administrative group. Several of your servers are close to
the 16 GB mailbox store limit, and rather than incur the expense of upgrading to
Exchange Server 2003, Enterprise Edition, management has approved implement-
ing storage limits on mailboxes across the board. What is the most efficient
approach to configuring storage limits for this environment?
3. The CEO of your company calls you and informs you that she is going out of town
for two weeks and needs to have her assistant check her e-mail while she is gone.
However, she doesn’t want the assistant to be able to access e-mail that is already
in the mailbox because it contains confidential information. What is the best way
to set it up so the assistant can check the CEO’s e-mail while she is out of town?
4. You configure the assistant’s address as the forwarding address for the CEO’s
mailbox, and when the CEO leaves town, e-mail addressed to her goes to the
assistant, as planned. However, when the CEO returns from her trip, she is dis-
mayed to find that she has not received any e-mail since she left. What happened?
5. You are the Exchange Server administrator for Contoso, Ltd. You have been asked
to create a distribution group for a new interdepartmental task force that is being
created for special projects. The members of the group are likely to change fre-
quently depending on the project. What type of group should you create so that
ongoing administration is as easy as possible?
a. A security group
b. A distribution group
c. A query-based distribution group
d. A universal group
Lesson 1 Configuring Recipient Objects 7-45
Lesson Summary
■ Recipient objects in Exchange Server 2003 can be mailbox-enabled users, mail-
enabled groups, mail-enabled contacts, and mail-enabled public folders.
■ The Exchange Task Wizard, accessible from both Exchange System Manager and
Active Directory Users And Computers, is used for many common tasks such as
creating and deleting mailboxes and e-mail addresses, and moving mailboxes.
■ Mailboxes must be initialized before they will appear in the Mailboxes folder of a
mailbox store.
■ Query-based distribution groups are used to define group membership dynami-
cally by using an LDAP query each time the group is sent an e-mail message.
■ Exchange extends the Active Directory Users And Computers console to include
Exchange-specific pages. These pages allow you to configure many settings on an
individual user basis, such as storage limits, message restrictions, forwarding
addresses, and mailbox rights.
■ System policies can be used to quickly and easily configure settings, such as
storage limits, for a large number of mailbox stores and users.
7-46 Chapter 7 Managing Recipient Objects and Address Lists
Lesson 2: Configuring Information Stores
Mailbox stores are only a portion of what can be contained within a storage group. The
information store service of Exchange Server 2003 manages all the storage groups on
a server, which can contain public folder stores as well as mailbox stores. Storage
groups are one of the most significant advantages Exchange Server 2003, Enterprise
Edition, has over Exchange Server 2003, Standard Edition. Exchange Server 2003,
Standard Edition, supports having only a single storage group per server, containing
one mailbox store and one public folder store. Exchange Server 2003, Enterprise
Edition, can support up to four storage groups per server, with each storage group
containing up to five databases (combinations of mailbox stores and public folder
stores).
After this lesson, you will be able to
■ Understand storage group architecture
■ Understand the use of multiple databases and storage groups
■ Add storage groups and databases
■ Move Exchange Server 2003 storage groups and databases
Estimated lesson time: 30 minutes
Understanding Storage Group Architecture
The Exchange Server 2003 storage architecture consists of databases (also known as
information stores) that are grouped together within a storage group. Each database is
comprised of two files: the rich text file (.edb file) and the streaming file (.stm file).
These files are managed as a single unit by the Microsoft Exchange Information Store
service. There are additional files, as well, that are common to the entire storage group.
■ E00.chk The checkpoint file, which is used to mark which transactions in the
transaction log have been committed to the database. E00 indicates the first stor-
age group on a server. When you create additional storage groups, the file name
that is created will be incremented to E01, E02, and so on.
■ E00.log The current transaction log. Exchange Server 2003 first writes data to a
transaction log rather than to the database itself, which allows for better
performance and scalability.
■ Mailbox.edb The rich text file. While the extension will always be .edb, the
name of the file is defined at the time the storage group is created. By default, it
will be named the same as the storage group.
■ Mailbox.stm The streaming file. As with the rich text file, the name of the
streaming file is defined at the time the storage group is created.
Lesson 2 Configuring Information Stores 7-47
■ Res1.log The first of two reserved transaction logs. The reserved logs are used
to reserve a portion of disk space for use by Exchange Server 2003 in case the
hard disk runs out of space. This allows the Exchange Server 2003 services to shut
down normally rather than crashing when the disk becomes full.
■ Res2.log The second reserved transaction log. Each transaction log is 5 mega-
bytes (MB) in size.
■ Tmp.edb A temporary transaction log used by Exchange Server 2003.
■ E00tmp.log When the E00.log file reaches 5 MB in size, it is renamed, and
another E00.log file is created. This E00tmp.log file is used to bridge the gap by
storing transactions that occur while the process of renaming E00.log takes place.
There are .edb and .stm files for each database in a storage group but only one set of
log files for all databases within a storage group.
Understanding the Use of Multiple Databases and Storage Groups
Multiple storage groups can be used for a number of purposes in an Exchange Server
2003 organization. One of the most common purposes is related to backup and restore.
Even in small companies, it is not uncommon to have over 20 GB in e-mail, particularly
if storage limits are not used. In large organizations, 100 GB or greater in e-mail is often
stored on the e-mail servers. With Exchange Server 5.5 and earlier, only a single mail-
box store (called the private information store) is possible. As a result, all the e-mail is
stored in a single database file. That poses a significant problem when it comes to
backing up and restoring data. The problem isn’t so much with backing up the
database as it is with restoring it. A restore typically takes twice as long as a backup, so
if you have a 100-GB mailbox store that takes eight hours to back up to tape, you can
expect it to take roughly 16 hours to restore the database in the event of a disaster.
Because e-mail is such a vital corporate application, that length of downtime is unac-
ceptable in most cases. That time frame doesn’t even include the time it takes to
replace any faulty hardware and reinstall or restore Windows prior to restoring
Exchange.
By using multiple databases, you can reduce the individual mailbox store size, making
backup and restore easier to manage. However, a limitation is that you cannot
schedule backups for individual databases within a storage group if you want them to
run at different times. Backup scheduling applies at the storage group level. So, to get
around that, you would instead use multiple storage groups, which would allow you
the flexibility of different backup schedules for each storage group.
In addition, you can restore mailbox stores individually, in the order you choose, in
case of a disaster recovery. For example, while you are restoring Exchange Server
2003, the executive management group requests that getting their e-mail online be the
highest priority. If you had the executives in their own mailbox store, you could restore
7-48 Chapter 7 Managing Recipient Objects and Address Lists
that database first and get the executives’ e-mail online, then work on restoring the rest
of the company’s e-mail. Using multiple databases also allows the flexibility of taking
one database offline for maintenance, or restoring an individual database, without
affecting the other databases. This results in limiting downtime to a subset of users
rather than to all of them.
Another advantage to using multiple storage groups is that you can configure circular
logging settings independent of each other. Circular logging is a process that saves
disk space usage by reusing the same set of log files, overwriting older transactions
with newer ones. This differs from the process described earlier where the transaction
log is renamed when it reaches 5 MB in size and a new log is created. This is the
default behavior and can result in significant disk usage if backups are not performed
regularly. Naturally, backups should always be run on a regular basis, generally at least
once a day. When a backup is run, transactions are committed to the database and the
unnecessary log files are deleted. With circular logging, only full backups can be run.
Incremental or differential backups cannot be used because of the way circular logging
works. As a result, if you have to restore a database, you can restore only to your last
full backup.
Caution This characteristic of circular logging is a very important and significant limitation.
Therefore, the use of circular logging is strongly discouraged unless you have no other choice,
such as a short-term workaround with a failed tape backup drive and insufficient disk
resources to hold the growing log files until the tape drive is replaced.
By default, circular logging is not enabled. However, if you do enable it, the setting
applies to all databases in a storage group. So, if you want to have circular logging on
a particular database but you don’t want other databases to use circular logging, you
would use a separate storage group to house the database that needs circular logging
and configure it in the properties of the storage group.
See Also Exchange Server 2003 also supports Recovery Storage Groups, which are a spe-
cial type of storage group used specifically for recovering databases. Recovery Storage
Groups are discussed in more detail in Chapter 12, “Backup and Restore,” which discusses
backup and restore of Exchange Server 2003.
Adding Storage Groups and Databases
Prior to adding more storage groups and databases, you should adequately plan for
them because they increase the complexity of administering Exchange Server 2003.
Planning involves determining the business needs for the storage group infrastructure,
which usually relates to backup and restore needs and to administrative requirements.
Lesson 2 Configuring Information Stores 7-49
To add a storage group, use Exchange System Manager. Each server running Exchange
Server 2003 can host up to four storage groups. (However, remember that if you are
using Exchange Server 2003 on a Cluster Service cluster, you need to ensure that a stor-
age group can hold the databases from another node in the case of a failover.) Navigate
to the server on which you want to create the new storage group. Then, right-click the
server, point to New, and then click Storage Group. This opens a Properties page for
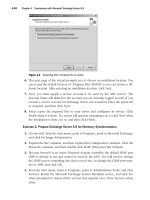
the new storage group. The first task is to name the storage group. As soon as you start
typing a name, Exchange Server 2003 will automatically fill in the paths to its installa-
tion directory and use the name for the location of the transaction logs and system
path. This is shown in Figure 7-36.
F07es36
Figure 7-36 Storage group properties
You can change the paths, and you probably should. Exchange Server 2003, like pre-
vious versions of Exchange Server, performs best when the transaction logs and the
databases are on separate physical drives. This approach is also highly recommended
for improved recovery since, if a hard drive fails, it will not take out both the
transaction logs and the databases.
Important If the partition that the transaction logs are located on completely fills up, the
Information Store service will stop in order to prevent data corruption. You can correct the
problem by freeing up disk space and then restarting the service.
On the Properties page, the Transaction Log Location defines the path to the
transaction log files. The System Path Location sets the location for the storage of tem-
7-50 Chapter 7 Managing Recipient Objects and Address Lists
porary and recovered files. The Log File Prefix is not user-configurable, but after you
create the storage group, you will be able to view the prefix, such as E01, E02, and so
on. The Zero Out Deleted Database Pages setting clears deleted data from the hard
drive, at the expense of system performance. The last configuration option, Enable
Circular Logging, reduces disk usage by reusing a single transaction log rather than cre-
ating a new one each time the 5 MB size limit is reached.
Exam Tip Transaction log files are always 5 MB in size. Exchange Server 2003 creates an
empty 5 MB file and then fills it with data. When the 5 MB size limit is reached, a new file
is created. A transaction log file that is not 5 MB in size is almost certainly corrupted.
Real World Disk Configuration
Because of the critical nature of the messaging system within a corporation, plan-
ning a server configuration for optimal performance and reliability is crucial. This
includes not only planning for Exchange Server 2003 but also for the Windows
operating system. The following hard disk configuration is considered the best
practice for a server running Exchange Server 2003 in the real world:
■ Mirrored system disk (RAID-1) Contains the operating system and
Exchange Server 2003 binaries (the application itself).
■ Mirrored transaction log disk (RAID-1) Contains the transaction logs for
Exchange Server 2003. The transaction logs are arguably more import-
ant than the databases themselves when it comes to disaster recovery, and
RAID-1 is ideal because data is mirrored automatically as it is written.
RAID-1 should be implemented with the two drives on different controllers
so as to avoid a bottleneck during disk write procedures. RAID-1 performs
better than RAID-5, which is better suited to write-once and read-many type
of operations.
■ RAID-5 database disk partition Contains the storage group and its data-
base. RAID-5, which provides disk striping with parity, scales well (requires
a minimum of three disks and can have up to 32) and, with the use of a hot
spare (another powered drive that isn’t presently part of the RAID set), up to
two drives can fail before data is lost. RAID-5 is well suited for storing the
databases because it is reliable and performs best when data is read more
often than it is written. Another good option is RAID-0+1, which is a combi-
nation of disk striping (without parity) and disk mirroring. A RAID-0 stripe
set is created, and then the stripe set is mirrored. This overcomes the primary
limitation of RAID-1, which is that it can utilize only two drives. However,
RAID-0+1 is costly in terms of disk hardware because even though it scales
well, the mirroring function results in only half of the total disk space being
available for data.
!
Lesson 2 Configuring Information Stores 7-51
This type of configuration should be scaled as the number of storage groups and
databases grows. For each storage group, which contains its own set of transac-
tion logs, you should have a separate mirrored disk set for the logs. Likewise,
each database should go on its own RAID-5 disk partition, or RAID-0+1 if cost is
not a concern. This ensures the optimal level of server performance and the
greatest level of reliability. In addition, if there is a performance difference
between hard disks in your server, you will want to place the transaction logs on
the fastest disks.
It may not be practical from a cost standpoint to have such an extensive disk
configuration in all environments, but the goal is to provide the best possible per-
formance and reliability.
Once you create a storage group, you will likely want to add a database to it.
Databases can be either mailbox stores or public stores. To add a database, right-click
the storage group in Exchange System Manager and point to New, and then click
Mailbox Store. As you can see in Figure 7-37, Exchange Server 2003 displays a
Properties dialog box.
See Also Creating and managing public stores and public folders is the topic of Chapter 8,
“Public Folders.”
F07es37
Figure 7-37 Configuring a new mailbox store
7-52 Chapter 7 Managing Recipient Objects and Address Lists
Some of the properties to configure for the mailbox store have already been discussed
in this chapter, such as Limits and Policies. Options on the General page that you might
configure are the path for the default public store for the database, the offline address
list that should be used by users in this mailbox store, and whether to archive all mes-
sages sent or received by mailboxes on the server. If you choose to do this, log files
will be created that record all incoming and outgoing e-mail messages.
Once you have added a new database to your storage group, you can manage it just
like any other database. Likewise, if you add a mailbox store, you will have the ability
to move users to the new mailbox store.
Moving Exchange Server 2003 Storage Groups and Databases
When Exchange Server 2003 is first installed, it places the first storage group and data-
bases it creates in the Mdbdata folder underneath the installation path (for example,
C:\Program files\Exchsrvr\Mdbdata). While this works, it does not allow for the opti-
mal level of performance and reliability. Exchange Server 2003 performs best when its
transaction logs and database files are on separate physical disks (or disk arrays). With
Exchange Server 5.5 and earlier, there was a utility called Performance Optimizer that
analyzed your server and made recommendations as to where to place the transaction
logs and database files (storage groups did not exist, so that wasn’t an option). You had
the option to accept the recommendations, to override them by choosing the locations
yourself, or to do nothing at all. Performance Optimizer is not included with Exchange
Server 2003, but you can still move databases.
Exchange System Manager is used to move both storage groups and databases. To
move a storage group, right-click it and then click Properties. Click the Database tab to
open a dialog box like that shown in Figure 7-38. You can click the Browse button next
to Transaction Log Location and select a new folder. You can also change the System
Path Location in the same way. Remember that if you change the location of the trans-
action logs, it affects every database in the storage group. As a result, all databases will
be dismounted (taken offline) while the process completes. Dismounting a database
makes it unavailable for users to access. When you click OK, Exchange System Man-
ager will prompt you with a message box, warning you of what tasks you are about to
perform and that all databases in the storage group will be temporarily dismounted.
You are prompted to click Yes to continue (which will move the files) or No to return
to the Properties dialog box.
Lesson 2 Configuring Information Stores 7-53
F07es38
Figure 7-38 Database properties
Moving a database is similar to moving a storage group. Using Exchange System
Manager, right-click the database that you want to move and click Properties. Next,
click the Database tab. For a database, you have the option of moving the Exchange
Database (.edb file) and the Exchange Streaming Database (.stm file). Generally, there
is no advantage in separating these files, so it makes sense to keep them located in the
same folder. After choosing new folder locations and clicking OK, Exchange System
Manager will prompt you to confirm, as shown in Figure 7-39.
F07es39
Figure 7-39 Confirming the database move
When moving a storage group or database, you can move the log files and database
files to any folder that you want to create. When you move log and database files, it is
recommended that you create the \Exchsrvr\Mdbdata file structure on the destination
disk partition for consistency, but you are not required to do so.
If you move data to another partition, you must grant the following default permissions
to the new Mdbdata folder that contains the log files and database files:
■ Administrators: Full Control
■ Authenticated Users: Read and Execute, List Folder Contents, Read
■ Creator Owner: None
■ Server Operators: Modify, Read and Execute, List Folder Contents, Read, Write
■ System: Full Control
7-54 Chapter 7 Managing Recipient Objects and Address Lists
Moving log files or database files invalidates all existing incremental and differential
backups, so it is recommended that you perform a full backup after the move.
Practice: Configuring Information Stores
In this practice, you will create a new storage group and mailbox stores. You will then
move the storage group to a new location, observing how the change affects the data-
bases within the storage group and the creation of new databases.
Exercise 1: Create a Storage Group
1. To start Exchange System Manager, from the Start menu, point to All Programs,
then point to Microsoft Exchange, and then click Exchange System Manager.
2. Navigate to the Exchange Server 2003 server that you will be adding the storage
group to. Right-click the server, point to New, and then click Storage Group.
3. Type MIS for the name. Leave all settings at their default for now, but observe that
the paths for the transaction logs are the installation root of Exchange Server 2003
plus the name of the storage group, such as C:\Program files\Exchsrvr\Mis. Click
OK.
4. The new storage group should have been created on the server.
Exercise 2: Add Mailbox Stores
1. Right-click the MIS storage group, point to New, and then click Mailbox Store.
2. Type HelpDesk for the name. Leave all other settings at their default for now and
click OK.
3. Repeat the process and create mailbox stores for SysAdm and Engineering.
4. Observe the new mailbox stores in the MIS storage group.
Exercise 3: Move a Storage Group
1. If you have a D hard disk partition, create a folder structure for D:\Exchsrvr\Mis.
If you have only a C partition, create a folder structure such as C:\Exchsrvr\Mis to
complete this exercise. This exercise assumes two physical disk drives configured
as C and D.
2. Right-click on the MIS storage group in Exchange System Manager and click
Properties.
3. Because the transaction logs and database files should be on separate physical
disks, you will only need to move one or the other. The databases tend to con-
sume more disk space than the transaction logs, so change the System Path
Lesson 2 Configuring Information Stores 7-55
Location. To do this, click Browse and select D:\Exchsrvr\Mis, and then click OK
twice. When prompted to continue, click Yes. All databases in the storage group
will be temporarily dismounted while the process completes.
Exercise 4: Move a Database
1. Right-click the HelpDesk mailbox store and click Properties. Click the Database
tab. Observe that even though you moved the System Path Location for the stor-
age group, the databases themselves do not move automatically and still reflect
their original location.
2. Click Browse next to Exchange Database and select D:\Exchsrvr\Mis\Helpdesk
for the new path. Click OK.
3. Click Browse next to Exchange Streaming Database and select
D:\Exchsrvr\Mis\Helpdesk for the new path. Click OK twice, and then click Yes
when prompted to continue. The database will be temporarily dismounted while
the process completes, but no other databases in the storage group will be
affected.
4. Repeat the process and move the SysAdm and Engineering mailbox stores.
5. Right-click the MIS storage group, point to New, and then click Mailbox Store.
Type Development for the name. Click the Database tab. Observe that the
default location of the Exchange Database and Exchange Streaming Database has
changed to reflect the move of the System Path Location for the storage group.
Lesson Review
The following questions are intended to reinforce key information presented in this
lesson. If you are unable to answer a question, review the lesson materials and then try
the question again. You can find answers to the questions in the “Questions and
Answers” section at the end of this chapter.
1. You are the Exchange Server administrator for Contoso, Ltd. Because of the high
level of interactivity between the Sales group and Contoso’s customer base,
executive management is concerned that if e-mail went down, it would take too
long to get the Sales staff back online. The CIO researches Exchange Server 2003
and asks you about segregating the e-mail for Sales into its own group outside the
general mailbox store so that Sales could be restored first in case of a disaster
recover. He also does not want Sales to have the mailbox limits that everyone else
has. Furthermore, whereas the general mailbox store is backed up nightly, the CIO
wants the Sales group e-mail to be backed up twice a day in order to minimize
potential data loss. How would you meet these requirements?
7-56 Chapter 7 Managing Recipient Objects and Address Lists
2. You are a network administrator who has been asked to define the specifications
for a new server running Exchange Server 2003 that will be purchased to replace
an existing server. The server will host three storage groups that each contain 2 to
5 databases, as follows:
Because of the existing server’s previous reliability problems, you have been told
that cost is not a consideration and that performance and reliability are the decid-
ing factors. Design a disk configuration for the new server that will maximize the
performance and reliability of the new server, as well as give the best flexibility in
administering information stores.
3. You are the network and Exchange Server administrator for a small company that
uses Exchange Server 2003. The server running Exchange Server 2003 has only
two hard disks, so you have moved the single storage group and its two databases
to the second disk (D), leaving the transaction logs on C. Your company does
most of its communication with customers and clients by e-mail. After about six
months, you occasionally run into a problem where the Information Store service
shuts down toward the end of the day. This usually happens on days when one or
more mass e-mails have been sent to customers. You find that after the nightly full
backup runs, you are able to restart the Information Store service successfully.
Management is concerned about the Exchange server going down too often and
wants to know what the problem is and how you can fix it.
Storage Group Database
General General Mailbox Store
General Public Store
Executive Executive Mailbox Store
Executive Public Store
Support SysAdm Mailbox Store
Development Mailbox Store
HelpDesk Mailbox Store
Engineering Mailbox Store
Support Public Store