mcts training kit 70 - 686 Windows 7 Enterprise Desktop Support administrator phần 4 pps
Bạn đang xem bản rút gọn của tài liệu. Xem và tải ngay bản đầy đủ của tài liệu tại đây (1.9 MB, 59 trang )
Lesson 2: Creating a Client Baseline Conguration
List of Applications
to Always Report
Errors For
Computer
only
Species the applications that should be included
in WER error reporting
List of Applications
to be Excluded
Both Species the applications that WER should
exclude from its error reporting
List of Applications to
Never Report Errors For
Computer
only
Species the applications that WER should never
include in its error reporting
Report Operating
System Errors
Computer
only
Species whether WER should process operating
system errors
Report Unplanned
Shutdown Events
Computer
only
Species whether WER should process unplanned
shutdowns as errors
Congure Default
Consent
Both Species whether WER should prompt the user
for consent before reporting errors
Customize Consent
Settings
Both Species whether WER should send the minimum
error reporting data without consent and prompt
the user for consent to send additional data
Ignore Custom Consent
Settings
Both Species whether the default consent settings
should override the custom consent settings
Auditing is one of the most powerful ways for administrators to monitor ongoing events on
their workstations. When you congure auditing in Group Policy, workstations track specic
types of events and record them in the computer’s Security log for examination by adminis-
trators at a later time.
For example, if you congure your workstations to audit account logon failures, the system
will create an event log entry each time a user types an incorrect password. If you see a large
number of failed logon attempts, you can assume that someone is trying to guess a user’s
password and you can take appropriate measures to stop that person.
Windows has had auditing capabilities for a long time, but Windows 7 and Windows Server
2008 R2 have extended the operating system’s auditing function, enabling administrators to
audit events on a much more granular level.
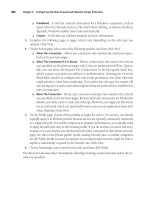
The standard auditing policies, which you can apply to all Windows servers and workstations,
are located in the Computer Conguration\Policies\Windows Settings\Security Settings\Local
Policies\Audit Policy container of a GPO, as shown in Figure 4-34.
Conguring Clients
The contents of the Audit Policy container in a Group Policy object
For all auditing policies, you can specify whether to monitor successes, failures, or both.
The settings available in the Audit Policy container are as follows:
■
Monitors attempts to authenticate to the local computer
across the network
■
Monitors attempts to create, modify, or delete user
accounts and groups, as well as attempts to change user passwords
■
Monitors attempts to access Active Directory objects
■
Monitors attempts to interactively log on to the local machine
■
Monitors attempts to access non–Active Directory objects, such
as folders, les, or printers, for which you have enabled auditing
■
Monitors attempts to modify user rights assignments, audit
policies, account policies, or trust policies
■
Monitors attempts to exercise user rights
■
Monitors process-related events, including process creation
and process termination
■
Monitors a variety of events that can affect the security of the
system
For Windows 7 workstations, you can use a more advanced set of audit policy subcategories,
which enable you to monitor more specic events. To use these subcategories, you must
rst enable the Audit: Force Audit Policy Subcategory Settings (Windows Vista or Later)
To Override Audit Policy Category Settings policy, found in the Computer Conguration\
Policies\Windows Settings\Security Settings\Local Policies\Security Options container.
After you enable this setting, you can use the settings found in the Computer Conguration\
Policies\Windows Settings\Security Settings\Advanced Audit Policy Conguration\Audit Policies
container, as shown in Figure 4-35.
Lesson 2: Creating a Client Baseline Conguration
The Advanced Audit Policy Configuration container
This container has 10 subcategories with a total of 55 auditing policies, which enable you
to monitor highly specic events. For example, the Account Logon subcategory contains four
policies, instead of the one available in standard auditing, enabling you to monitor individual
stages of the logon process, including credential validation, Kerberos Authentication Service
transactions, Kerberos Service ticket operations, and others.
IMportaNt
Folder Redirection is a set of policies that administrators can use to control where users store
their personal data. Many administrators prefer users to store their data on server drives,
rather than local ones. This enables the administrators to secure the data, as well as back it
up and recover it more easily. Storing data on servers also makes it possible to have roaming
users; individuals can access the les they need from any computer on the network.
Conguring Clients
To make this possible without reconguring each workstation individually, administrators
can use these Folder Redirection policies, which cause workstations to redirect specic folders
to shares on the network. The policies are located in the User Conguration\Policies\Windows
Settings\Folder Redirection container, as shown in Figure 4-36.
The Folder Redirection container in a GPO
When you congure one of the Folder Redirection policies, you see a Properties sheet like
the one shown in Figure 4-37.
A folder redirection policy’s Properties sheet
Lesson 2: Creating a Client Baseline Conguration
Each policy provides the following three options:
■
Redirects the folder to a specied location, to a folder named for the user at a
specied location, to the home directory specied in the user’s account, or to the local
user prole location.
■
Redirects the folder to different locations based on the user’s group
memberships.
■
The folder is not redirected and remains in its original location.
Note
One of the most common congurations is for an administrator to create a folder called
Users on a network share and use the Basic option with the Create A Folder For Each User
Under The Root Path setting to redirect folders to that location. The policy then creates a
separate subfolder for each user and stores the contents of the selected folder there.
A user prole is a collection of folders and registry settings that together provide the user
environment on a Windows computer. By default, Windows 7 workstations create a separate
prole in the C:\Users folder for each user that logs on to the computer. These are called local
user proles.
Many administrators prefer to store user proles on servers, however, so that users can
access them from any workstation. This makes it possible for users to maintain their own
desktop environments, even in a workplace where they log on at a different computer each
day. These are called roaming proles. When a workstation is congured to use roaming
proles, it downloads the prole from the server each time the user logs on. Later, when the
user logs off, the workstation copies any changes that the user made to the prole back to
the copy on the server.
Some administrators also prefer to create a single server-based prole containing a
standard desktop environment for all of their users and provide them with read-only
access to it. The process is the same as for a roaming prole when the user logs on, but
the workstation does not copy the changed prole back to the server at logoff. This enables
the users to modify their environments during a session, but they lose those modications
when they log off. Each time they log on again, the workstation reloads the standard prole.
This is called a mandatory prole.
One nal variation, called a super-mandatory prole, requires users to access the server-
based prole to log on. If the workstation cannot access the prole on the network, the
logon fails.
Conguring Clients
■
■
To create roaming proles and congure workstations to use them with Group Policy, use the
following procedure:
Create a folder on the server where you want to store the proles and share it.
Congure the prole folder with the NTFS permissions shown in Table 4-2.
NTFS Permissions for a Roaming Profiles Folder
Creator/Owner Allow Full Control Subfolders and les only
Domain Users Allow List Folder/Read Data
Allow Create Folders/
Append Data
This folder only
LocalSystem Allow Full Control This folder, subfolders,
and les
Administrator No permissions
Everyone No permissions
Congure the permissions for the prole share by granting the Allow Full Control
permission to the Everyone special identity.
You can copy a default network prole to the NETLOGON share on a domain controller
so that it will be replicated to all of the domain controllers for that domain.
This causes users to start with the default network prole when they log on for the rst
time, instead of using the default prole on the local disk.
Lesson 2: Creating a Client Baseline Conguration
In the Computer Conguration\Policies\Administrative Templates\User Proles container
of a GPO, enable the Set Roaming Prole Path For All Users Logging On To This Computer
policy, as shown in Figure 4-38, and specify the path to the prole share you created,
using the following format: \\servername\sharename\%USERNAME%.
The Set Roaming Profile Path For All Users Logging On To This Computer
Properties sheet
This causes the workstation to create a folder on the share, named for the user logging
on, in which the workstation stores the user’s roaming prole.
You can congure workstations to use different roaming prole paths by creating multiple
GPOs and applying them to different OUs or using ltering to apply them to different com-
puters in a single OU. You can also congure prole paths for individual users by specifying a
prole path on the Prole tab of a user’s Properties sheet, as shown in Figure 4-39.
Conguring Clients
The Profile tab of a user’s Properties sheet
Note
To create a baseline GPO, you congure the standard Group Policy settings that you want to
apply to all of your workstations, which could include auditing policies. This practice assumes
that you have already completed the Lesson 1 practice, in which you downloaded, installed,
and enabled GPMC, and then created a GPO called Baseline.
After installing GPMC and creating a GPO, you can use Windows 7 to create a baseline
workstation conguration.
Click Start, and then click Administrative Tools\Group Policy Management. The Group
Policy Management console appears.
Lesson 2: Creating a Client Baseline Conguration
Expand the Forest and Domains containers. Then expand the container representing
your domain and select Group Policy Objects.
Right-click the Baseline GPO you created earlier and, from the context menu, select
Edit. The Group Policy Management Editor window appears.
Expand the Computer Conguration, Policies, Windows Settings, Security Settings, and
Local Policies containers and select Audit Policy.
Double-click Audit Account Logon Events. The Audit Account Logon Events Properties
sheet appears.
Select the Dene These Policy Settings check box. The Audit These Attempts check
boxes are activated.
Clear the Success check box and select the Failure check box. Then click OK.
Open the Audit Account Management Properties sheet.
Select the Dene These Policy Settings check box, and then select both the Success
and Failure check boxes and click OK.
Leave Group Policy Management Editor open for the next exercise.
The Audit Object Access policy enables you to audit specic types of access to specic objects
by specic users groups. To do this, you must congure the policy and then congure auditing
on the objects you want to monitor.
In the Group Policy Management Editor, in the Audit Policy container, double-click
Audit Object Access. The Audit Object Access Properties sheet appears.
Select the Dene These Policy Settings check box, and then choose both the Success
and Failure check boxes and click OK.
Click Start. Then click All Programs\Accessories\Windows Explorer. The Windows
Explorer window appears.
Expand Computer and Local Disk (C:).
Create a new folder called Data on the C: drive.
Right-click the C:\Data folder you created and, from the context menu, select Properties.
The Data Properties sheet appears.
Click Security, and then click Advanced. The Advanced Security Settings For Data dialog
box appears.
Click the Auditing tab, and then click Edit. A new Advanced Security Settings For Data
dialog box appears, containing only an Auditing tab, as shown in Figure 4-40.
Conguring Clients
The Advanced Security Settings For Data dialog box
Click Add. The Select User, Computer, Service Account, Or Group dialog box appears.
In the Enter The Object Name To Select text box, type and click OK.
The Auditing Entry For Data dialog box appears, as shown in Figure 4-41.
The Auditing Entry For Data dialog box
Lesson 2: Creating a Client Baseline Conguration
Select the Successful and Failed check boxes for the List Folder/Read Data permission
and click OK. A new entry appears in the Auditing Entries list.
Click OK twice to close the two Advanced Security Settings For Data dialog boxes.
Click OK to close the Data Properties sheet.
■
A baseline conguration is a starting point, and in this context it refers to a collection
of settings that you apply to all of your workstations.
■
GPO Accelerator is a tool that automatically creates GPOs and OUs for the precongured
EC and SSLF environments dened in the Windows Security Guides.
■
Windows Error Reporting is a client/server technology that enables workstations to
automatically send error information to a server. Administrators can congure WER
using Group Policy.
■
Auditing is the process by which computers are congured to create event log entries
in response to specic security-related system activities. GPOs contain standard audit
policies and advanced audit policies that apply only to Windows 7 and Windows
Server 2008 R2.
■
Folder redirection policies enable users to store their personal data on network servers
so that administrators can secure and back up the data and users can access it from
any workstation.
■
A user prole is a collection of folders and registry settings that together provide the
user environment on a Windows computer. Windows 7 workstations create local user
proles in the C:\Users folder for each user that logs on.
■
Proles stored on servers (so that users can access them from any workstation) are
called roaming proles. Read-only roaming proles are called mandatory proles.
Mandatory proles that must be accessible to users from the network for successful
logons are called super-mandatory proles.
You can use the following questions to test your knowledge of the information in Lesson 2,
“Creating a Client Baseline Conguration.” The questions are also available on the companion
CD if you prefer to review them in electronic form.
Note
Conguring Clients
Which of the following folders can you make subdirectories of the Documents folder
using Folder Redirection policies? (Choose all that apply.)
Videos
Music
Saved Games
Pictures
Which of the following types of user proles prevents the user from logging on if it is
not accessible on the network?
Local user prole
Roaming prole
Mandatory prole
Super-mandatory prole
To further practice and reinforce the skills you learned in this chapter, you can perform the
following tasks:
■
Review the chapter summary.
■
Review the list of key terms introduced in this chapter.
■
Complete the case scenarios. These scenarios set up real-world situations involving the
topics of this chapter and ask you to create a solution.
■
Complete the suggested practices.
■
Take a practice test.
■
The primary method for deploying conguration settings to Windows 7 workstations in
an enterprise environment is Group Policy. To do this, you create Group Policy objects
using the Group Policy Management Console and link them to Active Directory Domain
Services objects, such as domains, sites, and organizational units. You can also congure
workstations using scripts that execute when the computer starts up or shuts down or
when users log on or log off.
■
A baseline workstation conguration consists of Group Policy settings that adminis-
trators want to deploy to all of the workstations on the network. These settings can
include policies that congure Windows Error Reporting, auditing, folder redirection,
and user proles.
Chapter Review
Do you know what these key terms mean? You can check your answers by looking up the
terms in the glossary at the end of the book.
■
asynchronous processing
■
functional GPO
■
GPO Accelerator
■
mandatory prole
■
monolithic GPO
■
roaming prole
■
starter GPO
■
super-mandatory prole
■
synchronous processing
■
user prole
■
VBScript
■
Windows Error Reporting
In the following case scenarios, you will apply what you’ve learned about subjects of this chapter.
You can nd answers to these questions in the “Answers” section at the end of this book.
Ed is creating GPOs for the workstations in the Sales department at A. Datum Corporation. In
their Active Directory hierarchy, a Sales OU contains the computer and user objects for the
entire department, except for the Order Entry team, which has its own OU subordinate to
Sales. The workstations in the Order Entry department use a highly restricted environment,
while the Sales workstations are relatively open. Ed has created two GPOs, one for Sales and
one for Order Entry. The GPOs have precisely the same policies congured, but their settings
are different. A Baseline GPO containing settings for all of the computers in the organization
is also in the hierarchy and is linked to the Adatum.local domain object. Which of the follow-
ing is the easiest way to deploy the GPOs to the appropriate workstations successfully?
Link the Sales and Order Entry GPOs to the domain object.
Link the Sales GPO to the Sales OU and the Order Entry GPO to the Order Entry OU.
Link the Sales GPO to the Sales OU and the Order Entry GPO to the Order Entry OU,
and then block Inheritance to the Order Entry OU.
Create Sales and Order Entry groups and use security lters to apply the Sales and
Order Entry GPOs to the appropriate computers.
Conguring Clients
Alice is conguring auditing policies for her enterprise network, and she wants to use the
Advanced Audit Policy Conguration settings for her Windows 7 workstations. However, the
company also has workstations running Windows Vista and Windows XP SP2, and the various
operating systems are distributed relatively evenly throughout the company and throughout
the organization’s Active Directory Domain Services hierarchy. Alice has created a separate GPO
containing the Advanced Audit Policy Conguration settings. How can she deploy the GPO
so that only the Windows 7 workstations receive these settings, without modifying the AD DS
hierarchy?
To help you successfully master the exam objectives presented in this chapter, complete the
following tasks.
In this practice, you congure Advanced Audit Policy Conguration settings for Windows 7
computers.
■
Open the Baseline GPO you created earlier in this chapter and enable
the Audit: Force Audit Policy Subcategory Settings (Windows Vista or Later) To
Override Audit Policy Category Settings policy in the Computer Conguration\
Policies\Windows Settings\Security Settings\Local Policies\Security Options container.
■
Browse to the Computer Conguration\Policies\Windows Settings\
Security Settings\Advanced Audit Policy Conguration\Audit Policies container.
Then examine the various auditing policies available there and enable the ones
that you think are appropriate for the network on which you are working.
In this practice, you install the GPO Accelerator tool and use it to create GPOs for the SSLF
environment.
■
Download the Security Compliance Management Toolkit from http://
www.microsoft.com/downloads/details.aspx?FamilyID=5534bee1-3cad-4bf0-b92b-
a8e545573a3e&displaylang=en and install the GPO Accelerator program.
■
Run the GPO Accelerator script with the following command:
gpoaccelerator.wsf /win7 /sslf /lab
■
Examine the settings in the GPOs created by the GPO Accelerator program.
Chapter Review
The practice tests on this book’s companion CD offer many options. For example, you can test
yourself on just one exam objective, or you can test yourself on all the 70-686 certication exam
content. You can set up the test so that it closely simulates the experience of taking a certica-
tion exam, or you can set it up in study mode so that you can look at the correct answers and
explanations after you answer each question.
More INfo
O
rganizations are far more likely to suffer loss of data through the carelessness of
employees than they are through deliberate attacks by nefarious third parties. With
this in mind, you should realize that conguring security is more than just conguring
rewall rules to stop dangerous lurkers on the Internet from sneaking inside the perimeter
network. Conguring security is about ensuring the integrity of your organization’s data.
This effort can include taking steps as simple as ensuring that a hard disk or sensitive le
is encrypted. When you take this precaution, you stop unauthorized third parties from
recovering data from a lost or stolen portable computer. Conguring security can also
include making sure that the default Web browser, used to surf the dangerous tides of the
Internet, is as sturdy as possible. Malicious software is far more likely to infect a computer
through a browser than it is by means of an attacker randomly throwing packets against a
rewall in the hope of nding a weakness in the network armor. In this chapter, you learn
how to congure Windows 7 client security to meet the needs of your organization. You
learn about encryption, rewall rules, application control policies, and account policies.
You also learn how to use Group Policy and the Internet Explorer Administration Kit to con-
gure Windows Internet Explorer to best meet the security needs of your organization.
■
Dene client security standards.
■
Dene Windows Internet Explorer settings.
■
Lesson 1: Conguring Client Security
■
Lesson 2: Conguring Windows Internet Explorer
Contents
Before You Begin . . . . . . . . . . . . . . . . . . . . . . . . . . . . . . . . . . . . . . . . . . . . . . . . 172
Lesson 1: Conguring Client Security . . . . . . . . . . . . . . . . . . . . . . . . . . . . . . 172
Using Encryption 173
Creating Firewall Rules 179
Dening Account Policies 181
Dening User Account Control Policies 182
Conguring User Rights and Security Policies 183
Locking Down Services 185
Dening AppLocker Settings 185
Conguring Removable Drive Policies 187
Modifying Network Security Settings 189
Lesson Summary 194
Lesson Review 194
Lesson 2: Conguring Windows Internet Explorer . . . . . . . . . . . . . . . . . . . 196
Internet Explorer Administration Kit 196
Windows Internet Explorer and Group Policy 199
Conguring Security Zones 199
Managing Cache Settings 202
Privacy Settings 203
Proxy Server Connections 207
Add-ons and Accelerators 208
Lesson Summary 214
Lesson Review 214
Chapter Review . . . . . . . . . . . . . . . . . . . . . . . . . . . . . . . . . . . . . . . . . . . . . . . . . 216
Chapter Summary 216
Key Terms 216
Case Scenarios 217
Suggested Practices 218
Take a Practice Test 218
Conguring Security and Internet Explorer
To complete the exercises in the practice sessions in this chapter, you need to have completed
the following steps:
■
Installed the Windows 7 operating system on a stand-alone client PC named WKSTN1,
as described in the Introduction at the beginning of this book.
■
To perform Exercise 2 in Lesson 2, you will need an active connection to the Internet
and need to download the Internet Explorer Administration Kit 8 from the following
TechNet Web site: />real World
A
In the past, client computers, like servers, rarely moved from the ofce building because com-
puters were big and heavy, and it took a fair amount of effort to move them from the desk
on which they had been set up. Having physical computers tied to a single location provided
an organization with a basic level of security. Unless someone broke into the premises and
stole computers, only a certain amount of data left the ofce on a regular basis. Only so many
documents could t on a oppy disk! Today’s security administrator faces greater challenges
because the majority of computers being made and sold are laptops. In many organizations,
Lesson 1: Conguring Client Security
the computers that people use for their daily work are what they take home with them each
evening. The mobility of portable computers and high-capacity thumb-size storage devices
naturally increase the chance that a signicant amount of data will fall out of your organiza-
tion’s control. Because administrators can do little to stop these devices being lost or stolen
after they leave the ofce, they must take other actions to secure organizational data. This
lesson looks at the client security policies that an administrator can congure to mitigate
some of these problems. The lesson also covers other technologies available in Windows 7
that can form integrated parts of your organization’s security strategy.
■
Congure Encrypting File System, BitLocker, and BitLocker To Go.
■
Create Windows Firewall with Advanced Security rules.
■
Dene user account control policies.
■
Manage user account policies.
■
Restrict application execution.
Encryption encodes data. When encryption is applied properly, authorized people are able to
decrypt the data and unauthorized people are unable to decrypt the data.
Windows 7 can implement encryption by means of two technologies: Encrypting File System
and BitLocker Drive Encryption. Encrypting File System, available on Windows 7 Professional,
Enterprise, and Ultimate, allows for le and folder encryption. BitLocker (and BitLocker To Go)
are available in Windows 7 Enterprise and Ultimate and provide full volume encryption. This
means that BitLocker encrypts the entire volume, not just specic les and folders. You can
implement one or both of these technologies when designing a client security strategy.
In addition to ensuring that all data stored on the client computer is encrypted, BitLocker can
also protect the integrity of the boot environment by notifying users of any modications, such
as when the computer suffers an infection by boot sector Trojan malware. If a change to the boot
environment occurs, the computer requires the user to enter the BitLocker recovery password
to acknowledge the change. If the user has not made the change, the requirement to enter the
recovery password serves as a notication that an unauthorized modication has occurred.
BitLocker does not protect data on a computer after the computer is fully active. After the
computer starts successfully, BitLocker unlocks the volume. For this reason, it is important to
consider BitLocker startup options when developing a client security standard. Startup options
include conguring a combination of a Trusted Platform Module (TPM) chip, a personal
Conguring Security and Internet Explorer
identication number (PIN), and a USB device that hosts a special cryptographically generated
le, called a startup key. Startup options are congured through the Computer Conguration\
Administrative Templates\Windows Components\BitLocker Drive Encryption\Operating System
Drives\Require Additional Authentication At Startup Group Policy item, shown in Figure 5-1.
BitLocker Startup options
Using this policy, you can congure the following BitLocker startup options:
■
The user does not have to provide a password at startup. This is the
least secure implementation of BitLocker because the hard disk is unlocked at startup.
■
User must have a USB startup key connected each time the com-
puter performs a cold boot. If the USB startup key is not connected, the computer boots
into recovery mode. Recovery mode is a special mode that allows the computer to start
if the BitLocker recovery key is entered. The BitLocker recovery key is different from the
startup PIN.
■
User must enter a PIN each time the computer performs a cold boot.
Failure to enter the PIN forces the computer into recovery mode.
■
User must enter a startup PIN and have the startup
key connected. If both these conditions are not met, the computer boots into recovery
mode. This is the most secure implementation of BitLocker, but is also the least con-
venient from the user perspective.
■
This mode allows the use of BitLocker on a computer that
does not have a compatible TPM chip but requires that a USB startup key be present
each time the computer performs a cold boot.
Lesson 1: Conguring Client Security
Organizations tend to use the BitLocker USB startup key modes only on servers rather than
portable computers because ensuring that a specic USB device is connected to a computer
at boot time is cumbersome to the user of that computer. This is less of a problem for servers,
for which restarts are less frequent than for client machines.
When conguring BitLocker as a part of your organization’s client security policy, you should
take care to consider how you will be able to recover BitLocker encrypted volumes. In an organi-
zational environment, the most convenient way of recovering data from BitLocker-protected
hard disk drives is to congure a data recovery agent. You can do this by assigning a specially
congured data recovery agent certicate using the \Computer Conguration\Windows Settings\
Security Settings\Public Key Policies\BitLocker Drive Encryption key. You can also congure
Group Policy so that BitLocker can be enabled on volumes only if the BitLocker recovery keys
have been safely backed up to Active Directory directory services. This safeguard allows an
administrator to recover the BitLocker recovery key from Active Directory in case a recovery
operation becomes necessary. You can archive BitLocker keys in Active Directory as long as
domain controllers in the environment are running Windows Server 2003 SP1 or later and the
schema has been extended. You do not need to extend the schema if Windows Server 2008
domain controllers are in use in the domain.
To ensure that recovery keys are backed up to Active Directory, congure the following policies:
■
Choose How BitLocker-Protected Operating System Drives Can Be Recovered
■
Choose How BitLocker-Protected Fixed Drives Can Be Recovered
When conguring these policies, ensure that you enable the Do Not Enable BitLocker Until
Recovery Information Is Stored To AD DS option, as shown at the bottom of Figure 5-2.
BitLocker recovery options
Conguring Security and Internet Explorer
Another important part of any client security strategy is informing users of exactly how a
specic encryption solution works. A common misconception about BitLocker is that data
remains encrypted when copied from a BitLocker-protected drive. If a person copies data stored
on a BitLocker-protected volume to a volume not protected by BitLocker, the data is no longer
encrypted. Similarly, if a person attaches a le stored on a BitLocker-protected volume to an
e-mail message and sends it, the le will not remain encrypted. Misconceptions about encryp-
tion are a signicant cause of data breaches with users often believing something has remained
encrypted when it has been inadvertently decrypted.
More INfo
/>
BitLocker To Go allows for the encryption of USB storage devices, such as ash drives and
removable hard disk drives. Writing data to BitLocker To Go–protected devices is supported only
on computers running Windows 7 Enterprise and Ultimate. With the appropriate password, you
can read data from BitLocker To Go–protected devices on all editions of Windows 7, Windows
Vista, and Windows XP operating systems. You can congure a removable storage device for-
matted with either the FAT32 or the NTFS le system to use BitLocker To Go.
BitLocker To Go protects the removable storage device with a single password. When
the encrypted device is connected, the user who connects the device enters the password,
after which she can access the data on the device. Data on the device cannot be accessed
by a user who does not have the BitLocker To Go password. As is the case with BitLocker, the
whole volume device is encrypted, which means that items copied to a protected device are
automatically encrypted.
Organizations that are concerned about the security of data stored on portable devices are
able to congure BitLocker To Go policies so that computer users are able to write data only
to portable storage devices that are protected by BitLocker To Go. You can go even further
than this and restrict access so that users can write data only to storage devices tagged with a
specic organizational identier and to congure Group Policy so that standard users cannot
enable BitLocker To Go on their own removable storage devices. Conguring these policies
allows an organization to control the use of removable storage devices by allowing people to
use only authorized storage devices. You might want to block people from using their own
devices for several reasons. Loss of small ash drives is a signicant problem for many organi-
zations. If such devices are provisioned centrally, users who lose these devices must inform
someone before a replacement is issued. If people are using their own devices, they may not
get around to informing anyone that a possible loss of data has occurred.
Lesson 1: Conguring Client Security
BitLocker To Go policies are found in the Computer Conguration\Administrative Templates\
BitLocker Drive Encryption\Removable Data Drives node. Here are policies that you should
consider conguring as a part of your organization’s client security strategy:
■
Enabling this policy enables the use
of BitLocker To Go. You can also congure whether individual users are able to apply
BitLocker protection to removable drives and whether they are allowed to suspend
and decrypt BitLocker-protected drives, as shown in Figure 5-3.
Controlling use of BitLocker To Go
■
Through this
policy, you can block people from using drives that are not protected by BitLocker.
Through this policy, you can also restrict users from writing to any devices that do not
have a specic organizational identier.
■
This policy allows BitLocker To Go devices to be congured so that they are
accessible to clients with the Windows XP and Windows Vista operating system installed.
■
Use this policy to congure
password complexity and length for BitLocker To Go passwords.
■
Use this policy
to congure whether a data recovery agent is congured for BitLocker To Go as well as
whether recovery data is written to Active Directory. When enabling backup of pass-
words to Active Directory, you can block BitLocker encrypting devices until successful
password backup occurs.
Conguring Security and Internet Explorer
In the practice exercise at the end of this lesson, you will congure BitLocker To Go so
that users are able to write data only to protected devices with a specic organizational
identier.
Encrypting File System (EFS) provides per-user le and folder encryption for client computers
running Windows 7 Professional, Enterprise, and Ultimate. You can use EFS to encrypt sensitive
folders, such as a user’s documents folder, in case you cannot implement BitLocker. You can
also use EFS in conjunction with BitLocker, with BitLocker providing volume encryption and
EFS encrypting individual les and folders stored on that volume. EFS is different from BitLocker
in the following important ways:
■
EFS-encrypted les and folders retain their encrypted status only when copied to
other NTFS formatted volumes. A le or folder that is hosted on a volume encrypted
by BitLocker remains encrypted only when copied to another volume that is also
encrypted by BitLocker. EFS-encrypted les are automatically decrypted when a user
who is able to access the encrypted le copies it to a volume that does not support
EFS, such as the FAT32 le system. EFS-encrypted les also do not remain encrypted
if sent as e-mail attachments.
■
You can use EFS-encrypted les and folders for different users of the same computer.
For example, if Orin and Craig both use the same computer running Windows 7, EFS
stops Orin from decrypting Craig’s les and makes sure that Craig is unable to decrypt
Orin’s les. BitLocker and BitLocker To Go work on the volume level, which means that
if Craig and Orin have access to the same computer, and NTFS permissions are set
appropriately, they can access each other’s les. It is possible to use EFS to encrypt
a le for multiple users on a per-user basis, but les cannot be encrypted on a per-
security-group basis.
■
If a user tries to transfer an EFS-protected le to another computer using a removable
storage device, he needs to import the associated EFS certicate on the destination
computer. EFS-encrypted les can be accessed only if the certicate that was used to
encrypt the le is accessible locally. For this reason, it is better to congure an enterprise
certicate authority to issue EFS certicates centrally so that a single EFS certicate is
used throughout the organization.
When conguring a client security standard using EFS, you should take care to imple-
ment a data recovery agent, a key recovery agent, or both types of recovery agent. You
can congure an EFS data recovery agent through the Computer Conguration\Windows
Settings\Security Settings\Public Key Policies\Encrypting File System node of Group Policy.
Key recovery agents are congured on an organization’s certicate server.
Lesson 1: Conguring Client Security
■
■
Windows Firewall with Advanced Security rules can be congured through Group Policy
and applied to client computers. This allows administrators to deploy specic rewall rules
to all or some computers within an organizational environment. The Windows Firewall
With Advanced Security Group Policy node is located under the Computer Conguration\
Windows Settings\Security Settings node, as shown in Figure 5-4.
Windows Firewall with Advanced Security node