User Interface Design for Mere Mortals PHẦN 9 potx
Bạn đang xem bản rút gọn của tài liệu. Xem và tải ngay bản đầy đủ của tài liệu tại đây (9.77 MB, 31 trang )
9
Usability
“Supposing is good, but finding out is better.”
—Samuel Clemens
Topics Covered in This Chapter
Selecting Techniques for Your Usability Test
Defining Your Usability Test
Conducting the Usability Test
Analyzing and Presenting Usability Test Results
After you design your software, hardware, or Web user interface, it’s time to
put your interface to the test by letting users preview it and provide feedback
so you can make changes as needed before you release it to the public.
You need to start by selecting techniques for your usability test. You will run
into resistance, and this chapter discusses the different questions you may be
asked and gives you some answers that you can give in response.
When you know what technique you want for your usability test,you need to
define your test to determine what information you need from the users and
how you will gather that information.
After you design the initial test, you need to conduct a pilot test that will
allow you to hone your observational and interviewing skills. When you’ve
worked out the kinks, you’re ready to conduct the real test.
When the test is over, it’s time to crunch the data and prepare a report and
presentation for your stakeholders that tells them what you found and gives
them your recommendations for improving the interface and the overall
product.
225
Selecting Techniques for Your Usability Test
You can use several techniques for conducting your usability test (Hackos and
Redish, 1998). Depending on your situation, you can use one or all usability
techniques to get the information you need to make your product or docu-
mentation better.
Observing, Listening to, and Engaging Users
One of these techniques is to go onsite to visit the users in their natural habi-
tat.You may run into resistance when you propose a site visit, especially if the
trip to the customer costs money. If you do encounter the following ques-
tions (Hackos and Redish, 1998), which are fairly common, you can counter
with the following arguments:
•
Why go at all?
—We must challenge or verify our assumptions. After all,
we haven’t seen how our customers work,and we may be surprised by
what we find out. That information will affect our product and its docu-
mentation.
•
This is a new product, so why go out and test it?
—We can challenge
our assumptions to see how well the new product will fit in the cus-
tomer’s workflow and how users approach new products, which will
make the implementation process smoother.
•
We’re just changing one par
rt (or feature), so why lo
ok beyond that?
—
Usability studies onsite can obviously affect the change in that one part.
What’s more, the change in that one part could affect the users’ work-
flow, so there needs to be a holistic analysis of the change in that one
part.
•
What will we learn from only a few users?
—Usability testing studies by
Neilsen (1993) and Virzi (1992) have shown that testers can glean a
high percentage of user needs from a sample of six to eight individuals
from each user group. Beyond eight users,we see repeated patterns
with a few minor variations. Testing a small group not only brings us
the information we need to analyze, but it is also cost effective.
•
Why not use
e the customer information we already have?
—We need to
test how well customers think this
product functions, not what cus-
tomers are doing now or have been doing.
226 Chapter 9
As I said in Chapter 3,“Making the Business Case,”be sure to perform a return
on investment (ROI) analysis, and include any site travel information in your
cost estimate.
When you observe users in their natural environment, you should adhere to
the following rules as you plan for any type of site visit (Hackos and Redish,
1998):
• Plan ahead. Understand the site visit issues and objectives.
• Select users to represent the diversity in the user group.
• Treat the users as partners.
• Watch, listen to,and talk with users. Usually, do this one at a time, and
observe their work as they work in their own environment.
• Make the conversation concrete by talking about what the users are
doing or just did.
• Take your cues from the users. You should also share your emerging
understanding with the users to ensure that you are correctly interpret-
ing what you see and hear.
If you also bring this information—particularly a plan for the site visit—to
your decision maker, it will help make your case even stronger.
Other Methods of User Interaction
There are other methods of user interaction that you can employ either in
place of or in tandem with site visits (Hackos and Redish, 1998). These meth-
ods, which will be familiar from related concepts in earlier chapters, include
usability evaluations away from the customer site as well as more traditional
marketing techniques:
•
Usability roundtables
—The customers come to your site and bring
their work with them so you can use the work as the context for evalu-
ating your product’s usability.
•
Controlled usability evaluations
—You can predesign your usability test
and then conduct that test in a controlled environment, such as a labo-
ratory with computers that have your product installed on them.
•
Focus groups
—You can bring your customers to your site and facilitate
a group of 8 to 12 people (the typical size for a focus group) to obtain
Usability 227
228 Chapter 9
attitudes, reactions, and opinions about your company’s products,
ideas, and customer requirements.
•
Bringing users to requirements-gathering sessions
—The product devel-
opment team interviews the users to find out what they want to see in
the product.
•
Include one or more users on the design teamm
—Having users on the
design team can help further users’ goals and desires throughout the
production life cycle.
•
User survey
s
—You can conduct user surveys as discussed in Phase 3 of
the Usability Engineering Life Cycle (UEL) and apply this information
to future versions of the product.
•
Meeting users at trade shows
—Trade shows and other profession-
al association meetings can be great venues for gathering user
information.
Each of these methods has drawbacks, generally falling into three categories:
bias for lack of adequate feedback, lack of information provided by users,
and misunderstandings. These misunderstandings are caused by confusion,
miscommunication, or not being able to see how the users actually use the
product.
There is no one best way of conducting a usability test. However, observing
and engaging users onsite have been shown to be the most effective ways of
gathering usability information from users (Hackos and Redish, 1998).
Defining Your Usability Test
The first step in the testing process is to define and plan your usabil-
ity test. If you don’t know how you are going to test and what you are
testing for, then you will be wasting the time of a lot of people—not
to mention the company’s money.You should keep good written
records of what you are testing, the responsibilities of project and
usability team members, and the decisions the team makes.
—Dumas and Redish, 1999
Dumas and Redish (1999) identify five tasks that you must complete as you
define your usability test:
1. Define your goals and concerns.
2. Determine who your test participants are.
3. Select, organize, and create test scenarios.
4. Determine how you will measure usability.
5. Prepare your test materials.
The following sections describe the tasks to complete (Dumas and Redish,
1999).
Goals and Concerns
After you have determined who your users are, you have to make choices
when you create your test—for example, whether you want your usability
test to be geared toward advanced users or the majority of users classified as
intermediate. You create your goals by starting with general goals, and from
there you build specific goals. These goals can come from several sources:
• Your task analysis and quantitative usability goals, such as those you
developed in your paper prototype.
• Timely issues, such as having to produce a usability study to resolve a
dispute about whether to add a feature.
• A heuristic analysis or an expert review, such as concerns from an inter-
nal customer (for example, marketing) that need to be addressed.
• Previous tests of this product or other products. One test may provoke
concerns that require another test.
Picking Your Test Participants
You must be choosy when you determine who you want to participate in
your usability test. When you create a persona, as you learned about in Chap-
ter 6,“Analyzing Your Users,” you’re determining the characteristics that you
want each user in your test to fit into. You need to think about two types of
characteristics: those that all users share,and those that may cause differences
between the users. Following are the decisions you need to make when deter-
mining characteristics:
• Users’ experience with computers or the product you’re testing.
• Users’ work experience
Usability 229
230 Chapter 9
• Users’ experience with your product
• Users’ experience with similar products
You should think broadly about your users when creating profiles. Following
are some examples of thinking broadly:
• Consider new hires who are just coming into the job.
• Think about new customers who will be using the product.
• If the product is used internally within one group, think about what
other groups in the company may be using the product in the future.
• Think about differences within a category. For example, younger users
may adapt more quickly to new technology than older ones.
From here, you can create groups and even subgroups of users who share the
same characteristics so you can, for example, learn if there are differences
between subgroups toward a new feature in your program.
Selecting, Organizing, and Creating Test Scenarios
Unfortunately, you can’t test every possible task that the user could do with
the product. So how do you narrow it down? Use tasks that
• Probe potential usability problems
• Are suggested from your concerns and experiences
• Are derived from other criteria
• The user will do with the product
As you select tasks, you must also keep in mind how long the task will take
for the user to do and what hardware, software, procedures, and other infor-
mation are needed for the user to do the task. You should write down your
tasks by giving each task a number and description (just as you did with
paper prototyping). Each task should show the time it will take,the hardware
and software needed,and the high-level instructions and procedures required
to complete the task.
You can use a scenario to tell participants what you want them to do during
the test. A scenario describes the task in a way that helps bridge the task
(which is artificial) with what the user would be doing in the world. For
example,“You have three new hires. Add accounts for them.”
A good scenario has the following characteristics:
• It’s short.
• It’s in the user’s words.
• It’s unambiguous.
• It gives participants enough information to do the task.
• It’s directly linked to your tasks and concerns.
Your tasks and scenarios don’t have to be written.You can have human actors
playing different roles, such as customers, support staff, or supervisors. You
can also have the participants stop between each task, such as after a longer
task or if you want to distribute a printed questionnaire to all participants
after each task. However, you must provide audio cues to tell the participants
to stop and start again because participants may become focused on the task
and won’t remember when to stop and start.
Determining How to Measure Usability
Usability measures two dimensions:
•
Performance measures
—These are quantitative measures of specific
actions and behaviors that you observe.
•
Subjective measures
—These are people’s perceptions, opinions,and
judgments.
In the case of performance measures, you can easily log each time a user
exhibits a certain behavior during the test,like expressing frustration. Subjec-
tive measures are harder to quantify unless more than one participant tells
you the same thing, such as that the email button is hard to find on the page.
There are commercially available programs for logging usability data, or you
may want you or a programmer on your product team to create a program
that meets your specific needs. If you can’t use a computer-based program,
you can create a printed form to use.
As you create your logging form, you need to set criteria for performance
measures. A typical criterion for performance measures is a four-point scale,
which forces a choice toward positive or negative because there is no strictly
neutral response. This four-point scale, in fact, has three passing grades and
only one failing one.You must also set performance measures that are directly
Usability 231
232 Chapter 9
tied to your general and specific concerns. For example, if you’re concerned
about how easy it is for a user to read a message, some of the measures you
may want to add include the time it takes for the user to perform the task and
the time it takes for the user to recover from errors.
You’ll want to follow the same performance measures for most tasks in the
same test whenever possible to get a good idea of how users perform. How-
ever, different tasks within a test may require different performance meas-
ures. For example, a function that is available in one Web page may not be
available in a sublevel Web page, so you wouldn’t log errors for that function
in that sublevel page.
You may also have to take into account the test situation,such as whether the
participants have to read the instructions for each task. If you’re testing the
time it takes users to complete a task, you have to add to the total time it
takes the users to complete the task to account for the test situation. For
example, you should add 30 seconds to the beginning of the test so the
testers have enough time to read and absorb the task instructions.
Preparing Test Materials
Before you test,you must prepare legal forms for the treatment of human par-
ticipants. As the tester,you are responsible for the following:
• Creating a legal form that correctly states each party’s rights
• Ensuring that all test participants have read and understand the form
• Observing or witnessing all participants signing the form
You should consult with your company’s legal department or attorney (if
possible) to produce these forms and possibly present them to your partici-
pants. If you are required to explain and present these forms, do so in a neu-
tral but friendly tone.
You should also have a testing script so that you test all users in all groups the
same way. If you remember standardized testing from high school, you’ll
remember that all the teachers followed the same script to ensure that every-
one was tested the same way so as not to skew the results and to make sure
that all tasks were completed at the same time. The script should also include
a checklist so you know that everything has been completed. If you have
other team members with their own checklists, you must ensure that they
have completed their checklists.
You may also want to distribute written questionnaires before the test, after
each task, or at the conclusion of the test to get the following information
from your users:
•
Pretest
—Gather information about the participant’s background.
•
Posttask
—Gather judgments and ratings about each task.
•
Posttest
—Gather judgments and ratings about the test.
Written questionnaires are useful and efficient because you ask all partici-
pants the same questions, and you don’t forget to answer the questions. How-
ever, you must ensure that all the questionnaires ask the right questions so
that you get the most effective answers. For example, if you want to ask a
question about the difficulty of completing a task, it would be more effective
if the question asked participants to rate the difficulty on a scale from 1 to 5
(5 being very difficult) rather than being close-ended.
Conducting the Usability Test
It’s time to assess your preparations by first conducting a pilot test to see how
well it works. After you have conducted the pilot test, you need to learn how
to take proper care of your test participants before you start your actual
usability test.
Conducting a Pilot Test
You should conduct a pilot test before you conduct the real usability test
(Dumas and Redish, 1999). A pilot test allows you to “debug” your test and
find out if there are any initial problems with the product or Web site you’re
testing, its documentation, its test methods, and its test materials. Following
are bugs you can encounter during the pilot test:
• The participant can’t perform a task because of a bug in the hardware,
software, or Web site.
• The participant uses a procedure that you didn’t anticipate to complete
the task.
• The participant only finishes a portion of the tasks.
• The participant keeps making the same mistakes.
Usability 233
• The participant doesn’t have the materials needed to complete the
task.
• A question or answer confuses the participant.
• Instructions in the documentation confuse the participant.
• The participant can’t complete a task because of basic usability prob-
lems with the product.
Always conduct the pilot test exactly as you will conduct the full usability
test, and use one test participant who represents the users you want to test.
By mimicking the same conditions in the full usability test, your pilot test will
give you the most accurate results. The pilot test will also let you test the way
you approach your users.
To give yourself enough time to make any necessary changes, schedule the
pilot test two days before the live usability test. That will give you a full day
(and perhaps longer if you schedule the pilot test in the morning) to make
any changes without feeling the pressure of an immediate deadline. If the
pilot test exposes problems that require more substantive changes, you can
also determine whether to escalate the issues.
Honing Your Observation Skills
From your pilot test, you will get clues that will help you hone your skills,
especially if you’re going onsite at a customer’s location to view how users
work and use your product. Many factors go into a successful site visit
(Hackos and Redish, 1998). Before you go to the user site, keep the following
in mind:
• Don’t arrive unannounced. Always arrange the logistics of your visit
with the managers and users onsite,and let them know what you’ll be
doing in general terms.
• Work through channels, including managers and unions, where neces-
sary.
• Work with the other site to schedule your site visit at a mutually agree-
able date and time.
• Confirm the visit with a fax as soon as it’s arranged and with a follow-
up call the day before your visit.
• Ask for directions to the site if necessary. You don’t want to be late.
234 Chapter 9
• Practice setting up any equipment at your headquarters to work out
any setup bugs before you set up the equipment at the customer’s site.
When you arrive, do the following:
• Greet the manager and the users, as well as the users’ colleagues if they
share space.
• Ask for permission to set up your space and the audio and visual equip-
ment, if needed.
• Verify the expectations about how long you’re visiting and what your
agenda is for the visit.
Do the following while you are onsite:
• Make the visit as cooperative as possible. Ensure that you build a good
relationship with the users, and help them feel reassured when neces-
sary. However, also be sure to let the users know that you’re interested
in seeing how they do things, not to be an expert to explain how to do
something.
• Be flexible about users’ schedule and needs, such as restroom breaks.
• Be sure that your language is friendly but neutral.
• Take a lot of notes. You can never take enough notes.
When you leave, do the following:
• Thank the users and the managers.
• Give the users a gift, even if you are paying for the visit.
• Pack up quickly and quietly.
After you leave, be sure to send a thank-you note to the users and the
managers.
Writing Notes
When you take notes as an observer, write them on a form that ensures that
you capture the important information about what the users are doing and
that you answer the question you have. Although the form should be specific
to your usability needs (and perhaps customized further to meet the needs of
the users you’re testing), it should include the following:
Usability 235
• The project name
• The observation form number, because you may interview more than
one user during your visit
• The name of the observer
• The date of the observation
• The page number of the form and the total number of pages in this
observation form
• The user’s goals
• The user’s task
• Notes about the user
• Notes about the environment
• The situation at the starting point of the task
• The time the task started
• Observations about the user during the task
• The time the task stopped
• The situation at the end of the task
• The end points of the task that will show that the usability goal has
been met
You should also write down inferences and questions about the users and the
task during the observation. Ask questions during the observation so you can
get as much information as possible.
Honing Your Interviewing Skills
You can interview the users as they are performing the task, but you can also
determine both from the users you’re interviewing and from the pilot usabil-
ity test what interview methods and skills are best for your site visit. In addi-
tion to obtaining information while the users are performing the task, which
is called a concurrent, contextual interview, you can also perform one or a
combination of the following types of interviews (Hackos and Redish, 1998):
•
Immediate recall interview
—Record what the users do, and then talk
about what they did at the completion of the task.
•
Cued recall interview
—Record what the users do, and then talk about
it sometime later, perhaps with the assistance of video playback.
236 Chapter 9
•
Process interview
—Interview users individually or in groups to under-
stand an entire process or workflow.
•
Ethnographic interview
—Interview one user first as a key informant,
and then later interview others and conduct observations with discus-
sion during the observations.
•
Cued recall or discourse-based interview with artifaact walkthro
ugh
—
Collect artifacts from the user and then construct an interview around
the artifacts.
•
Critical incident interview
—Interview users about specific situations
when you can’t observe them yourself.
•
Group interview or focus group
—Interview users individually or in
groups about attitudes, desires, preferences, and so on.
•
Usability roundta
ables
—Interview users away from their work site.
•
Customer partner
ing
—Work with a group of users over time, with
interviews as one of the techniques.
No matter which interview process you decide to use, you should always
keep three things in mind when you interview:
• Treat the users as partners, not as research subjects.
• Presume that the users know a lot about their work.
• Listen far more than you talk. As the old saying goes, you have two ears
and one mouth, and you should use them proportionally.
Fundamental Skills
Within this overall three-point philosophy about interviewing, there is a set of
fundamental skills you should adhere to so you can get the most out of your
interviews:
• Set expectations about your respective roles and knowledge.
• Plan the questions or issues for site visit interviews ahead of time.
• Know what you are trying to learn.
• Realize the power of different types of questions to get the answers
you’re looking for. For example, you may want to ask general questions
or specific questions at different points during the test to get the
answers you need.
Usability 237
• Ask neutral questions instead of leading or blaming questions.
• Respect silence, and let your users think about their answers (or their
questions) if they have to.
• Watch body language and other signals from users,and be cognizant of
cultural differences.
• Capture exactly what the users say.
• Stay close to your site visit plan.
• Give users the opportunity to answer the questions you didn’t ask.
• Treat users’questions with respect, and always promise that you will
take the users’ concerns, requests, praise, and other comments to the
appropriate people. Then keep that promise.
An Ongoing Relationship
Sometimes your interviews may require you to create an ongoing relationship
to track the progress of a product or document. As users progress from begin-
ner to expert, they go through several stages (Kuniavsky, 2003):
1. They makes mistakes.
2. They create mental models of how the product operates or how the
document reads.
3. They set expectations as their familiarity with the product or documen-
tation grows.
4. They form habits that may or may not be efficient ways of completing a
task.
5. They form opinions, which they can change as they acquire more expe-
rience with a product. They may like or dislike a particular feature or
subsystem.
6. Finally, they develop a context for the product in terms of their goals,
their job, and the relationship to other tools. This can result in a prod-
uct becoming indispensable or relegated to a bookshelf or drawer to
collect dust.
There are a number of methods for obtaining usability information over a
longer period of time (Dumas and Redish, 1999):
238 Chapter 9
• Have the users fill out a diary questionnaire form, which contains sev-
eral questions. The tester sends a new form to the users on a regular
basis either on follow-up site visits, by email, by fax, or even by regular
mail. The form can have many of the same questions as well as several
specific questions so you can get answers.
• Create an advisory board that meets regularly so users can provide
direct feedback to the project team.
• Telescope the research by bringing together users with different expe-
rience levels so you can see how different issues affect users.
• If you’re looking at the usability of a Web site, you could capture user
login information to create some metrics that answer questions such as
what page the users spend the most time on.
Caring for the Test Participants
You need to ensure that you take care of your test participants. When you
start the test, you need to ensure that your testers are comfortable and that
you’re calm and focused on them. A checklist can help keep you and your
testing team on track and ensure that you create a rapport with your testers
from the beginning (Dumas and Redish, 1999).
Some of that rapport can include small talk and having the testing staff and
testers introduce themselves by providing information about their jobs, their
organization, and what they want to get out of the test. You should also talk
with participants about the environment,and if you have a videotape,show it.
If you have a testing room either at the user site or your own, you should
show users the room and introduce them to any monitors who will be watch-
ing them and working with them throughout the test.
Conducting the Real Test
As you go through the test, remind your testers to think out loud whenever
possible (Dumas and Redish, 1999). Thinking aloud helps focus the testers’
thoughts and helps them understand what they’re thinking. The success rate
for thinking aloud can vary because some testers are more willing to share
their thoughts than others.
Sometimes testing can go awry. Following are some common situations and
what you can do in response (Dumas and Redish, 1999):
Usability 239
• A tester refuses to participate in the test any longer. In this case, you
should clearly understand why he doesn’t want to participate. If you
can’t alleviate this situation, you must let that tester leave.
• A tester is so nervous that he cannot continue with the test. You may
want to take a short break and talk with the nervous tester one on one
to see if you can resolve the problem. If not, you may have to let that
tester go.
• A tester is not qualified to participate in the test. You will usually learn
if a tester isn’t qualified in the pretest questionnaire, but you may find
out during the test. In any case, you have to immediately let the tester
go.
• A tester is taking too much time to complete a task. Before the test
starts, you should be clear that the testing group will move on to the
next task even if one or more testers haven’t completed the task. Also,
make sure to point out that the timing problem isn’t with the tester, but
with the product. If a tester is taking too long,it can be an indication
that the interface is difficult to use.
• If the product equipment or software fails, you should move the group
to another room and explain what is happening while your other team
members try to figure out what’s happening. If you decide to stop the
test, you must determine whether to reschedule.
• A tester is frustrated or nervous because the product is hard to use. In
this case, you may want to talk with the affected tester one on one so
you can determine if he wants to continue. You should point out that
the difficulty he’s having is quite valuable, and his feedback is needed
to resolve the problems.
Note that if you’re compensating testers, you’ll have to determine how to
compensate any who leave on a case-by-case basis.
During the test, you should always observe problems and create a problem
list. Those on your testing team should also create a problem list because
everyone has a different perspective on what’s happening. Write down your
observations, your hypotheses about the actions you observe, and your inter-
pretations. Keep your observations as neutral as possible, and record all user
problems. That way, you’ll get a complete list without discounting anything.
After you write down all your problems, you may want to discuss some of
them with your testers to get more information. After the test, you should talk
with your testing and project teams about what you found.
240 Chapter 9
Some of the information in this chapter repeats what has been covered in ear-
lier sections and chapters, but now you should see how all the information
fits together so you can conduct your usability test. After you complete your
usability test, you must analyze and present your data and then recommend a
plan of action, as we’ll discuss in the next section.
Analyzing and Presenting Usability Test Results
A usability test generates a lot of data that you need to go through (Dumas
and Redish, 1999). After the test,your data can include one or more of the fol-
lowing:
• A list of problems from the test
• Quantitative data on times, errors, and other performance measures,
including subjective ratings on questionnaires
• Testers’ comments from logs, notes, and questionnaires
• The testing team’s written notes
• Background data on the participants
• Videotapes of the test, perhaps from several different viewpoints in the
room
Analyzing and Presenting the Data
The first step in analyzing the data is to tabulate and summarize quantitative
data. This is something you can do with any spreadsheet program. You can
also compile all the comments into a word processing program. More power-
ful software programs such as the ones found in Microsoft Office let you link
your spreadsheet in Excel to the document in Word. When the spreadsheet is
updated in Excel, it is automatically updated in Word.
After you have entered all the data, you can analyze it for trends and surprises.
Spreadsheet programs are also useful in calculating statistical information
about the data, such as the mean score for a question in a questionnaire. How-
ever, as Mark Twain said, there’s always the problem of “lies, damned lies, and
statistics,”especially when it comes to inferential statistics. Inferential statistics
take a sample from a larger set of data and make inferences about the larger
data from the sample. This approach contrasts with descriptive statistics,
which describe a set of data, like the average time it takes to complete a task.
Usability 241
A useful technique for processing data is triangulating it (Dumas and Redish,
1999). This involves looking at all the data together to see how each set of
data supports the other sets. Each apex contains a different set of data:
• The problem list
• Quantitative data from logs and questionnaires
• Testers’ comments and the testing team’s observations
You measure the data against your usability goals and the quantitative criteria
you set before the test to determine what the problems are inside the triangle.
You may find some surprises that warrant further research. For example, you
may find that one user had different reactions to several questions. Perhaps
that user felt that performing a task was a lot harder than the other respon-
dents thought. Because the number of users in a usability test is small, you
should always treat this outlying data seriously. If the outlier may represent a
large group of potential users,the data may suggest that you need to schedule
another usability test with more users like the outlier to see if the problem is
with that set of users or is confined to that one user for some reason.
Dumas and Redish (1999) recommend that you adhere to the following guide-
lines to make statistical analysis as relevant as possible:
1. Use inferential statistics only if you understand how to apply and inter-
pret them.
2. After you employ a statistical test, carefully explain what the test
means.
3. Describe your interpretation of key data values when you don’t com-
pute statistical tests. This description will provide your readers with
some guidance on the accuracy of “eyeball” tests.
Both your quantitative data analysis as well as the qualitative data from feed-
back and notes will help you organize the information into two areas (Dumas
and Redish, 1999):
•
Scope
—How widespread is the problem? It’s best to organize problems
into general groups that indicate a significant problem that’s backed up
by more specific results from the test. For example, a general group can
242 Chapter 9
be lack of user feedback produced by a program, and the specific
results that support this group can include comments from testers
about times when the program wouldn’t give them any feedback after
they performed a task.
•
Severity
—How critical is the problem? You can set up severity criteria
as you analyze the data, or you can do so before the test takes place. It’s
up to you to determine the criteria that are both easy for you and the
people who will be reading your usability report to understand. For
example, you could have a five-point scale where problems rated 1 are
“show stoppers” that prevent completion of a task and need the project
team’s immediate attention, and problems rated 5 are problems that the
project team may want to look at in the next version.
The Report
Research is not an exact science, and there is bias in all facets of research.
When you present your report, be sure to start with two questions in mind
(Kuniavsky, 2003):
•
What are the data collection problems?
You should acknowledge the
problems with the data collection up front so no one in your audience
points out a fundamental flaw in collecting data that could doom your
effort.
•
What are the limitations of the analysis?
This book has discussed some
of these limitations. You should explain why you decided on the sub-
sets of data to analyze.
By addressing these questions first, you can minimize any issues and not only
help the data become clearer, but also lend weight to your arguments.
The type of report you create depends greatly on the audience. You may be
presenting to one or more groups within your company, so your report lan-
guage needs to be tailored for one or more of these audiences (Dumas and
Redish, 1999):
•
Engine
eers
—Engineers are problem solvers, so your report and recom-
mendations need to focus on solutions.
•
Virtual d
esigners
—Virtual designers are problem solvers, too,so design-
ers are also most interested in solutions.
Usability 243
•
Marketing
—The report should focus on reasons behind people’s
choices and the mental model of the users.
•
Upper management
—The expectations of managers vary, so you should
know the agendas of the managers involved in the review and approval
of the report. You may also want to contact the managers directly to
briefly discuss what’s important to them.
In addition, you should determine what format these audiences expect. You
may need only a Word file attached to an email message and send the message
to the appropriate people, or you may give your presentation at an executive
board meeting and therefore need a printed paper report to present to board
members. If you want to ensure that your format is acceptable, send a draft to
the intended recipient(s) and get feedback.
After you have established the formats, you need to categorize the report’s
information in the most effective manner for your audience. You may also
want to produce several versions of the report depending on your audience
(Dumas and Redish, 1999). For example:
• The abridged report contains only need-to-know information that’s
time critical. You may want to send this via email so that this informa-
tion is available immediately.
• The general report contains all the need-to-know information plus the
should-know information that’s available to everyone.
• The complete report contains need-to-know, should-know, and nice-to-
know information so that everyone is aware of not only what needs to
be done, but also some of the subtle feedback you received that your
project team may want to implement (as part of the nice-to-know infor-
mation).
Write your report in newspaper style—that is, structured like a newspaper
story where the first sentence contains the most important fact, and the least
important information is saved for last (Dumas and Redish, 1999). Break out
the report into several sections or chapters,such as these:
• Procedures
• Evaluator profiles
244 Chapter 9
• Observations
• Evaluator quotes
• Conclusions
• Recommendations
Begin the report with an executive summary that summarizes the informa-
tion in the report on one page so people who don’t want to read the report
can get a broad idea of what’s in the report and what your recommendations
are.
The Presentation
When you get ready to give your presentation, adhere to the following guide-
lines for making that presentation successful (Dumas and Redish, 1999):
• Prepare your audience so they’re in a mindset that helps them under-
stand the information they’re about to receive.
• Pick your points carefully. In formal presentations, you don’t have
unlimited time to make all your points, so make sure the must-know
topics are covered.
• Use real examples to make your points. You may want to use video
clips if you videotaped the usability test, or use participant names and
quotations.
• Emphasize the user market’s perspective when you present the results
so that you illustrate the differences between the users’ ideas and the
project team’s ideas.
• Use terminology sparingly, and only after you define the term,to pre-
vent confusion in your audience.
• Use numbers carefully. Make sure presentation of numbers is backed up
by hard data, because people see numbers as an absolute representa-
tion of an idea.
• Leave one-third of your time for questions.
After you set up your presentation, practice. It’s best if you can practice in
front of someone else, especially someone who is similar to your audience
members.
Usability 245
Preparing a Highlight Presentation
You may not be able to give a formal presentation. What’s more, some people
may never read the report because they’re too busy. The development of mul-
timedia technologies has made it easy not only to create a video presentation,
but also to publish that information in a streaming video file that you can
attach to an email message or post on the company intranet. For example,
when I worked as a contractor at Hewlett-Packard (HP), I created streaming
audio and video files using software that was available for $50, which was
within the manager’s discretionary budget for his department. The manager
liked the production so much that we placed the file on our group page
within the HP intranet.
There are advantages and drawback to making a highlight tape or streaming
video file (Dumas and Redish, 1999):
• The tape or file will provide viewers with all the data they will need
about the test. However, you will have only 20 to 30 minutes to make
your presentation, so viewers won’t be able to see all the exceptions
and caveats in the report. Viewers also won’t be able to ask questions
in real time, although you could invite them to contact you via phone
or email.
• Pictures and sound convey to people images that are more vivid and
longer lasting than what they read in a report. Even so, your audience
expects to see fast, snappy video pieces and may become bored quickly
by a video highlight presentation.
• The video presentation may be your only way to present your report to
important stakeholders. Yet there is no guarantee that people who have
access to your highlight presentation will see it, in contrast to the cap-
tive audience you would have in a formal presentation.
When you create your video, write down your plans using the following cri-
teria:
•
Scope
—Illustrate the most pressing problems and the most important
recommendations for improving the current design. Keep it brief so
you don’t dilute your message.
•
Objective
—Determine your objective for the video.
•
Audiences
—Who is the audience for the video?
246 Chapter 9
•
What they will do with the information
—What do you want the audi-
ence to do with the information presented in the video?
•
Constraints
—How long will the video be, what needs to be added into
the tape, and what are the deadlines?
Note that you may also need to buy hardware and software to produce your
video,which could be another impediment. If you already took videos of your
usability test and you have the video equipment to produce video and audio
recordings of yourself or another person as the narrator,chances are that your
company has the hardware and software you need to produce the video.
Changing the Product and Process
After you’ve imparted your information to the project team, how do you turn
that information into action so you can improve the usability of your product
and the process? You can be most helpful to managers, developers, and other
stakeholders—especially those who are resistant to change—by keeping
three things in mind (Dumas and Redish, 1999):
• Keep open communication throughout the project. Work with all stake-
holders from the beginning. If you’re open and up front with them,
they’ll be more likely to come on board.
• Help your stakeholders organize the required changes. By structuring
the problem and recommendations in a way that’s easy to find and use
in the report, you will go a long way toward convincing stakeholders to
implement the changes.
• Be realistic in your recommendations for changes. Time and money
constraints may require you to negotiate ways to fix the problem. How-
ever, don’t settle for the word can’t when you hear it—keep making
the business case, and let people know what will happen if the changes
aren’t made.
These three guidelines also hold true for changing processes, because usabil-
ity testing can well expose process defects that are leading to usability prob-
lems in your test(s). If you find that you need to change processes, your role
goes beyond just testing the product—you’re now a change agent for the
entire organization. And when you change the processes for the company,
you’re helping not only to improve usability for one product, but for all future
products that the company produces.
Usability 247
Case Study: Implementing the Paper Prototype Test
You’ve interviewed your testers and reviewed the existing applications. Now
it’s time to create the draft of the paper prototype test, place the materials in
the binder, and then have Evan conduct the pilot test.
In this pilot test, Evan will give the test to you, one observer, and one note
taker as he will give it to the testers in the actual test. The remaining
observers and note takers you hired will be observing the pilot test and will
provide feedback about that pilot test in the debriefing session immediately
following the test.
The pilot test is originally scheduled to run for 65 minutes with a 10-minute
introduction at the beginning of the test, which includes an introduction of
the primary persona and a 10-minute question and answer session afterward.
Based on the information you have gathered, you have come up with nine
tasks for the project team to test:
• Searching for a product or customer using the Search box
• Viewing the product or customer information in the appropriate page
• Navigating to another page from the Product/Customer Information
page
• Displaying parts supply information in the Product Availability page
• Accessing help from the Product Availability page
• Viewing part unavailability alerts in the Parts Maintenance page
• Viewing defective part alerts in the Parts Maintenance page
• Opening the parts supplier Web site from the application
• Calling the parts supplier from the application through the user’s VoIP
phone
Each task will take no more than 5 minutes, so this will leave 45 minutes for
the remainder of the test. Evan has the test binder ready (including the task
sheets) as you and the other two pilot testers sit around a round table to take
the test. The observers are Ann and Sam, and the note takers are Debbie, Jim,
and Robyn. Ann and Jim took part in the pilot test as the testers.
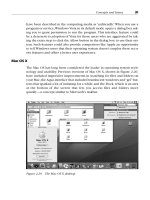
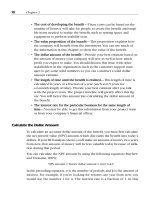
The note takers and observers will be in corners of the room and out of the
way of Evan and the other testers (see Figure 9.1).
248 Chapter 9
When the test starts, Evan shows the primary persona based on user feedback
so the testers know where the paper prototype options are coming from. He
then gives some brief instructions for the test:
• Testers must show, not tell.
• Evan clarifies that it’s okay to write on the prototype, but writing
replaces typing, not clicking.
• Evan is the computer. To make sure the computer is behaving properly,
bring on 2–3 college interns as note takers/observers. Have them
observe and take notes about the interactions between the user and the
computer (Evan). These notes will be part of the debriefing process
that you, Evan, and the note takers and testers will go through after the
test.
• If there is an unanticipated user action, Evan will note it or even mock
up a new screen on a piece of paper quickly to reflect it.
• If the paper prototype crashes, we’ll take a break.
Usability 249
Figure 9.1 Positioning of the “computer” and observers.
3 Pilot Testers
Ann
Robyn
Debbie
Jim
Sam
Evan