Beginning Android PHẦN 8 potx
Bạn đang xem bản rút gọn của tài liệu. Xem và tải ngay bản đầy đủ của tài liệu tại đây (1.25 MB, 38 trang )
244
CHAPTER 26
■ HANDLING ROTATION
The third possibility for handling rotations, therefore, is to tell Android that you will handle
them completely yourself and that you do not want assistance from the framework. To do this:
1. Put an android:configChanges entry in your AndroidManifest.xml file, listing the config-
uration changes you want to handle yourself versus allowing Android to handle for you.
2. Implement onConfigurationChanged() in your Activity, which will be called when one
of the configuration changes you listed in android:configChanges occurs.
Now, for any configuration change you want, you can bypass the whole activity-destruction
process and simply get a callback letting you know of the change.
To see this in action, turn to the Rotation/RotationThree sample application. Once again,
our layouts are the same, so the application looks the same as the preceding two samples.
However, the Java code is significantly different, because we are no longer concerned with
saving our state, but rather with updating our UI to deal with the layout.
But first, we need to make a small change to our manifest:
<?xml version="1.0" encoding="utf-8"?>
<manifest xmlns:android=" /> package="com.commonsware.android.rotation.three"
android:versionCode="1"
android:versionName="1.0.0">
<application android:label="@string/app_name">
<activity android:name=".RotationThreeDemo"
android:label="@string/app_name"
android:configChanges="keyboardHidden|orientation">
<intent-filter>
<action android:name="android.intent.action.MAIN" />
<category android:name="android.intent.category.LAUNCHER" />
</intent-filter>
</activity>
</application>
</manifest>
Here, we state that we will handle keyboardHidden and orientation configuration changes
ourselves. This covers us for any cause of the “rotation”—whether it is a sliding keyboard or a
physical rotation. Note that this is set on the activity, not the application—if you have several
activities, you will need to decide for each which of the tactics outlined in this chapter you wish
to use.
Murphy_2419-8C26.fm Page 244 Friday, April 24, 2009 9:13 AM
CHAPTER 26 ■ HANDLING ROTATION
245
The Java code for this project follows:
public class RotationThreeDemo extends Activity {
static final int PICK_REQUEST=1337;
Button viewButton=null;
Uri contact=null;
@Override
public void onCreate(Bundle savedInstanceState) {
super.onCreate(savedInstanceState);
setupViews();
}
@Override
protected void onActivityResult(int requestCode, int resultCode,
Intent data) {
if (requestCode==PICK_REQUEST) {
if (resultCode==RESULT_OK) {
contact=data.getData();
viewButton.setEnabled(true);
}
}
}
public void onConfigurationChanged(Configuration newConfig) {
super.onConfigurationChanged(newConfig);
setupViews();
}
private void setupViews() {
setContentView(R.layout.main);
Button btn=(Button)findViewById(R.id.pick);
btn.setOnClickListener(new View.OnClickListener() {
public void onClick(View view) {
Intent i=new Intent(Intent.ACTION_PICK,
Uri.parse("content://contacts/people"));
Murphy_2419-8C26.fm Page 245 Friday, April 24, 2009 9:13 AM
246
CHAPTER 26
■ HANDLING ROTATION
startActivityForResult(i, PICK_REQUEST);
}
});
viewButton=(Button)findViewById(R.id.view);
viewButton.setOnClickListener(new View.OnClickListener() {
public void onClick(View view) {
startActivity(new Intent(Intent.ACTION_VIEW, contact));
}
});
viewButton.setEnabled(contact!=null);
}
}
The onCreate() implementation delegates most of its logic to a setupViews() method,
which loads the layout and sets up the buttons. The reason this logic was broken out into its
own method is because it is also called from onConfigurationChanged().
Forcing the Issue
In the previous three sections, we covered ways to deal with rotational events. There is, of course,
a radical alternative: tell Android not to rotate your activity at all. If the activity does not rotate,
you do not have to worry about writing code to deal with rotations.
To block Android from rotating your activity, all you need to do is add android:
screenOrientation = "portrait" (or "landscape", as you prefer) to your AndroidManifest.xml
file, as shown (from the Rotation/RotationFour sample project):
<?xml version="1.0" encoding="utf-8"?>
<manifest xmlns:android=" /> package="com.commonsware.android.rotation.four"
android:versionCode="1"
android:versionName="1.0.0">
<application android:label="@string/app_name">
<activity android:name=".RotationFourDemo"
android:screenOrientation="portrait"
android:label="@string/app_name">
<intent-filter>
<action android:name="android.intent.action.MAIN" />
<category android:name="android.intent.category.LAUNCHER" />
</intent-filter>
</activity>
</application>
</manifest>
Murphy_2419-8C26.fm Page 246 Friday, April 24, 2009 9:13 AM
CHAPTER 26 ■ HANDLING ROTATION
247
Since this is applied on a per-activity basis, you will need to decide which of your activities
may need this turned on.
At this point, your activity is locked into whatever orientation you specified, regardless of
what you do. The following screen shots show the same activity as in the previous three sections,
but using the previous manifest and with the emulator set for both portrait and landscape
orientation. Note that the UI does not move a bit, but remains in portrait mode as can be seen
in Figures 26-3 and 26-4.
Figure 26-3. The RotationFour application, in portrait mode
Murphy_2419-8C26.fm Page 247 Friday, April 24, 2009 9:13 AM
248
CHAPTER 26
■ HANDLING ROTATION
Figure 26-4. The RotationFour application, in landscape mode
Making Sense of it All
All of these scenarios assume that you rotate the screen by opening up the keyboard on the
device (or pressing <Ctrl>-<F12> in the emulator). Certainly, this is the norm for Android
applications.
However, we haven’t covered the iPhone Scenario.
You may have seen one (or several) commercials for the iPhone, showing how the screen
rotates just by turning the device. By default, you do not get this behavior with the T-Mobile G1—
instead, the screen rotates based on whether the keyboard is open or closed.
However, it is very easy for you to change this behavior, so your screen will rotate based on the
position of the phone: just add android:screenOrientation = "sensor" to your AndroidManifest.
xml file (as seen in the Rotation/RotationFive sample project):
<?xml version="1.0" encoding="utf-8"?>
<manifest xmlns:android=" /> package="com.commonsware.android.rotation.five"
android:versionCode="1"
android:versionName="1.0.0">
Murphy_2419-8C26.fm Page 248 Friday, April 24, 2009 9:13 AM
CHAPTER 26 ■ HANDLING ROTATION
249
<application android:label="@string/app_name">
<activity android:name=".RotationFiveDemo"
android:screenOrientation="sensor"
android:label="@string/app_name">
<intent-filter>
<action android:name="android.intent.action.MAIN" />
<category android:name="android.intent.category.LAUNCHER" />
</intent-filter>
</activity>
</application>
</manifest>
The “sensor”, in this case, tells Android you want the accelerometers to control the screen
orientation, so the physical shift in the device orientation controls the screen orientation.
At least on the G1, this appears to only work when going from the traditional upright portrait
position to the traditional landscape position—rotating 90 degrees counter-clockwise. Rotating
the device 90 degrees clockwise results in no change in the screen.
Also note that this setting disables having the keyboard trigger a rotation event. Leaving
the device in the portrait position, if you slide out the keyboard, in a “normal” Android activity,
the screen will rotate; in a android:screenOrientation = "sensor" activity, the screen will
not rotate.
Murphy_2419-8C26.fm Page 249 Friday, April 24, 2009 9:13 AM
Murphy_2419-8C26.fm Page 250 Friday, April 24, 2009 9:13 AM
■ ■ ■
PART 5
Content Providers
and Services
Murphy_2419-8C27.fm Page 251 Tuesday, May 5, 2009 11:31 AM
Murphy_2419-8C27.fm Page 252 Tuesday, May 5, 2009 11:31 AM
253
■ ■ ■
CHAPTER 27
Using a Content Provider
Any Uri in Android that begins with the content:// scheme represents a resource served
up by a content provider. Content providers offer data encapsulation using Uri instances as
handles—you neither know nor care where the data represented by the Uri comes from, so
long as it is available to you when needed. The data could be stored in a SQLite database, or in
flat files, or retrieved off a device, or be stored on some far-off server accessed over the Internet.
Given a Uri, you can perform basic CRUD (create, read, update, delete) operations using a
content provider. Uri instances can represent either collections or individual pieces of content.
Given a collection Uri, you can create new pieces of content via insert operations. Given an
instance Uri, you can read data represented by the Uri, update that data, or delete the instance
outright.
Android lets you use existing content providers or create your own. This chapter covers
using content providers; Chapter 28 will explain how you can serve up your own data using the
content provider framework.
Pieces of Me
The simplified model of the construction of a content Uri is the scheme, the namespace of
data, and, optionally, the instance identifier, all separated by slashes in URL-style notation.
The scheme of a content Uri is always content://.
So, a content Uri of content://constants/5 represents the constants instance with an
identifier of 5.
The combination of the scheme and the namespace is known as the “base Uri” of a
content provider, or a set of data supported by a content provider. In the previous example,
content://constants is the base Uri for a content provider that serves up information about
“constants” (in this case, physical constants).
The base Uri can be more complicated. For example, the base Uri for contacts is content://
contacts/people, as the contacts content provider may serve up other data using other base
Uri values.
The base Uri represents a collection of instances. The base Uri combined with an instance
identifier (e.g., 5) represents a single instance.
Most of the Android APIs expect these to be Uri objects, though in common discussion, it
is simpler to think of them as strings. The Uri.parse() static method creates a Uri out of the
string representation.
Murphy_2419-8C27.fm Page 253 Tuesday, May 5, 2009 11:31 AM
254
CHAPTER 27
■ USING A CONTENT PROVIDER
Getting a Handle
Where do these Uri instances come from?
The most popular starting point, if you know the type of data you want to work with, is to
get the base Uri from the content provider itself in code. For example, CONTENT_URI is the base
Uri for contacts represented as people—this maps to content://contacts/people. If you just
need the collection, this Uri works as is; if you need an instance and know its identifier, you can
call addId() on the Uri to inject it, so you have a Uri for the instance.
You might also get Uri instances handed to you from other sources, such as getting Uri
handles for contacts via sub-activities responding to ACTION_PICK intents. In this case, the Uri
is truly an opaque handle . . . unless you decide to pick it apart using the various getters on the
Uri class.
You can also hard-wire literal String objects and convert them into Uri instances via
Uri.parse(). For example, in Chapter 25, the sample code used an EditText with content://
contacts/people pre-filled in. This isn’t an ideal solution, as the base Uri values could conceivably
change over time.
Making Queries
Given a base Uri, you can run a query to return data out of the content provider related to that
Uri. This has much of the feel of SQL: you specify the “columns” to return, the constraints to
determine which “rows” to return, a sort order, etc. The difference is that this request is being
made of a content provider, not directly of some database (e.g., SQLite).
The nexus of this is the managedQuery() method available to your activity. This method
takes five parameters:
1. The base Uri of the content provider to query, or the instance Uri of a specific object to
query
2. An array of properties of instances from that content provider that you want returned
by the query
3. A constraint statement, functioning like a SQL WHERE clause
4. An optional set of parameters to bind into the constraint clause, replacing any ?s that
appear there
5. An optional sort statement, functioning like a SQL ORDER BY clause
This method returns a Cursor object, which you can use to retrieve the data returned by
the query.
“Properties” is to content providers as columns are to databases. In other words, each
instance (row) returned by a query consists of a set of properties (columns), each representing
some piece of data.
This will hopefully make more sense given an example.
Murphy_2419-8C27.fm Page 254 Tuesday, May 5, 2009 11:31 AM
CHAPTER 27 ■ USING A CONTENT PROVIDER
255
Our content provider examples come from the ContentProvider/Constants sample appli-
cation, specifically the ConstantsBrowser class:
constantsCursor=managedQuery(Provider.Constants.CONTENT_URI,
PROJECTION, null, null, null);
In the call to managedQuery(), we provide:
•The Uri passed into the activity by the caller (CONTENT_URI), in this case representing the
collection of physical constants managed by the content provider
• A list of properties to retrieve (see the following code)
• Three null values, indicating that we do not need a constraint clause (the Uri represents
the instance we need), nor parameters for the constraint, nor a sort order (we should
only get one entry back)
private static final String[] PROJECTION = new String[] {
Provider.Constants._ID, Provider.Constants.TITLE,
Provider.Constants.VALUE};
The biggest “magic” here is the list of properties. The lineup of what properties are possible
for a given content provider should be provided by the documentation (or source code) for the
content provider itself. In this case, we define logical values on the Provider content provider
implementation class that represent the various properties (namely, the unique identifier, the
display name or title, and the value of the constant).
Adapting to the Circumstances
Now that we have a Cursor via managedQuery(), we have access to the query results and can do
whatever we want with them. You might, for example, manually extract data from the Cursor to
populate widgets or other objects.
However, if the goal of the query was to return a list from which the user should choose
an item, you probably should consider using SimpleCursorAdapter. This class bridges between
the Cursor and a selection widget, such as a ListView or Spinner. Pour the Cursor into a
SimpleCursorAdapter, hand the adapter off to the widget, and you’re set—your widget will
show the available options.
For example, here is the onCreate() method from ConstantsBrowser, which gives the user
a list of physical constants:
@Override
public void onCreate(Bundle savedInstanceState) {
super.onCreate(savedInstanceState);
constantsCursor=managedQuery(Provider.Constants.CONTENT_URI,
PROJECTION, null, null, null);
Murphy_2419-8C27.fm Page 255 Tuesday, May 5, 2009 11:31 AM
256
CHAPTER 27
■ USING A CONTENT PROVIDER
ListAdapter adapter=new SimpleCursorAdapter(this,
R.layout.row, constantsCursor,
new String[] {Provider.Constants.TITLE,
Provider.Constants.VALUE},
new int[] {R.id.title, R.id.value});
setListAdapter(adapter);
registerForContextMenu(getListView());
}
After executing the managedQuery() and getting the Cursor, ConstantsBrowser creates a
SimpleCursorAdapter with the following parameters:
• The activity (or other Context) creating the adapter; in this case, the ConstantsBrowser
itself
• The identifier for a layout to be used for rendering the list entries (R.layout.row)
•The cursor (constantsCursor)
• The properties to pull out of the cursor and use for configuring the list entry View
instances (TITLE and VALUE)
• The corresponding identifiers of TextView widgets in the list entry layout that those
properties should go into (R.id.title and R.id.value)
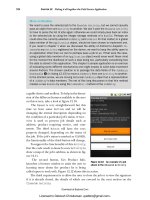
After that, we put the adapter into the ListView, and we get the results shown in Figure 27-1.
Figure 27-1. ConstantsBrowser, showing a list of physical constants
Murphy_2419-8C27.fm Page 256 Tuesday, May 5, 2009 11:31 AM
CHAPTER 27 ■ USING A CONTENT PROVIDER
257
If you need more control over the views than you can reasonably achieve with the stock
view construction logic, subclass SimpleCursorAdapter and override getView() to create your
own widgets to go into the list, as demonstrated in Chapter 9.
Doing It By Hand
Of course, you can always do it the “hard way”—pulling data out of the Cursor by hand. The
Cursor interface is similar in concept to other database access APIs offering cursors as objects,
though, as always, the devil is in the details.
Position
Cursor instances have a built-in notion of position, akin to the Java Iterator interface. To get
to the various rows, you can use:
• moveToFirst() to move to the first row in the result set or moveToLast() to move to the
last row in the result set
• moveToNext() to move to the next row and determine if there is yet another row to process
(moveToNext() returns true if it points to another row after moving, false otherwise)
• moveToPrevious() to move to the previous row, as the opposite to moveToNext()
• moveToPosition() to move to a specific index, or move() to move to a relative position
plus or minus from your current position
• getPosition() to return your current index
• a whole host of condition methods, including isFirst(), isLast(), isBeforeFirst(),
and isAfterLast()
Getting Properties
Once you have the Cursor positioned at a row of interest, you have a variety of methods
to retrieve properties from that row, with different methods supporting different types
(getString(), getInt(), getFloat(), etc.). Each method takes the zero-based index of the prop-
erty you want to retrieve.
If you want to see if a given property has a value, you can use isNull() to test it for null-ness.
Give and Take
Of course, content providers would be astonishingly weak if you couldn’t add or remove data
from them, only update what is there. Fortunately, content providers offer these abilities as well.
To insert data into a content provider, you have two options available on the ContentProvider
interface (available through getContentProvider() to your activity):
•Use insert() with a collection Uri and a ContentValues structure describing the initial
set of data to put in the row
•Use bulkInsert() with a collection Uri and an array of ContentValues structures to
populate several rows at once
Murphy_2419-8C27.fm Page 257 Tuesday, May 5, 2009 11:31 AM
258
CHAPTER 27
■ USING A CONTENT PROVIDER
The insert() method returns a Uri for you to use for future operations on that new object.
The bulkInsert() method returns the number of created rows; you would need to do a query
to get back at the data you just inserted.
For example, here is a snippet of code from ConstantsBrowser to insert a new constant into
the content provider, given a DialogWrapper that can provide access to the title and value of the
constant:
private void processAdd(DialogWrapper wrapper) {
ContentValues values=new ContentValues(2);
values.put(Provider.Constants.TITLE, wrapper.getTitle());
values.put(Provider.Constants.VALUE, wrapper.getValue());
getContentResolver().insert(Provider.Constants.CONTENT_URI,
values);
constantsCursor.requery();
}
Since we already have an outstanding Cursor for the content provider’s contents, we call
requery() on that to update the Cursor’s contents. This, in turn, will update any
SimpleCursorAdapter you may have wrapping the Cursor—and that will update any selection
widgets (e.g., ListView) you have using the adapter.
To delete one or more rows from the content provider, use the delete() method on
ContentResolver. This works akin to a SQL DELETE statement and takes three parameters:
1. A Uri representing the collection (or instance) you wish to update
2. A constraint statement, functioning like a SQL WHERE clause, to determine which rows
should be updated
3. An optional set of parameters to bind into the constraint clause, replacing any ?s that
appear there
Beware of the BLOB!
Binary large objects—BLOBs—are supported in many databases, including SQLite. However,
the Android model is more aimed at supporting such hunks of data via their own separate
content Uri values. A content provider, therefore, does not provide direct access to binary data,
like photos, via a Cursor. Rather, a property in the content provider will give you the content
Uri for that particular BLOB. You can use getInputStream() and getOutputStream() on your
ContentProvider to read and write the binary data.
Quite possibly, the rationale is to minimize unnecessary data copying. For example, the
primary use of a photo in Android is to display it to the user. The ImageView widget can do just
that, via a content Uri to a JPEG. By storing the photo in a manner that has its own Uri, you do
not need to copy data out of the content provider into some temporary holding area just to be
able to display it—just use the Uri. The expectation, presumably, is that few Android applications
will do much more than upload binary data and use widgets or built-in activities to display
that data.
Murphy_2419-8C27.fm Page 258 Tuesday, May 5, 2009 11:31 AM
259
■ ■ ■
CHAPTER 28
Building a Content Provider
Building a content provider is probably the most complicated and tedious task in all of Android
development. There are many requirements of a content provider, in terms of methods to
implement and public data members to supply. And, until you try using it, you have no great
way of telling if you did any of it correctly (versus, say, building an activity and getting valida-
tion errors from the resource compiler).
That being said, building a content provider is of huge importance if your application
wishes to make data available to other applications. If your application is keeping its data
solely to itself, you may be able to avoid creating a content provider, just accessing the data
directly from your activities. But if you want your data to possibly be used by others—for example,
if you are building a feed reader and you want other programs to be able to access the feeds you
are downloading and caching—then a content provider is right for you.
First, Some Dissection
As was discussed in the previous chapter, the content Uri is the linchpin behind accessing data
inside a content provider. When using a content provider, all you really need to know is the
provider’s base Uri; from there you can run queries as needed or construct a Uri to a specific
instance if you know the instance identifier.
When building a content provider, though, you need to know a bit more about the innards
of the content Uri.
A content Uri has two to four pieces, depending on the situation:
• It always has a scheme (content://), indicating it is a content Uri instead of a Uri to a
Web resource (http://).
• It always has an authority, which is the first path segment after the scheme. The authority is
a unique string identifying the content provider that handles the content associated with
this Uri.
• It may have a data type path, which is the list of path segments after the authority and
before the instance identifier (if any). The data type path can be empty if the content
provider handles only one type of content. It can be a single path segment (foo) or a
chain of path segments (foo/bar/goo) as needed to handle whatever data-access scenarios
the content provider requires.
• It may have an instance identifier, which is an integer identifying a specific piece of
content. A content Uri without an instance identifier refers to the collection of content
represented by the authority (and, where provided, the data path).
Murphy_2419-8C28.fm Page 259 Tuesday, May 5, 2009 10:58 AM
260
CHAPTER 28
■ BUILDING A CONTENT PROVIDER
For example, a content Uri could be as simple as content://sekrits, which would refer to
the collection of content held by whatever content provider was tied to the sekrits authority
(e.g., SecretsProvider). Or, it could be as complex as content://sekrits/card/pin/17, which
would refer to a piece of content (identified as 17) managed by the sekrits content provider
that is of the data type card/pin.
Next, Some Typing
Next you need to come up with some MIME types corresponding with the content from your
content provider.
Android uses both the content Uri and the MIME type as ways to identify content on the
device. A collection content Uri—or, more accurately, the combination authority and data type
path—should map to a pair of MIME types. One MIME type will represent the collection; the
other will represent an instance. These map to the Uri patterns discussed in the previous section
for no-identifier and identifier cases, respectively. As you saw in Chapters 24 and 25, you can
fill a MIME type into an Intent to route the Intent to the proper activity (e.g., ACTION_PICK on a
collection MIME type to call up a selection activity to pick an instance out of that collection).
The collection MIME type should be of the form vnd.X.cursor.dir/Y, where X is the name
of your firm, organization, or project, and Y is a dot-delimited type name. So, for example, you
might use vnd.tlagency.cursor.dir/sekrits.card.pin as the MIME type for your collection of
secrets.
The instance MIME type should be of the form vnd.X.cursor.item/Y, usually for the same
values of X and Y as you used for the collection MIME type (though that is not strictly required).
Step #1: Create a Provider Class
Just as an activity and intent receiver are both Java classes, so is a content provider. So, the big
step in creating a content provider is crafting its Java class, with a base class of ContentProvider.
In your subclass of ContentProvider, you are responsible for implementing six methods
that, when combined, perform the services that a content provider is supposed to offer to activities
wishing to create, read, update, or delete content.
onCreate()
As with an activity, the main entry point to a content provider is onCreate(). Here you can do
whatever initialization you want. In particular, here is where you should lazy-initialize your
data store. For example, if you plan on storing your data in such-and-so directory on an SD
card, with an XML file serving as a “table of contents,” you should check if that directory and
XML file are there and, if not, create them so the rest of your content provider knows they are
out there and available for use.
Similarly, if you have rewritten your content provider sufficiently to cause the data store to
shift structure, you should check to see what structure you have now and adjust it if what you
have is out-of-date. You don’t write your own “installer” program and so have no great way of
determining if, when onCreate() is called, this is the first time ever for the content provider, the first
time for a new release of a content provider that was upgraded in place, or just a normal startup.
Murphy_2419-8C28.fm Page 260 Tuesday, May 5, 2009 10:58 AM
CHAPTER 28 ■ BUILDING A CONTENT PROVIDER
261
If your content provider uses SQLite for storage, you can detect if your tables exist by
querying on the sqlite_master table. This is useful for lazy-creating a table your content provider
will need.
For example, here is the onCreate() method for Provider, from the ContentProvider/
Constants sample application available in the Source Code section of :
@Override
public boolean onCreate() {
db=(new DatabaseHelper(getContext())).getWritableDatabase();
return (db == null) ? false : true;
}
While that doesn’t seem all that special, the “magic” is in the private DatabaseHelper
object, described in the chapter on database access.
query()
As one might expect, the query() method is where your content provider gets details on a query
some activity wants to perform. It is up to you to actually process said query.
The query method gets the following as parameters:
•A Uri representing the collection or instance being queried
•A String[] representing the list of properties that should be returned
•A String representing what amounts to a SQL WHERE clause, constraining which
instances should be considered for the query results
•A String[] representing values to “pour into” the WHERE clause, replacing any ? found there
•A String representing what amounts to a SQL ORDER BY clause
You are responsible for interpreting these parameters however they make sense and returning
a Cursor that can be used to iterate over and access the data.
As you can imagine, these parameters are aimed toward people using a SQLite database
for storage. You are welcome to ignore some of these parameters (e.g., you can elect not to try
to roll your own SQL WHERE-clause parser), but you need to document that fact so activities
attempt to query you only by instance Uri and not using parameters you elect not to handle.
For SQLite-backed storage providers, however, the query() method implementation should
be largely boilerplate. Use a SQLiteQueryBuilder to convert the various parameters into a single
SQL statement, then use query() on the builder to actually invoke the query and give you a
Cursor back. The Cursor is what your query() method then returns.
For example, here is query() from Provider:
@Override
public Cursor query(Uri url, String[] projection, String selection,
String[] selectionArgs, String sort) {
SQLiteQueryBuilder qb=new SQLiteQueryBuilder();
qb.setTables(getTableName());
Murphy_2419-8C28.fm Page 261 Tuesday, May 5, 2009 10:58 AM
262
CHAPTER 28
■ BUILDING A CONTENT PROVIDER
if (isCollectionUri(url)) {
qb.setProjectionMap(getDefaultProjection());
}
else {
qb.appendWhere(getIdColumnName()+"="+url.getPathSegments().get(1));
}
String orderBy;
if (TextUtils.isEmpty(sort)) {
orderBy=getDefaultSortOrder();
} else {
orderBy=sort;
}
Cursor c=qb.query(db, projection, selection, selectionArgs,
null, null, orderBy);
c.setNotificationUri(getContext().getContentResolver(), url);
return c;
}
We create a SQLiteQueryBuilder and pour the query details into the builder. Note that the
query could be based on either a collection or an instance Uri—in the latter case, we need to
add the instance ID to the query. When done, we use the query() method on the builder to get
a Cursor for the results.
insert()
Your insert() method will receive a Uri representing the collection and a ContentValues structure
with the initial data for the new instance. You are responsible for creating the new instance,
filling in the supplied data, and returning a Uri to the new instance.
If this is a SQLite-backed content provider, once again, the implementation is mostly boil-
erplate: validate that all required values were supplied by the activity, merge your own notion
of default values with the supplied data, and call insert() on the database to actually create
the instance.
For example, here is insert() from Provider:
@Override
public Uri insert(Uri url, ContentValues initialValues) {
long rowID;
ContentValues values;
if (initialValues!=null) {
values=new ContentValues(initialValues);
} else {
values=new ContentValues();
}
Murphy_2419-8C28.fm Page 262 Tuesday, May 5, 2009 10:58 AM
CHAPTER 28 ■ BUILDING A CONTENT PROVIDER
263
if (!isCollectionUri(url)) {
throw new IllegalArgumentException("Unknown URL " + url);
}
for (String colName : getRequiredColumns()) {
if (values.containsKey(colName) == false) {
throw new IllegalArgumentException("Missing column: "+colName);
}
}
populateDefaultValues(values);
rowID=db.insert(getTableName(), getNullColumnHack(), values);
if (rowID > 0) {
Uri uri=ContentUris.withAppendedId(getContentUri(), rowID);
getContext().getContentResolver().notifyChange(uri, null);
return uri;
}
throw new SQLException("Failed to insert row into " + url);
}
The pattern is the same as before: use the provider particulars plus the data to be inserted
to actually do the insertion. Please note the following:
• You can insert only into a collection Uri, so we validate that by calling isCollectionUri().
• The provider knows what columns are required (getRequiredColumns()), so we iterate
over those and confirm our supplied values cover the requirements.
• The provider is responsible for filling in any default values (populateDefaultValues())
for columns not supplied in the insert() call and not automatically handled by the SQLite
table definition.
update()
Your update() method gets the Uri of the instance or collection to change, a ContentValues
structure with the new values to apply, a String for a SQL WHERE clause, and a String[] with
parameters to use to replace ? found in the WHERE clause. Your responsibility is to identify the
instance(s) to be modified (based on the Uri and WHERE clause), then replace those instances’
current property values with the ones supplied.
This will be annoying unless you’re using SQLite for storage. Then you can pretty much
pass all the parameters you received to the update() call to the database, though the update()
call will vary slightly depending on whether you are updating one instance or several.
For example, here is update() from Provider:
Murphy_2419-8C28.fm Page 263 Tuesday, May 5, 2009 10:58 AM
264
CHAPTER 28
■ BUILDING A CONTENT PROVIDER
@Override
public int update(Uri url, ContentValues values, String where, String[] whereArgs) {
int count;
if (isCollectionUri(url)) {
count=db.update(getTableName(), values, where, whereArgs);
}
else {
String segment=url.getPathSegments().get(1);
count=db
.update(getTableName(), values, getIdColumnName()+"="
+ segment
+ (!TextUtils.isEmpty(where) ? " AND (" + where
+ ')' : ""), whereArgs);
}
getContext().getContentResolver().notifyChange(url, null);
return count;
}
In this case, updates can either be to a specific instance or applied across the entire collec-
tion, so we check the Uri (isCollectionUri()) and, if it is an update for the collection, just
perform the update. If we are updating a single instance, we need to add a constraint to the
WHERE clause to only update for the requested row.
delete()
Like update(), delete() receives a Uri representing the instance or collection to work with and
a WHERE clause and parameters. If the activity is deleting a single instance, the Uri should repre-
sent that instance and the WHERE clause may be null. But the activity might be requesting to
delete an open-ended set of instances, using the WHERE clause to constrain which ones to delete.
As with update(), though, this is simple if you are using SQLite for database storage (sense
a theme?). You can let it handle the idiosyncrasies of parsing and applying the WHERE clause—
all you have to do is call delete() on the database.
For example, here is delete() from Provider:
@Override
public int delete(Uri url, String where, String[] whereArgs) {
int count;
long rowId=0;
if (isCollectionUri(url)) {
count=db.delete(getTableName(), where, whereArgs);
}
Murphy_2419-8C28.fm Page 264 Tuesday, May 5, 2009 10:58 AM
CHAPTER 28 ■ BUILDING A CONTENT PROVIDER
265
else {
String segment=url.getPathSegments().get(1);
rowId=Long.parseLong(segment);
count=db
.delete(getTableName(), getIdColumnName()+"="
+ segment
+ (!TextUtils.isEmpty(where) ? " AND (" + where
+ ')' : ""), whereArgs);
}
getContext().getContentResolver().notifyChange(url, null);
return count;
}
This is almost a clone of the update() implementation described earlier in this chapter—
either delete a subset of the entire collection or delete a single instance (if it also satisfies the
supplied WHERE clause).
getType()
The last method you need to implement is getType(). This takes a Uri and returns the MIME
type associated with that Uri. The Uri could be a collection or an instance Uri; you need to
determine which was provided and return the corresponding MIME type.
For example, here is getType() from Provider:
@Override
public String getType(Uri url) {
if (isCollectionUri(url)) {
return(getCollectionType());
}
return(getSingleType());
}
As you can see, most of the logic delegates to private getCollectionType() and
getSingleType() methods:
private String getCollectionType() {
return("vnd.android.cursor.dir/vnd.commonsware.constant");
}
private String getSingleType() {
return("vnd.android.cursor.item/vnd.commonsware.constant");
}
Murphy_2419-8C28.fm Page 265 Tuesday, May 5, 2009 10:58 AM
266
CHAPTER 28
■ BUILDING A CONTENT PROVIDER
Step #2: Supply a Uri
You also need to add a public static member . . . somewhere, containing the Uri for each collection
your content provider supports. Typically this is a public static final Uri put on the content-
provider class itself:
public static final Uri CONTENT_URI=
Uri.parse("content://com.commonsware.android.tourit.Provider/tours");
You may wish to use the same namespace for the content Uri that you use for your Java
classes, to reduce the chance of collision with others.
Step #3: Declare the Properties
Remember those properties you referenced when you were using a content provider in the
previous chapter? Well, you need to have those too for your own content provider.
Specifically, you want a public static class implementing BaseColumns that contains your
property names, such as this example from Provider:
public static final class Constants implements BaseColumns {
public static final Uri CONTENT_URI
=Uri.parse("content://com.commonsware.android.constants.Provider/constants");
public static final String DEFAULT_SORT_ORDER="title";
public static final String TITLE="title";
public static final String VALUE="value";
}
If you are using SQLite as a data store, the values for the property name constants should
be the corresponding column name in the table, so you can just pass the projection (array of
properties) to SQLite on a query(), or pass the ContentValues on an insert() or update().
Note that nothing in here stipulates the types of the properties. They could be strings, inte-
gers, or whatever. The biggest limitation is what a Cursor can provide access to via its property
getters. The fact that there is nothing in code that enforces type safety means you should docu-
ment the property types well so people attempting to use your content provider know what
they can expect.
Step #4: Update the Manifest
The glue tying the content-provider implementation to the rest of your application resides in
your AndroidManifest.xml file. Simply add a <provider> element as a child of the <application>
element:
<provider
android:name=".Provider"
android:authorities="com.commonsware.android.tourit.Provider" />
The android:name property is the name of the content-provider class, with a leading dot to
indicate it is in the stock namespace for this application’s classes (just like you use with activities).
Murphy_2419-8C28.fm Page 266 Tuesday, May 5, 2009 10:58 AM
CHAPTER 28 ■ BUILDING A CONTENT PROVIDER
267
The android:authorities property should be a semicolon-delimited list of the authority
values supported by the content provider. Recall, from earlier in this chapter, that each content
Uri is made up of a scheme, an authority, a data type path, and an instance identifier. Each
authority from each CONTENT_URI value should be included in the android:authorities list.
Now when Android encounters a content Uri, it can sift through the providers registered
through manifests to find a matching authority. That tells Android which application and class
implements the content provider, and from there Android can bridge between the calling activity
and the content provider being called.
Notify-on-Change Support
An optional feature your content provider offers its clients is notify-on-change support. This
means that your content provider will let clients know if the data for a given content Uri changes.
For example, suppose you have created a content provider that retrieves RSS and Atom
feeds from the Internet based on the user’s feed subscriptions (via OPML, perhaps). The content
provider offers read-only access to the contents of the feeds, with an eye toward several appli-
cations on the phone using those feeds versus everyone implementing their own feed-poll-
fetch-and-cache system. You have also implemented a service that will get updates to those
feeds asynchronously, updating the underlying data store. Your content provider could alert
applications using the feeds that such-and-so feed was updated, so applications using that
specific feed could refresh and get the latest data.
On the content-provider side, to do this call notifyChange() on your ContentResolver
instance (available in your content provider via getContext().getContentResolver()). This
takes two parameters: the Uri of the piece of content that changed, and the ContentObserver
that initiated the change. In many cases, the latter will be null; a non-null value simply means
the observer that initiated the change will not be notified of its own changes.
On the content-consumer side, an activity can call registerContentObserver() on its
ContentResolver (via getContentResolver()). This ties a ContentObserver instance to a supplied
Uri—the observer will be notified whenever notifyChange() is called for that specific Uri. When
the consumer is done with the Uri, unregisterContentObserver() releases the connection.
Murphy_2419-8C28.fm Page 267 Tuesday, May 5, 2009 10:58 AM
Murphy_2419-8C28.fm Page 268 Tuesday, May 5, 2009 10:58 AM