Beginning Microsoft Visual C# 2008 PHẦN 10 ppt
Bạn đang xem bản rút gọn của tài liệu. Xem và tải ngay bản đầy đủ của tài liệu tại đây (1.76 MB, 132 trang )
Chapter 34: Windows Presentation Foundation
1179
Run this example and experiment with resizing content. Note that the further up the stacking order a
control is, the more priority is given to its space. By shrinking the window, the fifth
Border control can
quickly be completely obscured by controls further up the stacking order. Be careful when using
DockPanel control layout to avoid this, perhaps by setting minimum dimensions for the window.
Grid
Grid controls can have multiple rows and columns that you can use to lay out child controls. You have
used
Grid controls several times already in this chapter, but in all cases you used a Grid with a single
row and a single column. To add more rows and columns, you must use the
RowDefinitions and
ColumnDefinitions properties, which are collections of RowDefinition and ColumnDefinition
objects, respectively, and are specified using property element syntax:
< Grid >
< Grid.RowDefinitions >
< RowDefinition / >
< RowDefinition / >
< /Grid.RowDefinitions >
< Grid.ColumnDefinitions >
< ColumnDefinition / >
< ColumnDefinition / >
< /Grid.ColumnDefinitions >
< /Grid >
This code defines a Grid control with three rows and two columns. Note that no extra information is
required here; with this code, each row and column is dynamically resized automatically as the
Grid
control resizes. Each row will be a third of the height of the
Grid , and each column will be half the width.
You can display lines between cells in a
Grid by setting the Grid.ShowGridlines property to true .
You can control the resizing with
Width , Height , MinWidth , MaxWidth , MinHeight , and MaxHeight
properties. For example, setting the
Width property of a column ensures that the column stays at that
width. You can also set the
Width property of a column to * , which means “ fill the remaining space after
calculating the width of all other columns. ” This is actually the default. When you have multiple
columns with a
Width of * , then the remaining space is divided between them equally. The * value can
also be used with the
Height property of rows. The other possible value for Height and Width is Auto ,
which sizes the row or column according to its content. You can also use
GridSplitter controls to
enable users to customize the dimensions of rows and columns by clicking and dragging.
Child controls of a
Grid control can use the attached Grid.Column and Grid.Row properties to specify
what cell they are contained in. Both these properties default to 0, so if you omit them, then the child
control is placed in the top - left cell. Child controls can also use
Grid.ColumnSpan and Grid.RowSpan
to be positioned over multiple cells in a table, where the upper - left cell is specified by
Grid.Column and
Grid.Row .
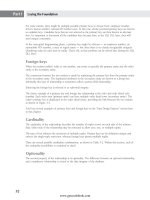
Figure 34 - 13 shows a
Grid control containing multiple ellipses and a GridSplitter with the window
resized to two sizes.
c34.indd 1179c34.indd 1179 3/25/08 12:37:09 PM3/25/08 12:37:09 PM
1180
Part V: Additional Techniques
The code used here is as follows:
< Grid Background=”AliceBlue” >
< Grid.ColumnDefinitions >
< ColumnDefinition MinWidth=”100” MaxWidth=”200” / >
< ColumnDefinition MaxWidth=”100” / >
< ColumnDefinition Width=”50” / >
< ColumnDefinition Width=”*” / >
< /Grid.ColumnDefinitions >
< Grid.RowDefinitions >
< RowDefinition Height=”50” / >
< RowDefinition MinHeight=”100” / >
< RowDefinition / >
< /Grid.RowDefinitions >
< Ellipse Grid.Row=”0” Grid.Column=”0” Fill=”BlanchedAlmond” Stroke=”Black” / >
< Ellipse Grid.Row=”0” Grid.Column=”1” Fill=”BurlyWood” Stroke=”Black” / >
< Ellipse Grid.Row=”0” Grid.Column=”2” Fill=”BlanchedAlmond” Stroke=”Black” / >
< Ellipse Grid.Row=”0” Grid.Column=”3” Fill=”BurlyWood” Stroke=”Black” / >
< Ellipse Grid.Row=”1” Grid.Column=”0” Fill=”BurlyWood” Stroke=”Black” / >
< Ellipse Grid.Row=”1” Grid.Column=”1” Fill=”BlanchedAlmond” Stroke=”Black” / >
< Ellipse Grid.Row=”1” Grid.Column=”2” Fill=”BurlyWood” Stroke=”Black” / >
< Ellipse Grid.Row=”1” Grid.Column=”3” Fill=”BlanchedAlmond” Stroke=”Black” / >
< Ellipse Grid.Row=”2” Grid.Column=”0” Fill=”BlanchedAlmond” Stroke=”Black” / >
< Ellipse Grid.Row=”2” Grid.Column=”1” Fill=”BurlyWood” Stroke=”Black” / >
< Ellipse Grid.Row=”2” Grid.Column=”2” Fill=”BlanchedAlmond” Stroke=”Black” / >
< Ellipse Grid.Row=”2” Grid.Column=”3” Fill=”BurlyWood” Stroke=”Black” / >
< Ellipse Grid.Row=”2” Grid.Column=”2” Grid.ColumnSpan=”2” Fill=”Gold”
Stroke=”Black” Height=”50”/ >
< GridSplitter Grid.RowSpan=”3” Width=”10” BorderThickness=”2” >
< GridSplitter.BorderBrush >
< SolidColorBrush Color=”Black” / >
< /GridSplitter.BorderBrush >
< /GridSplitter >
< /Grid >
Figure 34-13
c34.indd 1180c34.indd 1180 3/25/08 12:37:10 PM3/25/08 12:37:10 PM
Chapter 34: Windows Presentation Foundation
1181
This code uses various combinations of properties on the row and column definitions to achieve an
interesting effect when you resize the display, so it ’ s worth testing for yourself.
First, consider the rows. The top row has a fixed height of 50 pixels, the second row has a minimum
height of 100, and the third row fills the remaining space. This means that if the
Grid has a height of less
than 150 pixels, then the third row will not be visible. When the
Grid has a height of between 150 and
250 pixels, only the size of the third row will change, from 0 to 100 pixels. This is because the remaining
space is calculated as the total height minus the combined heights of rows that have a fixed height. This
remaining space is allocated between the second and third rows, but because the second row has a
minimum height of 100 pixels, it will not change its height until the total height of the
Grid reaches
250 pixels. Finally, when the height of the
Grid is greater than 250, both the second and third rows will
share the remaining space, so their height will be both equal to and greater than 100 pixels.
Next, look at the columns. Only the third column has a fixed size, of 50 pixels. The first and second
columns share up to a maximum of 300 pixels. The fourth column will therefore be the only one to
increase in size when the total width of the
Grid control exceeds 550 pixels. To work this out for
yourself, consider how many pixels are available to the columns and how they are distributed. First,
50 pixels are allocated to the third column, leaving 500 for the rest of the columns. The third column has
a maximum width of 100 pixels, leaving 400 between the first and fourth columns. The first column has a
maximum width of 200, so even if the width increases beyond this point, it will not consume any more
space. Instead, the fourth column will increase in size.
Note two additional points in this example. First, the final ellipse defined spans the third and fourth
columns to illustrate
Grid.ColumnSpan . Second, a GridSplitter is provided to enable resizing of the
first and second columns. However, once the total width of the
Grid control exceeds 550 pixels, this
GridSplitter will not be able to size these columns, as neither the first nor the second column can
increase in size.
The
GridSplitter control is useful, but it has a very dull appearance. This is one control that really
needs to be styled, or at least made invisible by setting its
Background property to Transparent , for
you to make the most of it.
If you have multiple
Grid controls in a window, you can also define shared size groups for rows or
columns by using the
ShareSizeGroup property in row and/or column definitions, which you just set
to a string identifier of your choice. For example, if a column in a shared size group changes in one
Grid
control, then a column in another
Grid control in the same size group will change to match this size. You
can enable or disable this functionality through the
Grid.IsSharedSizeScope property.
StackPanel
After the complexity of Grid , you may be relieved to discover that StackPanel is a relatively simple
layout control. You can think of
StackPanel as being a slimmed down version of DockPanel , where the
edge to which child controls are docked is fixed for those controls. The other difference between these
controls is that the last child control of a
StackPanel doesn ’ t fill the remaining space. However, controls
will, by default, stretch to the edges of the
StackPanel control.
The direction in which controls are stacked is determined by three properties.
Orientation can be set to
Horizontal or Vertical , and HorizontalAlignment and VerticalAlignement can be used to
determine whether control stacks are positioned next to the top, bottom, left, or right edge of the
StackPanel . You can even make the stacked controls stack at the center of the StackPanel using the
Center value for the alignment property you use.
c34.indd 1181c34.indd 1181 3/25/08 12:37:10 PM3/25/08 12:37:10 PM
1182
Part V: Additional Techniques
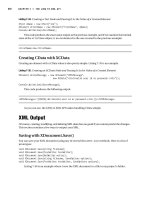
Figure 34 - 14 shows two StackPanel controls, each of which contains three buttons. The StackPanel
controls are positioned using a
Grid control with two rows and one column.
Figure 34-14
The code used here is as follows:
< Grid Background=”AliceBlue” >
< Grid.RowDefinitions >
< RowDefinition / >
< RowDefinition / >
< /Grid.RowDefinitions >
< StackPanel Grid.Row=”0” >
< Button > Button1 < /Button >
< Button > Button2 < /Button >
< Button > Button3 < /Button >
< /StackPanel >
< StackPanel Grid.Row=”1” Orientation=”Horizontal” >
< Button > Button1 < /Button >
< Button > Button2 < /Button >
< Button > Button3 < /Button >
< /StackPanel >
< /Grid >
When you use StackPanel layout, you often need to add scroll bars so that it is possible to view all the
controls contained in the
StackPanel . This is another area where WPF does a lot of the heavy lifting for
you. You can use the
ScrollViewer control to achieve this — simply enclose the StackPanel in this
control:
< Grid Background=”AliceBlue” >
< Grid.RowDefinitions >
< RowDefinition / >
< RowDefinition / >
< /Grid.RowDefinitions >
< ScrollViewer >
< StackPanel Grid.Row=”0” >
< Button > Button1 < /Button >
< Button > Button2 < /Button >
c34.indd 1182c34.indd 1182 3/25/08 12:37:11 PM3/25/08 12:37:11 PM
Chapter 34: Windows Presentation Foundation
1183
< Button > Button3 < /Button >
< /StackPanel >
< /ScrollViewer >
< StackPanel Grid.Row=”1” Orientation=”Horizontal” >
< Button > Button1 < /Button >
< Button > Button2 < /Button >
< Button > Button3 < /Button >
< /StackPanel >
< /Grid >
You can use more complicated techniques to scroll in different ways, or to scroll programmatically, but
often this is all you need to do.
WrapPanel
WrapPanel is essentially an extended version of StackPanel where controls that “ don ’ t fit ” are moved
to additional rows (or columns). Figure 34 - 15 shows a
WrapPanel control containing multiple shapes,
with the window resized to two sizes.
Figure 34-15
An abbreviated version of the code to achieve this is shown here:
< WrapPanel Background=”AliceBlue” >
< Rectangle Fill=”#FF000000” Height=”50” Width=”50” Stroke=”Black” RadiusX=”10”
RadiusY=”10” / >
< Rectangle Fill=”#FF111111” Height=”50” Width=”50” Stroke=”Black” RadiusX=”10”
RadiusY=”10” / >
< Rectangle Fill=”#FF222222” Height=”50” Width=”50” Stroke=”Black” RadiusX=”10”
RadiusY=”10” / >
< Rectangle Fill=”#FFFFFFFF” Height=”50” Width=”50” Stroke=”Black” RadiusX=”10”
RadiusY=”10” / >
< /WrapPanel >
c34.indd 1183c34.indd 1183 3/25/08 12:37:11 PM3/25/08 12:37:11 PM
1184
Part V: Additional Techniques
WrapPanel controls are a great way to create a dynamic layout that enables users to control exactly how
content should be viewed.
Control Styling
One of the best features of WPF is the complete control it provides designers over the look and feel of
user interfaces. Central to this is the ability to style controls however you want, in two or three
dimensions. Until now, you have been using the basic styling for controls that is supplied with .NET 3.5,
but the actual possibilities are endless.
This section describes two basic techniques:
Styles : Sets of properties that are applied to a control as a batch
Templates : The controls that are used to build the display for a control
There is some overlap here, as styles can contain templates.
Styles
WPF controls have a property called Style (inherited from FrameworkElement ) that can be set to an
instance of the
Style class. The Style class is quite complex and is capable of advanced styling
functionality, but at its heart it is essentially a set of
Setter objects. Each Setter object is responsible for
setting the value of a property according to its
Property property (the name of the property to set) and
its
Value property (the value to set the property to). You can either fully qualify the name you use
in
Property to the control type (for example, Button.Foreground ) or you can set the TargetType
property of the
Style object (for example, Button ) so that it is capable of resolving property names.
The following code, then, shows how to use a
Style object to set the Foreground property of a Button
control:
< Button >
Click me!
< Button.Style >
< Style TargetType=”Button” >
< Setter Property=”Foreground” >
< Setter.Value >
< SolidColorBrush Color=”Purple” / >
< /Setter.Value >
< /Setter >
< /Style >
< /Button.Style >
< /Button >
❑
❑
c34.indd 1184c34.indd 1184 3/25/08 12:37:11 PM3/25/08 12:37:11 PM
Chapter 34: Windows Presentation Foundation
1185
Obviously, in this case it would be far easier simply to set the Foreground property of the button in the
usual way. Styles become much more useful when you turn them into resources, because resources can
be reused. You will learn how to do this later in the chapter.
Templates
Controls are constructed using templates, which you can customize. A template consists of a hierarchy
of controls used to build the display of a control, which may include a content presenter for controls
such as buttons that display content.
The template of a control is stored in its
Template property, which is an instance of the
ControlTemplate class. The ControlTemplate class includes a TargetType property that you can set
to the type of control for which you are defining a template, and it can contain a single control. This
control can be a container such as
Grid , so this doesn ’ t exactly limit what you can do.
Typically, you set the template for a class by using a style. This simply involves providing controls to use
for the
Template property in the following way:
< Button >
Click me!
< Button.Style >
< Style TargetType=”Button” >
< Setter Property=”Template” >
< Setter.Value >
< ControlTemplate TargetType=”Button” >
< /ControlTemplate >
< /Setter.Value >
< /Setter >
< /Style >
< /Button.Style >
< /Button >
Some controls may require more than one template. For example, CheckBox controls use one template
for a check box (
CheckBox.Template ) and one template to output text next to the check box
(
CheckBox.ContentTemplate ).
Templates that require content presenters can include a
ContentPresenter control at the location
where you want to output content. Some controls, in particular those that output collections of items, use
alternative techniques, which aren ’ t covered in this chapter.
Again, replacing templates is most useful when combined with resources. However, as control styling is
a very common technique, it is worth looking at how to do it in a Try It Out.
c34.indd 1185c34.indd 1185 3/25/08 12:37:11 PM3/25/08 12:37:11 PM
1186
Part V: Additional Techniques
Try It Out Using Styles and Templates
1.
Create a new WPF application called Ch34Ex03 and save it in the directory
C:\BegVCSharp\Chapter34.
2. Modify the code in Window1.xaml as follows:
< Window x:Class=”Ch34Ex03.Window1”
xmlns=” />xmlns:x=” />Title=”Nasty Button” Height=”150” Width=”550” >
< Grid Background=”Black” >
< Button Margin=”20” Click=”Button_Click” >
Would anyone use a button like this?
< Button.Style >
< Style TargetType=”Button” >
< Setter Property=”FontSize” Value=”18” / >
< Setter Property=”FontFamily” Value=”arial” / >
< Setter Property=”FontWeight” Value=”bold” / >
< Setter Property=”Foreground” >
< Setter.Value >
< LinearGradientBrush StartPoint=”0.5,0” EndPoint=”0.5,1” >
< LinearGradientBrush.GradientStops >
< GradientStop Offset=”0.0” Color=”Purple” / >
< GradientStop Offset=”0.5” Color=”Azure” / >
< GradientStop Offset=”1.0” Color=”Purple” / >
< /LinearGradientBrush.GradientStops >
< /LinearGradientBrush >
< /Setter.Value >
< /Setter >
< Setter Property=”Template” >
< Setter.Value >
< ControlTemplate TargetType=”Button” >
< Grid >
< Grid.ColumnDefinitions >
< ColumnDefinition Width=”50” / >
< ColumnDefinition / >
< ColumnDefinition Width=”50” / >
< /Grid.ColumnDefinitions >
< Grid.RowDefinitions >
< RowDefinition MinHeight=”50” / >
< /Grid.RowDefinitions >
< Ellipse Grid.Column=”0” Height=”50” >
< Ellipse.Fill >
< RadialGradientBrush >
< RadialGradientBrush.GradientStops >
< GradientStop Offset=”0.0” Color=”Yellow” / >
< GradientStop Offset=”1.0” Color=”Red” / >
< /RadialGradientBrush.GradientStops >
< /RadialGradientBrush >
< /Ellipse.Fill >
< /Ellipse >
c34.indd 1186c34.indd 1186 3/25/08 12:37:12 PM3/25/08 12:37:12 PM
Chapter 34: Windows Presentation Foundation
1187
< Grid Grid.Column=”1” >
< Rectangle RadiusX=”10” RadiusY=”10” >
< Rectangle.Fill >
< RadialGradientBrush >
< RadialGradientBrush.GradientStops >
< GradientStop Offset=”0.0” Color=”Yellow” / >
< GradientStop Offset=”1.0” Color=”Red” / >
< /RadialGradientBrush.GradientStops >
< /RadialGradientBrush >
< /Rectangle.Fill >
< /Rectangle >
< ContentPresenter Margin=”20,0,20,0”
HorizontalAlignment=”Center” VerticalAlignment=”Center” / >
< /Grid >
< Ellipse Grid.Column=”2” Height=”50” >
< Ellipse.Fill >
< RadialGradientBrush >
< RadialGradientBrush.GradientStops >
< GradientStop Offset=”0.0” Color=”Yellow” / >
< GradientStop Offset=”1.0” Color=”Red” / >
< /RadialGradientBrush.GradientStops >
< /RadialGradientBrush >
< /Ellipse.Fill >
< /Ellipse >
< /Grid >
< /ControlTemplate >
< /Setter.Value >
< /Setter >
< /Style >
< /Button.Style >
< /Button >
< /Grid >
< /Window >
3. Modify the code in Window1.xaml.cs as follows:
public partial class Window1 : Window
{
private void Button_Click(object sender, RoutedEventArgs e)
{
MessageBox.Show(“Button clicked.”);
}
}
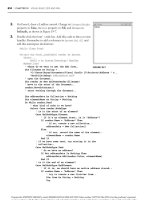
4. Run the application and click once on the button. Figure 34 - 16 shows the result.
c34.indd 1187c34.indd 1187 3/25/08 12:37:12 PM3/25/08 12:37:12 PM
1188
Part V: Additional Techniques
How It Works
First, let me apologize for the truly nasty - looking button shown in this example. However, aesthetic
considerations aside, this example does show that you can completely change how a button looks in
WPF without a lot of effort. In changing the button template, though, note that the functionality of the
button remains unchanged. That is, you can click on the button and respond to that click in an event
handler.
You probably noticed that certain things you associate with Windows buttons aren ’ t implemented in
the template used here. In particular, there is no visual feedback when you roll over the button or
when you click it. This button also looks exactly the same whether it has focus or not. To achieve these
effects you need to learn about triggers, which are the subject of the next section.
Before doing that, though, consider the example code in a little more detail, focusing on styles and
templates and looking at how the template was created.
The code starts with ordinary code that you would use to display a
Button control:
< Button Margin=”20” Click=”Button_Click” >
Would anyone use a button like this?
This provides basic properties and content for the button. Next, the Style property is set to a Style
object, which begins by setting three simple font properties of the
Button control:
< Button.Style >
< Style TargetType=”Button” >
< Setter Property=”FontSize” Value=”18” / >
< Setter Property=”FontFamily” Value=”arial” / >
< Setter Property=”FontWeight” Value=”bold” / >
Next, the Button.Foreground property is set using property element syntax because a brush is used:
< Setter Property=”Foreground” >
< Setter.Value >
< LinearGradientBrush StartPoint=”0.5,0” EndPoint=”0.5,1” >
< LinearGradientBrush.GradientStops >
< GradientStop Offset=”0.0” Color=”Purple” / >
< GradientStop Offset=”0.5” Color=”Azure” / >
Figure 34-16
c34.indd 1188c34.indd 1188 3/25/08 12:37:12 PM3/25/08 12:37:12 PM
Chapter 34: Windows Presentation Foundation
1189
< GradientStop Offset=”1.0” Color=”Purple” / >
< /LinearGradientBrush.GradientStops >
< /LinearGradientBrush >
< /Setter.Value >
< /Setter >
The remainder of the code for the Style object sets the Button.Template property to a
ControlTemplate object:
< Setter Property=”Template” >
< Setter.Value >
< ControlTemplate TargetType=”Button” >
< /ControlTemplate >
< /Setter.Value >
< /Setter >
< /Style >
< /Button.Style >
< /Button >
The template code can be summarized as a Grid control that contains three cells in a single row.
In turn, these cells contain an
Ellipse , a Rectangle , along with the ContentPresenter for the
template, and another
Ellipse :
< Grid >
< Ellipse Grid.Column=”0” Height=”50” >
< /Ellipse >
< Grid Grid.Column=”1” >
< Rectangle RadiusX=”10” RadiusY=”10” >
< /Rectangle >
< ContentPresenter Margin=”20,0,20,0”
HorizontalAlignment=”Center”
VerticalAlignment=”Center” / >
< /Grid >
< Ellipse Grid.Column=”2” Height=”50” >
< /Ellipse >
< /Grid >
None of this code is particularly complicated, and you can analyze it further at your leisure.
Triggers
In the first example of this chapter you saw how triggers can be used to link events to actions. Events in
WPF can include all manner of things, including button clicks, application startup and shutdown events,
and so on. There are, in fact, several types of triggers in WPF, all of which inherit from a base
TriggerBase class. The type of trigger shown in the example was an EventTrigger . The
EventTrigger class contains a collection of actions, each of which is an object that derives from the base
TriggerAction class. These actions are executed when the trigger is activated.
c34.indd 1189c34.indd 1189 3/25/08 12:37:13 PM3/25/08 12:37:13 PM
1190
Part V: Additional Techniques
Not a lot of classes inherit from TriggerAction in WPF, but you can, of course, define your own. You can
use
EventTrigger to trigger animations using the BeginStoryboard action, manipulate storyboards
using
ControllableStoryboardAction , and trigger sound effects with SoundPlayerAction . As this
latter trigger is mostly used in animations, you ’ ll look at it in the next section.
Every control has a
Triggers property that you can use to define triggers directly on that control. You
can also define triggers further up the hierarchy — for example, on a
Window object as shown earlier. The
type of trigger you will use most often when you are styling controls is
Trigger (although you will still
use
EventTrigger to trigger control animations). The Trigger class is used to set properties in
response to changes to other properties, and is particularly useful when used in
Style objects.
Trigger objects are configured as follows:
To define what property a
Trigger object monitors, you use the Trigger.Property property.
To define when the
Trigger object activates, you set the Trigger.Value property.
To define the actions taken by a
Trigger , you set the Trigger.Setters property to a collection
of
Setter objects.
The
Setter objects referred to here are exactly the same objects that you saw in the “ Styles ” section
earlier.
For example, the following trigger would examine the value of a property called
MyBooleanValue , and
when that property is
true it would set the value of the Opacity property to 0.5:
< Trigger Property=”MyBooleanValue” Value=”true” >
< Setter Property=”Opacity” Value=”0.5” / >
< /Trigger >
On its own this code doesn ’ t tell you very much, as it is not associated with any control or style. The
following code is much more explanatory, as it shows a
Trigger as you would use it in a Style object:
< Style TargetType=”Button” >
< Style.Triggers >
< Trigger Property=”IsMouseOver” Value=”true” >
< Setter Property=”Foreground” Value=”Yellow” / >
< /Trigger >
< /Style.Triggers >
< /Style >
This code would change the Foreground property of a Button control to Yellow when the
Button.IsMouseOver property is true . IsMouseOver is one of several extremely useful properties
that you can use as a shortcut to find out information about controls and control state. As its name
suggests, it is
true if the mouse is over the control. This enables you to code for mouse rollovers. Other
properties like this include
IsFocused , to determine whether a control has focus; IsHitTestVisible ,
which indicates whether it is possible to click on a control (that is, it is not obscured by controls further
up the stacking order); and
IsPressed , which indicates whether a button is pressed. The last of these
only applies to buttons that inherit from
ButtonBase , whereas the others are available on all controls.
❑
❑
❑
c34.indd 1190c34.indd 1190 3/25/08 12:37:13 PM3/25/08 12:37:13 PM
Chapter 34: Windows Presentation Foundation
1191
As well as the Style.Triggers property, you can also achieve a lot by using the ControlTemplate
.Triggers
property. This enables you to create templates for controls that include triggers. This is how
the default
Button template is able to respond to mouse rollovers, clicks, and focus changes with its
template. This is also what you must modify to implement this functionality for yourself.
Animation
Animations are created by using storyboards. The absolute best way to define animations is, without a
doubt, to use a designer such as Expression Blend. However, you can also define them by editing
XAML code directly, and by implication from code behind (as XAML is simply a way to build a WPF
object model).
A storyboard is defined using a
Storyboard object, which contains one or more timelines. You can
define timelines by using key frames or by using one of several simpler objects that encapsulate entire
animations. Complex storyboards may even contain nested storyboards.
As shown in the example, a
Storyboard is contained in a resource dictionary, so you must identify it
with an
x:Key property.
Within the timeline of a storyboard, you can animate properties of any element in your application that
is of type
double , Point , or Color . This covers most of the things that you may want to change, so it ’ s
quite flexible. There are some things that you can ’ t do, such as completely replace one brush with
another, but there are ways to achieve pretty much any effect you can imagine given these three types.
Each of these three types has two associated timeline controls that you can use as children of
Storyboard . These six controls are DoubleAnimation , DoubleAnimationUsingKeyFrames ,
PointAnimation , PointAnimationUsingKeyFrames , ColorAnimation , and
ColorAnimationUsingKeyFrames . Every timeline control can be associated with a specific
property of a specific control by using the attached properties
Storyboard.TargetName and
Storyboard.TargetProperty . For example, you would set these properties to MyRectangle and
Width if you wanted to animate the Width property of a Rectangle control with a Name property of
MyRectangle . You would use either DoubleAnimation or DoubleAnimationUsingKeyFrames to
animate this property.
The
Storyboard.TargetProperty property is capable of interpreting quite advanced syntax so that
you can locate the property you are interested in animating. In the example at the beginning of this
chapter, you used the following values for the two attached properties:
Storyboard.TargetName=”ellipse1”
Storyboard.TargetProperty=
“(UIElement.RenderTransform).(TransformGroup.Children)[0].(RotateTransform.Angle)”
The control ellipse1 was of type Ellipse , and the TargetProperty specified the angle that the
ellipse was rotated through in a transformation. This angle was located through the
RenderTransform
property of
Ellipse , inherited from UIElement , and the first child of the TransformGroup object that
was the value of this property. This first child was a
RotateTransform object, and the angle was the
Angle property of this object.
c34.indd 1191c34.indd 1191 3/25/08 12:37:13 PM3/25/08 12:37:13 PM
1192
Part V: Additional Techniques
Although this syntax can be long - winded, is straightforward to use. The most difficult thing is
determining what base class a given property is inherited from, although the object browser can help
you with that.
Next, you ’ ll look at the simple, nonkey-frame animation timelines, and then move on to look at the
timelines that use key frames.
Timelines Without Key Frames
The timelines without key frames are DoubleAnimation , PointAnimation , and ColorAnimation .
These timelines have identical property names, although the types of these properties vary according to
the type of the timeline (note that all duration properties are specified in the form
[days.]hours:
minutes:seconds
in XAML code):
Property Usage
Name The name of the timeline, so that you can refer to it from other places .
BeginTime How long after the storyboard is triggered before the timeline starts .
Duration How long the timeline lasts .
AutoReverse Whether the timeline reverses when it completes and returns properties to
their original values. This property is a Boolean value.
RepeatBehavior Set this to a specified duration to make the timeline repeat as indicated —
an integer followed by
x (for example, 5x ) to repeat the timeline a set
number of times; or use
Forever to make the timeline repeat until the
storyboard is paused or stopped.
FillBehavior How the timeline behaves if it completes while the storyboard is still
continuing. You can use
HoldEnd to leave properties at the values they are
at when the timeline completes (the default), or
Stop to return them to their
original values.
SpeedRatio Controls the speed of the animation relative to the values specified in other
properties. The default value is 1, but you can change it from other code to
speed up or slow down animations.
From The initial value to set the property to at the start of the animation. You can
omit this value to use the current value of the property.
To The final value for the property at the end of the animation. You can omit
this value to use the current value of the property.
By Use this value to animate from the current value of a property to the sum of
the current value and the value you specify. You can use this property on its
own or in combination with
From .
c34.indd 1192c34.indd 1192 3/25/08 12:37:14 PM3/25/08 12:37:14 PM
Chapter 34: Windows Presentation Foundation
1193
For example, the following timeline will animate the Width property of a Rectangle control with a
Name property of MyRectangle between 100 and 200 over 5 seconds:
< Storyboard x:Key=”RectangleExpander” >
< DoubleAnimation Storyboard.TargetName=”MyRectangle”
Storyboard.TargetProperty=”Width” Duration=”00:00:05” From=”100” To=”200” / >
< /Storyboard >
Timelines with Key Frames
The timelines with key frames are DoubleAnimationUsingKeyFrames ,
PointAnimationUsingKeyFrames , and ColorAnimationUsingKeyFrames . These timeline classes use
the same properties as the timeline classes in the previous section, except that they don ’ t have
From , To ,
or
By properties. Instead, they have a KeyFrames property that is a collection of key frame objects.
These timelines can contain any number of key frames, each of which can cause the value being
animated to behave in a different way. There are three types of key frames for each type of timeline:
Discrete: A discrete key frame causes the value being animated to jump to a specified value with
no transition.
Linear: A linear key frame causes the value being animated to animate to a specified value in a
linear transition.
Spline: A spline key frame causes the value being animated to animate to a specified value in a
nonlinear transition defined by a cubic Bezier curve function.
There are therefore nine types of key frame objects:
DiscreteDoubleKeyFrame ,
LinearDoubleKeyFrame , SplineDoubleKeyFrame , DiscreteColorKeyFrame ,
LinearColorKeyFrame , SplineColorKeyFrame , DiscretePointKeyFrame , LinearPointKeyFrame ,
and
SplinePointKeyFrame .
The key frame classes have the same three properties as the timeline classes examined in the previous
section, apart from the spline key frames, which have one additional property:
Property Usage
Name The name of the key frame, so that you can refer to it from other places
KeyTime The location of the key frame expressed as an amount of time after the timeline
starts
Value The value that the property will reach or be set to when the key frame is reached
KeySpline Two sets of two numbers in the form cp1x,cp1y cp2x,cp2y that define the
cubic Bezier function to use to animate the property. (Spline key frames only.)
❑
❑
❑
c34.indd 1193c34.indd 1193 3/25/08 12:37:14 PM3/25/08 12:37:14 PM
1194
Part V: Additional Techniques
For example, you could animate the position of an Ellipse in a square by animating its Center
property, which is of type
Point , as follows:
< Storyboard x:Key=”EllipseMover” >
< PointAnimationUsingKeyFrames Storyboard.TargetName=”MyEllipse”
Storyboard.TargetProperty=”Center” RepeatBehavior=”Forever” >
< LinearPointKeyFrame KeyTime=”00:00:00” Value=”50,50” / >
< LinearPointKeyFrame KeyTime=”00:00:01” Value=”100,50” / >
< LinearPointKeyFrame KeyTime=”00:00:02” Value=”100,100” / >
< LinearPointKeyFrame KeyTime=”00:00:03” Value=”50,100” / >
< LinearPointKeyFrame KeyTime=”00:00:04” Value=”50,50” / >
< /PointAnimationUsingKeyFrames >
< /Storyboard >
Point values are specified in x,y form in XAML code.
Static and Dynamic Resources
Another great feature of WPF is the capability to define resources, such as control styles and templates,
which you can reuse throughout your application. You can even use resources across multiple
applications if you define them in the right place.
Resources are defined as entries in a
ResourceDictionary object. As its name suggests, this is a keyed
collection of objects. This is why you ’ ve used
x:Key attributes in example code so far in this chapter
when you have defined resources: to specify the key associated with a resource. You can access
ResourceDictionary objects in a variety of locations. You could include resources local to a control,
local to a window, local to your application, or in an external assembly.
There are two ways to reference resources: statically or dynamically. Note that this distinction doesn ’ t
mean that the resource itself is in any way different — that is, you don ’ t define a resource as static or
dynamic. The difference is in how you use it.
Static Resources
You use static resources when you know exactly what the resource will be at design time, and you
know that the reference won ’ t change over the application ’ s lifetime. For example, if you define a button
style that you want to use for the buttons in your application, then you probably won ’ t want to change it
while the application runs. In this case, you should reference the resource statically. In addition, when
you use a static resource, the resource type is resolved at compile time, so performance is very fast.
To reference a static resource, you use the following markup extension syntax:
{StaticResource resourceName}
For example, if you had a style defined for Button controls with a x:Key attribute of MyStyle , then you
could reference it from a control as follows:
< Button Style=”{StaticResource MyStyle}” > < /Button >
c34.indd 1194c34.indd 1194 3/25/08 12:37:15 PM3/25/08 12:37:15 PM
Chapter 34: Windows Presentation Foundation
1195
Dynamic Resources
A property defined by using a dynamic resource can be changed at runtime to another dynamic resource.
This can be useful in a number of circumstances. Sometimes you want to give users control over the
general theme of your application, in which case you want resources to be allocated dynamically. In
addition, sometimes you are not aware of the key you require for a resource at runtime — for example, if
you dynamically attach to a resource assembly.
Dynamic resources therefore give you more flexibility than static resources do. However, there is a
downside. There is slightly more overhead related to the use of dynamic resources, so you should use
them sparingly if you want to optimize the performance of your applications.
The syntax required to reference a resource dynamically is very similar to that required to reference a
resource statically:
{DynamicResource resourceName}
For example, if you have a style defined for Button controls with a x:Key attribute of MyDynamicStyle ,
you could reference it from a control as follows:
< Button Style=”{DynamicResource MyDynamicStyle}” > < /Button >
Referencing Style Resources
Earlier, you saw how to reference a Style resource from a Button control, both statically and
dynamically. The
Style resource used here might be in the Resources property of the local Window
control, for example:
< Window >
< Window.Resources >
< Style x:Key=”MyStyle” TargetType=”Button” >
< /Style >
< /Window.Resources >
< /Window >
Every Button control that you want to use this control must then refer to it in its Style property
(statically or dynamically). Alternatively, you could define a style resource that is global to a given control
type. That is, the
Style object will be applied to every control of a given type in your application. To do
this, all you have to do is omit the
x:Key attribute:
< Window >
< Window.Resources >
< Style TargetType=”Button” >
< /Style >
< /Window.Resources >
< /Window >
This is a great way to theme your applications. You can define a set of global styles for the various
control types that you use and they will be used everywhere.
c34.indd 1195c34.indd 1195 3/25/08 12:37:15 PM3/25/08 12:37:15 PM
1196
Part V: Additional Techniques
You ’ ve covered a lot of ground in the last few sections, so it ’ s time to tie things together with an example.
In the next Try It Out, you modify the
Button control from the previous Try It Out to use triggers and
animations, and define the style as a global, reusable resource.
Try It Out Triggers, Animations, and Resources
1.
Create a new WPF application called Ch34Ex04 and save it in the directory
C:\BegVCSharp\Chapter34.
2. Copy the code from Window1.xaml in Ch34Ex03 into Window1.xaml in Ch34Ex04, but
change the namespace reference on the
Window element as follows:
< Window x:Class=”Ch34Ex04.Window1”
3. Copy the Button_Click() event handler from Window1.xaml.cs in Ch34Ex03 into
Window1.xaml.cs in Ch34Ex04.
4. Add a < Window.Resources > child to the < Window > element and move the < Style >
definition from the
< Button.Style > element to the < Window.Resources > element. Remove
the empty
< Button.Style > element. The result is shown here (abbreviated):
< Window x:Class=”Ch34Ex04.Window1”
xmlns=” /> xmlns:x=” /> Title=”Nasty Button” Height=”150” Width=”550” >
< Window.Resources >
< Style TargetType=”Button” >
< /Style >
< /Window.Resources >
< Grid Background=”Black” >
< Button Margin=”20” Click=”Button_Click” >
Would anyone use a button like this?
< /Button >
< /Grid >
< /Window >
5. Run the application and verify that the result is the same as in the previous example.
6. Add Name attributes to the main Grid in the template and the Rectangle that contains the
ContentPresenter element as follows:
< Setter Property=”Template” >
< Setter.Value >
< ControlTemplate TargetType=”Button” >
< Grid Name=”LayoutGrid” >
< Grid.ColumnDefinitions >
< Grid Grid.Column=”1” >
< Rectangle RadiusX=”10” RadiusY=”10” Name=”BackgroundRectangle” >
c34.indd 1196c34.indd 1196 3/25/08 12:37:15 PM3/25/08 12:37:15 PM
Chapter 34: Windows Presentation Foundation
1197
< Rectangle.Fill >
< /Rectangle.Fill >
< /Rectangle >
< /Grid >
< /Grid >
< /ControlTemplate >
< /Setter.Value >
< /Setter >
7. Add the following code to the < ControlTemplate > element, just before the
< /ControlTemplate >
tag:
< /Grid >
< ControlTemplate.Resources >
< Storyboard x:Key=”PulseButton” >
< ColorAnimationUsingKeyFrames BeginTime=”00:00:00”
RepeatBehavior=”Forever”
Storyboard.TargetName=”BackgroundRectangle”
Storyboard.TargetProperty=
“(Shape.Fill).(RadialGradientBrush.GradientStops)[1].(GradientStop.Color)” >
< LinearColorKeyFrame Value=”Red” KeyTime=”00:00:00” / >
< LinearColorKeyFrame Value=”Orange” KeyTime=”00:00:01” / >
< LinearColorKeyFrame Value=”Red” KeyTime=”00:00:02” / >
< /ColorAnimationUsingKeyFrames >
< /Storyboard >
< /ControlTemplate.Resources >
< ControlTemplate.Triggers >
< Trigger Property=”IsMouseOver” Value=”True” >
< Setter TargetName=”LayoutGrid” Property=”BitmapEffect” >
< Setter.Value >
< OuterGlowBitmapEffect GlowColor=”Red” GlowSize=”20” / >
< /Setter.Value >
< /Setter >
< /Trigger >
< Trigger Property=”IsPressed” Value=”True” >
< Setter TargetName=”LayoutGrid” Property=”BitmapEffect” >
< Setter.Value >
< OuterGlowBitmapEffect GlowColor=”Yellow” GlowSize=”40” / >
< /Setter.Value >
< /Setter >
< /Trigger >
< EventTrigger RoutedEvent=”UIElement.MouseEnter” >
< BeginStoryboard Storyboard=”{StaticResource PulseButton}”
x:Name=”PulseButton_BeginStoryboard” / >
< /EventTrigger >
< EventTrigger RoutedEvent=”UIElement.MouseLeave” >
< StopStoryboard
BeginStoryboardName=”PulseButton_BeginStoryboard” / >
< /EventTrigger >
< /ControlTemplate.Triggers >
< /ControlTemplate >
c34.indd 1197c34.indd 1197 3/25/08 12:37:15 PM3/25/08 12:37:15 PM
1198
Part V: Additional Techniques
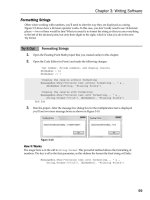
8. Run the application and hover the mouse over the button, as shown in Figure 34 - 17 . The
button pulses and glows.
Figure 34-17
Figure 34-18
9. Click the button, as shown in Figure 34 - 18 . The glow changes.
How It Works
In this example you have done two things. First, you defined a global resource that is used to format
all buttons in the application (there ’ s only one button, but that ’ s not the point). Second, you added
some features to the style created in the previous Try It Out that make it almost respectable.
Specifically, you have made it glow and pulsate in response to mouse rollover and click interaction.
Making the style a global resource was simply a matter of moving the
< Style > element to the
resources section of the
Window . You could have added an x:Key attribute, but because you didn ’ t
there was no need to set the
Style property of the Button control on the page; the style was instantly
global.
After making the style a resource, you proceeded to modify it. First, you added
Name attributes to two
of the controls in the style. This was necessary so that you could refer to them from other code, which
you do in the animation and triggers for the control template that is part of the style.
Next, you added an animation as a local resource for the control template specified in the style. The
animation
Storyboard object was identified using the x:Key value of PulseButton :
< ControlTemplate.Resources >
< Storyboard x:Key=”PulseButton” >
c34.indd 1198c34.indd 1198 3/25/08 12:37:16 PM3/25/08 12:37:16 PM
Chapter 34: Windows Presentation Foundation
1199
The storyboard contains a ColorAnimationUsingKeyFrames element, as it will animate a color used
in the control template. The property to animate was the red color used as the outer color in the radial
fill used in the
BackgroundRectangle control. Locating this property from the control required fairly
complex syntax for the
Storyboard.TargetProperty attached property:
< ColorAnimationUsingKeyFrames BeginTime=”00:00:00”
RepeatBehavior=”Forever”
Storyboard.TargetName=”BackgroundRectangle”
Storyboard.TargetProperty=
“(Shape.Fill).(RadialGradientBrush.GradientStops)[1].(GradientStop.Color)” >
The timeline for the animation consisted of three key frames to animate the color from Red to Orange
and then back again over two seconds:
< LinearColorKeyFrame Value=”Red” KeyTime=”00:00:00” / >
< LinearColorKeyFrame Value=”Orange” KeyTime=”00:00:01” / >
< LinearColorKeyFrame Value=”Red” KeyTime=”00:00:02” / >
< /ColorAnimationUsingKeyFrames >
< /Storyboard >
< /ControlTemplate.Resources >
Adding the animation as a resource does not cause it to be performed. To do that you added two
EventTrigger triggers:
< EventTrigger RoutedEvent=”UIElement.MouseEnter” >
< BeginStoryboard Storyboard=”{StaticResource PulseButton}”
x:Name=”PulseButton_BeginStoryboard” / >
< /EventTrigger >
< EventTrigger RoutedEvent=”UIElement.MouseLeave” >
< StopStoryboard
BeginStoryboardName=”PulseButton_BeginStoryboard” / >
< /EventTrigger >
This code uses the MouseEnter and MouseLeave events of the UIElement base class of the Button
control to control the operation of the animation.
MouseEnter causes animation to start through a
BeginStoryboard element, and MouseLeave causes it to stop through the StopStoryboard element.
Note that the storyboard resource is located using a static resource reference. This makes perfect sense
here because the storyboard is defined local to the control and you have no intention of changing it at
runtime.
You also defined two other triggers to provide a rollover and click glow by using the
OuterGlowBitmapEffect bitmap effect. You made use of the IsMouseOver and IsPressed
properties shown earlier in the chapter to achieve this:
< Trigger Property=”IsMouseOver” Value=”True” >
< Setter TargetName=”LayoutGrid” Property=”BitmapEffect” >
< Setter.Value >
< OuterGlowBitmapEffect GlowColor=”Red” GlowSize=”20” / >
< /Setter.Value >
< /Setter >
< /Trigger >
< Trigger Property=”IsPressed” Value=”True” >
c34.indd 1199c34.indd 1199 3/25/08 12:37:16 PM3/25/08 12:37:16 PM
1200
Part V: Additional Techniques
< Setter TargetName=”LayoutGrid” Property=”BitmapEffect” >
< Setter.Value >
< OuterGlowBitmapEffect GlowColor=”Yellow” GlowSize=”40” / >
< /Setter.Value >
< /Setter >
< /Trigger >
Here, the defined glow is small and red when the mouse hovers over the button, and larger and
yellow when the button is clicked.
Programming with WPF
Now that you have covered all of the basic WPF programming techniques you can begin to create
applications of your own. Unfortunately, there isn ’ t enough space here to cover some of the other great
features of WPF, including the details of data binding and some great ways to format the display of lists.
However, it wouldn ’ t be right to stop here just when you are becoming familiar with WPF programming.
Therefore, you look at two more topics before finishing this chapter, chosen not for their complexity but
because they reflect tasks you are likely to often perform in WPF applications:
How to create and use your own controls
How to implement dependency properties on your controls
You also work through a final example that illustrates more of the techniques covered in this chapter,
and just a small taste of WPF data binding.
WPF User Controls
WPF provides a set of controls that are useful in many situations. However, as with all the .NET
development frameworks, it also enables you to extend this functionality. Specifically, you can create
your own controls by deriving your classes from classes in the WPF class hierarchy.
One of the most useful controls you can derive from is
UserControl . This class gives you all the basic
functionality that you are likely to require from a WPF control, and enables your control to snap in
beside the existing WPF control suite seamlessly. Everything you might hope to achieve with a WPF
control, such as animation, styling, templating, and so on, can be achieved with user controls.
You can add user controls to your project by using the Project Add User Control menu item. This
gives you a blank canvas (well, actually a blank
Grid ) to work from. User controls are defined using
the top - level
UserControl element in XAML, and the class in the code behind derives from the
System.Windows.Controls.UserControl class.
Once you have added a user control to your project, you can add controls to lay out the control and code
behind to configure the control. When you have finished doing that, you can use it throughout your
application, and even reuse it in other applications.
❑
❑
c34.indd 1200c34.indd 1200 3/25/08 12:37:17 PM3/25/08 12:37:17 PM
Chapter 34: Windows Presentation Foundation
1201
One of the crucial things you need to know when creating user controls is how to implement
dependency properties. As shown earlier in this chapter, dependency properties are an essential part of
WPF programming. You won ’ t want to miss out on the functionality these properties give you when you
create your own controls.
Implementing Dependency Properties
You can add dependency properties to any class that inherits from System.Windows
.DependencyObject
. This class is in the inheritance hierarchy for many classes in WPF, including
all the controls and
UserControl .
To implement a dependency property to a class, you add a public, static member to your class definition
of type
System.Windows.DependencyProperty . The name of this member is up to you, but best
practice is to follow the naming convention
< PropertyName > Property :
public static DependencyProperty MyStringProperty;
It may seem odd that this property is defined as static, since you end up with a property that can be
uniquely defined for each instance of your class. The WPF property framework keeps track of things for
you, so you don ’ t have to worry about this for the moment.
The member you add must be configured by using the static
DependencyProperty.Register()
method:
public static DependencyProperty MyStringProperty =
DependencyProperty.Register( );
This method takes between three and five parameters, as shown in the following table (in order, with the
first three parameters being the mandatory ones):
Parameter Usage
string name The name of the property .
Type propertyType The type of the property .
Type ownerType The type of the class containing the property .
PropertyMetadata typeMetadata Additional property settings: the default value of the
property and callback methods to use for property
change notifications and coercion .
ValidateValueCallback
validateValueCallback
The callback method to use to validate property values .
c34.indd 1201c34.indd 1201 3/25/08 12:37:17 PM3/25/08 12:37:17 PM
1202
Part V: Additional Techniques
There are other methods that you can use to register dependency properties, such as
RegisterAttached() , which you can use to implement an attached property. You won ’ t look at these
other methods in this chapter, but it ’ s worth reading up on them.
For example, you could register the
MyStringProperty dependency property using three parameters as
follows:
public class MyClass : DependencyObject
{
public static DependencyProperty MyStringProperty = DependencyProperty.Register(
“MyString”,
typeof(string),
typeof(MyClass)
);
}
You can also include a .NET property that can be used to access dependency properties directly
(although this isn ’ t mandatory, as you will see shortly). However, because dependency properties are
defined as static members, you cannot use the same syntax you would use with ordinary properties. To
access the value of a dependency property, you have to use methods that are inherited from
DependencyObject , as follows:
public class MyClass : DependencyObject
{
public static DependencyProperty MyStringProperty =
DependencyProperty.Register(
“MyString”,
typeof(string),
typeof(MyClass)
);
public string MyString
{
get { return (string)GetValue(MyStringProperty); }
set { SetValue(MyStringProperty, value); }
}
}
Here, the GetValue() and SetValue() methods get and set the value of the MyStringProperty
dependency property for the current instance, respectively. These two methods are public, so client code
can use them directly to manipulate dependency property values. This is why adding a .NET property to
access a dependency property is not mandatory.
If you want to set metadata for a property, then you must use an object that derives from
PropertyMetadata , such as FrameworkPropertyMetadata , and pass this instance as the fourth
c34.indd 1202c34.indd 1202 3/25/08 12:37:17 PM3/25/08 12:37:17 PM
Chapter 34: Windows Presentation Foundation
1203
parameter to Register() . There are 11 overloads of the FrameworkPropertyMetadata constructor,
and they take one or more of the parameters shown in the following table:
Parameter Type Usage
object defaultValue The default value for the property .
FrameworkPropertyMetadataOptions
flags
A combination of the flags (from the
FrameworkPropertyMetadataOptions enum) that
you can use to specify additional metadata for a
property. For example, you might use
AffectsArrange to declare that changes to the
property might affect control layout. This would
cause the layout engine for a window to recalculate
control layout if the property changed. See the
MSDN documentation for a full list of the options
available here.
PropertyChangedCallback
propertyChangedCallback
The callback method to use when the property value
changes .
CoerceValueCallback
coerceValueCallback
The callback method to use if the property value is
coerced .
bool isAnimationProhibited Specifies whether this property can be changed by an
animation .
UpdateSourceTrigger
defaultUpdateSourceTrigger
When property values are databound, this property
determines when the data source is updated,
according to values in the UpdateSourceTrigger
enum. The default value is
PropertyChanged ,
which means that the binding source is updated as
soon as the property changes. This is not always
appropriate — for example, the
TextBox.Text
property uses a value of
LostFocus for this property.
This ensures that the binding source is not updated
prematurely. You can also use the value
Eplicit to
specify that the binding source should only be
updated when requested (by calling the
UpdateSource() method of a class derived from
DependancyObject ).
c34.indd 1203c34.indd 1203 3/25/08 12:37:17 PM3/25/08 12:37:17 PM