Beginning PHP 5.3 phần 8 ppt
Bạn đang xem bản rút gọn của tài liệu. Xem và tải ngay bản đầy đủ của tài liệu tại đây (771.99 KB, 85 trang )
558
Part III: Using PHP in Practice
You can also pass an array of target strings for preg_replace() to work on, much like using
preg_grep() . If you do this, preg_replace() returns the array of strings with any matched text
replaced by the replacement text:
$text = array(
“Mouse mat: $3.99”,
“Keyboard cover: $4.99”,
“Screen protector: $5.99”
);
$newText = preg_replace( “/\\$\d+\.\d{2}/”, “Only $0”, $text );
echo “ < pre > ”;
print_r( $newText );
echo “ < /pre > ”;
This code displays:
Array
(
[0] = > Mouse mat: Only $3.99
[1] = > Keyboard cover: Only $4.99
[2] = > Screen protector: Only $5.99
)
preg_replace() has a couple more tricks up its sleeve. You can pass an array of regular expression
strings to the function, and it will match and replace each expression in turn with the replacement string:
$text = “The wholesale price is $89.50. “ .
“The product will be released on Jan 16, 2010.”;
$patterns = array(
“/\\$\d+\.\d{2}/”,
“/\w{3} \d{1,2}, \d{4}/”
);
echo preg_replace( $patterns, “[CENSORED]”, $text );
This script outputs the following:
The wholesale price is [CENSORED]. The product will be released on
[CENSORED].
If you also pass an array of replacement strings, the matched text from each expression in the
expressions array is replaced by the corresponding string in the replacements array:
$text = “The wholesale price is $89.50. “ .
“The product will be released on Jan 16, 2010.”;
$patterns = array(
“/\\$\d+\.\d{2}/”,
“/\w{3} \d{1,2}, \d{4}/”
);
c18.indd 558c18.indd 558 9/21/09 6:17:59 PM9/21/09 6:17:59 PM
Chapter 18: String Matching with Regular Expressions
559
$replacements = array(
“[PRICE CENSORED]”,
“[DATE CENSORED]”
);
echo preg_replace( $patterns, $replacements, $text );
This script displays:
The wholesale price is [PRICE CENSORED]. The product will be released on
[DATE CENSORED].
If your replacements array contains fewer elements than your expressions array, matched text for any
expression without a corresponding replacement is replaced with an empty string. For example:
$text = “The wholesale price is $89.50. “ .
“The product will be released on Jan 16, 2010.”;
$patterns = array(
“/\\$\d+\.\d{2}/”,
“/\w{3} \d{1,2}, \d{4}/”
);
$replacements = array(
“[PRICE CENSORED]”
);
echo preg_replace( $patterns, $replacements, $text );
displays:
The wholesale price is [PRICE CENSORED]. The product will be released on .
preg_replace() supports two more optional arguments. The first argument, an integer, lets you restrict
how many times the pattern (or patterns) is replaced in the target string (or strings):
// Displays “71%, 83%”
echo preg_replace( “/\d+\%(,| )*/”, “”, “14%, 59%, 71%, 83%”, 2 );
This pattern replaces a percentage figure (followed optionally by commas and spaces) with an empty
string. Because a limit argument of 2 was supplied, only the first two matches are replaced.
The second optional argument is a variable to hold the number of replacements performed. (If you want
to use this argument but you don ’ t want to limit the number of replacements, pass
– 1 for the previous
argument.) The following example replaces the character
‘ % ’ with the string “ percent ” four times, and
displays the number of replacements:
preg_replace( “/\%/”, “ percent”, “14%, 59%, 71%, 83%”, -1, $count );
echo $count; // Displays “4”
The number stored in $count is the total number of replacements performed. So if you pass an array of
10 target strings and text is replaced once in five of them, then
$count equals 5.
c18.indd 559c18.indd 559 9/21/09 6:17:59 PM9/21/09 6:17:59 PM
560
Part III: Using PHP in Practice
Replacing Text using a Callback Function
preg_replace() is a powerful, flexible function, offering a multitude of ways to search and replace
text. However, if you need even more flexibility you can use
preg_replace_callback() , which lets
you create a callback function to handle the replacement side of the operation.
preg_replace_callback() works in much the same way as preg_replace() , and accepts all the
same arguments, except that instead of passing a replacement string (or array of strings) as the second
argument, you pass the name of your callback function as a string.
Your callback function needs to accept an array of matches. The first element of the array (at index
0 )
contains the whole matched text, and additional elements contain any matched subpatterns. The string
that your function returns is then used as the replacement text.
Here ’ s an example. Say you have a large amount of sales copy that mentions prices of various products in
your online store, and you want to increase all your product prices by a dollar. You can ’ t do arithmetic
in regular expressions, but you can use
preg_replace_callback() and a callback function to add
numbers together:
$text = “Our high-quality mouse mat is just $3.99,
while our keyboard covers sell for $4.99 and our
screen protectors for only $5.99.”;
function addADollar( $matches ) {
return “$” . ( $matches[1] + 1 );
}
echo preg_replace_callback( “/\\$(\d+\.\d{2})/”, “addADollar”, $text );
The addADollar() callback function takes the second element in the matches array, which contains the
matched text from the subpattern in the regular expression (that is, the price without the dollar symbol),
and adds one to it. It returns this new value, preceded by a dollar symbol. This string is then used by
preg_replace_callback() to replace the matched text, producing the following result:
Our high-quality mouse mat is just $4.99, while our keyboard covers sell for
$5.99 and our screen protectors for only $6.99.
Altering Matching Behavior with
Pattern Modifiers
By placing a single letter, known as a pattern modifier , directly after the closing delimiter of a regular
expression, you can change the way that the expression behaves. Here ’ s a list of the more useful
modifiers:
c18.indd 560c18.indd 560 9/21/09 6:18:00 PM9/21/09 6:18:00 PM
Chapter 18: String Matching with Regular Expressions
561
Modifier Description
i Causes the matching to be case insensitive: letters in the pattern match both upper -
and lowercase characters in the string
m Causes the target string to be treated as separate lines of text if it contains newlines.
This means that
^ and $ characters in the expression match not only the beginning
and end of the string, but also the beginning and end of each line in the string
s Normally, the dot ( . ) character in an expression matches any character except
newline characters. By adding this modifier you can make the dot character match
newlines too
x This modifier causes whitespace characters in the pattern to be ignored, rather than
treated as characters to match. (However, whitespace inside a character class is
never ignored.) This allows you to split your regular expression over lines and
indent it, much like regular PHP code, to aid readability. You can also include
comments in the expression by preceding them with a
# symbol. If you explicitly
want to match whitespace characters when using this modifier, use
“ \ “ (for a
space),
“ \t ” (for a tab), or “ \s ” (for any whitespace character)
e Only used by preg_replace() . This modifier allows you to use PHP code in your
replacement string. Any backreferences (
$1 , $2 , and so on) in the replacement
string are first replaced by their matched text. Then the string is evaluated as PHP
code, and the resulting expression used for the replacement
U Inverts the “ greediness ” of quantifiers within the expression: any non - greedy
quantifiers become greedy, and any greedy quantifiers become non - greedy
For example, you can make an expression case insensitive by adding
i after the closing delimiter of the
expression:
$text = “Hello, world!”;
echo preg_match( “/hello/”, $text ) . “ < br / > ”; // Displays “0”
echo preg_match( “/hello/i”, $text ) . “ < br / > ”; // Displays “1”
The following example shows how the m modifier works. The first expression attempts to match the
characters “ world! ” followed by the end of the string. Because “ world! ” is not at the end of the target
string, the match fails. However, the second expression uses the
m modifier. This causes the $ character to
match the newline after “ world! ” :
$text = “Hello, world!\nHow are you today?\n”;
echo preg_match( “/world!$/”, $text ) . “ < br / > ”; // Displays “0”
echo preg_match( “/world!$/m”, $text ) . “ < br / > ”; // Displays “1”
The m modifier is useful if you ’ re working with a multiline string (such as that read from a file or
database query) that you want to treat as multiple lines of text rather than as one long string.
By adding the
x modifier to your expression you can split the expression over multiple lines and add
comments — very handy for complex expressions:
c18.indd 561c18.indd 561 9/21/09 6:18:00 PM9/21/09 6:18:00 PM
562
Part III: Using PHP in Practice
$text = “Andy scored 184 points, Rachel attained 198 points and Bert scored
112 points.”;
$pattern = “/
(Andy|Rachel|Bert)\ # Only match people we know about
(scored|attained)\ # Two words, same meaning
(\d+) # The number of points scored
/x”;
preg_match_all( $pattern, $text, $matches );
for ( $i = 0; $i < count( $matches[0] ); $i++ ) {
echo $matches[1][$i] . “: “ . $matches[3][$i] . “ < br / > ”;
}
This code produces the following output:
Andy: 184
Rachel: 198
Bert: 112
Finally, here ’ s an example that uses the e modifier. This is the same example used in the
preg_replace_callback() section earlier in the chapter, rewritten to use e instead:
$text = “Our high-quality mouse mat is just $3.99,
while our keyboard covers sell for $4.99 and our
screen protectors for only $5.99.”;
echo preg_replace( “/\\$(\d+\.\d{2})/e”, “’$’ . ($1 + 1)”, $text );
For each match, the PHP code within the replacement string displays a dollar symbol followed by the
text from the subpattern match (the price) plus one. This results in the following output:
Our high-quality mouse mat is just $4.99, while our keyboard covers sell for
$5.99 and our screen protectors for only $6.99.
You can combine several modifiers at once — just add the modifier letters one after the other:
$text = “Hello, World!\nHow are you today?\n”;
echo preg_match( “/world!$/im”, $text ) . “ < br / > ”; // Displays “1”
You can see the full list of pattern modifiers at />.pcre.pattern.modifiers.php
.
Splitting a String with a Regular
Expression
The final regular expression function explored in this chapter is preg_split() . In Chapter 6 you
studied the
explode() function, which allows you to split a string into an array of substrings.
You pass in a delimiter string (a comma, for example) and the target string is split at each place the
delimiter is found.
c18.indd 562c18.indd 562 9/21/09 6:18:00 PM9/21/09 6:18:00 PM
Chapter 18: String Matching with Regular Expressions
563
preg_split() takes string splitting a stage further by letting you specify a regular expression for the
delimiter. This gives you a lot more flexibility when deciding what to split a string on, and is very useful
when you need to parse a string written in human - friendly form. Consider the following example:
$text = “John Steinbeck, Franz Kafka and J.R.R. Tolkien”;
$authors = preg_split( “/,\s*|\s+and\s+/”, $text );
echo “ < pre > ”;
print_r( $authors );
echo “ < /pre > ”;
This code splits up the input string into its individual author names. The regular expression matches
either a comma followed by zero or more whitespace characters, or the word “ and ” surrounded by one
or more whitespace characters. This means that, whenever one of these two patterns is found in the
input string, the string is split at that point, producing this result:
Array
(
[0] = > John Steinbeck
[1] = > Franz Kafka
[2] = > J.R.R. Tolkien
)
As with explode() , you can limit the number of array elements returned by passing an integer as the
third argument to
preg_split() . You can also control preg_split() ’ s behavior by passing some
optional flags as the fourth argument:
PREG_SPLIT_NO_EMPTY : Removes any empty substrings from the returned array. This is useful
for removing unwanted substrings, as you see in a moment
PREG_SPLIT_DELIM_CAPTURE : Causes any matched subpatterns in the delimiter expression to
be returned in the array, as well as the string parts
PREG_SPLIT_OFFSET_CAPTURE : This works much like preg_match() ’ s PREG_OFFSET_CAPTURE
flag. When set,
preg_split() returns an array of arrays, where each nested array contains two
elements: the text of the extracted substring and its position in the original string
To set multiple flags, combine them with the bitwise OR operator — for example:
PREG_SPLIT_NO_EMPTY |
PREG_SPLIT_DELIM_CAPTURE
.
If you want to set one or more flags and don ’ t want to limit the number of elements returned, pass
– 1 as
the third argument.
To see how useful
PREG_SPLIT_NO_EMPTY can be, consider the following example:
$text = “’hello’, ‘goodbye’”;
$letters = preg_split( “/[‘, ]/”, $text );
echo “ < pre > ”;
print_r( $letters );
echo “ < /pre > ”;
❑
❑
❑
c18.indd 563c18.indd 563 9/21/09 6:18:01 PM9/21/09 6:18:01 PM
564
Part III: Using PHP in Practice
This code displays:
Array
(
[0] = >
[1] = > hello
[2] = >
[3] = >
[4] = >
[5] = > goodbye
[6] = >
)
This is because the regular expression causes any of the apostrophe, comma, and space characters to be
treated as delimiters. So the string is split right at the start and end because the first and last characters
are delimiters, and is also split three times between “ hello ” and “ goodbye ” because
preg_split()
“ sees ” three empty strings between the apostrophe, comma, and space characters in the input string.
Naturally these empty substrings are unwanted. By setting the
PREG_SPLIT_NO_EMPTY flag you can
easily remove these substrings from the resulting array:
$text = “’hello’, ‘goodbye’”;
$letters = preg_split( “/[‘, ]/”, $text, -1, PREG_SPLIT_NO_EMPTY );
echo “ < pre > ”;
print_r( $letters );
echo “ < /pre > ”;
This code produces the desired result:
Array
(
[0] = > hello
[1] = > goodbye
)
Try It Out Validate Form Input
Regular expressions are often used to check that user input is of the correct format. For example, you
can use a regular expression to determine if a user-supplied date field contains a correctly formatted
date string, or if a supplied email address follows the standard rules for email addresses.
This example script creates an order form for an imaginary company selling three product ranges:
SuperWidgets (with product codes of “SWnn”, where “nn” is a two-digit number), MegaWidgets
(with products codes of “MWnn”), and WonderWidgets (with product codes of “WWnn”). The user
can enter his email address, phone number, and the product codes to order. The script then validates
both the email address and phone number fields, and also converts any supplied, valid product codes
to a more human-readable form to display to the user in the confirmation page.
Save the following script as
order_form.php in your document root folder.
c18.indd 564c18.indd 564 9/21/09 6:18:01 PM9/21/09 6:18:01 PM
Chapter 18: String Matching with Regular Expressions
565
<!DOCTYPE html PUBLIC “-//W3C//DTD XHTML 1.0 Strict//EN”
“ /><html xmlns=” xml:lang=”en” lang=”en”>
<head>
<title>Validating Order Form Fields</title>
<link rel=”stylesheet” type=”text/css” href=”common.css” />
</head>
<body>
<h1>Validating Order Form Fields</h1>
<?php
if ( isset( $_POST[“submitted”] ) ) {
processForm();
} else {
displayForm();
}
function displayForm() {
?>
<h2>Please enter your order details below then click Send Order:</h2>
<form action=”” method=”post” style=”width: 30em;”>
<div>
<input type=”hidden” name=”submitted” value=”1” />
<label for=”emailAddress”>Your Email Address:</label>
<input type=”text” name=”emailAddress” id=”emailAddress” value=”” />
<label for=”phoneNumber”>Your Phone Number:</label>
<input type=”text” name=”phoneNumber” id=”phoneNumber” value=”” />
<label for=” productCodes”>Product Codes to Order:</label>
<input type=”text” name=”productCodes” id=”productCodes” value=”” />
<label> </label>
<input type=”submit” name=”submitButton” value=”Send Order” />
</div>
</form>
<div style=”clear: both;”> </div>
<p>(Separate product codes by commas. Codes are SW, MW, WW followed by 2
digits.)</p>
<?php
}
function processForm() {
$errorMessages = array();
$emailAddressPattern = “/
^ # Start of string
\w+((-|\.)\w+)* # Some word characters optionally separated by - or
# .
\@
[A-Za-z\d]+ # Domain name: some alphanumeric characters
c18.indd 565c18.indd 565 9/21/09 6:18:02 PM9/21/09 6:18:02 PM
566
Part III: Using PHP in Practice
((-|\.)[A-Za-z\d]+)* # followed 0 or more times by (- or . and more
# alphanums)
\.[A-Za-z\d]+ # followed by a final dot and some alphanumerics
$ # End of string
/x”;
$phoneNumberPattern = “/
^ # Start of string
( # Optional area code followed by optional
# separator:
\(\d{3}\)[ ]? # Code with parentheses
| # or
\d{3}[ ]? # Code without parentheses
)?
\d{3} # Prefix
[ ] # Hyphen or dot separator
\d{4} # Line number
$ # End of string
/x”;
$productCodePattern = “/^(SW|MW|WW)(\d{2})$/i”;
if ( !preg_match( $emailAddressPattern, $_POST[“emailAddress”] ) )
$errorMessages[] = “Invalid email address”;
if ( !preg_match( $phoneNumberPattern, $_POST[“phoneNumber”] ) )
$errorMessages[] = “Invalid phone number”;
if ( $errorMessages ) {
echo “<p>There was a problem with the form you sent:</p><ul>”;
foreach ( $errorMessages as $errorMessage ) echo “<li>$errorMessage
</li>”;
echo ‘<p>Please <a href=”javascript:history.go(-1)”>go back</a> and try
again.</p>’;
} else {
echo “<p>Thanks for your order! You ordered the following items:</
p><ul>”;
$productCodes = preg_split( “/\W+/”, $_POST[“productCodes”], -1, PREG_
SPLIT_NO_EMPTY );
$products = preg_replace_callback( $productCodePattern,
“expandProductCodes”, $productCodes );
foreach ( $products as $product ) echo “<li>$product</li>”;
echo “</ul>”;
}
}
function expandProductCodes( $matches ) {
c18.indd 566c18.indd 566 9/21/09 6:18:02 PM9/21/09 6:18:02 PM
Chapter 18: String Matching with Regular Expressions
567
$productCodes = array(
“SW” => “SuperWidget”,
“MW” => “MegaWidget”,
“WW” => “WonderWidget”
);
return $productCodes[$matches[1]] . “ model #” . $matches[2];
}
?>
</body>
</html>
Run the script by opening its URL in your Web browser. Fill in the form with your email address and
phone number, along with some product codes in the prescribed format, as shown in Figure 18-2.
Click Send Order to process the form. Notice how the thank-you page (Figure 18-3) expands the
product codes you entered into more meaningful product names.
Try returning to the form and entering email addresses and phone numbers in different formats, then
resending the form. You should find that, although the script is quite tolerant of different formats, it
still rejects any email addresses or phone numbers that don’t obey the standard formatting rules.
Figure 18-2
c18.indd 567c18.indd 567 9/21/09 6:18:02 PM9/21/09 6:18:02 PM
568
Part III: Using PHP in Practice
processForm() carries out two broad tasks: first, it uses regular expressions to validate the entered
email address and phone number, and second, it uses more regular expressions to split the entered
product list into separate product codes and then convert those codes to human - readable form.
After creating an array to store the error messages, the function defines a string to hold the regular
expression to validate an email address:
$emailAddressPattern = “/
^ # Start of string
\w+((-|\.)\w+)* # Some word characters optionally separated by - or
# .
\@
[A-Za-z\d]+ # Domain name: some alphanumeric characters
((-|\.)[A-Za-z\d]+)* # followed 0 or more times by (- or . and more
# alphanums)
\.[A-Za-z\d]+ # followed by a final dot and some alphanumerics
$ # End of string
/x”;
Figure 18-3
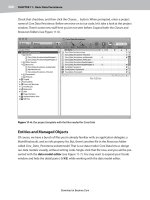
How It Works
This script follows the standard “form processor” format that you’ve seen many times before in the
book.
displayForm() is called to display the form markup, which in this case consists of fields for
email address, phone number, and a list of product codes.
c18.indd 568c18.indd 568 9/21/09 6:18:03 PM9/21/09 6:18:03 PM
Chapter 18: String Matching with Regular Expressions
569
The expression has been laid out in an easy - to - read format by using the x pattern modifier. The
comments help to make the expression self - explanatory. Essentially, in order to match the expression,
the email address needs to consist of a name portion, followed by an @ (at) symbol, followed by a
domain portion.
The name portion should be a string of letters and/or digits. The string may optionally contain hyphens,
dots, or underscores; however, the name mustn ’ t begin or end with a hyphen or dot.
The domain portion needs to start with a string of letters and/or digits, which may optionally contain
hyphens or dots, and finish with a final dot and more letters and/or digits (for example, “ .com ” ).
Next, the function defines a regular expression to validate a U.S. phone number:
$phoneNumberPattern = “/
^ # Start of string
( # Optional area code followed by optional
# separator:
\(\d{3}\)[ ]? # Code with parentheses
| # or
\d{3}[ ]? # Code without parentheses
)?
\d{3} # Prefix
[ ] # Hyphen or dot separator
\d{4} # Line number
$ # End of string
/x”;
A U.S. phone number can consist of an optional three - digit area code, followed by an optional hyphen,
dot, or space, followed by the three - digit prefix, then a hyphen or dot, then the four - digit line number.
The expression can deal with area codes surrounded by parentheses — such as (599) 123 - 4567 — as well
as area codes without parentheses — for example: 599 - 123 - 4567.
The function also defines a regular expression that matches a valid product code — this is used to
convert the product codes into product names:
$productCodePattern = “/^(SW|MW|WW)(\d{2})$/i”;
A product code is simply “ SW ” , “ MW ”, or “ WW ”, followed by a two - digit number. Notice that both
portions of the product code are matched using subpatterns so that the matched values can be extracted.
Now the function validates the supplied email address and phone number. If either of them fail to
match, an error message is generated:
if ( !preg_match( $emailAddressPattern, $_POST[“emailAddress”] ) )
$errorMessages[] = “Invalid email address”;
if ( !preg_match( $phoneNumberPattern, $_POST[“phoneNumber”] ) )
$errorMessages[] = “Invalid phone number”;
c18.indd 569c18.indd 569 9/21/09 6:18:04 PM9/21/09 6:18:04 PM
570
Part III: Using PHP in Practice
If one or more error messages were generated, they are displayed to the user:
if ( $errorMessages ) {
echo “ < p > There was a problem with the form you sent: < /p > < ul > ”;
foreach ( $errorMessages as $errorMessage ) echo “ < li > $errorMessage < /li > ”;
echo ‘ < p > Please < a href=”javascript:history.go(-1)” > go back < /a > and try
again. < /p > ’;
If all was well with the form, a thank - you message is displayed, and the list of ordered products is
shown to the user in expanded form:
} else {
echo “ < p > Thanks for your order! You ordered the following items:
< /p > < ul > ”;
$productCodes = preg_split( “/\W+/”, $_POST[“productCodes”], -1, PREG_
SPLIT_NO_EMPTY );
$products = preg_replace_callback( $productCodePattern,
“expandProductCodes”, $productCodes );
foreach ( $products as $product ) echo “ < li > $product < /li > ”;
echo “ < /ul > ”;
First, preg_split() is used to split the supplied product code string into an array of individual product
codes. The delimiter is a string of one or more non - word characters (
\W+ ). This allows a degree of
flexibility; for example, the user can use a comma to separate the codes, or a comma followed by a space,
or a hyphen.
Next the array of product codes is passed to
preg_replace_callback() to turn them into an
array of product names (
$products ). The product code regular expression created earlier
(
$productCodePattern ) is used to match the two portions of the product code. The expansion is
handled by the
expandProductCodes() function, which is explained in a moment.
Finally, the function loops through the
$products array, displaying the product names in an
unordered list.
The
expandProductCodes() function defines an array to map the two - letter portion of the product
code to a product range:
$productCodes = array(
“SW” = > “SuperWidget”,
“MW” = > “MegaWidget”,
“WW” = > “WonderWidget”
);
Then it ’ s simply a case of using the array to convert the first subpattern match — $matches[1] — to the
product range string, then returning this string, followed by the string “ model # ”, followed by the
second subpattern match, which is the two - digit product code:
return $productCodes[$matches[1]] . “ model #” . $matches[2];
c18.indd 570c18.indd 570 9/21/09 6:18:04 PM9/21/09 6:18:04 PM
Chapter 18: String Matching with Regular Expressions
571
Summary
This chapter introduced you to regular expressions, a powerful and compact way to search for
complex patterns of text within strings. You studied the various components of regular expression
syntax, including:
How to include literal characters in regular expressions
How to use character classes to match types of characters, such as letters or digits
Using quantifiers to match the same character more than once in succession
Controlling the amount of text matched through the use of greedy and non - greedy matching
How to use subpatterns to make regular expressions more powerful
Creating alternative patterns to allow for more flexible matching
Using anchors to match text at specific points in the target string
Modifying matching behavior with pattern modifiers
You also explored PHP ’ s various regular expression functions, including:
preg_match() and preg_match_all() for matching strings against regular expressions
preg_quote() for escaping special characters in expressions
preg_grep() for matching arrays of strings
preg_replace() and preg_replace_callback() for replacing pattern matches
with new text
preg_split() to split strings using a regular expression to match delimiters
Along the way you studied example scripts for finding linked URLs in a Web page, as well as validating
and processing user input.
The next chapter looks at XML — a very useful way to store and exchange data — and shows how you
can read and write XML data from within your PHP scripts. Meanwhile, try the following two exercises
to check your understanding of regular expressions. You can find the solutions to these exercises in
Appendix A.
Exercises
1. Write a regular expression that extracts the domain name portion of a Web URL (excluding
the “
www. ” subdomain if supplied). The protocol portion of the URL should be optional.
For example, the expression should extract the domain name
“ example.com ” from any of the
following URLs:
❑
❑
❑
❑
❑
❑
❑
❑
❑
❑
❑
❑
❑
❑
❑
c18.indd 571c18.indd 571 9/21/09 6:18:04 PM9/21/09 6:18:04 PM
572
Part III: Using PHP in Practice
❑
❑ www.example.com/hello/there.html
❑
2. Enhance the find_links.php script created earlier in the chapter to display not just the URL of
each link, but also the link text (the text between the
< a > and < /a > tags).
c18.indd 572c18.indd 572 9/21/09 6:18:05 PM9/21/09 6:18:05 PM
19
Working with XML
XML — eXtensible Markup Language — lets you create text documents that can hold data in a
structured way. It was originally designed to be a human - readable means of exchanging structured
data, but it has also gained ground very quickly as a means of storing structured data. Although
XML is different from a database in many ways, both XML and databases offer ways to format and
store structured data, and both technologies have advantages and drawbacks.
XML isn ’ t really a language but rather a specification for creating your own markup languages.
It is a subset of Standard Generalized Markup Language (SGML, the parent of HTML). XML is
intended to allow different applications to exchange data easily. If you ’ re familiar with HTML,
you ’ ll notice similarities in the way HTML and XML documents are formatted. Although
HTML has a fixed set of elements and attributes defined in the HTML specification, XML lets you
create your own elements and attributes, thereby giving you the capability to define your own
language in XML (or to use someone else ’ s definition). Essentially, you can format any data you
want using XML.
In addition, the definition of an XML - based language can be placed online for any person or
application to read. So two applications that know nothing about each other can still exchange
data as long as both applications have the ability to read and write XML.
For these reasons XML is rapidly becoming the data exchange standard, and many useful
technologies have been created on top of XML, such as:
Web Services, including languages such as SOAP for exchanging information in XML
format over HTTP, XML - RPC (SOAP ’ s simpler ancestor), and the Web Services
Description Language (WSDL), used for describing Web Services
Application file formats, such as OpenOffice ’ s OpenDocument Format (ODF) and
Microsoft ’ s Office Open XML (OOXML) that are used to store word processing
documents, spreadsheets, and so on
RSS and Atom news feeds that allow Web applications to publish news stories in a
universal format that can be read by many types of software, from news readers and email
clients through to other Web site applications
❑
❑
❑
c19.indd 573c19.indd 573 9/21/09 9:17:42 AM9/21/09 9:17:42 AM
574
Part III: Using PHP in Practice
PHP has many features and functions that make working with XML data fast and efficient, as well as
intuitive. In this chapter you learn the basics of XML, and how to create XML documents from scratch.
You then move onto using PHP ’ s XML Parser extension to read and parse XML documents
programmatically.
Once you ’ ve mastered XML Parser, you explore PHP ’ s DOM extension that gives you a lot of power to
read, create, and manipulate XML documents; then you take a look at SimpleXML — a nice, easy way
to read and perform simple operations on XML data. Finally, you take a brief look at another aspect of
XML called XSL, and examine PHP ’ s
XSLTProcessor class for transforming XML documents into
other formats.
What Is XML?
XML is a specification for creating your own markup languages. In turn, you use these markup
languages to create documents. Like HTML, an XML document contains elements and attributes in the
form of tags.
Though XML documents are human - readable, many applications are designed to parse XML documents
automatically and work efficiently with their content. PHP has many XML - related functions that can
easily be used to work with XML documents, or transform non - XML data into XML documents.
You can make your own XML document as easily as this:
< ?xml version=”1.0” ? >
< stockList >
< item type=”fruit” >
< name > apple < /name >
< unitPrice > 0.99 < /unitPrice >
< quantity > 412 < /quantity >
< /item >
< item type=”vegetable” >
< name > beetroot < /name >
< unitPrice > 1.39 < /unitPrice >
< quantity > 67 < /quantity >
< /item >
< /stockList >
The first line of this document is called the XML declaration ; it indicates that the following lines comprise
an XML document, and specifies the version of XML that is used to create the document. The second line
defines the root element of the document (named
stockList ). There can be only one root element for an
XML document. The third line defines a child element of the root element, named
item , and it contains an
attribute named
type that is set to the value fruit .
From reading this XML document, you can tell that:
It stores a list of stock items
There are 412 apples available, and an apple is a fruit and costs $0.99
There are 67 beetroots available, and a beetroot is a vegetable and costs $1.39
❑
❑
❑
c19.indd 574c19.indd 574 9/21/09 9:17:43 AM9/21/09 9:17:43 AM
Chapter 19: Working with XML
575
Like HTML, XML documents are composed primarily of elements and attributes. Each element may
optionally contain one or more child elements; in the example document just shown there are two
item
elements inside the root
stockList element, and each item element itself contains three child elements.
An element may also contain plain text rather than child elements (such as the text
apple inside the first
name element in the example document).
It ’ s also possible for an XML element to contain both child elements and plain text, though this usage
isn ’ t that common in practice.
Each element can optionally have one or more attributes; these are specified in the format
name= “ value ”
inside the element ’ s opening tag (such as
< item type= “ fruit “ > in the example document).
Anyone can write XML documents, and many folks also design applications to handle XML documents
— both reading existing documents and composing new ones. The XML specification is free for anyone
to use; the World Wide Web Consortium at
www.w3.org authored and maintains the latest versions of
the spec.
Although you can write XML documents just by creating arbitrary elements and attributes — as shown
in the
stockList example earlier — often you want to formally specify the elements and attributes that
are allowed in a document, as well as their meaning and structure. This is so that, when you exchange
data with another person or application, both parties to the transaction know exactly what the element
and attribute names mean. To do this, you use either a document type definition (DTD) or an XML
Schema definition (XSD); DTDs are discussed in detail a little later in this chapter.
Frequently when you create XML documents, you ’ ll either use an existing publicly available DTD (or
XSD) or use one you ’ ve written yourself. Once you write a DTD, you can publish it on the Web. That
means anyone who needs to read or write an XML document compatible with your system has the
capability to access the published DTD to make sure the document is valid.
XML Document Structure
Two terms that you hear frequently when discussing XML are well - formed and valid . A well - formed XML
document follows the basic XML syntax rules (to be discussed in a minute), and a valid document also
follows the rules imposed by a DTD or an XSD. In other words:
All XML documents must be well - formed — A well - formed XML document uses correct XML
syntax. It may contain any elements, attributes, or other constructs allowed by the XML
specification, but there are no rules about what the names of those elements and attributes can
be (other than the basic naming rules, which are really not much of a restriction) or about what
their content can be. It is in this extensibility that XML really derives a lot of its power and
usefulness; so long as you follow the basic rules of the XML specification, there ’ s no limit to
what you can add or change
An XML document can also be valid — A well - formed document does not need to be valid, but
a valid document must be well - formed. If a well - formed document contains a reference to a
DTD or XSD, the document can be checked against the DTD or XSD to determine if it ’ s valid. An
XML document is valid if its elements, attributes, and other contents follow the rules in the DTD
or XSD. Those rules dictate the names of elements or attributes in the document, what data
those elements and attributes are allowed to contain, and so on
❑
❑
c19.indd 575c19.indd 575 9/21/09 9:17:43 AM9/21/09 9:17:43 AM
576
Part III: Using PHP in Practice
By using valid XML documents, applications that know nothing about each other can still communicate
effectively — they just have to exchange XML documents, and understand the meaning of the DTD
or XSD against which those documents are validated. This is one of the main features that make XML
so powerful.
Major Parts of an XML Document
Broadly speaking, a well - formed XML document may contain the following:
An XML declaration at the top of the document, possibly including a character encoding
declaration. This declaration is a good idea, but it ’ s not mandatory. If no XML declaration is
given, version 1.0 is normally used. If no character encoding is specified, UTF - 8 is assumed.
For example:
< ?xml version=”1.0” encoding=”UTF-8”? >
An optional DTD or an XSD, or a reference to one of these if they are stored externally. This
must appear before the document ’ s root element. For example, here ’ s a reference to an
external DTD:
< !DOCTYPE stockList SYSTEM “ >
All XML documents must contain one — and only one — root element. This element usually
contains one or more child elements, each of which may optionally have one or more attributes.
An element can contain other child elements or data between its beginning and ending tag, or it
may be empty
XML documents may contain additional components such as processing instructions (PIs) that
provide machine instructions for particular applications; CDATA sections, which may contain
special characters that are not allowed in ordinary XML data; notations; comments; entity
references (aliases for entities such as special characters); text; and entities. You look at some of
these components later in the chapter
Here ’ s an enhanced version of the
stockList example document used earlier that illustrates each of
these major parts. First the XML declaration:
< ?xml version=”1.0” encoding=”UTF-8”? >
Next is the reference to a DTD that defines the allowed elements and attributes in the document:
< !DOCTYPE stockList SYSTEM “ >
Now the root element begins. Remember that there can be only one root element in an XML document:
< stockList >
❑
❑
❑
❑
c19.indd 576c19.indd 576 9/21/09 9:17:43 AM9/21/09 9:17:43 AM
Chapter 19: Working with XML
577
The root element contains two item child elements. Each child element itself contains four children. The
description elements contain CDATA sections to enclose their text data, because the data contains
characters such as
> , < , and & that would otherwise be treated as markup:
< item type=”fruit” >
< name > apple < /name >
< unitPrice > 0.99 < /unitPrice >
< quantity > 412 < /quantity >
< description > < ![CDATA[Apples are > > > yummy < < < ]] > < /description >
< /item >
< item type=”vegetable” >
< name > beetroot < /name >
< unitPrice > 1.39 < /unitPrice >
< quantity > 67 < /quantity >
< description > < ![CDATA[Beetroots are lovely & purple]] > < /description >
< /item >
Finally, the root element is closed:
< /stockList >
XML Syntax Rules
You now know what the major components of an XML document are. In addition, a well - formed XML
document must follow all the other syntax rules of the XML specification, the most common of which are
listed here:
XML elements are declared to be either non - empty, in which case they are designed to contain
data; or empty, in which case they cannot contain data. For example, in XHTML, the
p
(paragraph) element is non - empty because it can contain text, whereas the
br (line - break)
element is empty because it cannot contain anything
Non - empty elements can be created from start and end tags (like the
< p > < /p > tags in
XHTML). Empty elements should be created using the special empty - element tag format (like
the
< br/ > tag in XHTML). Unlike HTML, you cannot have a start tag that isn ’ t followed
by an end tag
XML attributes are written inside the start tags of non - empty elements, or inside the empty -
element tags of empty elements, and must be of the format
name= “ value ” or name=’value’ .
No attribute name may appear more than once inside any given element. For example:
< item type=”vegetable” > < /item >
< emptyElement color=’red’ / >
XML elements must be properly nested, meaning any given element ’ s start and end tags must
be outside the start and end tags of elements inside it, and inside the start and end tags of its
enclosing element. Here ’ s an example:
< ! Incorrect nesting >
< parent > < child > < /parent > < /child >
< ! Correct nesting >
< parent > < child > < /child > < /parent >
❑
❑
❑
❑
c19.indd 577c19.indd 577 9/21/09 9:17:44 AM9/21/09 9:17:44 AM
578
Part III: Using PHP in Practice
Element names may not start with the characters “ xml ” , “ XML ”, or any upper - or lowercase
combination of these characters in this sequence. Names must start with a letter, an underscore,
or a colon, but in practice, you should never use colons unless you ’ re dealing with XML
namespaces. Names are case - sensitive. Letters, numbers, the hyphen, the underscore, and the
period are valid characters to use after the first character
Comments are delimited in the same way as HTML comments (
< ! - - and - - > )
Using XML Elements and Attributes
XML elements and their attributes form the hierarchical structure of an XML document, and contain the
document ’ s data. Although there can be only one root element, every element (including the root) may
contain multiple elements (often referred to as child elements ). In addition, you ’ re allowed to have
multiple child elements all with the same name.
Each XML element may contain one or more attributes; however, an attribute name may appear only
once within any given element.
There is some controversy about when to use an attribute and when to use a child element for containing
data. Although there is no hard and fast rule, a good rule of thumb is:
Use a child element when you might need to include the same field more than once in an
element. For example, the
stockList root element described earlier contains multiple item
child elements. It wouldn ’ t be possible to do this with attributes, because you can ’ t have more
than one attribute with the same name for any given element
Use an attribute when you ’ re sure the data will occur only once within the element, such as the
type attribute for the item elements (an item can be a fruit or a vegetable, but not both)
Another good rule of thumb is: use child elements for data that is core to the element, and use attributes
for data that is peripheral to the element, or that uniquely identifies an element (such as an
id attribute) .
Valid XML Documents: DTDs and XSDs
As explained earlier, a valid XML document is one that contains a reference to a DTD (document type
definition) or an XSD (XML Schema definition), and whose contents follow both the general XML syntax
rules (meaning it is well - formed), and also the rules specified in the DTD or XSD (which means it is
valid). The “ stock list ” XML document described earlier is both well - formed and (potentially) valid:
< ?xml version=”1.0” encoding=”UTF-8”? >
< !DOCTYPE stockList SYSTEM “ >
< stockList >
< item type=”fruit” >
< name > apple < /name >
< unitPrice > 0.99 < /unitPrice >
< quantity > 412 < /quantity >
< description > < ![CDATA[Apples are > > > yummy < < < ]] > < /description >
< /item >
< item type=”vegetable” >
< name > beetroot < /name >
< unitPrice > 1.39 < /unitPrice >
❑
❑
❑
❑
c19.indd 578c19.indd 578 9/21/09 9:17:44 AM9/21/09 9:17:44 AM
Chapter 19: Working with XML
579
< quantity > 67 < /quantity >
< description > < ![CDATA[Beetroots are lovely & purple]] > < /description >
< /item >
< /stockList >
Notice the reference to the URL of an external DTD in the second line. This allows a piece of software to
validate the document by reading the DTD and making sure the document conforms to the DTD.
Of course, you could manually read through the document and compare it with the elements, attributes,
and other document components specified in the DTD, but many applications are available that
can automatically validate an XML document against a DTD or an XSD. And because the DTD or XSD is
available either directly in the document or online, it ’ s easy for these applications to perform the
validation function for you automatically as they parse the document.
It ’ s also possible to embed the contents of a DTD within the XML document itself, rather than referenc-
ing an external DTD. However, embedding is recommended only if the DTD is small.
DTDs are special documents written in Extended Backus - Naur Form (EBNF), which is not an XML language
and isn ’ t as easy to parse as XML. DTDs specify constraints on XML elements, attributes, content, and more.
XSDs serve the same purpose as DTDs, but are written in the XML - based XML Schema language, and as
such they can easily be processed using an XML parser. XSDs are also much more capable than DTDs for
defining detail in your elements and attributes (such as data type, range of values, and so forth) and are
therefore preferred over DTDs by many XML authors. However, XSDs are a complex topic that is out of
the scope of this book, so this chapter concentrates on DTDs instead.
If you ’ re interested in XSDs you can find more about them at
/>Schema/default.asp .
XHTML: An Example of DTDs in Action
As mentioned previously, anyone can author an XML document, and anyone can define a DTD or XSD
against which to validate an XML document. One well - known example of a DTD is XHTML, which is
HTML reformulated as XML. The XHTML DTD is essentially similar to the existing HTML DTD, with
very small modifications, and it defines all the elements, attributes, and other components allowed in an
XHTML document. The main difference between HTML and XHTML is the fact that an XHTML
document — being an XML document at heart — must conform to the XML specification, whereas
HTML documents are not required to do so.
To display an XHTML document as a regular Web page, the document must be well - formed, and also
validate against the XHTML DTD. In the next few sections you examine a portion of the DTD for
XHTML, learn how the DTD can be referenced in an XHTML document, explore XML namespaces, and
learn how to create an XHTML Web page.
The DTDs for XHTML
There are three DTDs for XHTML. They ’ re located at:
www.w3.org/TR/xhtml1/DTD/xhtml1 - strict.dtd
www.w3.org/TR/xhtml1/DTD/xhtml1 - transitional.dtd
www.w3.org/TR/xhtml1/DTD/xhtml1 - frameset.dtd
❑
❑
❑
c19.indd 579c19.indd 579 9/21/09 9:17:44 AM9/21/09 9:17:44 AM
580
Part III: Using PHP in Practice
These three DTDs complement their HTML counterparts, and are, in fact, quite similar. If you enter these
URLs in your browser, you ’ ll actually see the DTD in plain text. (You might need to download the DTD
file and open it in your text editor.)
Here is a portion of the XHTML Strict DTD showing how the
img (image) element is declared:
< !
To avoid accessibility problems for people who aren’t
able to see the image, you should provide a text
description using the alt and longdesc attributes.
In addition, avoid the use of server-side image maps.
Note that in this DTD there is no name attribute. That
is only available in the transitional and frameset DTD.
>
< !ELEMENT img EMPTY >
< !ATTLIST img
%attrs;
src %URI; #REQUIRED
alt %Text; #REQUIRED
longdesc %URI; #IMPLIED
height %Length; #IMPLIED
width %Length; #IMPLIED
usemap %URI; #IMPLIED
ismap (ismap) #IMPLIED
>
< ! usemap points to a map element which may be in this document
or an external document, although the latter is not widely supported >
On the first line following the comment, the img element is declared as EMPTY (that is, it contains no
content, only attributes). Following the
ELEMENT line is a list of attributes that may be included inside the
img tag in an XHTML document. Those of you familiar with HTML and XHTML no doubt recognize
the
src attribute as the URI that specifies the location of the image file; this attribute is REQUIRED .
So this portion of the DTD for XHTML documents specifies that it is permissible to include
img elements
in such documents. If the DTD is referenced in an XHTML document, and the document includes an
img
element with an appropriate
src attribute, the document could be said to be valid (at least as far as the
img element is concerned). However, if you tried to include an element name imge or image or images ,
a validating XML parser would produce an error, because according to the DTD such elements are not
declared, and therefore the document is not valid.
Referencing DTDs
To reference an external DTD, you use a DOCTYPE declaration. This declaration indicates the name and
the location of the DTD. For example, this line shows how to reference the XHTML Strict DTD:
< !DOCTYPE html PUBLIC “-//W3C//DTD XHTML 1.0 Strict//EN”
“ >
c19.indd 580c19.indd 580 9/21/09 9:17:45 AM9/21/09 9:17:45 AM
Chapter 19: Working with XML
581
The html after the < !DOCTYPE in the first line signifies that the root element is named html . The
declaration also includes the URI of the DTD on the
www.w3.org Web site. If the DTD is an external
document, it can be located anywhere, and identified by any URI that the application reading it
understands and has access to, not just a URL over the Internet.
Specifying Namespaces
An XML namespace indicates the source of names for elements and attributes. Being able to specify the
source of an element or attribute name means that you can use the same name to represent different
things within a single document. An XML document may reference multiple namespaces, if required.
A namespace can be identified within an XML document by referencing it via a special reserved XML
keyword: the
xmlns (XML Namespace) attribute. When applied to an element, the namespace is then
valid for that element and its children.
For example, all elements within an XHTML document must be in an XHTML namespace. The simplest
way to do this is to use the
xmlns attribute on the root element ( html ) of the XHTML document.
Defining the namespace for the root element also serves to define the namespace for all of its children —
that is, the rest of the elements and attributes in the document:
< html xmlns=” >
Creating an XHTML Document
Now that you understand how to create a valid XML document, you can apply this knowledge to create
an XHTML document.
To do this, start by indicating the version of XML you ’ re using, and then provide a
DOCTYPE declaration
referencing the XHTML DTD. Next, create the root element —
html — and include the xmlns attribute
to declare the XHTML namespace for this element (and all its child elements). Finally, you can include all
the child elements under the
html root element — in other words, the content of your XHTML page.
Here ’ s an example:
< ?xml version=”1.0” encoding=”UTF-8”? >
< !DOCTYPE html PUBLIC “-//W3C//DTD XHTML 1.0 Strict//EN”
“ >
< html xmlns=” xml:lang=”en” lang=”en” >
< head >
< title > An XHTML example < /title >
< /head >
< body >
< p > This is an example of an XHTML Strict document. It can contain images
( < img src=” alt=”an image” / > ) as
well as links ( < a href=” > example.com < /a > ) and any other
HTML elements, provided they conform to the XML syntax rules. < /p >
< /body >
< /html >
Of course, this document looks very much like an ordinary HTML document, and will be displayed just
like any Web page written in HTML in most browsers. However, unlike an HTML document it conforms
to the XML specification, and is not only well - formed but also valid.
c19.indd 581c19.indd 581 9/21/09 9:17:45 AM9/21/09 9:17:45 AM
582
Part III: Using PHP in Practice
Reading XML Documents with PHP
Recently, as the XML specification has gained prominence as a means of exchanging and storing data,
PHP has added progressively more functions and classes to make it easier to work with XML documents.
In the remainder of this chapter you concentrate on the following XML features in PHP:
Reading, or parsing, XML documents using the XML Parser extension
Using the DOM extension to manipulate XML documents via the Document Object Model
Reading, writing, and manipulating XML documents using PHP ’ s SimpleXML extension
This section looks at reading XML documents with XML Parser.
How XML Parser Works
With XML Parser, you create functions to deal with specific events — such as when the start or end of an
XML element is encountered — then register these functions as event handlers for the parser. Then,
whenever a parser encounters a new piece of the XML document, it calls your appropriate event handler
function which, in turn, processes that piece of the document.
The process of using XML Parser to read an XML document usually breaks down like this:
1. Create a new parser resource by calling the xml_parser_create() function.
2. Create two event handler functions to handle the start and end of an XML element, then register
these functions with the parser using the
xml_set_element_handler() function.
3. Create another event handler function to handle any character (text) data that may be found
inside an element, and register this function with the parser using
xml_set_character_data_handler() .
4. Parse the XML document by calling the xml_parse() function, passing in the parser and the
XML string to parse.
5. Finally, destroy the parser resource, if it ’ s no longer needed, by calling xml_parser_free() .
Next you explore each of these steps more closely.
Creating a New Parser
The process of creating a new parser is easy. Simply call xml_parser_create() to generate a new
parser resource, and store the resource in a variable:
$parser = xml_parser_create();
You can optionally add an argument that specifies the encoding in which character data is passed to
your event handler functions. By default, the parser sends characters using
UTF - 8 encoding, but you can
change this to either
ISO - 8859 - 1 or US - ASCII if you prefer. For example:
$parser = xml_parser_create( “US-ASCII” );
❑
❑
❑
c19.indd 582c19.indd 582 9/21/09 9:17:45 AM9/21/09 9:17:45 AM