Unix for mac your visual blueprint to maximizing the foundation of mac osx phần 2 potx
Bạn đang xem bản rút gọn của tài liệu. Xem và tải ngay bản đầy đủ của tài liệu tại đây (2.76 MB, 36 trang )
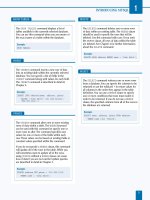
DELETE A FILE
⁄ Type rm and a space.
¤ Type the name of the file
and press Return.
■ The shell deletes the file.
DELETE A FILE SAFELY
⁄ Type rm -i and a space.
¤ Type the name of the file
and press Return.
■ The shell asks you if you
want to delete the file.
‹ Type your response and
press Return.
■ The rm command either
deletes the file or abandons
the operation, depending on
your response.
23
Y
ou can use the rm command to delete files you no
longer want to keep. When you delete a file using
the Mac OS X Finder in Aqua, the Finder does not
immediately delete the file, but stores it in the Trash.
However, when you delete a file using the rm command,
the file completely and instantly disappears. This means that
if you mistakenly delete a file from the shell, you cannot
recover it by simply dragging it back out of the Trash.
As with the cp and mv commands, deleting files can be
dangerous because people can make mistakes. You can use
the -i option to tell the rm command to confirm that you
want to delete a file; if you do, you can type y for yes, and
press Return. If you do not, you can press any other key or
simply the Return key.
By default, the rm command only removes ordinary files,
although you can remove an empty directory with the
rmdir command; for a directory containing files, you can
use the rm –r command. You cannot remove directories
unless they belong to you or you have write permission to
the files. However, there is no special access permission
required to delete a file.
It is possible to delete a file whose name begins with a
dash, such as -foo or -bar. These are extremely hard to
remove, because the rm command tries to interpret the
filenames as an option, because options begin with dashes.
In this situation, you can use the option (a double dash).
This means that the command does not check the rest of
the line for more options, making this your last option flag.
DELETE A FILE
WORK WITH FILES
2
DELETE A FILE
02 53730X Ch02.qxd 3/25/03 8:56 AM Page 23
REMOVE READ ACCESS
⁄ Type chmod and a space.
¤ Type og-r and a space.
‹ Type the name of a file
and press Return.
■ The shell indicates that only
you can read the file.
ADD WRITE ACCESS
⁄ Type chmod g+w and a
space.
¤ Type the name of a file
and press Return.
■ The shell indicates that
anyone in the file group can
change this file.
Y
ou can change the permissions on files you own,
allowing you to grant or withhold permission to
others to read, write, or execute your files. There
are two parameters for the chmod command, the first being
the new mode, and the second being the file you want to
change. You specify the mode change by indicating who the
change affects, whether the change should be to add,
remove, or set permissions, and what kind of permissions
you want to set.
Unix uses letters to designate the users that your mode
change affects: u, for the owner of the file, or user, g,for
users in the file group, o, for others — users not in the
group — or a, for all users. You can designate more than
one set of users by combining these designators together,
such as go, to indicate users in the file group and users not
in the file group, while omitting the file owner.
You can mark permission changes with a plus symbol (+) to
add permissions, a minus symbol (-) to remove them, or an
equal symbol (=) to set them. The possible permissions are
the same as those shown by the ls -l command: r for
read access, w for write access, and x for execute access.
You can make more than one change at a time to a given
file by listing them with commas as separators. For example,
to set the file example to be readable, writeable, and
executable by you, readable and executable by those in the
file group, and readable by those outside of the group, you
can type chmod u=rwx,g=rx,o=r example.
CHANGE FILE PERMISSIONS
UNIX FOR MAC
24
CHANGE FILE PERMISSIONS
02 53730X Ch02.qxd 3/25/03 8:56 AM Page 24
SET EXECUTION PERMISSIONS
⁄ Type chmod a-x,u+x and a
space.
¤ Type the name of a file
and press Return.
■ The shell indicates that only
you can execute this file.
SET CUSTOM PERMISSIONS
⁄ Type chmod a=r and a
space.
¤ Type the name of a file
and press Return.
■ The shell indicates the new
permissions: the file is now
read-only by everyone.
Note: You cannot alter this file
without changing the permissions
back.
WORK WITH FILES
2
You can change the permissions
for an entire directory and its
contents, including your Home
directory, by using the -R option
with the chmod command. The
-R option dictates that modes
should be changed recursively,
which means that the changes
apply to all files in that directory
or in its subdirectories.
For example, if you want to
make sure your Home directory
is readable only by you and not
by other users of your computer,
you use the chmod –R
command.
25
TYPE THIS:
[ferro:~] user% chmod -R go-rx ~
[ferro:~] user% ls -l
RESULTS:
drwx 8 user staff 272 Nov 13 13:57 Desktop
drwx 12 user staff 408 Nov 13 02:00 Documents
drwx 22 user staff 748 Nov 13 03:40 Library
drwx 3 user staff 102 Nov 4 13:49 Movies
drwx 3 user staff 102 Nov 4 13:49 Music
drwx 3 user staff 102 Nov 4 13:49 Pictures
drwx 4 user staff 136 Nov 4 13:49 Public
drwx 5 user staff 170 Nov 4 13:49 Sites
02 53730X Ch02.qxd 3/25/03 8:56 AM Page 25
MATCH A GLOB PATTERN
⁄ Type a command that
takes a filename as an
argument.
¤ Type a wildcard pattern
that matches the files you
want to select.
■ The shell executes your
command on the files
specified by the wildcard
pattern.
USE CARETS TO SELECT
UNMATCHED FILES
⁄ Type a command that
takes a filename as an
argument.
¤ Type ^ followed by the
wildcard pattern matching
the files you do not want to
select.
■ The shell executes your
command on the files in the
current directory, except for
those specified by the
wildcard pattern.
26
SELECT FILES USING WILDCARDS
Y
ou can use wildcard characters to avoid having to
type out the full name of each file you want to work
with in Unix. This not only saves typing but also lets
you refer to multiple files with similar names in a single
command.
Unix shell wildcards are also called glob-patterns, and the
use of these wildcards is known as globbing in Unix jargon.
You can use these wildcards whenever you give a filename
argument to a shell command.
The asterisk wildcard (*) matches any sequence of zero or
more characters in a filename. The question mark (?) matches
any single character. A range of characters in square brackets,
such as [a-m], matches any single character within that range.
Keep in mind that letters in filenames are case-sensitive, so
while the letter d is a match for [a-m], the letter D is not,
because it does not come between lowercase a and m.
A caret (^) at the start of a pattern or a range of characters
indicates that the pattern should select those characters
that do not match the given pattern. For example, if you
want to use the ls -l command on all directories and
files that begin with the letter P, you can type ls -l P*.To
remove all files beginning with A, followed by three letters,
and ending in .doc, from your Documents directory, you
can type rm -i Documents/A???.doc. You should always use
the -i option with the rm command if you give it wildcard
arguments, to avoid deleting the wrong files. A careless rm
* command in the wrong directory can remove the
contents of the directory.
Hidden files are resistant to being identified through
wildcards. The command ls *, for example, does not list
them while ls .* lists only hidden files.
SELECT FILES USING WILDCARDS
UNIX FOR MAC
02 53730X Ch02.qxd 3/25/03 8:56 AM Page 26
⁄ Type set autolist.
¤ Type a shell command
that takes a filename as an
argument.
‹ Type the first few letters of
the filename and press the
Tab key.
■ A list of possible matches
appears.
› Type enough letters to
make an unambiguous
match.
ˇ Press the Tab key again.
■ The shell completes the
filename.
Á Press Return.
■ The shell executes the
command.
27
Y
ou can easily specify filename arguments by using
command completion, which is a special function
built into the shell. To use filename completion, you
must type out the first part of the filename and then press
the Tab key. If there is a file that matches the incomplete
filename, the shell fills in the full filename for you.
If no file matches the filename, your shell program emits a
beep, indicating that there is not a match. If more than one
file matches, the shell program fills in as much as it can and
then emits a beep, while waiting for you to enter more text
to differentiate between the files that match the pattern up
to that point and then differ. At this point, you can either
type out the rest of the command line and press Return, or
type enough of the command line to uniquely identify the
file you want to access, and then press Tab again.
To see the results of an ambiguous match, you can press
Control + D after the beep. Alternatively, you can type set
autolist, which instructs your shell to list the remaining
choice whenever file completion fails. This is a good
command to save in your .tcshrc file, which ensures that this
feature is set every time you start a Terminal window.
Similarly, you can turn off autolist with unset autolist.
You can combine filename completion with full or relative
pathnames as well; if you type a partial pathname and press
Tab, the shell lists the options within that path. Using
filename completion can save you a lot of typing as well as
making it less likely that you mistype any characters.
SELECT FILES USING COMPLETION
WORK WITH FILES
2
SELECT FILES USING COMPLETION
02 53730X Ch02.qxd 3/25/03 8:56 AM Page 27
LOCATE FILES BY NAME
⁄ Type find and a space.
¤ Type the pathname of a
directory and a space.
‹ Type -name and a space.
› Type a filename.
ˇ Type -print and press
Return.
■ The shell executes the
find command and prints
the file location.
Y
ou can locate files by their names or other criteria by
using the find command. This command tends to be
faster than the Mac OS X Sherlock application for
locating files, especially those that are used by the system
or otherwise hidden from the Finder.
The find command is a complex and very powerful utility
that lets you run many different types of searches and
perform a variety of actions on the files that it finds.
However, the most common use for the find command is
simply to locate files with a certain name and print out their
locations.
The basic syntax for the find command is:
find pathname -name filename -print
The first parameter, pathname, is the directory where you
want to search. The filename is the name of the file for
which you are looking. The argument -print tells the
find command to display the location of the file.
You can also give a wildcard pattern instead of a filename,
and the find command lists all files that match that
pattern. When you use wildcard patterns in this way you
need to enclose them in quotation marks. For example, if
you save a Word document but you do not keep track of
what folder you save it in, you can use the find command
to locate all the .doc files in your Documents directory:
find ~/Documents -name "*.doc" -print
This displays a list of all file locations matching the pattern.
If you want to see a full file listing instead of the relative
pathname for the files found, you can replace the print
command with the ls command.
FIND FILES BY NAME
UNIX FOR MAC
28
FIND FILES BY NAME
02 53730X Ch02.qxd 3/25/03 8:56 AM Page 28
FIND FILES BY PATTERN
⁄ Type find and a space.
¤ Type the pathname of a
directory and a space.
‹ Type -name and a space.
› Type a wildcard pattern in
quotes.
ˇ Type -print and press
Return.
■ The shell executes the
find command and prints
the file location for each file
matching the wildcard
pattern.
WORK WITH FILES
2
In addition to searching by name or wildcard pattern, you can also
search by other qualities of the file, such as the last time the file was
changed, the owner of the file, or the permissions of the file. You
control the search with the arguments you include after the pathname
of the directory.
29
ARGUMENT SEARCHES FOR
-group groupname Files belonging to a certain group.
-iname filename Like -name, but matches regardless of case.
-mmin minutes Files modified within a certain number of minutes.
-mtime days Files modified within a certain number of days.
-perm +filemode Files that have specific permissions set.
-size charsc Files that are an exact size in characters.
02 53730X Ch02.qxd 3/25/03 8:56 AM Page 29
DETERMINE YOUR CURRENT
WORKING DIRECTORY
⁄ Type pwd and press
Return.
■ The shell shows your
current location.
CHANGE TO A DIFFERENT
DIRECTORY
¤ Type cd and a space.
‹ Type a new directory
name and press Return.
■ Your current directory
changes to the new location.
Y
ou can change your current directory by using the cd
command. Each shell window operates in a specific
location within the file structure, and you can view
this location by typing the pwd command. The pwd
command is Unix shorthand for print (display) working
directory. The current working directory is the directory
from which relative pathnames are computed and the
default directory in which files are found or saved.
If you type cd alone, it returns you to your Home directory.
If you provide the cd command with a pathname argument,
either relative or full, you change to that directory. You can
change your current directory to any directory that grants
you execution access permissions. This allows you to
explore nearly all of the directories on your hard drive, with
the exception of a few system directories that are
protected.
When your current directory changes, your prompt changes
as well, to reflect the new location. Your prompt displays
the names of up to three directories above your current
location, or fewer if you are close to the root directory.
For example, if you are in the directory /usr/share/
tcsh/examples, on a computer named ferro, your prompt
looks something like this:
[ferro:share/tcsh/examples] user%
You can use wildcards and filename completion with the cd
command; it accepts special directory names such as cd ,
to go up one directory level, and cd ~user, to change to
the Home directory of the user user. You can also use the
cd - command to return to the last directory in which you
were working.
CHANGE THE CURRENT DIRECTORY
UNIX FOR MAC
30
CHANGE THE CURRENT DIRECTORY
03 53730X Ch03.qxd 3/25/03 8:56 AM Page 30
RETURN TO THE
PREVIOUS DIRECTORY
› Repeat steps 2 and 3 to
move to a new directory.
ˇ Type cd - and press Return.
■ Your current directory
changes back to the previous
directory.
RETURN TO YOUR
HOME DIRECTORY
Á Type cd and press Return.
■ Your current directory
changes to your Home
directory.
WORK WITH DIRECTORIES
3
You can move through the file system by using the
directory stack. The stack is a list of directories of which
the shell keeps track. You can list the stack by typing dirs.
To change to a new directory and add it to the directory
stack, use the command pushd pathname. This
command adds a new pathname to the stack, and prints
the stack. You can use the directory stack by typing popd
to remove the top directory from the stack and change
to the next one down, or by typing pushd — with no
arguments — to swap the top two stack entries and
change to the new top directory. The directory stack is
very useful if you are going to be switching between
several directories in the same shell window.
Example:
[ferro:~/Documents] user% pushd /usr/lib
/usr/lib ~/Documents
[ferro:/usr/lib] kynn% pushd /etc
/etc /usr/lib ~/Documents
[ferro:/etc] kynn% popd
/usr/lib ~/Documents
[ferro:/usr/lib] kynn%
31
03 53730X Ch03.qxd 3/25/03 8:56 AM Page 31
CREATE A DIRECTORY
⁄ Type mkdir and a space.
¤ Type the name of a new
directory and press Return.
■ The shell creates the new
directory.
CREATE SEVERAL
DIRECTORIES AT ONCE
⁄ Type mkdir and a space.
¤ Type the names of several
directories you want to create
and press Return.
■ The shell creates the new
directories.
Y
ou can use the mkdir command to create new
directories. Directories are useful for organizing your
files into a logical structure. When you create a
directory in the Unix shell, you can access it through the
Mac OS X Finder as a folder; conversely, when you create a
folder in the Mac OS X Finder, you can access it as a
directory in the Unix shell.
The arguments that you give to the mkdir command affect
how the command creates new directories. When you
create a directory with a space in the name, you must
enclose it in quotation marks, unless you want to create
several directories at once.
To create a directory, you need to have write permissions
for the current directory or the directory in which you are
creating the new directory. For example, if you want to
create the directory /usr/local/resp, you must have write
access to the /usr/local directory. You can either change
your working directory to the /usr/local directory using the
cd command and type mkdir resp, or you can type mkdir
/usr/local/resp from any current directory.
When you give a pathname, whether relative or full, the
intervening directories must exist. If they do not, you
receive an error message, and the directory is not created.
You can tell the mkdir command to create any necessary
directories by using the -p option. For example, to create
the directory ~/Documents/by-date/2003/03, you can type
mkdir -p ~/Documents/by-date/2003/03. This command
creates the by-date and 2003 directories as well as the 03
directory if they do not already exist — presumably, the
Documents directory already exists in your Home directory.
CREATE A DIRECTORY
UNIX FOR MAC
32
CREATE A DIRECTORY
03 53730X Ch03.qxd 3/25/03 8:56 AM Page 32
CREATE A DIRECTORY WITH
A MULTIWORD NAME
⁄ Type mkdir and a space.
¤ Type the name of your
new directory in quotation
marks, and press Return.
■ The shell creates the new
directory.
CREATE INTERVENING
DIRECTORIES
⁄ Type mkdir -p and a
space.
¤ Type the pathname of
your new directory, including
intervening directories, which
do not yet exist.
■ The shell creates the new
directories.
WORK WITH DIRECTORIES
3
By default, anyone on the system can read and
execute any directories you create, which means
that all users of your computer can change to the
new directories and list their contents. If you do not
want universal access to your files or directories, you
can change the directory permissions by using the
chmod command, or you can instruct the mkdir
command to set the file mode automatically by
using the -m option.
When using the -m option, you follow it with the file
mode you want to set, as with the chmod command.
Example:
[ferro:~] user% mkdir -m go-rwx Private
[ferro:~] user% ls -lad Private
drwx——— 2 user staff 68 Nov 20 17:03 Private
33
03 53730X Ch03.qxd 3/25/03 8:56 AM Page 33
DELETE A DIRECTORY
⁄ Type rmdir and a space.
¤ Type the name of an
empty directory and press
Return.
‹ Type ls –F and press
Return to see the results.
DELETE A NON-EMPTY
DIRECTORY
⁄ Type cd, a space, and the
name of the non-empty
directory.
¤ Press Return.
Note: You may want to use the
ls
command to view the contents of
the directory before you delete it.
‹ Type rm -i * and press
Return.
› Type y and press Return
for each item that you want
to delete from the directory.
ˇ Type ls –F and press
Return to confirm that the
directory is empty.
■ The directory is empty.
Y
ou can remove unwanted directories by using the
rmdir command. One use for this command is to
remove extraneous directories that make it harder to
locate files you actually need.
While you can use the rm command to delete normal files,
you cannot use it to delete directories. This is a safety
measure to prevent you from accidentally deleting a
directory that might contain useful or important files. To
delete a directory, you must use the rmdir command.
The argument given to the rmdir command is the name of
the directory, or directories, that you want to remove. If that
directory is empty, then the command removes it. If the
directory is not empty, then a message appears, stating that
you cannot remove the directory.
In such a case, you can go into the directory and remove
any existing files using the rm command, or any
subdirectories using the rmdir command. You can now
remove the directory. Sometimes apparently empty
directories contain hidden files — such as .DS_Store, which
is a Mac OS X system file — and you need to locate them
with the ls -A command and remove them before
removing the directory.
While you are not allowed to remove the current directory
using the rmdir command, you may be able to remove it
indirectly. For example, if you are in the subdirectory foo of
your Home directory, you can type rmdir ~/foo.However,
this is not generally a good idea, because you can end up
stuck in an unresponsive non-directory where you cannot
even use the ls command to list the directory contents.
You can use the cd command, with no arguments, to return
to your Home directory.
DELETE A DIRECTORY
UNIX FOR MAC
34
DELETE A DIRECTORY
03 53730X Ch03.qxd 3/25/03 8:56 AM Page 34
Á Type cd and press
Return.
■ Your current directory
contains the now-empty
directory.
‡ Type rmdir and a space.
° Type the name of the
directory and press Return.
■ The shell deletes the empty
directory.
Note: You may need to find and
delete hidden files if you see an error
that says the directory is not yet
empty.
DELETE HIDDEN FILES
PREVENTING DIRECTORY
DELETION
⁄ Type cd, a space, and the
name of the directory, and
press Return.
¤ Type ls -A and press
Return.
‹ Type rm, a space, and the
name of a hidden file.
› Repeat step 3 for each
hidden file.
ˇ Type cd to move to the
parent directory.
Á Type rmdir, a space, and
the name of the directory you
want to delete.
■ The shell deletes the
directory and its contents.
WORK WITH DIRECTORIES
3
There is another way to remove an entire directory and its
contents, hidden or otherwise, using the rm command. The
-r option instructs the rm command to remove a directory
and everything within it; the -f option instructs the rm
command not to ask you about each deletion.
Although you can use the rm -rf command to delete an
entire directory at once, you should be very careful about
doing so, as a mistyped command could very easily wipe
out important files, with no way to recover them.
Example:
[ferro:~] user% rm -rf Install/
[ferro:~] user% rm -rf ~/ Extra
[ferro:~] user% ls
ls: .: Permission denied
Note that in the second line above, the user probably
means to type ~/Extra, but accidentally puts a space before
the word Extra. This is a costly mistake, as it means that the
rm command deletes the Home directory of the user.
35
03 53730X Ch03.qxd 3/25/03 8:56 AM Page 35
MOVE A FILE INTO A DIRECTORY
⁄ Type mv and a space.
¤ Type the name of a file
and a space.
Note: Use quotes around the
filename only if it contains spaces.
‹ Type the name of the
destination directory and
press Return.
› Type ls –F and a space,
followed by the name of the
directory, and press Return.
■ The shell shows the file in
the new directory.
MOVE MULTIPLE FILES
INTO A DIRECTORY
⁄ Type mv and a space.
¤ Type the names of the
files separated by spaces.
‹ Type the name of the
destination directory and
press Return.
› Type ls –F and a space
followed by the name of the
directory, and press Return.
■ The shell shows the files in
the new directory.
36
MOVE FILES INTO A DIRECTORY
Y
ou can move files into or out of a directory by using
the mv command. This is the same as dragging a file
in Finder to a new folder location. The mv command
can rename a directory just as it renames a normal file, but
it can also move the location of a file or directory within the
file structure. You can use the mv command to move a file,
or directory, by typing a command like this:
mv file location
The argument location must be a directory. Either this
directory exists and is owned by you, or you must have
permission to write files in the directory. If you type the
name of a directory that does not exist, you will not see an
error; the file will be renamed to the second name you
typed. This can also happen if you mistype the name of the
directory.
You can move multiple files using the mv command,
however, they must all go into the same directory. To do
this, you can simply type out each filename and specify the
destination as the final argument, as follows:
mv fileOne fileTwo fileThree andSoOn
location
This command moves all of the files that you list to the
location that you specify. If that location does not exist as a
directory, an error message appears, and the command
does not execute.
Using the -i option with the mv command can prevent you
from accidentally overwriting files when you move them.
MOVE FILES INTO A DIRECTORY
UNIX FOR MAC
03 53730X Ch03.qxd 3/25/03 8:56 AM Page 36
⁄ Type cp -R and a space.
¤ Type the name of the
original directory and a
space.
‹ Type the name of the new
copy of the directory and
press Return.
› Type ls –F and a space
followed by the name of the
original directory, and press
Return.
ˇ Repeat the ls –F
command in step 4 to show
the contents of the new
directory.
■ The new directory is a
duplicate of the original
directory.
37
Y
ou can use the cp command to make a copy of a
directory by using the -R option. Individual files can
be copied using the cp command with no options,
and as with the mv command, you can give a list of files and
a destination directory in order to copy a number of files
into the same directory:
cp fileOne fileTwo fileThree andSoOn location
You can use wildcards to copy files. For example, to copy all
of your .doc files into your Documents directory, type cp
*.doc ~/Documents.
When you copy files into a directory, the new versions of
each file will be named with their original names. The
directory needs to exist, as the cp command will not create
a new directory for you. You can use the mkdir command
to create the directory first.
However, if you try to copy a directory as you would copy a
file, you see an error message because directories are not
normal files:
[ferro:~] user% cp Documents "Backup of Docs"
cp: Documents is a directory (not copied).
To copy a directory, you must use the -R option, which tells
the cp command to copy the directory and its contents to
the new location. For example, to create a copy of the
Documents directory, you can type cp -R Documents
"Backup of Docs".
This will copy the entire directory at once, creating the new
directory and duplicating all of the files. The names of the
original files will be the same, although the directory names
will be different.
COPY A DIRECTORY
WORK WITH DIRECTORIES
3
COPY A DIRECTORY
03 53730X Ch03.qxd 3/25/03 8:56 AM Page 37
LIST DIRECTORY SIZES
⁄ Type du and press Return.
■ The shell displays a list of
directory sizes.
■ The final number in the list
is the total disk usage for your
current directory, in blocks.
Y
ou can use the du command to display the size and
contents of a directory. The name of the du
command stands for disk usage, and it tells you how
much space each file or directory uses on your hard drive.
This information is also available from the Finder using the
Get Info menu option. When you use the ls -l command,
you see a value for the size of the directory just as you do
for other files. However, this value does not represent the
size of the contents of the directory; it represents the size
of the directory entry itself, a list of the files stored in the
directory. To obtain the size of the contents of the directory,
including subdirectories, you can use the du command.
If you type du alone, you get a listing of disk usage in the
current working directory; if you give one or more
arguments, you see the space taken up by each of those
directories or files. Additionally, the space used by all
subdirectories also appears, along with subdirectories of
subdirectories. This can make the output of the du
command quite extensive and hard to read; if you want a
single answer to summarize the size of a directory, you can
use the option -s with the du command.
When the du command displays sizes for files and
directories, it measures these sizes in disk blocks; a block
on a Unix file system disk represents 512 characters. This is
an easy number for computers to work with but somewhat
difficult for us humans to grasp. You can use the option -k
to make the du command list sizes in kilobytes, which are
units of 1,024 bytes.
DETERMINE DIRECTORY SIZE
UNIX FOR MAC
38
DETERMINE DIRECTORY SIZE
03 53730X Ch03.qxd 3/25/03 8:56 AM Page 38
DETERMINE TOTAL
DIRECTORY SIZE
⁄ Type du -s and a space.
¤ Type the name of a
directory or file and press
Return.
■ The shell displays the total
size of the directory in
blocks.
LIST DISK SPACE IN KILOBYTES
⁄ Type du -k and a space.
¤ Type a directory or
filename and press Return.
■ The shell displays the size
of files in kilobytes.
WORK WITH DIRECTORIES
3
You can use the df command to check the total disk usage on
your computer. Like du, df measures sizes in 512-character blocks,
but you can use the -k option to make the results easier to read.
The df -k command lists all file systems on your computer, and
gives you a percentage indicating how full your disk is.
Example:
[ferro:~] user% df -k
Filesystem 1K-blocks Used Avail Capacity Mounted on
/dev/disk0s5 5865644 4027644 1779344 69% /
devfs 90 90 0 100% /dev
fdesc 1 1 0 100% /dev
<volfs> 512 512 0 100% /.vol
automount -fstab [314] 0 0 0 00% /Network/Servers
automount -static [314] 0 0 0 100% /automount
The last five file systems in the above list correspond to internal
systems used by the Unix operating system. You can safely ignore
them and only look at the first listing. According to this listing, the
above computer has a single disk that is 69 percent full.
39
03 53730X Ch03.qxd 3/25/03 8:56 AM Page 39
VIEW TEXT FILES
⁄ Type cat and a space.
¤ Type the name of a text
file and press Return.
■ The shell displays the
contents of the file.
VIEW BINARY FILES
⁄ Type cat -v and a space.
¤ Type the name of a binary
file and press Return.
■ The shell displays the
contents of the file, with
non-printing characters
shown.
■ This is an example of a
Meta-Control-T character.
40
VIEW TEXT FILES
Y
ou can display the content of text files with the cat
command. The name cat is short for concatenate,
which means to join several things together into one.
However, the cat command has additional functions
beyond concatenation, one of which is to display files
on-screen. You can display any file by typing this command:
cat filename
The screen displays the full contents of the file. If the file is
longer than one screen, your Terminal window scrolls to
display the whole file.
The two types of files that you can display using the cat
command are text and binary files. A text file consists of
ordinary letters, numbers, spaces, and punctuation,
collectively known as plain text. If you are using a word-
processing program and you save the file as text, you are
creating a text file.
The other type of file that the cat command can display
is a binary file. Binary files contain special characters that
you cannot print, because the computer codes for these
characters do not correspond to any printable symbols. The
executable files that programmers create from compiled
applications are often binary files, as are proprietary data
formats such as Microsoft Word documents.
If you try to use the cat command to display a binary file,
the best that you can expect is gibberish in your Terminal
window. The worst result is that it resets the display format
of your Terminal window, meaning that your prompt and
any letters you type also appear as gibberish.
To display the contents of a binary file safely, you can use
the -v option with the cat command. This command
displays non-printable characters by showing a caret (^)
before control characters, and M- before Meta characters.
VIEW TEXT FILES
UNIX FOR MAC
04 53730X Ch04.qxd 3/25/03 8:56 AM Page 40
⁄ Type cat and a space.
¤ Type a greater-than
symbol and a space.
‹ Type the name of the file
you want to create, and press
Return.
› Type the text you want
the file to contain.
ˇ Press Return.
Á Press Control + D.
■ The cat command creates
a file containing the text you
typed.
41
Y
ou can create a text file by using the cat command
and redirecting the output to a file. If you type cat
and press Return, the cat command appears to do
nothing, but your prompt does not reappear. When you
type something else and press Return, you just see whatever
you typed echo back at you. This means that the cat
command is letting you enter content. You are building a
virtual file that only exists for the execution of the
command. As long as you continue to type, you are adding
content to that virtual file.
To indicate that you are finished entering text into the cat
command, you must indicate the end of your virtual file. You
do this by pressing Return and then pressing Control + D.
By itself, the ability to type text and see it reappear
on-screen is not particularly useful. However, you can
combine the cat command with output redirection to
make simple text files. Output redirection means that you
save the results of a command to a file instead of displaying
them on-screen. To redirect the output of the cat
command to a file, you can type the following:
cat > filename
This creates a new file called filename. For better
compatibility with the Mac OS X Finder, you may want to
name a text file with the extension .txt. This allows you to
double-click the icon for the file in Finder and open it in the
TextEdit application.
The contents of the new file are whatever you type after
pressing Return. The file can contain multiple lines; just
press Return at the end of each line. When you are done,
you can press Control + D to create the file.
CREATE A SIMPLE TEXT FILE
WORK WITH TEXT
4
CREATE A SIMPLE TEXT FILE
04 53730X Ch04.qxd 3/25/03 8:56 AM Page 41
VIEW A FILE, PAGE BY PAGE
⁄ Type less and a space.
¤ Type the name of a file
and press Return.
■ The less command
displays the first page of the
content of the file.
‹ Press the Spacebar. ■ The shell displays the next
page of text.
Y
ou can display long files one screen at a time using
the less command. If you try to view a long file with
the cat command, it quickly scrolls your Terminal
window, and you must use the scroll bars to go back. The
less command is an example of a pager command, a
program that displays files one page at a time.
The less command displays a screen at a time, and waits
for you to finish reading that screen before continuing.
When you are ready to move ahead in the file, you can
press the Spacebar.
You can also search ahead in the file for a specific text
pattern by typing a forward slash (/) and then the text you
want to find. This moves you ahead in the file to the next
place that text appears.
If you try to use the less command on a binary file with
unprintable characters, the less command warns you and
asks if you want to continue. You can type y, for yes, and press
Return, or simply press Return to cancel the less command.
You have already used the less command if you have used
the man command; when you type man, you read a manual
page by viewing it as you would with the less command.
The name of the less command makes sense when you
know the history of pager commands in Unix. The original
command for displaying a page at a time was named more,
because, while waiting for you to read the page, it printed
More on the bottom line of the Terminal window. The
less command was named as a natural successor to the
more command, because it could do more than the more
command could do.
VIEW TEXT FILES AS PAGES
UNIX FOR MAC
42
VIEW TEXT FILES AS PAGES
04 53730X Ch04.qxd 3/25/03 8:56 AM Page 42
SEARCH AHEAD FOR
A CERTAIN WORD
› Type a forward slash.
■ The cursor appears in
the lower-left corner of the
Terminal window, beside the
forward slash.
ˇ Type a word or phrase
and press Return.
■ The less command skips
ahead to that word or phrase
and highlights it.
WORK WITH TEXT
4
In addition to pressing the Spacebar to page through a file using
the less command, or the man command, you can also use other
keystrokes to move through the file. For a full listing of keystrokes
in less, type man less or type h while using the less command.
43
KEYSTROKE MEANING
Return Go forward one line.
Down arrow Go forward one line.
Up arrow Go back one line.
b Go back one page.
?pattern Search backwards in the file.
g Go to the first line of the file.
G Go to the last line of the file.
v Open the file in a Unix text editor.
h Read the less command help.
q Quit immediately.
04 53730X Ch04.qxd 3/25/03 8:56 AM Page 43
VIEW THE BEGINNING
OF A TEXT FILE
⁄ Type head and a space.
¤ Type a filename and press
Return.
■ The shell displays the first
ten lines of the file.
‹ Type head and a space.
› Type a dash, the number
of lines you want to display,
and a space.
ˇ Type the filename and
press Return.
■ The shell displays as many
lines of the file as you specify.
Y
ou can display a portion of a text file by using the
head and tail commands. To understand how the
head and tail commands work, it is useful to
visualize a text file as if it were a fish being chopped into
head, tail, and body. The head command displays the
portion of the fish containing its head, and the tail
command shows the portion containing the tail of the fish.
You can give additional options that indicate where along
the body of the fish you want to cut.
Without any options, the head command shows the first
ten lines of a specified file and the tail command shows
the last ten lines. If the file has ten or fewer lines, the whole
file displays.
You can change the number of lines that display in the
following way:
head -linenumber filename
tail -linenumber filename
For example, type head -3 /usr/share/dict/words to see the
first three lines of the file /usr/share/dict/words. Several
Unix programs use this text file as a source of English words,
so it makes a good example for text commands.
Typing tail -3 /usr/share/dict/words shows you the last three
lines of this file. You can also tell the tail command to
start a certain number of lines in from the beginning of the
file by including a plus symbol:
tail +linenumber filename
If you want to view the tail of the words file starting at line
234,567 — it is a large file — you can type tail +234567
/usr/share/dict/words.
VIEW PORTIONS OF A TEXT FILE
UNIX FOR MAC
44
VIEW PORTIONS OF A TEXT FILE
04 53730X Ch04.qxd 3/25/03 8:56 AM Page 44
VIEW THE END OF A TEXT FILE
⁄ Type tail and a space.
¤ Type the filename and
press Return.
■ The shell displays the last
ten lines of the file.
START IN THE MIDDLE
OF A TEXT FILE
⁄ Type tail and a space.
¤ Type a plus symbol, the
number of the line you want
to start from, and a space.
‹ Type the filename and
press Return.
■ The shell displays the file
starting at the line you
specify.
WORK WITH TEXT
4
You can also set the tail command to display any new lines added to the end of a
file, by using the -f option.
The Mac OS X operating system maintains a number of files known as log files.
These files record system activity, much of it invisible to the user, which you can
use to diagnose problems or monitor processes. New lines are regularly appended
to log files. You can find most of the important system logs in the /var/log directory.
You can monitor these log files by using the tail -f command. To stop
monitoring these files, press Control + C.
Example:
[ferro:~] user% tail -5 -f /var/log/system.log
Dec 2 16:40:03 ferro configd[105]: executing
/System/Library/SystemConfiguration/Kicker.bundle/Resources/restart-AppleTalk
Dec 2 16:40:03 ferro lookupd[533]: lookupd (version 272) starting - Mon Dec
2 16:40:03 2002
Dec 2 16:40:05 ferro root: setting hostname to ferro.local.
Dec 2 16:40:05 ferro configd[105]: executing
/System/Library/SystemConfiguration/Kicker.bundle/Resources/set-hostname
Dec 2 16:40:06 ferro root: setting hostname to ferro.local.
^C
[ferro:~] user%
45
04 53730X Ch04.qxd 3/25/03 8:56 AM Page 45
EXTRACT TEXT USING
THE GREP COMMAND
⁄ Type grep and a space.
¤ Type a regular expression
pattern enclosed in single
quotes, and a space.
‹ Type a filename and press
Return.
■ The shell displays all lines
in the file that match the
pattern.
CHEAT ON CROSSWORD
PUZZLES
⁄ Type grep -i, a space, a
single quote, and a caret.
¤ Type each letter you
know, and type a period for
each letter you do not know.
‹ Type a dollar sign, a
closing quote mark, a space,
/usr/share/dict/words, and
press Return.
■ The shell displays all
words that might fit.
Y
ou can find and display lines within a text file that
match a specific pattern with the grep command.
The grep command searches through a file to find
lines that match a regular expression. Regular expressions,
or regexps, are commonly used to match text patterns.
Regular expressions are more powerful and flexible than
normal glob patterns because they can match a variety of
patterns and you can combine them to form very complex
expressions.
The syntax for the grep command is:
grep 'pattern' filename
You do not need to enclose the regular expression pattern
in single quotes. However, if you do not use the single
quotes, the shell interprets the pattern as a glob pattern
and matches it against files in the current directory. For this
reason, it is always a good practice to use single quotes
around your regular expression pattern with the grep
command.
Options for the grep command include -i, which makes
grep consider upper- and lowercase letters the same for
matching purposes; -v, which inverts the search and lists
lines that do not match; and -l, which does not display
matches but instead lists the names of files whose contents
contain the regular expression pattern.
A simple but useful example of the power of the grep
command is that it can help you with crossword puzzles or
crossword-style games such as Scrabble. Using the list of
English words in /usr/share/dict/words, you can display all
lines matching a specific pattern. For example, if the first
letter in a four-letter word is k, the third is n, and you do
not know the rest, you can use this command to display all
possible matches as show below:
grep -i '^k.n.$' /usr/share/dict/words
EXTRACT TEXT FROM A FILE
UNIX FOR MAC
46
EXTRACT TEXT FROM A FILE
04 53730X Ch04.qxd 3/25/03 8:56 AM Page 46
INVERT A GREP SEARCH
⁄ Type grep -v and a space.
¤ Type a regular expression
pattern in quotes for lines you
do not want to match, and a
space.
‹ Type a filename and press
Return.
■ The grep command
displays all lines that do
not match your pattern.
LIST ALL FILES CONTAINING
A PATTERN
⁄ Type grep -l and a space.
¤ Type a regular expression
pattern enclosed in single
quotes, and a space.
‹ Type an asterisk wildcard
to search all files, and press
Return.
■ The shell displays the
names of all files that contain
the pattern.
WORK WITH TEXT
4
Regular expressions consist of ordinary text
and characters with special meanings. The
simplest regular expression is just plain text,
such as Kynn. This matches any line that
contains the word Kynn anywhere on the line.
To select matches at the beginning of a line,
you can use the special character caret (^).
The regular expression to match lines starting
with Kynn is ^Kynn. Likewise, the dollar sign
($) indicates the end of a line, as with Kynn$,
which only matches lines where Kynn is the
final text of that line.
A period (.) matches any character. A set of characters
in square brackets, such as [0123456789ABCDEF],
matches any of those characters, and a range in
brackets matches any character within that range,
such as [a-zA-Z].
To match more than one character of the same type,
you can use the plus symbol (+) after a special
character, normal character, or range. To match zero
or more of the preceding types of characters, use an
asterisk (*). The regular expression '.*' matches
anything, because it is zero or more of any character.
A question mark (?) indicates zero or one repetition
of the preceding character.
47
04 53730X Ch04.qxd 3/25/03 8:56 AM Page 47