Beginning asp net 2.0 with c phần 4 ppsx
Bạn đang xem bản rút gọn của tài liệu. Xem và tải ngay bản đầy đủ của tài liệu tại đây (1.88 MB, 77 trang )
else
{
startYear = today.Year - 1;
endYear = today.Year;
}
Next you create the actual start and end dates of the season, using the start and end year already set:
seasonStart = new DateTime(startYear, 8, 20); // 20th August
seasonEnd = new DateTime(endYear, 5, 31); // 31st May
Now you check to see if the current date falls within the season start and end dates. If it does, you set the
Cancel property of the parameter e to true, so when the event procedure ends the event action (the
delete) will be cancelled. You also display a message to tell the user that players cannot be deleted dur-
ing the season:
if (today >= seasonStart && today <= seasonEnd)
{
e.Cancel = true;
Message.Text = “Cannot delete players during the season”;
}
If you are outside of the season, players can be deleted, so you simply clear any message and rebind the
grid (so that the deleted player doesn’t still show in the grid). Because you haven’t set the
Cancel prop-
erty of parameter
e to true (it is false by default), the action will take place, and the player will be
deleted:
{
GridView1.DataBind();
Message.Text = “”;
}
So what you’ve seen here is that some events can be cancelled, which allows you to build logic into your
applications, enabling you to control the actions that are run. This also means that events that you think
will run might not. For example, it was mentioned earlier that some of these events are paired. So, as
well as the
Deleting event, there is a Deleted event, and if you cancel the Deleting event the
Deleted event isn’t run. The logic of this is shown in Figure 6-21.
This process is also the same for inserted and updated items, where the
Inserting and Updating event
procedures are used. In all three cases you can set the
Cancel property of the parameter to true to can-
cel the event.
199
Events and Code
09_042583 ch06.qxd 4/4/06 2:44 PM Page 199
Figure 6-21
Global Events
So far in this chapter you’ve seen that events are raised by controls or by pages, but there is a third type
of event — an application event. Application events are raised by ASP.NET in response to certain condi-
tions, and these are stored in the Global Application Class,
global.asax, a code-only file.
The
global.asax page has several events:
❑
Application_Start, which is raised when the application first starts. This is when the first
user accesses the site and should be used to set any initial start conditions.
FirstName
LastName
Position
PictureURL
Chris
Christopher
Left Back
aaronson.jpg
Date Joined
Date Left
Edit
Delete New
SqlDataSource - DetailsDataSource
Deleting
Is deletion
Allowed?
Event
Cancelled
Event raised
Deleted
Yes
No
Event
Runs
200
Chapter 6
09_042583 ch06.qxd 4/4/06 2:44 PM Page 200
❑ Application_End, which is raised when the application stops.
❑
Session_Start, which is raised when a user starts a session. This is when the user starts
accessing the site for the first time, and includes the time when a user closes the browser win-
dow and opens it again.
❑
Session_End, which is raised when a user session ends. This isn’t when the browser window is
closed, because sessions have a timeout — if there is no user activity within that time, the ses-
sion ends.
❑
Application_Error, which is raised when an unhandled error occurs.
❑
Profile_OnMigrateAnonymous, which is raised when an anonymous user logs in, and allows
migration of any Profile properties.
You can create a Global Application Class in the same way as adding normal Web Forms, and when cre-
ated, the first four events in the preceding list will be created for you. They’ll have no code, but will be
ready for you to add code if you need it.
In the Wrox United application, none of the first four events are used, but the latter two are. The
Application_Error event is covered in Chapter 15, which looks at error handling, and the
Profile_OnMigrateAnonymous event is covered in Chapter 11, which looks at the Profile.
Summary
This chapter covered a lot about events, and you’ve seen that they can be raised under a number of dif-
ferent circumstances. First you looked at the ASP.NET page itself, where an event is raised when the
page is loaded, which allows you to take some action before anything is shown to the user. Additionally,
this chapter examined the following topics:
❑ The ASP.NET page has the
IsPostback property that allows you to identify whether this is the
first time the page has been displayed, or whether the user has clicked a button.
❑ Button controls, where an event is raised when the user clicks the button. You saw that similar
types of controls (the
Button and ImageButton controls) have similar events (the Click
event).
❑ Events that are raised by ASP.NET itself, both directly (such as the binding of data from a
database) and indirectly (such as updating database records). These events give you an oppor-
tunity to interact with the process of displaying or updating data, and allow you to fine tune the
interface and provide user feedback.
❑ How some events can be cancelled, thus canceling any action they trigger, such as another event.
In the example you saw that you can stop the deletion of data by using an event procedure.
Now that you’ve had a look at events, and especially some related to data, it’s time to look at databases
in more depth. The next chapter looks at some of the data controls and shows you how data can be
fetched from the database and displayed for easy use by the user.
201
Events and Code
09_042583 ch06.qxd 4/4/06 2:44 PM Page 201
Exercises
1. In the Chapter06 project create a new Web Form called Lists.aspx and add a ListBox control to
the page, and add three list items with values of One, Two, and Three. Add a
Label control and
a
Button control to the page. In the Click event of the Button, display the selected value of the
ListBox in the Label.
2. Modify Exercise 1 so that just selecting an item in the list posts back to the server (meaning you
don’t need to click the button). You’ll need to add an event procedure to the
ListBox, and in
that event procedure you can use the same code from the
Click event of the Button to display
the selected value in the
Label. Hint: The terms postback and automatic might be useful in your
hunt for correct properties.
3. Modify the EditSquad.aspx example so that the GridView is refreshed when a new player is
added to the squad. The technique is similar to the code you already have, but you’ll need to
use a different event. Remember that you can use the drop-down lists in the code view to find
the events.
202
Chapter 6
09_042583 ch06.qxd 4/4/06 2:44 PM Page 202
7
Reading Data
The hallmark of dynamic web application pages is the capability to use information from a
database. No other capability so widely expands the horizons of functionality for the visitor. The
majority of information in an enterprise is held in databases, so it is imperative that a web applica-
tion representing a business interact with that data. A tremendous effort by the ASP.NET 2.0 devel-
opment team has reduced the knowledge and lines of code needed to work with data. This
chapter and Chapter 8 explain how to implement the data-based features.
This chapter covers several major ideas:
❑ The theory of using data in ASP.NET 2.0, including a brief overview of the theory and
terminology of databases, an introduction to ASP.NET 2.0 data source controls and data-
bound controls, and the role of VWD in creating data-based pages
❑ Data source controls
❑ Data-bound selection lists
❑ Various data-bound controls, including
GridView, DataList, Repeater, DetailsView,
and
FormView
❑ Data source controls with parameters
❑ Implementing multiple data controls that work together
❑ Working with XML data
By the end of the chapter, you will have the tools and experience to use ASP.NET 2.0 server-side
controls to present on your pages information that comes from a database.
Introducing Databases
Before starting on the ASP.NET 2.0 data controls, take a moment to consider sources of data. Data
can be broadly divided into one of three categories. Relational data is organized into sets of tables
according to rules of normalization. This category includes the data held in Microsoft Access,
10_042583 ch07.qxd 4/4/06 2:45 PM Page 203
Microsoft SQL Server, Oracle, SAP, DB2, and MySQL. A second category of data resides in tree struc-
tures, such as XML files, the Windows registry, and the Windows file system. Last, data can be held in a
wide range of miscellaneous types, such as Excel files, text files, or proprietary formats. This book (as
per the vast majority of web site data interaction) discusses relational data and XML files.
Relational databases divide information into tables, and the tables contain records (also called rows). A
record represents one instance of the topic of the table. A table contains multiple fields, or columns, that
organize values by their type. For example, a table of employees could contain a record for each employee.
The table’s columns may be NameFirst, NameLast, DateOfHire, and so forth. For each column there would
be a value for each record. A group of tables makes a database in most management systems. In Microsoft
SQL Server, which is used in this book, one or more databases together make an instance of the server.
Typically, tables contain only the data. The description of how the data is organized, the names of fields,
and restrictions all reside in a separate structure of the database called metadata.
XML files are different from relational databases. First, instead of tables, the data is organized into a tree
with branches of the tree holding finer and finer points of data. Each set of data and each individual
datum are contained in a node. For example, an Employees XML file would have an Employees node
that would represent the main trunk. Then there would be a limb for each employee. From that limb
would be branches for FirstName, LastName, and so on. Second, an XML file is self-describing in that
the metadata is included with the data. Each piece of information has an HTML tag that acts like a con-
tainer that states the description of that data. For example, a datum like “John” would actually be stored
as
<NameFirst>John</NameFirst>. Although the self-descriptors can make an XML file huge, they
make it easy to understand the data without having the metadata information.
Almost all sources of data have a system that controls who is allowed to use the data. The first step in
security is authentication, wherein the system determines who is asking to use it. The topic of authenti-
cation was covered in detail in Chapter 4, so we won’t spend much time on it here. Basically, there are
two types of authentication: Windows Authentication (also known as Trusted Security) and SQL
Authentication. The decision of which authentication to use is made when the database is installed. With
SQL Server Express, you have the option of Windows Authentication or Mixed. Mixed means you can
use either Windows Authentication or SQL Authentication. SQL Server Express installs, by default, with
Mixed Authentication. This book uses Windows Authentication.
This book mainly uses Microsoft’s SQL Server. The product is sold with different sets of features, but for
our use the simplest version (SQL Server Express) is adequate. Fortunately, Microsoft provides SQL
Server Express free of charge, and automatically installs with the instructions given in this book for the
setup. The beauty of SQL Server Express is that when you deploy your site to the public, all of your
code fits without modification into the full-featured SQL Server.
After you are authenticated (you prove that you actually are who you say you are), there will probably
be a set of rights and limitations for your use of the data. First are restrictions in how you can look at
data. Database administrators (DBAs) generally restrict direct access to tables. Instead, data may only be
available to you through a view or query that contains limited fields or records. Second, you may have
limits on how (or if) you can change data. Last, even if you have the right to change data, there may be
restrictions (called constraints) on how data can be changed. To use Wrox United as an example, you
generally cannot delete a team that is listed in the schedule (thus leaving the schedule with the logical
fault of a game without an existing team).
204
Chapter 7
10_042583 ch07.qxd 4/4/06 2:45 PM Page 204
Using ASP.NET 2.0’s Data Controls
Chapter 3 presented the idea that ASP.NET offers server-side controls. These controls contain code writ-
ten by Microsoft that offers various behaviors, such as a drop-down list or a button. ASP.NET 2.0 has
two sets of controls that are specific to working with data. The first set is data source controls that enable
a page to connect to a source of data and to read from and write to that source. However, a data source
control has no means to display data on an ASP.NET 2.0 page, which is where data-bound controls come
into play. Data-bound controls display data to the user by rendering data onto a page. This chapter dis-
cusses data source controls and the reading behaviors of data-bound controls.
Almost all data source controls can work with almost all data-bound controls. This gives designers a
mix-and-match solution. Pick the data source control that is optimized for the data and then pick a data-
bound control that displays the information as desired.
Introducing Data Source Controls
ASP.NET 2.0 ships with several types of data source controls that are tailored to work with different
types of data sources. These controls are as follows:
❑ The
SqlDataSource control allows connections to most relational databases. The Sql in its
name refers to databases that understand the SQL language. That includes almost every kind of
database that holds its data in a relational format. Note that the
Sql does not refer only to the
Microsoft SQL Server database management system.
SqlDataSource controls utilize one of
several providers that are specific to different kinds of databases. The default provider is for
Microsoft SQL Server. Another provider is for Oracle. Both of these are written in managed
code, the most robust option in the .NET Framework. ASP.NET 2.0 contains an additional
provider that can communicate with any database that is OLEDB-enabled (OLEDB is an
acronym for Object Linking and Embedding for Databases). Because OLEDB is an old standard,
it comprises almost every other database management system including IBM DB2, MySQL,
and SAP. However, the provider for OLEDB connections is not written in managed code. That
means it does not meet all the requirements of being .NET technology, but it still can work with
.NET. We can expect third parties to publish more data source controls and providers and can
hope that they are in proper managed code.
❑ The
AccessDataSource control is a special case of the SqlDataSource control that contains a
provider optimized for Microsoft Access.
❑ The
XMLDataSource control allows connection to XML sources.
If you begin writing more advanced scenarios, you will discover that OLEDB data
source controls are not part of the
System.Data hierarchy. These controls actually
reside in the
System.Web.UI.Controls namespace. But this point does not arise for
most scenarios where you can just drag data controls from the toolbar.
205
Reading Data
10_042583 ch07.qxd 4/4/06 2:45 PM Page 205
❑ The SiteMapDataSource control, a specialized form of the XMLDataSource control, is opti-
mized for the specific architecture of the ASP.NET 2.0 web application site map (as you built in
Chapter 2).
❑ The
ObjectDataSource control connects to business objects you build yourself (discussed in
Chapter 10).
Regardless of which data source control (and in the case of the
SqlDataSource, which provider) you
use, the data source control will enable a set of behaviors for your ASP.NET 2.0 page. These include a
connection to the database and enablement of behaviors such as reading and writing data, which are
available to data-bound controls that display data and receive input from the user.
In summary, the data source controls create the background infrastructure needed to use data. However,
they do not create any rendering on the web page (see the next section for those capabilities). Rather,
they make the data behaviors like reading and writing to data stores available to data-bound controls.
Introducing Data-Bound Controls
Data-bound controls provide the link between the data source controls and the user. They take the data
and behaviors of the data source control and render it to the visitor. This division of labor works very
well. You can select any data source control and link that to any of the data-bound controls. With just a
few exceptions, it is a mix-and-match scenario.
Data-bound controls encapsulate remarkable amounts of behavior. For example, the
GridView control
can not only display data in a table, but it offers sorting, selecting, paging through subsets, and one-click
transition to data editing. If your needs extend beyond these capabilities, you can write custom code
hooked into events exposed by the
GridView control.
There is one constraint on the compatibility of data source controls and data-bound controls. Each con-
trol is optimized for tabular data, tree data, or custom class data. For example, XML data is organized as
a tree and thus best accessed with the
XMLDataSource control and displayed in Menu or SiteMapPath
data-bound controls. SQL Server data is organized into tables and thus accessed with the SqlDataSource
control and displayed in GridView (tables) or DetailsView. List-type data-bound controls can display
either source of data. You can twist the controls to cross-utilize types of data, but in general it is best to
stick to their intended purpose.
Four general groups of data-bound controls ship with ASP.NET 2.0. Because there is overlap in their func-
tionality, this chapter spends some time differentiating them. First you will look at their renderings, then a
comparison chart, and finally a guide to selecting the correct data-bound control for your purposes.
If you are familiar with older versions of ASP, the ASP.NET 2.0 data source controls
instantiate ADO.NET objects. Therefore, ADO.NET provides the underlying tech-
nology for data access. The creation and manipulation of ADO.NET objects for most
scenarios is now handled automatically (and correctly and efficiently) by the higher-
level data source control objects.
206
Chapter 7
10_042583 ch07.qxd 4/4/06 2:45 PM Page 206
The trick with data-bound controls arises in the selection. It can be confusing in the first attempts to get
the correct control for your purpose. To help, the following sections organize the data-bound controls
into four groups. Later in the chapter, you will practice using each of them in a series of exercises.
Tabular Controls
Tabular controls produce the classic HTML table listing the data of records, albeit with opportunity for
significant enhancements. These controls show multiple records in rows and one or more fields from
each record as columns. The
GridView control shows one value (datum) in each cell in a table layout.
The
DataList and Repeater controls behave in the same way, and render each cell with all of the fields
for one record. Figure 7-1 shows how these controls look in a browser.
Figure 7-1
The
GridView control offers the most behaviors, as it can read, edit, and select records. The DataList
control allows reading and editing, whereas the Repeater is a read-only control. The name of DataList
is a bit confusing because you have a separate set of List controls that are optimized for selecting a
record. The
DataList is a display control in a tabular format.
Single Record Display Controls
Single record controls (DetailsView and FormView) display one record at a time. You can think of them
as a deck of playing cards in a pile face up. At any moment all of the cards are there, but you can only
see the top one. You have to navigate down through the deck to see other cards (see Figure 7-2 for an
example of the
DetailsView control). Single record controls have navigation features to permit the visi-
tor to go to the next record, jump to a specific record, or fly to the first or last record. The
DetailsView
control provides some default layout when you create the control, whereas the FormView control creates
a blank slate upon which you create the entire layout. Both of these data-bound controls support the
reading, editing, and creation of new records.
Note that other controls, such as text boxes, can be data-bound. However, these inde-
pendent controls are best connected to data in the context of a template within one
of the controls just mentioned. This topic is discussed in detail in Beginning
ASP.NET 2.0 Databases from Wrox, ISBN 0-4717-8134-7.
207
Reading Data
10_042583 ch07.qxd 4/4/06 2:45 PM Page 207
Selection List Controls
Selection list controls are optimized to accept a user selection. These two controls display just one field
from each record and stand by for a mouse-click. As shown in Figure 7-3,
ListBox controls (right side
of figure) are by default expanded, whereas
DropDownList controls (left side of figure) display a single
row until the user expands. As you would expect, these controls are display-only with no capability to
change data.
Figure 7-2
Figure 7-3
Tree Controls
Tree controls are optimized to handle data that are stored in nodes rather than tables. The Menu control
provides a slide-out dynamic so that when you pass your mouse over a menu choice the submenu slides
out. The
TreeView control gives the user the option to expand or collapse nodes (see Figure 7-4). The
Menu control is on the left of Figure 7-4, and the TreeView control is on the right. The SiteMapPath con-
trol offers a navigation trail that automatically updates based on the current page.
208
Chapter 7
10_042583 ch07.qxd 4/4/06 2:45 PM Page 208
Figure 7-4
The following table summarizes the differences among the data-bound controls.
Control Primary Data Capabilities Description and
Structure Primary Uses
GridView Table Read and edit Separate column for each field.
Each field value in its own cell.
Display multiple records in a
grid.
Edit existing records.
DataList Table or Tree Read and edit All fields in one cell.
One cell equals one record.
Display multiple records in a
grid.
Create new record for GridView.
Table continued on following page
209
Reading Data
10_042583 ch07.qxd 4/4/06 2:45 PM Page 209
Control Primary Data Capabilities Description and
Structure Primary Uses
Repeater Table or Tree Read only All fields in one cell.
One cell equals one record.
Display multiple records in a
grid.Create new record for
GridView.
DetailsView Table or Tree Read, edit, create Display single records.
Default structure provided.
Edit existing records.
Create new records.
FormView Table or Tree Read, edit, create Display single records.
No default structure.
Edit existing records.
Create new records.
DropDownList Table or Tree Read only List of a few fields.
and ListBox
Invites a user selection.
Display data for user selection.
SiteMapPath Tree Read only List page names between home
and current page.
Used to identify current position
in site.
Menu Tree Read only Displays top-level nodes with
the option to expand one sub-
node at a time.
Used to display a menu where
there will be one selection.
TreeView Tree Read only Displays top-level nodes with
option to expand one or many
subnodes.
Used to display multiple
subnodes simultaneously.
210
Chapter 7
10_042583 ch07.qxd 4/4/06 2:45 PM Page 210
Data Source Controls and Data-Bound
Controls Work Together
As discussed in the previous two sections, ASP.NET 2.0 offers two families of controls for working with
data: data source controls and data-bound controls. This section takes a moment to look at how they
work together. The data source control handles the behind-the-scenes connections to the data as well as
a set of behaviors such as editing, sorting, and paging. The data-bound control presents the data and
behavior to the user in actual renderings to the page.
The two controls you use on your page should match in type. Tabular-type data-bound controls
such as
GridView and FormView should be sourced by table-type data source controls such as the
SqlDataSource. Tree-type data-bound controls should be sourced by an XML data source. Lists can be
sourced by either type. Having said that, there are some exceptions. Some tree sources can be used with
tabular data-bound controls. This combination generally requires an InfoPath statement that narrows the
scope of information that is harvested from the tree source of data.
A data-bound control must have a property that sets its source to the data source control. In addition, for
many behaviors there must be some coordination of properties between the pair of controls. For exam-
ple, if editing is to be enabled, the data source control must have that option turned on and the data-
bound control must also have its editing features enabled. As the controls are demonstrated later in the
chapter, you will see more details of how data source and data-bound controls work together.
Configuring Data Controls with VWD
When you place a data source control on your page (in Design View) VWD leads you through a wizard
to configure the various properties of the control. This procedure is remarkably cognizant of all the
details required to work with data on a page.
You can add data interactions using VWD at several levels. If you like to create controls one at a time,
you can drag a data source control and walk through its wizard, and then drag a data-bound control and
connect it to the data source control. Alternatively, you can start with a data-bound control, and its wiz-
ard steps you through creating a data source control. You can even work at a higher level by opening the
Database Explorer, selecting several fields, and dragging them to the page. VWD then creates both the
data source controls and data-bound controls for you.
VWD also offers tools for editing data controls that already exist on the page. The Properties window
offers a graphical user interface for changing settings. If you are working with code in Source View, you
can move the insertion bar within a data control tag and press the space bar to get a list of the appropri-
ate attributes in IntelliSense.
Last, VWD offers a very useful tool within wizards for building the SQL statements needed to display or
modify data. Instead of you typing (and commonly mistyping) the names of fields and the SQL key-
words, the wizard offers a drag-and-drop interface with check box options. When you click Finish, VWD
builds the SQL statement for you.
The tools of VWD greatly speed the development of data pages. However, you may find that some of
the default settings and tags created by VWD are not to your liking.The number of tags created by VWD
211
Reading Data
10_042583 ch07.qxd 4/4/06 2:45 PM Page 211
can be overwhelming (like long lists of parameters), particularly for beginners. Advanced designers may
want to substitute validation controls for the basic text boxes created by VWD. So although VWD does a
large amount of the page construction for you, most designers follow on with tweaks or partial rewrites.
You will see an example in a Try It Out later in this chapter.
Data Source Controls
This section moves from the theory to the practice by adding data source controls to a page. As men-
tioned in the previous section on VWD and data controls, a data source control is most easily created
by adding a data-bound control to a page and letting the VWD wizard set up the data source control.
However, at times you will have to create the data source control yourself, so you will walk through that
process here. The first step, of course, is to decide which data source control to use based on your type of
data. Take a look at a SQL Server Express data source (as used in this book).
The Basic Properties of Data Source Controls
Data source controls require several attributes. The obvious are an ID and the runat=”server”. You
must also specify which database on which server to use and your log on name and password for
authentication. These data are held in a connection string. Next you must specify which records and
fields to read from the data source. The data source control also requires a provider that describes how
to interact with the database. (The default provider for the
SqlDataSource control is the provider for
Microsoft SQL Server.) In this case, VWD walks you through these specifications in a wizard.
In this chapter, you mostly work on a
Fixtures.aspx page that will list Wrox United’s schedule. In this
Try It Out, you add the data source control using the VWD wizard and then examine the source code
that the IDE created for you.
Try It Out Data Source Control
1.
If you have not done so already, create a folder in the root of your site named App_Data. Right-
click the new folder and select Add Existing Item. Navigate to your downloads for this book.
Look in the
App_Data folder and select the file named WroxUnited.mdf. Click OK to import
the data file to your site.
2. Open the web site for the chapter (C:\BegASPNET2\WroxUnitedCS) and create a Web Form
called
Fixtures.aspx in the site’s root using the web form template with the site.master
page and with code in a separate page. Switch to Design View and type Fixtures in the content
panel.
3. From the Data section of the toolbar (see Figure 7-5), drag a SqlDataSource control to the mid-
dle of the content pane. You may have to scroll down to see the new control.
212
Chapter 7
10_042583 ch07.qxd 4/4/06 2:45 PM Page 212
Figure 7-5
3. Click the small arrow at the top right of the control to open the smart task panel (as shown in
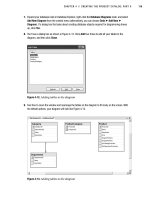
Figure 7-6) and click Configure Data Source. A wizard starts. In the first dialog box, drop down
the list of connections and select
WroxUnited.mdf. Click Next. Do not save to the application
configuration file.
Figure 7-6
4. Click Next and in the dialog box, accept the choice to specify columns from a table. From the
drop-down list, select the Fixtures table. Then select all of its fields by checking the asterisk (*)
choice in the columns panel. See Figure 7-7 for an example.
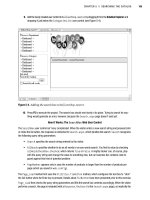
5. Click Next. In the last step of the wizard, you have an opportunity to test your query. You
should see several records and fields appear in the panel as in Figure 7-8. Click Finish.
213
Reading Data
10_042583 ch07.qxd 4/4/06 2:45 PM Page 213
Figure 7-7
Figure 7-8
6. Run the page and observe that although you have created a data source control, there is no ren-
dering. That will come when you add a data-bound control.
214
Chapter 7
10_042583 ch07.qxd 4/4/06 2:45 PM Page 214
7. Close the browser and click Source View in VWD. Take a look at what VWD built for you in the
SqlDataSource control. The Fixtures.aspx page appears as follows in Source View. Instead
of
(local)\SQLExpress, your server may be identified with a period (full stop) as
.\SQLExpress:
<%@ Page Language=”C#” MasterPageFile=”~/site.master” AutoEventWireup=”false”
CodeFile=”Fixture.aspx.cs” Inherits=”Fixture” title=”Untitled Page” %>
<asp:Content ID=”Content1” ContentPlaceHolderID=”mainContent” Runat=”Server”>
<asp:SqlDataSource ID=”SqlDataSource1” runat=”server”
ConnectionString=”Data Source=.\SQLEXPRESS; AttachDbFilename=C:\BegAspNet2\
WroxUnitedCS\app_Data\WroxUnited.mdf; Integrated Security=True;
User Instance=True”
providerName=”System.Data.SqlClient”
SelectCommand=”SELECT * FROM [Fixtures]”>
</asp:SqlDataSource>
</asp:Content>
How It Works
In this Try It Out, you used VWD to create a SqlDataSource control for you. Note how easy it was to
drag the control and then answer the series of questions in the wizard. VWD typed each of the proper-
ties listed earlier in the section. The basic
ID and Runat are there. Then you see a connection string hold-
ing the name of your server and database identified in connection string syntax as the initial catalog.
In the wizard, you requested Windows Authentication and so VWD wrote the connection string with
Integrated Security. That means you will allow Windows to certify who you are by using the name and
password with which you logged in to Windows. Last, when you picked your data source to be a
Microsoft SQL Server data file, VWD added a property to the data source control that sets the provider
to use the
System.Data.SqlClient.
Hiding the Connection String
In the preceding Try It Out, you placed the data of your connection string in the page. This leads to two
problems. First, if the name of your server or database changes, you have to change the connection
string in every page. Second, if you are using SQL Authentication, you have to present credentials (name
and password). Although the connection string is never sent to the browser, it should still make any
developer nervous to ever have that confidential authentication information on an ASP page.
Both of these problems can be solved by moving the connection string from the pages into a single entry
of the
Web.config file, and then referring to the entry rather than writing out the entire connection
string in the page. This change can be made by simply accepting the offer to “save the connection string
in the application configuration file” in the second page of the Data Source Configuration wizard.
In this Try It Out, you replace the data source control of
Fixtures.aspx with a new data source control
configured to use a connection string stored in the
Web.config file.
215
Reading Data
10_042583 ch07.qxd 4/4/06 2:45 PM Page 215
Try It Out Hiding Connection Strings
1.
Open your Fixtures.aspx page in Design View and delete the SqlDataSource1 control.
2. Drag a new SqlDataSource control to the content panel of the page. Click Configure Data
Source.
3. Make a new connection to the WroxUnited.mdb in the App_Data folder. Click test and OK.
Click Next to move to the Save the Connection String panel.
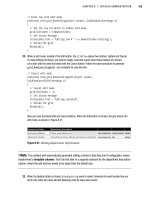
4. This time leave the check on (as default) to save the connection string to the application configu-
ration file and give it the name WroxUnited (see Figure 7-9). Click Next.
Figure 7-9
5. Continue with the rest of the wizard as before, using the fixtures table and selecting all of the
columns. Click Next, test the query, and click Finish. Save the page.
6. In the end, your data source control will appear as follows in the Fixtures.aspx page:
<asp:sqldatasource id=”SqlDataSource1” runat=”server”
connectionstring=”<%$ ConnectionStrings:WroxUnited %>”>
SelectCommand=”SELECT * FROM [Fixtures]”
</asp:sqldatasource>
7. Meanwhile, an addition has been created in <connectionstrings> section of the Web.config
code. In the actual Web.config file, the connection string runs on across one long line. To make
it easier to consider here, the line is broken into its sections:
216
Chapter 7
10_042583 ch07.qxd 4/4/06 2:45 PM Page 216
<connectionStrings>
<add name=”WroxUnited”
connectionString=”Data Source=.\SQLEXPRESS;
AttachDbFilename=|DataDirectory|WroxUnited.mdf;
Integrated Security=True;
Connect Timeout=30;
User Instance=True”/>
providerName=”System.Data.SqlClient” />
</connectionStrings>
How It Works
Take a look at the Fixtures.aspx page in Source View and focus on the data source control. Notice that
it now lacks the actual values for the connection string. Instead, you get a pointer to
connectionString
(which is understood to mean in the Web.config file) and within the connection strings to Wrox United.
Open the
Web.config file. Go to the section on connectionStrings. The <add> tag indicates another
connection string within the section. Following the name, you see the same information that you pro-
vided on the page in the previous Try It Out.
Details of the Connection String and Provider
The most complex parts of the data source control are the connectionString and the provider. The
previous examples present the simplest case. The connection string has three parts when connecting to a
SQL Server data source:
❑ First is the data source that means the name of the SQL server. A period (full stop) means the
local server:
<connectionStrings>
<add name=
“WroxUnited” connectionString=”Data Source=.\SQLEXPRESS;
❑ Second is the name of the database file to attach:
AttachDbFilename=|DataDirectory|WroxUnited.mdf;
Or alternatively:
AttachDbFilename= C:\BegAspNet2\ WroxUnitedCS\app_Data\WroxUnited.mdf;
❑ Last is the type of security to use:
Integrated Security=True;User Instance=True”/>
</connectionStrings>
If you use another relational database manager (such as Oracle or MySql), you must specify a provider
as follows. The provider for SQL Server is the default, so you did not have to use a provider in the
Try It Out exercises of this book. But for other sources, you must use the following syntax. The
Sql in
SqlDataSource means that the control can be used with any SQL-compliant data source (not only
Microsoft SQL Server). But if you use a data source other than Microsoft SQL Server, you must specify
a provider for that source so that the named provider can override the default provider:
217
Reading Data
10_042583 ch07.qxd 4/4/06 2:45 PM Page 217
<asp:SqlDataSource ID=”SqlDataSource1” Runat=”server”
providerName=”System.Data.OracleClient”
ASP.NET 2.0 can use virtually any source of data, including OLEDB- or ODBC-enabled systems. Access
files can be used for lightly loaded local sites, but complexities emerge when the MDB file has a security
scheme. Extensive discussion of the permutations, advantages, and syntax are presented in several chap-
ters of our sister book, Beginning ASP.NET 2.0 Databases.
Data-Bound Controls
Keep in mind the basic model of ASP.NET 2.0 for using data. Two controls must be on the page: a data
source control and the data-bound control. The remainder of this chapter focuses on the various data-
bound controls. It starts with selection lists; moves on to the
GridView, DataList, and Repeater; the
two single-record-display controls (
DetailsView and FormView); and finally the tree view for hierar-
chical data. Along the way, we will pause to look at how multiple data-bound controls can be used to set
parameters for each other.
You can add data-bound controls to a page (in Design View) using VWD in three ways:
❑ Add the data-bound control after adding a data source control and point to the existing data
source control.
❑ Add the data-bound control directly without an existing data source control, and let the VWD
wizard guide you through setting up a data source control.
❑ Add the field names directly from the Database Explorer to the page, and let VWD set up both
an appropriate data-bound control and a data source control.
This list increases in terms of ease as you move down the list, but decreases some of your options. For
example, a direct drag-and-drop of field names automatically creates a
GridView, whereas in the second
option you could create a
DropDownList.
Data-Bound Selection Lists
Data-bound lists present the user with a set of data from the database and imply a request that the user
select from the list. ASP.NET provides four types of lists for user selection:
DropDownList, ListBox,
RadioButtonList, and CheckBoxList. You can add the items in the selection list either by hard coding
(static) or from a data source control (dynamic). After the user makes a selection, the value is available to
your code or to other controls on the same page, or even controls on different pages.
It is easy to confuse the topic of this section (lists that request a user selection) with
the control named
ASP.NET DataList, which presents data without expectation of
user selection.
ASP.NET DataList is covered later in the chapter.
218
Chapter 7
10_042583 ch07.qxd 4/4/06 2:45 PM Page 218
All four of these selection controls support a pair of properties that are easily confused. The first is the
DataTextField property, which determines the text that the user will see. Related, but different, is the
DataValueField property that will hold the value that is used internally in your site to process the
user’s selection. For example, the
DataTextField control may show a combination of a customer’s
full name and city. But that long and mixed value is not useful to select the single customer from your
Customers table. So you set the selection list control’s
DataValueField property to be the customer ID
number, and that neatly fits into your code to narrow the orders you receive to those for that one cus-
tomer ID. When you use different fields as sources for the list control’s
DataText and DataValue, both
fields must be included in the list of fields obtained by the appropriate data source control.
One additional property is of importance for all of the selection lists.
AutoPostBack will rebuild and re-
present the page after a selection is made. This is critical if there is code in the
Page_Load event that you
want to execute to reflect the user’s selection, such as re-rendering a
GridView to show a limited set of
records based on the user’s selection from a list box.
Items can be added to a list in three ways. The first way adds items using individual ASP.NET 2.0 tags.
The second way binds the list to an array of values. Finally, the items can be read from a data source.
Adding List Items with Individual ASP.NET 2.0 Tags
When the items remain relatively static (for example, a list of states or provinces), you use hard coding
to add items. Although the code can be long, it will execute faster than opening up a connection to a data
source. Note that in some cases, although the original list of items may be static (the list of states), the
items to appear in the selection list may be dynamic (only those states with customers). Items can be
added with simple
<asp:ListItem> tags as shown in the following code. In this example, you create a
drop-down list for users to pick a player position. You want the user to see the full name of the position
(such as Left Back), so that is the
Text property. After the user makes a selection you, as a programmer,
will want to actually work with your code for the position, so that is the
Value property. Also note that
you can set a default selection on the Central Defender position. For example, in the following code list-
ing, the first item in the list will be for the Goalkeeper. The word
Goalkeeper will appear in the list box
as text and the value of
GK will be the value you can work with if the user selects Goalkeeper. (The con-
cepts of
DataTextField and DataValueField are covered a bit later.)
<asp:DropDownList id=”DropDownList1” runat=”server”>
<asp:ListItem Value=”GK”>Goalkeeper</asp:ListItem>
<asp:ListItem Value=”LB”>Left Back</asp:ListItem>
<asp:ListItem Value=”RB”>Right Back</asp:ListItem>
<asp:ListItem Value=”CD” Selected=”True”>Central Defender</asp:ListItem>
</asp:DropDownList>
Binding List Items to an Array
A more sophisticated method for adding static items employs an array. You create an array in the
Page_Load event, and then set the array as the data source for the list. Finally, you perform a binding.
Binding, in ASP.NET 2.0, refers to the act of bringing data into a control. For example, when you bind
a
ListBox to a data source control the information from the data source is actually brought into the
ListBox control. This is one of the few places in ASP.NET 2.0 where you use the version 1.x technique of
performing binding as a distinct line of code. In most cases in version 2.0, the data controls automatically
perform binding as needed. You carry out the steps in C# as follows:
219
Reading Data
10_042583 ch07.qxd 4/4/06 2:45 PM Page 219
<%@ Page Language=”C#” %>
<!DOCTYPE html PUBLIC “-//W3C//DTD XHTML 1.0 Transitional//EN”
“ /><script runat=”server”>
protected String[] MyStates ={ “AK”, “AL”, “AR” };
protected void Page_Load(object sender, EventArgs e)
{
DropDownList1.DataBind();
}
</script>
<html xmlns=” >
<head runat=”server”> <title>Demo-ListBind</title> </head>
<body>
<form id=”form1” runat=”server”>
<div>
<asp:DropDownList ID=”DropDownList1” runat=”server”
DataSource=”<%# MyStates %>” >
</asp:DropDownList>
</div>
</form>
</body>
</html>
The first shaded line creates a variable named MyStates and fills it with three values. The third shaded
line identifies that array (
MyStates) as the one to be bound to DropDownList1. The second shaded line
instructs the ASP.NET 2.0 page to, at the time of page load, actually perform the binding; that is, bring
the values in
MyStates into DropDownList1.
When you support variation in the items to be displayed, the population of the selection list should be
based on a data source control. The selection list will have a property of
DataSourceID with the value of
the ID of the data source control. Then there are values for the
DataTextField and DataValueField,
which are set to fields included in the
SelectCommand of the data source control.
Adding List Items from a Data Source
In many cases, the items of a list will be stored in a database, so it makes sense to populate the list from
the database rather than creating an array or individual tags as shown in the previous sections. Because
of ASP.NET 2.0’s mix-and-match design of data source and data-bound controls, you can populate the
list from a data source control. You just have to follow the VWD wizard to identify what data source to
use to supply the information to the
ListBox.
On the page, you want visitors to be able to limit the view of games to just one month. In this Try It Out,
you start with a page that hard-codes the months, and then move to a dynamic binding. Note that the
teams play games from October to December. You start with static binding for September to December.
Then you improve the page to dynamically bind to the actual dates in the database of games.
Try It Out Selection List Bound to a Data Source Control
1.
Early in this chapter, you created a Fixtures.aspx page. Open it in VWD. Delete the existing
SqlDataSource control and GridView.
220
Chapter 7
10_042583 ch07.qxd 4/4/06 2:45 PM Page 220
2. Add some text similar to Please pick a month, and then drag a ListBox control from the
Toolbox onto the content area. You will probably have to scroll down to see it, as in Figure 7-10.
Figure 7-10
3. Because code-behind is used in this book, you have to write your code in a separate file. At the
top of the Solution Explorer, click the View Code icon (the right-most icon in Figure 7-11) to
open the editor panel.
Figure 7-11
Notice that VWD automatically sets up the opening and closing lines of a
Page_Load event for
you (as shown in Figure 7-12). If it was not there (or for other events) you could have created it
as follows: at the top left of the editor panel, expand the drop-down list and click the Fixtures
object, and at the top-right, expand the drop-down list and select
Page_Load.
Figure 7-12
221
Reading Data
10_042583 ch07.qxd 4/4/06 2:45 PM Page 221
4. Add the following shaded lines to the Page_Load event. Note that around the list of numbers
are braces ({}), not parentheses. Also note that the declaration of the array occurs before
Page_Load:
public partial class Fixtures : System.Web.UI.Page
{
protected Int32[] ListOfMonths = { 9, 10, 11, 12 };
protected void Page_Load(object sender, EventArgs e)
{
ListBox1.DataBind();
}
}
5. Direct the ListBox control to use your array for its source of data. Switch from the
Fixtures.aspx.cs code page back to the Fixtures.aspx page and switch to Source View.
Select the
ListBox and modify its properties so that it will get its list of items from the data
source control, as shown in the following shaded lines:
<%@ Page Language=”C#” MasterPageFile=”~/site.master” AutoEventWireup=”true”
CodeFile=”Fixtures.aspx.cs” Inherits=”Fixtures” Title=”Untitled Page” %>
<asp:Content ID=”Content1” ContentPlaceHolderID=”mainContent” Runat=”Server”>
<h2>Fixtures</h2>
(end of TIO-Selection List Bound to Data Source Control)<br />
Please Pick a Month: <br />
<asp:ListBox ID=”ListBox1” runat=”server”
DataSource=<%# ListOfMonths %> >
</asp:ListBox></p>
</asp:Content>
6. Save and test the page in your browser by pressing F5. At this point, the list does not do any-
thing beyond show the months (see Figure 7-13).
But what if the team plays in January or February or you observe that there are no September
games even though you have the ninth month in your list box? You want the pages to offer new
choices in the list box automatically (dynamically). Now you will improve the
ListBox control
by binding it to the list of fixtures.
7. Drag a SqlDataSource control from the toolbar onto the fixtures page (the .aspx page, not the
code page) to a point just after the
ListBox, as shown in Figure 7-14 (you will probably have to
scroll down to see it). Then open its smart task panel and configure its data source. Select the
WroxUnited connection (not
WroxUnited.mdf) and click Next.
8. Specify a custom SQL statement and click Next. Type the following statement:
SELECT DISTINCT MONTH(FixtureDate) AS FixtureMonth FROM Fixtures
9. Click Next, Test Query, and Finish.
10. Select your ListBox control and make some changes in the Properties window. Eliminate
the
DataSource value; add a DataSourceID value of SqlDataSource1; and set both the
DataTextField and DataValueField to FixtureMonth (see Figure 7-15). If the Properties
window is not already visible (usually in the bottom right of your screen) you can bring it back
by pressing F4.
222
Chapter 7
10_042583 ch07.qxd 4/4/06 2:45 PM Page 222
Figure 7-13
Figure 7-14
223
Reading Data
10_042583 ch07.qxd 4/4/06 2:45 PM Page 223