Beginning asp net 2.0 with c phần 10 pot
Bạn đang xem bản rút gọn của tài liệu. Xem và tải ngay bản đầy đủ của tài liệu tại đây (2.22 MB, 76 trang )
3. Click OK. You are returned to the Wrox United Properties dialog box. This time, select the new
NETWORK SERVICE option. Scroll down and check the box next to Write (see Figure B-22).
Click Apply, and then click OK.
Figure B-22
This will enable your account to access the database.
Windows XP Home Edition Users Only
If, when you come to browse for a Security tab in Windows Explorer, you can’t find one, this is because you
have Windows XP Home Edition installed and you have a slightly more complex route to enable the cor-
rect permissions. Apparently, Windows XP Home Edition users just aren’t allowed to have the same kind
of power as their XP Professional counterparts. To get around this, restart your computer in Safe Mode.
To do this, restart your machine, and before the Windows XP logo appears, hold down the F8 key and
select Safe Mode. Let XP continue and then log in as Administrator. You’ll receive a warning about run-
ning in Safe Mode, but click Yes anyway. Locate the C:\WebSites\WroxUnited folder in Windows
Explorer and right-click the
App_Data folder. Select Properties and select the Security tab that has now
appeared. Now go back to step 1 in the previous section and follow the instructions from there on. At the
end, though, shut down and restart your machine in normal mode before you continue to the next step.
Checking the Installation with VWD and the ASP.NET
Development Server
After you have successfully downloaded the Wrox United zip file, unzipped it, and enabled the
Network Service, you are ready to check your installation. Follow these steps:
661
Setup
21_042583 appb.qxd 4/4/06 2:54 PM Page 661
1. Select the Start menu and navigate to All Programs. Select the Visual Web Developer 2005
Express Edition Icon at the bottom of the menu. VWD will open.
2. Select File➪Open Web Site, and browse to C:\Websites\WroxUnited and click Open. When the
web site has loaded into Solution Explorer, double-click
default.aspx to open the file. Press
the F5 key to run the page and observe it in a browser. You should see what appears in Figure
B-23 in your browser.
Figure B-23
Checking the Installation with IIS
Follow this step only if you have installed IIS and intend to use it as your main web server. To open
WroxUnited with IIS, start Internet Explorer and type http://localhost/WroxUnited into the Address line.
The web site should start and display what’s shown in Figure B-24.
Please note that while Figure B-22 is seemingly identical to Figure B-21, the Address line reveals a small
difference. If you are running your site on ASP.NET Development Server (the free web server with
VWD), you will get the following line (potentially with a different number):
http://localhost:1231/WroxUnited
This indicates that the web server is running on port 1231. The ASP.NET Development Server will arbitrar-
ily assign a port number in the URL. If you are running the web site on IIS, then you see the following line:
http://localhost/WroxUnited
662
Appendix B
21_042583 appb.qxd 4/4/06 2:54 PM Page 662
Figure B-24
IIS by default runs on port 80, and this doesn’t need to be specified in the URL.
Occasionally, if port 80 is taken by another process, IIS will default to
http://localhost:8080, or you
might have to specify it yourself if you get an error message saying
Unexpected error 0x8ffe2740
occurred
.
This means that another application is using port 80. To alter this, you need to start the IIS manager from
Administrative Tools in the Control Panel, right-click the Default Web site in the left panel, and select
Properties. From the Web Site tab, change the number there from 80 to 8080, or if 8080 is taken then 8081,
or the first one free above that number.
Troubleshooting
By and large, installation with SQL Express and the ASP.NET development is straightforward. However,
if you are trying to use SQL Server 2005 rather than SQL Express, you should run through the following
extra steps:
1. Add [machine\ASPNET] and [NT AUTHORITY\NETWORK SERVICE] as logins, substituting
machine with your machine name.
2. Attach the database (wroxunited.mdf), making ASPNET the db_owner.
3. Add [machine\ASPNET] and [NT AUTHORITY\NETWORK SERVICE] as database users.
4. Change the connection strings in web.config. That should be all for the WroxUnited database.
Then there’s the providers, which can be added to either the WroxUnited database or to a sepa-
rate one.
663
Setup
21_042583 appb.qxd 4/4/06 2:54 PM Page 663
5. Run aspnet_regsql (in the framework directory), to add user/roles/etc tables/procs to
the appropriate database.
6. Add provider sections in web.config, for <membership>, <roles>, and <profile>, setting
the default provider for each to the new provider added. These providers should point at the
ConnectionString for the database (which will be either WroxUnited or a new connection string
if you’re using another database).
Note that if you are using a different version of SQL Server than 2005, it isn’t possible to just attach the
database to the different version. If you are using the full version of 2005 and you encounter the following
problem:
Server Error in ‘/WroxUnited’ Application.
Failed to generate a user instance of SQL Server due to a failure in copying
database files. The connection will be closed.
Description: An unhandled exception occurred during the execution of the current
web request. Please review the stack trace for more information about the error and
where it originated in the code.
Exception Details: System.Data.SqlClient.SqlException: Failed to generate a user
instance of SQL Server due to a failure in copying database files. The connection
will be closed.
you will need to do the following:
1. Reboot windows.
2. Log in as Administrator (if you aren’t running with Admin privileges).
3. Delete the C:\Documents and Settings\username\Local Settings\Application Data\
Microsoft\Microsoft SQL Server Data\SQLEXPRESS
directory.
You might need to logout and log back in as a “normal” user if you normally run with non-admin privileges.
If this doesn’t work, try the following solution —there is a known problem with remote logging on and
SQL Express, which the following steps should circumvent:
1. Go to the SQL Configuration Manager.
2. Right-click SQL Express and select Properties.
3. From the Logon tab, change the account from Network Service to Local System.
4. Try to run it again.
Apart from that, if you encounter a problem go to
or
and check to see if your problem is addressed there.
664
Appendix B
21_042583 appb.qxd 4/4/06 2:54 PM Page 664
C
Wrox United
Database Design
Throughout this book, you’ve seen examples based on the fictional Wrox United soccer team web
site. The application relies on a SQL Server database, supplied with the code downloads for this
book (available at
www.wrox.com). This database stores details of the players in the team, fixtures
and results, news items, orders from the shop, and so on.
This appendix is not intended to provide a thorough overview of database design principles, and
as such, we recommend that you read Wrox’s Beginning Database Design.
The database schema looks like Figure C-1.
Figure C-1
22_042583 appc.qxd 4/4/06 2:54 PM Page 665
This diagram illustrates the tables that exist within the database, and the relationships between those
tables. For example, players score goals, goals are scored at fixtures, match reports are written about spe-
cific fixtures, and so on. Many tables relate to other tables in the database, but there are some tables that
stand on their own; for example, the News table, which stores news articles. This table doesn’t link to
data stored in any other table. Notice also that the Orders, Products, and OrderLines tables are separate
from the rest of the database —these tables are used to store data relating to orders from the Wrox
United shop.
This appendix walks through the structure of each of the tables in the database and describes the rela-
tionships between them.
Players and Matches
The players on the Wrox United team are involved in many fixtures, and several related tables in the
database store related data for matches. Take a look at these tables first.
The Players Table
The following shows the structure of the Players table.
Field Data Type Allow Nulls
PlayerID (Primary Key) int No
FirstName varchar(25) No
LastName varchar(25) No
Position varchar(50) Yes
PictureURL varchar(255) Yes
DateJoined datetime Yes
DateLeft datetime Yes
This table is typical of all database tables in that it has the following:
❑ A primary key field that uniquely identifies each row in the database
❑ Fields designed to store textual data about each player (in
varchar fields)
❑ Fields that store date and time information
❑ Flags indicating whether or not different fields require values
In this table, the primary key is the PlayerID field, which stores numeric values (integers) that are
unique to each player in the database. This field, along with the FirstName and LastName fields, is
marked as not allowing null values. In other words, if you enter a row of data in the table, you must
666
Appendix C
22_042583 appc.qxd 4/4/06 2:54 PM Page 666
enter values for each of these fields. However, the PlayerID field will be filled with an auto-generated
number for you (due to the way it is configured), so the only data you must enter when you create a new
row is the full name of the new player. The remaining information describing the player is optional. You
don’t have to specify which position the player occupies, and you don’t have to specify when he or she
joined.
Note that a
varchar field is a field that stores character data of varying length. The number in brackets
is the maximum number of characters that can be stored in that field. If the field contains less than the
maximum length, it occupies less space in the database. A
char field, by comparison, always takes up
the same size in the database, no matter how much of the available space is filled with data.
Figure C-2 shows an example of some data from the Players table.
Figure C-2
This screenshot comes straight from Visual Web Developer. You can right-click any database table in the
Database Explorer and select Show Table Data to try this out for yourself.
The Goals Table
The Goals table relates directly to the Players table, because players score goals during a match. The fol-
lowing shows the structure of the Goals table.
667
Wrox United Database Design
22_042583 appc.qxd 4/4/06 2:54 PM Page 667
Field Data Type Allow Nulls
GoalID (Primary Key) int No
FixtureID (Foreign Key) int Yes
PlayerID (Foreign Key) int Yes
Time int Yes
Notice that one of the fields in this table is the PlayerID field, which will store an integer value corre-
sponding to the ID of one of the players in the Players table, so if Dave Dickenson scored the first goal
for Wrox United, the goal in the table with GoalID of 1 will have a PlayerID of 4. Dave could later score
another goal for Wrox United, so another record in the Goal table would be created with another unique
value for GoalID, but with the same PlayerID. This type of field is called a foreign key because it relates
directly to a primary key in another table.
There is another field in the Goals table for storing ID values, which is the FixtureID field. This links
each goal to a particular fixture. Because players could score many goals at a single fixture, the relation-
ship between the Fixtures table and the Goals table is similar to that of the Players table and the Goals
table.
The Fixtures Table
The Fixtures table is structured as shown here.
Field Data Type Allow Nulls
FixtureID (Primary Key) int No
FixtureDate datetime No
FixtureType varchar(10) Yes
GoalsFor smallint Yes
GoalsAgainst smallint Yes
Notes text Yes
Opponents varchar(50) No
For each match played by the Wrox United team, there is an entry in the Fixtures table. Because fixtures
can be arranged several months in advance, the fixture date has to be entered as soon as the fixture is
arranged, and the opponents have to be entered. The number of goals scored can be entered later, after
the match has been played.
This sort of relationship —where one fixture can contain many goals, or where one
player could score many goals —is known as a one-to-many relationship.
668
Appendix C
22_042583 appc.qxd 4/4/06 2:54 PM Page 668
The MatchReports Table
After each match has taken place, it’s up to the reporters to write up the details of the match so that fans
can read all about it later. These reports are stored in the MatchReports table, which is structured like as
shown here.
Field Data Type Allow Nulls
ReportID (Primary Key) int No
FixtureID (Foreign Key) int No
Report text Yes
MemberName varchar(50) No
This table also links to the Fixtures table by including a FixtureID field in this table, linking a match
report to a specific fixture. The MemberName field stores the name of the reporter.
The Gallery Table
The Gallery table is used to store details of pictures uploaded by fan club members. The fields defined in
this table are shown here.
Field Data Type Allow Nulls
PictureID (Primary Key) int No
FixtureID (Foreign Key) int Yes
UploadedByMemberName varchar(50) Yes
Notes text Yes
PictureURL varchar(50) No
Each picture can relate to a specific fixture (notice the FixtureID field); however, because this field allows
the use of null values, this implies that pictures do not necessarily have to relate to fixtures.
Standalone Tables
The two standalone tables in the database are the Opponents table and the News table.
The Opponents Table
The Opponents table stands on its own in the database, and is defined as shown here.
The reason the Opponents table is on its own is a bit unfortunate, but the opposing team may decide to
change its name at some point in the future, which would change the name of all fixtures that Wrox
United played against them in the past if they were related. By keeping the tables separate, and only
using a name for each team, the name of the opponent in any particular match is preserved.
669
Wrox United Database Design
22_042583 appc.qxd 4/4/06 2:54 PM Page 669
Field Data Type Allow Nulls
OpponentID (Primary Key) int No
Name varchar(50) Yes
Won int Yes
Drawn int Yes
Lost int Yes
Points int Yes
TotalGoalsFor int Yes
TotalGoalsAgainst int Yes
This table can be updated with results of matches to maintain a tally of how well the Wrox United team
is performing in the league.
The News Table
The News table, described here, contains all of the news stories from the front page of the Wrox United site.
Field Data Type Allow Nulls
NewsID (Primary Key) Int No
DateToShow datetime No
Description text Yes
PictureURL varchar(50) Yes
Category varchar(50) Yes
Title varchar(50) Yes
Notice that each news item requires that a date be entered for each story, so that a story can remain hid-
den until a certain date has passed.
Wrox United Store Tables
The online shopping experience on the Wrox United site relies on data stored in three tables: the Orders
table, the Products table, and the OrderLines table. These tables are heavily reliant on each other.
The Orders Table
The Orders table, described here, contains a unique ID containing the main order details for an order.
670
Appendix C
22_042583 appc.qxd 4/4/06 2:54 PM Page 670
Field Data Type Allow Nulls
OrderID (Primary Key) Int No
OrderDate datetime No
OrderSentDate datetime Yes
MemberName varchar(50) No
Name varchar(50) No
Address varchar(255) No
County varchar(50) No
PostCode varchar(15) No
Country nchar(10) No
SubTotal money Yes
Discount money Yes
Total money Yes
In this table, you’ll notice that most of the fields are marked as mandatory (not allowing null values).
This highlights the fact that orders must have full address details before an order can be fulfilled. A cou-
ple of less familiar field types are in here too. The
nchar data type will always take up 10 characters
space in the database, and the
n in the name indicates that the data stored could contain Unicode charac-
ters. The other unfamiliar data type is
money, which (as the name implies) can be used to store monetary
values.
Notice that there are no details in this table about which products have been bought in a particular
order. This information is stored in the OrderLines table.
The OrderLines Table
The OrderLines table, described here, links the Products table to the Orders table, indicating which items
have been bought in a particular order.
Field Data Type Allow Nulls
OrderLineID (Primary Key) int No
OrderID (Foreign Key) int No
ProductID (Foreign Key) int No
Quantity smallint No
Price money No
671
Wrox United Database Design
22_042583 appc.qxd 4/4/06 2:54 PM Page 671
Because an order can contain one or many products, there is a foreign key link here to the Products table.
However, because many different orders can be for the same product, there is also a foreign key link here
to the Orders table. This means that an individual line in this table stores details of one item, and one
order number. If you order more than one of a specific product, the Quantity is increased for the order
line, but you won’t end up with a new OrderLineID.
The Products Table
The Products table, described here, contains details of all of the products that can be bought from the
shop.
Field Data Type Allow Nulls
ProductID (Primary Key) int No
Name varchar(50) No
Description varchar(255) Yes
Price money No
PictureURL varchar(255) Yes
This simple table provides data about products, and is used both when users are browsing the shop and
when they’re buying items from the shop.
The relationship between the Orders table and the Products table is a many-to-many
relationship. In this situation, there has to be a central table that has one-to-many
relationships to both tables, and this is called the Join table.
672
Appendix C
22_042583 appc.qxd 4/4/06 2:54 PM Page 672
D
VWD Database Explorer
When you’re designing pages that work with data, you frequently need to check the metadata, for
example, to confirm the data type of a field. You also want to test your pages by quickly modifying
the data in tables. Furthermore, in some cases, you want to add a small and simple table to a
database, such as a list of shippers. In the past, these database tasks required that you leave your
web editor to open a second window with a database management tool. Visual Web Developer
offers a built-in tool named the Database Explorer that can perform these tasks without the need
for a separate management tool. Some functions are performed directly and others invoke a wiz-
ard to step you through the task.
This appendix covers the various techniques for working with the Database Explorer.
Opening the Database Explorer
You can view the Database Explorer either by choosing Menu➪View or by pressing Ctrl+Alt+S.
After it is open, the Database Explorer by default stacks on top of the Solution Explorer on the
right side of the screen. You can move it to a new dock location by dragging its title bar.
Adding an Existing Database to the
Database Explorer
The technique to connect the Database Explorer to a database depends on the type of database.
The following three sections cover the Microsoft databases. Most other databases (such as Oracle
or MySQL) will be the same as connecting to a SQL Server.
If you mess up the layout, you can return to the default by choosing
Menu➪Windows➪Reset Windows Layout.
23_042583 appd.qxd 4/4/06 4:23 PM Page 673
Accessing Files
Follow these steps:
1. On the Database Explorer toolbar, click Connect to Database, and from the first page of the wiz-
ard, select Microsoft Access Database File, as shown in Figure D-1.
Figure D-1
2. Browse to the file, and then add logon information if needed (see Figure D-2).
Figure D-2
3. You have the option to test the connection and then it is added to your list in the Database
Explorer.
674
Appendix D
23_042583 appd.qxd 4/4/06 4:23 PM Page 674
SQL Databases on a SQL Server (Including SQL Server
Express)
Follow these steps:
1. On the Database Explorer toolbar, click Connect to Database, and in the first page of the wizard
(shown in Figure D-3), select Microsoft SQL Server.
Figure D-3
In the next dialog box, the Data Source section is locked— it actually means the kind of data
source, not the name of the database.
2. Continuing on the Add Connection screen, for the Server Name text box, there are two options.
If you are using a full install of SQL Server, select the server name. If you are using SQL Server
Express (as we do in this book), type the following syntax exactly: (local)\SQLExpress, as
shown in Figure D-4.
Figure D-4
675
VWD Database Explorer
23_042583 appd.qxd 4/4/06 4:23 PM Page 675
Note the potential confusion when using SQL Server Express. Your PC name will be listed in the
drop-down box of servers, but that is not the server you want to specify. You must type into the
server name box the specific syntax to point to your local machine’s instance of SQL Server
Express.
3. Keep the choice for logon information set to Windows (see Figure D-5) unless you have devel-
oped an authentication table in SQL Server.
Figure D-5
4. After you have selected the server name, you can drop down the list of databases. Test the con-
nection and then click Finish to see your new data connection.
Saving SQL Databases as an MDF File
For highest performance, data is kept in SQL Server without an external file structure. But for portability,
a database can be configured to save its data in a Windows file that can be copied to a new server. The
file will have an extension of .mdf. We use an .mdf file to distribute data in this book. (The alternative
would be to have you download a long SQL script that would build the entire database internally in
your server and populate its data.) Connecting to an .mdf file is very similar to connecting to Access
Files. Just follow these steps:
1. On the Database Explorer toolbar, click Connect to Database, and select Microsoft SQL Server
Database File, as shown in Figure D-6.
Figure D-6
2. Browse to the file and add logon information if needed (see Figure D-7).
3. You have the option to test the connection and then it is added to your list in the Database Explorer.
676
Appendix D
23_042583 appd.qxd 4/4/06 4:23 PM Page 676
Figure D-7
Viewing Database Diagrams
The VWD Database Explorer provides a visual presentation of your database’s objects along with the
capability to drill down into each object’s properties. Follow these steps to walk through a diagram of
your database:
1. Within the Database Explorer, expand your Data Connections and then expand your database.
When you expand the Database Diagrams (see Figure D-8) the first time, you may be asked to
establish yourself as the dbo (database owner). Click Yes. Right-click the Database Diagram object
and add a new diagram. If asked, accept the creation of elements needed to build the diagram.
Figure D-8
677
VWD Database Explorer
23_042583 appd.qxd 4/4/06 4:23 PM Page 677
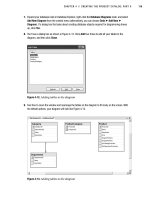
2. Add tables as desired and close the Add Table dialog box (see Figure D-9).
Figure D-9
The diagram can be so large that it is easy to miss tables. Note the Windows-standard horizontal
and vertical scroll bars to navigate the diagram (see Figure D-10).
Figure D-10
678
Appendix D
23_042583 appd.qxd 4/4/06 4:23 PM Page 678
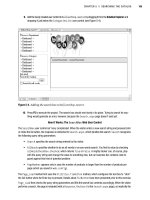
3. You can rearrange the tables (the relationship lines will automatically adjust). Start by changing
the zoom size to 30% or so to be sure you see all of the tables and then do some rearranging. The
zoom window is on the diagram toolbar, shown in Figure D-11 set to 30%.
Figure D-11
4. Increase the zoom size to be able to read the data. For example, after rearrangement, 70% shows
all the tables for Wrox United, as shown in Figure D-12.
5. Right-click the title bar of a table (for example, Players) and select Properties from the menu. In
the Properties box (in the lower right of the monitor), you can view parameters such as the
Identity column. Right-click one field (see Figure D-13) of a table and select Properties to see how
that column has been configured, including the data type and length.
6. Carefully place the tip of the mouse arrow on a relationship line (for example, between Fixtures
and MatchReports) so that the mouse arrow changes to a horizontal double-ended arrow. Right-
click this relationship and select Properties to view data on the relationship, including enforce-
ment rules, as shown in Figure D-14.
679
VWD Database Explorer
23_042583 appd.qxd 4/4/06 4:23 PM Page 679
Figure D-12
Figure D-13
680
Appendix D
23_042583 appd.qxd 4/4/06 4:23 PM Page 680
Figure D-14
7. You can also print the Database Diagram or save it to include in documentation for the site.
Note that there are tools to position page breaks at specific axes of the diagram, as well as a tool
that allows you to add a text box of notes.
Exploring a Table’s Structure
In addition to the Database Diagram, you can look at tables through the Table node of the Database
Explorer, as follows:
1. Starting in Database Explorer, expand the list of databases and then the database of interest.
Expand the Tables node and select a table name (for example, MatchReports). In the Properties
window, shown in Figure D-15, you will see the approximate number of records.
Figure D-15
681
VWD Database Explorer
23_042583 appd.qxd 4/4/06 4:23 PM Page 681
2. Double-click a table name to open a list of the columns (fields) and populate the Properties win-
dows with data on the table as a whole, as shown in Figure D-16.
Figure D-16
These metadata can be changed in this view, assuming that you have the rights to make changes
to the database structure.
Observing and Editing Data of Existing Tables
If you right-click a table name in the Tables node of Database Explorer, you’ll see an option to Show
Table Data. This is a quick way to find out if your data-enabled web pages are actually carrying out their
tasks. You can also add, modify, or delete records to test results in data-reading pages.
Be extremely careful about changing data with the Show Table Data tool. For example, deletions or
changes of customers may divorce them from their orders. In some databases, the addition of a record
may require the addition of a partner record in another table. A simple correction to a spelling mistake
may cause a failure to properly look up data that is based on the old spelling. If you thoroughly under-
stand the schema and are changing independent data, you may avoid trouble. But in most cases, it is
better to make revisions based on the interface that ensconces proper validation, limits, and controls.
682
Appendix D
23_042583 appd.qxd 4/4/06 4:23 PM Page 682
Creating a New Database
It is rare that you will use VWD to create a database from scratch. Good databases require the kind of
planning and implementation tools that come with your database management system. However, in the
case of a small and simple database, VWD does offer the necessary planning and implementation tools.
You can add a new database in two ways: directly in the Database Explorer or by adding a SQL Database
through the Add New Item menu in Solution Explorer.
Follow these steps to create a database in Database Explorer:
1. In the Database Explorer, right-click Data Connections and select Create New SQL Server
Database.
2. Select a server. If you’re using SQL Server Express, use this exact syntax for the server name:
(local)\SQLExpress. Use Windows authentication unless you have created an authentication
scheme internal to SQL Server Express. Type the name of the new database into the bottom text box.
Database Explorer will automatically add the database to its list and you are ready to create
tables and add data.
You can also create a new database directly in the Solution Explorer. This technique is very similar to the
preceding procedure except for the first few steps:
1. Start in the Solution Explorer and right-click the root of the web site. Select Add New Item and
select the template of type SQL Database.
2. When prompted, agree to add to the App_Data folder.
VWD will now roll you over to the Database Explorer where you will see the new database and
folders for its objects (albeit empty). You can now create tables, add data, and perform other tasks.
Creating a New Table and Adding Data
Tables can be added and populated in the Database Explorer, as follows:
1. Expand the database, right-click the Tables node, and select Add New Table from the menu
shown in Figure D-17.
Figure D-17
683
VWD Database Explorer
23_042583 appd.qxd 4/4/06 4:23 PM Page 683
2. In the resulting list of columns, enter the names and data types. For example, as shown in
Figure D-18, a new table that holds a schedule of reporter’s interviews with the players would
start with a column (field) for InterviewID.
Figure D-18
Note that under Data Type, you can scroll down to find the UniqueIdentifier type, which is sim-
ilar to AutoNumber in Access.
3. In the panel below the columns list, you will find additional properties for the current column
such as default value and length.
4. Set the primary key by selecting a field and clicking the key tool in the table’s toolbar.
5. Finish by choosing Menu➪File➪Save Table.
Examining and Creating Views
Views provide a set of data. Instead of returning information directly from a table, a view returns only
certain fields, modified fields, or records. In many databases, the security rules will allow a web site to
request a view but not directly request data from a table —this provides a level of control for the
database administrator. For example, a table of employees may hold a field for salary level. A view that
684
Appendix D
23_042583 appd.qxd 4/4/06 4:23 PM Page 684
is authorized for the accounting department would include that field, but other users only have access to
views that do not include the salary data. Views are also useful for creating hybrid data, such as combin-
ing a NameFirst field and a NameLast field to show both names in a single field of a list box.
You can do a basic exercise where you create a view that would support a selection ListBox of Players.
You want the view to create two fields —the first is the player’s ID and the second is a combination of
the player’s last and first names, separated by a comma. Follow these steps:
1. In Database Explorer, expand your database, right-click the Views node, and select Add a New
View. This opens the designer for a new view in the background, and in the foreground, the
Add Table dialog (see Figure D-19) will open.
Figure D-19
2. In the Add Table dialog box, select Players and click Add. Close the dialog box.
3. Before you go on, experiment with turning on and off the panels to display a view. From left to
right, they are the Diagram, Query, SQL Statement, and Results. Because you are making a small
view, you can display all four. Figure D-20 shows the four panels. On the top is the pane of
tables, showing just the Players table with the single field of PlayerID selected. The next panel
down is the query designer, which shows the single field selected. The next panel shows the
very simple SQL statement:
SELECT PlayerID FROM dbo.Players. The bottom panel shows
the results of choosing Query Designer➪Run to produce the results table.
685
VWD Database Explorer
23_042583 appd.qxd 4/4/06 4:23 PM Page 685