LEGO MINDSTORMS - The Unofficial Guide to Robots - Jonathan B. Knudsen Part 7 pps
Bạn đang xem bản rút gọn của tài liệu. Xem và tải ngay bản đầy đủ của tài liệu tại đây (199.7 KB, 20 trang )
110
Figure 5-6.
Linking shafts with pulleys and a band
se pulley slippage to your advantage. If part of your robot should have a limited range of motion,
hat this band does not slip, in general. Its motion is geared down so far
Grabber Arm
Minerva's grabber arm is operated by a single motor. If you run the motor in one direction, the arm lowers, the grabber grabs,
and the arm rises again. Run the motor in the opposite direction and the arm lowers, the grabber relaxes, and the arm rises once
again. This mechanical sorcery is based on the FetchBot, created by Ben Williamson (see the "Online Resources" section for
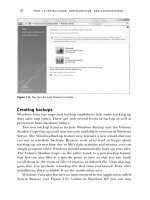
details). A cutaway view of the arm is shown in Figure 5-7.
The entire arm is controlled by the main drive shaft. A motor linked to a worm gear drives the 40t gear on the main drive shaft.
On the other hand, you can u
like a trap door that opens and closes, a pulley can be very useful. You can run the motor for longer than it actually takes to
open or close the door—when the door has gone as far as it can go, the pulley band will simply slip.
In the final design, a pair of pulleys is used to link the arm motor to the arm worm gear shaft. You can see this arrangement on
he top of Minerva—just look for the white band. Note tt
that the arm is likely to break apart before the pulley starts to slip.
Mechanical Design
Several thorny mechanical issues complicate the design and construction of Minerva. In this section, I'll talk about some of
Minerva's more interesting mechanical features.
111
Figure 5-7.
Cutaway view of the grabber arm
he key to understanding how the arm works is that it moves up and down for two separate reasons:
. When the grabber grips something, the geartrain that controls the grabber locks up. When the main drive shaft continues
oves the entire arm up and down.
rtrain becomes stationary with respect to the arm. The main drive shaft keeps rotating,
raising the entire arm with the closed grabber.
A single touch sensor can be used to detect when the arm is fully raised, either with the gripper open or the gripper closed.
Picking up an object is simply a matter of running the motor in the right direction and waiting for the touch sensor to be
pressed. Releasing an object is just as simple.
The "fingers" of the gripper need to pick up objects. Ideally, they should be slightly pliable and tacky rather than smooth.
Minerva uses two of the rubber wheels as fingers, which work reasonably well.
T
1. The cams on the lower shaft push the arm up and let it move back down.
2
turning, it m
Suppose Minerva begins with her arm raised and the grabber open. When the main drive shaft starts turning counterclockwise,
the lower shaft turns clockwise. The cams rotate down, allowing the arm to lower. (At the same time, the rotation of the main
shaft closes the grabber a little bit.) As the main drive shaft continues turning, the grabber closes. When it is fully closed, either
on an object or itself, the grabber gea
112
The arm also needs to be strong, as its parts are under a fair amount of stress. You may notice, as you use Minerva, that the
ieces of the arm loosen up after time. You could make the arm stronger, but it would also be bulkier. See Ben Williamson's
s is balance. The grabber arm sticks out in front of Minerva. Without some kind of
unterbalance, Minerva falls right on her face. One way to fix this is to move the drive wheels closer to the front of Minerva.
ver, the directional transmission and the grabber arm gearing would not have enough space to coexist.
inerva solves the problem of balance by mounting the RCX near the back of the robot. The weight of the RCX (the batteries,
imple, Minerva's drivetrain is a little more complex. When the motor runs
ne way, the two drive wheels both turn forward. When the motor runs the other way, the drive wheels turn in opposite
correct wheel movements. Only one of the outputs drives a wheel directly.
Input
ne way to move beyond the three-input barrier: attaching more than one sensor to a single input. Minerva, for example, has a
here are two common variations on the theme of attaching multiple sensors to one input, both of which are discussed here.
he first and easiest possibility is to attach multiple touch sensors to a single input. With the input configured for a touch
p
FetchBot (in the "Online Resources" section) for the original arm design, which is stronger and larger than Minerva's.
Balance
One of the fundamental issues Minerva face
co
In this case, howe
M
mostly) more than compensates for the weight of the grabber arm.
Drivetrain
Although the directional transmission is relatively s
o
directions, causing Minerva to spin in place. Minerva uses a fairly complex system of gears to translate the outputs of the
directional transmission into the
Two Sensors, One
You might think that the RCX's three inputs limit you to designing robots with only three sensors. In this section, I'll describe
o
touch sensor and a light sensor attached to a single input. If you have ambitious plans (and parts) for expanding Minerva,
you've got two inputs, not just one, with which to play.
T
Multiple Touch Sensors
T
sensor, a press on any one of the attached sensors will produce a value of 1 on the input.
113
This might be useful, for example, in a robot with a "skirt" touch sensor that runs around the entire robot. Different parts of the
irt might trigger different touch sensors. By putting all the skirt sensors on one input, you could easily detect any collision
ight and Touch
inerva uses a light sensor and a touch sensor on one input. The input is configured for a light sensor. When the touch sensor
ect on the light sensor reading. When the touch sensor is pressed, the input gives a value of 100; the
urrent value of the light sensor becomes irrelevant.
nditions around the sensor. You'll rarely see a real light sensor reading of 100 unless you point some very bright light
. In general, it's safe to assume that readings of 100 correspond to the touch sensor being pressed.
the two sensors being attached to one input. In particular, the touch sensor must normally
ay briefly so the touch sensor is no longer
ressed. This allows Minerva to observe values from the light sensor.
here Am I?
Timing
Minerva uses a fairly unreliable technique, called timing, to determine her current position. She moves forward for some
amount of time until she finds something to pick up. Then she turns around by spinning in place for a length of time defined in
TURNAROUND_TIME. Then she drives back to her starting point by moving forward for as much time as she moved forward
before. If Minerva drives forward for
sk
with the skirt, anywhere around the robot.
The downside, of course, is that you don't know which touch sensor is being pressed. There's a way around this problem, of
course, but it involves using a soldering iron. I'll explain how it works in Chapter 11, Make Your Own Sensors.
L
M
is not pressed, it has no eff
c
Usually the light sensor shows values in the range of 30 to 70, roughly speaking; the readings depend on the lighting
co
directly into the sensor
Minerva's program must account for
be not pressed. In the grab() and release() subroutines, for example, the grabber arm motor is run forward or in
reverse until the touch sensor is triggered. Then the motor must be run the other w
p
W
You've probably discovered that Minerva gets lost easily. If she drives over anything, or if her wheels slip in any way, she can't
find her way back to her starting point. Minerva, basically, is trying to answer the question "Where am I?" Unfortunately, she
can't answer it very well.
114
five seconds, she assumes she can reach her starting point by turning around and driving forward for five seconds again.
iming is not a very accurate technique. Variations in battery power, the material Minerva is driving on, and other
npredictable factors will mess things up. Turning around, in particular, is not very reliable: Minerva almost never heads back
she came. Minerva's directional transmission makes things more complicated, as well, because it takes a
ttle time for the transmission to shift from one direction to the other. This affects the timing of Minerva's forward motion, as
orded.
a should have some feedback about how far she's traveled and how far she's turned. You could, for example,
on sensors and attach them to inputs 1 and 2. If you put the rotation sensors on Minerva's two main wheels, you
ould know exactly how many times, and in what direction, each wheel had turned. By assuming that the wheels didn't slip on
d get a very accurate idea of where Minerva was, relative to her starting position. You wouldn't have to
orry about the directional transmission any more.
ected terrain like driving over blocks would likely throw this method of navigation off as well.
till, it's a step up from timing.
avigation Tools
ral generic navigation tools that you might consider attaching to your RCX to answer the question of location:
ass would give a good indication of what direction Minerva was pointing. Feedback from the compass
ading would allow Minerva to turn around with much better accuracy. The interface between the compass and Minerva's
rtunately, garden variety GPS is only accurate to 100
't get accurate enough information
T
u
precisely the way
li
the shifting time is also rec
Rotation Sensors
Ideally, Minerv
buy some rotati
w
the ground, you coul
w
Wheels do slip, sadly, so unexp
S
N
here are seve
T
1. A magnetic comp
re
inputs, of course, is entirely up to you and would probably require a bit of electronics hacking.
2. Triangulation is a commonly used navigation technique. Suppose you mounted three radio transmitters around the area
where Minerva was going to drive. By listening to the three signals, Minerva could determine her position relative to the radio
transmitters. Again, this is pretty high-tech, serious electronics.∗
An obvious choice might be the Global Positioning System (GPS). Unfo
∗
m or so. Unless you're the US military, or willing to spend some serious money, you won
om GPS to help your robot navigate.
fr
115
Why Should I Care?
Before you tear your hair out tr S n to your RCX, think about what you're trying to do. Do you really
eed to know precisely where the robot is? Using precise positioning and having the robot build a map of its world are both
rti mobile robotics. The RCX is not very powerful. If you just
ant to avoid table legs and walls, build a bumper and back up when you hit something. After all, you probably won't be able
ramming environment you use.
ying to get a GP u it to talk
n
techniques of the big-metal a ficial intelligence (AI) approach to
w
to build a map of the world in your RCX, no matter what prog
Online Resources
Directional Transmission
/>This page, created by Michael Powell, describes the basic principle of the directional transmission with detailed photographs.
Ben's Lego Creations
/>This page contains some fascinating robots created by Ben Williamson. A modified version of Ben's FetchBot arm was used as
Minerva's grabber arm. These robots are mechanically superlative; check them out.
"Where am I?"—Systems and Methods for Mobile Robot Positioning
/>Johann Borenstein's book about mobile robot navigation can be downloaded from this site as an Adobe Acrobat PDF file. The
whole book is 13 Mb, which is a little hefty for my dial-up Internet connection, but a free book is a free book. It's gotten good
reviews from the MINDSTORMS online community.
116
6
pbFORTH
On
he limitations of RCX Code, the
rogramming environment that comes with RIS. Even NQC, however, has its limitations. Even though you finally have the use
the memory, display, and other resources in the RCX. pbFORTH allows you to program your robots using Forth, an
established language that is suitable for small systems like the RCX.
This chapter will get you up and running with pbFORTH by covering the following topics:
• An overview of the pbFORTH software architecture
• Obtaining and installing pbFORTH
• A brief description of Forth
• Listings of RCX-specific words defined in pbFORTH
• Example programs
Replacement Firmware
Later, in Chapter 10, legOS, I'll talk about another popular programming environment. legOS and pbFORTH are both
replacement firmware, which means they actually replace the software on the RCX. This is the next level of power and
complexity beyond NQC. If you're considering this move, which should you choose? It all depends, of course, on what you're
trying to do and what programming you've already done. Table 6-1 compares pbFORTH and legOS in several important areas.
In this chapter:
• Replacement Firmware
• pbFORTH Overview
About Forth •
• pbFORTH Words
• An Expensive Thermometer
• Minerva Revisited
• Debugging
line Resources •
In Chapter 4, Not Quite C, I described how NQC allows you to get around many of t
p
of variables, you're limited to 31 of them. Furthermore, you can't put your own data on the display, which would be very useful
for debugging. In this chapter, I'll talk about pbFORTH (Programmable Brick Forth), a piece of software that gives greater
access to
117
Table 6-1. pbFORTH and legOS Compared, Briefy
pbFORTH legOS
rogramming language Forth C or C++
teractive? Yes No
rogramming tool Terminal emulator C compiler, either gcc or egcs
pment environment, pbFORTH excels in two areas:
Ther certain amount of pain, the startup cost, associated with learning and using a new development environment. For
bFOR his startup cost is low. The software tools you'll need on the PC side are simple and commonly available. Compare
erminal emulator or some other simple software that talks to the RCX's IR port. You can
teract RTH from a Windows terminal emulator, a Java application running on Linux, or even a custom-developed
pli mPilot.
development cycle
RTH, this sequence of
ps is farily short. Basically, yo r type your program into pbFORTH via a terminal emulator running on your PC.
y available to run. With legOS, you need to compile the program on your PC and download the
, which takes a couple of minutes.
ftware, but there are only a few good tools for working with it. As of this writing,
terminal sessions to program your RCX with pbFORTH.
C, it's not NQC that limits your robot programs;
QC just reflects the limitations of the RCX firmware. Remember, NQC is a replacement for software on the PC only. It
have to replace the RCX
mware itself. Figure 6-1 shows a block diagram, similar to Figure 4-1, that shows how pbFORTH replaces the RCX's
w
P
In
Development OS Any Unix, Linux, or similar
P
As a develo
start
up cost
e's a
TH, t
p
this with legOS, which requires some heavy-duty development tools that can be tricky to install and configure. pbFORTH is
very openended; all you need is a t
in
ap
with pbFO
cation on a Pal
A development cycle is the sequence of steps you need to follow to write and run a program. With pbFO
u upload o
ste
The program is immediatel
e thing to the RCX
whol
However, before you get all fired up about pbFORTH, remember some caution is in order. pbFORTH itself works well,
especially considering it's relatively new so
you will have to put up with ugly-looking
bFORTH Overview
p
Although I'm describing pbFORTH as a way around the limitations of NQ
N
generates bytecodes, just like RCX Code, that are downloaded and interpreted on the RCX itself. NQC's limitations are the
result of the limitations of the bytecode interpreter on the RCX. To break through this barrier, you
fir
firm
are.
118
Figure 6-1.
pbFORTH software architecture
orth is an interpreted language, whichF
Y
means you can type commands to pbFORTH and have the robot respond immediately.
ou don't have to compile and download programs; you simply type them directly to the interpreter.
Installing pbFORTH
Installing pbFORTH is a simple process:
1. Obtain pbFORTH from
. It's available as an archive that contains the
pbFORTH replacement firmware, the source code, and example scripts.
2. Install pbFORTH on the RCX. To do this, you'll need a firmware downloader. The firmware downloader is a piece of
software that knows how to transmit firmware over the IR link to the RCX. Two freely available firmware downloaders are
nqc (described in Chapter 4) and firmdl, available in C source code at
.Downloading firmware to the RCX takes a couple of minutes, so be prepared to wait.
To download pbFORTH using nqc, for example, you use the -firmware option, like this:
nqc -firmware pbforth.srec
When the download is complete, your RCX's screen will go entirely blank. Although the RCX looks dead, don't be fooled.
pbFORTH is running, and you will be able to talk to it as the next section.
pbFORTH will remain running on your RCX as long as the batteries are good. It replaces the regular MINDSTORMS
hout reinstalling the regular firmware. To
remove
described in
firmware entirely, so you won't be able to program with RCX Code or NQC wit
119
pbFORTH from your RCX, you'll need to remove the batteries to clear the memory. Then you can use nqc or firmdl to
download a different set of firmware. If you want to reinstall the default firmware, you can
use the RIS software.
indows users can use the HyperTerminal application that comes with Windows. Linux users can use minicom or
imilar. You'll need to point your emulator at whatever serial port has the IR tower attached. The other relevant
ttings are 2400 Baud, 8 data bits, 1 stop bit, and no parity.
To g uick start with pbFORTH, let's turn on one of the outputs. First, you'll need to initialize the RCX like this (the stuff
you type is shown in bold):
To tu output, use the MOTOR_SET command, which will be covered later. Type the following:
2 0 MOTOR_SET
m Return after you enter the whole line. Depending on your terminal settings, you will see the letters you
type es in a row, like this:
77 22 00 MMOOTTOORR__SSEETT
I have rem d the extra letters in the examples in this chapter, for clarity. To minimize the repeated characters as you type in
e e e sure "local echo" is disabled in your terminal emulator.
se (represented by 2) with full power
CX is about to drive off your desk, you can turn off the output like this:
Talking to pbFORTH
To interact with pbFORTH, you need to use a terminal emulator to exchange data with the RCX over the IR link.
W
something s
se
Once you've got your emulator running, press Enter on your keyboard a couple of times. pbFORTH should respond with ''ok"
messages:
ok
k
o
et a q
should
RCX_INIT
Ok
rn on
an
7
ok
Re
ember to press
two or three tim
ove
xamples, makth
The MOTOR_SET line turns on output A (represented in the code by 0) in rever
(represented by 7). If your R
7 3 0 MOTOR_SET
ok
120
This is the same as the previous example, except the 2 is now a 3. The 3 tells pbFORTH to turn the output off. I'll get to the
details of MOTOR_SET later, after I've introduced you to the Forth language itself.
separate everything with spaces. pbFORTH reads different words by assuming that they're all separated by
hitespace, either spaces or returns. If you miss a space, pbFORTH wil d and complain that it can't find a word
FORTH is also case sensitive. While MOTOR_SET is a defined word, Motor_Set is not, nor is motor_set or
MOTOR_SEt.
Send es
For s ent, you'll want to create your source code in a text file and send the whole file to pbFORTH when you're
eady an do this with many terminal emulators, although you have to set it up correctly.
in Figure 6-2.
Make sure you
w l get confuse
definition.
pb
ing Fil
erious developm
to test. You cr
First, the terminal emulator needs to know how long to wait after sending each character. In HyperTerminal (in Windows 95,
98, or NT), this setting is available in the File > Properties menu option. In the window that appears, choose the Settings tab
and press the ASCII Setup button. You should set the Line delay to 100 milliseconds and the Character delay to 20
milliseconds, as shown
Figure 6-2.
Setting character delays for sending files
To u e to pbFORTH, choose Transfer → Send Text File from the menu. pload a fil
121
There are other options, as well. Appendix B, A pbFORTH Downloader, contains source code for a Java-based program
downloader. Furthermore, t
he pbFORTH web site has pbFORTH tools written in Tcl/Tk.
Abo
In th I'll briefly describe the Forth language itself. Then I'll detail pbFORTH's RCX-specific words and present some
ve the top item. Adding an
item e stack is a push. Retrieving the top item is a pop. A pop always returns the last item that was pushed.
Assu this works. Let's begin by pushing a number
on th onds with a friendly "ok":
77
single period and press return. The period pops a value off the stack and prints it out to the console, along with that
u separating them with spaces. Similarly, you can pop more than one value off the
stack
If yo you know almost everything there is to know about Forth.
e is simply a list of words and what they mean. A word is a simply a
prog
ut Forth
is section,
short examples of robotic programming with pbFORTH.
The Stack
Forth is a simple but powerful language. It is based around the idea of a stack. A stack is just what it sounds like, like a stack of
trays in one of those spring-loaded carts at a cafeteria. You can add something to the stack or remo
to th
ming ready gotten pbFORTH running on your RCX, let's see howyou've al
e stack. Type a number into your terminal emulator and hit return. pbFORTH resp
ok
ow type a
N
ubiquitous "ok":
.
77 ok
Yo
can push multiple values on the stack by
more than one period, like this:
with
77 12 55
ok
. .
55 12 ok
.
77 ok
u understand the stack,
Words and the Dictionary
Th
other important concept in Forth is the dictionary. This
ith a name. To run it,
ram w
122
you just type its name. Many programs expect to find input values on the stack and may place their results on the stack when
they're done.
ilt-in words
Forth the dictionary. DUP, for example, duplicates the top element of the
stack ee how this works:
77 77 ok
able 6-2 lists some of the important built-in words in Forth. The table shows the stack before ("Initial Stack") and after
Tabl ds
Wor Mean Initial Stack Ending Stack
P on the stack x x x
VE Copies the second stack item x1 x2 x1 x2 x1
SWA e top two stack items x1 x2 x2 x1
x2 x3 x1
DRO rds the top item on the stack x
the stack and leave their result at the top of
You can change the number base you're working in using the HEX and DECIMAL words. For example, if you wanted to work
in hexidecimal (base 16), you would type HEX. Base 10 is represented by DECIMAL. Most of the numbers in this chapter will
be base 16.
Bu
has a number o
. You can easily s
f simple words that are built in to
77
ok
DUP
ok
. .
T
("Ending Stack") the word runs. By convention, the top is shown on the right. For example, x1 x2 shows a stack with x2 at
the top and x1 as the second item. This seems confusing at first, but it makes sense after a while (and it's the convention in
Forth documentation).
e 6-2. Forth Built-in Wor
d ing
DU Duplicates the top item
O
R
PICK Copies the nth stack item (n is zero-based) … n … xn
P Switches th
OT Moves the third stack item to the top x1 x2 x3
R
P Disca
Forth also supports mathematical operators, which operate on the top two items of
the st k. For example, you can divide two numbers like this:
ac
84 2 /
ok
.
42 ok
Bitwise operators are also defined: AND, OR, XOR.
123
BASE is a word (a variable, which I'll talk about soon) that contains the current number base. To print out the current number
ase, for example, do this:
10 ok
the current base with SE @ seem like a
ointless exercise, but it's useful if you want to save the current base away to be restored at some later time.
you want to work in a number system other than HEX or DECIMAL, you can use BASE ! to store any base number. The
hows two ways you can use Forth to convert numbers between different bases:
32 ok
16 ok
arenthesis ( is used to indicate a comment. The pbFORTH interpreter simply ignores the rest of the line after it
es the (.
ing words
ng programs in Forth is a matter of defining your own words in the dictionary. Word definitions begin with a colon and
The ter that the words that follow define a new word for the dictionary and should be stored to run
later e, threeTimes in this example, which is supplied immediately after the colon. Subsequent
word d when the new word is executed. The semicolon tells the interpreter that the new word definition has
ende Times duplicates the top item on the stack twice, so there are three copies of it, then adds them all together.
15 ok
ons:
b
BASE @ .
Interestingly, the current base is printed in terms of the current base, so it will always be 10. Suppose you're working in base 8.
If you print out the current base, 8, in base 8, it's expressed as 10. Retrieving BA may
p
If
following example s
HEX 20 DECIMAL . (20 in base 16 is 32 in base 10)
8 BASE ! 20 DECIMAL . (20 in base 8 is 16 in base 10)
The open p
se
efin
D
riti
W
end with a semicolon. Here's a simple example:
: threeTimes DUP DUP + + ;
ok
colon tells the Forth interpre
eeds a nam
. The new word n
l be execute
s wil
d. three
Now that you've defined a new word, you can use it like any other Forth word:
5 threeTimes .
nd you can, of course, use it in subsequent definiti
A
: nineTimes threeTimes threeTimes ;
ok
5 nineTimes .
45 ok
124
Here's another simple example that demonstrates how to print messages from within a word. Be careful about the spacing: the
actual string to be printe and
d is framed by the .“ ” words, which
e se
Hello, world. ok
: helloWorld ." Tag, Welt. " ;
lloWorld ok
You in Forth that represent numerical values. These words are called constants; you can use the word
anyw ean the number it represents. This is really handy for making programs more readable. To define a
cons
7 CONSTANT FULL
SET
VARIABLE
k
tack with the @ word:
t the specified address. Similarly, the @ word expects to find an
ddr with the value at that address. When you declare a variable with the VARIABLE
ord address (determined by the Forth interpreter) to a name.
ar
parate from the string.
: helloWorld ." Hello, world. " ;
ok
hell
oWorld
If you define a word that already exists, it will be redefined:
redefine he
Constants and Variables
can define words
here you really m
tant, push its value on the stack. Then use the word CONSTANT and supply a name. like this:
ok
You can the use FULL anywhere you really mean 7, like this:
FULL 2 0 MOTOR_
ok
ariables are even easier to define. Just use the word and supply a name:
V
VARIABLE z
ok
Values are stored in variables using the ! word, pronounced "store":
12 z !
o
he value of a variable can be retrieved and placed on the s
T
z @ .
12 ok
There's some tricky stuff going on here that I'll briefly discuss. A variable is really an address in memory. The ! word expects
o find an address and a value on the stack; it stores the value a
t
a
ess on the stack. It replaces the address
, all you're really doing is assigning an
w
125
Conditionals and Loops
Fo
com
rth statement, though the order is switched around from what you might be used to. The IF word
e s:
he IF word lo e condition on . If the condition is true, the body between IF and THEN is executed.
hat are available.
atical Condition Words
top two items on the stack; replaces them with true if the second item is less than the top item, false otherwise
em with true if they are equal, false otherwise
e stack; replaces them with true if the second item is greater than the top item, false
Replaces the top item of t k with true if it is equal to zero; false otherwise
e out a message if the top item on the stack is less than 0:
: negative 0< IF ." less than zero " THEN ;
The value on the stack. The result of this comparison is examined by the IF word. If it is true, the
body RTH to print text to the console, up until the ” word. Finally, THEN
mark
Ther
E falseBody THEN
ore, except words between ELSE and THEN will be executed if the condition is false.
limit start DO words LOOP
This loop performs the given words limit - start times. Internally, a loop index is given the value start. Each time
through the loop, the index is increased by one. When it is equal to limit, the loop ends. You can put the
supports a standard IF
s in two different varietie
condition IF body THEN
oks at th the stack
T
Table 6-3 lists some of the mathematical condition words t
Table 6-3. Mathem
Word Description
< Compares the
= Compares the top two items on the stack; replaces th
> Compares the top two items on th
otherwise
0< Replaces the top item of the stack with true if it is less than zero; false otherwise
he stac
0=
Th following example prints
ok
-2 negative
less than zero ok
2 negative
ok
0< word examines the top
of the IF is executed. The .“ word tells pbFO
s the f the body of the IF.
end o
e's als lightly more complicated IF word: o a s
condition IF trueBody ELS
his is the same as befT
Forth also includes some simple loops, including:
126
value of the loop index on the stack with the I word. For example, the following shows how to define a word that prints the
O I . LOOP ;
8 9 10 ok
his variation on the basic DO LOOP adds the given delta value to the loop index instead of always adding one. You can
o p backwards by supplying a negative delta.
his loop performs its body until a false condition is left on the stack. The following example waits for the View button to be
ff we haven't covered just yet):
ok
ok
the body of this loop we push on the stack and duplicate it. Then we call BUTTON_GET, which retrieves the
rre he value of RCX_BUTTON is retrieved (with @) and
omp When this condition is true, the loop ends and
BEG
his variation on BEGIN UN , executing its body each time through the loop.
bFORTH Words
bFORTH includes 34 words that perform RCX-specific funct section, I'll describe them all for you. Each word's
ith the starting and ending state of the stack, like this:
SWAP (x1 x2 x2 x1)
p of the stack is shown on the right side. If you push x1 on the
stack, then x2 and x3, then the stack would be shown like this: x1 x2 x3. The top of the stack is x3. The MOTOR_SET
word, for example, takes three values off the top of the stack:
MOTOR_SET (power mode index )
numbers from 1 to 10.
: oneToTen 11 1 D
ok
oneToTen
1 2 3 4 5 6 7
limit start DO words delta +LOOP
T
use this type of l o to count
BEGIN body UNTIL
T
pressed (using some stu
BUTTON_INIT
: waitForViewButton BEGIN RCX_BUTTON DUP BUTTON_GET @ 2 AND UNTIL ;
In
cu
RCX_BUTTON
nt state of the buttons into the RCX_BUTTON variable. Then t
ared to 2, which corresponds to the View button on the RCX.
c
WaitForViewButton is done.
IN body AGAIN
T TIL loops forever
p
ions. In this
p
name is listed along w
WORD_NAME (startStack endStack)
For example, the SWAP word would be listed like this:
The starting stack and ending stack are shown such that the to
127
After MOTOR_SET runs, the stack is empty. The first thing you need to push on the stack is power; the last thing is .
7 2 0 MOTOR_SET
In this case, 7 is power, 2 is mode, and 0 is index.
-
ters off the stack. The power parameter should be 1 to 7, where 7 is
output should be turned on going forward (1) or in reverse (2), or if it
, the motor shaft resists turning; in float mode, it turns
index tput A, B, or C, respectively.
or example, to turn on output 3 in full reverse, do this:
7 2 2 MOTOR_SET
emember that constants can make this kind of code a lot nicer. For example:
on
pbFORTH provides two words that allow you to examine which front panels are pressed.
index
In your code, it comes out in the same order:
The very first pbFORTH word initializes the RCX:
RCX_INIT ( )
This word starts the input and output handlers, system timers, and performs other important initializations. After you load
pbFORTH on the RCX, call this word before you try to do anything with the inputs, outputs, buttons, or other RCX services.
utput Control O
ne word is devoted to controlling the RCX's outputs:
O
OTOR_SET (power mode index - )
M
This word turns an output on or off. It pops three parame
ll power. The mode parameter indicates whether the
fu
should be turned off in "brake" (3) or "float" (4) modes. In brake mode
eely. The top parameter, , should be 0, 1, or 2, representing ou
fr
F
R
7 CONSTANT OUT_FULL
ok
2 CONSTANT FORWARD 4 CONSTANT FLOAT
ok
2 CONSTANT OUT_3
ok
OUT_FULL FORWARD OUT_3 MOTOR_SET
ok
OUT_FULL FLOAT OUT_3 MOTOR_SET
Ok
Fr t Panel Buttons
128
BUTTON_INIT ( )
This word initializes pbFORTH's button-handling system. Make sure to call it once before you try to call BUTTON_GET.
UTTON_GET (address )
t button state into the variable address. pbFORTH provides a variable, RCX_BUTTON, that you
n use for this purpose. The value placed in the variable tells which buttons are pressed and is a combination (boolean OR) of
6-4.
un 1
iew 2
rgm 4
or example, if the Run and Prgm buttons are pressed simultaneously, the flags returned from BUTTON_GET will be 5.
ere's a word definition that retrieves the button state and places it on the top of the stack:
: buttonState RCX_BUTTON DUP BUTTON_GET @ ;
uilding on this, here's a handy word definition that tests if the Run button is pressed:
: isRunButtonPressed buttonState 1 AND ;
emember, you have to call before you use this word; otherwise is won't work.
On-Off word, described later in this chapter.
ws because you can display the results of your
lay can be controlled individually; this includes the
you might never have seen otherwise), and the large
ments lit up.
ay numbers, or clear the entire display. For changes to
B
This word places the curren
ca
the values shown in Table
Table 6-4. BUTTON_GET Return Values
Button Name Value
R
V
P
F
H
B
R BUTTON_INIT
To test the state of the button, you'll need to use the POWER_GET
LCD Display Words
pbFORTH provides direct control of the RCX's display. This is exciting ne
programs or even intermediate values. Every segment of the LCD disp
"little man," the input and output arrows, the datalog indicators (which
numbers in the center. Figure 6-3 shows the display with most of its seg
pbFORTH offers words that show and hide individual segments, displ
actually take effect, however, you must call LCD_REFRESH:
129
LCD_REFRESH ( )
Use this word after making changes to the display. The state of the display will not change until you call LCD_REFRESH.
Figure 6-3.
y a number from the stack with the following word:
number value on the display. The decimal parameter controls the location of the decimal point, if
signed parameter determines whether value is shown as signed or unsigned. The acceptable values
Description
No decimal point
Three digits after the decimal point
signed
d Parameter of LCD_NUMBER
n Description
Signed, no leading zeros
Unsigned with leading zeros
Single digit on the right of the display (ignores decimal)
ber -4198, use the following:
3002 -1066 3001 LCD_NUMBER LCD_REFRESH
The RCX's display
pbFORTH can displa
CD_NUMBER (decimal value signed ) L
This word shows the
here is one, while the t
of decimal and signed are shown in Table 6-5 and Table 6-6.
Table 6-5. Values for the decimal Parameter of LCD_NUMBER
Value (in hexadecimal)
3002
3003 One digit after the decimal point
3004 Two digits after the decimal point
3005
any value Single digit on the right of the display (use 3017 for )
Table 6-6. Values for the signe
Value (i hexadecimal)
3001
301F
3017
For example, to display the num