McGraw-Hill - Robot Mechanisms and Mechanical Devices Illustrated Part 2 docx
Bạn đang xem bản rút gọn của tài liệu. Xem và tải ngay bản đầy đủ của tài liệu tại đây (602.14 KB, 25 trang )
Introduction xxv
water-soluble supports are formed by a separate extrusion head, and they
can be washed away after the model is complete.
Three-Dimensional Printing (3DP)
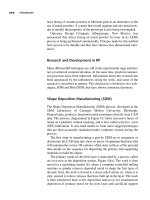
The Three-Dimensional Printing (3DP) or inkjet printing process, dia-
grammed in Figure 6, is similar to Selective Laser Sintering (SLS)
except that a multichannel inkjet head and liquid adhesive supply
replaces the laser. The powder supply cylinder is filled with starch and
cellulose powder, which is delivered to the work platform by elevating a
delivery piston. A roller rolls a single layer of powder from the powder
cylinder to the upper surface of a piston within a build cylinder. A multi-
channel inkjet head sprays a water-based liquid adhesive onto the surface
of the powder to bond it in the shape of a horizontal layer of the model.
In successive steps, the build piston is lowered a distance equal to the
thickness of one layer while the powder delivery piston pushes up fresh
powder, which the roller spreads over the previous layer on the build pis-
Figure 6 Three-Dimensional Printing (3DP): Plastic powder from a reservoir is spread
across a work surface by roller onto a piston of the build cylinder recessed below a table
to a depth equal to one layer thickness in the 3DP process. Liquid adhesive is then
sprayed on the powder to form the contours of the layer. The piston is lowered again,
another layer of powder is applied, and more adhesive is sprayed, bonding that layer to
the previous one. This procedure is repeated until the 3D model is complete. It is then
removed and finished.
xxvi Introduction
ton. This process is repeated until the 3D model is complete. Any loose
excess powder is brushed away, and wax is coated on the inner and outer
surfaces of the model to improve its strength.
The 3DP process was developed at the Three-Dimensional Printing
Laboratory at the Massachusetts Institute of Technology, and it has been
licensed to several companies. One of those firms, the Z Corporation of
Somerville, Massachusetts, uses the original MIT process to form 3D
models. It also offers the Z402 3D modeler. Soligen Technologies has
modified the 3DP process to make ceramic molds for investment casting.
Other companies are using the process to manufacture implantable
drugs, make metal tools, and manufacture ceramic filters.
Direct-Shell Production Casting (DSPC)
The Direct Shell Production Casting (DSPC) process, diagrammed in
Figure 7, is similar to the 3DP process except that it is focused on form-
ing molds or shells rather than 3D models. Consequently, the actual 3D
model or prototype must be produced by a later casting process. As in the
3DP process, DSPC begins with a CAD file of the desired prototype.
Figure 7 Direct Shell Production Casting (DSPC): Ceramic molds rather than 3D models
are made by DSPC in a layering process similar to other RP methods. Ceramic powder is
spread by roller over the surface of a movable piston that is recessed to the depth of a sin-
gle layer. Then a binder is sprayed on the ceramic powder under computer control. The
next layer is bonded to the first by the binder. When all of the layers are complete, the
bonded ceramic shell is removed and fired to form a durable mold suitable for use in metal
casting. The mold can be used to cast a prototype. The DSPC process is considered to be
an RP method because it can make molds faster and cheaper than conventional methods.
Introduction xxvii
Two specialized kinds of equipment are needed for DSPC: a dedicated
computer called a shell-design unit (SDU) and a shell- or mold-
processing unit (SPU). The CAD file is loaded into the SDU to generate
the data needed to define the mold. SDU software also modifies the orig-
inal design dimensions in the CAD file to compensate for ceramic
shrinkage. This software can also add fillets and delete such features as
holes or keyways that must be machined after the prototype is cast.
The movable platform in DSPC is the piston within the build cylinder.
It is lowered to a depth below the rim of the build cylinder equal to the
thickness of each layer. Then a thin layer of fine aluminum oxide (alu-
mina) powder is spread by roller over the platform, and a fine jet of col-
loidal silica is sprayed precisely onto the powder surface to bond it in the
shape of a single mold layer. The piston is then lowered for the next layer
and the complete process is repeated until all layers have been formed,
completing the entire 3D shell. The excess powder is then removed, and
the mold is fired to convert the bonded powder to monolithic ceramic.
After the mold has cooled, it is strong enough to withstand molten
metal and can function like a conventional investment-casting mold.
After the molten metal has cooled, the ceramic shell and any cores or
gating are broken away from the prototype. The casting can then be fin-
ished by any of the methods usually used on metal castings.
DSPC is a proprietary process of Soligen Technologies, Northridge,
California. The company also offers a custom mold manufacturing serv-
ice.
Ballistic Particle Manufacturing (BPM)
There are several different names for the Ballistic Particle Manu-
facturing (BPM) process, diagrammed in Figure 8. Variations of it are
also called inkjet methods. The molten plastic used to form the model
and the hot wax for supporting overhangs or indentations are kept in
heated tanks above the build station and delivered to computer-
controlled jet heads through thermally insulated tubing. The jet heads
squirt tiny droplets of the materials on the work platform as it is moved
by an X-Y table in the pattern needed to form each layer of the 3D
object. The droplets are deposited only where directed, and they harden
rapidly as they leave the jet heads. A milling cutter is passed over the
layer to mill it to a uniform thickness. Particles that are removed by the
cutter are vacuumed away and deposited in a collector.
Nozzle operation is monitored carefully by a separate fault-detection
system. After each layer has been deposited, a stripe of each material is
deposited on a narrow strip of paper for thickness measurement by opti-
xxviii Introduction
cal detectors. If the layer meets specifications, the work platform is low-
ered a distance equal to the required layer thickness and the next layer is
deposited. However, if a clot is detected in either nozzle, a jet cleaning
cycle is initiated to clear it. Then the faulty layer is milled off and that
layer is redeposited. After the 3D model is completed, the wax material
is either melted from the object by radiant heat or dissolved away in a hot
water wash.
The BPM system is capable of producing objects with fine finishes,
but the process is slow. With this RP method, a slower process that yields
a 3D model with a superior finish is traded off against faster processes
that require later manual finishing.
The version of the BPM system shown in Figure 8 is called Drop on
Demand Inkjet Plotting by Sanders Prototype Inc, Merrimac, New
Hampshire. It offers the ModelMaker II processing equipment, which
produces 3D models with this method. AeroMet Corporation builds tita-
nium parts directly from CAD renderings by fusing titanium powder
with an 18-kW carbon dioxide laser, and 3D Systems of Valencia,
Figure 8 Ballistic Particle Manufacturing (BPM): Heated plastic and wax are deposited
on a movable work platform by a computer-controlled X-Y table to form each layer. After
each layer is deposited, it is milled to a precise thickness. The platform is lowered and the
next layer is applied. This procedure is repeated until the 3D model is completed. A fault
detection system determines the quality and thickness of the wax and plastic layers and
directs rework if a fault is found. The supporting wax is removed from the 3D model by
heating or immersion in a hot liquid bath.
Introduction xxix
California, produces a line of inkjet printers that feature multiple jets to
speed up the modeling process.
Directed Light Fabrication (DLF)
The Directed Light Fabrication (DLF) process, diagrammed in Figure 9,
uses a neodymium YAG (Nd:YAG) laser to fuse powdered metals to
build 3D models that are more durable than models made from paper or
plastics. The metal powders can be finely milled 300 and 400 series
stainless steel, tungsten, nickel aluminides, molybdenum disilicide, cop-
per, and aluminum. The technique is also called Direct-Metal Fusing,
Laser Sintering, and Laser Engineered Net Shaping (LENS).
The laser beam under X-Y computer control fuses the metal powder
fed from a nozzle to form dense 3D objects whose dimensions are said to
be within a few thousandths of an inch of the desired design tolerance.
DLF is an outgrowth of nuclear weapons research at the Los Alamos
National Laboratory (LANL), Los Alamos, New Mexico, and it is still in
the development stage. The laboratory has been experimenting with the
Figure 9 Directed Light Fabrication (DLF): Fine metal powder is distributed on an X-Y
work platform that is rotated under computer control beneath the beam of a neodymium
YAG laser. The heat from the laser beam melts the metal powder to form thin layers of a
3D model or prototype. By repeating this process, the layers are built up and bonded to
the previous layers to form more durable 3D objects than can be made from plastic.
Powdered aluminum, copper, stainless steel, and other metals have been fused to make
prototypes as well as practical tools or parts that are furnace-fired to increase their bond
strength.
xxx Introduction
laser fusing of ceramic powders to fabricate parts as an alternative to the
use of metal powders. A system that would regulate and mix metal pow-
der to modify the properties of the prototype is also being investigated.
Optomec Design Company, Albuquerque, New Mexico, has
announced that direct fusing of metal powder by laser in its LENS
process is being performed commercially. Protypes made by this method
have proven to be durable and they have shown close dimensional toler-
ances.
Research and Development in RP
Many different RP techniques are still in the experimental stage and have
not yet achieved commercial status. At the same time, practical commer-
cial processes have been improved. Information about this research has
been announced by the laboratories doing the work, and some of the
research is described in patents. This discussion is limited to two tech-
niques, SDM and Mold SDM, that have shown commercial promise.
Shape Deposition Manufacturing (SDM)
The Shape Deposition Manufacturing (SDM) process, developed at the
SDM Laboratory of Carnegie Mellon University, Pittsburgh,
Pennsylvania, produces functional metal prototypes directly from CAD
data. This process, diagrammed in Figure 10, forms successive layers of
metal on a platform without masking, and is also called solid free- form
(SFF) fabrication. It uses hard metals to form more rugged prototypes
that are then accurately machined under computer control during the
process.
The first steps in manufacturing a part by SDM are to reorganize or
destructure the CAD data into slices or layers of optimum thickness that
will maintain the correct 3D contours of the outer surfaces of the part and
then decide on the sequence for depositing the primary and supporting
materials to build the object.
The primary metal for the first layer is deposited by a process called
microcasting at the deposition station, Figure 10(a). The work is then
moved to a machining station (b), where a computer-controlled milling
machine or grinder removes deposited metal to shape the first layer of
the part. Next, the work is moved to a stress-relief station (c), where it is
shot- peened to relieve stresses that have built up in the layer. The work
is then transferred back to the deposition station (a) for simultaneous
deposition of primary metal for the next layer and sacrificial support
Introduction xxxi
metal. The support material protects the part layers from the deposition
steps that follow, stabilizes the layer for further machining operations,
and provides a flat surface for milling the next layer. This SDM cycle is
repeated until the part is finished, and then the sacrificial metal is etched
away with acid. One combination of metals that has been successful in
SDM is stainless steel for forming the prototype and copper for forming
the support structure
The SDM Laboratory investigated many thermal techniques for
depositing high-quality metals, including thermal spraying and plasma
or laser welding, before it decided on microcasting, a compromise
between these two techniques that provided better results than either
technique by itself. The metal droplets in microcasting are large enough
(1 to 3 mm in diameter) to retain their heat longer than the 50-mm
droplets formed by conventional thermal spraying. The larger droplets
remain molten and retain their heat long enough so that when they
impact the metal surfaces they remelt them to form a strong metallurgi-
cal interlayer bond. This process overcame the low adhesion and low
mechanical strength problems encountered with conventional thermal
metal spraying. Weld-based deposition easily remelted the substrate
Figure 10 Shape Deposition Manufacturing (SDM): Functional metal parts or tools can
be formed in layers by repeating three basic steps repetitively until the part is completed.
Hot metal droplets of both primary and sacrificial support material form layers by a ther-
mal metal spraying technique (a). They retain their heat long enough to remelt the
underlying metal on impact to form strong metallurgical interlayer bonds. Each layer is
machined under computer control (b) and shot-peened (c) to relieve stress buildup
before the work is returned for deposition of the next layer. The sacrificial metal supports
any undercut features. When deposition of all layers is complete, the sacrificial metal is
removed by acid etching to release the completed part.
xxxii Introduction
material to form metallurgical bonds, but the larger amount of heat trans-
ferred tended to warp the substrate or delaminate it.
The SDM laboratory has produced custom-made functional mechani-
cal parts and has embedded prefabricated mechanical parts, electronic
components, electronic circuits, and sensors in the metal layers during
the SDM process. It has also made custom tools such as injection molds
with internal cooling pipes and metal heat sinks with embedded copper
pipes for heat redistribution.
Mold SDM
The Rapid Prototyping Laboratory at Stanford University, Palo Alto,
California, has developed its own version of SDM, called Mold SDM,
for building layered molds for casting ceramics and polymers. Mold
SDM, as diagrammed in Figure 11, uses wax to form the molds. The wax
occupies the same position as the sacrificial support metal in SDM, and
water-soluble photopolymer sacrificial support material occupies and
supports the mold cavity. The photopolymer corresponds to the primary
metal deposited to form the finished part in SDM. No machining is per-
formed in this process.
The first step in the Mold SDM process begins with the decomposi-
tion of CAD mold data into layers of optimum thickness, which depends
on the complexity and contours of the mold. The actual processing
begins at Figure 11(a), which shows the results of repetitive cycles of the
deposition of wax for the mold and sacrificial photopolymer in each
layer to occupy the mold cavity and support it. The polymer is hardened
by an ultraviolet (UV) source. After the mold and support structures are
built up, the work is moved to a station (b) where the photopolymer is
removed by dissolving it in water. This exposes the wax mold cavity into
which the final part material is cast. It can be any compatible castable
material. For example, ceramic parts can be formed by pouring a gel-
casting ceramic slurry into the wax mold (c) and then curing the slurry.
The wax mold is then removed (d) by melting it, releasing the “green”
ceramic part for furnace firing. In step (e), after firing, the vents and
sprues are removed as the final step.
Mold SDM has been expanded into making parts from a variety of
polymer materials, and it has also been used to make preassembled
mechanisms, both in polymer and ceramic materials.
For the designer just getting started in the wonderful world of mobile
robots, it is suggested s/he follow the adage “prototype early, prototype
often.” This old design philosophy is far easier to use with the aid of RP
tools. A simpler, cheaper, and more basic method, though, is to use
Introduction xxxiii
Popsicle sticks, crazy glue, hot glue, shirt cardboard, packing tape, clay,
or one of the many construction toy sets, etc. Fast, cheap, and surpris-
ingly useful information on the effectiveness of whatever concept has
been dreamed up can be achieved with very simple prototypes. There’s
nothing like holding the thing in your hand, even in a crude form, to see
if it has any chance of working as originally conceived.
Robots can be very complicated in final form, especially those that do
real work without aid of humans. Start simple and test ideas one at a time,
then assemble those pieces into subassemblies and test those. Learn as
much as possible about the actual obstacles that might be found in the
environment for which the robot is destined. Design the mobility system
to handle more difficult terrain because there will always be obstacles that
will cause problems even in what appears to be a simple environment.
Learn as much as possible about the required task, and design the manip-
ulator and end effector to be only as complex as will accomplish that task.
Trial and error is the best method in many fields of design, and is
especially so for robots. Prototype early, prototype often, and test every-
thing. Mobile robots are inherently complex devices with many interac-
tions within themselves and with their environment. The result of the
effort, though, is exciting, fun, and rewarding. There is nothing like see-
ing an autonomous robot happily driving around, doing some useful task
completely on its own.
Figure 11 Mold Shape Deposition Manufacturing (MSDM): Casting molds can be
formed in successive layers: Wax for the mold and water-soluble photopolymer to sup-
port the cavity are deposited in a repetitive cycle to build the mold in layers whose thick-
ness and number depend on the mold’s shape (a). UV energy solidifies the photopolymer.
The photopolymer support material is removed by soaking it in hot water (b). Materials
such as polymers and ceramics can be cast in the wax mold. For ceramic parts, a gelcast-
ing ceramic slurry is poured into the mold to form green ceramic parts, which are then
cured (c). The wax mold is then removed by heat or a hot liquid bath and the green
ceramic part released (d). After furnace firing (e) any vents and sprues are removed.
This page intentionally left blank.
Acknowledgments
T
his book would not even have been considered and would never have
been completed without the encouragement and support of my lov-
ing wife, Victoria. Thank you so much.
In addition to the support of my wife, I would like to thank Joe Jones
for his input, criticism, and support. Thank you for putting up with my
many questions. Thanks also goes to Lee Sword, Chi Won, Tim Ohm,
and Scott Miller for input on many of the ideas and layouts. The process
of writing this book was made much easier by iRobot allowing me to use
their office machines. And, lastly, thanks to my extended family, espe-
cially my Dad and Jenny for their encouragement and patience.
xxxv
Copyright © 2003 by The McGraw-Hill Companies, Inc. Click here for Terms of Use.
This page intentionally left blank.
Chapter 1 Motor and Motion
Control Systems
Copyright © 2003 by The McGraw-Hill Companies, Inc. Click here for Terms of Use.
This page intentionally left blank.
INTRODUCTION
A modern motion control system typically consists of a motion con-
troller, a motor drive or amplifier, an electric motor, and feedback sen-
sors. The system might also contain other components such as one or
more belt-, ballscrew-, or leadscrew-driven linear guides or axis stages.
A motion controller today can be a standalone programmable controller,
a personal computer containing a motion control card, or a programma-
ble logic controller (PLC).
All of the components of a motion control system must work together
seamlessly to perform their assigned functions. Their selection must be
based on both engineering and economic considerations. Figure 1-1
illustrates a typical multiaxis X-Y-Z motion platform that includes the
three linear axes required to move a load, tool, or end effector precisely
through three degrees of freedom. With additional mechanical or electro-
3
Figure 1-1 This multiaxis X-Y-Z
motion platform is an example of
a motion control system.
4 Chapter 1 Motor and Motion Control Systems
mechanical components on each axis, rotation about the three axes can
provide up to six degrees of freedom, as shown in Figure 1-2.
Motion control systems today can be found in such diverse applica-
tions as materials handling equipment, machine tool centers, chemical
and pharmaceutical process lines, inspection stations, robots, and injec-
tion molding machines.
Merits of Electric Systems
Most motion control systems today are powered by electric motors
rather than hydraulic or pneumatic motors or actuators because of the
many benefits they offer:
• More precise load or tool positioning, resulting in fewer product or
process defects and lower material costs.
• Quicker changeovers for higher flexibility and easier product cus-
tomizing.
• Increased throughput for higher efficiency and capacity.
• Simpler system design for easier installation, programming, and
training.
• Lower downtime and maintenance costs.
• Cleaner, quieter operation without oil or air leakage.
Electric-powered motion control systems do not require pumps or air
compressors, and they do not have hoses or piping that can leak
Figure 1-2 The right-handed
coordinate system showing six
degrees of freedom.
Chapter 1 Motor and Motion Control Systems 5
hydraulic fluids or air. This discussion of motion control is limited to
electric-powered systems.
Motion Control Classification
Motion control systems can be classified as open-loop or closed-loop.
An open-loop system does not require that measurements of any output
variables be made to produce error-correcting signals; by contrast, a
closed-loop system requires one or more feedback sensors that measure
and respond to errors in output variables.
Closed-Loop System
A closed-loop motion control system, as shown in block diagram
Figure 1-3, has one or more feedback loops that continuously compare the
system’s response with input commands or settings to correct errors in
motor and/or load speed, load position, or motor torque. Feedback sensors
provide the electronic signals for correcting deviations from the desired
input commands. Closed-loop systems are also called servosystems.
Each motor in a servosystem requires its own feedback sensors, typi-
cally encoders, resolvers, or tachometers that close loops around the
motor and load. Variations in velocity, position, and torque are typically
caused by variations in load conditions, but changes in ambient tempera-
ture and humidity can also affect load conditions.
A velocity control loop, as shown in block diagram Figure 1-4, typically
contains a tachometer that is able to detect changes in motor speed. This
sensor produces error signals that are proportional to the positive or nega-
tive deviations of motor speed from its preset value. These signals are sent
Figure 1-3 Block diagram of a
basic closed-loop control system.
6 Chapter 1 Motor and Motion Control Systems
to the motion controller so that it can compute a corrective signal for the
amplifier to keep motor speed within those preset limits despite load
changes.
A position-control loop, as shown in block diagram Figure 1-5, typi-
cally contains either an encoder or resolver capable of direct or indirect
measurements of load position. These sensors generate error signals that
are sent to the motion controller, which produces a corrective signal for
amplifier. The output of the amplifier causes the motor to speed up or
slow down to correct the position of the load. Most position control
closed-loop systems also include a velocity-control loop.
The ballscrew slide mechanism, shown in Figure 1-6, is an example of
a mechanical system that carries a load whose position must be controlled
in a closed-loop servosystem because it is not equipped with position sen-
sors. Three examples of feedback sensors mounted on the ballscrew
mechanism that can provide position feedback are shown in Figure 1-7:
(a) is a rotary optical encoder mounted on the motor housing with its shaft
coupled to the motor shaft; (b) is an optical linear encoder with its gradu-
Figure 1-4 Block diagram of a
velocity-control system.
Figure 1-5 Block diagram of a
position-control system.
Chapter 1 Motor and Motion Control Systems 7
ated scale mounted on the base of the mecha-
nism; and (c) is the less commonly used but more
accurate and expensive laser interferometer.
A torque-control loop contains electronic cir-
cuitry that measures the input current applied to
the motor and compares it with a value propor-
tional to the torque required to perform the
desired task. An error signal from the circuit is
sent to the motion controller, which computes a
corrective signal for the motor amplifier to keep
motor current, and hence torque, constant.
Torque- control loops are widely used in ma-
chine tools where the load can change due to
variations in the density of the material being
machined or the sharpness of the cutting tools.
Trapezoidal Velocity Profile
If a motion control system is to achieve smooth,
high-speed motion without overstressing the ser-
Figure 1-6 Ballscrew-driven
single-axis slide mechanism with-
out position feedback sensors.
Figure 1-7 Examples of position feedback sensors installed
on a ballscrew-driven slide mechanism: (a) rotary encoder,
(b) linear encoder, and (c) laser interferometer.
8 Chapter 1 Motor and Motion Control Systems
vomotor, the motion controller must command the motor amplifier to
ramp up motor velocity gradually until it reaches the desired speed and
then ramp it down gradually until it stops after the task is complete. This
keeps motor acceleration and deceleration within limits.
The trapezoidal profile, shown in Figure 1-8, is widely used because it
accelerates motor velocity along a positive linear “up-ramp” until the
desired constant velocity is reached. When the motor is shut down from
the constant velocity setting, the profile decelerates velocity along a neg-
ative “down ramp” until the motor stops. Amplifier current and output
voltage reach maximum values during acceleration, then step down to
lower values during constant velocity and switch to negative values dur-
ing deceleration.
Closed-Loop Control Techniques
The simplest form of feedback is proportional control, but there are also
derivative and integral control techniques, which compensate for certain
steady-state errors that cannot be eliminated from proportional control.
All three of these techniques can be combined to form proportional-
integral-derivative (PID) control.
• In proportional control the signal that drives the motor or actuator is
directly proportional to the linear difference between the input com-
mand for the desired output and the measured actual output.
• In integral control the signal driving the motor equals the time inte-
gral of the difference between the input command and the measured
actual output.
Figure 1-8 Servomotors are
accelerated to constant velocity
and decelerated along a trape-
zoidal profile to assure efficient
operation.
Chapter 1 Motor and Motion Control Systems 9
• In derivative control the signal that drives the motor is proportional
to the time derivative of the difference between the input command
and the measured actual output.
• In proportional-integral-derivative (PID) control the signal that
drives the motor equals the weighted sum of the difference, the time
integral of the difference, and the time derivative of the difference
between the input command and the measured actual output.
Open-Loop Motion Control Systems
A typical open-loop motion control system includes a stepper motor with
a programmable indexer or pulse generator and motor driver, as shown in
Figure 1-9. This system does not need feedback sensors because load
position and velocity are controlled by the predetermined number and
direction of input digital pulses sent to the motor driver from the con-
troller. Because load position is not continuously sampled by a feedback
sensor (as in a closed-loop servosystem), load positioning accuracy is
lower and position errors (commonly called step errors) accumulate over
time. For these reasons open-loop systems are most often specified in
applications where the load remains constant, load motion is simple, and
low positioning speed is acceptable.
Kinds of Controlled Motion
There are five different kinds of motion control: point-to-point, sequenc-
ing, speed, torque, and incremental.
•Inpoint-to-point motion control the load is moved between a
sequence of numerically defined positions where it is stopped before
it is moved to the next position. This is done at a constant speed, with
both velocity and distance monitored by the motion controller. Point-
to-point positioning can be performed in single-axis or multiaxis sys-
tems with servomotors in closed loops or stepping motors in open
Figure 1-9 Block diagram of
an open-loop motion control
system.
10 Chapter 1 Motor and Motion Control Systems
loops. X-Y tables and milling machines position their loads by multi-
axis point-to-point control.
• Sequencing control is the control of such functions as opening and
closing valves in a preset sequence or starting and stopping a con-
veyor belt at specified stations in a specific order.
• Speed control is the control of the velocity of the motor or actuator in
a system.
• Torque control is the control of motor or actuator current so that
torque remains constant despite load changes.
• Incremental motion control is the simultaneous control of two or
more variables such as load location, motor speed, or torque.
Motion Interpolation
When a load under control must follow a specific path to get from its
starting point to its stopping point, the movements of the axes must be
coordinated or interpolated. There are three kinds of interpolation: lin-
ear, circular, and contouring.
Linear interpolation is the ability of a motion control system having
two or more axes to move the load from one point to another in a straight
line. The motion controller must determine the speed of each axis so that
it can coordinate their movements. True linear interpolation requires that
the motion controller modify axis acceleration, but some controllers
approximate true linear interpolation with programmed acceleration pro-
files. The path can lie in one plane or be three dimensional.
Circular interpolation is the ability of a motion control system having
two or more axes to move the load around a circular trajectory. It
requires that the motion controller modify load acceleration while it is in
transit. Again the circle can lie in one plane or be three dimensional.
Contouring is the path followed by the load, tool, or end- effector
under the coordinated control of two or more axes. It requires that the
motion controller change the speeds on different axes so that their trajec-
tories pass through a set of predefined points. Load speed is determined
along the trajectory, and it can be constant except during starting and
stopping.
Computer-Aided Emulation
Several important types of programmed computer-aided motion control
can emulate mechanical motion and eliminate the need for actual gears
Chapter 1 Motor and Motion Control Systems 11
or cams. Electronic gearing is the control by software of one or more
axes to impart motion to a load, tool, or end effector that simulates the
speed changes that can be performed by actual gears. Electronic cam-
ming is the control by software of one or more axes to impart a motion to
a load, tool, or end effector that simulates the motion changes that are
typically performed by actual cams.
Mechanical Components
The mechanical components in a motion control system can be more
influential in the design of the system than the electronic circuitry used
to control it. Product flow and throughput, human operator requirements,
and maintenance issues help to determine the mechanics, which in turn
influence the motion controller and software requirements.
Mechanical actuators convert a motor’s rotary motion into linear
motion. Mechanical methods for accomplishing this include the use of
leadscrews, shown in Figure 1-10, ballscrews, shown in Figure 1-11,
worm-drive gearing, shown in Figure 1-12, and belt, cable, or chain
drives. Method selection is based on the relative costs of the alternatives
and consideration for the possible effects of backlash. All actuators have
finite levels of torsional and axial stiffness that can affect the system’s
frequency response characteristics.
Figure 1-10 Leadscrew drive: As
the leadscrew rotates, the load is
translated in the axial direction of
the screw.
12 Chapter 1 Motor and Motion Control Systems
Linear guides or stages constrain a translating load to a single degree
of freedom. The linear stage supports the mass of the load to be actuated
and assures smooth, straight-line motion while minimizing friction. A
common example of a linear stage is a ballscrew-driven single-axis
stage, illustrated in Figure 1-13. The motor turns the ballscrew, and its
rotary motion is translated into the linear motion that moves the carriage
and load by the stage’s bolt nut. The bearing ways act as linear guides.
As shown in Figure 1-7, these stages can be equipped with sensors such
as a rotary or linear encoder or a laser interferometer for feedback.
A ballscrew-driven single-axis stage with a rotary encoder coupled to
the motor shaft provides an indirect measurement. This method ignores
Figure 1-11 Ballscrew drive: Ballscrews use recirculating
balls to reduce friction and gain higher efficiency than con-
ventional leadscrews.
Figure 1-12 Worm-drive systems can provide high speed
and high torque.
Figure 1-13 Ballscrew-driven
single-axis slide mechanism trans-
lates rotary motion into linear
motion.
Chapter 1 Motor and Motion Control Systems 13
the tolerance, wear, and compliance in the mechanical components
between the carriage and the position encoder that can cause deviations
between the desired and true positions. Consequently, this feedback
method limits position accuracy to ballscrew accuracy, typically ±5 to 10
µm per 300 mm.
Other kinds of single-axis stages include those containing antifriction
rolling elements such as recirculating and nonrecirculating balls or
rollers, sliding (friction contact) units, air-bearing units, hydrostatic units,
and magnetic levitation (Maglev) units.
A single-axis air-bearing guide or stage is shown in Figure 1-14. Some
models being offered are 3.9 ft (1.2 m) long and include a carriage for
mounting loads. When driven by a linear servomotors the loads can reach
velocities of 9.8 ft/s (3 m/s). As shown in Figure 1-7, these stages can be
equipped with feedback devices such as cost-effective linear encoders or
ultra-high-resolution laser interferometers. The resolution of this type of
stage with a noncontact linear encoder can be as fine as 20 nm and accu-
racy can be ±1 µm. However, these values can be increased to 0.3 nm res-
olution and submicron accuracy if a laser interferometer is installed.
The pitch, roll, and yaw of air-bearing stages can affect their resolu-
tion and accuracy. Some manufacturers claim ±1 arc-s per 100 mm as the
limits for each of these characteristics. Large air-bearing surfaces pro-
vide excellent stiffness and permit large load-carrying capability.
The important attributes of all these stages are their dynamic and
static friction, rigidity, stiffness, straightness, flatness, smoothness, and
load capacity. Also considered is the amount of work needed to prepare
the host machine’s mounting surface for their installation.
Figure 1-14 This single-axis lin-
ear guide for load positioning is
supported by air bearings as it
moves along a granite base.