McGraw-Hill - Robot Mechanisms and Mechanical Devices Illustrated - 2003 Part 7 pot
Bạn đang xem bản rút gọn của tài liệu. Xem và tải ngay bản đầy đủ của tài liệu tại đây (576.1 KB, 25 trang )
114 Chapter 3 Direct Power Transfer Devices
TEN UNIVERSAL SHAFT COUPLINGS
Hooke’s Joints
The commonest form of a universal coupling is a Hooke’s joint. It can
transmit torque efficiently up to a maximum shaft alignment angle of
about 36°. At slow speeds, on hand-operated mechanisms, the permissi-
ble angle can reach 45°. The simplest arrangement for a Hooke’s joint is
two forked shaft-ends coupled by a cross-shaped piece. There are many
variations and a few of them are included here.
Figure 3-20 The Hooke’s joint
can transmit heavy loads. Anti-
friction bearings are a refinement
often used.
Figure 3-21 A pinned sphere
shaft coupling replaces a cross-
piece. The result is a more com-
pact joint.
Figure 3-22 A grooved-sphere
joint is a modification of a pinned
sphere. Torques on fastening
sleeves are bent over the sphere
on the assembly. Greater sliding
contact of the torques in grooves
makes simple lubrication essential
at high torques and alignment
angles.
Chapter 3 Direct Power Transfer Devices 115
Constant-Velocity Couplings
The disadvantages of a single Hooke’s joint is that the velocity of the
driven shaft varies. Its maximum velocity can be found by multiplying
driving-shaft speed by the secant of the shaft angle; for minimum speed,
multiply by the cosine. An example of speed variation: a driving shaft ro-
tates at 100 rpm; the angle between the shafts is 20°. The minimum out-
put is 100 × 0.9397, which equals 93.9 rpm; the maximum output is
1.0642 × 100, or 106.4 rpm. Thus, the difference is 12.43 rpm. When out-
put speed is high, output torque is low, and vice versa. This is an objec-
tionable feature in some mechanisms. However, two universal joints con-
nected by an intermediate shaft solve this speed-torque objection.
This single constant-velocity coupling is based on the principle
(Figure 3-25) that the contact point of the two members must always lie
on the homokinetic plane. Their rotation speed will then always be equal
because the radius to the contact point of each member will always be
equal. Such simple couplings are ideal for toys, instruments, and other
light-duty mechanisms. For heavy duty, such as the front-wheel drives of
Figure 3-23 A pinned-sleeve
shaft-coupling is fastened to one
saft that engages the forked,
spherical end on the other shaft
to provide a joint which also
allows for axial shaft movement.
In this example, however, the
angle between shafts must be
small. Also, the joint is only suit-
able for low torques.
Figure 3-24 A constant-velocity
joint is made by coupling two
Hooke’s joints. They must have
equal input and output angles to
work correctly. Also, the forks
must be assembled so that they
will always be in the same plane.
The shaft-alignment angle can be
double that for a single joint.
116 Chapter 3 Direct Power Transfer Devices
military vehicles, a more complex coupling is shown diagrammatically
in Figire 3-26A. It has two joints close-coupled with a sliding member
between them. The exploded view (Figure 3-26B) shows these members.
There are other designs for heavy-duty universal couplings; one, known
as the Rzeppa, consists of a cage that keeps six balls in the homokinetic
plane at all times. Another constant-velocity joint, the Bendix-Weiss,
also incorporates balls.
Figure 3-25
Figure 3-26
Figure 3-27 This flexible shaft permits any shaft angle. These
shafts, if long, should be supported to prevent backlash and
coiling.
Figure 3-28 This pump-type coupling has the reciprocating
action of sliding rods that can drive pistons in cylinders.
Figure 3-29 This light-duty coupling is ideal for many sim-
ple, low-cost mechanisms. The sliding swivel-rod must be
kept well lubricated at all times.
Chapter 3 Direct Power Transfer Devices 117
COUPLING OF PARALLEL SHAFTS
Figure 3-30 One method of coupling shafts
makes use of gears that can replace chains,
pulleys, and friction drives. Its major limitation
is the need for adequate center distance.
However, an idler can be used for close cen-
ters, as shown. This can be a plain pinion or
an internal gear. Transmission is at a constant
velocity and there is axial freedom.
Figure 3-31 This coupling consists of two
universal joints and a short shaft. Velocity
transmission is constant between the input
and output shafts if the shafts remain parallel
and if the end yokes are arranged symmetri-
cally. The velocity of the central shaft fluctu-
ates during rotation, but high speed and wide
angles can cause vibration. The shaft offset
can be varied, but axial freedom requires that
one shaft be spline mounted.
Figure 3-32 This crossed-axis yoke coupling
is a variation of the mechanism shown in Fig.
2. Each shaft has a yoke connected so that it
can slide along the arms of a rigid cross mem-
ber. Transmission is at a constant velocity, but
the shafts must remain parallel, although the
offset can vary. There is no axial freedom. The
central cross member describes a circle and is
thus subjected to centrifugal loads.
Figure 3-33 This Oldham coupling provides
motion at a constant velocity as its central
member describes a circle. The shaft offset
can vary, but the shafts must remain parallel.
A small amount of axial freedom is possible.
A tilt in the central member can occur
because of the offset of the slots. This can be
eliminated by enlarging its diameter and
milling the slots in the same transverse plane.
118 Chapter 3 Direct Power Transfer Devices
TEN DIFFERENT SPLINED CONNECTIONS
Cylindrical Splines
Figure 3-34 Sqrare Splines make simple
connections. They are used mainly for trans-
mitting light loads, where accurate position-
ing is not critical. This spline is commonly
used on machine tools; a cap screw is
required to hold the enveloping member.
Figure 3-35 Serrations of small size are
used mostly for transmitting light loads. This
shaft forced into a hole of softer material
makes an inexpensive connection. Originally
straight-sided and limited to small pitches,
45º serrations have been standardized (SAE)
with large pitches up to 10 in. dia. For tight
fits, the serrations are tapered.
Figure 3-36 Straight-Sided splines have
been widely used in the automotive field.
Such splines are often used for sliding mem-
bers. The sharp corner at the root limits the
torque capacity to pressures of approxi-
mately 1,000 psi on the spline projected
area. For different applications, tooth height
is altered, as shown in the table above.
Chapter 3 Direct Power Transfer Devices 119
Figure 3-37 Machine-Tool splines have
wide gaps between splines to permit accu-
rate cylindrical grinding of the lands—for pre-
cise positioning. Internal parts can be ground
readily so that they will fit closely with the
lands of the external member.
Figure 3-38 Involute-Form splines are used where high loads are to be transmitted.
Tooth proportions are based on a 30º stub tooth form. (A) Splined members can be posi-
tioned either by close fitting major or minor diameters. (B) Use of the tooth width or side
positioning has the advantage of a full fillet radius at the roots. Splines can be parallel or
helical. Contact stresses of 4,000 psi are used for accurate, hardened splines. The diame-
tral pitch shown is the ratio of teeth to the pitch diameter.
Figure 3-39 Special Involute splines are made by using
gear tooth proportions. With full depth teeth, greater con-
tact area is possible. A compound pinion is shown made by
cropping the smaller pinion teeth and internally splining the
larger pinion.
Figure 3-40 Taper-Root splines are for drivers that require
positive positioning. This method holds mating parts
securely. With a 30º involute stub tooth, this type is stronger
than parallel root splines and can be hobbed with a range of
tapers.
120 Chapter 3 Direct Power Transfer Devices
Face Splines
Figure 3-41 Milled Slots in hubs
or shafts make inexpensive con-
nections. This spline is limited to
moderate loads and requires a
locking device to maintain posi-
tive engagement. A pin and
sleeve method is used for light
torques and where accurate posi-
tioning is not required.
Figure 3-42 Radical Serrations
made by milling or shaping the
teeth form simple connections.
(A) Tooth proportions decrease
radially. (B) Teeth can be straight-
sided (castellated) or inclined; a
90º angle is common.
Figure 3-43 Curvic Coupling teeth are machined by a face-mill cutter. When hardened
parts are used that require accurate positioning, the teeth can be ground. (A) This
process produces teeth with uniform depth. They can be cut at any pressure angle,
although 30º is most common. (B) Due to the cutting action, the shape of the teeth will
be concave (hour-glass) on one member and convex on the other—the member with
which it will be assembled.
Chapter 3 Direct Power Transfer Devices 121
TORQUE LIMITERS
Robots powered by electric motors can frequently stop effectively with-
out brakes. This is done by turning the drive motor into a generator, and
then placing a load across the motor’s terminals. Whenever the wheels
turn the motor faster than the speed controller tries to turn the motor, the
motor generates electrical power. To make the motor brake the robot, the
electrical power is fed through large load resistors, which absorb the
power, slowing down the motor. Just like normal brakes, the load resis-
tors get very hot. The energy required to stop the robot is given off in this
heat. This method works very well for robots that travel at slow speeds.
In a case where the rotating shaft suddenly jams or becomes over-
loaded for some unexpected reason, the torque in the shaft could break
the shaft, the gearbox, or some other part of the rotating system.
Installing a device that brakes first, particularly one that isn’t damaged
when it is overloaded, is sometimes required. This mechanical device is
called a torque limiter.
There are many ways to limit torque. Magnets, rubber bands, friction
clutches, ball detents, and springs can all be used in one way or another,
and all have certain advantages and disadvantages. It must be remem-
bered that they all rely on giving off heat to absorb the energy of stop-
ping the rotating part, usually the output shaft. Figures 3-44 through 3-53
show several torque limiters, which are good examples of the wide vari-
ety of methods available.
TEN TORQUE-LIMITERS
Figure 3-44 Permanent mag-
nets transmit torque in accor-
dance with their numbers and
size around the circumference of
the clutch plate. Control of the
drive in place is limited to remov-
ing magnets to reduce the drive’s
torque capacity.
122 Chapter 3 Direct Power Transfer Devices
Figure 3-45 Arms hold rollers in
the slots that are cut across the
disks mounted on the ends of
butting shafts. Springs keep the
roller in the slots, but excessive
torque forces them out.
Figure 3-46 A cone clutch is
formed by mating a taper on the
shaft to a beveled central hole in
the gear. Increasing compression
on the spring by tightening the
nut increases the drive’s torque
capacity.
Figure 3-47 A flexible belt
wrapped around four pins trans-
mits only the lightest loads. The
outer pins are smaller than the
inner pins to ensure contact.
Chapter 3 Direct Power Transfer Devices 123
Figure 3-48 Springs inside the
block grip the shaft because they
are distorted when the gear is
mounted to the box on the shaft.
Figure 3-49 The ring resists the
natural tendency of the rollers to
jump out of the grooves in the
reduced end of one shaft. The
slotted end of the hollow shaft
acts as a cage.
Figure 3-50 Sliding wedges
clamp down on the flattened end
of the shaft. They spread apart
when torque becomes excessive.
The strength of the springs in
tension that hold the wedges
together sets the torque limit.
124 Chapter 3 Direct Power Transfer Devices
Figure 3-51 Friction disks are
compressed by an adjustable
spring. Square disks lock into the
square hole in the left shaft, and
round disks lock onto the square
rod on the right shaft.
Figure 3-52 Friction clutch
torque limiter. Adjustable spring
tension holds the two friction sur-
faces together to set the overload
limit. As soon as an overload is
removed, the clutch reengages. A
drawback to this design is that a
slipping clutch can destroy itself if
it goes undetected.
Figure 3-53 Mechanical keys. A
spring holds a ball in a dimple in
the opposite face of this torque
limiter until an overload forces it
out. Once a slip begins, clutch
face wear can be rapid. Thus,
this limiter is not recommended
for machines where overload is
common.
Chapter 3 Direct Power Transfer Devices 125
ONE TIME USE TORQUE LIMITING
In some cases, the torque limit can be set very high, beyond the prac-
tical limit of a torque limiter, or the device that is being protected needs
only a one-time protection from damage. In this case, a device called a
shear pin is used. In mobile robots, particularly in autonomous robots, it
will be found that a torque limiter is the better choice, even if a large one
is required to handle the torque. With careful control of motor power,
both accelerating and braking, even torque limiters can be left out of
most designs.
Torque limiters should be considered as protective devices for motors
and gearboxes and are not designed to fail very often. They don’t often
turn up in the drive system of mobile robots, because the slow moving
robot rarely generates an overload condition. They do find a place in
manipulators to prevent damage to joints if the manipulator gets over-
loaded. If a torque limiter is used in the joint of a manipulator, the joint
must have a proprioceptive sensor that senses the angle or extension of
the joint so that the microprocessor has that information after the joint
has slipped. Figure 3-54 shows a basic shear pin torque limiter.
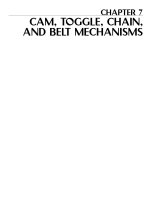
Figure 3-54 A shear pin is a
simple and reliable torque limiter.
However, after an overload,
removing the sheared pin stubs
and replacing them with a new
pin can be time consuming. Be
sure that spare shear pins are
available in a convenient location.
This page intentionally left blank.
Chapter 4 Wheeled Vehicle
Suspensions
and Drivetrains
Copyright © 2003 by The McGraw-Hill Companies, Inc. Click here for Terms of Use.
This page intentionally left blank.
G
iven the definition of robot in the introduction to this book, the most
vital mechanical part of a robot must be its mobility system, includ-
ing the suspension and drivetrain, and/or legs and feet. The ability of the
these systems to effectively traverse what ever terrain is required is para-
mount to the success of the robot, but to my knowledge, there has never
been an apples to apples comparison of mobility systems.
First, just what is a mobility system? A mobility system is all parts of
a vehicle, a land-based robot for the purposes of this book, that aid in
locomoting from one place to another. This means all motors, gearboxes,
suspension pieces, transmissions, wheels, tires, tracks, springs, legs, foot
pads, linkages, mechanisms for moving the center of gravity, mecha-
nisms for changing the shape or geometry of the vehicle, mechanisms for
changing the shape or geometry of the drivetrain, mechanisms and link-
ages for steering, etc., are parts of mobility systems.
The systems and mechanisms described in this book are divided into
four general categories: wheeled, tracked, walkers, and special cases.
Each gets its own chapter, and following the chapter on special cases is a
separate chapter devoted to comparing the effectiveness of many of the
systems.
There are some that are described in the text that are not discussed in
Chapter Nine. These are mostly very interesting designs that are worth
describing, but their mobility or some other trait precludes comparing
them to the other designs. Most of the systems discussed in Chapter
Eight fall into this category because they are designed to move through
very specific environments and are not general enough to be comparable.
Some wheeled designs are discussed simply because they are very sim-
ple even though their mobility is limited. This chapter deals with
wheeled systems, everything from one-wheeled vehicles to eight-
wheeled vehicles. It is divided into four sections: vehicles with one to
three wheels and four-wheeled diamond layouts, four- and five-wheeled
layouts, six-wheeled layouts, and eight-wheeled layouts.
129
130 Chapter 4 Wheeled Vehicle Suspensions and Drivetrains
WHEELED MOBILITY SYSTEMS
By far the most common form of vehicle layout is the four-wheeled,
front-steer vehicle. It is a descendant of the horse-drawn wagon, but has
undergone some subtle and some major changes in the many decades
since a motor was added to replace the horses. The most important
changes (other than the internal combustion engine) were to the suspen-
sion and steering systems. The steering was changed from a solid center-
pivot axle to independently pivoting front wheels, which took up less
space under the carriage. Eventually the suspension was developed into
the nearly ubiquitous independently suspended wheels on all four cor-
ners of the vehicle.
Although the details of the suspensions used today are widely varied,
they all use some form of spring and shock combination to provide good
control and a relatively comfortable ride to the driver. Most suspensions
are designed for high-speed control over mostly smooth surfaces, but
more importantly, they are designed to be controlled by a human. In spite
of their popularity and sometimes truly fantastic performance in racecars
and off-road vehicles, there are very few sprung suspension systems dis-
cussed in this book. The exception is sprung bogies in some of the
tracked vehicle layouts and a sprung fourth wheel in a couple four-wheel
designs.
WHY NOT SPRINGS?
Springs are so common on people-controlled vehicles, why not include
them in the list of suspension systems being discussed?
Springs do seem to be important to mobility, but what they are really
addressing is rider comfort and control in vehicles that travel more than
about 8m/s. Below that speed, they are actually a hindrance to mobility
because they change the force each wheel exerts on the ground as bumps
are negotiated. A four-wheeled conventional independent suspension
vehicle appears to keep all wheels equally on the ground, but the wheels
that are on the bumps, being lifted, are carrying more weight than the
other wheels. This reduces the traction of the lightly loaded wheels. The
better solution, at low speeds, is to allow some of the wheels to rise, rel-
ative to the chassis, over bumps without changing the weight distribution
or changing it as little as possible. This is precisely what happens in
rocker and rocker/bogie suspensions.
Ground pressures across all vehicles range from twenty to eighty kilo-
pascals (the average human foot exerts a pressure on the ground of about
Chapter 4 Wheeled Vehicle Suspensions and Drivetrains 131
35 kilo-pascals) for the majority of vehicles of all types. Everything from
the largest military tank to the smallest motor cycle falls within that
range, though some specialized vehicles designed for travel on loose
powder snow have pressures of as low as five kilo-pascals. This narrow
range of pressures is due to the relatively small range of densities and
materials of which the ground is made. Vehicles with relatively low
ground pressure will perform better on softer materials like loose sand,
snow, and thick mud. Those with high pressures mostly perform better
on harder packed materials like packed snow, dirt, gravel, and common
road surfaces. The best example of this fact are vehicles designed to
travel on both hard roads and sand. The operator must stop and deflate
the tires, reducing ground pressure, as the vehicle is driven off a road and
onto a stretch of sand. Several military vehicles like the WWII amphibi-
ous DUKS were designed so tire pressure could be adjusted from inside
the cab, without stopping. This is now also possible on some modified
Hummers to extend their mobility, and might be a practical trick for a
wheeled robot that will be working on both hard and soft surfaces.
This also points to the advantage of maintaining as even a ground
pressure as possible on all tires, even when some of them may be lifted
up onto a rock or fallen tree. Suspension systems that do this well will
theoretically work better on a wider range of ground materials.
Suspension systems that can change their ground pressure in response to
changes in ground materials, either by tire inflation pressure, variable
geometry tires, or a method of changing the number of tires in contact
with the ground, will also theoretically work well on a wider range of
ground materials.
This chapter focuses on suspension systems that are designed to work
on a wide range of ground materials, but it also covers many layouts that
are excellent for indoor or relatively benign outdoor environments. The
latter are shown because they are simple and easy to implement, allow-
ing a basic mobile platform to be quickly built to ease the process of get-
ting started building an autonomous robot. Vehicles intended for use in
any arbitrary outdoor environment tend to be more complicated, but
some, with acceptably high mobility, are surprisingly simple.
SHIFTING THE CENTER OF GRAVITY
A trick that can be applied to mobile robots that extends the robot’s
mobility, independent of the mobility system, is to move the center of
gravity (cg) of the robot, thereby changing which wheels, tracks, or legs
are carrying the most weight. A discussion of this concept and some lay-
132 Chapter 4 Wheeled Vehicle Suspensions and Drivetrains
outs are included in this chapter, but the basic concept can be applied to
almost any mobile robot.
Shifting the center of gravity can be accomplished by moving a dedi-
cated weight, shifting the cargo, or reorienting the manipulator. Moving
the cg can allow the robot to move across wider gaps, climb steeper
slopes, and get over or onto higher steps. If it is planned to move the
manipulator, then the manipulator must make up a significant fraction of
the total weight of the vehicle for the concept to work effectively. While
moving the cg seems very useful, all but the manipulator technique
require extra space in the robot for the weight and/or mechanism that
moves the weight.
The figures show the basic concept and several variations of cg shift-
ing that might be tried if no other mobility system can be designed to
negotiate a required obstacle, or if the concept is being applied as a retro-
fit to extend an existing robot’s mobility. Functionally, as a gap in the ter-
rain approaches, the cg is shifted aft, allowing the mobility system’s
front ground contact point to reach across the gap without the robot tip-
ping forward. When those parts reach the far side of the gap, the robot is
driven forward until it is almost across, then the cg is shifted forward,
lifting the rear ground contact points off the ground. The vehicle is then
driven across the gap the rest of the way.
For stair climbing or steep slopes, the cg is shifted forward so it
remains over the center of area of the mobility system. For climbing up a
single bump or step, it is shifted back just as the vehicle climbs onto the
step. This reduces the tendency of the robot to slam down on the front
parts of the mobility system. It must be noted that cg shifting can be con-
trolled autonomously fairly easily if there is an inclinometer or
accelerometer onboard the robot that can give inclination. The control
loop would be set to move the cg in relation to the fore and aft tilt of the
robot. In fact, it might be possible to make the cg shifting system com-
pletely automatic and independent of all other systems on the robot, but
no known example of this has been tested. Figures 4-1 and 4-2 show two
basic techniques for moving the cg.
The various figures in this chapter show wheel layouts without show-
ing drive mechanisms. The location of the drive motor(s) is left to the
designer, but there are a few unusual techniques for connecting the drive
motor to the wheels that affect mobility that should be discussed. Some
of the figures show the chassis located in line with the axles of the
wheels, and some show it completely above the wheels, which increases
ground clearance at the possible expense of increased complexity of the
coupling mechanism. In many cases, the layouts that show the chassis
down low can be altered to have it up high, and vise-versa.
Chapter 4 Wheeled Vehicle Suspensions and Drivetrains 133
Figure 4-1 Method for shifting
the center of gravity on a linear
slide
Figure 4-2 Shifting the cg on a
swinging arm
134 Chapter 4 Wheeled Vehicle Suspensions and Drivetrains
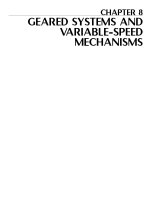
For the raised layouts, the drive axle is coupled to the wheel through a
chain, belt drive, or gearbox. The US Army’s High Mobility
Multipurpose Wheeled Vehicle (HMMWV, HumVee, or Hummer), uses
geared offset hubs (Figure 4-3) resulting in a ground clearance of 16"
with tires that are 37" in diameter. This shows how effective the raised
chassis layout can be.
WHEEL SIZE
In general, the larger the wheel, the larger the obstacle a given vehicle
can get over. In most simple suspension and drivetrain systems, a wheel
will be able to roll itself over a step-like bump that is about one-third the
diameter of the wheel. In a well-designed four-wheel drive off-road
truck, this can be increased a little, but the limit in most suspensions is
something less than half the diameter of the wheel. There are ways
around this though. If a driven wheel is pushed against a wall that is
taller than the wheel diameter with sufficient forward force relative to the
vertical load on it, it will roll up the wall. This is the basis for the design
of rocker bogie systems.
Figure 4-3 Geared offset
wheel hub
Chapter 4 Wheeled Vehicle Suspensions and Drivetrains 135
Three wheels are the minimum required for static stability, and three-
wheeled robots are very common. They come in many varieties, from
very simple two-actuator differential steer with fixed third wheel types,
to relatively complex roller-walkers with wheels at the end of two or
even three DOF legs. Mobility and complexity are increased by adding
even more wheels. Let’s take a look at wheeled vehicles in rough order
of complexity.
The most basic vehicle would have the least number of wheels.
Believe it or not, it is possible to make a one-wheeled vehicle! This vehi-
cle has limited mobility, but can get around relatively benign environ-
ments. Its wheel is actually a ball with an internal movable counter-
weight that, when not over the point of contact of the ball and the
ground, causes the ball to roll. With some appropriate control on the
counterweight and how it is attached and moved within the ball, the vehi-
cle can be steered around clumsily. Its step-climbing ability is limited
and depends on what the actual tire is made of, and the weight ratio
between the tire and the counterweight.
There are two obvious two wheeled layouts, wheels side by side, and
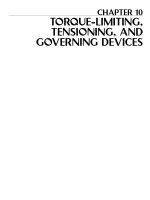
wheels fore and aft. The common bicycle is perhaps one of the most rec-
ognized two-wheeled vehicles in the world. For robots, though, it is quite
difficult to use because it is not inherently stable. The side by side layout
is also not inherently stable, but is easier to control, at low speeds, than a
bike. Dean Kamen developed the Segway two-wheeled balancing vehi-
cle, proving it is possible, and is actually fairly mobile. It suffers from
Figure 4-4 Bicycle
136 Chapter 4 Wheeled Vehicle Suspensions and Drivetrains
the same limitation the single wheeled ball suffers from and cannot get
over bumps much higher than one quarter a wheel height.
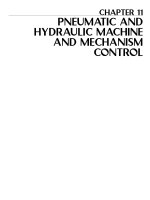
The third, less obvious layout is to drag a passive leg or tail behind the
vehicle. This tail counteracts the torque produced by the wheels, makes
the vehicle statically stable, and increases, somewhat, the height of
obstacle the robot can get over. The tail dragger is ultra-simple to control
by independently varying the speed of the wheels. This serves to control
both velocity and steering. The tail on robots using this layout must be
light, strong, and just long enough to gain the mobility needed. Too long
and it gets in the way when turning, too short and it doesn’t increase
mobility much at all. It can be either slightly flexible, or completely stiff.
The tail end slides both fore and aft and side to side, requiring it to be of
a shape that does not hang up on things. A ball shape, or a shape very
similar, made of a low friction material like Teflon or polyethylene, usu-
ally works out best.
THREE-WHEELED LAYOUTS
The tail dragger demonstrates the simplest statically stable wheeled
vehicle, but, unfortunately, it has limited mobility. Powering that third
Figure 4-5 Tail dragger
Chapter 4 Wheeled Vehicle Suspensions and Drivetrains 137
contact point improves mobility greatly. Three wheels can be laid out in
several ways. Five varieties are pictured in the following figures. The
most common and easiest to implement, but with, perhaps, the least
mobility of the five three-wheeled types, is represented by a child’s tri-
cycle. On the kid-powered version, the front wheel provides both propul-
sion and steers. Robots destined to be used indoors, in a test lab or other
controllable space, can use this simple layout with ease, but it has
extremely poor mobility. Just watch any child struggling to ride their tri-
cycle on anything but a flat smooth road or sidewalk. Powering only one
of the three wheels is the major cause of this problem. Nevertheless,
there have been many successful indoor test platforms that use this lay-
out precisely because of its simplicity.
In order to improve the mobility and stability of motorcycles, the three
wheeled All Terrain Cycle (ATC) was developed. This vehicle demon-
strates the next step up in the mobility of three wheeled vehicles. The
rear two wheels are powered through a differential, and the front steers.
This design is still simple, but although ATCs seemed to have high
mobility, they did not do well in forest environments filled with rocks
and logs, etc. The ATC was eventually outlawed because of its major
flaw, very poor stability. Putting the single wheel in front lead to reduced
resistance to tipping over the front wheel. This is also the most common
form of accident with a child’s tricycle.
Increasing the stability of a tricycle can be easily accomplished by
reversing the layout, putting the two wheels in front. This layout works
fine for relatively low speeds, but the geometry is difficult to control
when turning at higher speeds as the forces on the rear steering wheel
tend to make the vehicle turn more sharply until eventually it is out of
control. This can be minimized by careful placement of the vehicle’s
center of gravity, moving it forward just the right amount without going
so far that a hard stop flips the vehicle end over end. A clever version of
this tail dragger-like layout gets around the problem of flipping over by
virtue of its ability to flip itself back upright simply by accelerating rap-
idly. The vehicle flips over because there is no lever arm to resist the
torque in the wheels. Theoretically, this could be done with a tricycle
also. At low speeds, this layout has similar mobility to a tail dragger and,
in fact, they are very similar vehicles.
Steering with the front wheels on a reversed tricycle removes the
steering problem, but adds the complexity of steering and driving both
wheels. This layout does allow placing more weight on the passive
rear wheel, significantly reducing the flipping over tendencies, and
mobility is moderately good. The layout is still dragging around a pas-
sive wheel, however, and mobility is further enhanced if this wheel is
powered.
138 Chapter 4 Wheeled Vehicle Suspensions and Drivetrains
Figure 4-6 Reversed tricycle,
differential steer
Figure 4-7 Reversed tricycle,
front steer