cInet Do-It-Yourself PC UPGRADE PROJECTS phần 6 ppsx
Bạn đang xem bản rút gọn của tài liệu. Xem và tải ngay bản đầy đủ của tài liệu tại đây (16.44 MB, 30 trang )
134 Part II: Intermediate
Any computer or item marked with a yellow triangle and an exclamation
mark doesn’t yet have a sharing setting applied to it.
To allow other users of your computer to access your media library, click the
Other Users Of This PC icon in the Share My Media To list box, and then click
the Allow button. Windows Media Player changes the exclamation-mark
icon for a checkmark icon and makes the Customize button available.
To allow users of a particular other computer to access your media library,
click the computer’s icon in the Share My Media To list box, and then click
the Allow button. Windows Media Player replaces the exclamation-mark
icon with a checkmark icon and makes the Customize button available.
To block users of a particular other computer from accessing your media
library, follow these steps:
Click the computer’s icon in the Share My Media To list box, and then
click the Deny button. Windows Media Player displays the Deny dialog
box for the computer.
If you want to prevent any other user of your computer from sharing
media with the computer you’re blocking, click the Yes button, and then
go through User Account Control for the Windows Media Player Con-
figuration feature. If you want to leave other users of your computer free
to share their media with the computer you’re blocking, click the No but-
ton. Either way, you can select the Don’t Show This Message Again check
box before clicking a button if you don’t want Windows Media Player to
ask you this question again.
If you don’t want to share your entire media library with the other users of
your PC or the specified computer, follow these steps:
Click the computer’s icon or the Other Users Of This PC icon (as appro-
priate) in the Share My Media To list box.
6.
7.
8.
●
●
9.
●
Project 13: Share Your Household’s Music and Movies Easily and Effectively 135
Click the Customize button. Windows Media Player display the Media
Sharing – Customize dialog box:
Clear the Use Default Settings check box. (Using the default settings
means sharing all media types—music files, picture files, and video
files—with minimal-quality screening and without parental ratings.)
Windows Media Player makes all the Media Types, Star Ratings, and
Parental Ratings controls available.
In the Media Types column, select only the check boxes for the media
types you want to share. For example, if you want to share only music,
select the Music check box, and clear both the Pictures check box and the
Video check box.
In the Star Ratings column, choose what you want to share. Select the
All Ratings option button only if you’re determined to share your dross
as well as your diamonds. Normally, you’re better advised to select the
Only option button, and then choose either Rated 5 Stars or Rated 4 Stars
Or Higher in the drop-down list. Clear the Include Unrated Files check
box unless you really want to share everything.
To get the most out of your media library, rate all the files it contains—eventually, not all at
once. You can then be confident of sharing only quality media. Better yet, you can keep the
library’s size down by removing the low-rated files.
In the Parental Ratings column, select the All Ratings option button if
you want to share all items no matter how low they’re rated. Otherwise,
select the Only option button, and then select the check boxes for the
unrated items you want to share: Music, Pictures, or Video.
The check boxes that appear in the Parental Ratings list box correspond to the check boxes
you’ve selected in the Media Types column. For example, if you clear the Video check box in the
Media Types column, the Parental Ratings list box doesn’t have a Video: Unrated check box.
●
●
●
●
●
tip
note
136 Part II: Intermediate
Click the OK button. Windows Media Player closes the Media Sharing –
Customize dialog box, returning you to the Media Sharing dialog box.
Click the OK button. Windows Media Player closes the Media Sharing dialog
box and applies the settings you chose.
Play Media Files in a Shared Library
To play media files in a shared library, follow these steps:
In Windows Media Player, click the Library button on the toolbar to display
the Library (unless the Library is already displayed). The shared libraries
appear toward the bottom of the left column.
Double-click the library name to expand its listing, displaying its contents.
(You can also click the black triangle, but double-clicking the name is usually
easier.)
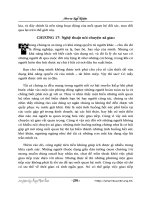
Click the view you want to use to display the library’s contents, as in the
example in Figure 13-1, which shows Artist view. You can then play items as
usual—for example, double-click a song to start it playing.
●
10.
1.
2.
3.
Figure 13-1
Once you’ve set Win-
dows Media Player to
look for shared media
libraries, you can easily
play shared music and
video files.
Project 13: Share Your Household’s Music and Movies Easily and Effectively 137
Step 3: Share Music and Video Files via iTunes
If you have an iPod or an iPhone rather than a player that’s compatible with Win-
dows Media Player, you’ll probably want to manage the iPod or iPhone using iTunes,
the program that Apple provides—for free—for managing iPods and iPhones. (There
are several alternative programs that you can use to manage iPods from Windows,
but most of them involve paying money.)
Like Windows Media Player (discussed in Step 2), iTunes makes it easy to share
your music and video files with other iTunes users on your network and to play the
files they’re sharing. You may also want to share files with other users of your com-
puter—which, interestingly, requires a little more effort.
Get and Install iTunes
If you’re already using an iPod or an iPhone, chances are that you’ve already down-
loaded and installed iTunes. If not, open your web browser, go to the Apple web site
(www.apple.com/itunes/download/), and download the latest version of iTunes for
Windows.
iTunes has a straightforward installation procedure except for one minor issue on
Windows Vista: the User Account Control dialog boxes that make sure you’re intend-
ing to install the software (rather than having accidentally triggered some malware
Start Sharing Your Media Library the Easy Way
This section shows you how to set up sharing of your media library manually,
but there’s an even easier way to get started. When Windows Media Player
notices a shared media library that you haven’t used before, it displays a
pop-up message above the notification area:
Click the pop-up message to open the Windows Media Player Library
Sharing dialog box. If you want to share your media library with this computer,
click the Allow button. If you’re feeling surly, click the Deny button. And if
you’re feeling really surly, select the Disable Future Notifications check box,
and then click the Deny button.
That’s enough possibilities to satisfy most people, but if you want to
customize your sharing settings, click the Sharing Settings button. Windows
Media Player displays the Media Sharing dialog box, in which you can set up
custom sharing as discussed in step 9 of the preceding list.
138 Part II: Intermediate
that’s trying to run it) tend to get stuck behind the main installation window. If instal-
lation seems to have gotten stuck, look at the Taskbar to see if there’s a flashing button
for User Account Control. If so, click it, and then go through User Account Control
as usual. Because the installer installs not only iTunes but also QuickTime and other
components, you may have to go through User Account Control twice or more.
Once you’ve installed iTunes, start it, and then follow through its prompts for
adding media files to your media library (iTunes offers to search your folders for
files). You can add other files to the media library easily:
Drag the files from a Windows Explorer window to the Library area of the
Source pane (the pane on the left of the iTunes window).
Choose File | Add Folder To Library to add a whole folder of files.
Choose File | Add File To Library to add an individual file.
Share Your Library with Other Local iTunes Users
You can share either your entire library or selected playlists with other users on your
network. You can share most items, including MP3 files, AAC files, Apple Lossless
Encoding files, AIFF files, WAV files, and links to radio stations. You can’t share Au-
dible files or QuickTime sound files.
At this writing, you can share your library with up to five other computers per day, and your
computer can be one of up to five computers accessing the shared library on another computer
on any given day. However, Apple can change the details of library sharing, so you may see different
restrictions from these.
To share some or all of your library, follow these steps:
In iTunes, choose Edit | Preferences or press CTRL-COMMA or CTRL-Y to display
the iTunes dialog box.
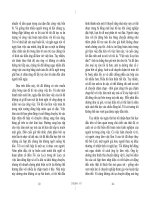
Click the Sharing tab, shown in Figure 13-2 with settings chosen.
Select the Share My Library On My Local Network check box (which is
cleared by default). By default, iTunes then selects the Share Entire Library
option button. If you want to share only some playlists, select the Share
Selected Playlists option button, and then select the check boxes for the
playlists you want to share.
By default, the items in your shared library are available to any other user
on the network. To restrict access to only those people with whom you share
a password, select the Require Password check box, and then enter a strong
(unguessable) password in the text box.
If there are many computers on your network, use a sharing password to help avoid running up
against the five-users-per-day limit. If your network has only a few computers, you may not need
a password to avoid reaching this limit.
●
●
●
1.
2.
3.
4.
note
tip
Project 13: Share Your Household’s Music and Movies Easily and Effectively 139
Click the General tab to display its contents. In the Shared Name text box , set
the name that other users trying to access your library will see. The default
name is username’s Library—for example, Mimi’s Library. You might choose
to enter a more descriptive name, especially if your computer is part of a
well-populated network (for example, in a dorm).
Click the OK button to apply your choices and close the dialog box.
When you set iTunes to share your library, iTunes displays a message reminding you that
“Sharing music is for personal use only”—in other words, remember not to violate copyright law.
Select the Do Not Show This Message Again check box if you want to prevent this message from
appearing again.
Once you’ve shared your library, other iTunes users on the same network can ac-
cess it as described in the upcoming section “Access and Play Another Local iTunes
User’s Shared Library.”
Disconnect Other Users from Your Shared Library
To disconnect other users from your shared library, follow these steps:
In iTunes, choose Edit | Preferences or press CTRL-COMMA or CTRL-Y to display
the iTunes dialog box.
Click the Sharing tab to display it.
5.
6.
1.
2.
Figure 13-2
On the Sharing tab,
choose whether to look
for shared libraries and
whether to share part
or all of your library.
note
140 Part II: Intermediate
To see how many users are connected to your shared library, look at the Sta-
tus readout toward the bottom of the Sharing tab.
Clear the Share My Library On My Local Network check box.
Click the OK button. If any other user is connected to your shared library,
iTunes displays a message box that indicates so and asks whether you are
sure you want to turn off sharing.
Click the Yes button or the No button, as appropriate. If you click the Yes but-
ton, anyone playing an item from the library will be cut off abruptly without
notice.
Access and Play Another Local iTunes User’s Shared Library
To access another person’s shared library, you must first set your computer to look for
shared libraries. You may already have done so when you turned on sharing on your
own computer. If not, do so first.
Set Your Computer to Look for Shared Libraries
First, set your computer to look for shared libraries:
In iTunes, choose Edit | Preferences or press CTRL-COMMA or CTRL-Y to display
the iTunes dialog box.
Click the Sharing tab to display its contents.
Select the Look For Shared Libraries check box.
Click the OK button to close the iTunes dialog box.
Access Shared Libraries on Your Local Network
Once you’ve selected the Look For Shared Libraries check box on the Sharing tab,
iTunes automatically detects shared libraries when you launch the program while
your computer is connected to a network. If a shared library comes online after that,
iTunes detects it almost immediately.
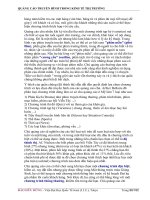
If iTunes finds shared libraries or playlists, it displays them in the Source pane
on the left. Figure 13-3 shows an example of browsing the music shared by another
computer.
If a shared library has a password, iTunes displays the Shared Library Password
dialog box. Type the password, and then click the OK button to access the library.
Select the Remember Password check box before clicking the OK button if you want
iTunes to save the password to speed up future access to the library.
Double-click the entry for a shared library in the Source pane to open a separate window that
shows the library’s contents.
3.
4.
5.
6.
1.
2.
3.
4.
tip
Project 13: Share Your Household’s Music and Movies Easily and Effectively 141
Disconnect a Shared Library
To disconnect a shared library you’ve connected to, take one of these actions:
Click the Eject icon next to the library in the Source pane.
Click the library in the Source pane and then either press CTRL-E, click the
Eject icon in the lower-right corner of the iTunes window, or choose Controls |
Disconnect Library (where Library is the name of the shared library).
Right-click the library in the Source pane and choose Disconnect.
Share Your Music More Effectively with Other Local Users
As you saw earlier in this step, iTunes makes it easy for you to share either your li-
brary or specific playlists with other iTunes users on your local area network (LAN).
You can share with up to five different computers per day, and your computer must
be attached to the network and powered on for other computers to be able to access
your shared files.
You may also want to share your music and videos with other users of your
computer. As you saw in Step 2, Windows Media Player knows the ins and outs of
Windows Firewall and can share your media files even if you’ve put them in the
folders within your user account that are normally barred to anyone but you. iTunes
doesn’t have this inside knowledge, and as a result, you have to work around the se-
curity features built into Windows before you can share your music and video files.
●
●
●
Figure 13-3
Computers sharing
libraries appear in the
Source pane in iTunes,
allowing you to quickly
browse the songs and
other items that are
being shared.
142 Part II: Intermediate
Your iTunes library, which is stored by default in your Music\iTunes\iTunes Music
folder, is securely protected from other users of your computer. That’s great if you
want to keep your music to yourself, but not so great if you want to share it with
your friends, family, or coworkers.
The easiest way to give other users access to your library is to move it to the Pub-
lic folder. Windows creates this folder automatically when you install it, and shares it
automatically with other users of your computer but not with other computers on the
network. The Public folder appears at the top level of the file system from the user’s
point of view. Choose Start | Computer to open a Computer window, click the drop-
down arrow at the left end of the Address bar, and choose Public. In the Public folder,
you’ll find a full set of folders for sharing, including Public Music, Public Pictures,
and Public Videos.
Moving your library to the Public Music folder involves two steps: Moving the
files, and then telling iTunes where you’ve moved them to.
Move Your Library Files to the Shared Folder
To move your library files to the Public Music folder or the Shared Music folder, fol-
low these steps:
Close iTunes if it’s running. (For example, press ALT-F4 or choose File | Exit.)
Open your library folder. Choose Start | Music to open a Windows Explorer
window showing your Music folder.
Double-click the iTunes folder to open it. You’ll see an iTunes Music Library.
xml file, an iTunes Music Library.itl file, and an iTunes Music folder. The first
two files must stay in your library folder. If you remove them, iTunes won’t
be able to find your library, and it will create these files again from scratch.
Right-click the iTunes Music folder and choose Cut to cut it to the Clip-
board.
In the Music folder, double-click the shortcut to the Sample Music folder.
(The Sample Music folder is in the Public Music folder, so double-clicking
the Sample Music folder’s shortcut is a handy way to jump to inside the Pub-
lic Music folder.) In the Address bar, click the Public Music item to display
the folder’s contents.
Right-click an open space in the Public Music folder, and then choose Paste
to paste the iTunes Music folder into the folder.
Close the Windows Explorer window. (For example, press ALT-F4 or choose
File | Close.)
1.
2.
3.
4.
5.
6.
7.
Project 13: Share Your Household’s Music and Movies Easily and Effectively 143
Tell iTunes Where the Media Files Are Located
Next, you need to tell iTunes where the song files and other media files are:
Start iTunes. (For example, double-click the iTunes icon on your Desktop.)
Press CTRL-COMMA or choose Edit | Preferences to display the iTunes
dialog box.
Click the Advanced tab to display its contents.
Click the Change button to display the Browse For Folder dialog box.
Navigate to the Public Music folder, and then click the OK button to close the
Browse For Folder dialog box.
Click the OK button to close the iTunes dialog box.
After you’ve done this, iTunes knows where the files are, and you can play them
back as usual. When you rip further song files from CD or import files, iTunes stores
them in the Public Music folder.
You’re all set. The other users of your PC can do either of two things:
Move their library to the Public Music folder, using the techniques described
here, so that all files are stored centrally. Instead of moving the library folder
itself, they should move the folders it contains. Users can then add songs
they import to the shared library, and all users can access them.
Keep their library separate, but add the contents of the shared library folder
to it:
Choose File | Add Folder To Library to display the Browse For Folder
dialog box.
Navigate to the Public Music folder.
Select the iTunes Music folder.
Click the Open button. iTunes adds all the latest songs to the library.
Whichever approach the other users of your PC choose, the songs that they add
to the shared library don’t appear automatically in your library. To add all the latest
songs, use the Add To Library dialog box, as described in the previous list—but be
careful not to add the same songs twice.
If you do add the same songs to your library twice (or more), click the Music item in the Library
area of the Source pane, and then choose View | Show Duplicates to reveal duplicate songs.
You can then delete any unwanted duplicates once you’ve made sure they’re actually duplicates
rather than other versions of the same songs.
1.
2.
3.
4.
5.
6.
●
●
1.
2.
3.
4.
note
144 Part II: Intermediate
Step 4: Set Up a Media Server for Your Household
If you find that trying to play songs stored in libraries that keep disappearing off the
network is too tedious, another option is to set up a media server for your household.
In the old days, a server would be a dedicated computer that you kept running the
whole time, but there’s also a modern alternative that you may find preferable—a
network-aware drive or an external hard drive connected to a network router.
If you have an old computer that you can turn into a server, and you’re prepared
to leave it running the whole time, cranking up your electricity bill, the server is a
good option. But if getting a server would mean buying a new computer, a network
drive may be a better choice. Let’s look at the network drive option first.
This section assumes that you’re using the server primarily to share media files—but you can
also use it to share other files (such as documents or spreadsheets) or to back up files.
Choose a Network Drive
A network drive tends to be a neater solution than running a full-bore server—and it
is usually much lighter on the electricity than is a server. And if you’re really lucky,
you may already have a network router that can share a drive. So start by making
sure you know the capabilities of your network router. An increasing number of these
include one or more USB ports to which you can attach an external drive, and then
share it on the network. The configuration process varies depending on the router
manufacturer, but it is usually easy. If your router has this capability, all you need do
is buy an external drive, connect it via USB, and configure it for sharing.
If your network router doesn’t have the capability to share an attached USB drive,
look at independent network-attached storage (NAS) devices designed for consumers
rather than corporations. You can find these at any computer store worth patronizing,
but you may find a wider variety at online stores such as Amazon (www.amazon
.com) and CDW (www.cdw.com).
Examples of NAS devices include those in the following list. On most of these
sites, you’ll want to follow a Network Storage link to find the devices if they don’t
have links on the home page.
LinkStation series Buffalo Technology Inc. (www.buffalotech.com)
StorCenter series Iomega Corporation (www.iomega.com)
Ethernet Big Disk NAS Server series LaCie (www.lacie.com)
Shared Storage NAS Server Seagate Technology LLC (www.seagate.com)
Once you’ve bought the NAS device, connect it to your network via an Ethernet
cable, and then configure it following the instructions that come with it.
●
●
●
●
note
Project 13: Share Your Household’s Music and Movies Easily and Effectively 145
Set Up a “Real” Server
You can either build a server from scratch on a new computer or change the role of
one of your existing computers—even a pensioned-off computer that’s too old to run
Windows Vista or XP at a decent speed. Whether you buy (or build) a new computer
or repurpose an existing computer will color your choices for your server. Here are
notes on the key components for the server:
Operating system The server can run Windows Vista or Windows XP if
you have a copy that you can spare; if not, you might consider using a less
expensive (or even free) operating system, such as one of the many distribu-
tions of Linux.
Another possibility is to use Windows Home Server. After installing Windows Home Server, you
can manage the server remotely through a management console, so the computer running
Windows Home Server doesn’t even need a monitor or a keyboard.
Processor The server can run on a modest processor—even an antiquated
one by today’s standards, such as a 500-MHz or faster processor for a Win-
dows or Linux server.
RAM The server needs only enough RAM to run the operating system un-
less you’ll need to run applications on it. For example, 256MB of RAM is
adequate for a server running Windows XP. Windows Vista requires 512MB
or (preferably) 1GB.
Disk space The server must have enough disk space to store all the songs
and other files you want to have available. A desktop computer is likely to be
a better bet than a notebook computer, because you can add internal drives to
it. Alternatively, you might use one or more external USB or FireWire drives
to provide plenty of space.
Network connection The server must be connected to your network, either
via network cable or via wireless. A wireless connection is adequate for serv-
ing a few computers, but in most cases, a wired connection (Fast Ethernet or
Gigabit Ethernet) is a much better choice.
Monitor If the server will simply be running somewhere convenient (rath-
er than being used for other computing tasks, such as running applications),
all you need is an old monitor capable of displaying the bootup and login
screens for the operating system. After that, you can turn the monitor off
until you need to restart or configure the server.
Keyboard and mouse Like the monitor, the keyboard and mouse can be
basic devices, because you’ll need to use them only for booting and configur-
ing the server.
●
●
●
●
●
●
●
note
146 Part II: Intermediate
CD-ROM drive Your server needs a CD-ROM drive only if you’ll use
the server for ripping. If you’ll rip on the clients, the server can get by
without one.
Sound card Your server needs a sound card only if you’ll use it for playing
music or other media files.
Reliability Your server may be modest, but it must be reliable—otherwise
the files won’t be available when you want to play them. Make sure also that
the server has plenty of cooling, and configure its power settings so that it
doesn’t go to sleep.
Location If you choose to leave your server running all the time, locate it
somewhere safe. To keep down the noise, you may be tempted to hide the
server away in a closet. If you do, make sure there’s enough ventilation so
that the server doesn’t overheat.
Place the Files and Media Libraries on the Server
Once you’ve gotten your NAS device or server up and running, perform these
general steps:
Create a folder that will contain the songs.
Share that folder on the network so that all the users you want to be able
to play music are allowed to access it.
On each of the client computers, move the library into the shared folder.
●
●
●
●
1.
2.
3.
147
Project 14
Turn Your PC
into a Recording
Studio
What You’ll Need
Hardware: Audio interface, microphones, your existing instruments,
a room
Software: Audacity
Cost: $100 U.S. and up to wherever you choose to stop
B
ack in the old days before PCs became ubiquitous and multipotent, recording
high-quality audio was a complex process involving expensive equipment, reel-
to-reel recorders, and usually a studio. Recording a track worth other people’s
listening time usually meant a serious investment of time, money, and effort.
Now that PCs powerful enough to handle audio and video are easily affordable,
recording is far easier, though it can still be as complex as you choose to make it.
For example, if you want to record an entire rock band (or other musical group) all
together, you’ll need a load of microphones, pickups, and mixing gear. But if you’re
happy to proceed by recording one or two instruments at a time, and then mixing the
tracks together on your PC, you can get impressive results using only a minimum
of equipment.
This project shows you how to turn your PC into a recording studio by getting the
hardware and installing the software you need for recording. The next project demon-
strates how to use the software to record and mix tracks together.
Step 1: Prepare a Room for Recording
If you will use a studio for recording, you can skip this section. But if you’re not in a po-
sition to afford burning handfuls of dollars every hour, you’ll do better to work at home.
The basic rule of home recording is to make the most of what you’ve got. Chances are
that you won’t have a spare room that you can devote to recording, so you will probably
need to repurpose an existing room—for example, your bedroom or the living room.
●
●
●
148 Part II: Intermediate
A bedroom can actually be a great choice for home recording, because it contains curtains and
soft objects that help absorb sound.
Whatever type of room you have available, you’ll need to prepare the room acous-
tically as far as possible and set up the PC in a suitable and (preferably) quiet way.
The next sections offer suggestions for how to go about these tasks.
Work on the Room’s Acoustics
Have you ever walked into a big, empty room with bare walls—a community hall,
perhaps, or a school gym—and heard your footsteps echoing back at you? Or your
voice booming when you spoke? In such rooms, standing waves tend to occur when
something makes a noise. Your heel cracks down on the floor, and the noise bounces
off one wall, reflecting across the room to the other wall, where it bounces off again.
The waves meet up again in the middle of the room, producing the standing waves.
Unless you’re deliberately aiming for a recording that sounds as though it was
made in a garbage can, you’ll want to minimize standing waves by taming the sound
reflections. To tame the reflections, you need to break up any bare walls or similar
surfaces (such as fitted closet doors) in the room. For example:
Draw the curtains. The curtains will damp down the window.
Hang a blanket over and around the door. This will damp down the door and
also reduce the amount of sound leaking out of the room.
Remove any sliding closet doors. These loose, flat objects can vibrate beautifully.
After removing such doors, hang a blanket over the open space to deaden it.
Put a rug on a bare floor. Polished hardwood floors are beautiful, but the sound
bounces off them big-time. Use a rug or some off-cuts of carpet to absorb the
sound.
Add furniture. Your first reaction is probably to shift all the furniture out of
the room so that you have space for your instruments (and for you and your
bandmates to express yourselves). But a bed, sofa, armchairs, and so on are
great for reducing standing waves.
Put a cushion or bean-bag in each open corner. If the room has open corners, you
need to damp them down. One easy way is to put a pillow, cushion, bean-
bag, or folded blanket in each open corner. Alternatively, move furniture into
the corners. For example, put an armchair in a corner.
If you have pets, remove them from not only your studio but the surrounding area when you’re
playing. This is not just to avoid the potential cruelty of forcing them to listen to your music but
also to prevent them from adding vocal contributions—for example, your dog might decide to
howl when a stringed instrument hits the animal’s resonant frequency.
●
●
●
●
●
●
note
tip
Project 14: Turn Your PC into a Recording Studio 149
You also need to, within reason, remove any objects that may resonate or vibrate.
When you and your bandmates start playing your instruments, any loose objects in
the room will start getting a sonic workout. When an object, or part of it, hits its reso-
nant frequency, it starts to vibrate or rattle. This is awkward enough when a single
object starts vibrating noisily when you’re playing, but if your band goes in for a
wall-of-sound sonic assault, you’ll probably get multiple objects vibrating or rattling
at the same time. Musical instruments tend to be prime culprits here, though they’re
not the only ones (your mom’s collection of china plates, tastefully arranged on dis-
play racks, might collect an interesting range of vibrations). For example, if you have
a piano in your recording room, other instruments from drums to guitars will make
its strings vibrate, so you’ll probably want to remove it from the room if you’re not
using it. Bass guitar often sets the snare wires on a snare drum vibrating. And other
instruments can trigger vibrations in guitars.
Set Up Your PC in the Recording Room
Next, set up your PC in the recording room so that you can connect your sound sourc-
es to it. Normally, you’ll have two main considerations when setting up the PC:
Position the PC where it is as easy to use as possible.
Avoid recording any noise that the PC itself makes.
Make the PC Easy to Use When Recording
Set up your PC in the room so that you’ll be able to access it easily while you’re record-
ing. For example, if you’re wearing a guitar or bass, you will probably find it easier to
use the PC while standing than while sitting, so putting the monitor, keyboard, and
mouse on a higher surface than usual may be helpful. On the other hand, if you’ll be
hammering away at musical keyboards most of the time, having the computer key-
board somewhere you can reach from a seated position will usually be preferable.
Avoid Recording Noise from Your PC
To make sure that their recordings contain no noise from the computers used for re-
cordings, professional sound studios use computers that are almost totally silenced.
You too can have a totally silent PC, but they tend to be expensive.
See Project 22 for instructions on reducing the amount of noise your PC makes—and to learn
sources for buying totally silent PCs.
More likely, though, you’ll want to get started with your existing PC. If the PC is
noisy enough to create problems with the recording, try these workarounds:
Place the PC’s CPU in a corner of the room as far as possible from your mi-
crophones and pickups. Screen the CPU off with furniture, cushions, or other
sonic baffles. If you’re tempted to cover it with blankets, make sure it doesn’t
overheat.
●
●
●
note
150 Part II: Intermediate
If your PC is a noisy laptop, treat the whole of the laptop as the CPU, positioning it away from
your microphones and pickups. Attach an external monitor, keyboard, and mouse to the laptop.
Position the monitor, keyboard, and mouse where you need to control the
recording, and connect them to the CPU via extension cables.
If you can run cables under a door, through a vent, or through a serving
hatch, you may even be able to position the CPU in a different room from the
monitor, keyboard, and mouse.
If you’re using an external audio interface, as recommended in this project,
position it with the monitor, keyboard, and mouse. Again, you’ll probably
need an extension cable.
Step 2: Get the Audio Hardware You Need
Since around the turn of the millennium, it has been hard to buy a PC that doesn’t
have multimedia capabilities, so there’s every chance that your PC includes at least
basic sound hardware. But if you’re planning on serious amounts of recording, you
may want to beef up your PC’s audio capabilities.
Choose an Audio Interface
For most people starting out with recording audio, the easiest choice usually is an
external audio interface, which is basically a sound box into which you can connect
your instruments. The sound box sits outside your PC and transfers the sound to the
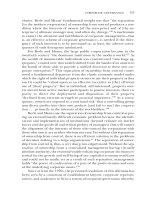
PC via USB or FireWire. Figure 14-1 shows the MobilePre USB audio interface from
M-Audio (www.m-audio.com), which this project uses as its example.
Having a single cable going to your PC tends to be much easier than simply plug-
ging instruments or microphones into the sound card—especially on a laptop PC,
which normally has only a single audio input. However, if you do want to be able to
●
●
●
note
Figure 14-1
An external audio
interface such as the
MobilePre USB makes
it easy to get a high-
quality audio signal into
your PC.
Project 14: Turn Your PC into a Recording Studio 151
plug multiple instruments and microphones directly into a desktop PC, and you’re
prepared to install a PCI sound card, you can use an audio interface such as the Delta
1010LT (see Figure 14-2), also available from M-Audio.
Connect Your Audio Interface to Your PC
If you’re using an external audio interface, you need to connect it to your PC and
install any drivers that Windows needs in order to recognize and use the interface.
This section shows you the general steps you need to follow. The example uses an
M-Audio MobilePre USB interface; the precise steps needed to connect any other audio
interface will almost certainly be somewhat different.
To connect your audio interface, follow these general steps:
Install the driver software for the interface:
Even if the interface included a disc containing drivers, it’s a good idea to
visit the manufacturer’s web site to see if an updated version is available.
Even though an interface may appear to be a single object to the human
eye (for example, a box with knobs, switches, and connectors), to Win-
dows it may appear as several different components. For example, the
M-Audio MobilePre USB appears as both a USB controller (as shown on the
left here) and a sound, video, or game controller (as shown on the right).
1.
●
●
Figure 14-2
An internal audio inter-
face such as the Delta
1010LT lets you plug a
wide array of instru-
ments directly into a
desktop PC.
152 Part II: Intermediate
When the software installation is complete, or when the installation routine
prompts you to do so, plug in the audio interface.
When Windows tells you that your device or devices are ready to use, click
the Close button. If Windows prompts you to restart your PC, do so.
Step 3: Connect or Mike Your Instruments
The next step is to connect your instruments to the audio interface. How you will do
this depends on what types of instruments you have and what types of audio inter-
face, but here are brief examples.
Vocals
Use a good-quality dynamic microphone designed to pick up a full range of vocals,
not that extra webcam mike that has been sitting unused for three years because you
bought a Bluetooth headset. Normally, you’ll plug the microphone directly into the
audio interface unless you need to run it through any effects boxes first—for example,
to multitrack your voice.
Use a pop shield to protect the microphone from any excesses in your voice stream. If you don’t
have a pop shield, you can create a workable substitute quickly by stretching an old pair of
nylons over a coat hanger.
If you’ll be playing an instrument while singing, you’ll need a microphone stand.
If you can devote your full energy to singing, holding the microphone will give you
more freedom.
Acoustic Guitar
To record an acoustic guitar, use a dynamic microphone positioned about a hand’s
breadth away from the sound hole in the guitar. Normally, you’ll want to use a micro-
phone stand to hold the microphone in place, but if you’re short of a stand, you may
be able to tape the microphone to the back of a chair. (If so, tape it securely, and make
sure the chair is stable enough to avoid vibration.)
Electric Guitar or Bass
When recording electric guitar, you have two main options:
Run the guitar through your effects pedals or processors (reverb, wah-wah,
or whatever), and then run a cord from the last pedal or processor to your
audio interface so that you can record the processed sound. This approach
lets you create your preferred sound in your regular way, and then simply
record it.
2.
3.
●
tip
Project 14: Turn Your PC into a Recording Studio 153
Connect the guitar directly to the audio interface and record it “clean,” and
then apply audio effects in Audacity as needed (Audacity is introduced in
Step 4). This approach gives you more flexibility in Audacity, but you will
need to learn a different way of creating your preferred sound.
If you’re in a hurry to get results, go with the first option. Given more time, you
will probably want to experiment with both approaches and find out which suits you
the best.
When recording electric bass, proceed as for electric guitar.
Drums
Most drummers swear by acoustic drums and swear at electronic drums, but elec-
tronic drums are far easier to record than acoustic drums, as you can run the signal
directly into your audio interface. This section assumes you’ve got acoustic drums.
In the olden days, big-band recording engineers would devote a single micro-
phone to the drums, positioning it with great care but often not a great deal of success.
As you’ll know, if you’ve listened to such recordings, unless the engineer was very
good (or got lucky), some of the drums would be dominant and others barely audible.
These days, many professional recording studios mike each drum or percussion item
(for example, a hi-hat or a cymbal) separately. Some of the key drums or percussion
items may even enjoy two or more microphones to give the engineer more flexibility
in processing the sound.
In a pinch, you can create acceptable drum tracks by positioning one microphone
on either side of the drum kit. You’ll need to experiment to find the best placement,
and you may need to vary your normal drumming style—for example, by striking
some drums less hard than usual so that they don’t swamp the other drums. If you’re
looking for optimum results, grit your teeth, buy the microphones and microphone
stands, and then position them as follows:
Bass drum Take off the front skin (the one away from the drum pedal and
beater), and place a folded blanket against the back skin (the one the drum
beater strikes) to dampen the sound. Position a dynamic microphone inside
the bass drum. If you need to deepen the bass drum’s sound, place a thick
blanket over the drum (but not over the back skin).
Snare drum Position a dynamic microphone a few inches away from the
drum head on the side opposite the drummer. If the snare rings too loud, use
damping gels (widely available in music stores) or cloth and tape to damp
the sound.
When positioning microphones on drums, your challenge is to get them close enough to the
drum head to pick up the sound clearly without the sound of other percussion but far enough
away from the drummer’s flailing sticks. A well-struck microphone makes a fine, dramatic sound
on a recording—but usually only once.
●
●
●
note
note
154 Part II: Intermediate
Toms For each tom, position a dynamic microphone a few inches away
from the drum head on the side opposite the drummer.
Hi-hat Position a condenser microphone a few inches away from the top
plate of the hi-hat at the upper extent of its travel.
Cymbals Position a condenser microphone six inches to a foot from each of
the most important cymbals (for example, your primary ride cymbal). Cym-
bals that you use less—for example, ancillary crash or splash cymbals—may
be able to share a microphone effectively.
If you’re short of microphones, cut down your drum kit to a minimum. For example, by ditching
the second tom, the floor tom, and a couple of crash or splash cymbals, you can save yourself a
handful of microphones.
Step 4: Download and Install Audacity
Many different recording programs are available, but if you’re feeling the knock-on
effects of the subprime pinch, the best place to start is with a free program. Luckily,
there’s a great one, Audacity, which runs not only on Windows but also on Linux and
the Mac. Go to the Audacity page on the SourceForge.net web site (http://sourceforge
.net/projects/audacity/) and download Audacity by following the link that leads to
the latest stable version for Windows. (There’s also an unstable version that’s suitable
only for the adventurous.) You want the version described as “.exe (32-bit Windows),”
not the zip file.
Internet Explorer may try to block you from downloading Audacity. If nothing happens when
you click the download link, click the Information Bar (the yellow bar that appears between the
lowest toolbar and the top of the window) to display a menu that allows you to circumvent the
blocking.
To install Audacity, follow these steps:
Run the file you’ve downloaded. For example, if you’re using Internet Ex-
plorer, click the Run button in the Download Complete dialog box.
If Internet Explorer displays a Security Warning dialog box to let you know
that “The publisher could not be verified,” click the Run button. As long as
you’ve downloaded Audacity via SourceForge, the file should be fine, even
though it has not been signed with a digital certificate. You also need to go
through User Account Control for the audacity-win program (unless you
have turned off User Account Control).
Accept the license agreement.
●
●
●
1.
2.
3.
tip
note
Project 14: Turn Your PC into a Recording Studio 155
Specify where to install Audacity. The default location, in an Audacity folder
inside your Program Files folder, is fine unless you particularly want to put
it somewhere else.
On the Select Additional Tasks screen, choose whether to create a Desktop
icon (you may find it useful) and create Windows file associations with the
Audacity project file extension (.aup; usually a good idea).
On the Completing The Audacity Setup Wizard screen, leave the Launch
Audacity check box selected so that the wizard launches Audacity for you.
The first time you run Audacity, choose the language you want to use. You then
see an Audacity window. Project 15 shows you how to use the Audacity interface, so
for now, your next step is to configure Audacity for sound recording.
Step 5: Configure Audacity for Sound Recording
Part of Audacity’s power comes from the wide variety of configurable settings it of-
fers. By choosing suitable settings, you can greatly increase your chances of making a
high-quality recording that others will listen to with pleasure rather than with horror
or embarrassment. To access the settings, choose Edit | Preferences. Audacity opens
the Audacity Preferences dialog box.
Configure Input/Output Settings
With the Audacity Preferences dialog box open, start by configuring the audio input/
output settings:
Click the Audio I/O tab to display its contents (see Figure 14-3).
In the Playback drop-down list, select the audio device you want to use for
playing back audio. For example, you may want to output audio through
your audio interface so that you can play it through an amplifier rather than
merely listen to it on speakers.
4.
5.
6.
1.
2.
Figure 14-3
Choose your playback
and recording devices,
and the number of
channels, on the Audio
I/O tab.
156 Part II: Intermediate
In the Device drop-down list in the Recording group box, select the item for
your audio interface.
In the Channels drop-down list, select 1 (Mono) if you’re getting mono input
or 2 (Stereo) for stereo input. Audacity supports up to 16 channels if your
input device can supply them.
If you want to play back the existing tracks in the audio project while record-
ing a new track, select the Play Other Tracks While Recording New One check
box. This setting lets you play along with what you’ve recorded so far.
If you want Audacity to play back each new track as you record it, select the
Software Playthrough check box.
Leave the Audacity Preferences dialog box open for the moment so that you can
choose recording quality settings.
Choose Recording Quality Settings
To choose recording quality settings, follow these steps:
Click the Quality tab to display its contents (see Figure 14-4).
In the Default Sample Rate drop-down list, select 44100 Hz unless you
know you want to use a different sample rate. 44100 Hz (often described as
44.1 kilohertz, or kHz) is the sample rate used for CDs, and provides very
high audio quality. Audacity does offer much higher sample rates—up to
96000 Hz—if you need them.
In the Default Sample Format drop-down list, choose 32-bit Float if your
sound card supports 32-bit sound. This gives you the best audio quality—but
if your sound card maxes out at 16-bit sound, there’s no point in using 32-bit
sound, so choose 16-bit instead, and you will reduce the file sizes by half. If
your sound card supports 24-bit sound, choose 24-bit, which is the stage in
3.
4.
5.
6.
1.
2.
3.
Figure 14-4
Choose the default
sample rate and default
sample format on the
Quality tab.
Project 14: Turn Your PC into a Recording Studio 157
between 16-bit and 32-bit sound. (Check your sound card’s documentation if
you’re not sure of its capabilities.)
In the Real-Time Sample Rate Converter drop-down list, choose Fast Sinc
Interpolation.
In the High-Quality Sample Rate Converter drop-down list, choose High-
Quality Sinc Interpolation.
In the Real-Time Dither drop-down list, choose None.
In the High-Quality Dither drop-down list, choose Triangle.
Again, leave the Audacity Preferences dialog box open so that you can continue
choosing settings.
Choose File Formats Settings
To choose file formats settings, follow these steps:
Click the File Formats tab to display its contents (see Figure 14-5).
In the When Importing Uncompressed Audio Files Into Audacity group box,
select the Make A Copy Of The File Before Editing option button if you want
to avoid even the possibility of damage to your existing uncompressed audio
files (for example, WAV files) when importing them into Audacity for your
projects. Select the Read Directly From The Original File option button if
you’re prepared to tolerate the faint possibility of damage occurring while
Audacity reads the files.
4.
5.
6.
7.
1.
2.
Figure 14-5
The most important
setting on the File For-
mats tab is the Uncom-
pressed Export Format
drop-down list. You can
also use the controls on
this tab to add an MP3
encoder to Audacity.
158 Part II: Intermediate
In the Uncompressed Export Format drop-down list, choose the format in
which you want to export uncompressed audio:
This is the format in which you will export your project files unless you
compress them using the OGG encoder or an MP3 encoder that you add
(as described in the sidebar, “Add an MP3 Encoder to Audacity so that
You Can Create MP3 Files”).
Normally, the best choice here is WAV (Microsoft 16 Bit PCM) if you’re
working with a 16-bit sample size, or WAV (Microsoft 32 Bit Float) if
you’re working with a 32-bit sample size.
If you will export audio files to the Ogg Vorbis file format, choose a quality
on the OGG Quality slider.
Ogg Vorbis is a free, open-source encoder for compressed audio. Ogg Vorbis competes with the
MP3 encoder (which is proprietary), but at this writing, MP3 is much more widely used.
If you will export audio files to the MP3 file format, add an MP3 encoder to
Audacity, and then choose settings. See the following sidebar, “Add an MP3
Encoder to Audacity so that You Can Create MP3 Files,” for details.
3.
●
●
4.
5.
Add an MP3 Encoder to Audacity so that
You Can Create MP3 Files
If you want to be able to create MP3 files directly from Audacity, you must add
an MP3 encoder to Audacity. Alternatively, you can export WAV files from
Audacity, import them into a media player such as Windows Media Player or
iTunes, and then create MP3 files using that program’s MP3 encoder. To add an
MP3 encoder to Audacity, follow these steps:
Download the latest stable version of the LAME encoder from the
LAME Project home page (
or another site. The Audacity home page maintains a link to a site that
provides LAME downloads.
Internet Explorer may try to block this download. Click the Information Bar to display a
menu that allows you to download the file.
Extract the lame_enc.dll file from the download package and put it in
the System32 folder in your Windows folder:
The easiest way to open a Windows Explorer window to this
folder is to choose Start | Run, type %windir%\system32, and
then press ENTER.
Windows may try to hide the contents of the System32 folder from
you. If so, click the Show The Contents Of This Folder link.
1.
2.
●
●
note
note