Windows XP Headaches-How to Fix Common Problems in a Hurry phần 7 docx
Bạn đang xem bản rút gọn của tài liệu. Xem và tải ngay bản đầy đủ của tài liệu tại đây (1002.92 KB, 27 trang )
Windows XP is the easiest operating system Microsoft has ever produced in terms of
networking. There is more wizard help and less configuration for you to do than with any
previous version of Windows, and that's great. After all, you want to spend time enjoying
your home or small office network, not learning everything under the sun in order to make it
actually work.
However, networking is a complex process, and although Windows XP does a fine job of
making your life easier, there are a number of problems you might run into, no matter whether
you have a simple cable connection between two computers or a larger office network with
multiple computers and shared printers. Either way, the problems you are likely to experience
are about the same.
In this chapter, I assume you have studied a networking book or the Windows XP Help and
Support Center and that you already know a thing or two about networking. In fact, I expect
that the reason you have turned to this chapter is that you have tried to network computers
together and are having problems. In this chapter, I explore the major issues you are likely to
have when networking with Windows XP; and I assume those problems relate to your home
network or a small office network.
Problems with Network Setup and Access
In order to create a network, you need two primary items:
• HardwareFirst, your computers must have the necessary hardware that enables
them to communicate with each other. This hardware, called a network adapter card,
allows your computer to be connected to a network. There are several different kinds
of network adapter cards, and your computer may have been shipped with one. Before
you get too involved in network issues, you'll first need to install a network adapter
card if your computer does not have one. If your computer does have one, it will
automatically appear in the Network Connections folder in Control Panel, as shown in
Figure 12-1
. It will be labeled Local Area Connection. If you do not see the
connection in the Network Connections folder, then your computer is not outfitted
with a network adapter card or the card is not working.
Figure 12-1: Your network adapter card, appearing in the Network Connections window as
the Local Area Connection
• SoftwareYour computer must have the correct software to allow the computer to
operate on the network. Don't worry, though-that software is already included in
Windows XP, so there is nothing else to buy.
What kind of network should I use?
There are several different kinds of networks that you can use in your home or small office.
Your choice depends on your needs and how much you want to spend. If your computers are
not already outfitted with a network adapter card, you can make some choices about the kind
of network you might want. I'd suggest you do some additional reading in the Windows XP
Help and Support Center before making your decision, but here are the major types of
networks:
• EthernetEthernet is a standard network type that has been in use for a long time.
Your computer is outfitted with a standard Ethernet network adapter, and you connect
all of your computers to a little device called a hub. You use standard Ethernet wiring,
which looks like a large telephone line, and your computers all communicate with
each other through the hub. I use this kind of network in my home office; it's easy and
it works great, but it is not the newest technology out there.
• HomePNAHomePNA networks use phone lines in your home to communicate with
each other. A HomePNA network adapter card is installed in your computer, which
then plugs into your phone jack. Then, other computers in different rooms of your
house do the same, and they can communicate with each other that way. The good
news about HomePNA is that it is rather inexpensive, it works well, and it uses the
existing phone line system without more cables running everywhere. Most computer
stores sell HomePNA kits that can help you set everything up. If you want a home
network where you have access in practically every room (that is, in every room with
a phone jack), this one is for you.
• WirelessWireless networks, which use infrared and radio technologies, are also
available today. Your computer is outfitted with a wireless network adapter card that
communicates with a wireless hub, or two wireless adapter cards can communicate
with each other with no hub (called an ad hoc connection). Although not as popular as
Ethernet or Home PNA, wireless networks are on the cutting edge; you can learn more
about them in the Windows XP Help and Support Center or at
.
Once you gather any needed network adapter cards and cables, depending on the type of
network you want to install, you should get everything connected according to the
manufacturer's setup instructions. Follow the instructions carefully, and if you are not sure
what you are doing, you may consider getting extra help from technical support, or even from
a friend or relative who has networked computers together before. Once you get all the
hardware connected (and have checked it twice), you are ready to set up your computers for
networking. See the Windows XP Help and Support Center for instructions, and see the
following Headaches and their solutions for more help!
I can't get my network set up.
Operating Systems Affected Windows XP Professional and Home Editions are affected.
Cause Network setup in Windows XP is relatively easy if your network adapter card is
installed and working. Be sure to open Network Connections in Control Panel to see if your
Local Area Connection is available. If you see it there, you know that the network adapter
card is installed and functioning, and you are ready to set up the network. If not, check your
computer or network adapter card documentation, or the manufacturer's Web site, for more
information.
The Pain Killer Once you are certain that the network adapter is installed as it should be, you
can use the Network Setup Wizard to help you configure the first computer on your network.
1. Click Start | All Programs | Accessories | Communications | Network Setup Wizard.
2. Click Next on the Welcome screen.
3. Read the instructions on the Before You Continue screen; they tell you to turn on all
computers, printers, and so on, before starting. Click Next.
4. In the Select a Connection Method screen, shown in the following illustration, choose
an option that describes your computer, and then click Next.
5. If you chose the first option in Step 4, the Network Setup Wizard needs to identify
your Internet connection. Select it in the provided screen, as shown in the following
illustration, and then click Next.
6. In the Name and Description screen, give the computer a description and a network
name. The name should be something friendly and easy to remember. If your
computer has a cable or a Digital Subscriber Line (DSL) modem, you may be required
to use a certain name provided by the Internet service provider (ISP). If this is the
case, do not change the name. Check your broadband documentation for details. Click
Next.
7. Choose the name of your network. It should be something simple; it is MSHOME by
default, but you can call it anything you like.
8. In the next window, a summary of the settings to be applied are listed. Click Next to
apply the settings, and follow any additional instructions that might appear.
Tip
N
ow that you have set up the first computer on your netwo
r
k, you are ready to begin
s
etting up the additional computers. If you are having trouble with this task, see the next
H
eadache for assistance.
I can't install additional clients on my network.
Operating Systems Affected Windows XP Professional and Home Editions are affected.
Cause Once you have set up the first computer on your network, your next task is to set up
the other computers on the network. If you want the first computer to share the Internet
connection and all other computers to connect to the Internet through that shared connection,
you can easily configure the additional client computers using the Network Setup Wizard. If
you need a different configuration, you can set up that as well.
The Pain Killer To set up your client computers, follow these steps:
1. Click Start | All Programs | Accessories | Communications | Network Setup Wizard.
2. Click Next on the Welcome screen.
3. Read the instructions on the Before You Continue screen; they tell you to turn on all
computers, printers, and so on, before starting. Click Next.
4. In the Select a Connection Method screen, you can choose the This Computer
Connects to the Internet Through Another Computer on My Network or Through a
Residential Gateway option. If this does not describe your network or if Internet
Connection Sharing will not be used, click the Other radio button and then click Next.
5. In the Other Internet Connection Methods screen, shown in the following illustration,
you have the options to connect to the Internet directly or not connect. If you are not
sure about your network setup, click the link at the bottom of the window to learn
more about home and small office network configurations. Make your selection, and
then click Next.
6. Enter a computer description and name. Click Next.
7. Choose the network name. You must use the same network name on all computers.
Click Next.
8. Review your settings, and then click Next.
9. Once the settings are applied, you'll see the option to create a network setup disk to
use on other computers so that they will be configured in the same way, and another
option to use your Windows XP CD. You can also select the Just Finish the Wizard, as
shown in the following illustration. Make a selection, and then click Next. You may
need to follow additional steps, depending on your selection.
I need to set up Windows network clients that are not Windows XP clients.
Operating Systems Affected Windows XP Professional and Home Editions are affected.
Cause If you have earlier versions of Windows on your network, such as Windows 2000,
Windows Me, or Windows 9x, you can use the setup disk you created during the network
configuration of the Windows XP computers. If you did not create a network setup disk, no
problem, you can use your Windows XP installation CD-ROM.
The Pain Killer To set up a down-level client computer, follow these steps:
1. If you have the network setup disk you created when you configured the XP clients,
insert the disk and start the Network Setup Wizard from that disk by double-clicking
Netsetup. If you do not have a network floppy disk, go to Step 2.
2. Insert the Windows XP installation CD-ROM into the down-level computer's CD-
ROM drive. On the Welcome screen, click the Perform Additional Tasks option.
Then, in the following window, choose the Set Up a Home or Small Office Network
option and follow the wizard instructions that appear.
I can't configure networking with a Linux or Macintosh computer.
Operating Systems Affected Windows XP Professional and Home Editions are affected.
Cause Windows XP is able to natively network with other Windows computers (down to
systems using Windows 95). However, XP does not provide support for direct networking
with Linux or Macintosh. In this case, you need a network server that handles network
translation between the two different systems, which of course is not a practical solution for a
home or small office network.
The Pain Killer Sorry, there is no workaround for this headache! (If I were a doctor I might
recommend that you try taking two aspirin and e-mailing Microsoft in the morning…, or not.)
My computer does not connect to the network. All other networked computers
are functioning correctly.
Operating Systems Affected Windows XP Professional and Home Editions are affected.
Cause If your computer has been set up for the network, but you still cannot access network
resources, the problem usually resides with either your network adapter card or your current
TCP/IP configuration. Transmission Control Protocol/Internet Protocol (TCP/IP) is a network
protocol that your computers use to talk to each other.
The Pain Killer To resolve the problem, follow these steps:
1. First, you should check your network adapter card and make sure that it is working.
Click Start | Control Panel. In Control Panel's Classic view, click Network
Connections. Right-click your local area connection, and then click Status.
2. In the Connection window, shown in the following illustration, see if the Status line
reads 'Connected.' If not, click the Support tab.
3. On the Support tab, shown in the following illustration, click the Repair button to
attempt to repair the connection. If this does not work, the network adapter card may
not be installed correctly or there may be a problem with the card. See the
manufacturer's instructions or Web site for more information.
4. If your network adapter card seems to be working, test it one more time with a Ping
test. Ping 127.0.0.1 is a command that tests network connectivity against your network
adapter card so that you can be sure it is working. To use Ping, click Start | Run. Type
Command, and then click OK.
5. In the command window, type ping 127.0.0.1 and press ENTER.
6. You should see a reply message like the one shown in the following illustration. If you
do not, there is something wrong with your network adapter card.
7. If you do see a reply message, then try to Ping other computers on your network. You
can do this using their network name, such as ping name. For example, on my
network, I have a computer called 'writer,' so I would just Ping the computer by typing
ping writer. If this works, you'll see the same reply message, as shown here:
8. If you cannot Ping other computers using their names, try a few using the IP address.
You can find the IP address, such as 192.168.0.190, on the Support tab of the Local
Area Connection Status window, (shown previously in Step 3). Using the Ping
command again, Ping the IP address by typing it, as in ping 192.168.0.190.
9. If the Ping command fails again, you'll need to check the IP address of your own
computer. The address your computer uses must be in the same family, or more
technically, the same subnet. You can easily make sure your computer is using the
same IP subnet by clicking Start | Control Panel. Then in Control Panel's Classic view,
click Network Connections. Right-click your Local Area Connection, and then click
Properties.
10. On the General tab, shown in the following illustration, select Internet Protocol
(TCP/IP), and then click the Properties button.
11. In the Internet Protocol (TCP/IP) Properties window, shown in the following
illustration, make sure you have selected the Obtain an IP Address Automatically
radio button, and click OK. Then use the Repair option found in the Status window,
and make sure your computer gets an IP address in the same range and subnet as the
other computers on your network. You'll need to ch3eck the other computers to see if
the IP address is in the same range.
I need to use a different IP address configuration on my network.
Operating Systems Affected Windows XP Professional and Home Editions are affected.
Cause Windows XP uses TCP/IP to communicate on home and small office networks, as well
as on networks that contain thousands of computers. Because TCP/IP is a highly technical
and complex subject, Microsoft devised a system known as Automatic Private IP Addressing
(APIPA). APIPA allows the computers on your network to automatically assign themselves
an IP address so that you don't have to do it-or even know anything about it, for that matter.
However, in some cases, such as with cable and DSL modems, you may need to manually
assign your network computers an IP address in a particular range for Internet connectivity to
work on your network. If this is the case, you need to follow your ISP's instructions carefully,
but the Pain Killer gives you the skinny on manual IP address configuration as well.
Prevention
Unless your ISP has given you instructions to do so, never manually change the
I
P addresses of your computers. Configuring IP addresses incorrectly will
cause your computers to stop communicating with each other.
The Pain Killer To manually configure an IP address, follow these steps:
1. Click Start | Control Panel. In Control Panel's Classic view, click Network
Connections.
2. Right-click the local area connection, and then click Properties.
3. On the General tab, click the Internet Protocol (TCP/IP) option in the dialog box, and
then click Properties.
4. In the Internet Protocol Properties window, shown in the above illustration, click the
Use the Following IP Address option and enter a valid IP address, subnet mask, and
default gateway, as instructed by your ISP. Again, do not change any of these settings
unless you have been instructed to do so. Click OK when you are done.
I get an 'access denied' message when I try to access another computer on my
network.
Operating Systems Affected Windows XP Professional and Home Editions are affected.
Cause The computer is using New Technology File System (NTFS) permissions and has not
given you access to the computer or the shares on that computer.
The Pain Killer You, or the administrator of that computer, will need to configure the
computer to give you access. See the next section to learn more about share access problems.
Difficulties with Network Shares
Once the network is all connected and working as it should, you can begin sharing folders,
printers, drives, just about anything else you might want. After all, that is the purpose of
networking to begin with. However, network sharing can be quite complex, especially when
you want to finely control permissions, and there are some headaches you might run into.
Prevention
The best prevention for network share headaches is to keep things as simple as
p
ossible. Complex shares with complex permissions tend to cause problems, so
keep things as simple as you can.
I want to see all of the shares available on a particular computer or on my
network.
Operating Systems Affected Windows XP Professional and Home Editions are affected.
Cause You can easily view resources that are available to you, and there are a few different
ways to do it.
The Pain Killer To view resources available on your network, follow these steps:
1. To view resources on a particular computer, click Start | Run. In the Run dialog box
type \\computername. For example, if I wanted to access a computer called 'writer,'
then I would type \\writer.
2. Click OK. A window opens, as shown in the following illustration, and you can see
the shared resources available on that computer.
3. You can also view the shared resources available to you on another computer by using
the Net View command. Click Start | Run and type command. Click OK. At the
command prompt, type net view \\computername, such as net view \\writer, as
shown in the following illustration.
The options on the Sharing tab are grayed out.
Operating Systems Affected Windows XP Professional and Home Editions are affected.
Cause If you want to share a folder, but the options to share the folder on the Sharing tab are
grayed out, then the folder is residing in another folder that has been made private. When a
folder is made private, it cannot be shared, and any subfolders in that folder cannot be shared
either.
The Pain Killer Drag the folder out of the private folder to a different location so that it can
be shared.
Prevention
System folders cannot be shared.
I can't configure NTFS permissions.
Operating Systems Affected Windows XP Professional Edition is affected.
Cause NTFS provides extensive permissions, which you can assign to network resources.
However, by default, simple file sharing is enabled in order to make things easier. Simple file
sharing allows you to share a resource and give your users full control, or give them just read
access by clearing the check box option on the Sharing tab. However, what if you want Bob to
have full control to a folder but Susan to have read-only access? You cannot configure this
under simple file sharing, so you'll need to turn it off.
N
ote
You can turn off simple file sharing and use advanced NTFS permissions on Windows
X
P Professional only; this option is not available on Windows XP Home Edition.
The Pain Killer To turn off simple file sharing, follow these steps:
1. Click Start | Control Panel. In Control Panel's Classic view, click Folder Options.
2. Click the View tab. Scroll to the bottom of the page and clear the Use Simple File
Sharing option, as shown in this illustration. Click OK.
3. Once you clear the option, you will see that the Sharing tab on any resource now
allows you to configure permissions (that is, you will see a Permissions button), as
shown in the following illustration.
I have configured specific permissions, but users still have full access to my
share.
Operating Systems Affected Windows XP Professional Edition is affected.
Cause Folder and NTFS permissions can be complicated and are beyond the scope of this
book. However, the most likely cause of this problem is that you have given the Everyone
group full control. Since all users are members of the Everyone group, full control
permissions most likely are overriding the permissions you configured for each user.
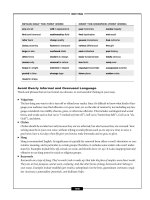
The Pain Killer Open the properties pages for the share and click the Security tab. Remove
all permissions for the Everyone group by selecting the check boxes and clicking Remove, as
shown in Figure 12-2. Keep in mind that this action will stop everyone from accessing the
share, unless you have configured individual permissions for certain users.
Figure 12-2: Removing permissions for the Everyone group in order to conFigure individual
permissions
You can think out of the box with shares.
Windows XP allows you to share resources on your network so that you can have the
flexibility you need. You can share folders, printers, and even your CD and DVD-ROM
drives so that other computers on the network can access those resources. Additionally, a
number of games are made for network play so that multiple users can play a single game
together at different computers. Also, some applications can be shared. This means you install
the application on one computer, share the folder, and then access the application from a
different computer. Some applications, however, do not allow network sharing, so check the
application's documentation for details.
I have shared folders on my computer, but no one can access my computer. I
can access other computers with no trouble.
Operating Systems Affected Windows XP Professional and Home Editions are affected.
Cause If you have shared folders, simple file sharing is in use, and you can access other
computers but no one can access yours, the problem is most likely the Internet Connection
Firewall (ICF). ICF can be enabled on your Internet connection but never on your network
adapter card. If you enable ICF on your network adapter card, users on the network will not
be able to access your computer.
The Pain Killer To turn off ICF on the network adapter card, follow these steps:
1. Click Start | Control Panel. In Control Panel's Classic view, click Network
Connections. Right-click the Local Area Connection, and then click Properties.
2. Click the Advanced tab, as shown in the following illustration. Clear the ICF check
box and click OK.
Aggravations with Internet Connection Sharing
Internet Connection Sharing (ICS) is a cool feature that allows you to share an Internet
connection with other computers on your network. For example, you may have one computer
that is outfitted with a DSL modem. You can share this connection so that other computers on
your network can use the DSL connection.
When you used the Network Setup Wizard to configure your Internet connection, you had the
option to share the Internet connection with other users on your network. If you chose this
option in the wizard, the other computers on your network were configured with the IP
address of the main computer's connection so that Internet Explorer and mail programs could
access the Internet through that shared connection. Overall, ICS works great once you have it
configured; and you are likely to run into only a few problems, which I'll explore in this
section.
I did not set up ICS when I first configured my network, but I want to use it
now. How can I configure it?
Operating Systems Affected Windows XP Professional and Home Editions are affected.
Cause If you did not configure ICS when you first used the Network Setup Wizard, you can
enable it and use it later. See the Pain Killer for instructions.
The Pain Killer To configure ICS after the network is already configured, follow these steps:
1. Click Start | Control Panel. In Control Panel's Classic view, click Network
Connections. Right-click the Internet connection, and then click Properties.
2. Click the Advanced tab. Enable all three of the ICS check boxes, as shown in the
following illustration, and click OK.
3. On the client computers, run the Network Setup Wizard again. You'll see a new screen
that detects the shared connection and asks if you want to use it, as shown in the
following illustration. Choose the Yes option, and complete the wizard. Now ICS will
work on your network.
When I try to enable ICS, a message appears telling me that my user name
and password are not saved for all users.
Operating Systems Affected Windows XP Professional and Home Editions are affected.
Cause When you first configured the Internet connection, you had the option to make your
user name and password for the ISP 'public' for the other users on your computer. If you chose
to keep it private, ICS will not work because no other users can access the connection. If you
see the message shown in Figure 12-3, you need to change the connection's user name and
password so that it is saved for all users.
Figure 12-3: Network Connections user name and password not saved message
The Pain Killer To save your user name and password for use by all users, follow these
steps:
1. Click Start | Control Panel. In Control Panel's Classic view, click Network
Connections. Right-click the Internet connection, and then click Connect.
2. In the Connection window that appears, as shown in the following illustration, choose
the Anyone Who Uses This Computer radio button. Click the Dial button to activate
the option.
When I try to configure a computer for Internet Connection Sharing, I receive
a message telling me there is an IP address conflict.
Operating Systems Affected Windows XP Professional and Home Editions are affected.
Cause If you try to turn on ICS for a computer and you receive the message shown in Figure
12-4, then another computer on your network is configured for ICS. Only one computer on
the network can be an ICS host; in other words, only one computer can share its Internet
connection.
Figure 12-4: Network Connections address conflict message
The Pain Killer To resolve the problem, locate the other shared ICS computer and clear the
ICS sharing options on the Advanced tab of the Internet connection's properties sheets.
Users can disconnect the ICS Internet connection, and I don't want them to be
able to control the connection.
Operating Systems Affected Windows XP Professional and Home Editions are affected.
Cause By default, users can disconnect and control the ICS Internet connection. However, if
you do not want users to be able to access the ICS connection and manage it, you can disable
the option.
The Pain Killer To stop users from controlling the Internet connection, follow these steps:
1. Click Start | Control Panel. In Control Panel's Classic view, click Network
Connections. Right-click the Internet connection, and then click Properties.
2. Click the Advanced tab. Clear the Allow Other Network Users to Control or Disable
the Shared Internet Connection check box, and click OK.
The ICS computer does not dial a connection when a network user needs it.
Operating Systems Affected Windows XP Professional and Home Editions are affected.
Cause By default, ICS will dial a connection (if dialing is required) when a network user
needs the connection. However, if the setting is turned off, the ICS host will not dial.
The Pain Killer To make sure the ICS host dials the connection, follow these steps:
1. Click Start | Control Panel. In Control Panel's Classic view, click Network
Connections. Right-click the Internet connection, and then click Properties.
2. Click the Advanced tab. Enable the Establish a Dial-Up Connection Whenever a
Computer on My Network Attempts to Access the Internet check box and click OK.
ICS dial-up connections are slow.
Operating Systems Affected Windows XP Professional and Home Editions are affected.
Cause ICS enables you to share an Internet connection among several computers. However, if
several people are using the Internet connection at the same time, access will seem slow over
dial-up connections due to traffic.
The Pain Killer The only workaround is to upgrade to a broadband connection, such as DSL
or cable, keep users from accessing the shared connection at the same time, or make sure that
no large file downloads are performed while two or more people are using the connection.
My e-mail does not work with ICS.
Operating Systems Affected Windows XP Professional and Home Editions are affected.
Cause Assuming you are using Outlook or Outlook Express, you must configure the mail
client to get e-mail using a Local Area Connection rather than a direct Internet connection.
The Pain Killer See the mail client's documentation for information about setting up the mail
client to access mail through a Local Area Connection.
No clients can use the ICS computer.
Operating Systems Affected Windows XP Professional and Home Editions are affected.
Cause If ICS is configured but clients cannot access the Internet, it is usually one of two
possible problems:
• The ICS computer is not turned on or the Internet connection is not working. Check
the ICS computer and make sure it is operational and that the connection is working.
• If the connection is working and your clients are configured correctly, the default
gateway address of the ICS computer may be incorrect if you have manually
configured your IP addresses.
If neither of these options is true, try rebooting the computer to clear out any software or
Internet access glitches.
The Pain Killer If you have manually configured or changed the IP addressing information
on the ICS computer, check the IP address properties. The default gateway should be
192.168.0.1.
Pains with Remote Desktop and Remote Assistance
Remote Desktop and Remote Assistance are two new features in Windows XP. Remote
Desktop enables you to connect to a remote computer over the Internet and use the computer
as though you are actually sitting at it. Remote Assistance is similar, but it is used to support
other people and help them solve problems. See the Windows XP Help and Support Center
for setup and configuration information; and if you are having problems, the following
sections explore the issues you are likely to run into.
Remote Desktop
The following Headaches and solutions pertain to Remote Desktop. Remote Desktop is
designed to be an office solution to enable remote users to connect to the LAN and access a
computer that allows remote desktop connections. In addition, it can be used by several users
for collaborative purposes within the network.
N
ote
R
emote Desktop is only available for the Windows XP Professional Edition.
I can't use Remote Desktop.
Operating Systems Affected Windows XP Professional Edition is affected.
Cause In order to remotely connect to a Windows XP Professional computer, you have to
configure the computer to allow a Remote Desktop connection and indicate what users are
allowed to connect to it remotely.
The Pain Killer To configure Remote Desktop, follow these steps:
1. Click Start | Control Panel. In Control Panel's Classic view, click System.
2. Click the Advanced tab and click the Remote Desktop option to enable the feature, as
shown in the following illustration.
3. Click the Select Remote Users button. In the dialog box that appears, click the Add
button and select the users that you want to allow to connect from a remote location. If
the user you want is not available, use the Users option in Control Panel to configure
an account for the user. Every user that connects to your computer via Remote
Desktop must have a valid user account configured on your computer in order to gain
access.
Prevention
I
t is important to keep in mind that a Remote Desktop computer must have an
I
nternet connection that is 'always on' and is designed for corporate computers
where you access the corporate computer over the Internet from a home
computer.
Remote Desktop does not work with ICF.
Operating Systems Affected Windows XP Professional Edition is affected.
Cause Internet Connection Firewall (ICF) does not allow incoming traffic that is not
explicitly requested by a local user, so Remote Desktop traffic is dropped by default.
However, you can configure ICF to allow Remote Desktop traffic.
The Pain Killer To configure ICF to allow Remote Desktop traffic, follow these steps:
1. Click Start | Control Panel. In Control Panel's Classic view, click Network
Connections. Right-click the Internet connection, and then click Properties.
2. Click the Advanced tab and click the Settings button.
3. In the Advanced Settings window, shown in the following illustration, click the
Remote Desktop check box on the Services tab and click OK. Click OK again.
I need to connect to a Remote Desktop computer from a Windows computer
that does not use Windows XP Professional Edition.
Operating Systems Affected Windows XP Professional Edition are affected.
Cause Only Windows XP Professional Edition computers can be configured to provide
Remote Desktop, but any Windows client can be configured to access the Remote Desktop
computer by installing a program available on the Windows XP Professional Edition CD-
ROM.
Prevention
A
lthough Windows XP Home Edition cannot host a Remote Desktop
configuration, it can connect to one by using the Remote Desktop connection
option found in Start | All Programs | Accessories | Communications | Remote
D
esktop Connection. The installation option presented in the following Pain
K
iller, however, is needed for down-level clients, such as Windows 2000,
Windows Me, Windows NT, and Windows 9x.
The Pain Killer To configure a client to access a Remote Desktop computer, follow these
steps:
1. Insert the Windows XP Professional CD-ROM into the CD-ROM drive.
2. On the Welcome screen, choose Perform Additional Tasks, and then choose the Set
Up a Remote Desktop Connection option.
3. Click Next on the Welcome screen that appears.
4. Read and accept the licensing agreement, and then click Next.
5. Enter your name, and choose the option to allow the software to be used only by you
or someone who accesses the computer. Click Next.
6. Click the Install button.
Remote Desktop is slow.
Operating Systems Affected Windows XP Professional is affected.
Cause Depending on your Internet or network connection, Remote Desktop may respond
slowly, considering the amount of information and graphics that must be downloaded to your
computer. However, you can configure Remote Desktop to work more quickly over slow
connections.
The Pain Killer To configure Remote Desktop to work more quickly over slow connections,
follow these steps:
1. Click Start | All Programs | Accessories | Remote Desktop Connection.
2. Click the Options button, and then click the Experience tab that appears.
3. On the Experience tab, shown in the following illustration, click the drop-down menu
and choose the connection speed. Then, clear any desired check boxes concerning
desktop background settings, themes, and so on. The more options you clear here, the
faster the connection is likely to work. When you are done, click OK. Click OK again.
Remote Assistance
Remote Assistance is similar to Remote Desktop, but the difference is that a user sends an
invitation to another user with Windows Messenger, Microsoft Outlook, or Outlook Express
so that a user on the Internet may connect to and configure the computer system. Again, make
sure you check Windows XP Help and Support Center to learn how to use Remote
Assistance.
Tip
R
emote Assistance works on both Windows XP Professional and Home Editions.
I can't create a Remote Assistance invitation.
Operating Systems Affected Windows XP Professional and Home Editions are affected.
Cause Make sure you have enabled Remote Assistance on the Remote tab of System
Properties. Once you have enabled it, follow the steps in the Pain Killer.
The Pain Killer To create a Remote Assistance invitation, follow these steps:
1. Click Start | Help and Support.
2. Click the link in the right side of the window that allows you to get help and support
using Remote Assistance.
3. In the Remote Assistance window, click the Invite Someone to Help You link.
4. As you can see in the following illustration, you have the option to contact the user via
Windows Messenger or by sending an e-mail message. Make your selection and
follow the rest of the steps that appear.
I want to use Remote Assistance, but I don't want the user to be able to control
my computer.
Operating Systems Affected Windows XP Professional and Home Editions are affected.
Cause With Remote Assistance, you can simply talk to someone using Windows Messenger,
or you can allow that user to remotely control your computer and make configuration
changes. If you do not want the user making changes to your computer, see the Pain Killer.
The Pain Killer To stop remote control, follow these steps:
1. Click Start | Control Panel. In Control Panel's Classic view, click System.
2. On the Remote tab, click the Advanced button. Clear the check box that allows the
computer to be controlled remotely, as shown in the following illustration.
Chapter 13: Media Player Headaches
In this chapter, you'll cure…
• Problems with the interface
• Difficulties with music and movie clips
• Aggravations with Media Library
• Problems copying music
• Troubles with Radio Tuner
Windows Media Player 8 is the included version of Media Player that ships with Windows
XP. In the past, Windows Media Player did little more than provide audio CD playback
features; but today, it is a complex program that does all kinds of things. Because of the
multimedia nature of the Internet today and our computing experiences in general, you will
probably use Windows Media Player a lot.
First of all, let me note that you can avoid a number of headaches just by getting familiar with
Windows Media Player and how it works. See Windows XP's Help and Support Center and a
general user book, such as How to Do Everything with Windows XP (Berkeley, CA:
Osborne/McGraw-Hill, 2001), to find out how to use the software. For Headaches and
problem solving, read on.
Configuring the Interface
Windows Media Player provides a default interface, as you can see in Figure 13-1. The
default interface contains the look and features that most people need. However, you can
change the interface in a number of different ways, all of which can be both cool and
headache provoking, depending on your perspective. No worries, though; in this section, we'll
take a look at common interface Headaches you are likely to run into.