Windows XP Headaches-How to Fix Common Problems in a Hurry phần 8 pot
Bạn đang xem bản rút gọn của tài liệu. Xem và tải ngay bản đầy đủ của tài liệu tại đây (993.67 KB, 27 trang )
Figure 13-4: Skin options
The Pain Killer If you are having problems getting connected to the Web site, launch an
Internet connection first, and then try the More Skins option. If you are having trouble
downloading the skins, the problem is most likely due to the quality of your current
connection. You may have success downloading the skin you want at a later time.
Tip
D
ownloads can range in size to 200KB to over a megabyte. Downloading with a modem
will take several minutes or even longer. Always try to download at off-peak usage times,
s
uch as very late at night or early in the morning; you'll tend to have better results then.
I don't know how to manage visualizations.
Operating Systems Affected Windows XP Professional and Home Editions are affected.
Cause Windows Media Player provides visualizations, little programs that give you visual
stimulation while you are playing CD music. In non-techno terms, they are cool to look at
when you listen to music. You can select different visualizations, and you can even download
them from the Internet. However, how to use visualizations may not be readily apparent in the
Media Player interface.
The Pain Killer Here's how to manage visualizations:
• You can choose a different visualization at any time by clicking View | Visualizations
and then choosing the visualization you want from one of the subcategories that
appears.
• You can also download visualizations from Microsoft's Web site. To do this, your
computer must be configured to use an Internet connection (see Chapter 9). To
download visualizations, follow these steps:
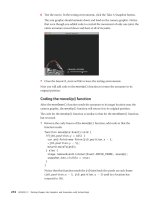
1. Click Tools | Download Visualizations.
2. Click Tools | Options, and then click the Visualizations tab, shown in the following
illustration. Click the Add button to add the visualizations you have downloaded. Note
that you can only remove visualizations that you have added-not the default
visualizations provided by Windows Media Player.
3. If you are having problems with the display of a visualization, select the category from
the visualization list and click Properties. The Properties window, shown in the
following illustration, enables you to select the screen size and the buffer size. Under
most circumstances, the default setting is what you need, but if you are having
problems, try using alternate settings.
Tip
You can also download visualizations for Windows Media Player from third-party Web
s
ites. For example, check out .
I don't want to see the anchor window when I'm in skin mode.
Operating Systems Affected Windows XP Professional and Home Editions are affected.
Cause When you are in skin mode, Windows Media Player displays an anchor window
(shown previously in Figure 13-3) in the lower-right corner of your screen. However, this
anchor window may get on your nerves, so if you want to remove it, you can.
The Pain Killer To remove the anchor window, follow these steps:
1. Click Tools | Options.
2. On the Player tab, shown in the following illustration, clear the Display Anchor
Window When in Skin Mode check box, and then click OK.
Prevention
Take note of the other Player settings here as well; you may find others you
want to change.
Music and Movie Difficulties
One of the main purposes of Windows Media Player is to play audio music, as well as movie
and Digital Video Disc (DVD) clips. Under most circumstances, you don't need to configure
anything. You can insert a music CD into your CD-ROM drive, and Windows Media Player
automatically opens and begins playing the CD. The same is true when you open a movie clip
or start a DVD. However, things do not always work perfectly, so this section helps you with
issues you might face with music and movie playback.
My CD player will not play CD music.
Operating Systems Affected Windows XP Professional and Home Editions are affected.
Cause Most of the time, CD-ROM drives play CD music without any difficulties. However,
there are a few settings that can prevent CD-ROMs from playing CD music. Before
troubleshooting these problems, however, you need to make sure the CD-ROM drive is
working. Try a different CD or an application CD to see if you can open and read the CD-
ROM drive's contents. If the drive seems to be working as it should, except for CD music
playback, then follow the steps in the Pain Killer.
The Pain Killer To get your CD-ROM drive to play CD music, follow these steps:
1. Click Start | My Computer.
2. In the My Computer window, right-click your CD-ROM drive, and then click
Properties.
3. Click the AutoPlay tab. Under Actions, choose the Select an Action to Perform button.
Choose the Play Using Windows Media Player action, as shown in the following
illustration, and then click OK.
4. Next, make sure the device is configured to play CD music. To do this, click Start |
Control Panel. In Control Panel's Classic view, click System.
5. Click the Hardware tab, and then click the Device Manager button.
6. Expand the DVD/CD-ROM Drives category; then right-click the CD-ROM and click
Properties.
7. Click the Properties tab, shown in the following illustration. Move the slider to the
right to set the CD Player Volume to High. If the Enable Digital CD Audio for This
CD-ROM Device is selected, leave it selected. If not, select the check box and click
OK. Close Device Manager.
8. Now open Windows Media Player. Click Tools | Options.
9. Click the Devices tab, shown in the following illustration. Make sure that your Audio
CD drive appears in this window. If it does not, try clicking the Refresh button.
10. If the CD-ROM drive still will not play CDs, go back to the Device Manager CD-
ROM Properties window (see Steps 4, 5, and 6), and click the Properties tab. Clear the
Enable Digital CD Audio for This CD-ROM Device check box, and click OK.
11. If the CD-ROM drive still will not play music, make sure you have tried several CDs.
When you are sure you have tried all of these steps, it's time to get some help from
technical support. Consult your computer documentation for support contact
information.
My system's CD playback does not sound good.
Operating Systems Affected Windows XP Professional and Home Editions are affected.
Cause Windows Media Player uses some automatic settings for playing CD music, which
some users may not like. However, you can change those settings so that the music quality is
set the way you like it. You can do this with a graphic equalizer, just as you would set on a
physical stereo.
The Pain Killer To adjust graphic equalizer settings, follow these steps:
1. Open Windows Media Player and click Now Playing.
2. Click the Show Equalizer button on the top bar, or click View | Now Playing Tools |
Show Equalizer and Settings.
3. The equalizer appears in the Now Playing area, as you can see in Figure 13-5. Adjust
the settings as desired using the slider bars.
Figure 13-5: Windows Media Player
Tip
You can also click the Select View button to view additional settings, such as SRS Wow
E
ffects (for surround-sound settings), Media Information, and other features.
The quality of a video clip I'm playing is poor.
Operating Systems Affected Windows XP Professional and Home Editions are affected.
Cause Windows Media Player uses default settings to govern video playback. If you are
playing a video clip that is stored on your local computer, you are likely to see better quality
playback than if you are playing one being downloaded from the Internet. Online video clips
come to your computer in a streaming format. This means bits and pieces of the video are sent
over the Internet to your computer and assembled by your computer. Glitches in transmission
often interrupt quality, even with broadband connections. While there's not much you can do
about that, you can check Windows Media Player's settings to verify that they are configured
for optimal performance.
The Pain Killer To adjust video playback performance, follow these steps:
1. Open Windows Media Player and start the video clip. Click Now Playing.
2. Click the Graphic Equalizer button and choose Video Settings from the drop-down
menu that appears. Alternatively, you can click View | Now Playing Tools | Show
Equalizer and Settings | Video Settings.
3. The Video Settings options appear, as shown in Figure 13-6. Make any desired
adjustments using the slider bar options.
Figure 13-6: Video Settings options
I am having performance problems with streaming media.
Operating Systems Affected Windows XP Professional and Home Editions are affected.
Cause Streaming media, such as video clips, arrive over the Internet to your computer in a
streaming fashion. This means that your computer assembles bits and pieces of the video and
plays it back to you. Distortion and disruption of video playback can occur for three main
reasons:
• Slow connection speedIf you are using a modem, media streaming will not work
well. There simply is too much data in a media stream for a modem connection to
keep up with. For this reason, the video will play a few seconds and stop for a few
seconds (or even minutes) before continuing. A modem connection cannot download
the data fast enough to keep one continual stream going. There is no workaround for
this problem other than to upgrade to a broadband connection-that is, Digital
Subscriber Line (DSL), cable, and so on.
• Traffic and Web site problemsIf you have a broadband connection, you still may
experience problems with streaming media if there is a lot of traffic or if the Web site
to which you are connected is working slowly.
• Windows Media Player settingsOn rare occasions, some Windows Media Player
settings can keep you from getting the best media stream, and the following Pain
Killer shows you how to check those out.
The Pain Killer To check your video stream settings, follow these steps:
1. In Windows Media Player, click Tools | Options.
2. Click the Performance tab.
3. Under Connection Speed, make sure the Detect Connection Speed option is selected,
as shown in the following illustration. Under Network Buffering, make sure the Use
Default Buffering option is selected. In addition, you should make sure the Video
Acceleration slider is set to Full. Click OK.
I can't play a DVD with Windows Media Player because of a decoder problem.
Operating Systems Affected Windows XP Professional and Home Editions are affected.
Cause DVDs have to have the correct decoder in order to be able to work with Windows XP,
and if you don't have the decoder the DVD needs, you'll need to get it to use the DVD.
The Pain Killer This is a bother, but you'll need to download the correct decoder from the
DVD manufacturer's Web site if it is not available on your computer. Check the DVD
instructions that came with the disk for details.
Media Library Aggravations
Windows Media Player contains something called Media Library that holds audio and video
media. This feature enables you to add music and video clips that you want to keep and view
in the library so that they are available anytime you want to hear or see them. You can copy
CD music and video clips to your computer's hard drive and then place them in the Media
Library. Then, you simply click on the item in Windows Media Player to play it, instead of
having to have the actual CD handy.
Media Library, as you can see in Figure 13-7
, contains an expandable list of categories in the
left pane, and the contents of the selected category in the right pane. You can add and remove
content at any time, and you can also create customized lists of music, called playlists. You
should spend some time working with the Media Library to learn how to use it, and Windows
Media Player Help can be of assistance as well. For particular problems, read on.
Figure 13-7: Media Library
Prevention
A
lthough Media Library is great, you should have good housekeeping skills.
B
ecause audio and video media consume a lot of disk space on your computer,
make sure you regularly delete old items to avoid wasting storage space on
y
our computer.
I can't add CD music to Media Library.
Operating Systems Affected Windows XP Professional and Home Editions are affected.
Cause In order to add music or video to the library, that music must be stored on your hard
drive. In other words, you cannot play a CD and add it to your library without first copying
the CD to your hard drive. Then, you can add it, as explained in the following Pain Killer.
The Pain Killer To add a CD to Media Library, follow these steps:
1. Use the Copy From CD feature to copy the CD to your hard drive. See the next section
if you are having problems copying from CDs.
2. In Media Library, expand the Audio category and select Album. Then click the Add to
Library button, which looks like a plus sign (+), located at the top of the Media Player
window. From the pop-up menu that appears, select Add File. In the Shared Music
folder that appears, select the desired album or browse to the location of the copied
CD. When you find the file you are looking for, select it and click Open. The new
album now appears in the Media Library.
Prevention
When you click the Add to Library button, you also see the Add Currently
P
laying Track option. You can use this option only if the currently playing track
is stored on your hard drive. If you are playing an actual CD in the CD-ROM
drive, this will be grayed out until you save the music to your hard drive.
I accidentally deleted a file from Media Library.
Operating Systems Affected Windows XP Professional and Home Editions are affected.
Cause Media Library works a lot like an e-mail inbox. If you delete an item from Media
Library, it gets stored in the Deleted Items folder. Fortunately, you can retrieve the item from
the Deleted Items folder-unless, of course, you have right-clicked Deleted Items and clicked
Empty Deleted Items, in which case the item is gone for good.
The Pain Killer To remove a listing from the Deleted Items folder, followthese steps:
1. In the left pane of Media Library, expand the Deleted Items category and select All
Deleted Media. Any deleted items then appear in the right pane, as you can see in
Figure 13-8.
Figure 13-8: Restoring listings from the Deleted Items folder
2. Drag the file from the right pane to the Audio Folder or to the Video folder in the left
pane.
I can't figure out how to create a playlist.
Operating Systems Affected Windows XP Professional and Home Editions are affected.
Cause Media Library allows you to create playlists, which are groups of songs, albums, or
even video clips that you can hear or watch as one unit. It's sort of like creating an album of
your favorite songs or a videotape of your favorite video clips. However, the process can be a
little confusing.
The Pain Killer To create a playlist, you must first have media in your library from which to
create the list. Once you have added media to Media Library, follow these steps:
1. In Media Library, click the New Playlist button, located at the top of the Media Player
window.
2. In the New Playlist dialog box, give the playlist a name, and then click OK.
Tip
Make sure you give the playlist a friendly, recognizable name so that you will
remember what is on the list.
3. In Media Library, select the desired songs, albums, or videos in the right pane after
expanding the appropriate category. Click the Add to Playlist button, and from the
pop-up menu select the name of the playlist you want to add the media to.
4. Repeat Step 3 for each category, as necessary, until you have added all of the desired
media.
5. When you are done, you can simply right-click the new playlist and click Play to hear
it.
Tip
You can also drag and drop items from the right pane to the playlist, which makes the
creation of the playlist go much faster.
I can't import/export a playlist from another Windows Media Player.
Operating Systems Affected Windows XP Professional and Home Editions are affected.
Cause Using the File menu, you can export existing playlists for use on different computers
or import playlists from other computers. To perform this action, you use the Export Playlist
option.
The Pain Killer To export a playlist, follow these steps:
1. In Media Library, select the desired playlist from the left pane.
2. Click File | Export Playlist to File.
3. In the Save As window, give the playlist a filename. Note that the playlist is exported
as a Media Playlist file (that is, a file with a .asx, .wax, or .wvx extension). The
playlist is saved, along with all of the media in the list. You can now use the playlist
on Windows Media Player on another computer, or you can send it to someone else by
e-mail.
Prevention
When you export a playlist, keep in mind that the media is wrapped together in
a file. Depending on the playlist, the file can be quite large (even several
megabytes). If you want to e-mail it to someone, consider compressing the file
s
o that it will transfer more quickly.
To import a playlist, follow these steps:
1. Open the File menu and choose Import Playlist to Media Library.
2. Select the playlist you want to import, and then click Open.
Web sites have no access to my Media Library.
Operating Systems Affected Windows XP Professional and Home Editions are affected.
Cause Windows Media Player sets default rights that allow read-only access from other
applications and no access from Internet Web sites. For example, if you want a Web site to
automatically import media to Windows Media Player, the action will not be allowed. This is
the safest option, but if you want to allow Web sites access to Media Library, you can change
the setting.
The Pain Killer To allow Web sites to access Media Library, follow these steps:
1. In Windows Media Player, click Tools | Options.
2. Click the Media Library tab, shown in the following illustration. As you can see,
Internet sites have no access by default, but you can change this setting to Read-Only
Access or Full Access, depending on your needs. Make the change you want, and then
click OK.
Problems Copying Music
Windows Media Player allows you to copy music from a CD to a writeable CD or to the
computer's hard disk. This feature allows music or video to be stored locally on your
computer's hard drive and in Media Library so that you can play the media whenever you
want without having to look for the music on a CD or disk. It's a great feature, and for the
most part trouble free. However, you might run into a few snags, which you'll read about in
this section.
The defaults for the Copy Music feature do not work the way I want them to.
Operating Systems Affected Windows XP Professional and Home Editions are affected.
Cause Windows Media Player sets default behavior for the Copy Music feature. You can
change a number of default settings by accessing the Copy Music tab in Media Player's
Options window.
What is the deal with copied music and copyright?
Copyright violation is, of course, a big deal and something you should be mindful of when
working with copied music. The rules are easy, though, so just keep them in mind:
• You have the right to copy music from a CD to your hard drive so that you can listen
to it in Windows Media Player.
• You have the right to copy that music to a read-write CD or to another portable device,
such as a handheld device using the Windows CE operating system.
• You do not have the right to distribute copied music or burned CDs to anyone else.
Doing so violates copyright law.
• Also, you have a 'one listen rule,' which basically says that you can only listen to one
copy at a time. In other words, you should not use the original and give the copy to a
friend.
The Pain Killer To change the default Copy Music options, follow these steps:
1. In Windows Media Player, click Tools | Options.
2. Click the Copy Music tab, shown in the following illustration. You can change the
default location where copied music is stored (the My Music folder), as well as other
copy settings in the second half of the window. Note the Protect Content check box.
Selecting this box enables Windows Media Player to track copied music in order to
ensure that it is used in a way that does not violate copyright law.
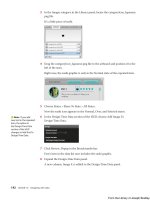
The Get Names feature of Copy Music does not work.
Operating Systems Affected Windows XP Professional and Home Editions are affected.
Cause If you right-click an album name in the Copy Music window, you can choose the Get
Names option which then becomes the Hide Names button. However, in order to get the
names of the tracks, you must have an Internet connection; otherwise you will see a 'Page
Cannot Be Displayed' message, as shown in Figure 13-9
.
Figure 13-9: 'Page Cannot Be Displayed' message
The Pain Killer To solve the problem, launch an Internet connection and try the option again.
The music copying process takes too long or takes up too much disk space.
Operating Systems Affected Windows XP Professional and Home Editions are affected.
Cause The Copy Music feature does take a little time, and audio CD files take up disk space.
Fortunately, you can manage the amount of disk space that is consumed by adjusting the
slider bar on the Copy Music tab to a lower value. However, this will also reduce the quality
of the copied music.
N
ote
I
n most cases, the quality of copied music and video comes down to how much disk
s
pace you are willing to sacrifice. You'll have to strike a balance between your need for
s
torage and your desire for music quality.
The Pain Killer Click Tools | Options, and then click the Copy Music tab to adjust the slider
bar.
Radio Tuner Troubles
Windows Media Player provides a cool Internet radio feature-if you can actually get it to
work. It isn't so much that the Radio Tuner is faulty; it is Internet connections that are the
problem. To use Internet radio very well, you need a broadband connection so that the radio
data can be streamed to you without too many disruptions. (Even with a broadband
connection, you'll probably have some disruptions.) The following sections point out the few
Headaches and solutions you are likely to encounter.
Radio playback is choppy or of poor quality.
Operating Systems Affected Windows XP Professional and Home Editions are affected.
Cause You must have an Internet connection in order to use the Radio Tuner feature, and the
quality of music stream you receive from a Web site over the Internet is dependant on your
Internet connection. I'm afraid that if you are using a modem connection to the Internet, Radio
Tuner is not going to work well for you most of the time. You'll see bursts of good
performance, but as a whole, the dial-up connection will not be able to keep up the necessary
media stream in order to provide you quality playback.
The Pain Killer In this situation, the only workaround is to purchase a broadband connection
to the Internet, such as DSL or cable.
I can't get my stations to play.
Operating Systems Affected Windows XP Professional and Home Editions are affected.
Cause After you have added the stations you want to the My Stations list, they do not play
automatically until you click the green button.
The Pain Killer Click the green button next to the station name (don't click the actual station
name) to start the play process, as you can see in Figure 13-10.
Figure 13-10: Radio Tuner
Chapter 14: Movie Maker Headaches
In this chapter, you'll cure…
• Difficulties with video
• Problems editing video
• Annoyances with audio
• Aggravations with file types
Windows XP provides you with Windows Movie Maker, a free program included with
Windows XP that enables you to edit and digitize analog movies from your camcorder, or edit
movies from your digital camera. Movie Maker is a fun and cool tool, especially considering
the fact that it is free, and it provides you with an easy way to create video clips that you can
e-mail to friends. Or, you can burn movies onto a CD for safe storage-which is one of my
favorite features of the product.
However, I do not live in Movie Maker lala land, and let me be the first to tell you that Movie
Maker is not perfect. It has some difficult annoyances, and the simple truth is that there are
other video editing software packages on the market that are better and easier to use. The
downside of that is they can be expensive. So, use Movie Maker, explore it, have fun-but
remember, if you want to get serious about movie editing, you'll probably outgrow Movie
Maker fairly quickly. In this chapter, you can explore the Movie Maker headaches you are
most likely to experience and learn how to solve them-or at least how to get around them!
Prevention
L
ike all chapters in this book, I assume you are already working with Movie
Maker and need some extra help. Since this is the case, this chapter does not
f
unction as a tutorial. If you need to learn more about Movie Maker, read a
g
ood Windows XP book and check the Windows XP Help and Support Center
f
iles.
Difficulties with Video
Windows Movie Maker is a video editing tool, so in order to actually use the software, you
have to provide it with some video. Sounds easy enough, but the way can be difficult. Movie
Maker can work with either digital video that comes from a digital camera connected to your
computer or with analog video from a camcorder that you can connect to your computer,
typically with a special video card that allows analog audio and video input-otherwise known
as a capture device. The following Headache sections explore the problems you are likely to
experience.
Movie Maker doesn't recognize my capture device.
Operating Systems Affected Windows XP Professional and Home Editions are affected.
Cause Windows Movie Maker automatically recognizes most capture devices. When you
start playing a movie, you can open Movie Maker and see the movie appear in the monitor
area, as you can see in Figure 14-1. However, Windows Movie Maker may have trouble with
some devices and no matter how much you cry and scream, Movie Maker will not see the
video playing.
Figure 14-1: Windows Movie Maker
The Pain Killer In these cases, the best way to solve the problem is to use the capture
device's software that came with the capture device. Capture the movie that you want and
save it in a file type that is supported by Movie Maker, then (in Movie Maker) click File |
Import and import the movie.
Tip
Movie Maker can read most all movie, video, and picture file formats, including MPEG,
MPG, MIV, MPA, AVI, WMV, WAV, SND, AU, MP3, BMP, JPEG, GIF, and several
others.
Movie Maker works very slowly.
Operating Systems Affected Windows XP Professional and Home Editions are affected.
Cause Movie Maker works with graphics and sound files, which consume a lot of system
resources. If your Windows XP system is low on system resources, such as RAM or processor
speed, you'll notice that Movie Maker will work more slowly.
The Pain Killer The only solutions are to make sure you have all other applications closed
when Movie Maker is running and to upgrade your computer's hardware if necessary. Movie
Maker's minimum requirements are a 300 MHz processor and 64MB of RAM. Of course,
systems that have better processor speed and more RAM will perform much better.
I don't know what capture device I need.
Operating Systems Affected Windows XP Professional and Home Editions are affected.
Cause If you want to use analog data on your computer, such as movies from a VCR tape or a
camcorder, you must have a capture device, which is typically a video card with RCA ports so
that you can connect a VCR/camcorder to it.
The Pain Killer You'll need to shop around for the kind of video card you might want, but
make sure the card is compatible with Windows XP. Capture cards tend to be expensive, and
you might expect to pay anywhere from $100-300 for the card.
I upgraded to Windows XP and now my capture device does not work.
Operating Systems Affected Windows XP Professional and Home Editions are affected.
Cause If you upgraded from a previous version of Windows, particularly 9x or Me, your
capture device may not work the way it used to under the old operating system. Typically, all
you need is an updated driver for the card.
The Pain Killer In order to obtain an updated driver for the capture device, you'll need to
visit the manufacturer's Web site to see if a driver for Windows XP is available. If so, you can
download the driver and install it on your system. See Chapter 5 to learn more about driver
installation.
I can't copy or record a commercial movie.
Operating Systems Affected Windows XP Professional and Home Editions are affected.
Cause Commercial movies found on VHS or DVDs have a copy protection feature that
prevents you from copying them. It is not legal to copy a commercial movie into Movie
Maker.
When I record, I cannot hear the audio.
Operating Systems Affected Windows XP Professional and Home Editions are affected.
Cause During the recording process, Windows Movie Maker does not provide you the ability
to hear the movie. This is a not a problem, but rather just the way the program works. Once
recording is completed, you play back the movie and hear it. However, in most cases, you can
still hear the movie during recording by listening to your computer's speakers, since the sound
card can still provide output.
The Truth About Capture devices
I've used Movie Maker since it first appeared in Windows Me and now in XP with a number
of different devices, and I'll be perfectly honest with you-I've had a lot of problems with
interoperability between capture devices and Movie Maker. Sometimes it seems to work and
sometimes not. The easiest workaround is to use the software that comes with your capture
device. You can capture the video, save to a common file format, such as AVI, and then use
the File | Import feature to import the movie into Movie Maker. You can then edit and create
your movie from there.
I'm having problems with my video capture device, or I receive a message
telling me that the device is already in use.
Operating Systems Affected Windows XP Professional and Home Editions are affected.
Cause This problem can occur when another program is using the video capture device, or
when the movie is not recognized by Windows Movie Maker.
The Pain Killer First, make sure that no other programs are using the capture device. Then,
click File | Record. In the Record window, shown in Figure 14-2, check the drop-down menus
to make sure that the correct device is selected and the recording options are correct. You can
adjust these settings as needed, then click Record and try again. If you continue to have
problems, check the camera manufacturer's Web site for information about interoperability
with Movie Maker.
Figure 14-2: Record window
Problems Editing Video
Once you get your movie recorded or imported, you can then use Movie Maker to edit the
video. Once you get the hang of how Movie Maker works, editing movies is not too difficult.
However, there are certainly some problems, or at least aggravations, you may run into.
Check out the following sections for help.
I have imported a movie, but clips are not created.
Operating Systems Affected Windows XP Professional and Home Editions are affected.
Cause Under the default configuration, Movie Maker automatically creates clips for you so
that the movie is easier to work with and edit. However, there is a setting that disables this
feature so you'll need to check it out.
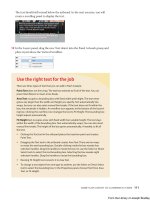
The Pain Killer In Movie Maker, click View | Options, as you can see in Figure 14-3. On the
Options page, ensure that the Automatically Create Clips check box is selected.
Figure 14-3: Options page
I can't create a trim point.
Operating Systems Affected Windows XP Professional and Home Editions are affected.
Cause Windows XP enables you to trim clips so that you can remove dead spots or portions
of the movie that are boring. You can create and end a trim point by clicking the Clip menu
and selecting Set Start Trim Point. However, if the options here are grayed out, then you need
to add the clip to the storyboard/timeline before you can trim it.
The Pain Killer To add a clip to the storyboard/timeline, follow these steps:
1. In the Preview area, select the clip that you want to trim and click Clip | Add to
Storyboard/Timeline. Or, you can just drag the clip to the storyboard/timeline, as you
can see in the following illustration.
2. Click the Clip | Set Start Trim Point to start the trim point and use the same menu to
set the end trim point as needed.
Trimming seems to throw away the pieces of the movie I want.
Operating Systems Affected Windows XP Professional and Home Editions are affected.
Cause Trimming can be a little confusing, and if Movie Maker seems to be throwing away
the trimmed portions that you want, you are probably setting your beginning and ending trim
points incorrectly.
The Pain Killer When you set the beginning and ending trim points, everything outside of
this area is discarded. In other words, the beginning and ending trim points keep the video
inside of them and discard the rest. If you are having problems trimming clips, consider using
a practice clip until you get the hang of the process.
I can't split a clip.
Operating Systems Affected Windows XP Professional and Home Editions are affected.
Cause Clips can be split in two at the desired split point in order to make the clips easier to
work with. To split the clip, however, you have to play the clip in the monitor window and
choose the point at which you want to split the clip.
The Pain Killer To split the clip, select the clip that you want to split and press the Play
button in the monitor. When the clip reaches the point where you want to split it, press the
Split Clip button, or you can press CTRL+SHIFT+S on your keyboard. The clip is split and
the new clip now appears in the window, as you can see in Figure 14-4.
Figure 14-4: Audio Levels window
I can't combine two clips.
Operating Systems Affected Windows XP Professional and Home Editions are affected.
Cause Just as you can split a clip, you can also combine clips so that they function as one
clip.
The Pain Killer In the Collections area, select the first clip and hold down the SHIFT key on
your keyboard, and then select the second clip. Click Clip | Combine to combine the two
clips.
I can't create a transition.
Operating Systems Affected Windows XP Professional and Home Editions are affected.
Cause When you place clips on the storyboard/timeline, you can create transitions between
the clips so that the clips fade into each other instead of looking choppy when you play the
movie. To create the transitions, you use the storyboard/timeline area.
The Pain Killer To create a transition, follow these steps:
1. In the film workspace at the bottom of the window, click the Timeline view.
2. Between the two clips where you want to make the transition, choose the transition on
the right side of the two clips, and then drag the transition so that the clip overlaps the
previous clip, as you can see in the following illustration. The overlapping area that
you see is the transition area where one clip will fade into the next.
Annoyances with Audio
Windows Movie Maker allows you to mix audio with your video. For example, let's say that
you shoot some video of a family reunion. You can mix a song into the background when you
create the movie, or you can even create narration if you like. To include audio in your video,
you must use the File | Import feature to import the audio that you want to use. If you want to
record narration, you can do that directly from the Move Maker interface, assuming your
computer is outfitted with a sound card and microphone. Overall, using audio is easy, but the
next three Headaches point out the trouble you might run into.
I can't import an audio file.
Operating Systems Affected Windows XP Professional and Home Editions are affected.
Cause In order to import a sound file, the file has to be stored in a supported audio file
format.
The Pain Killer Use a supported sound file, such as WAV, SND, AU, AIF, AIFC, AIFF,
WMA, or MP3.
I can't record narration.
Operating Systems Affected Windows XP Professional and Home Editions are affected.
Cause To record narration, make sure your sound card and microphone are working, and then
follow the steps in the Pain Killer.
The Pain Killer Follow these steps to record narration:
1. In the workspace area, click the Storyboard button, and then click the Microphone
icon.
Prevention
I
f you are working in Timeline view, you cannot click the Microphone
icon. Make sure you switch to Storyboard view.
2. In the Record Narration Track, you see the device you will use, shown in the
following illustration. Click Change, if necessary. Otherwise, adjust the record level
and click Record.
3. As you are recording, you will see the movie playing in the monitor area so that you
can synchronize your narration with the movie events.
Tip
While you are recording your narration, you may be able to hear the original movie
s
oundtrack. This may get in the way of your narration, so you can simply click the Mute
Video Soundtrack check box, seen in the previous illustration. This will prevent you from
hearing the movie soundtrack while you are recording your narration.
Audio levels on the movie track and my narration are not good.
Operating Systems Affected Windows XP Professional and Home Editions are affected.
Cause Once you record a narration track, you may need to adjust the levels in the movie
soundtrack and your narration so that the mix sounds good.
The Pain Killer To adjust the levels of the sound, click Edit | Audio Levels. In the Audio
Levels window that appears, shown in the the following illustration, move the slider bar
closer to the video track to hear more of the original video sound or move the level to the right
to hear the narration more clearly. You may need to try different settings to find the one that is
right for you.
Aggravations with File Types
When you get ready to save your movie, you can click the File | Save As, or File | Save
Movie. You'll quickly see that you can only save your movie as a Windows Media Video
(WMV) file. This means that applications must be able to read WMV files in order to play
them. This is a serious aggravation because only Windows computers will be able to play
your movies. In many cases, this might not be a big deal, but if you want to trade video files
with someone using a Macintosh computer, you might have problems. I have found this to be
an aggravation since it is easier to use movie files that are saved in a more universal file
format, such as an AVI. However, there isn't anything you can do about this issue. Not very
comforting, I know, but I thought I would point this aggravation out.
Chapter 15: Tools and Utility Headaches
In this chapter, you'll cure…
• Problems with Windows XP tools
• Aggravations with utilities
Windows XP contains a number of helpful tools and utilities that configure all kinds of
operating system features and even help you solve problems. The problem is, those tools and
utilities can sometimes be as much of a headache as the issue you are trying to resolve. The
tools and utilities in Windows XP all have very specific functions and purposes, and using
them can even require a little help from the Windows XP Help and Support Center. Overall,
the tools and utilities are easy to use, but you may run into some specific snags along the way.
So, in this chapter I've included an assortment of Headaches and Pain Killers on a number of
different Windows XP tools and utilities. This chapter serves as a 'catchall' for issues that do
not naturally fit into other chapters, so you can expect the Headaches and Pain Killers you see
here to vary a lot. Okay-ready to solve those nagging problems? Then let's get started!
I can't get my computer to play any sound.
Operating Systems Affected Windows XP Professional and Home Editions are affected.
Cause In order for your computer to play any sound, including CD music or Windows event
noises, your computer must have a sound card that is installed and working. If your computer
has a sound card installed but it does not seem to work, you probably need an updated driver.
See Chapter 5 for more information about driver installation and management. If the driver is
new or you know the sound card once worked on the same computer, you probably need to
check your volume controls-the sound may have been muted somehow.
The Pain Killer To check the volume controls, follow these steps:
N
ote
The following steps assume you are using the Classic view of Control Panel. If you are
not sure if you are using the Classic view of Control Panel, click Start | Control Panel.
I
n the left window pane, click the Switch to Classic View option.
1. Click Start | Control Panel | Sounds and Audio Devices.
2. On the Volume tab, shown in the following illustration, make sure the volume is
turned up and the Mute option is not checked. You can also check your speaker
volume by clicking the Speaker Volume button. Click OK when you are done.
Tip
You may find it helpful to have a Volume Control icon in your notification area so you
can easily adjust the sound volume. Just click the Place Volume Icon In the Taskbar
check box on the Volume tab and click OK. Also, click the Advanced button to check the
mixer settings.
My microphone does not work.
Operating Systems Affected Windows XP Professional and Home Editions are affected.
Cause Microphones work with the sound card on your computer and plug into a microphone
jack on that sound card. Before your microphone can work, you must ensure that the sound
card itself is working (see the first Headache in this chapter). If the sound card is working but
the microphone does not work, make sure the microphone is plugged into the correct port.
When you are sure it is, you may just need to adjust the microphone volume.
The Pain Killer To check the microphone volume configuration, follow these steps: