Windows XP Headaches-How to Fix Common Problems in a Hurry phần 9 pptx
Bạn đang xem bản rút gọn của tài liệu. Xem và tải ngay bản đầy đủ của tài liệu tại đây (940.84 KB, 27 trang )
The Pain Killer To change the date and/or time, follow these steps:
1. Right-click the time in your notification area and click Adjust Date/Time, or click
Start | Control Panel, Date and Time.
2. On the Date and Time tab, shown in the following illustration, adjust the date and time
as necessary, and verify that the time zone is correct. Click OK.
My computer does not automatically adjust for daylight savings time.
Operating Systems Affected Windows XP Professional and Home Editions are affected.
Cause If you live in an area where daylight savings time is in use, you can configure
Windows XP to automatically adjust the time when daylight savings time is in use.
The Pain Killer To automatically adjust for daylight savings time, follow these steps:
1. Right-click the time in your notification area and click Adjust Date/Time, or click
Start | Control Panel, Date and Time.
2. On the Time Zone tab, click the Automatically Adjust Clock for Daylight Savings
Changes check box, as shown in the following illustration.
I want my computer to automatically run Disk Cleanup, or automatically run
another utility.
Operating Systems Affected Windows XP Professional and Home Editions are affected.
Cause Windows XP contains a Scheduled Task feature where you can configure utilities or
even programs to run at a certain time. For example, you can configure utilities like Disk
Cleanup to run every week or so in the middle of the night. This keeps your computer clean
but does not waste your time doing so. You can configure a Scheduled Task with the help of a
wizard.
The Pain Killer To configure a scheduled task, follow these steps:
1. Click Start | Control Panel | Scheduled Tasks.
2. In the Scheduled Tasks folder, click the Add Scheduled Task option. The wizard's
Welcome screen appears. Click Next.
3. In the Program window, choose the program that you want to automatically schedule,
as shown in the following illustration, and click Next.
4. In the Perform Task window, you can choose to perform the task daily, weekly,
monthly, one time only, when the computer starts, or when you log on. Make a
selection by clicking the appropriate radio button and click Next.
5. In the Time and Day window, shown in the following illustration, configure the Start
time and day that you want the task to run and then click Next.
6. Enter your user name and password and click Next.
7. Click Finish. The new task now appears in the Scheduled Tasks window. You can add
more tasks by repeating these steps.
Prevention
I
f you want to stop using a scheduled task, just right-click it in the Scheduled
Tasks folder and click Delete. You can also override the schedule at any time by
right-clicking the task and clicking Run.
A scheduled task does not run.
Operating Systems Affected Windows XP Professional and Home Editions are affected.
Cause If a scheduled task does not run when it is supposed to, there are a few things you need
to check.
The Pain Killer Check these items:
1. Was the computer turned on when the task was supposed to run? Will the task run at
all? Try running the task and see if it will work.
2. Open the Scheduled Tasks folder and right-click the scheduled task that did not run.
Click Properties.
3. On the Task tab, shown in the illustration to the right, make sure the Enabled check
box is selected.
4. On the Schedule tab, make sure that the time and date are correct.
5. Click the Settings tab, shown in the illustration to the right. Make sure that none of
these settings are overriding the way you want the scheduled task to behave (such as
the Idle Time requirement or battery power option). When you are done, click OK.
6. Make sure that you do not have multiple tasks scheduled to run at the same time.
Some tasks, such as Disk Cleanup and Disk Defragmenter, will not run correctly if
they do not have exclusive drive access. Schedule the tasks to run at different times.
7. If you are connected to a Windows 2000/.NET domain (a large Windows network),
your network administrators may have policies in place that prevent your computer
from running scheduled tasks. Check with a network administrator for details.
8. Finally, if you are not logged on at the time a scheduled task is supposed to run, the
task will still run but simply not be visible (since you are not the logged-on user).
Check the Status column in the Scheduled Tasks window to see if the task actually
ran. The Status column will tell you if the task ran, or give you some indicator as to
why not if it didn't.
Disk Defragmenter does not completely defragment my hard drive.
Operating Systems Affected Windows XP Professional and Home Editions are affected.
Cause Disk Defragmenter is a great tool that defragments your hard disk and helps Windows
XP run faster. However, Disk Defragmenter cannot defragment your drive completely. Some
fragmentation is normal and you should not see it as a problem.
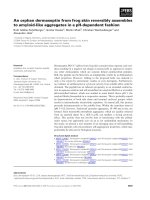
The Pain Killer First of all, do not worry if disk defragmenter leaves some fragmented files.
This is normal. As you can see in Figure 15-1, a newly defragmented disk on my computer
still has fragmented files. If you think there are too many files still fragmented, run Disk
Defragmenter several times in a row, which sometimes further reduces fragmentation.
Figure 15-1: Disk Defragmenter may leave some files fragmented.
Disk Defragmenter stops working before it is finished.
Operating Systems Affected Windows XP Professional and Home Editions are affected.
Cause In order for Disk Defragmenter to work, it must have exclusive access to your disk.
This means no other programs should be running when Disk Defragmenter is trying to work.
The Pain Killer Close all programs and close all items in your notification area (antivirus
programs too). Turn off your Screen Saver. Then, allow Disk Defragmenter to run with no
interruptions.
Error- checking stops working.
Operating Systems Affected Windows XP Professional and Home Editions are affected.
Cause The Error-checking tool, which you can find on the Tools tab of the hard disk's
properties sheets, checks your computer's hard disk for file system errors and surface sector
problems. The Error-checking tool takes some time to run, depending on the size of your
computer's hard disk, and must have exclusive access to the disk in order to work.
The Pain Killer To get error-checking to work as it should, you need to close all programs
and close all items in your notification area. Make sure you have closed any antivirus or third-
party disk management tools before running error-checking.
I need to easily move files and/or settings from one computer to my XP
computer.
Operating Systems Affected Windows XP Professional and Home Editions are affected.
Cause Getting a new computer can be a really exciting time, but the problem is moving all
your files and trying to get the new computer to work the way your old one did. With this
thought in mind, Windows XP provides a Files and Settings Transfer Wizard, which is an
easy way to move files from one Windows computer to your new Windows XP computer.
What does 'exclusive disk access' really mean?
Some utilities, particularly disk management tools such as Error-checking and Disk
Defragmenter, cannot work well if they do not have exclusive access to the disk. This means
that no other programs can access the hard disk. For example, let's say that error-checking is
running and you use a program to save a file. That save action writes data to the hard disk at
the same time error-checking is trying to fix problems. This write action is seen as an
interruption and error-checking may stop working. For this reason, close all programs and
make sure that any antivirus or disk management tools are closed, since these programs
regularly access the computer's hard disk.
The Pain Killer To use the Files and Settings Transfer Wizard, follow these steps:
1. On the computer that you want to move the files and/or settings from, click Start | All
Programs | Accessories | Files and Settings Transfer Wizard if the computer is a
Windows XP computer. If it is not, insert your Windows XP CD-ROM into the
computer's CD-ROM drive and click Perform Additional Tasks, then click Transfer
Files and Settings.
Tip
You can transfer settings from Windows 9x, Me, NT, and 2000 computers using
the wizard on the Windows XP CD-ROM.
2. The wizard appears. Click Next on the Welcome screen.
3. In the Which Computer Is This window, click the Old Computer radio button, shown
in the following illustration, and click Next.
4. The wizard prepares for the next step. In the Select a Transfer Method window, shown
in the following illustration, you can transfer the files and settings using a direct cable
connection or a removable disk (floppy, zip, and so forth), or use another method such
as a network share. Make a selection and click Next.
5. In the What Do You Want to Transfer window, shown in the following illustration,
you can choose to transfer settings only, files only, or both files and settings. If you
want to select custom options, click the Let Me Select a Custom List check box and
click Next.
Prevention
D
o not move your Windows folder using this process! This will move all
of your data and applications to the new system, which is not what you
want! Use this wizard to move files and settings only.
6.
7. If you chose the Custom option, shown in the following illustration, you can use this
window to add settings, folders, and files to the list that you want to transfer. When
you are done, click Next.
8. The files and settings are collected and transferred according to the method that you
selected. Click Finish.
9. Now that you have created the transfer file, your next step is to run the wizard on the
Windows XP computer where you are transferring the files and settings. Click Start |
All Programs | Accessories | System Tools | Files and Settings Transfer Wizard.
10. Click Next on the Welcome screen.
11. On the Computer screen, click New Computer.
12. In the Windows XP CD window, you can click the I Don't Need a Wizard Disk option,
since you have already collected your settings from the old computer. However, if you
had trouble using the Windows XP CD on the old computer, note here that you can
create a wizard floppy disk to use instead, as you can see in the following illustration.
13. In the next window, choose the location of the files you are importing (disk, direct
cable, network share, and so forth) Click Next.
14. The transfer takes place. Click Finish when the wizard is done.
I think I may have unsigned digital files on my computer.
Operating Systems Affected Windows XP Professional and Home Editions are affected.
Cause In order to make sure the files on your computer are safe and are from appropriate
sources, Windows XP keeps track of the digital signature on the files. If you think you may
have some unsigned files, or if you just want to check them to make sure they are signed, you
can use the File Signature Verification utility.
The Pain Killer To run the File Signature Verification utility, follow these steps:
1. Click Start | All Programs | Accessories | System Tools | System Information.
Tip
You can also access System Information by clicking Start | Run and typing
M
sin
f
o32 and clicking OK.
2. In the System Information window, click Tools | File Signature Verification Utility.
3. Click the Start button to run the utility.
N
ote
You can also click the Advanced button in order to scan a specific folder or configure
logging options. You can explore these settings and see if you want to try them out.
I am having problems with DirectX.
Operating Systems Affected Windows XP Professional and Home Editions are affected.
Cause DirectX is a technology that governs how video and sound function on your computer
with games and other multimedia applications. If you are having problems with DirectX
functionality, you will need to check your Windows XP documentation to learn more about
DirectX versions and possible troubleshooting information. However, there is also a DirectX
Diagnostic tool that can be very helpful in diagnosing the problem.
The Pain Killer To use the DirectX Diagnostic tool, follow these steps:
1. Click Start | All Programs | Accessories | System Tools | System Information.
2. In the System Information window, click Tools | DirectX Diagnostic Tool.
3. The tool runs a check on your system, and then gives you a number of tabs that
contain information and options about DirectX, as you can see in the following
illustration. Browse through the tabs and look for any problems or suggestions in the
Notes section of each one.
System Restore does not work.
Operating Systems Affected Windows XP Professional and Home Editions are affected.
Cause System Restore is a feature that enables you to return your computer to an earlier time
in the event that something goes wrong and a new configuration causes a bunch of problems.
System Restore periodically creates a system checkpoint. In the event that you need to restore
your computer to an earlier time, the checkpoint is used to reconfigure your system and return
it to a normal operating state. It is a very handy tool that should be available to you at all
times.
If System Restore does not seem to be working, you need to turn it on.
The Pain Killer To turn on System Restore, follow these steps:
1. Click Start | Control Panel | System.
2. Click the System Restore tab, shown in the illustration to the right. Make sure the Turn
Off check box is not selected.
3. Click the Settings button for the desired drive. In the Settings window, make sure you
are allowing plenty of disk space for System Restore to work. By default, the
Maximum setting uses 12 percent of your disk space to store checkpoint information,
as shown in the illustration to the right. I recommend leaving the setting at Maximum.
I can't back up data.
Operating Systems Affected Windows XP Professional is affected.
Cause Windows XP Professional includes a Backup utility that can help you back up
information on your computer. You can store the backup job in a safe location, such as on a
CD or network share. In the event of a failure, you can use the backup job to restore data
when the computer is functional again.
The Backup feature is not available on Windows XP Home Edition, but it is found in System
Tools in Windows XP Professional. The Pain Killer gives you a walkthrough of the utility.
The Pain Killer To use the Backup utility, follow these steps:
1. Log on with an administrator account and click Start | All Programs | Accessories |
System Tools | Backup.
2. The Backup Wizard appears. Click Next on the Welcome screen.
3. Choose to back up files and settings and click Next.
4. In the What to Back Up window, you can choose to back up different items, as shown
in the following illustration, or you can have the wizard let you specifically choose
what to back up. Make a selection and click Next.
5. If you chose the option in Step 4 to select what you want to back up, a selection
window appears, as shown in the following illustration. Make your selection and click
Next.
6. Choose a location and name for your backup job (such as a CD-RW drive or a
network location). Click Next.
7. Click Finish. The Backup Progress window appears, as you can see in the illustration
to the right. When the backup is complete, click Close.
Chapter 16: Performance Headaches
In this chapter, you'll cure…
• Problems with Windows XP performance
• Issues with application performance
• Aggravations with printing performance
• Difficulties with laptops and Windows XP
Windows XP, like all computer systems, can be affected by performance problems. In broad
terms, 'performance problems' simply means that Windows XP or some application or process
does not work fast enough or does not work very well. As a general rule, if your computer
exceeds the Windows XP installation requirements, you will probably not have too many
performance problems. However, depending on the kinds of applications you run and things
you want to do with Windows XP, you may run into a number of the Headaches presented in
this chapter.
Tip
K
eep in mind that there are a number of third-party programs that can help your
computer run more efficiently, such as Norton Utilities. You might consider investing in
one of these programs to help you optimize your computer.
Windows XP Performance Problems
In this section you'll take a look at the performance problems you are most likely to
experience with Windows XP. As you'll soon see, many of the issues have to do with the
amount of RAM and processor speed available on the computer. If you purchased your
Windows XP computer directly from the computer manufacturer, your computer most likely
exceeds the installation requirements of Windows XP. If you upgraded to Windows XP from
Windows 2000, Me, or 98, you are much more likely to experience performance problems.
Check out the following Headaches to learn more!
My computer runs too slowly.
Operating Systems Affected Windows XP Professional and Home Editions are affected.
Cause A slow-running computer is usually caused by one or two things-a processor that
cannot keep up with the demands of the operating system or not enough RAM. According to
Microsoft, your computer should have at least a 233 MHz processor and at least 64MB of
RAM to run Windows XP. But I don't mind telling you, that is the bare-bones minimum.
Your computer will limp along using Windows XP with this processor and amount of RAM.
As a point of recommendation, you really should have at least a 300 MHz processor and
128MB of RAM for better performance. For the best performance, have more. I have written
this book on a Windows XP Professional computer that has a 1.6 GHz processor and 256MB
of RAM-and it jams! I also use another computer with Windows XP Home Edition that has a
400 MHz processor with 256MB of RAM, and there is a noticeable performance difference
between the two systems-so, the more the better.
The point is simply this: You must have enough RAM and a processor that can keep up. If
you barely meet the requirements, there are things you can do to help Windows XP, but you
might want to consider some hardware upgrades if you want things to work really well.
The Pain Killer To check out your processor and amount of RAM, follow these steps:
N
ote
The following steps assume you are using the Classic view of Control Panel. If you are
not sure if you are using the Classic view of Control Panel, click Start | Control Panel.
I
n the left window pane, click the Switch to Classic View option.
1. Click Start | Control Panel | System.
2. On the General tab, shown in the following illustration, you'll see the processor speed
and amount of RAM towards the bottom of the tab.
Tip
I
f you are thinking about upgrading your RAM and processor, you'll need to get in touch
with a quality computer service center or store in your area. Check your local yellow
p
ages to find a location and ask around for advice. But beware-it is often less expensive
to simply buy a new computer than to completely upgrade your RAM and processor!
My computer once worked great, but opening and closing files now takes a
long time.
Operating Systems Affected Windows XP Professional and Home Editions are affected.
Cause If your computer takes a long time to open or close files, your hard disk is probably
fragmented. Fragmentation is a normal process that occurs over time as files are saved,
resaved, opened, and deleted. Fragmentation causes different portions of the file to be stored
in different places on the hard drive, which makes the opening and closing of the file take
longer.
The Pain Killer Run the Disk Defragmenter utility, found in Start | All Programs |
Accessories | System Tools | Disk Defragmenter. See Chapter 6
to learn more about hard disk
problems.
My computer barely has enough RAM, but I cannot upgrade.
Operating Systems Affected Windows XP Professional and Home Editions are affected.
Cause If you know that your computer really does not have enough RAM, but upgrading is
not an option, there are a few things you can do that can help conserve RAM so that you can
still use Windows XP. Keep in mind that RAM, which is random access memory, enables
your computer to run internal processes and applications. More RAM means your computer
can do more in a faster way. Less RAM means that your system and applications must fight
over what is available. Still, there are a few things you can do to make sure Windows XP is
conserving RAM and using what it has in the best possible way.
The Pain Killer To conserve RAM, follow these steps:
1. First, log on with an administrator account, then click Start | Control Panel | System.
2. Click the Advanced tab. You see three sections, shown in the following illustration.
Under Performance, click the Settings button.
3. On the Visual Effects tab in the Performance Options window, shown in the following
illustration, click the Adjust for Best Appearance radio button. This will cause
Windows XP to lose most of its cool, new look, but it will save RAM and processor
cycles because Windows XP will not have to generate all of those visual effects for
you. On a system that is limping along, though, this setting will help you.
4. Click the Advanced tab, shown in the following illustration. Make sure that the
Programs button is selected for both Processor Scheduling and Memory Usage.
5. Under Virtual Memory on the Advanced tab, click the Change button. You see the
Virtual Memory tab, shown in the following illustration. Virtual memory allows
Windows XP to use a portion of your computer's hard disk to store memory data when
RAM is running low. You should let Windows XP manage these settings, so make
sure that that the System Managed Size radio button is selected. Click OK twice to
save any changes you have made.
The Truth About Virtual Memory
Maybe you have a computer friend who has said something like, 'Hey dude, I pump up my
computer's virtual memory settings and make things run a lot faster-with less RAM!' Sound
right? Wrong! Here's what virtual memory does. Let's say you have three applications open,
named 1, 2, and 3. That's a lot of data for Windows XP to have to keep in RAM. If you are
using application 3, Windows XP may write the memory data for 1 and 2 onto your
computer's hard disk until it is needed in order to free up more RAM. When you need
application 1 or 2 again, it will read that data from the hard disk back into memory. So,
Windows XP has to do a lot of reading and writing to the disk when a lot of virtual memory is
required-which is slower than real RAM. Simply put, virtual memory is a way that Windows
XP helps RAM, but it is in no way a replacement for physical RAM. You will not see
performance gains by boosting the amount of virtual memory that is used.
Prevention
Windows XP does a good job of managing its virtual memory settings. If you
change them yourself, you may experience performance problems-it is always
best to leave these settings alone!
Sometimes my computer works well and other times it seems very slow.
Operating Systems Affected Windows XP Professional and Home Editions are affected.
Cause If Windows XP seems to work well at times and is sluggish at other times, there is
probably some program that is taking up too much RAM or processor cycles, slowing
everything down. Is there a new program that you have installed? Has anything changed?
These are important questions to ask yourself. In the meantime, you can also use a handy tool
called Windows Task Manager to see if you can figure out what is going on.
The Pain Killer To use Windows Task Manager, follow these steps:
1. On your keyboard, press CTRL+ALT+DEL. This means to press the CTRL key, the
ALT key and the DELETE key at the same time.
2. The Windows Task Manager appears. Click the Performance tab, shown in the
illustration. The Performance tab tells you how much of the CPU is in use
(percentage) as well as the amount of RAM. If the computer is running slowly, this
can quickly tell you if the problem is a RAM problem or a CPU problem.
3. Click the Processes tab. As you can see in the illustration to the right, the Processes
tab shows what programs are using how much of the CPU and the memory. You can
inspect this list and look for anything that seems much higher than the others. This
may alert you to the program that is causing the problems. If you find the program,
you may have to do a little homework to decipher its name under Image Name. Once
you do, though, you can stop using that program if necessary. Also, you can select the
program in the Processes tab and click the End Process button to make it stop working
immediately.
Prevention
The End Process option can be helpful, but it should be used judiciously.
P
rograms should always be shut down in the correct way if possible.
I
nternal programs and processes are also listed here (such as
explorer.exe). If you stop one of them from working, you may have to
reboot your computer. If it seems that one of Windows XP's internal
p
rocesses is eating up the processor time, you may need to call your
technical support personnel for troubleshooting help.
4. Check your notification area. Do you have a lot of icons there? If so, there are
probably a number of background programs running. You can disable these one at a
time by right-clicking them and see if this makes any difference on performance.
5. There is also an advanced tool called Performance, which you can find in Start |
Control Panel | Administrative Tools. This program, as shown in the following
illustration, allows you to set up counters so that you can view the performance of
various system processes. You can learn more about using the Performance tool from
the Windows XP Help and Support Center or from any general user book on Windows
XP.
My computer boots very slowly.
Operating Systems Affected Windows XP Professional and Home Editions are affected.
Cause If your computer boots slowly, the problem may be that a number of applications or
services are configured to begin at startup. This can cause the computer to take longer to boot
because all of these extra features have to be loaded. Also, if your processor and RAM are
barely meeting the requirements, you can expect the computer to boot more slowly.
The Pain Killer To check the items that are configured to start when the computer boots,
follow these steps:
1. Click Start | Run. Type msconfig and click OK.
2. This opens the System Configuration utility, as shown in the following illustration. On
the Services tab, you see a list of items that are configured to start when the computer
starts. You can take out items by simply clearing the check box next to them.
However, you should be careful. Many items are needed for Windows XP to run
properly. A good way to use this is to look in the Manufacturer column. Look for
manufacturers other than Microsoft, and you might see a number of programs that you
really do not use or even need. Check your computer documentation for details, and
don't hesitate to contact technical support for help.
Tip
Make sure you know what you are doing before removing any of the startup programs-
s
ome of them may be needed by software or hardware on your system.
Tip
You can click the Hide All Microsoft Services check box at the bottom of the window so
that you can more easily view the third-party listings.
Application Performance Problems
Applications that you run on Windows XP can certainly cause you problems. This is due to a
number of factors, but is usually based on the system resources your computer has free and
the compatibility of the application with Windows XP. In fact, most application performance
problems come down to those two items.
An application makes my computer run very slowly.
Operating Systems Affected Windows XP Professional and Home Editions are affected.
Cause If an application causes the computer system to run very slowly, your computer does
not have enough CPU or memory power to manage the application or the multiple
applications that you might have open at the moment.
The Pain Killer Check the minimum requirements for the application and make sure your
computer meets (or exceeds!) them. Some applications, especially graphics applications, are
very resource intensive and your computer must have enough power to keep up. Also, when
you run the particular application, make sure all other programs are closed. This will give
your computer more resources with which to run the application.
My computer cannot run multiple applications at the same time.
Operating Systems Affected Windows XP Professional and Home Editions are affected.
Cause If your computer cannot run multiple applications at the same time, there are two
possible explanations. First, there is a conflict with one or more of the applications that causes
the applications to stop running. Or, your computer's memory and/or processor cannot keep
up with the task of running all of the programs (usually memory).
The Pain Killer The only real cure is to increase the RAM on the computer or not open all of
the applications at one time.
I have an application that locks up.
Operating Systems Affected Windows XP Professional and Home Editions are affected.
Cause If an application locks up (stops responding), something has happened in the software
code that has made it quit working or something has happened when the application is trying
to work with Windows XP. If this is a one-time occurrence, it is usually not a big deal.
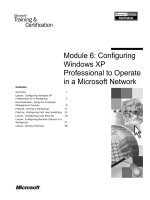
The Pain Killer To end the application, press CTRL+ALT+DEL to open Task Manager and
click the Applications tab. Select the process that is not responding and click End Task, as
you can see in Figure 16-1. You can then normally restart the application.
Figure 16-1: Use the Applications tab to end applications that have stopped responding.
Prevention
When you use the Applications tab to end a task, any unsaved data in the
application will be lost. Of course, if the application has locked up, there's not
much you can do about that anyway.
Windows XP and Lockups
If you used Windows 9x or Me, you were probably used to holding your breath, waiting for
something to lock up. You probably also learned to save your data frequently because you
never knew when things would go wrong. For the most part, you can relax. Windows XP is
built on a completely different operating system model and it is rock solid. Although
applications may sometimes fail for a number of reasons (including poorly written software),
you are not likely to lose control of Windows XP as you did in earlier versions of Windows.
I have an application that locks up repeatedly.
Operating Systems Affected Windows XP Professional and Home Editions are affected.
Cause If you are having problems with the same application locking up time and time again,
the problem is usually compatibility with Windows XP.
The Pain Killer The only solution is to either purchase an upgraded version of the software
that is designed for Windows XP, or you can try to use the Program Compatibility Wizard to
get the program to work. See Chapter 4 for more information.
Aggravations with Printing Performance
You can find out more about printing Headaches in Chapter 8, but I do want to mention a few
printing performance issues here. First and foremost, if you are having printing problems,
always refer to the printer manufacturer's Web site and product documentation for
information. Many times, there are 'known issues' with the printer's behavior and simple fixes
you can use. So, always start there. For other headaches, read on…
Printing slows my computer's responsiveness down.
Operating Systems Affected Windows XP Professional and Home Editions are affected.
Cause When you print a document, the print file is sent to a location on your hard disk called
the spool until it is sent to the printer. In order to take care of all of this and return control of
the operating system back to you, RAM is used. If your computer doesn't have quite enough
RAM, you will experience sluggishness or possibly even a big slowdown until the print job is
finished.
The Pain Killer There is no workaround for this problem except to add more RAM to your
computer.
I lose control of my computer until printing is finished.
Operating Systems Affected Windows XP Professional and Home Editions are affected.
Cause If you lose control of your computer when you print, the computer is configured to
print directly to the printer instead of using the printer spool. This causes the system to use all
of its resources on the print job, which may cause you to lose control of the desktop and
applications.
The Pain Killer To make sure your printer is using the print spool, follow these steps:
1. Click Start | Control Panel | Printers and Faxes.
2. Right-click the Printer icon and click Properties.
3. Click the Advanced tab. Make sure the Spool Print Documents So Program Finishes
Printing Faster radio button is selected. Under this setting, make sure the Start Printing
Immediately radio button is also selected. Click OK.
My printer's output does not look good.
Operating Systems Affected Windows XP Professional and Home Editions are affected.
Cause If your printer output does not look good, there are a few possible explanations. First,
you may not be using the correct printer driver. An incorrect driver can cause you a number
of problems, so see Chapter 8 to learn more about this issue. Also, the printer cartridges may
need replacing or the printer heads may need cleaning.
The Pain Killer Refer to the manufacturer's Web site or printer documentation for more
detailed information about the printer output problems.
Performance Issues with Laptops
Laptop computers are very handy and work well with Windows XP, but there are a few
specific performance issues that may cause you some problems. As with a desktop PC, you
need to make sure that your laptop meets the minimum hardware requirements for running
Windows XP-and preferably, exceeds those requirements. In most cases, this is not a problem,
especially if you have purchased a new laptop.
Battery power runs down quickly.
Operating Systems Affected Windows XP Professional and Home Editions are affected.
Cause If your battery power runs down quickly, there are a few things you can do that will
help.
The Pain Killer Follow these steps:
1. First, check your laptop's documentation about the battery. You may simply need a
new battery to solve your problems.
2. Use Power Options System Standby features and Hibernation in order to conserve
power when you are not using the computer. See Chapter 1 for details.
3. If you have multiple PC cards, consider creating a hardware profile that disables
everything that you are not using when you are mobile. These resources consume
valuable battery power, even when you are not directly using them. See Chapter 5 for
more information about hardware profiles.
Tip
D
on't leave CDs in the CD drive when you are running on batteries. The spinning CD
burns battery power!
Colors are difficult to see on the LCD screen.
Operating Systems Affected Windows XP Professional and Home Editions are affected.
Cause The Windows XP theme may cause you some visual problems with LCD screens, due
to the vivid colors and fonts used in the XP theme.
The Pain Killer Try some different theme settings and check your display settings as well.
See Chapter 1 to learn more.
Chapter 17: Windows XP Migraine
Headaches
In this chapter, you'll cure…
• Problems with installation
• Pains with system crashes and boot failures
• Problems with activation
Ah, those migraine headaches. If you have ever suffered a real migraine headache, as I have,
you know how painful it can be and how much you desperately need relief. I've titled this
chapter 'Windows XP Migraine Headaches' because this chapter explores installation
problems and other nasty behaviors, such as crashes and lockups. The Headaches in this
chapter completely stop your computer from working and can just about drive you crazy.
Unfortunately, these problems are difficult to cure and often require advanced help, usually
from a support person who can troubleshoot your system over the phone. In some cases, you
may even have to take your computer to a professional for some serious help. So, in this
chapter, I'll help you understand and cure the headaches I can, and if I can't solve a headache
for you in these pages, I'll direct you to the proper resource.
Problems with Installation
If you bought your computer with Windows XP preloaded, you have not had to worry about
installation. For others, who have upgraded or tried to install Windows XP on a computer
with no operating system, there are some installation problems you may have run into. As a
general rule, Windows XP installation works well and is usually problem free. In fact, the
installation can often detect incompatibilities and stop itself before it is too late. However, the
main problems you are likely to have during installation are hardware incompatibilities.